Why Aluminium Windows Leak and What You Can Do About It
Most homeowners assume their aluminium windows should keep every drop of rain on the outside. That assumption is understandable, but it misses how these windows actually work. Leaking aluminium windows are rarely a sign that the entire frame has failed. More often, a specific part of the window’s water management system has stopped doing its job.
This guide is your hands-on repair companion. We will walk through diagnosis, targeted fixes, sealant selection, and maintenance so you can resolve the problem yourself, or at least understand exactly what a tradesperson needs to address.
How Aluminium Windows Are Designed to Handle Water
Aluminium window frames are not sealed boxes. They are engineered to accept that small amounts of wind-driven rain will penetrate past the outer weatherseals and into internal drainage channels. From there, the water is guided downward and expelled through weep holes on the bottom rail. The system works on the principle of collect, channel, and drain rather than absolute exclusion.
When that drainage path is clear and the seals are intact, water exits harmlessly. When something blocks or breaks the path, water backs up and overflows into your home.
Common Reasons Your Aluminium Windows Are Leaking
So why do aluminium windows leak? Several failure points can disrupt the drainage cycle:
- Blocked weep holes or drainage slots — dirt, paint, or insect debris prevents water from escaping the frame.
- Failed or perished seals and gaskets — rubber components harden and crack over time, letting water bypass the intended barriers.
- Thermal movement breaking sealant bonds — aluminium has a high coefficient of thermal expansion, roughly twice that of uPVC and several times that of timber. Frames expand and contract with temperature swings, gradually stressing sealant joints until they crack or debond.
- Installation defects — missing flashings, incorrect frame levelling, or inadequate perimeter sealant from the original fit-out.
- Damaged or poorly matched weatherstripping — pile seals and compression gaskets that no longer make full contact with the sash.
That thermal expansion factor is one most homeowners overlook. In Australian climates with large daily temperature swings, aluminium frames can move noticeably between a cool morning and a hot afternoon. Over years, this repeated cycling fatigues sealant joints that were perfectly sound at installation.
The good news: most of these issues are fixable without replacing the window. Identifying which failure mode is causing your aluminium windows leaking water is the critical first step, and that is exactly where we start next.
How to Find the Exact Source of the Leak
Grabbing a tube of sealant and running a bead around the frame might feel productive, but if you seal the wrong spot you have wasted time and possibly trapped water inside the wall cavity. Before you fix anything, you need to know precisely where water is getting in. A simple garden hose test gives you that answer in under thirty minutes.
The Garden Hose Test Method
This technique mimics rainfall in a controlled way so you can isolate the exact failure point on your aluminium window frame leaking water into the house. You need two people, a garden hose with a fan spray nozzle, and a bit of patience.
The principle is straightforward: start at the lowest point and work upward. If you spray the top first and water appears at the bottom inside, you cannot tell whether it entered at the top and ran down through the cavity, or entered directly at the sill. Working from the bottom up eliminates that ambiguity.
- Set up inside and out. Station a helper inside with a torch, dry paper towels, and a phone to communicate with you. They watch the interior frame perimeter, sill track, and wall surface below the window. You operate the hose outside.
- Spray the sill area first. Direct a gentle fan spray at the bottom rail and the joint where the sill meets the wall cladding. Hold it there for a full five minutes. Your helper reports any moisture appearing inside.
- Move to the side jambs. If the sill passes, spray the left jamb for five minutes, then the right. Focus on the frame-to-wall junction on each side.
- Test the head (top rail). Spray across the top of the frame and the joint where it meets the wall above. Again, five minutes minimum.
- Spray the glazing rebate last. Direct water over the glass surface and the seal where glass meets frame. If all other zones passed, this isolates a gasket failure.
Keep the pressure low to moderate. You are simulating rain, not pressure-washing. Too much force pushes water through joints that would never leak under normal weather conditions, giving you false positives.
Identifying the Leak Location on Your Frame
The zone where your helper first spots water leaking from aluminium windows tells you exactly what has failed. Water appearing at the interior sill corners typically points to blocked weep holes or deteriorated sill sealant. Moisture tracking down the inside of a jamb suggests the perimeter caulking on that side has cracked or pulled away. Drips from the head usually mean a flashing issue or failed sealant along the top rail.
If water only shows when you spray the glass directly, the glazing gasket has likely perished. Each location calls for a different repair approach, which is why skipping this diagnosis step leads to wasted effort and recurring leaks.
Condensation vs Actual Water Ingress
Not every wet window frame is a leak. Before concluding you have aluminium windows leaking water from outside, rule out condensation. The distinction comes down to timing and pattern:
- Condensation appears as a fine mist or droplets spread across the glass, typically on cold mornings or after cooking, showering, or drying clothes indoors. It improves when you ventilate the room.
- Wind-driven rain ingress shows as a sharp, localised wet line or puddle at a specific frame edge, only during or shortly after rain on that elevation. Ventilation makes no difference.
- Seal failure produces a repeatable wet spot in the same location every time it rains from a particular direction, regardless of indoor humidity levels.
A quick way to confirm: wipe the area completely dry, then check whether it returns only during rain events or also on still, dry nights when indoor humidity is high. If it correlates strictly with rainfall, you are dealing with genuine water ingress and the hose test will pinpoint the entry path.
With the leak source identified, you can target your repair precisely. For many homeowners, the culprit turns out to be something surprisingly simple sitting right at the bottom of the frame.
Clearing Weep Holes and Restoring Drainage
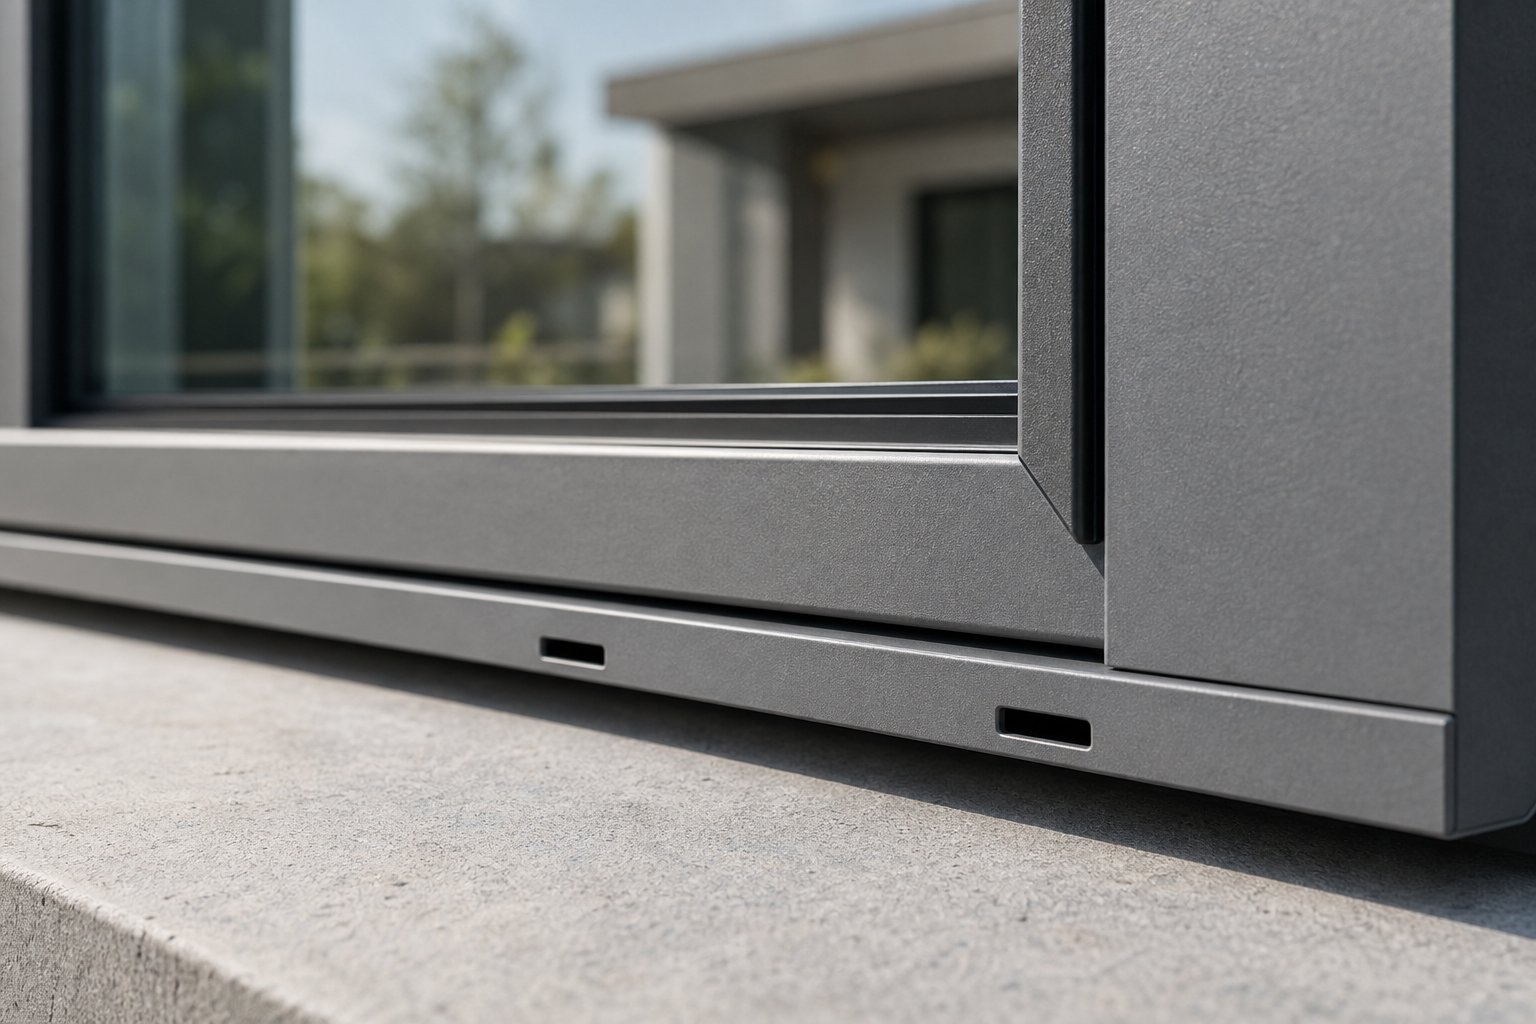
That something simple? It is a set of tiny slots you may never have noticed. Aluminium window weep holes blocked with grime are one of the most common causes of interior water damage, yet the fix costs nothing and takes minutes.
What Weep Holes Do and Where to Find Them
The aluminium window drainage system relies on small rectangular openings, typically 5 mm to 10 mm wide, cut into the exterior face of the bottom rail. Their job is straightforward: any rain that gets past the outer weatherseal collects in the sill track or glazing rebate channel, flows downward by gravity, and exits through these slots to the outside.
Look at the bottom edge of your window frame from the exterior. You should see at least two slots, one toward each end of the sill. Some frames have additional weep holes along the centre or hidden beneath a snap-on cover strip. If you cannot spot them, check whether a previous painter or caulker has accidentally sealed them over. That alone can be the entire problem.
When these openings are clear, water drains before it ever reaches a level that could overflow into your home. When they are blocked by accumulated dirt, dried paint, spider nests, or sealant overspill, water backs up inside the frame channel and eventually spills over the interior lip, appearing as a mysterious puddle on your window sill.
How to Clear Blocked Weep Holes Step by Step
Here is how to clear weep holes on aluminium windows using basic household tools:
- Inspect each slot visually. Crouch down at the exterior bottom rail and look into each weep opening. Note any visible dirt, paint film, or insect debris.
- Dislodge surface blockages. Insert a thin wire, straightened paperclip, or the tip of a flat-head screwdriver into the slot. Use gentle side-to-side movements to break up compacted material. Avoid pushing debris deeper into the channel.
- Clean the internal channel. Feed a pipe cleaner or small straw brush into the hole, pulling debris outward as you go. If you can access the interior weep hole (often visible in the sill track when you open the window), work from both ends to clear the full drainage path.
- Flush with water. Pour a small cup of water into the interior sill track. Watch the exterior weep holes. Water should flow freely out within seconds. If it pools or drains slowly, repeat the brushing step or use a short burst of compressed air from the interior side to push remaining debris out.
- Confirm drainage is restored. Pour water into the track once more. A clear, steady stream exiting each weep slot confirms the system is working again.
Be gentle throughout. Widening the slots with excessive force can turn an outlet into an inlet during heavy wind-driven rain.
This single piece of weep hole maintenance on aluminium windows resolves a surprisingly large proportion of leaks at zero cost. It is worth checking every six months, particularly after dusty summers or if you notice cobwebs forming around the frame base. If clearing the weep holes does not stop the leak, the issue likely sits higher up the frame, in a failed sealant joint or degraded gasket, and that is where material choice becomes critical.
Choosing and Applying the Right Sealant for Aluminium
Material choice is where many DIY repairs quietly fail. Grabbing the cheapest silicone tube from the hardware store shelf can actually accelerate corrosion on your aluminium frames, creating a worse leak than the one you started with. Understanding how to reseal aluminium windows properly starts with knowing which chemistry is safe for the substrate.
Why Sealant Type Matters on Aluminium
Not all silicone sealants are created equal when it comes to metal compatibility. The critical distinction is between acetoxy-cure and neutral-cure formulations.
Acetoxy silicone releases acetic acid as it cures. You will recognise it instantly by the strong vinegar smell when you cut the nozzle. That acetic acid is the problem. On ceramic tiles or glass it is harmless, but on bare or anodised aluminium it can cause corrosion over time, weakening the bond and eventually letting water back through the joint. Many bathroom-grade silicones are acetoxy-based, which is why they are cheap and widely available, but they have no place on your window frames.
Neutral cure silicone for aluminium windows is the correct choice. It cures by releasing either an oxime or alkoxy compound, both of which are non-corrosive to metals. The bond remains stable for years without degrading the frame surface beneath it. If you remember only one rule from this section, it is this: smell the sealant before you apply it. Vinegar smell means walk away.
Beyond neutral-cure silicone, other sealant types suit specific locations on the window:
- Polyurethane sealant — excellent adhesion and paintability for frame-to-wall perimeter joints where the aluminium meets brick, render, or timber reveals. It handles structural movement well but degrades under prolonged direct UV exposure, so it works best in joints that will be painted or sheltered by flashings.
- MS polymer (modified silyl) — a hybrid that combines the UV resistance of silicone with the paintability of polyurethane. It offers primerless adhesion to aluminium, glass, and masonry, cures without bubbling on damp surfaces, and lasts 20 years or more in exterior applications. It costs more per cartridge but eliminates the need for primer and reduces callback risk.
- Butyl tape — a self-adhesive strip used beneath flashings and behind frame flanges during installation. It is not a surface sealant you apply after the fact, but if you are refitting a head flashing, butyl tape between the flashing and the wall provides a reliable compression seal.
Choosing the best sealant for aluminium window frames depends on where the joint sits and what it needs to do. The table below summarises your options at a glance.
| Sealant Type | Best Use Location | Aluminium Compatibility | Flexibility | Typical Lifespan |
|---|---|---|---|---|
| Neutral-cure silicone | Glazing rebates, glass-to-frame joints, weatherseal repairs | Excellent — non-corrosive | High (±25% movement) | 15–20 years |
| Polyurethane | Frame-to-wall perimeter joints (painted or sheltered) | Good — non-corrosive | Medium-high (±20%) | 10–15 years |
| MS polymer | Versatile — perimeter joints, flashings, any exterior joint | Excellent — primerless adhesion | High (±25% movement) | 20+ years |
| Butyl tape | Under flashings, behind frame flanges at installation | Excellent — no chemical reaction | Low (compression seal only) | 20+ years when protected |
Correct Sealant Removal and Application Technique
New sealant will not bond properly over old, failed material. You need a clean substrate for adhesion to work. Here is how to strip and reapply correctly:
- Cut out the old sealant. Run a sharp razor scraper or utility knife along both edges of the existing bead, slicing it free from the aluminium and the adjacent surface. Peel away the bulk of the material by hand.
- Scrape residue. Use a plastic scraper on the aluminium to avoid scratching the finish. A razor blade works on glass. Remove every trace of the old sealant, including any thin film left behind.
- Solvent wipe. Dampen a lint-free cloth with isopropyl alcohol and wipe both bonding surfaces. This removes oils, dust, and any silicone residue that would prevent the new sealant from gripping. Let it flash off completely before proceeding.
- Install backer rod for deep joints. If the gap between the frame and wall is deeper than 10 mm, press a closed-cell polyethylene backer rod into the joint so the sealant only bonds to the two parallel faces. This prevents three-sided adhesion, which restricts movement and causes premature tearing.
- Apply the sealant. Cut the nozzle at a 45-degree angle to match the joint width. Gun a continuous bead without stopping and starting, maintaining even pressure on the trigger.
- Tool within five minutes. Smooth the bead with a wetted finger, plastic spoon, or purpose-made finishing tool before a skin forms. Tooling pushes the sealant into full contact with both surfaces and creates a concave profile that sheds water.
Never apply sealant over or into weep holes. Blocking drainage openings with sealant is one of the most common DIY mistakes and will guarantee future leaks by trapping water inside the frame.
Work in dry conditions with the surface temperature above 5°C. Most silicone sealants for aluminium windows need at least 24 hours of dry weather to cure fully, though they form a skin within 20 to 40 minutes. Check the manufacturer’s data sheet for the specific product you are using.
With the right sealant in place and properly applied, the next question becomes where exactly on the frame you need it. Different leak locations call for different repair strategies, and a corner mitre joint failure demands a very different approach to a perimeter seal breakdown.

Targeted Repairs by Leak Location on the Frame
Each zone on an aluminium window frame fails in its own way. A repair that works perfectly at the sill will do nothing for a leaking corner mitre, and a perimeter re-seal cannot fix a degraded glazing gasket. Matching the fix to the failure point is what separates a lasting aluminium window leak repair from a weekend wasted on guesswork.
Bottom Rail and Sill Leaks
The bottom rail is the most common location for leaking aluminium window frames because it is where all internal drainage converges. Water pooling at the interior sill corners or tracking along the bottom edge almost always traces back to one of two causes.
- Blocked weep holes — clear them using the method covered in the previous section. If water flows freely after cleaning, the problem is solved.
- Perished sill gaskets — the rubber seal between the sash and the sill track hardens over time, allowing water past. Peel out the old gasket, measure the channel width, and press in a matching replacement strip. Silicone-based gaskets outlast EPDM in UV-heavy Australian conditions.
- Sill-to-wall junction failure — if the external sealant between the bottom of the frame and the wall cladding has cracked, water bypasses the frame entirely. Strip the old bead and re-seal with neutral-cure silicone or MS polymer.
Corner Mitre Joint Failures
Aluminium frames are typically joined at 45-degree mitres, either crimped mechanically or sealed with adhesive during manufacturing. Over years of thermal cycling, these joints can open slightly, creating a direct path for water into the wall cavity. You will often notice water appearing at the inside corner of the frame rather than along a flat edge.
- Strip existing sealant — remove any previous silicone patch jobs from the exterior mitre joint using a razor scraper and solvent wipe.
- Clean to bare aluminium — sand lightly with fine abrasive and wipe with isopropyl alcohol. Proper surface preparation is critical for adhesion at these high-movement joints.
- Apply neutral-cure sealant deep into the joint — use a fine nozzle to push sealant into the mitre gap rather than just capping the surface. A deep back-seal inside the mitre is far more durable than a surface smear.
- Consider professional re-crimping — on older windows where the mechanical crimp has loosened, sealant alone may not hold long-term. A specialist can disassemble the joint, re-crimp the connection, and back-seal it properly. This is worth the cost if your aluminium window leaking at the corner keeps recurring after sealant repairs.
Head Flashing and Top Rail Repairs
Water entering from the top of the frame usually has nothing to do with the window itself. The culprit is almost always the flashing above it, or the absence of one. A head drip flashing should extend beyond the frame width, slope away from the wall, and feature a kicked-out drip edge that throws water clear of the frame below.
- Inspect the existing flashing — look for lifting edges, corrosion, or gaps where the flashing meets the wall cladding. Even a 1 mm gap at the top edge can channel water behind the frame.
- Re-seal lifted flashing — if the metal is sound but the top edge has separated from the wall, apply polyurethane sealant or butyl tape beneath the lifted section and press it back into place.
- Install a drip flashing if missing — some older installations relied solely on sealant at the head with no metal flashing. Retrofit a formed aluminium drip cap with a minimum 100 mm back leg tucked behind the cladding and a drip edge that projects at least 20 mm beyond the frame face.
- Check the top rail sealant — if flashing is intact but water still enters at the head, the sealant between the top of the frame and the lintel or wall may have failed. Strip and re-seal with a flexible product that tolerates thermal movement.
Glazing Rebate Seal Replacement
When your hose test only produces water ingress while spraying directly on the glass surface, the glazing gasket or wedge has failed. These rubber or EPDM seals sit in a channel around the perimeter of the glass, keeping water from entering the rebate faster than the drainage system can handle it.
- Remove the glazing bead — on most aluminium frames, the interior glazing bead clips into a channel. Insert a stiff putty knife at one end and lever it free. Work along the length carefully to avoid bending the bead.
- Pull out the old gasket — note the profile shape and measure the channel width. Gaskets come in wedge, bulb, and flipper profiles, and the replacement must match.
- Clean the rebate channel — remove any debris, old sealant, or mould from the channel before fitting the new seal.
- Press in the new gasket — start at one corner and work around the perimeter, ensuring the gasket seats fully into the channel without stretching. Trim to length at the final corner with a clean butt joint.
- Refit the glazing bead — snap it back into place, starting at the corners. Confirm the glass is held firmly with even compression all around.
Frame-to-Wall Perimeter Sealing
The joint between the aluminium frame and the surrounding wall is the last line of defence. It is also the most exposed to building movement, particularly in Australian brick veneer and weatherboard homes where the wall structure and the window frame move independently.
- Identify the failure — look for cracked, peeling, or separated sealant around the exterior perimeter of the frame. Gaps as small as 0.5 mm can admit wind-driven rain under pressure.
- Strip the full perimeter — do not patch over old sealant. Remove the entire bead on the affected side, or all four sides if the sealant is aged and brittle throughout.
- Check for missing flashing — in some installations, a flexible flashing membrane should sit behind the frame flange, lapping over the wall wrap. If this was omitted during installation, perimeter sealant is the only barrier, and it needs to be in perfect condition. Where flashing is absent and leaks persist, a tradesperson may need to partially remove the frame to retrofit a membrane.
- Re-seal with the right product — use polyurethane or MS polymer for perimeter joints. These products handle the movement between frame and wall better than silicone, and they accept paint if you want a clean finish.
- Maintain a continuous bead — do not leave gaps at corners or stop-start points. Run the sealant in one continuous pass along each side, overlapping slightly at the corners.
Tackling leaking aluminium window frames by location keeps each repair focused and efficient. But the specific window type you are working on also matters. A sliding window has different seal arrangements and wear patterns compared to a casement or fixed pane, and those differences shape how you approach the job.

Repair Approaches for Different Aluminium Window Types
A sliding window and a casement window might sit side by side on the same wall, but they seal against water in fundamentally different ways. The sliding sash rides on tracks and relies on pile weatherstripping to block rain at the interlock. The casement hinges outward and depends on compression gaskets pressed tight by locking hardware. A fixed pane has no moving parts at all — its only seals are the glazing gaskets and the perimeter joint to the wall. Each configuration wears differently, leaks in different spots, and calls for a different repair strategy.
Sliding Window Leak Points and Fixes
An aluminium sliding window leaking is one of the most common calls for Australian homes, particularly in coastal areas where salt and sand accelerate wear on the track system. Sliding windows manage water through a drainage channel in the bottom track, with weep holes expelling collected water to the exterior. Leaks develop when that drainage path is compromised or when the seals between the sliding sash and the fixed frame deteriorate.
The three primary failure points on sliding windows are:
- Worn pile seals — the fuzzy strip running along the sash edges and interlock rail compresses over years of opening and closing. Once it flattens or sheds fibres, wind-driven rain pushes past the meeting rail. Replacement pile strip is sold by the metre; measure the channel width (commonly 5 mm, 6.5 mm, or 7 mm) and the fin height to get the correct size.
- Track drainage blockages — dirt, leaves, and grit accumulate in the lower track, damming water before it reaches the weep holes. A stiff brush and vacuum followed by a flush test confirms whether the track drains freely. Never seal the track weep holes — they are designed to let water escape.
- Interlock and meeting rail gaps — if the rollers beneath the sliding sash have worn or dropped, the sash sits lower in the track and the interlock no longer overlaps correctly. Adjusting the roller height screws (usually accessible through holes in the sash underside) lifts the panel back into alignment and restores the seal at the meeting rail.
Casement and Awning Window Seal Repairs
Casement and awning windows rely on a continuous compression gasket around the sash perimeter. When the sash closes and the locking hardware engages, it pulls the sash firmly against this gasket, creating an even seal on all four sides. Leaks appear when that compression is incomplete — either because the gasket has perished or because the hardware no longer draws the sash in tightly enough.
For an aluminium casement window seal replacement, start by diagnosing which factor is at play:
- Perished compression gasket — run your finger around the rubber seal on the frame face where the sash closes against it. If it feels hard, looks cracked, or stays flat when you press it (no spring-back), it has lost its compression recovery and needs replacing. Pull the old gasket from its channel, measure the groove width and depth, and source a matching EPDM profile.
- Hinge-side gaps — the hinge side of a casement often leaks first because it is furthest from the locking points. If the gasket is still supple but you see daylight at the hinge corners when the window is closed, the hinges may have worn or the friction stay arms need adjustment to pull the sash tighter against the frame.
- Operator hardware misalignment — awning windows use winder mechanisms or stay arms that control how far the sash opens and how firmly it seats when closed. Stiff or worn operator hardware can prevent the sash from pulling fully home, leaving a gap along the top or bottom edge. Lubricating the mechanism or replacing worn components often restores a complete seal without touching the gasket itself.
Fixed Window Glazing Gasket Replacement
Fixed windows have no moving sash, so there is no weatherstripping or hardware to wear out. Their leak sources are limited to two: the glazing gaskets holding the glass in the frame, and the perimeter sealant between the frame and the wall. If you have already checked and re-sealed the perimeter (covered in the previous section), the remaining culprit is the glazing gasket.
Aluminium window rubber seal replacement on a fixed pane follows a straightforward process. The gasket sits in a channel between the glass edge and the aluminium rebate, forming a watertight cushion. Over time, UV exposure and heat cycling cause the rubber to harden, shrink at the corners, and lose contact with the glass surface. You may notice hairline gaps at the corners or a chalky, whitened appearance on the exposed face of the seal.
To understand how to replace a gasket on an aluminium window:
- Remove the interior glazing bead by levering it from its clip channel with a stiff putty knife.
- Pull the old gasket free, noting whether it is a U-channel type (wraps the glass edge) or a wedge type (pressed between glass and frame).
- Measure the internal channel width, channel depth, and glass thickness. The gap calculation — channel width minus glass thickness — determines which profile will seat correctly.
- Source EPDM replacement gasket in the matching profile. EPDM outperforms PVC for exterior applications due to superior UV and temperature resistance, with a typical service life of 8 to 15 years depending on exposure.
- Press the new gasket into place without stretching it. Start at one corner, work around the perimeter, and make clean mitre cuts at each corner to prevent water tracking through butt joints.
The table below summarises how each window type differs in its leak behaviour and repair complexity:
| Window Type | Common Leak Points | Typical Seal Type | DIY Difficulty | When to Call a Professional |
|---|---|---|---|---|
| Sliding | Meeting rail interlock, lower track drainage, pile seal edges | Pile weatherstrip (fin type) | Moderate — roller adjustment needs care | Rollers seized or track profile damaged |
| Casement / Awning | Hinge-side corners, lock-side compression, operator mechanism | Compression gasket (EPDM bulb or blade) | Moderate — hardware adjustment required | Hinges worn, friction stays bent, or frame racked |
| Fixed | Glazing gasket corners, frame-to-wall perimeter | U-channel or wedge glazing gasket | Low to moderate — no hardware involved | Glass cracked, frame corroded, or channel deformed |
Regardless of window type, the telltale signs of a perished seal are the same: flattening where the gasket should be rounded, surface cracking or a chalky white discolouration, hardness when you press with a fingernail, and shrinkage pulling the material away from corners. If you spot any of these, the gasket has lost its elasticity and no amount of cleaning or lubricating will restore it. Replacement is the only lasting fix.
When sourcing gaskets, bring a short offcut of the old seal to your supplier or photograph the cross-section with a ruler for scale. Channel widths on aluminium frames are not standardised across manufacturers, so a visual match matters more than a generic product description. Specialist weatherseal suppliers carry a wider range of profiles than general hardware stores and can often match discontinued sections.
With the right gasket fitted and hardware adjusted, your window should compress evenly on all sides. But what happens when a storm hits before you have had time to source parts or wait for dry weather? The next step covers how to stop water in an emergency and when to schedule the permanent repair.
Emergency Fixes vs Permanent Repair Solutions
Rain does not wait for your replacement gaskets to arrive in the post. When water is actively streaming through your aluminium window frame at 2 a.m. during a southerly blow, you need a temporary fix for a leaking aluminium window that works right now, even if it will not last the season.
Temporary Emergency Measures During Rain
The goal here is damage control. You are buying hours or days, not months. These measures stop water coming through aluminium windows long enough for you to protect flooring, furniture, and wall linings while you wait for dry conditions to do the job properly.
- Exterior painter’s tape — press a strip of waterproof painter’s tape firmly over the leaking joint from the outside. It adheres reasonably well to wet aluminium and can redirect water away from the gap for the duration of a storm.
- Temporary caulk bead — a quick bead of removable or paintable caulk over the visible crack slows ingress. Do not use permanent silicone here; you will need to strip it later for a proper repair.
- Plastic sheeting — tape a sheet of heavy-duty plastic over the entire exterior of the window, sealing the edges with duct tape. Crude, but effective for an emergency window leak repair when the source is unclear or widespread.
- Removable putty or plumber’s mait — press a strip of non-hardening putty directly into the gap. It moulds to irregular surfaces and peels away cleanly once the rain passes.
- Towels and containers inside — while you work outside, have someone managing water indoors with rolled towels along the sill and a container catching drips to prevent damage spreading to flooring or cabinetry below.
These methods can get you through a weekend storm, but moisture often finds new paths once the wind shifts direction. Treat every emergency measure as a stopgap with an expiry date, not a solution you can forget about.
Planning a Permanent Repair in Dry Conditions
Knowing how to stop an aluminium window leaking in rain permanently comes down to timing and preparation. Sealants need dry substrates to bond. Gaskets need clean, debris-free channels to seat properly. Rushing a permanent repair during damp conditions almost guarantees you will be redoing it within months.
Never apply permanent sealant over a wet surface. Moisture trapped beneath the bead prevents adhesion, and the joint will peel away at the first temperature cycle. If you cannot guarantee at least 24 hours of dry weather for full cure, wait.
Schedule your repair for a stretch of dry weather — a minimum 24-hour window after application, though 48 hours is safer in cooler or humid coastal climates. Silicone sealants form a surface skin within 30 to 60 minutes, but full cure takes 24 to 48 hours depending on temperature and humidity. Warmer, more humid conditions speed the process; cold, dry days slow it considerably.
Use the emergency period to gather the right materials: neutral-cure silicone or MS polymer, backer rod, isopropyl alcohol, a razor scraper, and replacement gaskets if needed. Having everything on hand means you can complete the permanent repair in a single session the moment conditions allow, rather than stretching it across multiple weekends.
A well-timed permanent fix eliminates the leak for years. But even the best repair has a finite lifespan if you never look at it again. Routine maintenance is what keeps those seals and drainage paths working long after the repair day fades from memory.

Preventive Maintenance to Stop Future Leaks
Routine attention is what separates a one-off repair from a recurring headache. Aluminium frames are low-maintenance compared to timber, but they are not no-maintenance. The seals, gaskets, and drainage paths that keep water out degrade gradually, and catching that degradation early is far cheaper than dealing with water damage to plasterboard and flooring. A simple aluminium window maintenance checklist, split into six-monthly and annual tasks, keeps everything functioning the way it should.
Climate plays a direct role here. Aluminium’s thermal expansion rate means frames in regions with large daily or seasonal temperature swings — think inland NSW or Queensland where mornings can be cool and afternoons scorching — put more cyclical stress on sealant joints and gaskets than frames in mild, stable coastal climates. The wider the swing, the faster seals fatigue. Adjusting your maintenance frequency to match your local conditions helps prevent aluminium windows from leaking before the problem starts.
Six-Monthly Maintenance Tasks
These quick checks take less than fifteen minutes per window and address the most common failure triggers. Aim for early spring and early autumn — before the wet season hits and after summer dust has settled.
- Clear all weep holes. Inspect the exterior bottom rail slots and remove any dirt, cobwebs, or paint film. Flush with a small cup of water from the interior sill track to confirm free drainage.
- Clean sliding window tracks. Vacuum out grit, sand, and leaf debris from the lower track. Wipe with a damp cloth and confirm the track drainage slots are unobstructed.
- Wipe and treat gaskets. Run a damp cloth along all rubber seals and compression gaskets to remove grime. Then apply a light coat of silicone spray or rubber conditioner. This keeps the rubber supple, maintains its compression recovery, and slows UV-driven hardening — a core aluminium window seal maintenance tip that extends gasket life significantly.
- Test sash compression. Close each operable window and engage the locks. Slide a piece of paper between the sash and frame gasket at several points around the perimeter. If the paper pulls out freely without resistance, the seal is not compressing fully and hardware adjustment is needed.
Annual Inspection Checklist
Once a year, ideally before winter rains, carry out a deeper inspection that covers the elements which degrade more slowly.
- Inspect perimeter sealant. Walk the exterior of every window and examine the sealant bead where the frame meets the wall. Look for cracking, separation at the edges, or sections that have gone chalky and brittle. Any joint showing these signs should be stripped and re-sealed before the wet season.
- Check flashings. Examine head flashings above each window for lifted edges, corrosion spots, or gaps where the top edge meets the wall cladding. Reseat or re-seal any lifted sections with polyurethane or butyl tape.
- Verify hardware adjustment. Tighten any loose hinge screws on casement and awning windows. On sliding windows, check that rollers hold the sash at the correct height so the interlock engages fully. Lubricate friction stays, winder mechanisms, and lock strikers with a silicone-based spray.
- Assess gasket condition. Look for flattening, corner shrinkage, or surface cracking on all weatherseals. If a gasket no longer springs back when pressed, schedule replacement before it allows water past.
- Clean frames and drainage channels. Wash frames with warm soapy water and a soft cloth — avoid solvent-based cleaners that can damage powder-coat finishes. Clear any internal drainage channels accessible when the sash is open.
Knowing how to maintain aluminium window seals through these seasonal routines dramatically reduces the chance of unexpected leaks. Most failures caught at the inspection stage can be fixed in minutes with materials you already have on hand.
It is worth noting that windows engineered and tested to rigorous Australian performance standards carry a built-in advantage here. Products certified to AS 2047 for water penetration resistance are designed with multi-point drainage, factory-fitted compression seals, and tighter manufacturing tolerances that reduce the long-term maintenance burden. Where homeowners are considering replacement rather than ongoing repair, selecting windows with documented compliance to AS 2047 and AS/NZS 4284 provides confidence in lasting weather performance. MEICHEN’s Compliance and Certifications page is a useful resource for understanding how tested compliance translates to real-world durability — covering structural adequacy, water resistance, and energy efficiency ratings in one place.
Consistent maintenance keeps existing windows performing well for years. But there comes a point where patching and re-sealing no longer makes economic sense, and the smarter investment is a new window altogether. Recognising that threshold saves you from pouring time and money into a frame that has reached the end of its serviceable life.
When Replacement Makes More Sense Than Repair
A single failed gasket or a blocked weep hole is a straightforward fix. But when you find yourself resealing the same corner mitre for the third time, or discovering new leak points every winter, the frame is telling you something. At a certain point, learning how to fix leaking aluminium windows becomes less about technique and more about recognising diminishing returns.
Signs Your Window Is Beyond Repair
Repair makes sense when the frame is structurally sound and the failure is isolated. Replacement becomes the better path when multiple systems have degraded simultaneously, or when the frame itself is compromised. Look for these indicators:
- Multiple leak points across the same frame — if your hose test reveals water entering at the corner mitres, the sill, and the glazing rebate all on one window, the frame has deteriorated beyond what targeted repairs can address economically.
- Visible corrosion or pitting on the aluminium — white powdery deposits or rough pitting on the frame surface indicate oxidation has progressed past the protective anodising or powder coat. Corroded aluminium weakens sealant adhesion and compromises the structural integrity of gasket channels.
- Gasket channels that are damaged or deformed — if the groove that holds the weatherseal has been bent, cracked, or worn to the point where a new gasket cannot seat properly, no replacement rubber will form a reliable seal. The channel is the foundation; once it is gone, the gasket has nothing to grip.
- Frames racked out of square — building settlement, footing movement, or poor original installation can pull a frame out of alignment. A racked frame cannot compress seals evenly, and no amount of hardware adjustment will restore uniform contact around the perimeter. You will chase leaks from corner to corner indefinitely.
- Single-glazed units where performance gains justify the cost — older single-glazed aluminium windows without thermal breaks lose heat rapidly in winter and admit excessive solar gain in summer. Replacing them with thermally broken, double-glazed units solves the leak while delivering measurable energy savings and improved acoustic insulation. The leak becomes the trigger for an upgrade that pays back across multiple fronts.
- Recurring repairs exceeding replacement cost — if you have spent several hundred dollars on sealant, gaskets, and your own time across two or three repair cycles on the same window, the cumulative cost is approaching what a new unit would deliver in permanent, warranty-backed performance.
Any one of these on its own might still justify a repair attempt. Two or more appearing together on the same window shifts the equation firmly toward replacement. Continuing to patch a fundamentally compromised frame is spending money to delay the inevitable.
What to Look for in a Replacement Window
Modern aluminium window systems have evolved significantly from the non-thermally broken, single-glazed frames common in Australian homes built before the early 2000s. If your current windows fall into that era, the performance gap between what you have and what is available now is substantial.
Features that directly address the leak and performance issues covered throughout this guide include:
- Thermally broken frames — a polyamide strip inside the aluminium profile separates the interior and exterior faces of the frame, reducing condensation and thermal stress on seals. This also cuts the thermal cycling that fatigues sealant joints over time.
- Multi-point drainage systems — modern designs incorporate concealed drainage channels with multiple weep paths, reducing the chance that a single blockage causes overflow. Some systems include baffled weep holes that resist wind-driven rain re-entry.
- Factory-fitted compression seals — rather than relying on site-applied sealant at critical junctions, quality systems arrive with precision-fitted EPDM gaskets installed under controlled factory conditions. These seals are matched to the exact channel dimensions and tested before the window leaves the production line.
- Double or triple glazing — beyond energy efficiency, insulated glass units (IGUs) reduce condensation on the interior glass surface, eliminating a common source of moisture that homeowners mistake for frame leaks.
- Improved corner joinery — modern manufacturing uses combination crimping and structural adhesive at mitre joints, creating a stronger, more watertight connection than the crimped-only joints found on older frames.
These engineering improvements mean a well-specified replacement window should not develop the same leak patterns that plagued the old unit, provided it is installed correctly with proper flashings and perimeter sealing.
Before committing to any product, verify that the replacement windows meet current Australian Standards. AS 2047 sets the benchmark for structural adequacy, water penetration resistance, and air infiltration limits. Windows tested and certified to this standard have been subjected to simulated wind-driven rain at pressures specific to your building’s location and height — giving you documented proof that the drainage and seal systems will perform under real weather conditions, not just in a showroom.
Ask the manufacturer or supplier for a certificate of compliance and check that testing was conducted by a NATA-accredited laboratory. Products certified to AS/NZS 4284 (the testing method standard) provide an additional layer of confidence that the performance claims are backed by rigorous, independent verification rather than internal assertions alone.
For homeowners weighing up how to stop water leaking from aluminium windows permanently, replacement with a tested, compliant product is the most definitive answer when repair is no longer viable. MEICHEN’s Compliance and Certifications page offers a practical example of how manufacturers document their tested performance credentials — covering AS 2047 weather resistance, energy efficiency ratings, and structural adequacy — so you can verify claims before making a purchasing decision. Treating this as a due-diligence step, the same way you would check a builder’s licence, protects your investment and ensures the new windows deliver the long-term weather performance that made replacement worthwhile in the first place.
Frequently Asked Questions About Fixing Leaking Aluminium Windows
1. Why are my aluminium windows leaking when it rains?
Aluminium windows leak during rain when their built-in water management system fails. The most common causes are blocked weep holes preventing drainage, perished rubber gaskets that no longer seal against the sash, cracked perimeter sealant between the frame and wall, and thermal movement breaking sealant bonds over time. Aluminium expands and contracts more than timber or uPVC with temperature changes, which gradually stresses joints. A controlled garden hose test, starting at the bottom of the frame and working upward, helps pinpoint the exact entry point so you can target the correct repair rather than guessing.
2. How do I clear blocked weep holes on aluminium windows?
Locate the small rectangular slots on the exterior face of the bottom rail, typically one near each end of the sill. Insert a thin wire, straightened paperclip, or pipe cleaner into each slot and gently dislodge any dirt, paint, or insect debris. Work from both the exterior and interior sides if accessible. After clearing, pour a cup of water into the interior sill track and confirm it flows freely out through the exterior weep holes within seconds. If drainage is slow, use a short burst of compressed air from the inside to push remaining blockages out. This zero-cost maintenance task resolves a large proportion of aluminium window leaks.
3. What is the best sealant to use on aluminium window frames?
Neutral-cure silicone is the safest general-purpose sealant for aluminium frames because it does not release corrosive acetic acid during curing. Avoid acetoxy silicone, identifiable by its vinegar smell, as it can corrode aluminium over time. For frame-to-wall perimeter joints, polyurethane or MS polymer sealants offer superior adhesion and movement tolerance. MS polymer is particularly versatile as it bonds to aluminium, glass, and masonry without primer, accepts paint, and lasts over 20 years. Always remove old sealant completely and wipe surfaces with isopropyl alcohol before applying new product for proper adhesion.
4. Can I temporarily stop a leaking aluminium window during rain?
Yes, several emergency measures can stop water ingress until you can perform a permanent repair in dry conditions. Press waterproof painter’s tape over the leaking joint from the outside, apply a bead of removable caulk over the visible gap, or tape heavy-duty plastic sheeting over the entire exterior of the window. Non-hardening putty pressed directly into the gap also works well and peels away cleanly afterwards. These are strictly short-term solutions. Permanent sealant repairs require at least 24 hours of dry weather for proper cure, so schedule the lasting fix for the next dry stretch.
5. When should I replace leaking aluminium windows instead of repairing them?
Replacement becomes more cost-effective than repair when multiple leak points appear across the same frame, visible corrosion or pitting has compromised the aluminium surface, gasket channels are deformed and cannot hold new seals, or the frame has racked out of square due to building movement. Single-glazed windows without thermal breaks are also strong candidates for replacement, as modern thermally broken, double-glazed units solve the leak while delivering energy savings and acoustic benefits. When choosing replacements, verify the product is certified to AS 2047 for water penetration resistance and tested by a NATA-accredited laboratory to ensure documented weather performance.
More Window & Door Guides