What Is Window Sill Flashing and Why Every Window Needs It
When you install a window, the glass and frame get all the attention. But the real protection happens in a layer you never see once the trim goes on. Window sill flashing is a weatherproofing component installed at the bottom of a window rough opening to direct water away from the wall assembly and prevent moisture from reaching the framing. It sits at the lowest, most gravity-exposed point of the entire window opening, the exact spot where water naturally collects and pools.
Window sill flashing is a water-management layer installed beneath and around the window sill to intercept moisture and redirect it to the building exterior before it can reach the wall cavity or framing.
So what is window flashing in the broader sense? It refers to the full system of waterproof materials, including tape, metal, and membranes, layered around all four sides of a window opening. Sill flashing is just one piece of that system, but it handles the hardest job. Head flashing deflects water at the top, jamb flashing covers the vertical sides, and sill flashing catches everything that drains down to the bottom. Every layer depends on the one below it, which is why getting the sill right matters more than any other single detail when flashing windows during new construction or a renovation.
Where Sill Flashing Sits in the Window Assembly
Imagine looking at a framed wall with a rectangular hole cut for a window. That hole is the rough opening. The exterior sheathing, typically plywood or OSB, forms the face of the wall, and a weather-resistive barrier like housewrap covers it. Sill flashing sits right at the bottom ledge of that rough opening, bonded to the sheathing and extending down onto the face of the wall below. It wraps slightly up the vertical sides of the opening to form small dams at the corners. When the window unit is set into the opening, it rests on top of this flashing layer. You will not see it from inside or outside once the installation is complete, but it is actively working every time rain hits the wall. Understanding these window flashing details helps you evaluate whether an installer is doing the job correctly or cutting corners.
Sill Flashing vs Sill Pans vs Drip Edges
These three terms get mixed up constantly, and each one refers to something different.
A sill pan is a rigid or pre-formed tray, usually plastic or sheet metal, that sits at the base of the rough opening. It has a built-in slope toward the exterior and raised edges called end dams and a back dam. Think of it as a shallow baking tray designed to catch and drain water. Products like pre-formed plastic pans take the guesswork out of corner sealing because the shape is factory-made rather than field-fabricated.
Window sill flashing, on the other hand, is a broader term. It can refer to that rigid pan, but it also covers peel-and-stick membrane tape or liquid-applied coatings that serve the same drainage function. When a builder uses self-adhesive membrane pressed into the sill corners and wrapped up the jambs, that is sill flashing without a rigid pan. Both approaches protect the same area, just with different materials.
A drip edge is a piece of window metal flashing, typically aluminum or galvanized steel, bent at an angle and installed at the head (top) of the window. Its job is to kick water outward and away from the top of the frame so it does not track down behind the cladding. Drip edges are sometimes called drip caps, and they solve a different problem than sill flashing. In masonry construction, brick flashing serves a similar diverting role where window openings meet the brick veneer.
If you are planning to install window flashing tape at the sill for the first time, knowing which component you actually need prevents buying the wrong product. A membrane tape handles most residential wood-frame sill applications. A rigid pan adds an extra level of reliability, especially in high-exposure walls. And a drip edge belongs at the top, not the bottom.
The material you choose and how you layer it determines whether water drains out or quietly pools against your framing for years. That layering sequence, and the specific materials that make it work, is where most installations succeed or fail.
Why Sill Flashing Failures Lead to Serious Water Damage
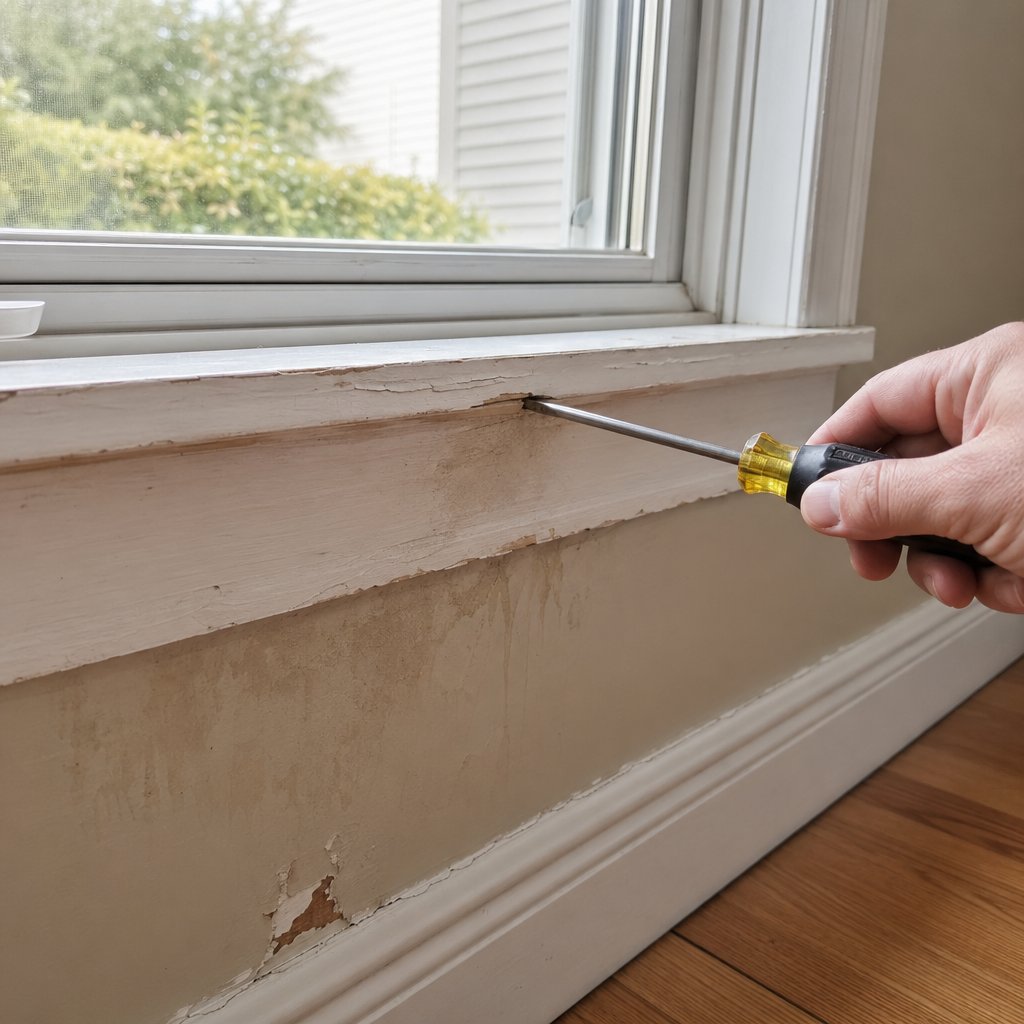
A gap the width of a credit card at the sill is all it takes. Water does not need a dramatic failure to get behind your wall. It needs a path, a driving force, and time. Missing or poorly installed window flashing at the sill gives water all three, and the damage it causes stays hidden until repair costs multiply.
The sill is the most failure-prone point in any window installation, residential or commercial, from a single-hung bedroom window to storefront flashing on a retail facade. Gravity pulls every drop of rain that hits the window frame straight down to the bottom of the opening. If the flashing in windows is lapped incorrectly, punctured during installation, or simply left out, that water enters the wall cavity and begins soaking into framing, sheathing, and insulation.
How Water Finds Its Way Behind Windows
Three mechanisms work against you at the sill. The Australian Window Association identifies them as the core trio behind rain penetration in window assemblies:
- Gravity drainage — the most common and most damaging force. Water runs down the face of the window and pools at the sill. Without a sloped, sealed flashing layer to redirect it outward, it flows inward along the rough opening.
- Capillary action — water wicks into gaps smaller than 3mm without any external pressure. Joints between the window frame and the rough opening are prime candidates, especially where sealant has cracked or flashing tape has lifted.
- Wind pressure — during storms, wind creates a pressure difference between the exterior and interior of the wall. That pressure drives water through openings that would otherwise only seep slowly. Even a window sill pan flashing with a small unsealed corner can allow bulk water entry under these conditions.
These forces do not work in isolation. A wind-driven rain event combines all three simultaneously, which is why a sill that “looks fine” in calm weather can leak badly during a storm.
The Real Cost of Skipping Sill Flashing
Water damage behind windows is not a surface-level fix. Remediation typically means removing interior trim and drywall, tearing out saturated insulation, replacing rotted framing members, and reinstalling the window from scratch. Water damage restoration averages $3,863, and mold removal alone runs $1,200 to $3,800 on top of structural repairs. Compare that to the cost of a roll of flashing tape or a pre-formed sill pan, products readily available at any building supply store or flashings Home Depot carries in stock, and the math is not close.
Beyond cost, there are code and warranty implications. IRC Section R703.8 requires approved corrosion-resistant flashing at exterior window openings, applied in shingle fashion to prevent water from entering wall cavities or penetrating structural framing. Self-adhered window flashing must comply with AAMA 711, and fluid-applied membranes with AAMA 714. Skipping this step does not just risk water damage. It puts you out of code compliance and can void the window manufacturer’s warranty entirely.
Here are the primary risks when sill flashing is missing or fails:
- Bulk water entry into the wall cavity during rain events
- Condensation trapping between the window frame and sheathing
- Wood rot in sill plates, jack studs, and cripple studs
- Mold growth behind drywall and interior finishes
- Insulation degradation that reduces thermal performance
- Voided window warranties due to improper installation
- Building code non-compliance under IRC R703.8
The frustrating part is that every one of these problems is preventable. The fix is not expensive or complicated. It just has to happen at the right time, in the right order, with the right materials. That brings up a practical question: which sill flashing material actually fits your wall assembly and climate?
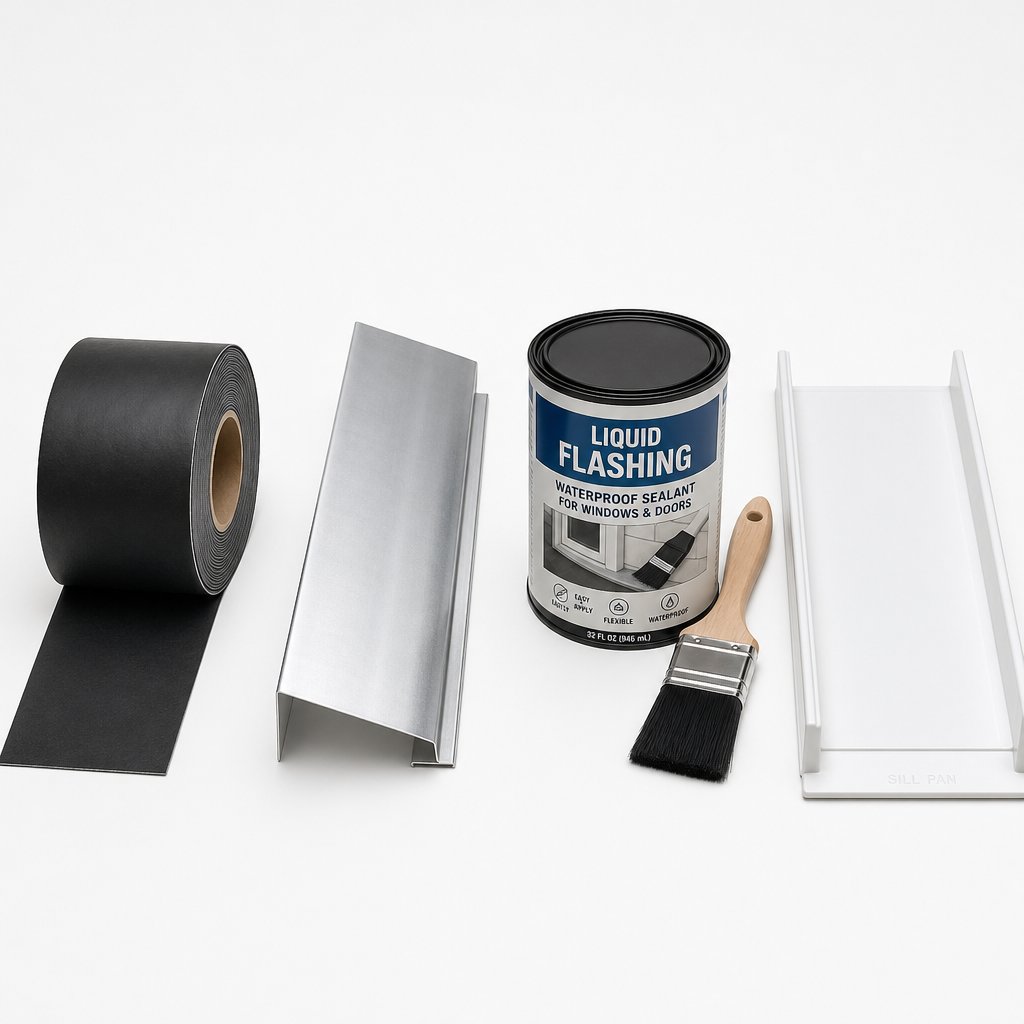
Types of Window Sill Flashing Materials Compared
Four material categories cover virtually every sill flashing scenario you will encounter, whether you are flashing a window in a new wood-frame home or retrofitting a masonry commercial building. Each one manages water differently, bonds to different substrates, and suits different skill levels. Choosing the right one is the difference between proper window flashing that lasts decades and a membrane that peels away in three winters.
Self-Adhesive Membrane Flashing
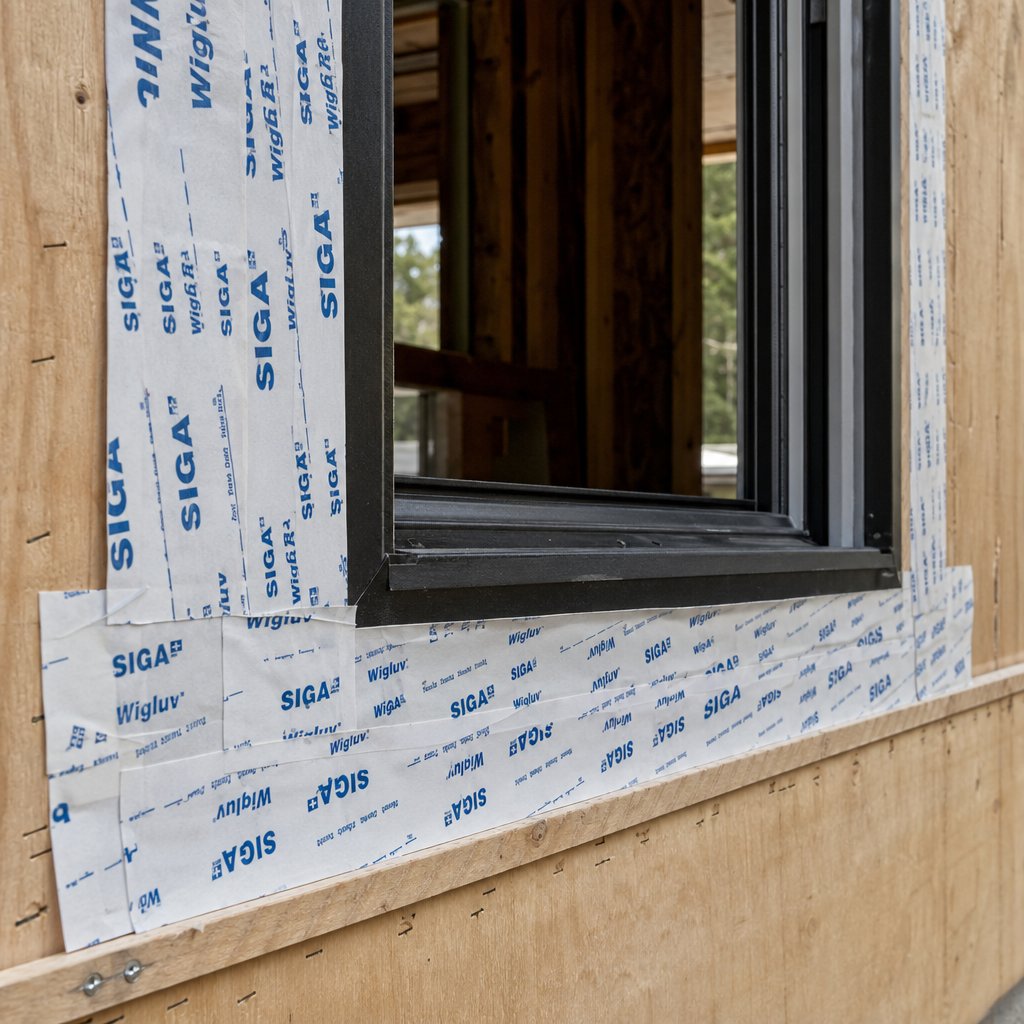
Peel-and-stick membranes are the most common choice for residential new construction, and for good reason. These flexible sheets, typically made from butyl rubber or modified bitumen with an adhesive backing, conform to the corners and contours of a rough opening without special tools. You cut a piece to size, peel the release liner, and press it into place along the sill and up the jamb sides to form integrated end dams.
Adhesion quality depends heavily on the substrate. On clean, dry OSB and plywood, most window flashing tape products bond reliably without a primer. Rigid foam insulation and coated sheathing systems like ZIP System panels require tapes specifically engineered for those surfaces, since standard bituminous membranes may not grip a smooth or treated face. Temperature matters too. Most manufacturers specify a minimum application temperature between 25degF and 40degF. Below that range, the adhesive stiffens and will not form a lasting bond, so cold-weather projects may need a primer or a switch to a different material entirely.
Metal Drip Edge and Formed Sill Flashing
Where membranes rely on adhesion to keep water out, metal sill flashing relies on physics. A formed piece of aluminum or galvanized steel, bent to create a sloped surface with a kicked-out front edge, physically directs water away from the opening. Gravity does the work, and there is no adhesive to fail over time.
Metal flashings are standard in masonry and commercial construction. When a window meets a window brick sill or a stone veneer, the rigid profile bridges the transition between the frame and the cladding cleanly. In residential wood-frame walls, metal sill pieces are less common but still valuable in high-exposure locations, like coastal homes or walls without roof overhangs. The tradeoff is that metal requires careful fitting. Inside corners need to be folded into “dog ear” details rather than simply cut and sealed, as Building Science Corporation recommends, to avoid creating a seam right where water concentrates most.
Liquid-Applied Flashing
Liquid-applied membranes are rolled or brushed directly onto the sill area, curing into a seamless, monolithic rubber-like coating. No seams means no weak points at corners, which is the single biggest advantage over tape and metal. Products in this category are typically polyurethane or silicone-based and bond to wood, concrete, masonry, and most sheathing types without a primer.
Complex geometries are where liquid flashing really earns its place. Irregularly shaped openings, rough substrates with uneven surfaces, and transitions between different wall materials all become simpler when you can paint on a continuous barrier rather than cutting and folding sheet goods. The downside is application precision. You need consistent film thickness across the entire sill, and the product requires curing time, anywhere from a few hours to overnight, before the window can be set. Rushing that step compromises the barrier.
Rigid Sill Pans
Pre-formed sill pans, made from molded plastic or bent sheet metal, offer the most reliable protection of any option. They arrive with integrated back dams and end dams already shaped, eliminating the field-fabrication step that introduces most installation errors. You dry-fit the pan into the rough opening, shim it to confirm a slight slope toward the exterior, and seal the back dam to the sheathing.
The catch is sizing. Rigid pans require a rough opening built to specific dimensions. If the opening is out of square or oversized, the pan will not seat properly, and gaps at the corners defeat the purpose. For projects where you control the framing, like new construction, this is rarely an issue. For retrofit work or replacement windows in older homes, a membrane or liquid approach is usually more practical. As Building Science Corporation notes, the back dam of a manufactured pan must also be protected from bending and breakage during window installation, so careful handling during the set is essential.
| Material Type | Durability | Ease of Installation | Best Use Case | Compatibility Notes |
|---|---|---|---|---|
| Self-Adhesive Membrane | Moderate — adhesive can degrade in extreme heat or cold over time | High — cut, peel, press; minimal tools needed | Residential new construction on wood-frame walls | Verify primer needs on foam and coated sheathing; check minimum application temperature |
| Metal (Aluminum / Galvanized Steel) | High — decades of service with proper coating | Moderate — requires precise bending, folding, and fitting | Masonry, commercial, and high-exposure residential walls | Isolate from dissimilar metals to prevent galvanic corrosion; fold corners rather than cut |
| Liquid-Applied Membrane | High — seamless barrier resists cracking and peeling | Moderate — requires consistent film thickness and curing time | Complex geometries, irregular substrates, mixed-material transitions | Bonds to most substrates without primer; confirm compatibility with sealants used at the frame |
| Rigid Sill Pan | Very High — factory-formed shape resists field damage | Low to Moderate — demands precise rough opening dimensions | New construction where framing tolerances are controlled | Two-piece pans need sealed joints; protect back dam during window set |
When you are ready to flashing tape install on a standard wood-frame home in a moderate climate, self-adhesive membrane handles the job well. Steel-stud or masonry walls in wind-driven rain zones benefit from metal or rigid pans. Liquid-applied products fill the gap for anything in between, especially where odd angles or mixed substrates make flashing in the window opening difficult with sheet materials alone.
Picking the right material is only half the equation, though. Every one of these options can fail if the layers are stacked in the wrong order. The sequence in which sill flashing connects to the water-resistive barrier, the jamb flashing, and the head flashing follows a single principle that governs every leak-free window installation.

The Shingling Principle That Prevents Every Sill Leak
You could buy the best flashing material on the market, apply it to a perfectly framed rough opening, and still end up with water pouring into your wall cavity. How? By stacking the layers in the wrong order. The single most common cause of window flashing failure is not a bad product or a missing piece. It is a reversed lap, where one layer tucks behind another instead of overlapping on top of it. Construction attorney Anthony Law SC notes that reverse-lapped window flashings are one of the most frequent findings when destructive testing reveals the source of water intrusion claims.
The fix is a concept so simple it predates modern building science by centuries: shingling. Think about how shingles work on a roof. Each row overlaps the row below it so that water hitting any surface always flows down and over the next layer, never behind it. The same logic applies to every material transition around a window opening. When you get the lapping order right, water has no path inward. When you reverse even one overlap, you create a funnel that channels moisture straight into the framing.
The Correct Lapping Sequence at the Sill
Here is where most installations go wrong, and where understanding the sequence makes all the difference. At the bottom of the window opening, the sill flashing must lap over the water-resistive barrier (WRB), not behind it. This is the opposite of what happens at the jambs and head, which is exactly why it trips up so many installers.
Picture the flow of water. Rain hits the wall, runs down the face of the housewrap, and reaches the bottom of the window opening. If the sill flashing sits on top of the WRB at that point, water rolls right off the flashing and continues down the exterior face of the housewrap below. It never enters the wall. If the sill flashing is tucked behind the WRB at the bottom, water running down the housewrap hits that seam and flows behind the flashing, directly into the rough opening and the wall cavity. As Polyguard’s installation guide emphasizes, incorrect layering traps moisture instead of directing it outward, and even well-sealed joints will eventually fail if water collects behind them.
At the jambs and head, the relationship flips. The WRB laps over the jamb flashing and head flashing so that water running down the face of the housewrap passes over those transitions without getting behind them. This is the part that feels intuitive. The sill is the exception, and that exception is where leaks start.
Whether you are working with metal window flashing, self-adhesive membrane, or a liquid-applied product, this rule does not change. The material is different, but the physics of water drainage is identical. Gravity always wins, and the lapping order is how you make gravity work for you instead of against you.
How Sill Flashing Connects to Jamb and Head Flashing
Getting the sill-to-WRB lap right is the critical first step. The next question is how the sill, jamb, and head flashings connect to each other at the corners, because those intersections are where water loves to escape sideways.
The full lapping sequence follows a strict bottom-to-top order:
- Install the sill flashing first. Apply it across the bottom of the rough opening, extending it down over the face of the WRB below the opening. Wrap the ends up the jamb sides by at least 150mm (6 inches) to create end dams that prevent water from running off the edges.
- Apply jamb flashing over the sill flashing corners. Each vertical jamb piece overlaps the turned-up end of the sill flashing at the bottom corner. This means any water running down the jamb flashing drains onto the sill flashing rather than behind it. Extend the jamb flashing above the top of the opening by at least 75mm (3 inches).
- Install head flashing over the jamb flashing tops. The horizontal head piece overlaps the upper ends of both jamb pieces. Water hitting the head flashing drains down onto the jamb flashing, which drains down onto the sill flashing, which drains to the exterior. Every transition sheds water outward.
- Integrate the WRB. Cut and lap the housewrap over the head flashing and down over the jamb flashing on both sides. At the bottom, leave the sill flashing exposed on top of the WRB. Do not tuck the housewrap over the sill flashing, as this reverses the lap and defeats the entire system.
- Set the window and apply exterior flashing tape over the flanges. The flange tape at the sides and head seals the window to the flashed opening. Leave the bottom flange unsealed so any water that reaches the sill pan can weep out freely.
This sequence mirrors exactly what Fine Homebuilding’s Mike Guertin demonstrates in his window-before-housewrap method: side flashing tape layers over the sill pan, head flashing extends past the sides, and the housewrap eventually laps over everything except the bottom. The result is a continuous shingle-style drainage path from the top of the wall to the foundation.
Corner laps and end dams deserve extra attention. The turned-up ends of the sill flashing act as small walls that keep water from spilling off the sides of the sill before it reaches the exterior. Without them, water migrates laterally along the sill and finds its way behind the jamb flashing at the corners. If you are using membrane tape, press it firmly into the 90-degree corner where the sill meets the jamb to eliminate air pockets. If you are working with metal, fold the end dam rather than cutting and butting two pieces together, since a butt joint at the corner is a leak waiting to happen.
This same shingling principle applies to flashing on windows of every type, from a small bathroom casement to a full-width patio door flashing assembly. Larger openings simply have longer sill runs and more corner area to manage, but the lapping order stays the same. Whether you picked up your flashing tape home depot or sourced a commercial-grade liquid membrane from a specialty supplier, the installation logic is universal.
Knowing the correct sequence is one thing. Executing it cleanly across an entire rough opening, with the right overlaps, the right pressure on adhesive membranes, and the right integration with the WRB, is where the real skill lives. A detailed walkthrough of each physical step makes the difference between understanding the principle and actually building a watertight sill.
Step-by-Step Window Sill Flashing Installation
Theory only gets you so far. At some point you are standing in front of a framed rough opening with a roll of membrane in one hand and a utility knife in the other, and the question shifts from “why does lapping order matter” to “where exactly do I press this tape first?” The following sequence covers flashing around windows from rough opening prep through final WRB integration, applicable whether you are using self adhesive window flashing membrane, liquid window flashing, or a rigid sill pan.
Preparing the Rough Opening
Every reliable sill flashing job starts before any membrane comes out of the packaging. Check the rough opening for square by measuring diagonals. They should match within 3mm (1/8 inch). Use a level on the sill plate and both jamb studs to confirm level and plumb. Even a slight rack in the opening can create low spots where water pools instead of draining.
Run your hand along the sill and jamb faces. Protruding nail or screw tips will puncture membrane the moment you press it down. Drive any proud fasteners flush or pull them entirely. Inspect the sheathing for damage, delamination, or gaps at panel joints. Patch any voids with compatible sheathing tape so the flashing has a continuous bonding surface.
If the sill plate is dead level, consider adding a slight slope toward the exterior. Many builders rip a thin wedge from a piece of clapboard siding and fasten it to the sill to create pitch. As 475 High Performance Building Supply notes, the concern with this approach is that the shim can create a dam on the exterior side of where the window frame sits, so ideally the slope begins at the interior edge of where the window unit will rest. This back-to-front pitch ensures any water that reaches the sill drains outward by gravity rather than sitting against the framing.
Applying Sill Flashing Membrane or Setting the Sill Pan
For membrane installations, cut a piece of window waterproofing tape 150 to 200mm (6 to 8 inches) longer than the width of the rough opening. That extra length gives you 75 to 100mm of material on each side to wrap up the jambs and form end dams. Position the membrane so it covers the full depth of the sill and extends down onto the face of the sheathing below the opening, lapping over the WRB at the bottom.
- Peel the release liner halfway and align the membrane along the sill, centering the excess evenly on both sides.
- Press the membrane into the sill-to-sheathing corner first, working from the center outward. Use a wallpaper squeegee or J-roller to eliminate air pockets. As Northern Built Pro recommends, a cheap wallpaper squeegee works well for pressing tapes into and around corners where a J-roller cannot reach.
- Peel the remaining liner and smooth the membrane down onto the face of the WRB below the opening. Roll firmly with a J-roller to activate the pressure-sensitive adhesive.
- Make a downward relief cut at each bottom corner of the excess material on the jamb sides. Fold the flaps up the jamb faces, pressing them tightly into the 90-degree corner where the sill meets the jamb. These turned-up sections are your end dams. They should extend at least 100mm (4 inches) up each jamb, though 150mm is better in high-exposure walls.
- Roll every seam and corner again. Adhesive bond strength increases with pressure. Do not skip this step, especially at the inside corners where the membrane transitions from horizontal to vertical.
For rigid sill pans, the process differs slightly. Dry-fit the pan into the opening and check that the back dam sits snug against the sheathing at the interior edge. Shim beneath the pan if needed to confirm a slight slope toward the exterior. Apply a bead of compatible sealant along the back dam and press the pan into position. Verify that the end dams sit tight against both jamb studs with no gaps at the corners.
If you are working with a brick sill or masonry substrate, apply a primer before setting any adhesive-based membrane. Masonry surfaces carry dust and mineral deposits that prevent reliable adhesion without surface preparation.
Integrating Jamb and Head Flashing
With the sill protected, the jamb flashing goes on next. Cut two pieces of window wrap tape long enough to cover the full height of the rough opening plus overlap onto the turned-up sill flashing ends at the bottom and extend past the top of the opening by at least 75mm.
- Apply each jamb piece so it overlaps the sill flashing end dam at the bottom corner. This maintains the shingle principle: water running down the jamb drains onto the sill flashing, not behind it. Press firmly into the corner overlap with a J-roller.
- Install the head flashing across the top of the opening. This piece should extend past the outer edges of both jamb pieces by at least 50mm on each side. Layer it over the tops of the jamb flashing so water draining from the head flows onto the jambs, then onto the sill, then to the exterior.
At every overlap, you are building a continuous drainage path. No seam should face upward where water could pool against it. If you are using liquid window flashing instead of tape, brush or roll the product in the same bottom-to-top sequence, allowing each layer to cure before applying the next one above it.
Final WRB Integration and Window Installation
The housewrap ties everything together. If the WRB was installed before the rough opening was cut, as is common in new construction, fold the cut flaps back into the opening and tape the corners. Lowe’s installation guide recommends cutting a capital-I shape across the top and bottom of the opening and down the center, then folding the WRB back across the vertical sides. Cut 100 to 150mm diagonal slits up from each top corner to create a flap that will later fold down over the head flashing.
- Lap the WRB over the head flashing and down over the jamb flashing on both sides. Tape these overlaps securely.
- Leave the sill flashing exposed over the WRB below the opening. Do not tuck the housewrap over the sill membrane. This is the critical reverse-lap point covered in the shingling principle. The sill flashing must remain on top so water drains outward.
- Set the window unit into the flashed opening following the manufacturer’s instructions. Apply sealant to the top and side flanges as specified, but leave the bottom flange unsealed so any water that reaches the sill pan can weep freely to the exterior.
- Fasten the window, check for plumb and level, and apply exterior self adhesive window flashing tape over the side and top flanges. Choose a tape 50 to 75mm wider than the flange so it bridges onto the WRB and creates a sealed transition. Roll all edges with a J-roller.
- Fold the WRB flap above the window down over the head flashing tape. Secure the corners so the flap lies flat. If metal Z-flashing is specified at the head, install it under this WRB flap so water drains over the metal and onto the housewrap face.
A few conditions affect adhesive performance and are worth noting before you start. Most self-adhesive membranes require a minimum application temperature of 25degF to 40degF. Below that range, the adhesive will not bond reliably, and you risk the membrane lifting after installation. Wet or dusty substrates also compromise adhesion. If the sheathing is damp from recent rain, let it dry before applying any pressure-sensitive tape. On coated sheathing systems, use the manufacturer’s recommended primer or compatible tape to ensure a lasting seal.
With the window set and all flashing layers integrated, the rough opening is fully protected. But the flashing tape you chose for this job, its adhesive chemistry, width, and substrate compatibility, plays a bigger role in long-term performance than most installers realize.
How to Choose the Right Flashing Tape for Your Project
A perfectly executed lapping sequence still fails if the tape itself will not stay bonded to the wall. Flashing tape selection is one of those details that rarely gets discussed beyond “grab whatever is on the shelf,” but the adhesive chemistry, width, and substrate compatibility of the tape you choose directly determines how long your window flashing detail holds up. Pick the wrong product for your sheathing type or climate, and you could find the tape peeling away from the wall within months of installation.
Matching Flashing Tape to Your Sheathing Type
Not all flashing tapes grip all surfaces equally. The substrate you are bonding to, whether it is raw OSB, plywood, rigid foam, or a coated panel system, changes which adhesive chemistry will actually hold.
OSB and plywood are the most common substrates in residential framing, and most flashing tapes are formulated with these surfaces in mind. The rough, porous texture of OSB gives adhesives plenty of mechanical grip, but that same porosity can work against you. Sawdust, moisture, and wax residue from the manufacturing process can sit on the surface and prevent a clean bond. Testing by the University of Texas Construction Durability Lab found that many peel-and-stick tapes failed on OSB within hours when applied without a primer, especially asphalt-based products. Wiping the surface clean and applying a manufacturer-recommended primer before taping makes a measurable difference in long-term adhesion.
Rigid foam insulation presents a different challenge. Extruded polystyrene (XPS) and polyisocyanurate boards have smooth, sometimes waxy faces that give pressure-sensitive adhesives very little to grab. Standard bituminous tapes tend to slide or lift on these surfaces. Butyl-based and acrylic-based tapes perform better, but a primer is still recommended for reliable results on foam sheathing.
ZIP System sheathing and similar coated OSB panels have a factory-applied weather-resistive barrier bonded to the face. That green or tan coating is specifically engineered to work with the manufacturer’s own acrylic tape. Using a different adhesive chemistry on these panels, particularly asphalt-based products, can result in poor adhesion or even chemical incompatibility that degrades the coating. If you are working with coated sheathing, stick with the tape system designed for it or confirm compatibility with the sheathing manufacturer before applying anything else.
Regardless of substrate, two conditions undermine every tape: moisture and dust. A damp surface prevents the adhesive from making full contact with the sheathing fibers, and construction dust acts as a release agent between the tape and the wall. Wipe the bonding area clean and let it dry before applying any flashing tape. This takes two minutes and prevents callbacks that take two days.
Choosing the Right Flashing Tape Width and Thickness
Flashing tapes for window openings typically come in widths of 4 inches (100mm), 6 inches (150mm), and 9 inches (225mm). The right width depends on two factors: the depth of the rough opening and the overlap you need onto the face of the sheathing or WRB.
For standard 2×4 or 2×6 framed walls, a 6-inch tape handles most flashing at window sill applications comfortably. It provides enough material to cover the sill depth and extend down onto the sheathing face below the opening with adequate overlap. Deeper wall assemblies, like double-stud walls or walls with exterior continuous insulation, may need 9-inch tape to maintain that same overlap without stretching the material thin across the sill.
Thickness is a tradeoff. Thicker tapes, generally 25 mil and above, offer greater puncture resistance and durability. They hold up better when a window unit is slid across the sill during installation, and they resist tearing at fastener penetrations. The downside is conformability. A thick, stiff tape does not fold neatly into the 90-degree corners where the sill meets the jambs, and those corners are exactly where window corner flashing needs to be airtight. Thinner tapes, around 15 to 20 mil, wrap into corners more easily but are more vulnerable to puncture and mechanical damage.
The practical solution is to match thickness to location. Use a thicker tape across the flat sill surface where durability matters most, and a thinner, more conformable tape for the corner transitions and end dam folds. Some builders use liquid-applied flashing at the corners and tape across the flat sections, combining the seamless coverage of a fluid membrane with the speed of peel-and-stick on straight runs.
Butyl vs Asphalt-Based Flashing Tapes
When you search for the best window flashing tape, you will find two dominant adhesive chemistries on the market: modified asphalt and butyl rubber. Each has a distinct performance profile, and the right choice depends on your climate, your substrate, and how long the tape will sit exposed before cladding goes on.
Asphalt-based tapes have been the industry standard since the 1970s. They are widely available, affordable, and stocked at most building supply stores. The adhesive is tar-based, which gives it decent initial tack on porous substrates like raw OSB and plywood. The limitations show up at temperature extremes. In high heat, asphalt adhesives can soften and liquefy, sometimes producing oily runs on metal head flashing. In cold weather, the adhesive stiffens and loses its grip. Asphalt-based products also have compatibility concerns: the petroleum content can degrade certain sealants, caulks, and even some WRB materials over time. If you use an asphalt tape, plan on priming the substrate and mechanically fastening the top edge with cap nails or staples for added security.
Butyl rubber tapes are a newer generation that hit the market in the 1990s. Butyl adhesives remain flexible across a much wider temperature range, maintain adhesion in both heat and cold better than asphalt, and are chemically compatible with most sealants and building materials. Butyl rubber’s dense molecular structure also provides superior UV stability and a very low water vapor transmission rate, making it a stronger performer when the tape will be exposed to sunlight for weeks or months before cladding installation. The tradeoff is cost. Butyl tapes are more expensive and less commonly stocked at big-box retailers, so you may need to source them from specialty building supply dealers.
A third category worth noting is acrylic-based tapes, the newest adhesive technology in this space. Acrylic tapes performed best overall in durability testing at the University of Texas lab, holding weight under tension for the full 30-day test period while many asphalt and butyl products failed within hours. Acrylic adhesives bond especially well to coated sheathing systems and are the standard choice for ZIP System panels. They require firm J-roller pressure during application to activate fully, but once bonded, they stay put.
| Adhesive Type | Temperature Range | UV Resistance | Substrate Compatibility | Relative Cost |
|---|---|---|---|---|
| Modified Asphalt | Narrow — softens in high heat, stiffens below 40°F | Low — degrades with prolonged UV exposure | Good on raw OSB and plywood with primer; can react with some sealants and WRBs | Low |
| Butyl Rubber | Wide — maintains flexibility from below 0°F to over 150°F | Moderate to High — resists UV degradation for extended exposure periods | Good on most substrates; primer recommended on OSB and plywood; compatible with most sealants | Moderate to High |
| Acrylic | Wide — performs well across extreme cold and heat | High — designed for extended UV exposure before cladding | Excellent on coated sheathing (ZIP); good on plywood; may need primer on raw OSB | High |
So how do you decide which tape fits your project? Rather than chasing a single “best flashing tape for windows” answer, run through these selection criteria:
- Climate zone — Cold climates with freeze-thaw cycles favor butyl or acrylic tapes that stay flexible year-round. Hot climates with intense sun exposure need UV-stable products that will not soften or run.
- Sheathing material — Raw OSB and plywood work with all three chemistries when primed. Coated sheathing panels pair best with acrylic tapes. Rigid foam insulation needs butyl or acrylic with a primer.
- UV exposure duration — If cladding installation is weeks or months away, choose a tape rated for extended UV exposure. Asphalt tapes left in direct sunlight will degrade quickly.
- Sealant compatibility — Confirm that the tape’s adhesive will not react with the sealant you plan to use at the window flange. Asphalt-based tapes are the most likely to cause compatibility issues with silicone and polyurethane sealants.
Understanding how to flash a window properly means pairing the right tape with the right substrate and climate conditions. A zip flash system on coated sheathing, a butyl membrane on plywood in a cold climate, or an asphalt tape on a budget project in a mild, dry region — each combination works when the materials are matched intentionally. The tape is only as good as the bond it forms, and that bond depends on choices made before the release liner ever comes off.
Selecting the right product and installing it correctly covers new construction well. But what happens when the flashing is already in the wall, the window has been in place for years, and water stains are showing up on the interior trim? Diagnosing a failed sill flashing in an existing home requires a different approach entirely.
Diagnosing and Fixing Failed Window Sill Flashing
New construction gives you the luxury of building every flashing layer from scratch. Existing homes do not. If you are reading this section, chances are water is already showing up somewhere it should not, and you need to figure out whether the sill flashing is the culprit, how bad the damage is, and what it takes to fix it. This is the scenario most homeowners actually face, yet it is the one that gets the least attention in installation guides.
Signs Your Sill Flashing Has Failed
Sill flashing does not announce its failure with a dramatic leak. It whispers. The clues show up gradually, often in places you would not immediately connect to the window opening. Knowing what to look for, and where to look, helps you catch the problem before it spreads deep into the wall assembly.
The most telling indicators include:
- Water stains on interior walls below the window — Yellow or brown discoloration on drywall beneath the sill is one of the earliest visible signs. These marks tend to appear after heavy rain and may dry between storms, making them easy to dismiss as a one-time event.
- Peeling paint or bubbling drywall near the sill — Moisture trapped behind the wall finish causes paint to lose adhesion and drywall paper to blister. If the bubbling is concentrated at or below sill height, the source is almost certainly at the base of the window opening rather than the head.
- Musty odors near the window — A persistent damp smell around a window, especially one that intensifies after rain, points to moisture accumulating in a concealed space. The framing cavity behind the sill is a prime location for this kind of trapped moisture.
- Soft or spongy wood at the sill plate — Press a screwdriver into the interior sill or the trim at the base of the window. If the wood gives easily or feels punky, rot has already set in. Sardar Restoration identifies soft or spongy wood as a sign of internal rot rather than surface wear, meaning the damage extends deeper than what is visible.
- Visible mold on framing when trim is removed — Pull off the interior casing at the bottom of the window and inspect the rough framing. Black or green mold growth on the jack studs or sill plate confirms prolonged moisture exposure in the cavity.
Location matters when you are diagnosing the source. Water evidence concentrated below the window strongly suggests a sill flashing failure, because gravity pulls water to the lowest point of the opening and that is where a failed or missing membrane lets it through. Staining above the window or along the top of the frame points to head flashing or drip cap problems instead. And if moisture appears uniformly around the entire frame with no clear concentration point, condensation on the glass or frame itself may be the issue rather than a flashing window failure. Condensation problems tend to worsen in cold weather regardless of rain, while flashing failures correlate directly with rain events.
When to Repair vs When to Replace
Not every sill flashing problem requires tearing the window out. The scope of the fix depends on what you find once you open things up.
Minor failures — a lifted edge of membrane tape, a small puncture from a misplaced fastener, or a short section where the adhesive has released from the sheathing — can sometimes be patched in place. Clean the area, apply a primer if needed, and press a compatible piece of the best window flashing tape you can source over the damaged section, extending at least 50mm (2 inches) beyond the failure in every direction. Roll it firmly with a J-roller. This works when the surrounding membrane is still well-bonded and the framing beneath is dry and structurally sound.
Widespread failures tell a different story. If the membrane has lost adhesion across most of the sill, if the lapping order was wrong from the start, or if the framing shows rot, a patch will not solve the underlying problem. These situations call for full removal of the window unit, stripping the failed flashing, replacing any compromised framing, and reinstalling the complete flashing sequence from scratch. As Rite Window’s installation guide notes, water that bypasses failed caulk, missing flashing, or an unprotected sill often reveals itself as soft or darkened wood at the sill and lower jambs, and replacing that rotted material is structural, not cosmetic.
Before calling a professional, you can run through a basic diagnostic sequence yourself to understand the scope of the problem:
- Inspect the exterior cladding at the base of the window for cracked sealant, gaps between the trim and siding, or staining on the wall surface below the sill.
- Check the interior sill and surrounding trim for soft spots by pressing firmly with a screwdriver or awl. Sound wood resists penetration; rotted wood gives way easily.
- Remove the interior casing at the bottom of the window carefully. Look for discoloration, mold, or dampness on the rough framing and sheathing behind the trim.
- Run a garden hose at low pressure along the exterior sill area for 10 to 15 minutes while someone watches the interior for any signs of water entry. This isolates the sill as the leak source versus the head or jambs.
- Photograph everything you find. Clear documentation helps a contractor assess the situation accurately and provide a realistic repair scope without unnecessary exploratory demolition.
If the hose test produces water on the interior at or below sill level, and the framing behind the trim shows rot or mold, you are looking at a full flashing replacement rather than a surface repair. The earlier you catch it, the less framing you lose.
Retrofit Sill Flashing for Replacement Windows
Flashing for windows during new construction is straightforward because you have full access to the sheathing, the WRB, and every layer of the wall assembly. Replacement windows installed into existing openings present a fundamentally different challenge. The original housewrap and sill flashing, if they existed at all, are buried behind cladding that you may not want to remove. Full membrane integration with the WRB is often physically impossible without stripping the exterior wall down to the sheathing.
Two practical strategies handle this reality.
Exterior-applied flashing works from the outside in. After removing the old window and cleaning the rough opening, apply a self-adhesive or liquid-applied membrane across the sill and up the jambs, bonding it to whatever accessible substrate exists, whether that is original sheathing, aged housewrap, or even the back face of the exterior trim. The goal is to create a continuous drainage surface at the sill that directs water outward, even if you cannot tie it into the full WRB system behind the cladding. Aluminum window flashing bent to form a sloped sill profile can supplement the membrane here, providing a rigid drainage plane that does not depend on adhesive bond alone.
Sealant-based approaches fill the gap when neither membrane nor metal can be fully integrated. A high-quality, flexible polyurethane or silicone sealant applied at the junction between the new window frame and the rough opening creates a weather seal at the sill. This is not a substitute for proper sill flashing in new construction, but in retrofit scenarios where the wall cannot be opened up, a well-executed sealant joint combined with exterior-applied flashing tape over the bottom window flange provides a functional water management layer. The key is ensuring the sealant remains flexible enough to accommodate seasonal frame movement without cracking.
Replacement window projects also benefit from choosing a window unit with good drainage built into the frame itself. Windows with integrated weep systems and properly sized flanges reduce the burden on the sill flashing by handling incidental water within the frame before it ever reaches the rough opening. That relationship between the window unit and the flashing beneath it plays a larger role in long-term performance than most homeowners realize.
How Your Window Choice Affects Sill Flashing Performance
Flashing protects the rough opening, but the window unit sitting on top of it determines how much work that flashing actually has to do. A window with poor drainage dumps every drop of infiltrated water onto the sill membrane. A window with well-designed weep channels and dimensionally stable frames handles most incidental moisture internally, letting the sill flashing serve as a backup rather than the sole line of defense. The relationship between the two is symbiotic, and overlooking it is one of the most common blind spots in window installation flashing planning.
How Window Frame Materials Interact with Sill Flashing
Every window frame expands and contracts with temperature changes. The rate and magnitude of that movement depends on the frame material, and it directly affects the seal between the window flange and the flashing membrane beneath it.
Timber frames move the most. Wood absorbs and releases moisture seasonally, swelling in humid conditions and shrinking in dry ones. That dimensional change stresses the bond between the window flange and the flash tape or sealant at the sill. Over repeated cycles, the seal can crack or peel, opening a path for water. Timber frames also introduce a secondary risk: if the frame itself absorbs moisture through a compromised finish, it can transfer that moisture downward to the sill flashing interface, accelerating adhesive degradation from the inside out.
Vinyl (uPVC) frames are dimensionally stable against moisture but have a high coefficient of thermal expansion. In direct sunlight, a dark-colored vinyl frame can expand significantly along its length. That linear movement pulls the flange away from the flashing tape at the corners, exactly where the brick sill detail or cladding transition is most vulnerable. Lighter-colored vinyl reduces this effect, but the material still moves more than metal under thermal cycling.
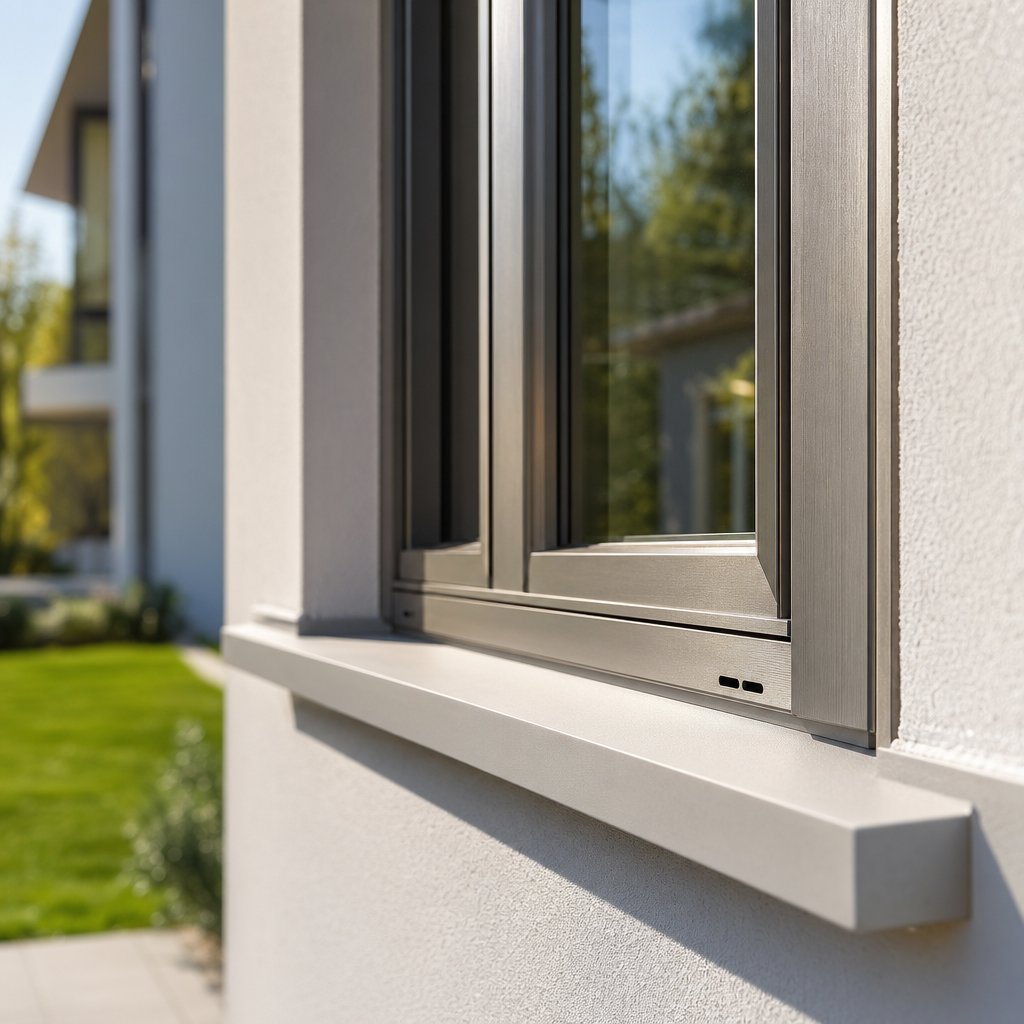
Aluminium frames offer the best dimensional stability of the three. Aluminium’s thermal expansion rate is lower than vinyl’s, and unlike timber, it does not absorb moisture at all. The result is a frame that maintains a consistent, predictable contact with the sill flashing year after year. That stability matters most at the flange-to-membrane junction, where even small gaps allow capillary water entry during wind-driven rain. As the IIBEC technical paper on aluminium windowsill design notes, contemporary aluminium window systems are fabricated with reservoir-style sill extrusions that collect water entering the frame and drain it to the exterior through weeps, reducing the load on the flashing beneath.
Window Drainage Systems and Weep Hole Integration
No window is perfectly watertight at the glazing seal. Wind-driven rain pushes past gaskets, and condensation forms inside the frame cavity. Properly designed windows account for this by incorporating internal drainage channels that collect infiltrated water and route it to weep holes at the base of the frame. Those weep holes discharge water onto the sill flashing, which then directs it to the building exterior.
When this system works as intended, the sill flashing handles a small, controlled volume of water that exits the frame at predictable locations. The flash tape or membrane beneath the weep holes stays intact because it is managing drainage, not fighting bulk water entry.
Windows without effective weep systems tell a different story. Water that enters the frame has nowhere to go except to pool inside the sill extrusion or seep through corner joints in the frame itself. That uncontrolled leakage lands on the sill flashing in unpredictable locations and volumes, stressing adhesive bonds and overwhelming end dams at the corners. Over time, this places the entire burden of water management on the flashing layer alone, a role it was designed to share with the window, not carry solo.
A few details determine whether a window’s drainage system actually performs:
- Weep hole placement — Weeps should be located at the lowest point of the sill extrusion, positioned to discharge water onto the sill flashing rather than behind it or into the wall cavity.
- Weep hole sizing and spacing — Undersized or too-few weeps cannot keep up with heavy rain events. Look for windows with multiple weep slots spaced evenly across the sill width.
- Internal drainage slope — The interior of the sill extrusion should slope toward the weep holes. A flat or reverse-sloped internal channel traps water instead of draining it.
- End dam integrity within the frame — At the corners where the sill meets the jamb inside the frame, sealed end dams prevent water from bypassing the weep system and leaking at the frame joints. The IIBEC study found that damaged foam gaskets and gaps between back dams and end dams within the frame are a frequent source of leakage in aluminium window systems, reinforcing that internal sealing quality matters as much as external flashing.
Imagine two identical sill flashing installations, same membrane, same lapping order, same substrate. One sits beneath a window with a well-engineered weep system. The other sits beneath a window with no internal drainage. After five years of storms, the first flashing is still performing because it only ever handled small, controlled volumes of water. The second is failing at the corners because it absorbed the full force of every rain event the frame could not manage. The brick window sill detail and exterior trim may look identical from the street, but the condition of the flashing beneath tells a completely different story.
Choosing Windows Designed for Reliable Flashing Integration
When you are specifying or shopping for windows, a few frame and flange features make window installation flashing significantly easier and more durable over the long term:
- Integrated mounting flanges sized for standard flashing tape overlap — A flange width of at least 25mm (1 inch) gives flash tape enough bonding surface to create a reliable seal. Narrow or non-existent flanges force you to rely on sealant alone, which degrades faster than a properly bonded membrane.
- Weep systems that drain to the exterior face — Confirm that the weep holes discharge water forward, onto the sill flashing and out past the cladding line. Some budget windows route weeps to the interior side of the frame, which defeats the purpose entirely.
- Frame profiles that allow proper sealant application — The junction between the frame and the rough opening needs enough clearance for a properly sized sealant bead. Frames that sit flush against the sheathing with no gap leave no room for sealant tooling, creating a weak point at the most critical transition.
- Dimensional stability under thermal cycling — Frames that hold their shape across seasonal temperature swings maintain a tighter seal with the flashing membrane over time. Aluminium excels here, followed by fiberglass, then vinyl, then timber.
Aluminium window systems engineered to Australian standards are a strong example of this design philosophy in practice. They combine dimensional stability, integrated weep drainage, and flange profiles specifically sized for standard flashing tape installation. MEICHEN’s aluminium windows collection, built for homeowners, renovators, and builders, reflects this approach with energy-efficient, Australian-standard-compliant frames designed to simplify proper sill flashing integration. For projects where long-term flashing performance is a priority, aluminium frames with these built-in details reduce the risk of seal failure at the sill.
The window and the flashing beneath it function as a single water-management system. Choosing one without considering the other leaves a gap in your defense, no matter how carefully each component is installed on its own. With the right pairing of frame, drainage, and flashing material, the sill becomes the reliable barrier it was always meant to be rather than the silent failure point it so often turns into.
Getting Window Sill Flashing Right for Every Project
Every section of this guide circles back to the same reality: the sill is where windows fail. Not the head, not the jambs, not the glazing seal. The bottom of the rough opening, where gravity pools water and where a single reversed lap can funnel moisture straight into the wall cavity. Whether you are framing a new build, replacing a leaking window, or trying to figure out why paint is bubbling beneath your bedroom sill, the principles that prevent failure are the same.
Sill Flashing Essentials to Get Right Every Time
Regardless of material choice, project type, or wall assembly, four non-negotiable principles govern every successful sill flashing installation. Get these right and the rest falls into place. Miss any one of them and you are building in a failure point that water will eventually find.
- Correct lapping order at the sill — The sill flashing laps over the water-resistive barrier at the bottom of the opening. At the jambs and head, the WRB laps over the flashing. This is the single detail that separates a watertight window from a slow leak, and it applies whether you are working with flexible window flashing membrane, rigid metal, or a liquid-applied product.
- Adequate corner overlaps with end dams — The turned-up ends of the sill flashing must extend at least 100mm up each jamb, and the jamb flashing must overlap those end dams completely. Unsealed corners are the most common escape route for water migrating laterally across the sill.
- Material compatibility with the sheathing substrate — A butyl tape on raw OSB, an acrylic tape on coated sheathing, a primer on rigid foam. Matching the adhesive chemistry to the bonding surface is what keeps flashing tape for windows attached to the wall five, ten, and twenty years after installation.
- Full integration with the window flashing sequence — Sill flashing is not a standalone component. It connects to jamb flashing, head flashing, the WRB, and the window flange in a specific bottom-to-top order. Skipping a layer or reversing a single overlap breaks the drainage chain. Understanding window flashing how to sequences from sill to head is what separates a weathertight installation from one that looks right but leaks.
The sill is where most window leaks originate — getting the lapping order right at this one location prevents the majority of water intrusion failures.
These principles hold true across every climate zone, every wall type, and every flashing material on the market. They apply to a zip tape flashing system on a new-construction home just as much as they apply to a liquid flashing for windows repair on a 30-year-old retrofit. The physics of water drainage does not change. Only the materials and methods adapt.
Your Next Steps Based on Your Project
Your situation determines where to focus. A homeowner investigating a leak needs a different starting point than a builder specifying materials for a new development. Here are tailored action paths based on where you are right now:
- Homeowners investigating a leak: Start with the diagnostic steps outlined in the diagnosis section above. Check for water stains below the window, press a screwdriver into the interior sill to test for soft wood, and carefully remove the bottom casing to inspect the rough framing. Run a low-pressure hose test at the exterior sill to isolate the leak source. If you find rot or widespread membrane failure, bring in a professional with the documentation you have gathered. Catching a sill flashing failure early limits the damage to a manageable repair rather than a full wall rebuild.
- DIYers planning a new installation: Follow the step-by-step installation guide with close attention to the shingling principle. Cut your membrane with enough excess to form proper end dams, press every corner with a J-roller, and resist the temptation to seal the bottom window flange. Leave it open so water can weep out. Check your flashing tape’s minimum application temperature before starting, and prime the substrate if you are working on foam sheathing or dusty OSB. A clean, dry bonding surface and the correct lapping order will handle the rest.
- Builders and developers specifying window systems: Select windows with integrated weep drainage, properly sized mounting flanges, and dimensionally stable frames that maintain a consistent seal with the sill flashing over time. Aluminium frames engineered to Australian standards offer the best combination of thermal stability and flashing-friendly flange profiles. MEICHEN’s aluminium window range is a solid starting point for projects requiring energy-efficient, Australian-standard-compliant windows with frame details designed for reliable flashing integration. Pair the right window with the right flashing material for your wall assembly, and specify the lapping sequence in your installation documentation so every crew on site follows the same method.
Window sill flashing is not glamorous work. It disappears behind trim and cladding the moment the job is done, and no one ever compliments a homeowner on a well-lapped membrane. But it is the single most effective barrier between your wall framing and the water that wants to destroy it. Get the lapping order right, match your materials to your substrate, and seal those corners. The window above will do its part. The flashing below will do the rest.
Window Sill Flashing FAQs
1. What is the difference between window sill flashing and a sill pan?
A sill pan is a rigid, pre-formed tray made from plastic or sheet metal with built-in end dams and a back dam that sits at the base of the rough opening. Window sill flashing is a broader term that includes sill pans but also covers peel-and-stick membrane tape and liquid-applied coatings that serve the same water-drainage function. Both protect the same area, but sill pans eliminate field-fabrication errors because their shape is factory-made, while membrane flashing offers more flexibility for retrofit work and irregular openings.
2. What happens if window sill flashing is installed incorrectly?
Incorrectly installed sill flashing, particularly a reversed lap where the membrane is tucked behind the water-resistive barrier instead of over it, creates a direct path for water into the wall cavity. Over time this leads to wood rot in framing members, mold growth behind drywall, insulation degradation, and potential structural damage. Remediation typically requires removing interior finishes, replacing rotted framing, and reinstalling the window, costing significantly more than proper flashing during initial installation. It can also void window warranties and put the building out of IRC R703.8 code compliance.
3. Should I use butyl or asphalt-based flashing tape for window sills?
Butyl rubber tapes maintain flexibility across a wider temperature range and offer better UV resistance, making them ideal for cold climates with freeze-thaw cycles or projects where cladding installation is delayed. Asphalt-based tapes are more affordable and widely available but can stiffen in cold weather and soften in extreme heat. Acrylic tapes are a third option that performed best in university durability testing and bond especially well to coated sheathing systems. Your choice should be guided by climate zone, sheathing material, expected UV exposure duration, and sealant compatibility.
4. How do I know if my existing window sill flashing has failed?
Key indicators include water stains on interior walls below the window, peeling paint or bubbling drywall near the sill, musty odors around the window opening, and soft or spongy wood when you press a screwdriver into the interior sill. Removing the interior casing at the bottom of the window and finding mold or discoloration on the rough framing confirms prolonged moisture exposure. A low-pressure hose test directed at the exterior sill can isolate the leak source. Water evidence concentrated below the window strongly suggests sill flashing failure rather than head flashing or condensation issues.
5. Does the window frame material affect sill flashing performance?
Yes, significantly. Timber frames expand and contract with moisture changes, stressing the seal between the flange and flashing membrane over repeated cycles. Vinyl frames have high thermal expansion in direct sunlight, which can pull the flange away from the tape at corners. Aluminium frames offer the best dimensional stability, maintaining a consistent contact with sill flashing year-round due to low thermal expansion and zero moisture absorption. Aluminium windows engineered to Australian standards, such as those in MEICHEN’s collection, also incorporate integrated weep drainage and properly sized flanges that simplify reliable flashing integration.
More Window & Door Guides