What Is Window Flashing and Why It Matters
Window flashing is a weather-resistant barrier installed around window openings to direct water away from the building envelope and prevent moisture from entering wall cavities. It typically consists of thin strips of metal, self-adhesive membrane, or tape applied at the head, jambs, and sill of a window opening, working together to channel water down and outward before it can reach vulnerable framing and sheathing materials.
Sounds simple enough, right? In practice, this unassuming layer of protection is one of the most critical components in your entire wall assembly.
What Window Flashing Actually Does
Every window starts as a large hole cut into your wall. Even after you fill that hole with a high-performance window unit, the junction where the window frame meets the rough opening and wall sheathing remains a weak point. Window flashing acts as a secondary drainage plane at this vulnerable intersection, bridging the gap between the window itself and the weather-resistive barrier (house wrap) that protects the rest of the wall.
Think of it this way: the window is your primary water-shedding surface, and the flashing is the safety net behind it. As the SIGA building envelope team puts it, flashing is “the connection between window and wall” that manages bulk water during the installation process and for decades afterward.
Window flashing doesn’t stop water from reaching the window — it controls where water goes when it inevitably gets behind the cladding.
That principle is worth remembering. Rain, wind-driven moisture, and condensation will find their way past your siding. Flashing tape for windows, liquid flashing for windows, and window metal flashing all serve the same purpose: they give that water a predictable, controlled path back to the exterior. When you look at an installed window from outside, you’ll often notice a small metal strip angled slightly outward along the top of the trim. That’s the head flashing, or drip cap, and it’s one of the few visible signs that the system is in place. The rest of the flashing layers sit hidden beneath the cladding, quietly doing their job.
Why Every Window Needs Proper Flashing
Missing or failed flashing doesn’t announce itself right away. Water travels along framing members, soaking into sheathing and insulation before any visible stain appears on your interior walls. By the time you notice bubbling paint or a musty smell near a window, the damage behind the drywall may already be extensive. The Building America Solution Center warns that missing window flashing can cause “hundreds or thousands of dollars worth of damage” hidden inside the wall, including mold growth, rotting of wall sheathing and framing, and degraded insulation that loses its thermal performance.
This is exactly why building codes treat flashing as mandatory, not optional. IRC Section R703.8 requires approved corrosion-resistant flashing to be applied in shingle fashion at exterior window and door openings, preventing water from entering wall cavities or penetrating structural framing. Self-adhered products must comply with AAMA 711, and fluid-applied membranes must meet AAMA 714. For projects in Australia, standards like AS 2047 set parallel requirements for weatherproofing performance at fenestration openings. Regardless of your climate zone, whether you’re in a rain-soaked coastal region or a dry inland area, the code is clear: every window needs proper flashing.
It’s also worth noting that flashing protects far more than the window itself. A single failed detail at one opening can compromise the insulation, framing, and sheathing across an entire wall section. Products like zip tape flashing and liquid-applied membranes have expanded the options available, but the underlying requirement hasn’t changed: water must be directed out, not trapped in.
The real question isn’t whether your windows need flashing. It’s whether the right materials were chosen and installed correctly for your specific wall assembly, and that starts with understanding the different types available.
Types of Window Flashing Materials Compared
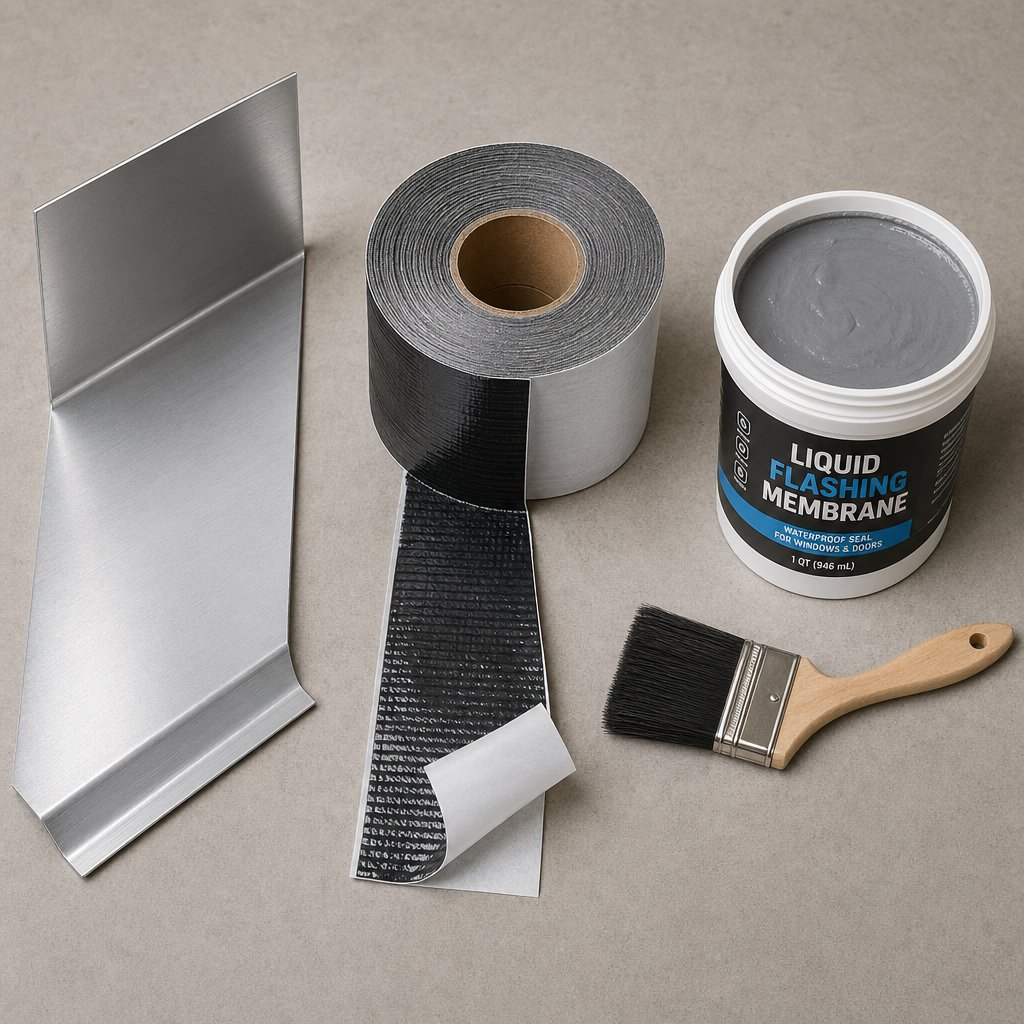
Choosing the right material is half the battle when flashing a window. Each type has distinct strengths, and the best pick depends on where it’s going, what cladding you’re working with, and how complex the opening is. Three main categories dominate the market: metal, self-adhesive tape, and liquid-applied membranes. Here’s how they stack up.
Metal Flashing for Long-Term Durability
Metal remains the most durable option for flashing in windows, especially at high-exposure locations like the head (drip cap) and window sill pan flashing. It doesn’t degrade under UV light, won’t lose adhesion over time, and holds its shape for decades.
Aluminium is the most popular metal choice for residential projects. It’s lightweight, naturally corrosion-resistant, and easy to bend and form on site with basic hand tools. You’ll often see it used for drip caps above windows and pre-formed sill pans that create a rigid tray at the bottom of the rough opening. Copper is a premium alternative that develops a protective patina over time and can last the life of the building, though its cost limits it to high-end or historic restoration work. Galvanized steel handles heavy-duty commercial applications where impact resistance and structural rigidity matter more than weight.
One thing to keep in mind with metal: dissimilar metals in contact can cause galvanic corrosion. If you’re using aluminium flashing against steel fasteners or copper drip edges near galvanized components, a separation barrier prevents long-term degradation.
Self-Adhesive Flashing Tape Options
Self-adhesive tapes are the most common choice for jamb and sill details in residential construction, and they’re the product most DIYers reach for first. When you install window flashing tape, you’re working with one of two adhesive chemistries: butyl-based or acrylic-based. The differences matter more than you might expect.
Butyl tapes (sometimes grouped with asphalt-based products) offer aggressive initial tack. They grab the substrate quickly and are forgiving on slightly imperfect surfaces, making them popular on job sites where speed counts. The tradeoff? Butyl adhesives can become fluid in high heat and brittle in cold, and they may dry out over repeated thermal cycles. Asphalt-based tapes are the cheapest option, but they bond reliably only within a narrow temperature window and can break down quickly, sometimes even voiding window manufacturer warranties.
Acrylic tapes take a different approach. Their bond actually strengthens over time as the adhesive cures, and they offer superior UV resistance and long-term stability across a broader temperature range. The catch is that acrylic adhesives are sensitive to surface moisture during initial application, so the substrate needs to be clean and dry. They also tend to cost more upfront. For most window flashing details that need to perform for 20-plus years behind cladding, acrylic is increasingly the preferred chemistry among building envelope professionals.
Liquid-Applied Flashing Membranes
Imagine a flashing product with no seams, no laps to get wrong, and no corners to fold. That’s the appeal of liquid-applied membranes. You brush, roll, or trowel them onto the substrate, and they cure into a continuous, flexible barrier that fully conforms to the surface beneath.
Liquid applied flashing excels in situations where tape simply can’t conform cleanly: round-top windows, arched openings, complex geometries, and rough substrates with gaps or irregularities. Because the membrane is seamless once cured, there are no joints or overlap points where water can find a path inward. It also bonds to a wide range of materials, including concrete, wood, metal, and masonry, which simplifies material selection on mixed-substrate projects.
The downsides are practical. Application is messier than peeling and sticking a tape, curing time means you can’t immediately proceed with the next step, and getting a consistent film thickness requires some skill. Still, for sill pans and complex transitions, liquid flashing for windows is rapidly gaining ground on job sites.
Comparing Flashing Materials at a Glance
| Material Type | Best Use Case | Durability | Ease of Installation | Cost Range |
|---|---|---|---|---|
| Metal (Aluminium, Copper, Steel) | Head flashing (drip caps), rigid sill pans, high-exposure areas | High | Moderate (requires cutting and forming) | Medium to High |
| Self-Adhesive Tape (Butyl/Acrylic) | Jamb flashing, sill wraps, nailing fin integration | Medium to High (acrylic) / Medium (butyl) | Easy (peel-and-stick) | Low to Medium |
| Liquid-Applied Membrane | Irregular shapes, sill pans, complex geometries, mixed substrates | High | Moderate (brush/roller, requires curing time) | Low to Medium |
In practice, many professional installations combine multiple types rather than relying on just one. A common approach pairs a metal drip cap at the head with self-adhesive tape at the jambs and a liquid-applied sill pan at the bottom. Each material handles the location where it performs best, and together they create a layered system that’s far more resilient than any single product alone.
Of course, having the right materials on hand is only part of the equation. The order in which those materials go on, and how each layer overlaps the one below it, determines whether the system actually sheds water or quietly funnels it into your wall cavity.
How Water Management Drives Window Flashing Sequence
Every flashing material in the world is useless if it goes on in the wrong order. The sequence isn’t arbitrary, and it isn’t something manufacturers invented to make your life harder. It follows a single, universal principle rooted in gravity. Understand this one concept, and you can adapt to any window opening, any cladding system, and any combination of materials without memorizing a rigid set of steps.
The Shingle Lapping Principle Explained
Picture the shingles on a roof. Each row overlaps the one below it so rainwater flows down the surface, always riding over the top of the next layer, never slipping behind it. That overlapping pattern creates a continuous downward drainage path from ridge to eave. The same logic governs every piece of window flashing tape, metal window flashing, and liquid membrane you install around an opening.
The rule is straightforward: upper layers always lap over lower layers. Gravity pulls water down, and each overlap ensures that water stays on the exterior face of the material beneath it. If any single piece is tucked behind the layer below, water follows that seam inward like a funnel. One reversed lap is all it takes to direct moisture straight into the wall cavity.
Think bottom-up when installing, but top-down when imagining how water travels. Every layer you add should shed water onto the face of the layer already in place.
This principle applies identically to door and window flashing. Whether you’re working on a small bathroom window or a wide patio door, the physics don’t change. Discussions on flashing reddit threads circle back to this same idea constantly: if you get the lapping direction right, most other mistakes become minor. Get it wrong, and no amount of caulk will save the assembly.
Why Sill Flashing Goes First
The shingle lapping principle dictates the entire installation sequence, starting from the lowest point and working upward. The sill sits at the bottom of the rough opening, which makes it the foundation of the drainage chain. Everything above it must eventually shed water onto the sill pan, so the sill pan has to be in place first.
Here’s how the logic builds, layer by layer:
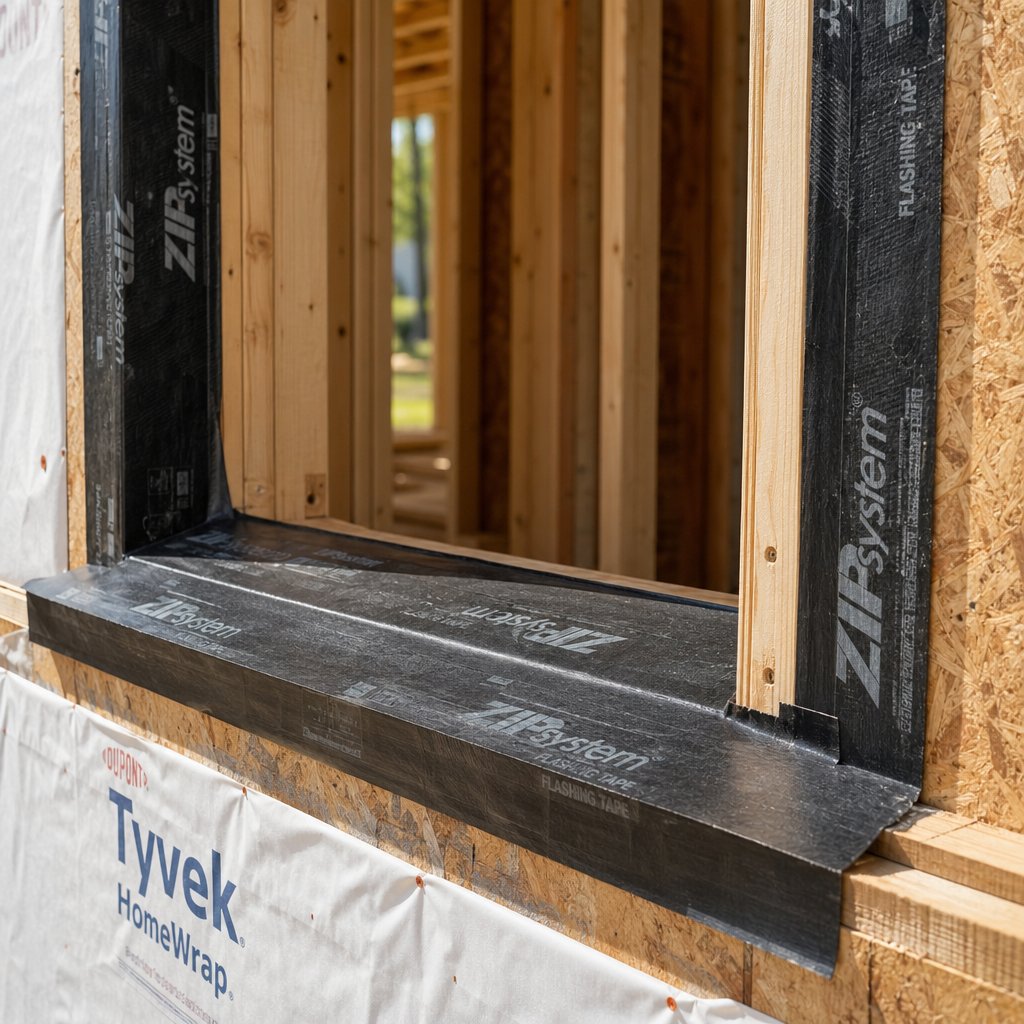
- Sill pan flashing — Installed first across the bottom of the rough opening, extending up each side and out onto the face of the sheathing. This creates a tray that catches any water reaching the lowest point of the opening.
- Jamb flashing (both sides) — Applied next, running vertically up each side of the opening. The bottom edge of each jamb strip overlaps the sill pan flashing so water running down the jambs drains onto the sill tray rather than behind it.
- Head flashing — Installed last across the top of the opening, overlapping both jamb strips. Water hitting the head drains down onto the jamb flashings, which drain onto the sill pan, which directs everything outward. The drainage chain is complete.
- Integration with the weather-resistive barrier (WRB) — The final step ties the window flashings into the house wrap that protects the rest of the wall, closing the system into a continuous drainage plane.
As VERTEX’s forensic architecture team summarizes it: “Bottom, Side, Top.” That three-word sequence captures the entire principle. If you can remember it, you’ll get the lapping direction right every time.
Integrating Flashing with the Weather-Resistive Barrier
The flashing around a window doesn’t work in isolation. It has to connect seamlessly with the WRB (house wrap) covering the rest of the wall, and the lapping rules at this junction are where many installations go wrong.
At the sill, the WRB is cut and tucked behind the sill pan flashing. This ensures that any water running down the face of the house wrap drains onto the exterior face of the sill pan, not behind it. The 2021 IRC Section R703.2 requires the WRB to provide a continuous water-resistive barrier behind the exterior cladding, and this tuck-behind detail at the sill is how continuity is maintained at the bottom of the opening.
At the jambs, the WRB can lap either behind or over the jamb flashing depending on the manufacturer’s instructions, though lapping behind is more common with mechanically attached house wraps.
At the head, the sequence reverses. The WRB flap above the window folds down over the head flashing, making it the outermost layer at the top of the opening. Water running down the wall hits the WRB first, rides over the head flashing, and never gets a chance to slip behind it. This single detail, the WRB lapping over the head flashing, is the most critical tie-in point in the entire assembly. If you’re shopping for materials at flashings home depot carries or ordering specialty products online, the quality of your materials matters far less than getting this overlap direction correct.
When the full system is assembled properly, water follows a predictable path from the top of the wall to the bottom: WRB to head flashing, head flashing to jamb flashing, jamb flashing to sill pan, and sill pan to the exterior. Every transition uses gravity and overlap to keep moisture moving outward. No sealant joints to fail, no caulk beads to crack. Just physics, working quietly behind your cladding for decades.
With the underlying logic in place, the hands-on process of applying each layer becomes far more intuitive, especially when you’re working with self-adhesive tape on a standard new-construction opening.
How to Flash a Window Step by Step
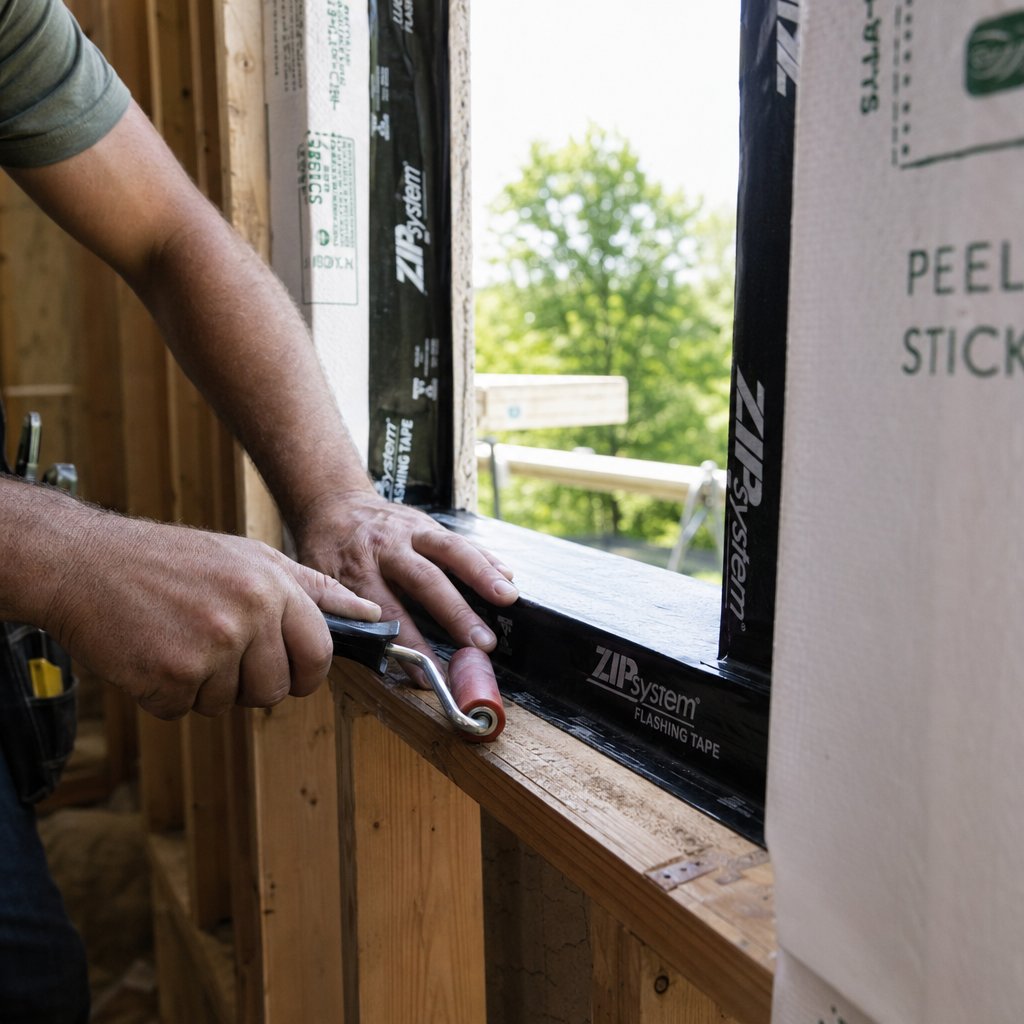
Knowing why each layer overlaps the one below it is the hard part. The actual hands-on work, applying self-adhesive flashing tape to a new-construction rough opening, is surprisingly straightforward once the logic clicks. This walkthrough covers the most common residential scenario: a nail-fin window going into a framed wall with sheathing and a weather-resistive barrier (WRB) already in place.
Preparing the Rough Opening
Proper window flashing starts before any tape comes out of the packaging. The rough opening needs to be clean, dry, and free of sawdust, loose debris, and protruding fasteners. Run your hand along the sill and jambs. Anything that prevents full contact between the tape and the sheathing will create a void where water can travel.
Some tape manufacturers require a primer coat on the sheathing surface before application, especially on OSB or bare wood substrates. Check the product data sheet. Skipping this step when it’s specified can void both the tape warranty and the window warranty.
With the surface prepped, cut the WRB covering the opening. The most common method is a modified I-cut: slice horizontally across the top and bottom of the opening, then make a single vertical cut down the center. Fold the resulting flaps inward around the jambs and staple them to the framing. At the top, cut a short diagonal slit upward from each corner of the opening at roughly 45 degrees. This creates a head flap that you’ll fold up and temporarily tape out of the way. That flap plays a critical role later.
Installing Sill Pan and Jamb Flashing Tape
The sill goes first, just as the shingle lapping principle demands. Here’s the sequence for a flashing tape install at the sill and jambs:
- Cut a strip of flashing tape long enough to span the full width of the sill plus at least 6 inches extra on each side.
- Center the tape across the sill so it covers the sill plate and extends 2 to 3 inches onto the face of the sheathing below the opening.
- Fold the extra length on each side upward, pressing the tape at least 6 inches up each jamb to form turned-up end dams.
- Press the entire surface firmly with a J-roller to eliminate air pockets and activate the adhesive bond. Pay extra attention to corners and transitions where the tape changes direction.
- For each jamb, cut a strip of tape long enough to run from the sill pan upward to the top of the opening. Apply it vertically so the bottom edge overlaps the sill tape by at least 2 inches. Roll firmly with the J-roller.
That 2-inch overlap at the sill-to-jamb transition is non-negotiable. It ensures water running down the jamb flashing drains onto the face of the sill pan rather than sneaking behind it. As Huber Engineered Woods recommends, the jamb flashings must overlap the sill flashing at the bottom to achieve a correct shingling pattern and avoid creating a leak path.
Completing the Window Head Flashing and Final Integration
The head is the last piece of flashing on windows before the WRB tie-in. Cut a strip of tape wide enough to cover the top of the opening and extend at least 1 inch past each jamb strip on both sides. Press it across the header, overlapping both jamb strips, and roll it thoroughly.
Here’s where that WRB head flap you set aside earlier comes back into play. Fold it down over the top of the head flashing tape so it becomes the outermost layer at the top of the opening. Seal the flap to the WRB above with a final strip of tape along its upper edge. This detail is the single most important overlap in the entire assembly: the WRB must always be the last layer applied at the head, ensuring water running down the wall rides over the exterior window flashing rather than behind it.
With the rough opening fully flashed, you can set the window unit, shim it plumb and level, and fasten through the nailing fins per the manufacturer’s specs. After the window is secured, apply additional strips of flashing tape over the nailing fins at the jambs and head, sealing them to the WRB. Choose a tape that’s 2 to 3 inches wider than the window trim flashing area so any fasteners driven through the trim or siding later will penetrate the self-sealing membrane.
Leave the bottom nailing fin untaped. The sill must remain open to allow any moisture that reaches the sill pan to weep outward rather than getting trapped behind a sealed edge.
The result is a weathertight envelope that follows the same gravity-driven logic from top to bottom. Every layer sheds water onto the one below it, and the only exit point is outward at the sill. That’s the complete flashing sequence for a standard new-construction opening, but the real-world picture gets more interesting when different cladding systems enter the equation.
Flashing Techniques for Different Wall Cladding Systems
The step-by-step sequence covered above works perfectly for a textbook rough opening on a sheathed wall. But here’s the catch: the cladding you install over that wall changes how flashing around windows needs to be detailed. Brick behaves nothing like vinyl. Stucco introduces drainage requirements that lap siding doesn’t. And fiber cement has its own quirks with moisture wicking. If you apply the same flashing approach to every cladding type, you’ll get it right on some walls and dangerously wrong on others.
Flashing Windows in Brick Veneer Walls
Brick veneer creates a unique challenge because the cladding itself sits on a ledge away from the sheathing, with an air cavity between the two. Water that penetrates the mortar joints collects inside that cavity and needs a clear path back out. That’s where through-wall flashing comes in.
At the window head, a through-wall flashing membrane must extend from behind the WRB on the sheathing side outward through the mortar joint in the brick. The outer edge of this membrane should project slightly past the face of the brick or terminate in a drip edge so water falls free rather than running back along the underside of the flashing. Weep holes spaced every 24 to 36 inches along this head flashing allow trapped moisture to drain from the cavity. Without them, water pools on top of the flashing and eventually finds its way inward.
The sill detail is equally critical and often more problematic. The brick ledge below the window creates a horizontal shelf, and horizontal surfaces collect water. A flat piece of tape across the sill won’t cut it here. You need a sloped sill pan with turned-up end dams on both sides and a back dam at the interior edge. This tray catches water draining down the cavity and directs it outward through weep holes at the sill course. Liquid window flashing works well for forming these sill pans because it conforms to irregular masonry surfaces and creates a seamless, watertight tray without relying on folded corners that can pull apart over time.
The same principles apply to patio door flashing in brick veneer walls, though the wider opening amplifies every detail. Longer spans of through-wall flashing need proper support to prevent sagging, and the larger sill area demands more robust end dams to contain the increased volume of water.
Window Flashing for Stucco and Fiber Cement Cladding
Stucco is one of the most unforgiving cladding systems when it comes to exterior flashing mistakes. As Walls & Ceilings notes, modern energy codes have made wall assemblies much tighter and less forgiving, which means stucco walls that lack a proper drainage plane can lose their ability to dry out entirely. The solution is a ventilated rainscreen or drainage mat installed between the stucco and the WRB, creating an air gap that allows moisture to drain and the assembly to breathe.
Flashing at window openings must integrate with this drainage plane. Casing beads or J-trim installed around the perimeter of the window create a clean termination point for the stucco, but they also create a potential entry point for water if the flashing doesn’t extend behind them. The flashing tape must lap behind these accessories so any moisture that reaches the stucco-to-window transition drains down the face of the flashing rather than wicking behind the trim and into the wall. When choosing between window flashing tape asphalt vs butyl products for stucco applications, keep in mind that acrylic-based tapes generally offer better long-term adhesion against the alkaline environment that wet stucco creates during curing.
Fiber cement siding, such as HardiePlank, follows a flashing sequence similar to standard lap siding. The shingle lapping principle still governs everything. The key difference is capillary action. Fiber cement is a porous, cementitious material that can wick moisture through tight gaps. If the space between the cladding edge and the window trim is too narrow, water can bridge that gap through capillary suction rather than draining away. Maintaining a minimum gap (typically 1/8 to 3/16 inch) between the fiber cement and any window trim, and backing that gap with properly lapped flashing, prevents this hidden moisture path. Flashing tape home depot stocks and similar retail options work fine for these details as long as you verify the adhesive chemistry is compatible with your sheathing and meets the siding manufacturer’s requirements.
Vinyl Siding and Lap Siding Considerations
Vinyl siding is the most forgiving cladding for moisture management because it functions as a ventilated rain screen by design. The panels hang loosely on the wall, allowing air to circulate behind them and moisture to drain freely. That built-in forgiveness, however, doesn’t eliminate the need for proper flashing at the window opening itself. The cladding may breathe, but the rough opening behind it does not.
The biggest trap with vinyl siding is J-channel. This U-shaped trim piece wraps around the window perimeter to receive the cut edges of the siding panels, and it can quietly collect and hold water if the flashing underneath isn’t detailed correctly. Water runs down the face of the siding, hits the J-channel, and follows it horizontally along the bottom of the window. If the J-channel sits directly against the WRB with no flashing beneath it, that pooled water soaks straight into the sheathing.
The fix is simple: make sure the exterior flashing at the sill and jambs is fully in place before the J-channel goes on. The channel should sit on top of the flashing, not replace it. Some installers also cut small drainage slots in the bottom of the J-channel to prevent water from pooling, though this is a backup measure, not a substitute for proper flashing.
For wood lap siding, the approach mirrors fiber cement with one addition: wood expands and contracts more aggressively with moisture changes, so the flashing bond at the window perimeter needs to accommodate that movement without breaking its seal. Acrylic-based tapes handle this better than butyl products because their adhesion strengthens over time rather than becoming brittle.
Quick Reference: Key Differences by Cladding Type
- Brick veneer: Requires through-wall flashing with weep holes at head and sill. Sloped sill pan with end dams is essential to prevent pooling on the brick ledge.
- Stucco: Flashing must integrate with a drainage mat or rainscreen behind the stucco. Tape extends behind casing beads and J-trim to prevent water entry at termination points.
- Fiber cement: Follows standard lap siding sequence but demands careful gap management between cladding and trim to prevent capillary wicking.
- Vinyl siding: J-channel must sit over flashing, not replace it. Drainage slots in the bottom of J-channel provide a secondary escape path for trapped water.
- Wood lap siding: Acrylic-based flashing tapes are preferred to accommodate greater expansion and contraction cycles in the wood.
Each cladding system introduces its own wrinkles, but the underlying water management logic stays the same: overlap upper layers over lower layers, slope surfaces toward the exterior, and never trap water without giving it a way out. The real complexity shows up when you factor in whether you’re working on a brand-new build with full access to the rough opening or retrofitting flashing on an existing window that’s already boxed in by finished walls.
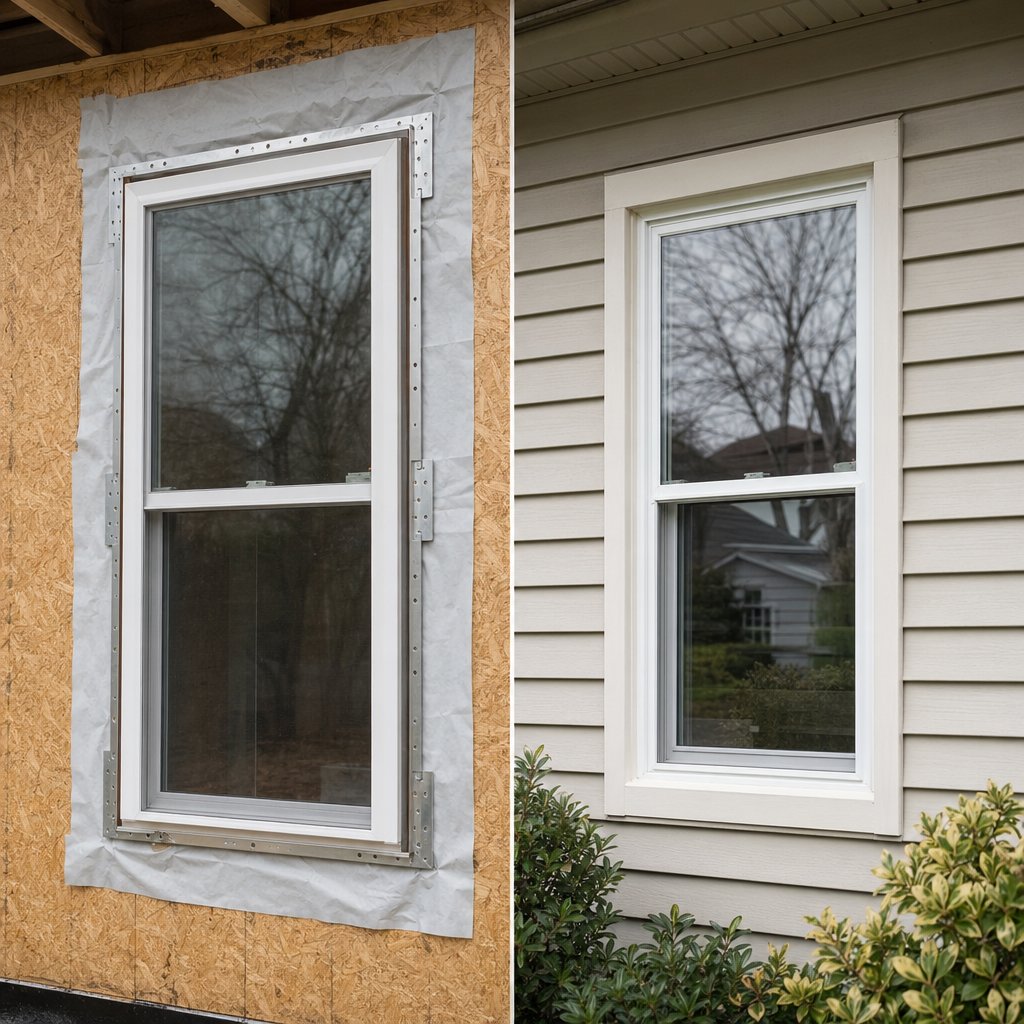
New Construction vs Replacement Window Flashing
Full access to bare sheathing, exposed framing, and an untouched weather-resistive barrier makes new construction the easier scenario by a wide margin. But most window projects aren’t new builds. Millions of homeowners replace aging windows every year, and the flashing challenges they face are fundamentally different. The rough opening is already buried behind finished walls, the original flashing may be deteriorated or missing entirely, and there’s no clean slate to work from. Understanding how to flash a window in both situations, and where the techniques diverge, is what separates a watertight result from a slow-motion leak.
New Construction Flashing with Nailing Fins
New construction windows come with integral nailing fins, flat flanges that extend outward from the window frame on all four sides. These fins get fastened directly to the sheathing and then sealed to the WRB with flashing tape, creating a straightforward tie-in between the window unit and the wall’s drainage plane.
The process follows the same shingle lapping sequence covered earlier: sill pan first, then jamb flashing overlapping the sill, then head flashing overlapping the jambs, and finally the WRB head flap folding down over everything at the top. Because you have full access to the rough opening and wall assembly, every layer can be applied cleanly, pressed firmly with a J-roller, and inspected before the next one goes on. Products like zip flash tape and acrylic-based membranes bond readily to fresh sheathing surfaces, and there are no existing finishes or trim pieces in the way.
The key advantage here is control. You choose the materials, you set the sequence, and you verify each overlap before it gets buried. If something looks wrong, you fix it on the spot. That luxury disappears the moment you shift to a retrofit scenario.
Retrofit Flashing for Replacement Windows
Replacement windows, sometimes called insert or pocket windows, install inside the existing window frame rather than replacing the entire unit and frame down to the rough opening. The original frame stays in place, and the new window slides into it. This approach is faster, less disruptive, and avoids tearing into exterior cladding and interior trim. The tradeoff? You’re trusting that the original flashing at the window is still intact and functional, and that’s a gamble.
Before setting a replacement unit, inspect the existing flashing condition as thoroughly as access allows. From the exterior, look for cracked or separated caulk between the old frame and the cladding, staining or discoloration on the siding below the window, and any visible gaps where the frame meets the wall. From the interior, check for soft spots in the drywall near the sill and jambs, musty odors, or paint that’s bubbling or peeling. These are signs that the original flashing has already failed.
If the existing flashing appears sound, with no evidence of moisture damage and the WRB integration still intact, you can preserve it and proceed with the replacement. Apply a continuous bead of sealant to the interior face of the old frame where the new unit will bear against it, set the window, shim it plumb and level, and fasten per the manufacturer’s instructions. Then seal the exterior perimeter with backer rod and a high-quality polyurethane or silicone sealant. This exterior seal is critical because, unlike new construction, you typically can’t wrap flashing tape around the replacement unit’s frame where it meets the existing opening.
When the inspection reveals damage, deteriorated flashing, rotted framing, or mold in the wall cavity, a simple insert replacement won’t solve the problem. At that point, the old window and frame need to come out entirely so the rough opening can be exposed, repaired, and reflashed from scratch. Research published by the IIBEC highlights that proper flashing repairs on installed window systems can require complete window system removal, and that water intrusion below windows may go undetected for extended periods, resulting in substantial damage to wall components and interior finishes. Trying to patch over hidden rot with new caulk and a fresh window unit just buries the problem deeper.
For retrofit projects where the frame is being removed but the rough opening substrate is concrete or masonry, there’s more flexibility in how to apply flashing. A fluid-applied waterproofing membrane can be brushed directly onto the concrete sill and jambs to create a fully bonded, seamless sill pan. The same IIBEC case studies document successful use of this technique on both a 1970s concrete municipal building in Oregon and a 1929 historic structure in Alaska, where fluid-applied membranes formed watertight sill flashing systems that integrated with new aluminium-framed replacement windows. Mock-ups performed on site helped verify performance before full-scale installation, a practice worth adopting on any retrofit project where existing conditions are unpredictable.
Choosing the Right Window System for Long-Term Performance
The frame material you choose for your new or replacement window has a direct impact on how well the flashing performs over time. Wood frames expand and contract with moisture changes, which can stress adhesive bonds and open gaps at flashing seals. Vinyl frames are dimensionally stable in moderate climates but can warp or distort under sustained heat, pulling away from flashing tape at the nailing fin. Fiberglass offers good stability but comes at a higher price point.
Aluminium frames stand out in flashing applications for a practical reason: dimensional stability. Aluminium doesn’t absorb moisture, so it won’t swell or shrink with humidity cycles. It resists the thermal expansion and contraction swings that crack sealant joints and peel tape edges over repeated seasons. And its smooth, non-porous surface provides an ideal bonding substrate for both metal and tape flashing products, which means fewer adhesion failures at the frame-to-flashing interface where head flashing and jamb details meet the window unit.
For homeowners, renovators, and builders looking at aluminium as a frame material, MEICHEN’s aluminium windows collection offers energy-efficient, Australian-standard-compliant systems designed for both new builds and renovation projects. Their consistent frame dimensions and integrated drainage channels simplify flashing integration, whether you’re taping nailing fins on a new-construction opening or sealing a retrofit unit into an existing frame. That predictability matters. When the window frame behaves consistently over time, the flashing details you worked so carefully to get right stay intact rather than slowly pulling apart.
Regardless of frame material, the principle holds: a well-engineered window system with tight manufacturing tolerances and proper weep drainage makes flashing installation more predictable and reduces the risk of long-term failure. Choosing a quality window isn’t just about energy ratings and aesthetics. It’s about giving your flashing the stable foundation it needs to do its job for decades.
Even with the right materials and a solid installation, though, mistakes happen. Some of the most damaging flashing errors are subtle enough that experienced builders miss them, and the building science behind each failure explains exactly why a small oversight can lead to widespread rot inside the wall.
Common Window Flashing Mistakes and Why They Fail
A flashing detail can look perfectly fine from the outside and still be funneling water into the wall cavity. That’s what makes these mistakes so dangerous: they’re invisible once the cladding goes on, and the damage they cause stays hidden for months or years before symptoms surface. The three errors below account for the vast majority of window flashing installation failures, and each one traces back to a specific violation of building science principles.
Reverse Lapping and Incorrect Overlap Direction
This is the single most common and most damaging flashing mistake in residential construction. Building scientist Joseph Lstiburek of Building Science Corporation calls reverse lapping the most common residential construction defect he encounters, noting that “despite all the education and training in the world it still happens.” The error is deceptively simple: an upper layer of flashing or WRB gets tucked behind a lower layer instead of overlapping it.
Imagine tucking the head flashing behind the jamb flashing instead of lapping it over the top. Water running down the wall hits that reversed seam and follows it inward like a gutter, draining directly into the rough opening rather than riding over the surface below. A single reversed lap, even just a few inches of misaligned tape at one corner, can compromise the entire window flashing detail because it breaks the continuous drainage chain that the shingle lapping principle depends on.
The fix sounds obvious: always overlap upper layers over lower layers. Yet the mistake persists because the correct sequence feels counterintuitive during installation. You’re working from the bottom up, and it’s natural to want to tuck each new piece under the one already in place to create a “tighter” seal. That instinct is exactly backward. Every layer you add should shed water onto the face of the layer below it, not slide behind it. If you catch a reverse lap before the cladding goes on, a strip of window waterproofing tape sealed over the misaligned joint can salvage the detail, but only if the tape fully bridges the gap and is terminated properly at its upper edge.
Skipping the Sill Pan or Using Flat Sill Flashing
The sill is where the most water accumulates and where failures cause the most damage. Water doesn’t just pass through the sill area; it pools there. Every drop that runs down the jamb flashing, every bit of condensation that forms on the window frame, and every splash of wind-driven rain that hits the sill plate all converge at the bottom of the opening. A flat strip of tape across the sill does nothing to contain that water or direct it outward.
A proper window sill flashing functions as a pan, not a patch. It has three critical features: a sloped surface that angles water toward the exterior, turned-up end dams on both sides that prevent water from spilling off the edges and into the wall cavity, and a back dam at the interior edge that stops water from migrating inward past the window frame. As JLC reports, improvised sill pans made from flashing tape lack the proper slope, have no back dam, and are easily damaged when the window unit is slid into place during installation.
Without those dams and that slope, water sits on the flat tape surface until it finds a seam, a fastener hole, or a gap at the corner. Then it drains straight down into the subfloor or wall framing below. Because the sill is a horizontal surface rather than a vertical one, gravity doesn’t help clear the water the way it does on the jambs. The water just sits there, soaking into the sheathing and framing over time. This is why sill rot is far more common than jamb or head rot in failed window assemblies.
Poor Surface Preparation and Adhesion Failures
You can get the sequence perfect, use the best flashing for windows on the market, and still end up with a failure if the tape doesn’t actually stick. Adhesion is where building science meets chemistry, and the chemistry is unforgiving.
Lstiburek puts it bluntly: “there is no way to stick stuff to muddy, dirty, cold, wet and frozen surfaces.” That statement applies to every adhesive technology available, whether butyl, acrylic, or asphalt-based. Dust on the sheathing creates a weak boundary layer between the adhesive and the substrate. Moisture prevents the adhesive from wetting out into the microscopic pores of the surface. Cold temperatures stiffen the adhesive so it can’t conform and bond. Engineered Materials Inc. recommends applying pressure-sensitive adhesive tapes in conditions between 59-77 degrees F (15-25 degrees C) for optimal bonding, and most flashing tape manufacturers set a minimum application temperature of 40 degrees F (4 degrees C). Below that threshold, the tape may appear to stick initially but will peel away over weeks or months as the adhesive fails to achieve full bond strength.
Even in ideal temperatures, firm pressure is essential. A strip of window corner flashing tape laid loosely into a 90-degree transition will trap air pockets at the bend, and those voids become channels for water migration. A J-roller pressed firmly along every inch of tape, especially at corners, direction changes, and overlaps, eliminates those air pockets and drives the adhesive into full contact with the substrate. Skipping the roller is one of the most common shortcuts on job sites, and it turns a good product into a ticking clock.
Beyond these three major errors, several other mistakes show up repeatedly in failed assemblies:
- Over-reliance on caulk instead of flashing: Sealant is a complement to flashing, not a replacement. Caulk joints crack, shrink, and lose adhesion over time, especially at joints that experience thermal movement. Flashing provides a mechanical drainage path that doesn’t depend on a sealant bond staying intact.
- Puncturing flashing with fasteners: Every nail or screw driven through a flashing membrane creates a potential leak point. Fasteners should penetrate through the nailing fin area where they’ll be covered by the next layer of tape, not through the field of the sill pan or jamb flashing.
- Leaving gaps at corners: The transition from sill to jamb is the most leak-prone point in the entire opening. If the tape doesn’t wrap continuously around this corner with full adhesion, water finds the gap and enters the wall. Liquid-applied products or pre-formed corner pieces handle this transition more reliably than folded tape.
- Failing to integrate flashing with the WRB: Flashing that stops at the edge of the rough opening without tying into the house wrap leaves a gap in the drainage plane. Water running down the WRB hits that gap and drains behind the flashing rather than over it.
Every one of these mistakes shares a common thread: they create a path for water to move inward rather than outward. The damage doesn’t show up immediately. It builds slowly behind finished walls, softening framing, feeding mold colonies, and degrading insulation until the symptoms finally break through to the interior. Recognizing those symptoms early, before the rot spreads beyond a single opening, can mean the difference between a targeted repair and a full wall teardown.
Signs of Flashing Failure and How to Diagnose Problems
The tricky thing about a flashing window failure is that the evidence rarely shows up where the problem actually started. Water that enters at a head flashing gap on the second floor can travel along a stud, soak into a sill plate, and surface as a stain on a first-floor ceiling ten feet from the nearest window. By the time you notice something wrong, the moisture has had months or even years to work its way through framing members, sheathing, and insulation. Catching the signs early, and knowing where to look, is the fastest way to limit the damage.
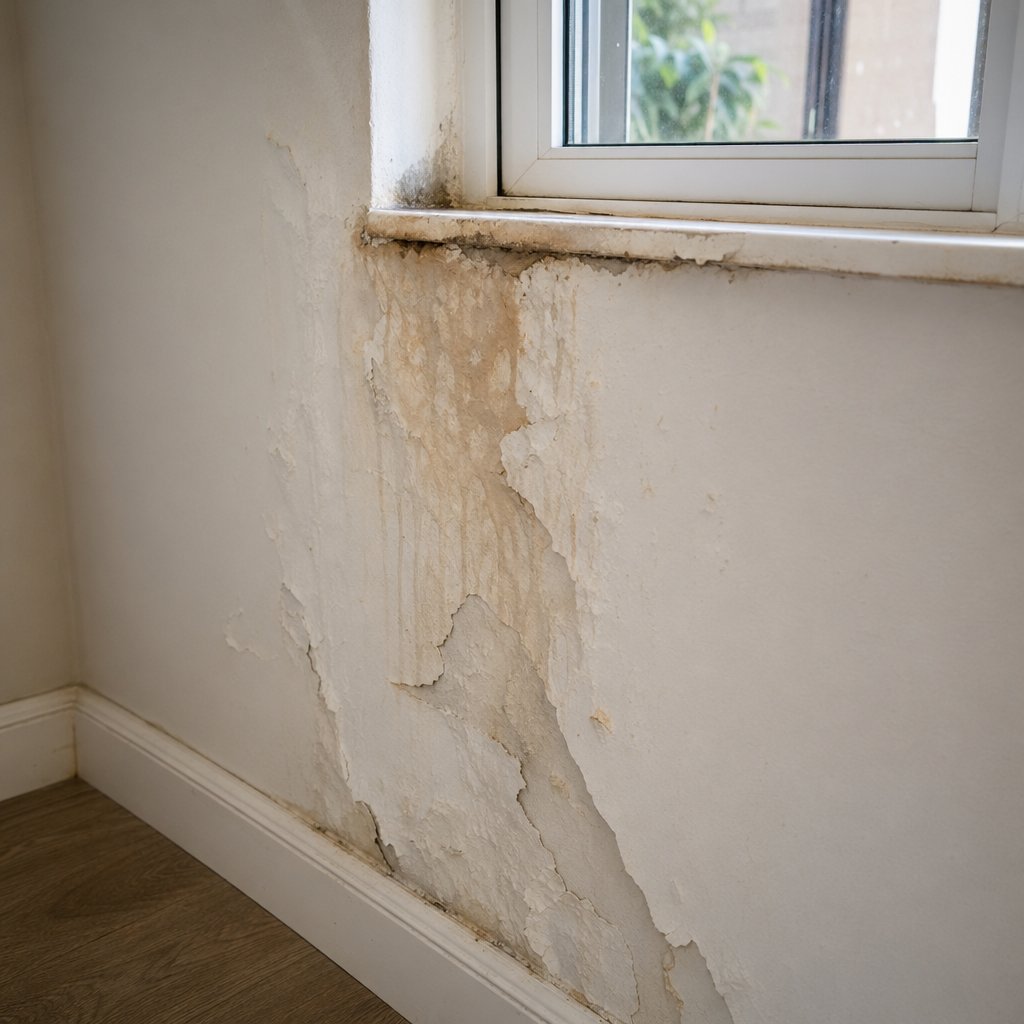
Visual Signs of Window Flashing Failure
Some indicators are obvious. Others are easy to dismiss as cosmetic issues or normal wear. The Building America Solution Center notes that missing or failed flashing can cause water infiltration that leads to major hidden damage inside the wall, and the visible symptoms often appear long after the leak began. Here’s what to watch for, both inside and outside the home:
- Water stains on interior walls or ceilings below or beside windows, especially stains that grow after rain events.
- Peeling, bubbling, or cracking paint on interior window sills or on the wall directly beneath a window. When damp wood or drywall dries in the sun, the escaping moisture vapor lifts paint right off the surface.
- Soft or spongy drywall near window openings. Press gently with your thumb. If the surface gives, moisture has been soaking into the gypsum board from behind.
- Musty or mildew odors near windows, indicating hidden mold growth inside the wall cavity.
- Exterior caulk that has cracked, separated, or pulled away from the window frame or cladding. Failed sealant joints are both a symptom and a cause: they signal movement at the joint and allow water a direct path inward.
- Rotting, warping, or discolored exterior trim around windows. A screwdriver test works well here. Push the tip into the wood trim. Firm resistance means the wood is sound. If the screwdriver sinks in easily, dry rot has already set in.
- Peeling or blistering paint on exterior siding below windows. As the PNNL research team documents, water that gets behind the paint due to lack of flashing causes bubbling and blistering on lap siding when the trapped moisture tries to escape.
- Carpenter ants inside the home. These insects seek out damp, softened wood for nesting. Their presence near windows can point to a hidden moisture problem in the wall.
Keep in mind that not every stain or paint blister traces back to flashing. Plumbing leaks, condensation from poor ventilation, and foundation drainage issues can produce similar symptoms. The location of the damage relative to windows and exterior doors is the strongest clue. If the problem clusters around openings, flashing is the most likely culprit.
How to Inspect Your Window Flashing
You don’t need to tear into walls to get a preliminary read on your flashing condition. A careful exterior inspection reveals more than most homeowners expect.
Start at the top of each window. Look for a visible metal head flashing strip, sometimes called a drip cap, along the upper edge of the trim. It should angle slightly downward and outward, projecting past the face of the trim so water drips free rather than rolling back against the frame. If there’s no drip cap at all, that’s a red flag. The PNNL inspection guide notes that the metal head flashing is often the only flashing layer visible on an installed window, and its absence suggests the rest of the hidden layers may be missing too.
Move down to the sill area. On masonry walls, look for white powdery deposits (efflorescence) on the brick or stone below the window. Efflorescence forms when water migrates through masonry and deposits dissolved salts on the surface as it evaporates. It’s a reliable indicator that water is moving through the wall assembly near the sill flashing zone. On wood or fiber cement siding, look for staining, algae growth, or paint failure concentrated below the window corners, where failed sill flashing typically allows water to escape.
Check the perimeter seal between the window frame and the surrounding cladding. Run your finger along the joint. Gaps, cracks, or sections where the sealant has pulled away from either surface indicate movement and potential water entry. The same inspection applies to exterior door flashing details: examine the base of door trim for rot or paint failure, which often signals water entering from above due to missing or failed head flashing at the door opening.
From inside the home, look for daylight around the window frame edges or feel for drafts on a windy day. Air leaks and water leaks follow the same paths. If air is getting through, water can too.
For a more definitive assessment without destructive investigation, a professional moisture meter test can detect elevated moisture levels inside wall cavities around windows and doors. Pin-type meters measure actual moisture content by gauging electrical resistance, while pinless meters use radio frequencies to scan for dampness without penetrating the surface. A qualified inspector using both types can map the extent of hidden moisture and pinpoint whether the source is at the sill, jamb, or head, all without cutting into drywall.
Repair vs Full Replacement Decision Framework
Once you’ve identified a problem, the next question is whether you can patch it or need to strip everything back and start over. The answer depends on how far the damage has spread and whether the underlying drainage plane is still intact.
Minor repairs make sense in limited scenarios: adding a missing drip cap to a window that has intact sill and jamb flashing, touching up a cracked sealant joint where the flashing beneath is still bonded and functional, or applying the best window flashing tape over a small section of nailing fin where the original tape has lifted but the sheathing underneath is dry and sound. These are targeted fixes for isolated weak points, not systemic failures.
Full removal and reinstallation becomes necessary when any of these conditions exist:
- Rot or mold is present in the rough opening framing or sheathing.
- The WRB behind the flashing is torn, deteriorated, or improperly lapped.
- Multiple failure points are found around the same opening, such as failed sill flashing combined with reverse-lapped jamb tape.
- Moisture meter readings show elevated levels across a wide area of the wall cavity, not just at one localized spot.
- The window frame itself has shifted, warped, or separated from the rough opening, breaking the flashing seal.
Here’s the critical principle: if the WRB behind the flashing is compromised, a surface repair will not solve the problem. The WRB is the last line of defense between the flashing system and the wall structure. Patching the flashing while leaving a torn or deteriorated WRB in place is like replacing a shingle on a roof with rotted decking underneath. The new shingle looks fine, but water still gets through.
When in doubt, err on the side of opening up the wall for a full inspection. The cost of removing a section of cladding and trim to assess the damage is a fraction of what you’ll spend remediating widespread rot and mold that went undetected because the repair stayed on the surface. Knowing how to window flashing diagnostics properly, and being honest about what you find, saves far more money than it costs.
That honest assessment also leads to a practical fork in the road: some of these repairs are well within reach for a capable homeowner, while others genuinely require professional expertise and equipment to get right.
When to DIY and When to Call a Professional
That fork in the road between a weekend project and a phone call to a contractor isn’t always obvious. Some flashing jobs are genuinely approachable for a handy homeowner with the right tools and a solid grasp of the water management principles covered throughout this guide. Others involve enough complexity, risk, or hidden variables that even experienced DIYers are better off stepping back. The key is knowing which category your project falls into before you commit.
When DIY Window Flashing Makes Sense
A competent homeowner can handle window flashing tape installation confidently in a few specific scenarios. Replacing a single window in a standard wood-frame wall with lap siding is the most common one. You have one opening to focus on, the cladding is straightforward to remove and reinstall, and the shingle lapping sequence is manageable when you’re not juggling multiple openings at once.
Other reasonable DIY tasks include applying additional flashing tape to an existing installation where a small section has lifted or failed, and adding a missing metal drip cap to a window head that never had one. These are targeted fixes with limited scope, and the consequences of a minor imperfection are contained to a single detail rather than an entire wall assembly.
The critical factor isn’t your skill with a tape measure or a J-roller. It’s whether you genuinely understand why each layer goes where it does. Following a step-by-step checklist mechanically can produce a result that looks correct but still fails because a subtle overlap was reversed or a corner wasn’t fully bonded. If you’ve read through the water management principles and installation sequence in this article and the logic makes sense to you, not just the steps, you’re in a strong position to tackle a straightforward project. If any part of the lapping logic still feels fuzzy, that’s a signal to either study further or bring in someone who does this daily.
Budget-conscious homeowners sometimes source materials from retailers like flashing at home depot or local building supply stores, which stock a solid range of tapes, metal drip caps, and liquid-applied products suitable for residential work. Just verify that the products you choose are compatible with your sheathing, WRB, and window manufacturer’s requirements before you start.
Scenarios That Warrant Professional Installation
Some projects carry enough risk or complexity that the cost of professional installation is a bargain compared to the potential cost of getting it wrong. The Fenestration and Glazing Industry Alliance recommends professional installation for replacement windows specifically to avoid performance issues that can develop down the road, and that guidance applies even more strongly to the flashing details that protect the wall around those windows.
Strongly consider hiring a professional when your project involves any of the following:
- Multiple windows being replaced simultaneously. More openings mean more chances for a sequencing error, and the cumulative risk of moisture damage across several failed details is far greater than at a single window.
- Brick veneer or stucco cladding. Through-wall flashing, weep hole integration, and drainage plane coordination require specialized knowledge and experience that goes well beyond standard tape-and-drip-cap work.
- Evidence of existing water damage or rot in the rough opening. If the framing is soft, the sheathing is delaminated, or mould flashing and mold remediation are needed before new flashing can go on, the scope has moved beyond a flashing project into structural repair territory.
- Multi-story installations requiring scaffolding or ladder work at height. Safety risk escalates quickly above the first floor, and working overhead with adhesive tapes and sealants while maintaining proper overlap direction is significantly harder than working at ground level.
- Projects where building permits and code inspections are required. A failed inspection means tearing off finished work and redoing it, which costs more than hiring a pro to get it right the first time. Inspectors check window header flashing detail, sill pan construction, and WRB integration closely because these are known failure points.
- Retrofit situations where the existing flashing condition is unknown. If you can’t see what’s behind the cladding and don’t have a moisture meter to assess hidden conditions, a professional can diagnose the situation before committing to an approach.
The math here is straightforward. Professional flashing installation on a standard residential window typically runs $300 to $800 per window including materials and labor. Compare that to the cost of remediating water damage from a failed installation. Data from the Insurance Information Institute puts the average water damage and freezing insurance claim at $12,514, and moderate damage involving water extraction, mold removal, and floor or ceiling repair ranges from $3,500 to $7,500. Severe cases with structural involvement can exceed $15,000. Spending a few hundred dollars on professional window head flashings and sill pan installation is one of the cheapest forms of insurance a homeowner can buy.
Choosing Quality Windows That Simplify Flashing
Whether you’re handling the work yourself or hiring a contractor, the window system you choose has a direct impact on how reliably the flashing performs over time. A window with consistent frame dimensions, tight manufacturing tolerances, and integrated drainage channels gives the flashing a stable, predictable surface to bond to. Inconsistent frames with warped edges or poorly formed nailing fins make every tape application and sealant joint harder to execute and more likely to fail.
Aluminium-framed windows are particularly well suited to flashing integration. The frame material doesn’t absorb moisture, swell, or shrink, so the bond between the flashing and the frame stays intact through seasonal temperature and humidity cycles. That dimensional stability matters whether you’re using moist stop flashing products, self-adhesive tapes, or liquid-applied membranes. For homeowners, renovators, builders, and developers seeking energy-efficient systems that comply with Australian standards, MEICHEN’s aluminium windows collection is designed to integrate cleanly with standard flashing methods on both new builds and renovation projects. Their consistent frame profiles and proper weep drainage reduce the variables that lead to flashing failures, making the installation more predictable for professionals and skilled DIYers alike.
Ultimately, the goal isn’t to choose between doing it yourself and calling a pro. It’s to match the approach to the project. A single window swap in a simple wall assembly with no hidden damage? That’s a satisfying weekend project for someone who understands the principles. A multi-window retrofit in a brick veneer home with signs of moisture intrusion? That’s a job for a crew with experience, equipment, and insurance. The flashing itself doesn’t care who installs it. It only cares that every layer laps correctly, every surface is clean and dry, and every overlap follows gravity downward and outward. Get those details right, and the water stays where it belongs: outside your walls.
Window Flashing FAQs
1. What happens if window flashing is missing or installed incorrectly?
Missing or incorrectly installed window flashing allows water to enter wall cavities, leading to structural rot in framing and sheathing, mold growth, insulation degradation, and costly remediation. The damage often stays hidden for months or years because water travels along framing members before visible symptoms like paint bubbling or musty odors appear. A single reversed lap or missing sill pan can compromise an entire wall section, with average water damage insurance claims reaching over $12,000 according to industry data.
2. What is the correct order for installing window flashing?
Window flashing must be installed from the bottom up following the shingle lapping principle: sill pan flashing goes on first, then jamb flashing on both sides overlapping the sill by at least 2 inches, then head flashing overlapping both jambs. Finally, the weather-resistive barrier (house wrap) at the head folds down over the head flashing as the outermost layer. This sequence ensures gravity carries water down and outward at every transition, never allowing it to flow behind a lower layer.
3. Can I install window flashing myself or do I need a professional?
DIY window flashing is reasonable for single window replacements in standard wood-frame walls with lap siding, adding a missing drip cap, or repairing small sections of lifted tape. However, professional installation is strongly recommended for brick veneer or stucco walls, multi-window projects, situations with existing water damage or rot, multi-story work requiring scaffolding, and projects requiring building permits. Professional flashing typically costs $300 to $800 per window, far less than the $3,500 to $15,000 cost of remediating water damage from a failed installation.
4. What is the difference between butyl and acrylic flashing tape for windows?
Butyl-based flashing tapes offer aggressive initial tack and work well on slightly imperfect surfaces, but they can become fluid in high heat and brittle in cold over time. Acrylic-based tapes develop a stronger bond over time as the adhesive cures, offer superior UV resistance, and maintain stability across a broader temperature range. Acrylic tapes require clean, dry surfaces during application and cost more upfront, but they are increasingly preferred by building envelope professionals for long-term performance behind cladding where the tape must last 20-plus years.
5. How do I know if my existing window flashing has failed?
Key warning signs include water stains on interior walls below or beside windows, peeling or bubbling paint on interior sills, soft or spongy drywall near openings, musty odors indicating hidden mold, cracked exterior caulk, and rotting exterior trim. From outside, check for a visible metal drip cap at the window head, efflorescence on masonry below windows, and gaps between the frame and cladding. A professional moisture meter test can detect hidden dampness in wall cavities without cutting into drywall, helping pinpoint whether the failure is at the sill, jamb, or head.
More Window & Door Guides