Step 1 – Confirm You Actually Have a Leak and Not Condensation
You spot water on a window sill one morning and immediately assume the worst. Before you reach for the sealant gun, pause. The most common misdiagnosis Australian homeowners make is confusing condensation with an actual window leak. These two problems look similar at a glance, but they demand completely different responses.
Aluminium is a highly conductive metal. On cold mornings, the interior surface of an aluminium frame drops in temperature faster than timber or uPVC alternatives. When warm, humid indoor air contacts that cooler surface, moisture condenses into droplets that pool on sills. This is a physics issue, not a structural failure. It happens in still, humid conditions regardless of the weather outside, and it typically clears once ventilation improves or temperatures rise.
A genuine window leak behaves differently. If my window is leaking water inside, it will correlate directly with rainfall and wind direction. The water appears during or shortly after a storm, often in the same spot each time. Wall staining, dampness that lingers for hours after rain stops, or water in window tracks that won’t dry out are all red flags pointing to actual ingress rather than condensation.
Condensation on Aluminium Frames vs Real Water Ingress
Timing is your clearest diagnostic tool. Condensation shows up on calm, cold mornings when humidity is high indoors. A window leaking from a seal failure or flashing issue will only produce moisture when rain hits the building, particularly during wind-driven storms from a specific direction. If water appears on a dry, still day, condensation is almost certainly the culprit.
Quick Self-Test to Confirm a Leak
Dry the suspect area completely with a towel. Apply strips of painter’s tape along the interior joints where the frame meets the wall and where the glazing bead meets the glass. Then have someone run a garden hose on the exterior of the window to simulate driving rain. Start low, then work upward. If the tape gets wet from behind, you have a confirmed window leak that needs attention.
Here are the telltale signs that separate a genuine leak from harmless condensation:
- Water appears only during or immediately after rainfall
- Moisture is concentrated at frame joints, corners, or the head of the window rather than evenly across the glass
- Staining or paint bubbling on the wall surrounding the frame
- Dampness persists for hours after the storm passes
- Water on window tracks does not dry within a day, even with ventilation
- Musty smell or early mould growth near the frame edges
If condensation is your only issue, improving ventilation and managing indoor humidity will solve it. But if your self-test confirms water ingress, the next step is understanding exactly why aluminium frames develop leaks at specific points over time.
Step 2 – Understand Why Aluminium Windows Leak at Specific Points
Aluminium frames are durable, corrosion-resistant, and structurally strong. So why do they eventually spring leaks? The answer lies in how the material interacts with temperature, sunlight, and the other metals fastened to it. Understanding these mechanisms tells you where window leaks originate and, more importantly, where to direct your repair effort.
Thermal Expansion and Seal Fatigue
Aluminium expands and contracts with temperature changes more aggressively than timber or uPVC. On a hot Australian summer day, a 2-metre aluminium frame can grow by over a millimetre in length. That sounds trivial until you consider it happening daily across seasons for years. Each expansion-contraction cycle flexes the sealant joints, and over time, those joints fatigue. Silicone stretches a little further with each cycle until it pulls away from the substrate or develops hairline cracks. Site observations at extreme temperatures confirm that poorly designed expansion allowances cause gaskets to harden, shrink, and lose their seal under sustained heat. In Australian climates with wide diurnal temperature swings, this thermal cycling is one of the primary reasons you end up with leaking windows sooner than expected.
UV radiation compounds the problem. Rubber gaskets and silicone beads pressed against aluminium profiles are exposed to intense Australian sunlight year-round. UV breaks down the polymer chains in these materials, turning supple rubber brittle and causing silicone to crack and peel. North-facing windows cop the worst of it and tend to show seal failure years before their south-facing counterparts.
The third aluminium-specific cause is galvanic corrosion. When dissimilar metals sit in contact with moisture between them, an electrochemical reaction occurs. Carbon steel fixings installed into aluminium frames are a common culprit. The reaction pits the aluminium surface around the fastener, creating rough, uneven areas where seals no longer sit flush. In coastal environments, salt air accelerates this process dramatically. Industry research into fastener corrosion shows that using austenitic stainless steel fasteners eliminates this risk, but many older windows were assembled with cheaper carbon steel screws that degrade over time. If you notice brown water leaking from window corners or around hardware attachment points, galvanic corrosion is a likely cause—the rusty discharge comes from deteriorating steel fixings reacting against the aluminium frame.
Corner Joints, Gasket Channels, and Weep Hole Anatomy
Certain structural points on an aluminium window are inherently more vulnerable than flat sections of frame. Corner mitre joints, where two frame profiles meet at 45 degrees, rely on crimping and sealant to remain watertight. Thermal movement and vibration loosen these joints over time. The glazing bead channel—the groove where glass sits within the frame—depends on a continuous rubber gasket for its seal. Any section of that gasket that hardens or compresses unevenly creates a path for water. Finally, the sub-sill junction where the bottom of the window frame meets the wall opening is subject to standing water and often receives inadequate flashing during original installation.
A small amount of water inside the bottom track of your aluminium window is normal. The track is engineered as a drainage channel—water enters, collects briefly, and weeps to the exterior through purpose-built slots. This is part of the system working correctly, not a sign of leaky windows. Only worry when water overflows the track into your room or fails to drain at all.
How Window Age Predicts Where Leaks Start
Window age offers a reliable clue about which component has likely failed. Windows under 10 years old that develop leaks almost always have a gasket problem—rubber that was slightly underspec or exposed to unusually harsh UV has degraded ahead of schedule. The frame joints and flashing on newer windows are typically still sound. For windows leaking after 15 to 20 years, the failure pattern shifts. Sealant at corner joints will have endured thousands of thermal cycles and is often cracked or detached. Flashing materials above the frame may have corroded or separated from the cladding. Older windows may also show brown water leaking from window fixings where galvanic corrosion has been quietly working for a decade or more.
Knowing which failure mode matches your window’s age narrows down the inspection. Rather than checking every possible point, you can focus on the components most statistically likely to have failed—which is exactly what the next step walks you through.
Step 3 – Locate the Exact Source of the Leak
A leaking window frame can drive water into walls, skirtings, and subfloor cavities if the entry point goes unidentified. Rather than guessing and sealing everything in sight, a methodical inspection from the most statistically common failure point to the least common saves time and materials. The best moment to do this is during or immediately after rain, when active water paths are visible and you can trace them in real time.
Follow this numbered sequence as a walk-around checklist. Each step targets a specific component, and at each location you are looking for the contrast between a healthy part and a failed one.
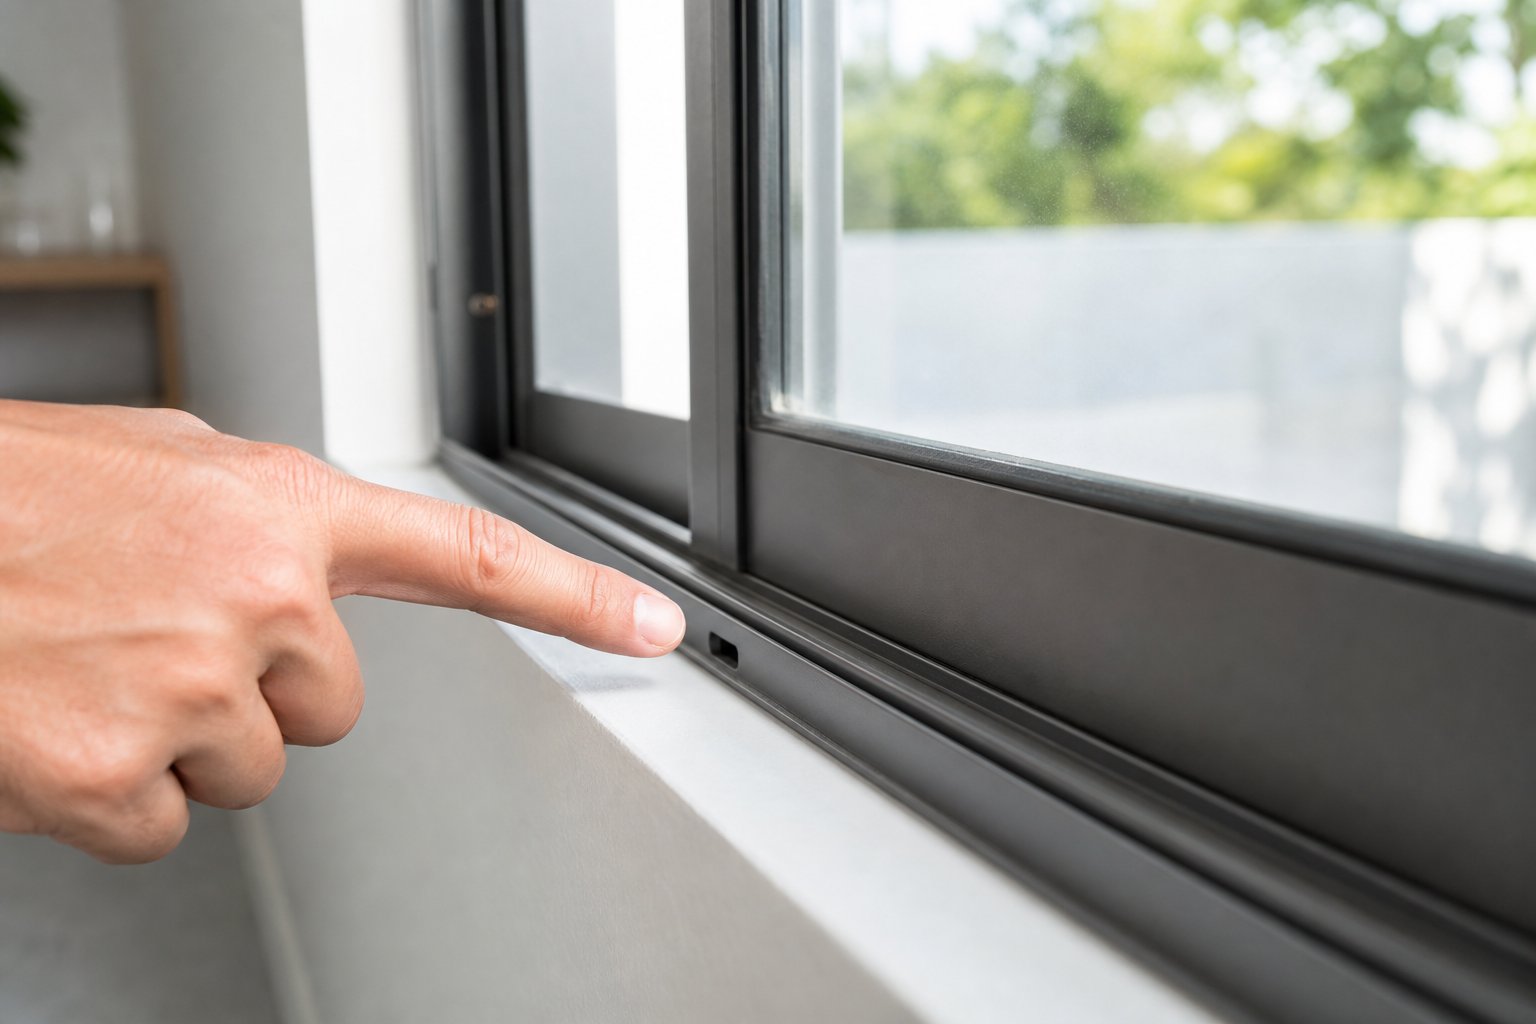
- Bottom track weep holes and drainage slots – Start here because blocked drainage is the single most frequent cause of windows leaking water in window frame tracks. Open the sash and look along the base of the outer track for small rectangular slots or round holes.
- Rubber gaskets and glazing beads – Run your finger along the gasket that sits between the glass and the aluminium profile on both interior and exterior sides.
- External frame-to-wall sealant – Step outside and examine the continuous bead of sealant where the aluminium frame meets brickwork, render, or cladding.
- Head flashing above the window – Look at the junction above the top of the frame where a metal or membrane flashing should be directing water away from the opening.
Inspect Weep Holes and Bottom Track Drainage
Healthy weep holes are clear, unobstructed openings that allow water sitting in the track to drain freely to the exterior. You should be able to see daylight through them or feel airflow with a fingertip. A failed drainage system looks different: slots packed with dirt, paint overspray, insect debris, or calcium build-up. When these openings clog, rainwater that enters the track during normal operation has nowhere to go. It rises until it spills over the internal lip of the track and onto your sill—creating the appearance of water leaking from window frame joints when the frame itself may be perfectly intact.
If you spot pooled water sitting in the track with no sign of it moving toward the weep slots, drainage is your primary suspect.
Check Gaskets, Glazing Beads, and Glass Seals
A healthy EPDM gasket is pliable, uniformly compressed against the glass, and springs back when you press it with a fingernail. Failed gaskets tell a different story: they feel hard and brittle, show visible cracking or flattening, and may have pulled away from corners where the gasket loop meets itself. Any gap, even 1–2 mm, gives wind-driven rain a direct channel into the frame cavity. This is a common source of water leaking inside window frame corners, particularly on north and west-facing elevations where UV degradation is most aggressive.
Also check that glazing beads—the snap-in aluminium strips holding the glass in place—are seated firmly. A bead that rattles or has lifted at one end exposes the gasket channel beneath it to water entry.
Examine External Frame-to-Wall Sealant and Head Flashing
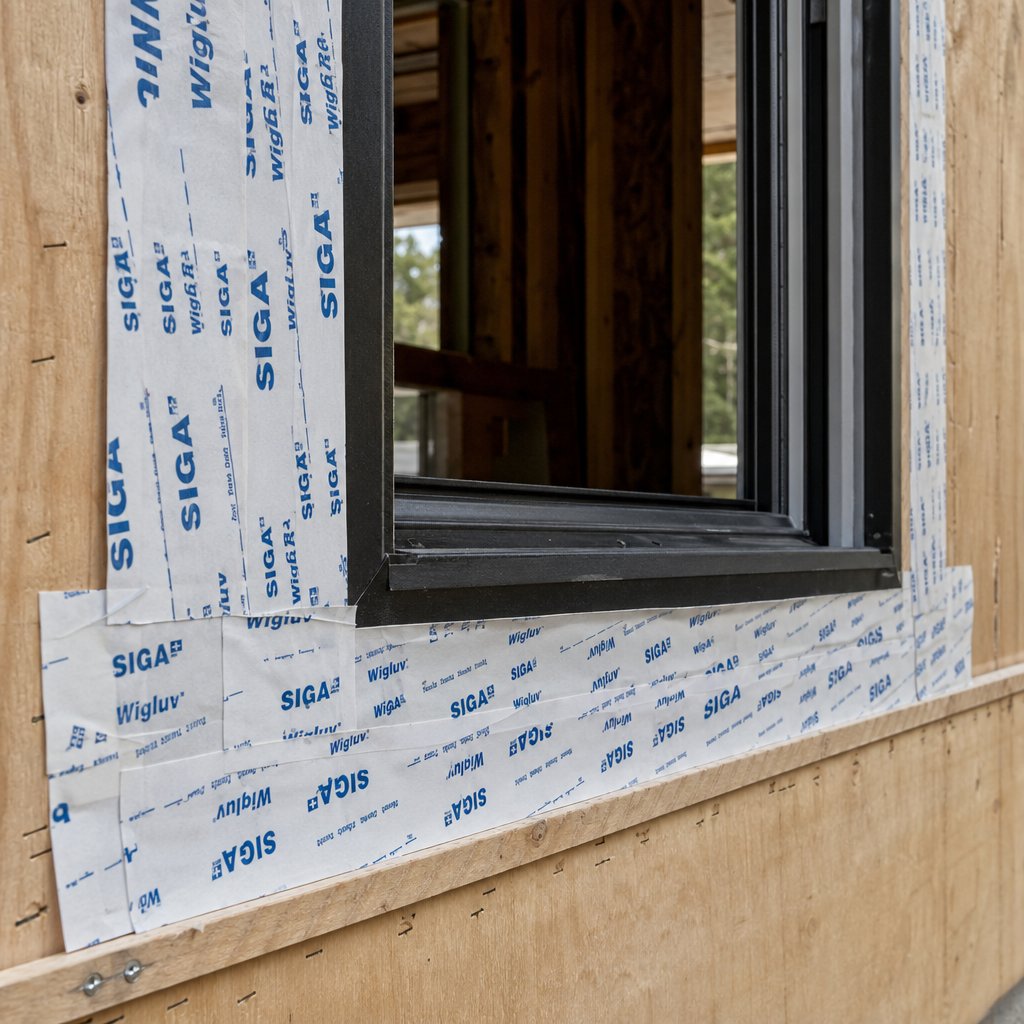
Outside, look for the sealant bead that bridges the gap between the aluminium frame edge and the surrounding wall material. A sound joint is continuous, flexible, and bonded firmly to both surfaces. A water leak from window frame perimeters becomes likely when you spot cracking, peeling, or sections where the sealant has pulled cleanly away from either the frame or the wall substrate. In older brick veneer homes, the mortar joint directly above the window lintel can also deteriorate, creating a pathway for water to track down behind the frame.
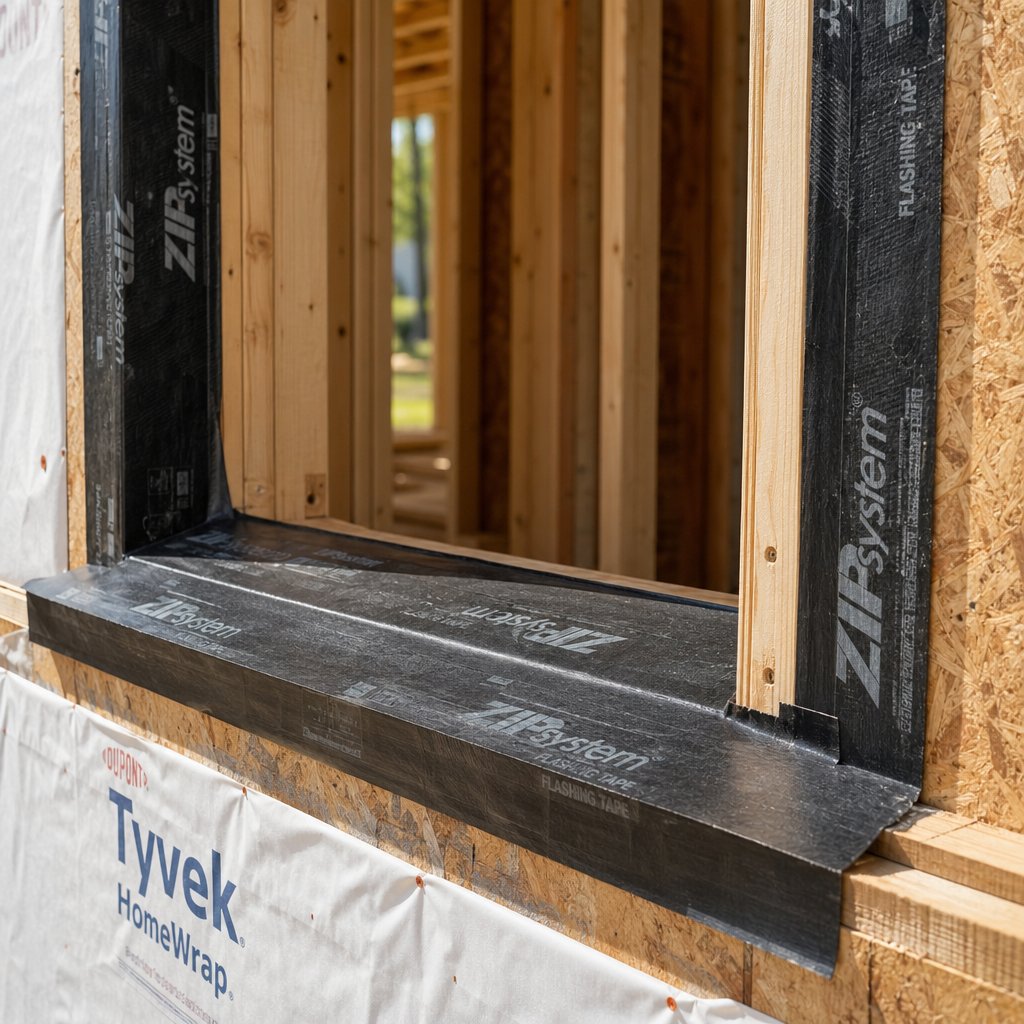
Finally, check the head flashing. This metal or membrane strip should overlap the top of the frame and tuck behind the cladding above. If it is bent, rusted, detached, or missing entirely, water running down the wall face will pour directly behind the frame—a window frame leaking water from the top is almost always a flashing fault rather than a frame defect.
With the exact entry point identified, you can target your repair precisely rather than re-sealing the entire window perimeter. Gathering the correct materials for that specific fix is the next priority.
Step 4 – Gather the Right Tools and Materials
Fixing window leaks does not require a workshop full of specialty gear, but using the wrong product can actually make things worse. The key is matching your materials to the specific repair you identified in the previous step. A blocked weep hole needs nothing more than a brush and five minutes. A full gasket replacement demands more precision. Buy only what your situation calls for.
Essential Tools for Every Repair Level
The table below organises everything into three tiers so you can scan straight to your repair type and build a shopping list without overbuying.
| Repair Level | Tools Needed | Materials Needed |
|---|---|---|
| Quick fixes (blocked drainage, minor debris) | Stiff nylon brush, vacuum with crevice attachment, compressed air can, utility knife | Clean rags, mild detergent |
| Mid-level repairs (seal replacement, gasket swap) | Caulking gun, flat pry tool or glazing shovel, masking tape, spray bottle | Neutral-cure silicone sealant, isopropyl alcohol, replacement EPDM gaskets matched to profile |
| Advanced work (flashing, structural sealing) | Tin snips, pop rivet gun, spirit level, extension ladder (if working at height) | Self-adhesive flashing tape, closed-cell backer rod, primer for porous substrates (brick, render), exterior-grade polyurethane sealant |
A few notes on sourcing. Replacement EPDM gaskets must match the exact cross-section profile of your existing rubber—both width and geometry matter. Industry guidance on gasket selection stresses measuring the channel width, depth, and glass thickness before ordering, because a gasket that is even slightly undersized will leave gaps that let wind-driven rain straight through. Take a short sample of the old gasket to your supplier or photograph it with a ruler for scale.
Choosing the Right Sealant for Aluminium Frames
This is where most DIY leaking window repair jobs go wrong. Homeowners grab whatever silicone tube is cheapest at the hardware store, and often that is an acetic-cure (acetoxy) product. Acetic-cure silicone releases acetic acid as it cures—the same compound found in vinegar. On glass or glazed tiles that is fine, but on aluminium it causes corrosion and white staining over time. The acid attacks the protective oxide layer on the frame, eventually undermining the very seal you just applied.
Neutral-cure silicone uses an alkoxy or oxime cross-linker and releases a non-corrosive byproduct during curing. It bonds safely to aluminium, stone, rendered walls, and painted surfaces. It also offers superior UV and weather resistance, which matters on exposed Australian facades. The trade-off is a slightly longer cure time—up to 72 hours for full strength versus 24 hours for acetic products—but the longevity is worth the wait. For gaps wider than 6 mm at the frame-to-wall junction, pair your sealant with closed-cell backer rod to control joint depth and prevent three-sided adhesion, which causes premature sealant failure.
If you are dealing with porous substrates like raw brick or concrete render, apply a compatible primer before sealing. Without it, neutral-cure silicone may not bond adequately to dusty or chalky masonry.
Sometimes, though, the issue goes beyond what fresh sealant can solve. When gaskets have disintegrated across multiple faces, hardware is worn, and the drainage system is corroded beyond cleaning, you are essentially patching a window that has reached end of life. Modern aluminium window systems like the MEICHEN MC100 Awning Window are engineered with tested water-tightness ratings, integrated drainage channels, and durable EPDM seals from the factory—addressing every failure mode we have discussed so far. Comparing your existing window’s condition against what a purpose-built system delivers helps you decide whether continued repair is realistic or replacement makes better financial sense.
With the right materials on your bench, the actual hands-on work to repair leaking windows starts at the simplest fix first: restoring drainage flow through those small but critical weep holes.

Step 5 – Clear Weep Holes and Restore Drainage
Blocked weep holes account for more cases of water coming through window tracks than any other single cause. The good news is that this fix costs nothing, requires no specialist tools, and takes less than five minutes once you know the process.
Every aluminium window track is designed as a managed drainage channel. Small rectangular slots or round holes at the base of the outer track give collected rainwater an exit path to the exterior. When those openings clog with dust, pollen, insect nests, or paint overspray, the system backs up. Water rises in the track until it overflows the inner lip and spills onto your sill—creating a window leaking from bottom that looks alarming but often has a laughably simple cause.
How to Clear Blocked Weep Holes in Under Five Minutes
Follow this sequence to restore full drainage. Work with the window open so you have clear access to the bottom track.
- Vacuum the entire bottom track using a crevice attachment to remove loose dirt, leaves, and cobwebs.
- Locate each weep slot along the outer edge of the track. There are usually two or three per window panel.
- Use a stiff nylon brush or pipe cleaner to dislodge compacted debris from inside each slot. A straw brush or wire hook works well for reaching deeper into the drainage channel without pushing material further in.
- If debris is stubborn, direct a short burst of compressed air into the interior weep hole to blow material outward.
- Pour a cup of water into the track and watch the exterior. Water should flow freely from each weep hole within seconds.
- Wipe the track dry with a clean rag and confirm no pooling remains.
If water exits cleanly, your window leaking rain issue is resolved. Test again during the next storm to confirm it holds up under real conditions.
When Water Still Pools After Clearing
Persistent water in window frame tracks after cleaning points to a deeper problem. Three possibilities are worth checking. First, the window may no longer be level—building settlement over years can tilt the frame just enough that water pools at one end instead of draining toward the weep slots. Place a spirit level across the sill to check. If settlement has occurred, shimming the low side during a re-installation can restore the correct fall.
Second, corrosion inside the track channel may have created rough, pitted areas that trap water and impede flow. Run your fingertip along the track floor. If it feels rough or flaky rather than smooth, the profile surface has degraded beyond what cleaning can fix.
Third, an internal gasket may have shifted or swollen, redirecting water to the wrong side of the drainage channel where no weep holes exist. This is common when water is coming in through window tracks on one side only while the other side drains perfectly.
Any of these scenarios means the problem has moved beyond a simple clean-out. The next layer of repair involves re-sealing frame joints and replacing degraded weatherstripping to cut off the ingress paths that drainage alone cannot manage.
Step 6 – Re-seal Frame Joints and Replace Weatherstripping
When drainage is clear but water still finds its way inside, the leak path runs through deteriorated sealant or a failed gasket. Sealing a leaking window properly means starting fresh rather than smearing new product over old—the preparation matters as much as the application itself.
Begin by scoring along both edges of the existing sealant bead with a sharp utility knife. Peel and scrape the old material away completely using a putty knife or dedicated caulk removal tool. Professional sealant guidance confirms that applying new caulk over old prevents proper adhesion and leads to early failure. Once stripped, wipe both surfaces—aluminium frame edge and wall substrate—with isopropyl alcohol on a clean rag to dissolve residual oils and dust. Let everything dry thoroughly. Then lay masking tape along both sides of the joint, leaving an even gap that defines your bead width. This gives you clean, straight edges and makes tooling far easier.
Re-sealing the Exterior Frame-to-Wall Junction
For gaps wider than 6 mm between the frame and the wall, press closed-cell backer rod into the joint first. Size it approximately 25–50% larger than the gap width so it wedges snugly without falling in. Backer rod controls the depth of your sealant bead and prevents three-sided adhesion—a common cause of premature cracking where the sealant bonds to the back of the joint as well as both faces.
Load your caulking gun with neutral-cure silicone and cut the nozzle at a 45-degree angle to match the joint width. Starting at one end, gun a continuous bead in a single pass. Stops and starts create weak points. Within five minutes of application—before the silicone starts to skin—tool the bead with a wet finger or plastic spatula to press it firmly into both surfaces and create a slightly concave profile that sheds water. Pull the masking tape away immediately while the sealant is still wet. Waiting until it cures will tear the finished edge.
This is the best way to seal leaky windows at the frame-to-wall junction. A well-tooled neutral-cure bead on a clean substrate will last 10 years or more in typical Australian conditions.
Replacing Glazing Gaskets and Weatherstripping
If your window seal leaking issue traces back to the gasket around the glass rather than the external perimeter, the glazing bead needs to come off. Press the centre of the aluminium bead inward to disengage its clips, then slide a flat plastic tool—never a metal screwdriver, which will gouge the frame—along its length to release it fully. Lift the bead out carefully; specialist guidance on glazing seal replacement warns that sourcing replacement beading is extremely difficult, so damaging yours adds significant cost.
With the bead removed, pull the old rubber gasket from its channel. Measure the cross-section profile—width, height, and geometry (wedge, E-gasket, or bubble type). A short sample taken to your glazing supplier or a close-up photo with a ruler ensures you get an exact EPDM match. When fitting the new gasket, start at the top centre of the frame and work around, pressing it firmly into the groove without stretching. Stretching causes the rubber to retract over time, reopening gaps. Over-cut the length by roughly 5% to account for future shrinkage, then snap glazing beads back into place.
One critical warning: do not fill glazing channels with standard household silicone to fix leaky window gaskets. Silicone in the channel makes future gasket replacement nearly impossible—it bonds to everything and tears the new rubber when you attempt removal years down the track. If the gasket channel is sound, a correctly profiled EPDM rubber seated without adhesive is the lasting solution for how to seal a leaking window at the glass line.
Avoid these common mistakes that undermine an otherwise solid re-sealing job:
- Applying new sealant directly over old caulk—adhesion fails within months as the old layer continues to degrade underneath
- Using acetic-cure silicone on aluminium frames—the acid released during curing corrodes the protective oxide layer and stains the profile
- Accidentally sealing weep holes shut when running a bead along the bottom of the frame—this blocks the drainage system and causes water to pool inside the track
- Skipping backer rod in wide joints—without it, sealant bonds on three sides and cracks under thermal movement
- Tooling the bead too late—once silicone skins over, tooling tears the surface rather than shaping it
A properly re-sealed perimeter and fresh gaskets handle most leaky window seal scenarios. But there is one leak type these repairs cannot reach: water entering from above the frame, behind the cladding, where the problem lies with flashing rather than sealant.
Step 7 – Fix Leaks Coming from the Top of the Frame
Water dripping from the top of window frame interiors is the most frustrating leak scenario because you cannot fix it from inside the room. Unlike gasket failures or blocked weep holes, a window leaking from top of frame almost always points to a component hidden behind your exterior cladding: the head flashing.
Head flashing is a thin strip of metal or self-adhesive membrane installed above the window opening during construction. Its job is simple but critical—intercept water running down the wall face and redirect it outward, over the top of the frame, so it never gets behind the window. When this strip corrodes, detaches, or was installed with insufficient overlap in the first place, water tracks down the back of the frame and appears inside as drips from the top corners or damp staining on the wall above the window. A leak from top of window behaves differently to lower seal failures: it often worsens in heavy, wind-driven rain and can saturate the wall cavity long before visible evidence appears indoors.
Diagnosing a Head Flashing Failure
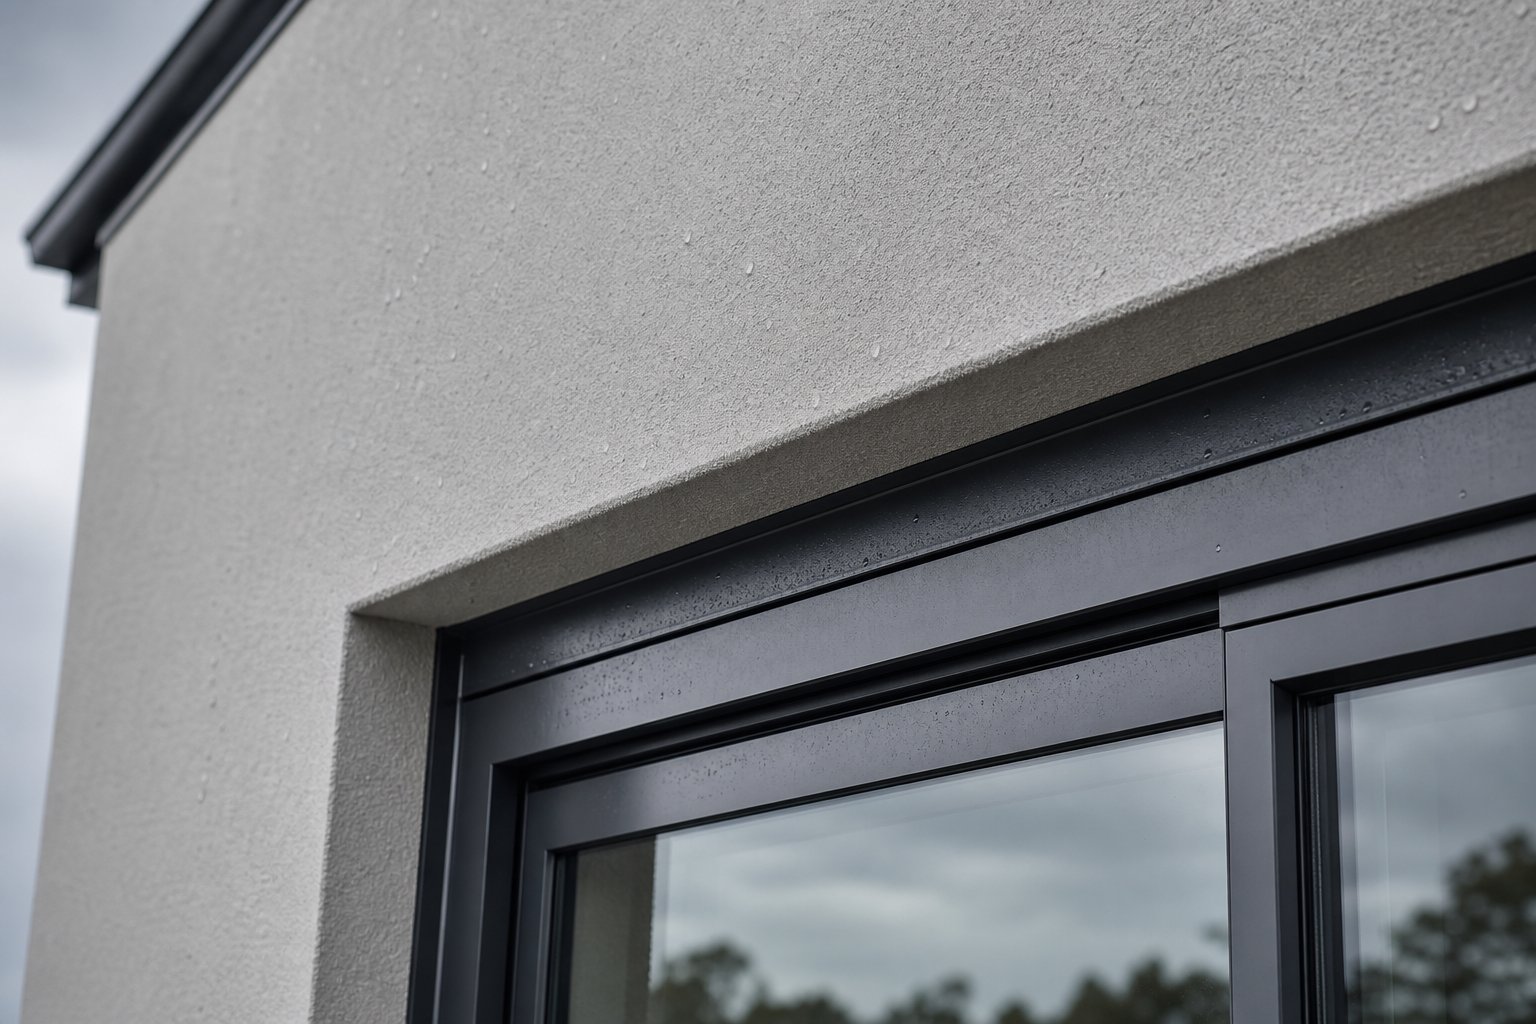
Step outside and look at the area directly above the window frame. You are checking for gaps between your cladding (weatherboard, render, or brick) and the top edge of the aluminium frame. Peeling or bubbling paint on the external wall just above the window is a strong indicator that moisture is trapped behind the surface. If metal flashing is visible, look for rust streaks, lifted edges, or sections that have pulled away from the wall. On rendered facades, hairline cracks running horizontally along the window head allow water to wick inward by capillary action—these are easy to miss unless you inspect closely after rain.
Where building envelope research identifies the most common flashing defects, insufficient overlap and misalignment with the surrounding cladding top the list. Even a 10 mm gap between the flashing’s upper leg and the house wrap or building paper behind the cladding gives water a direct path into the wall frame. Windows leaking from top are frequently a construction-stage defect that only becomes apparent years later once sealant backup fails or the flashing material fatigues.
Temporary and Permanent Fixes for Top-of-Frame Leaks
If you need an immediate stop-gap while planning a proper repair, self-adhesive flashing tape offers a workable temporary solution. Clean the wall surface above the frame thoroughly—remove loose paint, dust, and moisture. Apply the tape so it covers the junction between the cladding and the window head, pressing firmly to exclude air bubbles. This can hold for a season or two, but UV exposure and thermal movement will eventually degrade the adhesive bond.
The permanent fix for a window leaking from top frame involves removing a course of cladding above the window to access the flashing cavity behind. A new aluminium Z-flashing is then installed, with its upper leg tucked behind the building paper or house wrap and its lower leg extending over the top of the window frame to kick water outward. Practical installation guidance stresses that the flashing must extend at least 25 mm beyond the window frame at each side and be sealed at its upper edge with a compatible sealant to prevent water tracking behind it. The overlapping principle is non-negotiable: water must always flow over the top of each layer, never under it.
Once flashing is correctly lapped and sealed, the removed cladding is refixed and any penetrations are sealed. The result is a system that sheds water reliably for the life of the building.
A critical safety note: diagnosing and repairing head flashing often involves working at height and removing sections of exterior cladding. This work can expose structural framing, building paper, and electrical or plumbing services hidden in the wall cavity. If your windows are above ground-floor level or the cladding removal is extensive, hire a licensed builder. Falls from ladders remain one of Australia’s most common serious home-injury causes, and disturbing structural elements without understanding load paths can create problems far worse than the original leak.
Water leaking from top of window frame is never a problem that gets better on its own. Left unchecked, it saturates wall framing, promotes mould growth in concealed cavities, and can compromise structural timber. Whether you apply a temporary tape fix or commission a full reflashing job, acting quickly limits the damage radius. The bigger question many homeowners face at this stage is whether repeated repairs across multiple failure points still make economic sense—or whether the window has reached the point where replacement delivers better value.
Step 8 – Decide Whether to Repair or Replace Your Windows
You have cleared drainage, re-sealed joints, replaced gaskets, and potentially addressed flashing. But what happens when those repairs keep stacking up across multiple windows, or when the same frame develops a new leak path six months after you fixed the last one? At some point, learning how to fix a leaky window becomes less important than asking whether fixing it still makes financial sense.
The repair-versus-replace decision does not have to be a gut feeling. Three measurable factors drive it: the number of simultaneous failure points, the age of your window system, and the total repair spend relative to what replacement would cost. Run these against your situation and the answer usually becomes clear.
When Repair Makes Sense
For most homeowners dealing with one or two specific issues on windows that otherwise function well, repair is the right call. A single failed gasket, a blocked weep hole, or an isolated sealant crack at the frame-to-wall junction are problems that cost between $100 and $500 AUD to fix professionally—or far less if you handle them yourself. These repairs buy another 5 to 15 years of useful life from a window that is structurally sound.
The logic is straightforward. If you are asking how to fix leaky window seals on a 12-year-old aluminium frame with one degraded gasket, spending $200 on a gasket replacement makes far more sense than a $1,200 full window replacement that discards a decade or more of remaining frame life. The frame is fine. The hardware works. Only one component has failed.
Repair also makes sense when you are planning to sell within three to five years. Replacement payback timelines—driven by energy savings and avoided future maintenance—require longer tenure to deliver a return. A functional, recently-sealed window reads identically to a brand-new one during a buyer’s inspection. You are not going to recoup the premium of full replacement at resale in that timeframe.
Specific scenarios where repair wins cleanly:
- Single gasket or seal failure on an otherwise sound frame—$100 to $400 AUD fix
- Weatherstripping degraded across multiple windows but frames and hardware intact—$150 to $250 per window
- Exterior sealant cracked at frame-to-wall junction with no deeper structural issue—$80 to $200 per window
- Weep holes blocked or drainage compromised by debris—free to minimal cost
When Full Replacement Is the Smarter Investment
The calculus flips when failures stack. A window showing a failed gasket, corroded corner joints, fogged double glazing between the panes, and worn-out hardware is not one problem—it is a system at end of life. Repairing each component individually might total $800 to $1,200 AUD per window, approaching or exceeding the cost of a new unit while delivering none of the performance gains that come with modern engineering.
Several signals indicate replacement delivers better long-term value:
- Multiple leak sources on the same window – If water enters from two or more paths simultaneously (gasket failure plus sealant breakdown plus blocked drainage), the window has degraded as a system, not just at one component.
- Frame corrosion at joints – Pitting or galvanic corrosion at mitre joints or around fixings compromises structural integrity. No amount of re-sealing restores a corroded joint to its original water-tightness.
- Fogged IGU (insulated glass unit) – Condensation trapped between panes means the sealed unit has failed. Combined with frame-level issues, this tips the economics toward replacement.
- Seven or more windows showing the same failure mode – When failures are systemic across the installation rather than isolated, the entire window system is at end of life. Per-window repair costs at that scale approach whole-home replacement costs while offering far shorter longevity.
- Window age beyond 25 years with non-thermally-broken frames – Older aluminium windows without thermal breaks perform poorly by current standards. Even if repaired, they continue leaking energy at rates that compound into significant heating and cooling costs year after year.
Modern thermally broken aluminium window systems address every failure mode discussed throughout this guide at the engineering stage rather than relying on aftermarket fixes. Tested water-tightness ratings under AS 2047 confirm performance against wind-driven rain at specific pressure differentials. Integrated EPDM gasket systems maintain seal compression across temperature extremes. Purpose-designed drainage channels with correctly positioned weep holes prevent the pooling issues that plague older frames.
The MEICHEN MC100 Awning Window illustrates what this looks like in practice. It is a system with documented water-tightness and air-tightness performance, multiple glass options including double-glazed configurations for different climate zones, and durable powder-coated frame finishes rated for Australian UV and coastal exposure. For homeowners whose existing aluminium windows have reached the point where repair costs are stacking and performance remains poor, comparing their current situation against what an engineered replacement system delivers makes the decision concrete rather than abstract.
The decision matrix below brings the repair-versus-replace factors together in a scannable format. Find the row that best matches your situation.
| Approach | Typical Scenario | Relative Cost (per window) | Expected Longevity |
|---|---|---|---|
| Spot seal repair | One isolated gasket or sealant failure, frame structurally sound | $100 – $400 AUD | 5 – 15 years additional life |
| Multi-component repair | 2–3 issues on same window (seal + weatherstrip + minor hardware) | $500 – $900 AUD | 3 – 8 years before next failure |
| Single window replacement | Stacked failures, corroded frame, or fogged IGU on one window | $800 – $1,800 AUD installed | 30 – 50+ years (new system) |
| Whole-home replacement (8+ windows) | Systemic failures across the installation, non-thermally-broken frames, 25+ year-old system | $12,000 – $25,000+ AUD total | 40 – 60 years (thermally broken aluminium) |
The middle row—multi-component repair costing $500 to $900 per window—is where most homeowners hesitate. At that price point, you are approaching single-window replacement cost while getting only a fraction of the lifespan. If three or more windows sit in this category simultaneously, the per-window economics of whole-home replacement improve substantially, and the cumulative benefits of modern thermal performance, better air-tightness, and engineered drainage begin compounding from day one.
How do you fix a leaking window that keeps failing despite repeated repairs? Sometimes the honest answer is that you stop fixing it and invest in a system designed to not fail in the first place. That is not a defeat—it is a recognition that a 25-year-old window has delivered its service life and the cost of extending it further exceeds the cost of starting fresh with a modern, tested replacement.
Whichever path you choose—targeted repair or full replacement—protecting that investment over the long term requires one final piece: a seasonal maintenance routine that catches small issues before they become expensive problems.

Step 9 – Set Up a Seasonal Maintenance Schedule to Prevent Future Leaks
A repaired window or a brand-new installation both follow the same rule: neglect accelerates failure. The seals, gaskets, and drainage systems you have just restored will last years longer with a small, consistent care routine tied to the seasons. Fifteen minutes of inspection four times a year prevents the kind of water damage under window sills and inside wall cavities that costs thousands to remediate.
The schedule below is designed for Australian climate patterns. Set calendar reminders at each season change and work through the relevant row. Each task is quick, requires no specialist tools, and catches developing issues while they are still free to fix.
Seasonal Inspection Checklist for Aluminium Windows
| Season | Inspection Task | Action Required |
|---|---|---|
| Spring | Weep holes and drainage tracks clogged with pollen, dust, or insect debris after the warmer months | Vacuum tracks, brush each weep slot clear, flush with water to confirm drainage flows to exterior |
| Summer | Sealant condition under peak UV exposure—check for cracking, peeling, or discolouration | Inspect all external sealant beads; note any sections pulling away from the frame or wall substrate for re-sealing in autumn before rains arrive |
| Autumn | Leaf litter and organic debris accumulating in tracks; drainage function before winter storm season | Clear all debris from tracks and sills, confirm weep holes are unobstructed, check gaskets for hardening or compression ahead of wet weather |
| Winter | Active water ingress during the first heavy storm of the season | Inspect interior sills and frame corners during or immediately after rain; if windows leaking water inside appears, identify the source using the Step 3 process and repair before sustained wet weather compounds the damage |
Winter is your truth test. If water appears during that first serious storm, you know exactly which window and which component needs attention because you have already checked sealant in summer and drainage in autumn. Acting within days rather than tolerating a slow leak for an entire wet season is the difference between a $50 tube of sealant and serious water damage around window framing, plasterboard, and skirtings.
Extending Sealant and Gasket Life
Beyond the seasonal checklist, a few simple habits dramatically extend the lifespan of the materials keeping water out of your home.
- Never pressure-wash directly at window seals. High-pressure water can force past gaskets, push debris into weep holes, and degrade sealant adhesion along joint lines. Window longevity research identifies pressure washing as one of the most common maintenance mistakes that actually shortens window life. Use a soft cloth and bucket or a garden hose on low pressure instead.
- Apply a UV-protectant silicone spray to exposed EPDM gaskets once a year. A light coat in early summer restores flexibility and slows the hardening that UV radiation causes. This is particularly valuable on north and west-facing windows that cop direct Australian sun for hours daily.
- Keep vegetation trimmed at least 300 mm from window frames. Plants hold moisture against seals, encourage mould growth on gaskets, and drop organic debris directly into tracks. Creepers and climbing plants are the worst offenders—their tendrils can work into drainage slots and physically block water exit paths.
- Rinse frames with fresh water after coastal storms. Salt deposits left on aluminium accelerate corrosion of fixings and degrade sealant bonds. A quick hose-down within 48 hours of a salt-laden storm removes the residue before it causes harm.
Knowing how to fix leaking windows during heavy rain is valuable, but preventing the leak from forming in the first place is where real savings live. A window leaking water after years of neglect can saturate wall framing, destroy insulation, and create concealed mould colonies that require professional remediation. All of that traces back to small failures—a clogged weep hole, a cracked sealant bead, a hardened gasket—that 15 minutes of seasonal attention would have caught and corrected for free.
Treat your aluminium windows like any other building system: inspect regularly, maintain proactively, and address small issues before they compound. That routine protects the repairs you have already made, extends the life of your windows by years, and keeps your home dry through every storm season ahead.
Frequently Asked Questions About Aluminium Window Leaks
1. Why is my aluminium window leaking from the bottom when it rains?
Bottom leaks during rain are most commonly caused by blocked weep holes in the window track. These small drainage slots get clogged with dirt, pollen, insect debris, or paint overspray over time. When blocked, rainwater that normally drains to the exterior pools inside the track and overflows onto your sill. Clearing weep holes with a stiff brush and flushing with water usually resolves the issue in under five minutes. If water still pools after clearing, the window frame may have settled out of level, or internal corrosion may be impeding drainage flow.
2. How do I tell if my aluminium window has a leak or just condensation?
The key difference is timing. Condensation appears on cold, still mornings when indoor humidity is high and clears once temperatures rise or ventilation improves. A genuine leak only produces moisture during or shortly after rainfall, often from a consistent spot on the frame. To confirm, dry the area completely, apply painter’s tape along suspect joints, and spray a garden hose on the exterior. If the tape gets wet from behind, you have a confirmed water ingress issue that requires sealing or component replacement rather than just improved ventilation.
3. What type of sealant should I use on aluminium window frames?
Always use neutral-cure silicone sealant on aluminium frames. Acetic-cure (acetoxy) silicone releases acetic acid during curing, which corrodes aluminium’s protective oxide layer and causes white staining over time. Neutral-cure products use a non-corrosive cross-linker, bond safely to aluminium and masonry, and offer superior UV and weather resistance for Australian conditions. For gaps wider than 6 mm, pair your sealant with closed-cell backer rod to control joint depth and prevent three-sided adhesion that causes premature cracking.
4. When should I replace my aluminium windows instead of repairing them?
Replacement makes better financial sense when multiple failure points exist simultaneously on the same window, such as corroded corner joints, failed gaskets, fogged double glazing, and worn hardware. If repair costs approach $800 to $1,200 AUD per window while only delivering 3 to 8 years of additional life, a modern thermally broken aluminium system like the MEICHEN MC100 Awning Window offers tested water-tightness, engineered drainage, and a 30 to 50-plus year lifespan. Windows over 25 years old with non-thermally-broken frames are generally better replaced than repeatedly repaired.
5. How often should I maintain my aluminium windows to prevent leaks?
A seasonal maintenance schedule with four brief inspections per year prevents most leak issues. Clear weep holes and tracks in spring after pollen season, check sealant condition in summer when UV damage is most visible, remove leaf debris in autumn before winter rains, and verify no water ingress during the first heavy winter storm. Additionally, apply UV-protectant silicone spray to exposed gaskets annually, avoid pressure-washing directly at seals, and keep vegetation trimmed at least 300 mm from frames to reduce moisture contact.
More Window & Door Guides