What Are External Aluminium Window Architraves
Every window punched through an external wall creates a junction — a gap between the window frame and the surrounding wall surface that needs covering. That gap is where external aluminium window architraves earn their place.
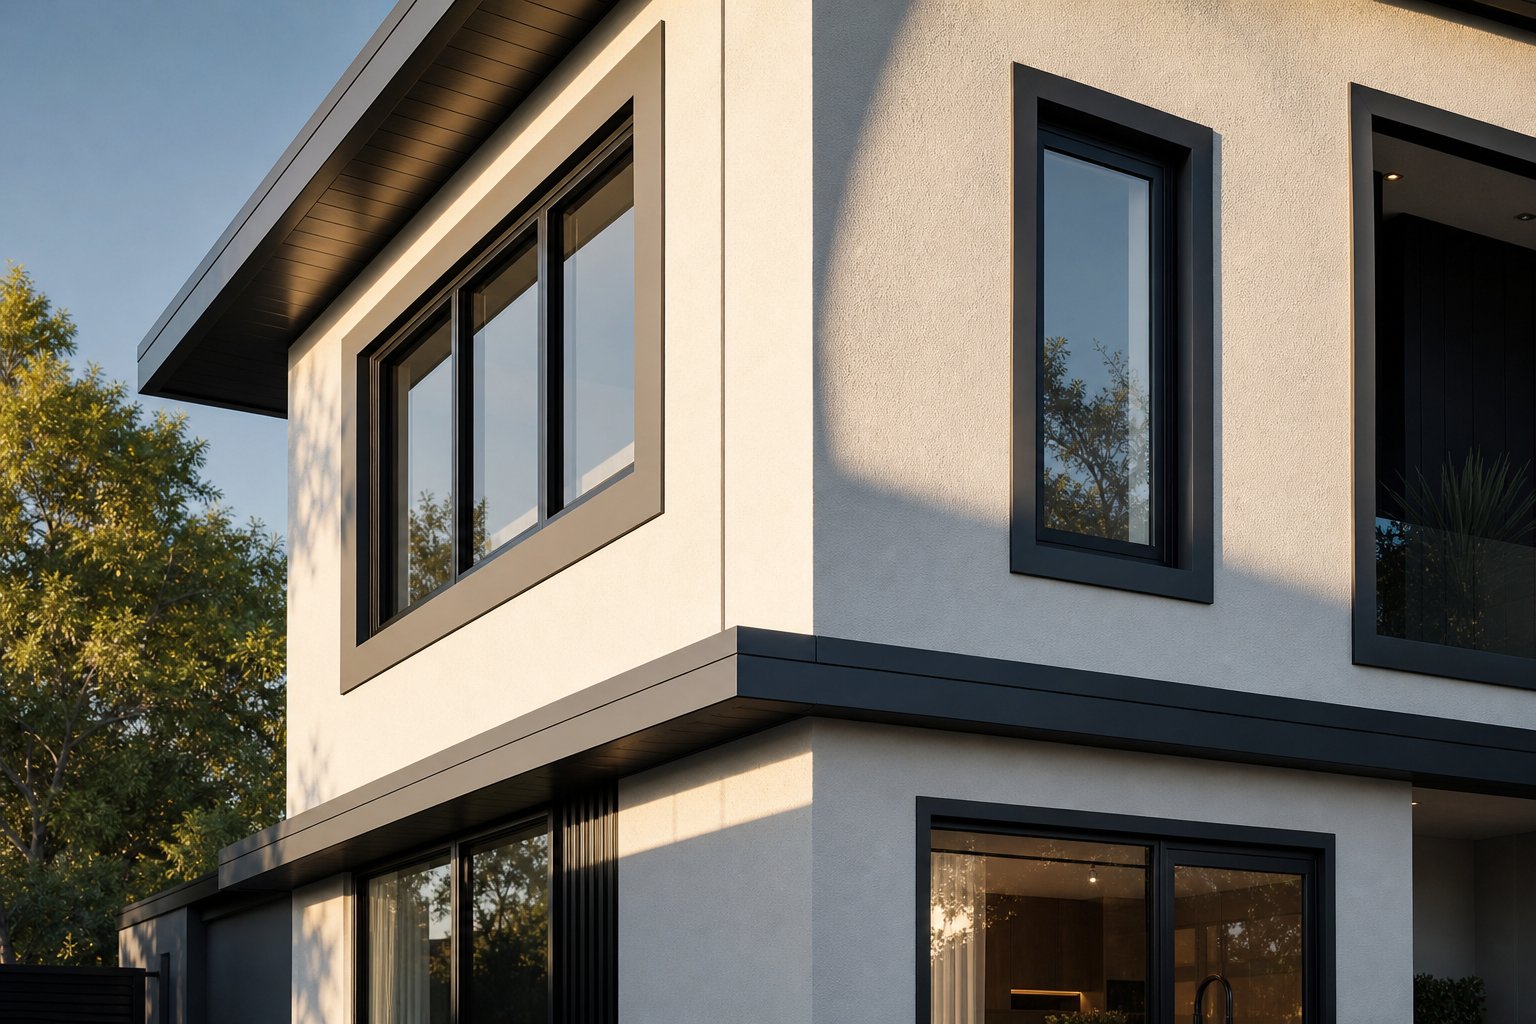
An external aluminium window architrave is a purpose-formed aluminium profile that frames the perimeter of a window opening on the outside face of a building, concealing the joint between the window frame and the wall cladding while providing weather protection and a finished aesthetic edge.
Unlike generic window trim exterior products that might serve decorative or transitional roles anywhere on a facade, an architrave specifically frames an opening. It wraps around a window in a deliberate configuration — head, jambs, and sometimes sill — to perform a defined set of jobs at that junction point.
What External Aluminium Architraves Actually Do
These profiles carry three functional roles simultaneously. First, they seal the vulnerable junction against wind-driven rain, preventing moisture from tracking behind cladding or into wall cavities. Second, they cover expansion gaps that builders leave between window frames and wall linings to accommodate thermal movement and structural settling. Third, they frame the window visually, giving exterior window frames a clean, deliberate border that reads as intentional rather than raw.
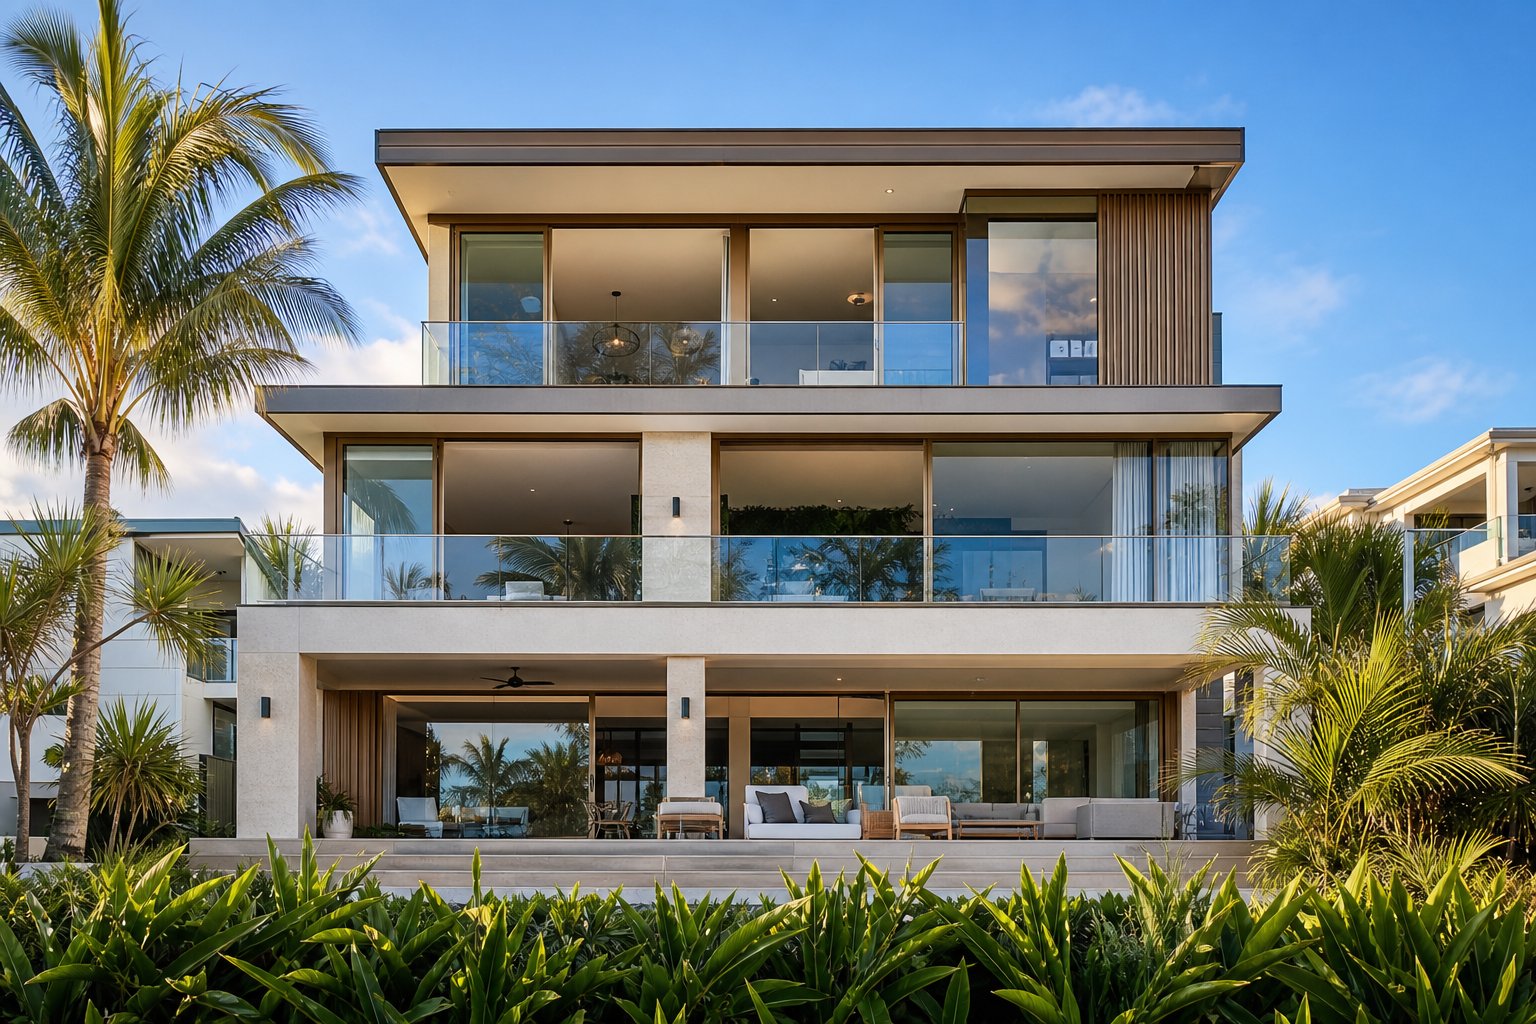
Across Australian residential and commercial construction, aluminium architraves appear on everything from single-storey brick veneer homes in suburban Melbourne to multi-level apartment facades in coastal Queensland. Their prevalence reflects both the dominance of aluminium window systems in Australian building and the material’s suitability for exterior exposure without ongoing maintenance.
How External Architraves Differ From Interior Ones
Interior architraves — typically timber or MDF — exist in a controlled environment. They hide plasterboard joints and add decorative character, but they never face UV radiation, rain, or salt air. External aluminium architraves, by contrast, function as part of the building envelope. They must resist weathering, shed water effectively, and tolerate thermal cycling without warping or degrading. The window outside trim on a building’s facade works harder than any interior moulding ever will.
This resource covers the full picture in one place: material comparisons, profile types, finish options, installation considerations, and how exterior window moulding integrates with common Australian wall systems — so you can make decisions with confidence rather than guesswork.
Architraves vs Reveals vs Flashings vs Trim Profiles
Four different components surround a window opening, and they get mixed up constantly — in conversations with builders, on supplier websites, even in specification documents. If you have ever asked “what is a window casing?” and received four different answers, you are not alone. Each component serves a distinct purpose, sits in a specific location, and solves a different problem. Getting them confused means you might order the wrong product or miss a critical weatherproofing layer entirely.
Architraves vs Window Reveals
A window reveal is the visible return of the wall material between the window frame and the outer face of the wall. Think of it as the depth you see when you look at a window from an angle — that recessed section where the wall thickness is exposed. In Australian timber-frame construction, reveals are typically timber surrounds that the window frame fixes into, providing structural support and a finished internal edge. As A&L Windows explains, the reveal’s primary job is to fix the window into the stud wall frame and provide stability to the aluminium frame.
An architrave, on the other hand, sits on the face of the wall — on top of the finished surface — covering the junction where the reveal or frame meets the cladding. Reveals are structural and recessed. Architraves are surface-mounted and decorative-functional. You can have a reveal without an architrave (a square-set or plaster-return finish), but you cannot have an architrave without something behind it to frame against.
Where Flashings and Trim Fit In
Flashings sit in a completely different category. They are water-management components — typically metal or self-adhered membrane — installed above, below, or beside a window to redirect moisture away from the wall assembly. A head flashing (drip cap) diverts water that runs down the wall face away from the top of the window. A sill pan catches any water that penetrates past the frame and drains it outward. Flashings are concealed behind cladding and are never intended to be visible. They protect framing; architraves protect appearances.
Trim or moulding is the broadest term. It encompasses any exterior window casing profile that covers a joint or transition — architraves, cover moulds, corner pieces, and general finishing strips all fall under this umbrella. An architrave is a specific type of trim that frames an opening. Not all trim is an architrave, but every architrave is trim.
| Component | Primary Function | Location | Material Options |
|---|---|---|---|
| Architrave | Covers junction between frame and wall face; provides weather seal and aesthetic framing | Surface-mounted on exterior wall around window perimeter | Aluminium, timber, PVC, fibre cement |
| Reveal | Structural support for window frame; finished return of wall depth | Recessed within the wall opening between frame and wall face | Timber (MDF, finger-jointed pine, hardwood), plaster |
| Flashing | Redirects water away from rough opening to prevent moisture infiltration | Concealed behind cladding at head, jambs, and sill | Aluminium, galvanised steel, self-adhered membrane tape |
| Trim / Moulding | Covers any exterior joint or transition for a finished appearance | Surface-mounted at various locations on the facade | Aluminium, timber, PVC, composite, fibre cement |
Choosing the Right Terminology for Your Project
Knowing which component you actually need saves time and prevents costly miscommunication. If your problem is a raw, unfinished edge where cladding meets the window frame, you need an architrave or exterior casing for windows. If water is tracking into the wall cavity above your window, you need head flashing — no amount of architrave will solve a drainage issue. If the recessed depth around your window looks unfinished from inside, you are looking at a reveal solution.
Many Australian window installations use all four components together. The reveal provides internal structure, flashings manage concealed moisture paths, the architrave covers the external junction, and additional trim pieces handle corners or transitions where window casing profiles meet other facade elements. Understanding how these layers relate to each other — rather than treating them as interchangeable terms — puts you in a stronger position when specifying materials or briefing your builder.
With terminology sorted, the next decision is material. And that choice carries consequences that play out over decades of sun, rain, and salt air exposure.
Comparing Aluminium Against Timber, PVC, and Composite Options
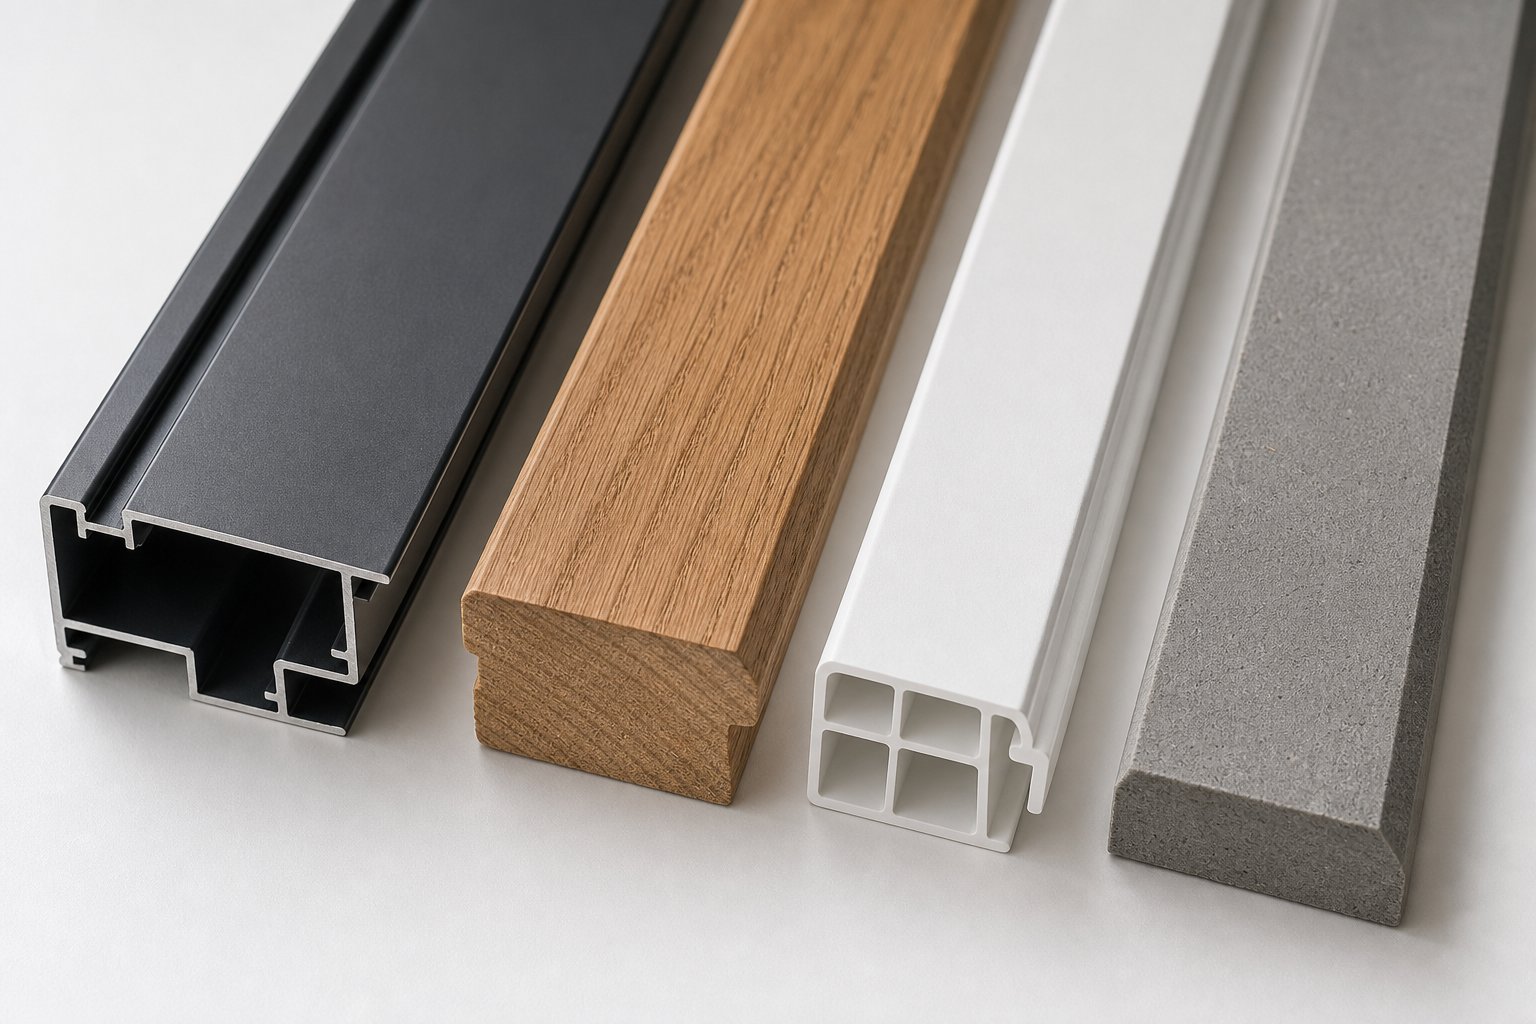
Material choice determines how your external architraves will look, perform, and age over five, fifteen, or thirty years of Australian weather exposure. Four materials compete for this role — aluminium, timber, PVC, and fibre-cement composite — and each brings a different balance of strengths and compromises. No single competitor resource lays this comparison out clearly, so here it is in one place.
Aluminium Durability and Weather Performance
Aluminium earns its dominance in metal window trim applications for straightforward reasons. A powder-coated aluminium profile resists UV degradation, does not absorb moisture, cannot rot, and holds zero interest for termites or borers. Thermal expansion exists — aluminium does move with temperature changes — but the movement is predictable and manageable with correct installation detailing. In coastal environments where salt air accelerates corrosion in lesser materials, powder-coated aluminium window trim exterior profiles maintain their integrity for decades with nothing more than periodic washing.
The finish itself acts as a functional barrier. Unlike paint sitting on a porous substrate, powder coating bonds electrostatically to the aluminium surface, creating a skin that resists chipping, peeling, and UV-driven chalking far longer than any painted timber surface. For anyone specifying an aluminum window casing system for external use, this durability profile means the upfront investment pays back through virtually zero maintenance over the product’s lifespan.
Timber and PVC Limitations in External Applications
Timber architraves — typically cedar, hardwood, or finger-jointed pine — deliver a warmth and texture that suits heritage homes and traditional Australian designs. A window wood casing in dressed hardwood looks beautiful on day one. The problem is what happens after year three, year five, and year ten of sun, rain, and humidity exposure.
Wood is prone to rot, warping, and insect damage when not meticulously maintained. In Australian conditions — particularly humid subtropical regions or areas with high termite pressure — timber exteriors demand repainting or resealing every three to five years. Skip a cycle, and moisture penetrates, paint blisters, and rot establishes itself at joints and end-grain. The ongoing cost in labour and materials accumulates quickly.
PVC (cellular vinyl) solves the moisture problem entirely. Vinyl outdoor window trim cannot rot and repels water effectively. However, PVC grows brittle under prolonged UV exposure — a serious limitation across most of Australia where solar radiation intensity is high year-round. Colour options are limited without painting, and PVC expands and contracts more than aluminium in temperature extremes, making tight mitre joints prone to opening over time. It suits concealed or shaded applications better than fully exposed window surrounds.
When Composite Materials Make Sense
Fibre-cement composite — a blend of cement, sand, and cellulose fibres — offers strong resistance to fire, rot, and insects. It holds paint well and suits homes in bushfire-prone areas where non-combustible materials are required under BAL ratings. The trade-offs are weight and workability: fibre cement is heavier than aluminium or PVC, requires specialised cutting tools, and cannot be formed into the slim, precise profiles that metal exterior window trim achieves. It works well as flat-section architrave in rendered or painted applications but lacks the refinement of extruded aluminium for modern architectural detailing.
For projects where an aluminum window casing needs to match a full aluminium window system in colour, profile precision, and longevity, composite materials fall short on integration — they require painting to colour-match, and that paint layer reintroduces the maintenance cycle you were trying to avoid.
| Material | Durability | Maintenance | Cost Range | Weather Resistance | Aesthetic Versatility | Typical Lifespan |
|---|---|---|---|---|---|---|
| Aluminium (powder-coated) | Excellent — no rot, no pest vulnerability | Periodic wash only; no repainting | Mid to high (varies by profile and finish) | Excellent — UV stable, moisture-proof, salt-resistant | Wide colour range; slim or traditional profiles available | 30+ years |
| Timber (hardwood/cedar) | Good initially; degrades without maintenance | Repaint or reseal every 3–5 years | Low to mid (material), high (lifetime maintenance) | Poor to moderate — vulnerable to moisture and UV | Excellent natural texture; unlimited paint options | 15–25 years (with maintenance) |
| PVC (cellular vinyl) | Good for moisture; poor UV longevity | Low initially; may need replacement when brittle | Mid | Waterproof but UV-sensitive; high thermal expansion | Limited colours; less refined profiles | 15–20 years (climate-dependent) |
| Fibre-cement composite | Very good — fire, rot, and pest resistant | Repaint every 7–10 years | Mid to high | Very good — non-combustible, moisture-resistant | Flat profiles only; requires painting for colour | 25+ years |
Cost comparisons at the material level depend heavily on profile complexity, supplier, and finish specification — request current pricing from your supplier for accurate project budgeting. What the table makes clear is that the cheapest material upfront is rarely the cheapest material over a building’s lifetime. Aluminium’s higher initial cost disappears against timber’s repainting bills or PVC’s eventual replacement.
Material sorted, the next question becomes shape. The profile you choose determines not just how the architrave looks, but how it functions against different window types, wall depths, and cladding systems.
Profile Types and Sizing for Different Window Styles
Aluminium architrave profiles are not one-size-fits-all. The cross-sectional shape of the extrusion determines how the architrave sits against the wall, how it transitions to the window frame, and how much visual weight it adds to the facade. Choosing the wrong profile creates problems — gaps that collect water, interference with opening hardware, or a visual mismatch that cheapens an otherwise considered design.
Four main profile categories cover the range available from Australian aluminium suppliers:
- Flat bar — A simple rectangular cross-section that sits flush against the wall face. This is the dominant choice for contemporary builds, delivering clean lines and minimal visual interruption. Flat exterior window trim suits modern facades where shadow lines and simplicity define the aesthetic.
- Angled profiles — Aluminium angles (typically L-shaped or Z-shaped extrusions) wrap around the junction between frame and wall, covering both the face and the return in a single piece. These are functional workhorses on cladding-over-frame details where the wall surface sits proud of the window.
- Picture frame configurations — Mitred at all four corners to create a continuous border around the window, picture frame window trim delivers a formal, symmetrical appearance. All four sides — head, jambs, and sill — use the same profile width for visual consistency.
- Traditional moulded profiles — Extruded to replicate heritage timber moulding shapes (ogee, ovolo, or bullnose edges), these suit renovations or period-style homes where a flat stock window trim profile would look too stark against detailed facade work.
Flat Bar and Angled Profile Options
Flat bar dominates new-build specifications because it integrates seamlessly with modern aluminium window systems. A flat window molding profile — say 65 mm wide and 3 mm thick — creates a subtle shadow line without competing with the window itself. Builders appreciate flat bar for its forgiving installation: slight wall irregularities hide behind the profile’s width, and mitres are straightforward to cut cleanly.
Aluminium angles serve a different purpose. Where the wall cladding finishes proud of the window frame — common with sheet cladding systems — an L-shaped aluminium angle trim covers both the face gap and the step between surfaces. Z-profiles take this further, wrapping a three-plane transition in one continuous piece. These profiles are less about decoration and more about solving a geometry problem at the junction. They excel on commercial facades and multi-storey residential where cladding build-up creates depth changes around openings.
Sizing Architraves for Different Window Types
Profile width matters beyond appearance. Standard face widths for external aluminium architraves range from 40 mm to 90 mm, with 50 mm and 65 mm being the most commonly stocked sizes across Australian suppliers. Wider profiles (75 mm and above) suit larger openings and buildings with generous proportions — a narrow 40 mm strip around a 2400 mm wide sliding door would look undersized and visually lost.
Window type directly influences which profile and width you can use. Awning windows hinge at the top and swing outward from the bottom, so the head architrave needs to sit clear of the sash arc — or use a profile shallow enough that the open sash clears it without binding. Casement windows hinge on the side and swing outward more aggressively, meaning jamb architraves on the hinge side must allow clearance for the opening hardware and sash edge. Sliding windows pose fewer clearance issues because the sash moves within the frame plane, so profile choice is purely aesthetic.
Depth — how far the architrave projects from the wall surface — also varies by application. A 10 mm projection creates a subtle finished edge. A 20 mm or deeper projection creates deliberate shadow lines but requires careful integration with head flashings to avoid water pooling on the top edge. The window molding sizes you select should balance visual intent with practical weathering behaviour.
How to Measure Your Window Openings Accurately
Getting measurements right before ordering prevents waste and frustrating rework. Three dimensions matter:
- Frame rebate — Measure how much of the aluminium window frame edge is visible from outside. The architrave needs to overlap this edge by at least 10–15 mm to conceal the junction but should not cover the frame’s drainage slots or weep holes.
- Wall thickness and cladding offset — Determine whether the finished wall surface sits flush with the window frame, recessed behind it, or projects forward of it. This dictates whether you need a flat profile, an angled profile, or a combination with a packing piece behind.
- Opening dimensions — Measure each window individually. Even in new builds, openings can vary by several millimetres. Measure at head, mid-height, and sill level for width; and at both jambs and centre for height. Use the smallest dimension for each to ensure the architrave sits tight without forcing.
Always account for a 3–5 mm expansion gap at mitre joints. Aluminium expands approximately 1.2 mm per metre over a 50-degree Celsius temperature swing — realistic for dark-coloured profiles on west-facing walls in Australian summers. Cutting dead-tight mitres without an allowance results in joints that buckle or push open when the profile heats up.
Profile shape and sizing decisions lock in how your architraves perform structurally and visually. But how those profiles hold up over years of sun exposure hinges on a separate choice entirely — the finish system applied to the aluminium surface.
Finish Options That Protect and Perform Outdoors
A finish on external aluminium architraves is not a cosmetic afterthought — it is the primary barrier between the raw metal and decades of Australian UV, salt, humidity, and thermal cycling. Choose the wrong finish and you end up with chalking, fading, or premature corrosion at fixing points. Choose well, and your window exterior trim looks the same at year twenty as it did at installation.
How Powder Coating Protects External Aluminium
Powder coating dominates external aluminium applications for good reason. The process works by spraying electrostatically charged dry powder onto the grounded aluminium surface, then curing it in an oven at around 180–200 degrees Celsius. The powder melts and fuses into a continuous, bonded film — typically 60 to 80 microns thick — that grips the substrate far more tenaciously than conventional wet paint.
This bonded film delivers three functional advantages critical for exterior window trim molding. First, UV stability: architectural-grade powder coatings resist ultraviolet degradation, maintaining colour and gloss without the chalking that plagues standard acrylic paints after a few years of full sun. Second, chip and impact resistance: the cured film is flexible enough to absorb minor knocks during installation and everyday life without cracking or peeling. Third, colour retention: where painted timber architraves fade noticeably within five to seven years, powder-coated aluminium holds its original hue with minimal shift across its service life.
Australian suppliers typically specify architectural-grade powder-coat systems — Dulux Duralloy, Interpon D-Series, or equivalent — offering palettes of several hundred colours. These systems carry warranties against excessive fading, chalking, and loss of adhesion under normal external exposure, giving homeowners and specifiers confidence that their exterior trim for windows will maintain its appearance without recoating.
Colour Matching With Windows and Wall Cladding
One practical advantage of powder coating is colour coordination across the full facade. Because aluminium window frames, architraves, flashings, and fascia can all be coated in the same system and batch, you achieve a precise match that would be nearly impossible with separately painted timber components. Popular choices for window mouldings exterior applications include Monument, Surfmist, Woodland Grey, and Matt Black — colours that correspond to Australia’s Colorbond palette and integrate seamlessly with roofing and gutter tones.
Specifying your architraves in the same colour and gloss level as the window frames creates a cohesive visual unit. Alternatively, a contrasting architrave colour — a darker frame against a lighter wall, for instance — defines the window as a deliberate design element rather than just a functional opening. Either approach works, but consistency within a chosen strategy matters more than the specific colour selected.
Anodised vs Powder-Coated Finishes
Anodising offers an alternative surface treatment that works through entirely different chemistry. Rather than applying an external layer, anodising grows an oxide layer from the aluminium surface itself through an electrochemical process. The result is a ceramic-like finish that becomes part of the metal rather than sitting on top of it.
For external architraves, anodising delivers exceptional surface hardness and scratch resistance — superior to powder coating in abrasion tests. It also adds negligible thickness, preserving the crisp edges and precise dimensions of extruded profiles. The metallic, translucent character of anodised aluminium suits contemporary facades where a refined, industrial aesthetic is desired.
The limitations are real, though. Anodised aluminium colour options are restricted to natural silver, bronze, black, and a handful of grey tones — enhancing the metal’s inherent character rather than concealing it. If your window exterior trim kit needs to match a specific Colorbond colour or a bold architectural palette, powder coating is the only viable path. Anodised finishes are also difficult to repair locally; damage typically requires replacing the entire piece rather than touching up a section, as the oxide layer cannot be spot-treated.
Matt versus gloss presents one final consideration. A matt finish (typically 20–30 percent gloss units) hides minor surface undulations and reduces glare on sun-facing elevations — practical advantages for west-facing architraves that catch afternoon sun. Gloss finishes (70 percent and above) read as sharper and more precise but reveal every ripple or dust inclusion in the coating. For most external applications, a satin or low-sheen powder coat strikes the best balance between visual crispness and forgiving performance.
Finish locks in the architrave’s long-term appearance. But appearance only holds if the profile integrates correctly with the wall behind it — and Australian homes present quite different wall constructions, each requiring a distinct approach to that junction.
Matching Architraves to Australian Wall Systems
Australian homes are built in remarkably different ways — and the wall construction behind your window opening dictates exactly how an external aluminium architrave needs to be detailed, fixed, and sealed. A profile that works perfectly against brick may fail against fibre-cement cladding if the junction geometry and fixing method are not adapted. Understanding your wall type is not optional; it is the starting point for correct installation.
Architraves on Brick Veneer Homes
Brick veneer remains the most common wall system across Australian suburban housing, particularly in Victoria, New South Wales, and South Australia. In this construction, the aluminium window frame typically fixes into a timber or steel stud frame, and the brick skin is built up to the window opening with a small gap between the brick face and the frame edge.
This gap is where the brick mould detail becomes critical. A brickmold window installation uses an aluminium profile — often an L-shaped or flat-back extrusion — that bridges the junction between the window frame’s outer edge and the face of the brick. The brick mould casing sits against the rough brick surface on one side and overlaps the aluminium frame on the other, creating a sealed, weather-resistant transition. An aluminum brick mold profile is purpose-designed for this geometry: its back face is flat or slightly textured to bed into sealant against uneven brickwork, while the visible face presents a clean finished line.
For exterior window trim on brick, fixing typically relies on a combination of construction adhesive (applied to the back face), mechanical fasteners into the window frame’s screw boss, and a continuous bead of neutral-cure silicone along the top edge to prevent water ingress. The key consideration with brick exterior window trim is accommodating the irregularity of the masonry surface — mortar joints, slight brick projections, and course alignment variations all mean the architrave must be bedded rather than simply clamped tight.
- Use neutral-cure silicone (not acetic-cure, which corrodes aluminium) at all junctions between the architrave back face and the brick.
- Ensure the head architrave overlaps the frame’s weep system without blocking drainage slots.
- Allow 2–3 mm clearance above the brickmold casing at the head for expansion and sealant accommodation.
- For exterior brick window trim on painted brick, prime and seal the brick surface first to ensure adhesive bond strength.
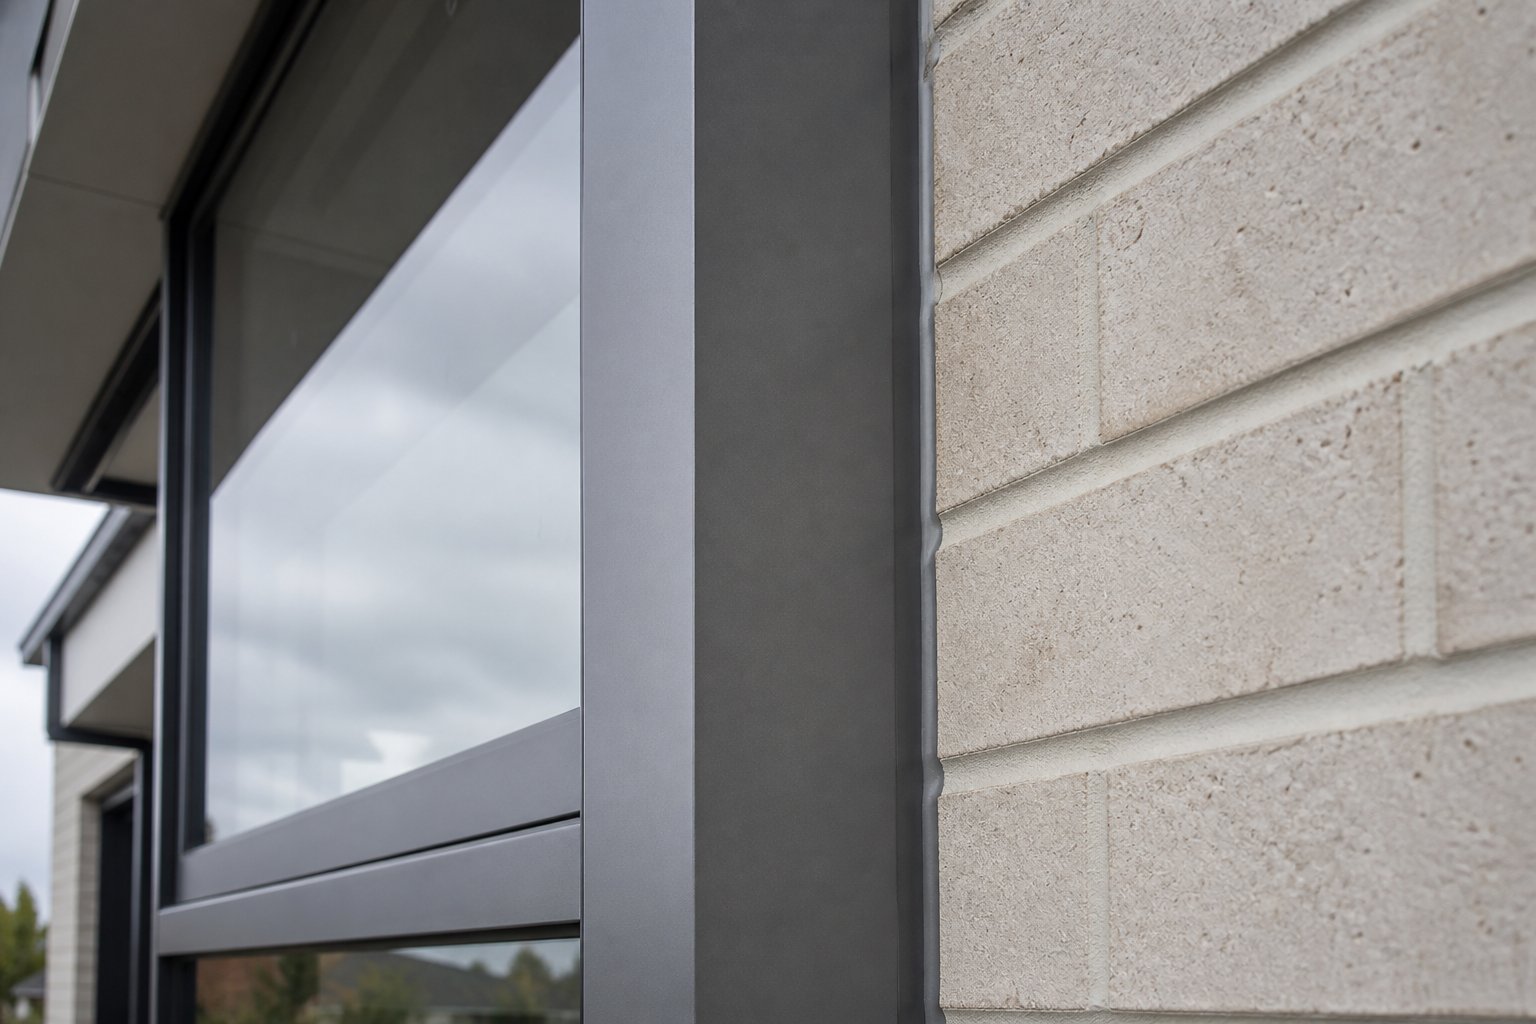
Integration With Lightweight Cladding Systems
Fibre-cement sheet, weatherboard, and composite panel cladding systems present a different challenge. These materials are cut to fit around window openings, leaving exposed edges that are vulnerable to moisture uptake — particularly fibre-cement, where site-cut edges are highly absorbent and must be sealed before any trim is installed over them.
The aluminium architrave in a cladding application performs double duty. It covers the raw, cut edge of the sheet material, protecting it from direct rain exposure, and it manages the surface water run-off path so that moisture tracks away from the penetration rather than behind the cladding. A flat bar or angled aluminium profile works well here because it can span the step between the window frame face and the cladding surface — which often sits 10–20 mm proud of the frame due to batten or cavity depth.
- Seal all cut edges of fibre-cement cladding with an alkali-resistant primer before installing the architrave over them — raw edges left unsealed will wick moisture even behind the aluminium.
- For weatherboard homes, scribe or pack behind the architrave to account for the profile of lapped boards.
- On batten-and-sheet systems, use a packing piece behind the architrave at fixing points to bridge the cavity between the cladding face and the window frame.
- Direct the head architrave’s top edge sealant bead behind the bottom edge of the cladding sheet above, creating a shingle-lapped water path.
Rendered and Concrete Wall Applications
Rendered walls — whether traditional sand-cement render over masonry block, or acrylic render over polystyrene insulation (EPS/EIF systems) — give you two options. You can render a return into the window opening, creating a rendered reveal with no architrave at all. Or you can stop the render short of the frame and apply an aluminium architrave over the junction, delivering a cleaner line and eliminating the cracking that render-to-frame junctions are notorious for.
The second approach has become increasingly popular in modern Australian builds. Render cracks at window junctions due to differential movement between the rigid aluminium frame and the render system — particularly on lightweight framed walls that flex under wind load. An aluminium architrave conceals this inevitable movement joint, accommodates it behind the profile with a flexible sealant, and provides a permanent, maintenance-free finish that never needs patching.
- On rendered block or concrete, fix architraves with masonry anchors or concrete screws — pop rivets alone will not hold into hard substrates.
- Leave a 5 mm gap between the render surface and the architrave back face, filled with flexible polyurethane sealant, to allow for building movement.
- For tilt-up concrete or precast panels, coordinate architrave installation with the window installer to ensure the frame’s fixing lugs are accessible before architrave profiles are applied.
- On EIF/polystyrene render systems, avoid over-compressing the insulation layer when fixing — use purpose-designed thermally isolated fasteners where required.
Each wall system demands a slightly different approach to fixing, sealing, and detailing — but the aluminium architrave itself adapts across all of them. The consistent variable is not the material on the wall, but the skill involved in executing the junction. Which raises a practical question: can you handle that junction yourself, or does it warrant professional hands?
DIY vs Professional Installation
Fitting external aluminium architraves sits in an interesting space on the DIY difficulty spectrum. It is not as simple as nailing up a picture frame, but it is nowhere near as complex as plumbing or electrical work. The honest answer about whether you should do it yourself depends on three things: the height of the windows, the complexity of the wall junction, and your tolerance for imperfect mitres staring back at you every time you pull into the driveway.
When DIY Installation Is Realistic
Ground-floor windows on single-storey homes with straightforward wall junctions represent the sweet spot for capable DIY installers. If the wall is flat (brick or rendered), the window frame is square, and you can comfortably reach the head of the opening from a standard stepladder, the job is well within reach. Simple picture-frame configurations with four straight runs and four mitred corners are manageable for anyone who has used a mitre saw before and understands the importance of measuring twice.
Where things shift toward professional territory:
- Multi-storey work — Second-storey windows require scaffolding, working at height introduces safety risk, and manoeuvring long aluminium lengths on a platform is awkward without a second pair of hands.
- Complex junctions — Windows set into cladding systems with cavity battens, or openings where the outside window molding must integrate with existing flashings and sarking, demand an understanding of water management layers that goes beyond trim carpentry.
- Heritage buildings — Older homes often have out-of-square openings, inconsistent reveal depths, and wall surfaces that are anything but flat. Custom scribing and packing to achieve clean lines on a federation-era weatherboard home is skilled work.
- Large openings — Bi-fold or stacker door surrounds with runs exceeding 2400 mm amplify every measurement error. Thermal expansion across long lengths also becomes a more critical calculation.
The tools required are relatively accessible. You will need a mitre saw fitted with a non-ferrous (aluminium-rated) blade — standard wood blades will grab and kick rather than cutting cleanly. Beyond that: a pop rivet gun for mechanical fasteners, a caulking gun loaded with neutral-cure silicone, a spirit level, a tape measure, a pencil, and hearing and eye protection. A deburring tool or fine file for cleaning cut edges is worth having too. Most of this kit costs less than a single hour of a tradesperson’s time, which makes the investment sensible if you plan to tackle the job yourself.
For context, here is a simplified sequence showing how outdoor window moulding installation typically progresses on a standard rectangular opening:
- Verify the window frame is plumb and level; check the wall surface for flatness across the architrave footprint.
- Measure and mark the head (top) piece first, allowing 3–5 mm expansion gap at each mitre joint.
- Cut the head piece with 45-degree mitres at both ends using the non-ferrous blade. Clean the cut edges with a deburring tool.
- Dry-fit the head piece against the opening, confirming overlap onto the frame and clearance from any weep holes or drainage slots.
- Apply a continuous bead of neutral-cure silicone along the top edge of the head piece’s back face, plus spot beads at fixing points.
- Fix the head piece using pop rivets into the frame’s screw boss or masonry anchors into the wall — method depends on substrate.
- Measure, cut, and fit each jamb piece in turn, working top-down so any water that reaches the junction shingles outward.
- Fit the sill piece last (if used), ensuring it falls away from the frame to shed water.
- Run a final sealant bead along the top edge where the head architrave meets the wall, tooling it smooth for a clean finish.
This sequence provides orientation — not full instructions. Every opening has quirks, and your specific wall system will dictate fixing details that a generic list cannot cover.
Common Installation Mistakes to Avoid
Three errors account for most DIY exterior window trim moulding failures, and all of them relate to underestimating how external conditions differ from interior work.
Skipping or skimping the top-edge sealant. Water runs down walls. It hits the top of your head architrave and looks for a way behind it. If the seal between the architrave’s top edge and the wall surface is incomplete, cracked, or applied with the wrong sealant type, moisture tracks behind the profile and into the wall assembly. This single bead of silicone is arguably the most important weatherproofing detail on the entire installation — yet it is the one DIY installers most often rush or forget. Use neutral-cure silicone only; acetic-cure products corrode aluminium over time and will fail at the bond line.
Dead-tight mitres with no expansion allowance. A freshly cut 45-degree joint that closes perfectly in the morning can buckle or push apart by afternoon if the sun hits it. Aluminium expands roughly 1.2 mm per metre over a 50-degree temperature range — entirely plausible for dark-coloured molding for exterior windows on a north or west-facing wall in Australian summer. Without a 3–5 mm gap at mitre joints (filled with colour-matched sealant), thermal movement has nowhere to go, and the joint either springs open or distorts the profile. Cutting tight feels right in the moment, but the material needs room to breathe.
Ignoring the substrate condition. Fixing outdoor window molding over damp timber, unsealed fibre-cement edges, or crumbling mortar creates problems that the architrave conceals but does not solve. Moisture trapped behind the profile accelerates substrate deterioration, and fixings into degraded material lose holding strength over time. Preparation work — sealing cut edges, repointing loose mortar, drying damp framing — is unglamorous but non-negotiable for a lasting result.
What Professional Installers Handle Differently
A licensed carpenter or facade installer brings two things that experience alone cannot replicate: speed born from repetition, and an understanding of how the architrave fits within the broader envelope system. What might take a homeowner an entire weekend, an experienced tradesperson can complete in a few hours — with consistently tighter joints and fewer material offcuts wasted on test cuts.
Professionals also handle the coordination that DIY installers often overlook. They check that head flashings are correctly lapped before covering them. They verify that the window’s drainage system remains unobstructed after the architrave is installed. They understand how to sequence work around other trades — ensuring the architrave goes on after cladding is complete but before painters seal the final junctions.
For multi-storey work, professionals carry appropriate insurance and work-at-height certification. In Queensland, licensed builders operating under the QBCC framework provide workmanship guarantees that protect homeowners if defects emerge. Similar licensing requirements apply across other states. This is not just paperwork — it means someone stands behind the quality of the installation if a sealed joint fails or a fixing pulls out during a storm.
Budget-wise, professional installation adds labour cost on top of materials, but it also eliminates the hidden costs of DIY miscalculation: wasted offcuts from bad measurements, replacement profiles after a blade grabs and tears the extrusion, or — worst case — water damage behind a poorly sealed junction that goes unnoticed for months. For straightforward ground-floor work on a home you know well, DIY delivers genuine savings. For anything involving height, complex flashing integration, or heritage detailing, professional fitting is the more economical path once you factor in risk.
Whether installed by your own hands or a tradesperson’s, the architrave now sits on the building doing its job. How long it keeps doing that job — and how little attention it demands along the way — depends on environment, maintenance, and the quality of the complete window system behind it.
Maintenance and Long-Term Durability Across Climates
Aluminium does not rot. It does not attract termites. It does not need repainting every few years. But “low maintenance” does not mean “no maintenance” — and the climate your building sits in determines exactly how much attention your outdoor window trim actually needs to stay in peak condition over its multi-decade lifespan.
Maintenance by Climate Zone
Australia’s diverse climate zones subject exterior window moldings to vastly different stresses, and your cleaning frequency should reflect that reality.
Coastal regions (within 5 km of the shoreline in areas like the Gold Coast, Sydney’s Northern Beaches, or Perth’s coastal suburbs) present the harshest conditions. Salt spray deposits on powder-coated surfaces act as a corrosive film that, left unchecked, gradually compromises the finish. Research on aluminium performance in coastal environments confirms that regular rinsing — monthly in exposed positions — prevents salt accumulation from reaching damaging concentrations. A garden hose and soft cloth are all you need. No chemicals, no scrubbing.
High-UV inland areas (western Sydney, regional Queensland, central Victoria) bake exterior surfaces under intense solar radiation for much of the year. Quality architectural powder coatings resist UV degradation far longer than paint, but prolonged exposure still causes gradual gloss reduction over many years. Cleaning every three to four months removes grime layers that trap heat against the surface and accelerate this process.
Humid subtropical regions (Brisbane, northern NSW coast) introduce a different concern: organic growth. Mould and mildew can establish on any exterior surface where moisture lingers and airflow is limited — particularly on south-facing elevations or architraves partially shielded by eaves. A quarterly wash with mild pH-neutral detergent eliminates biological growth before it stains the finish permanently. Avoid pressure washers entirely; the high-pressure stream can damage the powder coat and force water behind the exterior window wrap where it does not belong.
For all climate zones, the cleaning method stays simple: rinse with a garden hose to remove loose debris, wash gently with warm water and a squirt of dish soap using a soft microfibre cloth, rinse again thoroughly, and wipe dry. Work from the top of the architrave down so dirty water does not run across already-cleaned surfaces.
Signs of Wear and When to Act
Powder-coated aluminium architraves age gracefully, but they do give early warning signs if the finish is beginning to fail. Catching these signals early keeps a minor touch-up from becoming a full replacement.
- Chalking — A powdery residue when you rub your finger along the surface indicates UV breakdown of the top coating layer. Mild chalking after fifteen-plus years is normal on north and west-facing elevations. Heavy chalking within ten years suggests the original coating was underspecified for external exposure.
- Colour fading — Gradual loss of colour intensity, particularly on darker shades (Monument, Black, deep blues), signals cumulative UV load. Fading is cosmetic rather than structural, but it tells you the coating’s protective capacity is diminishing.
- Corrosion at fixings — Small white or grey spots around pop rivets or screws point to galvanic corrosion where dissimilar metals contact each other, or where the coating was breached during installation. This is the most actionable warning sign — address it by cleaning the area, applying a zinc-rich primer to the spot, and sealing with a colour-matched touch-up paint before moisture penetrates further.
- Bubbling or peeling — Rare on quality powder-coated profiles, but if it occurs, trapped moisture has broken the bond between coating and substrate. Affected sections typically need replacement rather than repair.
Mold on metal window frames and adjacent architraves in humid climates is unsightly but rarely damages the aluminium itself — it sits on the surface and washes off with detergent. The concern is what it signals: insufficient airflow or a drainage issue that keeps that junction wet longer than it should be. Fix the moisture source, and the mould stops returning.
How Window System Quality Affects Architrave Performance
An architrave is only one component in a system. Its long-term performance links directly to what sits behind it — the aluminium window frame, the hardware, the seals, and the drainage engineering. A beautifully finished outdoor window casing installed over a poorly designed frame with inadequate weep holes will eventually show water damage at the junction, no matter how well the architrave itself was installed.
This is why specifying architraves in isolation — divorced from the window system they frame — often leads to compatibility issues. Colour mismatches between separately sourced components, inconsistent profile depths that create awkward shadow lines, and finish systems that age at different rates all undermine the result. Selecting a complete aluminium window system from a specialist supplier — frames, hardware, seals, and architrave-compatible profiles engineered as a coordinated package — eliminates these integration risks and delivers a consistent exterior window wrap that performs as a unified assembly.
For homeowners, builders, and architects exploring integrated aluminium window solutions suited to Australian residential and commercial projects, MEICHEN’s aluminium windows range offers a starting point for understanding how frame systems, custom options, and exterior trim kits work together as a complete, long-term exterior package.
The takeaway across all climates and all building types is consistent: external aluminium architraves reward you with decades of clean, stable performance in return for almost nothing — a periodic wash, an occasional inspection, and the confidence that comes from choosing a material engineered to outlast the building cycle around it.
Frequently Asked Questions About External Aluminium Window Architraves
1. What is the difference between an external window architrave and a window reveal?
A window reveal is the recessed return of wall material visible between the window frame and the outer wall face — it provides structural support and sits within the wall opening. An external architrave, by contrast, is a surface-mounted profile that sits on the finished face of the wall, covering the junction where the reveal or frame meets the cladding. Reveals are structural and recessed; architraves are decorative-functional and surface-applied. You can have a reveal without an architrave (using a square-set finish), but an architrave always needs something behind it to frame against.
2. How long do powder-coated aluminium architraves last in coastal Australian conditions?
Powder-coated aluminium architraves typically last 30 years or more, even in coastal environments within 5 km of the shoreline. The key to achieving this lifespan in salt-air conditions is regular maintenance — monthly rinsing with a garden hose and soft cloth to remove salt deposits before they concentrate and compromise the powder-coat finish. Architectural-grade powder coatings from systems like Dulux Duralloy carry warranties against excessive fading, chalking, and adhesion loss under normal external exposure, making them well-suited to harsh Australian coastal climates.
3. Can I install external aluminium window architraves myself?
DIY installation is realistic for ground-floor windows on single-storey homes with straightforward wall junctions — flat brick or rendered surfaces where the frame is square and accessible from a stepladder. You will need a mitre saw with a non-ferrous blade, a pop rivet gun, neutral-cure silicone sealant, and a spirit level. However, multi-storey work, complex flashing integration, heritage buildings with out-of-square openings, or large bi-fold door surrounds typically warrant professional installation to ensure correct weatherproofing and avoid costly mistakes.
4. What profile width should I choose for external aluminium architraves?
Standard face widths range from 40 mm to 90 mm, with 50 mm and 65 mm being the most commonly stocked sizes across Australian suppliers. Wider profiles (75 mm and above) suit larger openings and buildings with generous proportions, while narrow 40 mm profiles work on smaller windows in minimalist designs. Your choice should also account for window type — awning and casement windows need profiles that allow clearance for opening hardware and sash movement, while sliding windows have no clearance restrictions.
5. Should I choose anodised or powder-coated finish for external aluminium architraves?
Powder coating is the better choice for most Australian external applications. It offers a far wider colour palette (hundreds of options matching Colorbond and architectural palettes), strong UV resistance, and the ability to colour-match across window frames, architraves, and fascia in a single batch. Anodising delivers superior surface hardness and scratch resistance with a refined metallic aesthetic, but colour options are limited to natural silver, bronze, black, and select grey tones. Anodised finishes are also difficult to repair locally — damage usually requires full piece replacement rather than spot touch-up.
More Window & Door Guides