Why Aluminium Window Paint Chips and When Touch Up Works
That first chip on your aluminium window frame always seems to appear out of nowhere. One day the finish looks flawless, and the next there’s a small flake exposing bare metal to the elements. The reality is that coating breakdown on aluminium frames follows predictable patterns driven by physics and chemistry. Understanding what causes it helps you fix it properly with aluminium window touch up paint rather than wasting time and money on repairs that peel off within months.
What Causes Paint to Chip on Aluminium Frames
Aluminium has a thermal expansion coefficient roughly twice that of steel. In Australian conditions, where frame surface temperatures can swing from near-freezing overnight to well above 50 degrees Celsius on a sun-facing elevation, this constant expansion and contraction places enormous stress on the paint film. Over thousands of cycles, micro-cracks develop in the coating, creating entry points for moisture and contaminants.
UV radiation compounds the problem. Australia’s intense solar exposure breaks down the resin binders that hold pigment particles together in the coating. As those binders degrade, the finish chalks, loses gloss, and becomes brittle. Moisture then penetrates the micro-cracks from below, working between the coating and the aluminium substrate. Once oxygen and water reach bare aluminium, oxidisation begins to form underneath the coating, progressively lifting it away from the metal surface. Physical impact from hail, garden debris, or even window hardware scraping against the frame accelerates the process by creating immediate breach points in what was otherwise intact coating.
Coastal properties face an additional threat: airborne salt deposits settle on frames, accelerate corrosion at any compromised point, and can undermine powder coat adhesion across entire frame sections if cleaning is neglected.
When Touch Up Paint Is the Right Solution
Not every bit of damage warrants calling a professional. Touch up paint for aluminum frames is a practical and cost-effective fix for localised damage, but it has clear boundaries. Here’s a straightforward framework for deciding your approach:
DIY touch-up is appropriate when:
- Individual chips are under 10 mm in diameter
- Scratches are shallow and isolated to one or two frame sections
- Minor flaking is confined to edges or corners where physical contact occurs
- The surrounding coating remains firmly adhered and shows no signs of bubbling
- Bare aluminium is exposed but shows no white pitting or deep corrosion
Professional refinishing or replacement is warranted when:
- Peeling or flaking extends across large sections of the frame profile
- Filigree corrosion (spider-like strands under the coating) is visible
- Deep pitting has formed in the aluminium substrate
- Previous touch-up attempts are themselves lifting or discolouring
- Damage covers more than 20 percent of the visible frame surface
- The coating has chalked extensively or feels powdery to the touch
A useful rule of thumb: if you can spot the damage from several steps away across multiple areas, you’ve moved beyond touch-up territory. Isolated blemishes you need to look for up close are ideal candidates for a careful DIY repair with aluminum color spray paint or a brush-on product.
Setting Realistic Expectations
Factory powder coating on aluminium windows is applied electrostatically and cured at temperatures around 200 degrees Celsius, creating a chemically cross-linked film that bonds at a molecular level. No consumer-applied touch-up product can replicate that process on an installed window. The finish will differ slightly in texture, thickness, and durability compared to the original.
That said, a well-executed touch-up achieves two critical goals. First, it seals exposed aluminium from further oxidisation and corrosion, halting damage progression. Second, it significantly improves appearance when colour and sheen are matched correctly. Most homeowners find that a careful repair is virtually invisible from normal viewing distance.
Success hinges on three factors this guide covers in depth: identifying your existing coating type so you choose a compatible product, achieving an accurate colour and sheen match, and preparing the surface so the new paint actually bonds rather than sitting loosely on top waiting to peel.
Understanding Your Original Window Coating Type
Grabbing any tin of paint off the shelf and brushing it over a chipped aluminium frame is the fastest route to a repair that peels within weeks. The reason is paint system compatibility. Your touch-up product must work with the existing coating already on the frame, and that coating falls into one of three categories. Identifying which one you’re dealing with changes everything about primer choice, surface prep, and product selection.
Powder Coated Aluminium Frames
Most aluminium windows manufactured in the last 30 years use powder coating. The process works by electrostatically charging dry powder particles onto the aluminium extrusion, then curing the assembly in an oven at around 200 degrees Celsius. The result is a tough, uniform film with excellent adhesion and weather resistance that standard house paint simply cannot replicate or bond to reliably.
Within powder coatings, there are meaningful differences. Standard polyester powders are widely used on residential window frames and offer good UV resistance at an economical price. Super durable polyester formulations push that performance further, delivering roughly ten times the colour and gloss retention of standard polyesters. At the top tier, fluoropolymer powders based on FEVE resin deliver the longest-lasting protection and are typically specified for high-exposure commercial curtain wall and premium residential projects.
For touch-up purposes, the key takeaway is this: powder-coated frames have a hard, cross-linked surface. Your repair product needs to adhere to that cured film at chip edges while also protecting any exposed bare aluminium at the chip centre. Generic acrylic house paint lacks the hardness and adhesion profile to do either job well.
Wet Paint and Liquid-Applied Coatings
Older aluminium windows, specialty architectural frames, and some commercial installations use liquid-applied coatings rather than powder. These include two-pack polyurethane systems and, on high-end projects, 70% PVDF fluoropolymer liquid coatings (sold under trade names like Kynar 500 and Hylar 5000). Two-pack polyurethane finishes are chemically cross-linked once cured, making them extremely hard and solvent-resistant.
Touch-up on these surfaces requires a product that can bond to a low-energy, highly cured substrate. The surface energy of a fully cured two-pack polyurethane is lower than standard powder coat, so mechanical keying through light sanding becomes even more critical. If your aluminium windows date from the 1970s or 1980s, or were part of a commercial fitout specifying liquid PVDF, assume you’re working with a wet-applied system and adjust your preparation accordingly.
Anodised Aluminium Surfaces
Can you paint anodised aluminium? Yes, but the surface behaves differently from any organic coating. Anodising is an electrochemical process that converts the aluminium surface into a layer of aluminium oxide. This oxide layer is integral to the metal itself, meaning it cannot peel or flake the way paint does. It’s also extremely hard and chemically stable, which is precisely why standard primers struggle to grip it.
If your frames have a metallic, slightly translucent appearance, particularly in natural silver, champagne, or bronze tones with visible grain, they’re likely anodised. The challenge when learning how to paint anodised aluminium is that the sealed oxide surface resists mechanical bonding. You need to scuff-sand with a fine non-woven abrasive to open the sealed pore structure, then apply a self-etching or epoxy primer formulated for aluminium substrates. Skipping this step, or using a generic timber or all-surface primer, virtually guarantees adhesion failure and peeling within months.
Anodised frames are most common on Australian homes built between the 1960s and early 1990s, particularly in natural silver and bronze finishes. Many remain in excellent structural condition despite surface staining or fading, making them ideal candidates for a painted refresh rather than replacement.
| Coating Type | Typical Window Age | Touch-Up Difficulty | Primer Requirement |
|---|---|---|---|
| Powder coat (polyester) | 1990s onwards | Moderate | Self-etching primer on bare aluminium; adhesion promoter on intact surrounding coat |
| Powder coat (fluoropolymer) | 2000s onwards, premium builds | Moderate to high | Self-etching primer on bare aluminium; manufacturer-matched product preferred |
| Wet-applied two-pack polyurethane | 1970s to 1990s, commercial | High | Light sanding essential; epoxy or self-etching primer on exposed metal |
| Anodised (natural or coloured) | 1960s to early 1990s | High | Scuff sanding plus self-etching or epoxy primer mandatory, even on intact areas |
Which statement is true regarding paint system compatibility across these coatings? Put simply, no single touch-up product works optimally on all four substrates. A product designed for powder-coated frames may fail on anodised aluminium because the bonding mechanism is fundamentally different. Identify your coating type first, then select your repair system to match. That single step eliminates the most common reason DIY touch-ups fail before you even open the tin.
Knowing your substrate also determines how closely you can match the original colour, because each coating type ages and fades differently under UV exposure.
How to Match Your Aluminium Frame Colour Accurately
Colour matching is where most DIY touch-up projects go wrong. You can nail the surface prep, buy a quality product, and apply it with real precision, yet still end up with a patch that screams “repaired” because the colour is half a shade off. The challenge is amplified on aluminium window frames because the original finish was produced under tightly controlled factory conditions using specific powder or paint formulations that consumer products rarely replicate exactly.
The good news: practical strategies exist to get close enough that repairs become invisible from normal viewing distance. It starts with understanding how your frame colour was specified in the first place.
Using the RAL Colour System
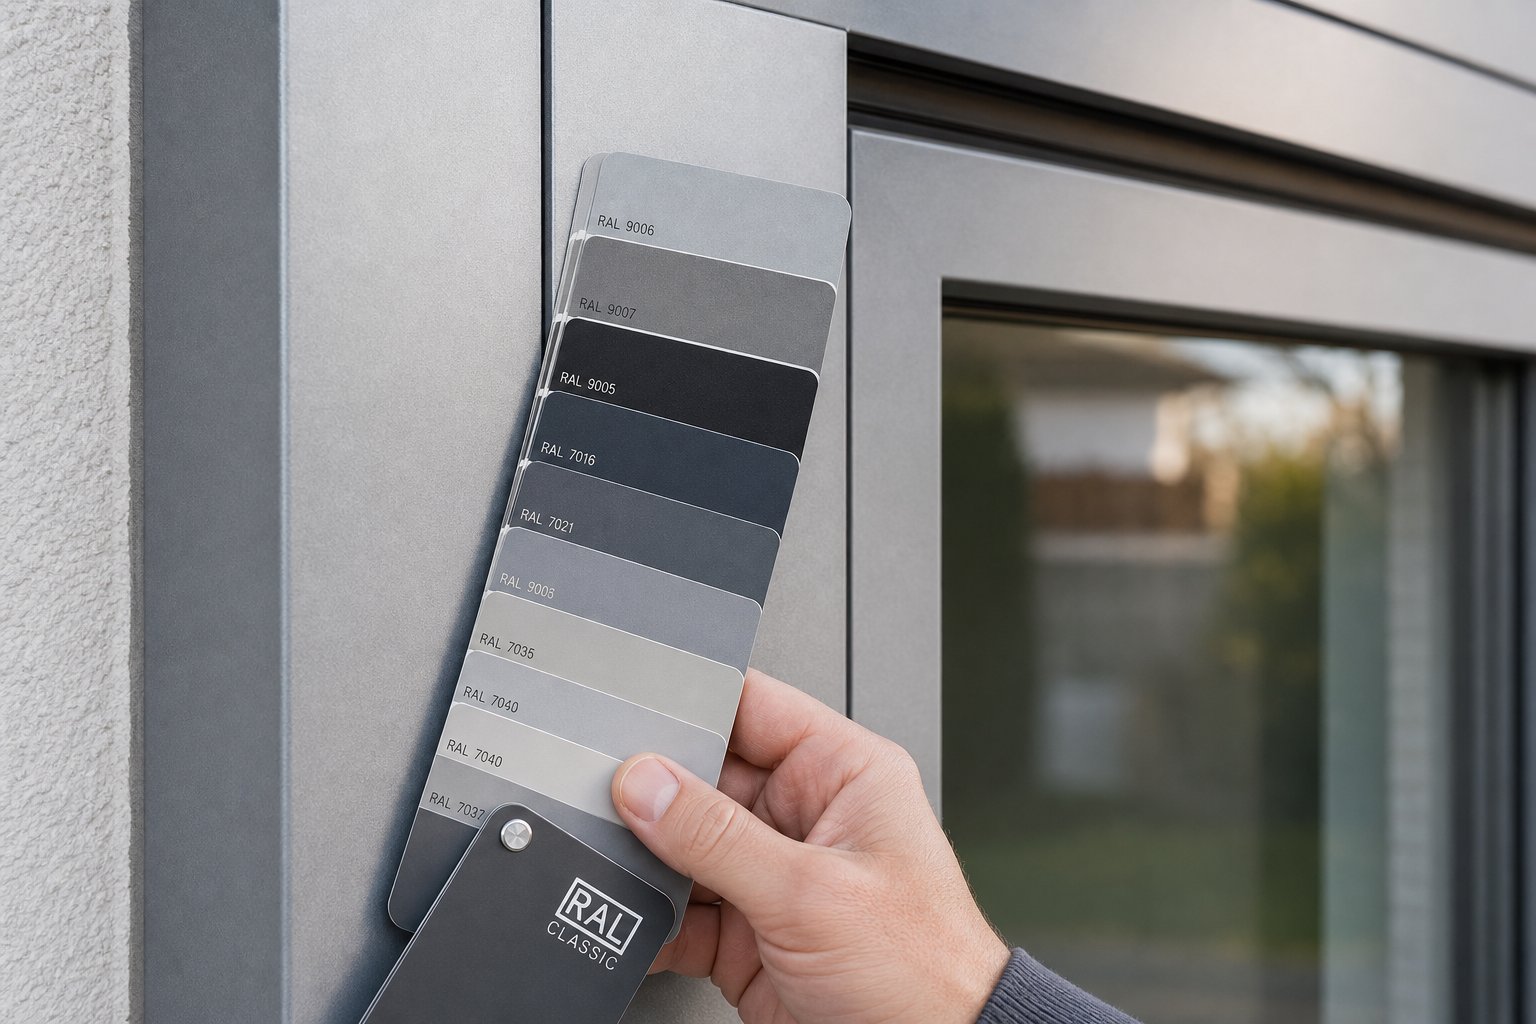
Most powder-coated aluminium windows in Australia and worldwide are finished to a RAL colour reference. RAL is a standardised colour matching system originating from Germany that assigns a unique numeric code to each shade, removing the guesswork from colour communication between manufacturers, powder coaters, and suppliers.
RAL 9006, known as White Aluminium, is one of the most widely used aluminium window frame colours globally. The RAL 9006 color sits in the metallic silver-grey family and closely mimics the natural appearance of raw aluminium with a subtle metallic sheen. If your frames have that classic silvery-grey metallic look common on residential and commercial buildings from the mid-1990s onward, RAL 9006 White Aluminium is a strong starting point for your touch-up colour search.
Other commonly specified RAL codes for window frames include:
- RAL 9005 (Jet Black) and RAL 9017 (Traffic Black) for black frames
- RAL 7016 (Anthracite Grey) for the popular dark charcoal finish
- RAL 9010 (Pure White) and RAL 9016 (Traffic White) for white frames
- RAL 8014 (Sepia Brown) and BS 08 B 29 (Van Dyke Brown) for traditional brown tones
Finding your specific RAL code is often straightforward. Check original window documentation, the manufacturer’s invoice or order confirmation, or any labels on the frame hardware. If you’ve moved into an existing property and have no records, contacting the original installer or window manufacturer is the fastest route, as reputable companies typically retain order records including colour specifications.
One critical detail many homeowners miss: the same RAL reference can look slightly different depending on which powder manufacturer produced it. Syntha Pulvin, Interpon (Akzo Nobel), Tiger, and IGP all manufacture their own powder formulations. Two frames both specified as RAL 7016 Matt but coated with powder from different manufacturers may not be an exact visual match. When sourcing touch-up paint, knowing both the RAL code and the powder brand (if possible) produces the tightest colour alignment.
Matching Bronze and Custom Colours
Bronze tones, charcoal variants, and bespoke architectural colours present a harder matching challenge. Unlike standard RAL whites and blacks that cluster around a few well-known codes, bronze finishes vary enormously between manufacturers. A “light bronze” from one window supplier can look entirely different from another’s product labelled identically.
Where the original window manufacturer offers their own branded touch-up product, that’s always your best option for bronze and custom colours. These products are formulated using the same pigment blends as the original factory finish.
When no manufacturer-specific product exists, the most reliable alternative is spectrophotometer matching. Most quality paint suppliers in Australian metro areas have a spectrophotometer, a device that analyses the precise wavelengths of light reflected from a colour sample and formulates an exact pigment recipe to replicate it. The service is typically free or low-cost. For the best results, remove a small piece of hardware from the frame, such as a vent cover, end cap, or drain clip, and bring it into the store. These removable pieces give the machine a flat, clean surface to read without texture or dirt interference.
Keep in mind that spectrophotometer accuracy sits around 90 percent, and results improve with flat, non-textured samples. Glossy or heavily metallic finishes can cause light scatter that reduces reading precision, so ask the technician to take multiple readings and average them.
Dealing with Faded Frames
Here’s where many careful homeowners trip up despite doing everything else right. You track down the exact RAL code, source a perfectly matched touch-up product, apply it flawlessly, and the repair stands out like a sore thumb. The reason is UV fading.
Frames exposed to years of Australian sun gradually shift in colour. South and west-facing elevations fade faster than protected southern faces. A frame originally specified as RAL 9006 may have drifted noticeably from the factory standard over a decade of UV bombardment. Your brand-new touch-up paint, mixed to the original specification, now looks too saturated or too clean against the weathered surrounding finish.
The most invisible repair matches the colour your frames are now, not the colour they were when new. Match the faded frame, not the original specification.
The practical approach: always test-patch in an inconspicuous area first. Apply a small amount to a hidden section of the frame, let it cure fully (at least 48 hours), then assess the match in natural daylight from a normal viewing distance. If the test patch looks too fresh or saturated, you have two options. Ask a paint supplier to adjust the formula slightly toward a more faded version, or lightly mist the cured touch-up with a very thin coat of clear matte to knock back some of the sheen and vibrancy.
Darker colours tend to show fading less visibly than light metallics, which is one reason dark frame touch-ups often produce more satisfying results. On heavily faded frames where the colour shift is dramatic, consider whether touching up individual chips will create a “leopard spot” effect. In those cases, refinishing entire frame sections or rails produces a more uniform result, even if it requires more product and masking effort.
With colour accurately dialled in, the next variable that separates a professional-looking repair from an obvious patch is how you physically get paint onto the frame. The format you choose, whether pen, brush, or spray, determines both the finish quality and the skill level needed to pull it off.
Touch Up Solutions for Bronze and Dark Frame Finishes
Bronze aluminium frames dominate a significant portion of Australian residential and commercial buildings, particularly homes built from the 1970s through the 2000s. The colour matching principles covered above apply, but bronze and dark finishes introduce complications that standard whites, blacks, and greys simply don’t. A single product labelled “bronze” almost never matches your specific frame because the term covers a vast spectrum of warm metallic tones.
Bronze Finish Variations Explained
Walk into any architectural hardware supplier and ask for paint for bronze aluminium frames, and the first question back will be “which bronze?” The range is broad, and subtle differences between shades become glaringly obvious when a touch-up patch sits alongside the original.
Common bronze finish names you’ll encounter on Australian aluminium windows include:
- Champagne Bronze — a light, warm gold-beige with soft metallic sheen, common on 1990s residential frames
- Medium Bronze — a mid-tone brown with golden undertones, the most widely used bronze variant across suburban homes
- Dark Bronze — a rich chocolate-brown with minimal gold, popular on commercial shopfronts and 1980s builds
- Midnight Bronze — nearly black with warm brown undertones visible only in direct light
- Venetian Bronze — a reddish-warm bronze with copper undertones, used on heritage and period-style installations
- Anodic Bronze — the classic anodised bronze common on 1970s and 1980s Australian homes, with visible aluminium grain
Manufacturers like CRL (C.R. Laurence) and Seymour produce specific bronze-tone spray paints formulated for architectural aluminium applications. CRL’s range includes dedicated midnight bronze spray paint and medium bronze options calibrated to common commercial framing systems. Seymour’s architectural line similarly targets specific bronze variants rather than offering a one-size-fits-all product. If your frames came from a major window system like AWS, Capral, or Alspec, contact the manufacturer directly, as many stock or can source venetian bronze paint and other proprietary touch-up colours matched to their original powder specifications.
Matching Metallic and Textured Dark Finishes
Many bronze and charcoal frame finishes contain metallic flake particles suspended in the coating. These create directional light effects that shift depending on viewing angle, making brush-on touch-up particularly tricky. A brush tends to lay metallic flakes flat in one direction, creating a visible patch that reflects light differently from the surrounding spray-applied or powder-coated finish.
Spray application generally produces a far closer match for metallic colours because the atomised droplets deposit flake particles in random orientations, mimicking the original factory finish pattern. If your bronze frames have any metallic shimmer, plan to use aerosol rather than a brush-on product.
For depth on darker metallic finishes, layering works better than a single heavy coat. Apply a thin mist coat first, allow it to tack off for five to ten minutes, then build with two or three additional light passes. Each layer adds depth and helps metallic particles settle at slightly different angles, producing the subtle complexity that makes factory finishes look rich rather than flat. Matt and textured dark finishes present the opposite challenge: too much product fills the texture, creating a glossy spot. Light, dry passes from slightly further back preserve surface texture.
Heat and Sun Exposure Considerations
Dark-coloured frames absorb significantly more solar radiation than lighter finishes. On a 35-degree day in Sydney or Brisbane, a north-facing dark bronze frame can reach surface temperatures above 70 degrees Celsius. That thermal load means your touch-up paint must tolerate repeated high-temperature cycling without softening, losing adhesion, or discolouring.
Standard touch-up paints are typically rated to around 60 degrees Celsius surface temperature. For north and west-facing elevations where dark frames cop the worst solar punishment, look for products specifically rated for elevated temperature performance, often marketed as high heat bronze spray paint or heat-resistant architectural coatings. CRL’s range and automotive-grade metallic touch-up products generally handle thermal stress better than generic hardware store options.
Timing matters too. Avoid applying touch-up paint to dark frames when the surface is hot. Early morning on an overcast day gives you the best working window: the frame is cool enough for proper paint flow and adhesion, and you avoid the flash-drying that causes poor levelling and reduced durability on sun-heated dark surfaces.
Getting the right bronze shade onto your frame is only half the battle. The format you apply it in, and the physical technique you use, determines whether that colour match translates into an invisible repair or an obvious smear.
Choosing Between Pens, Brushes, and Spray Cans
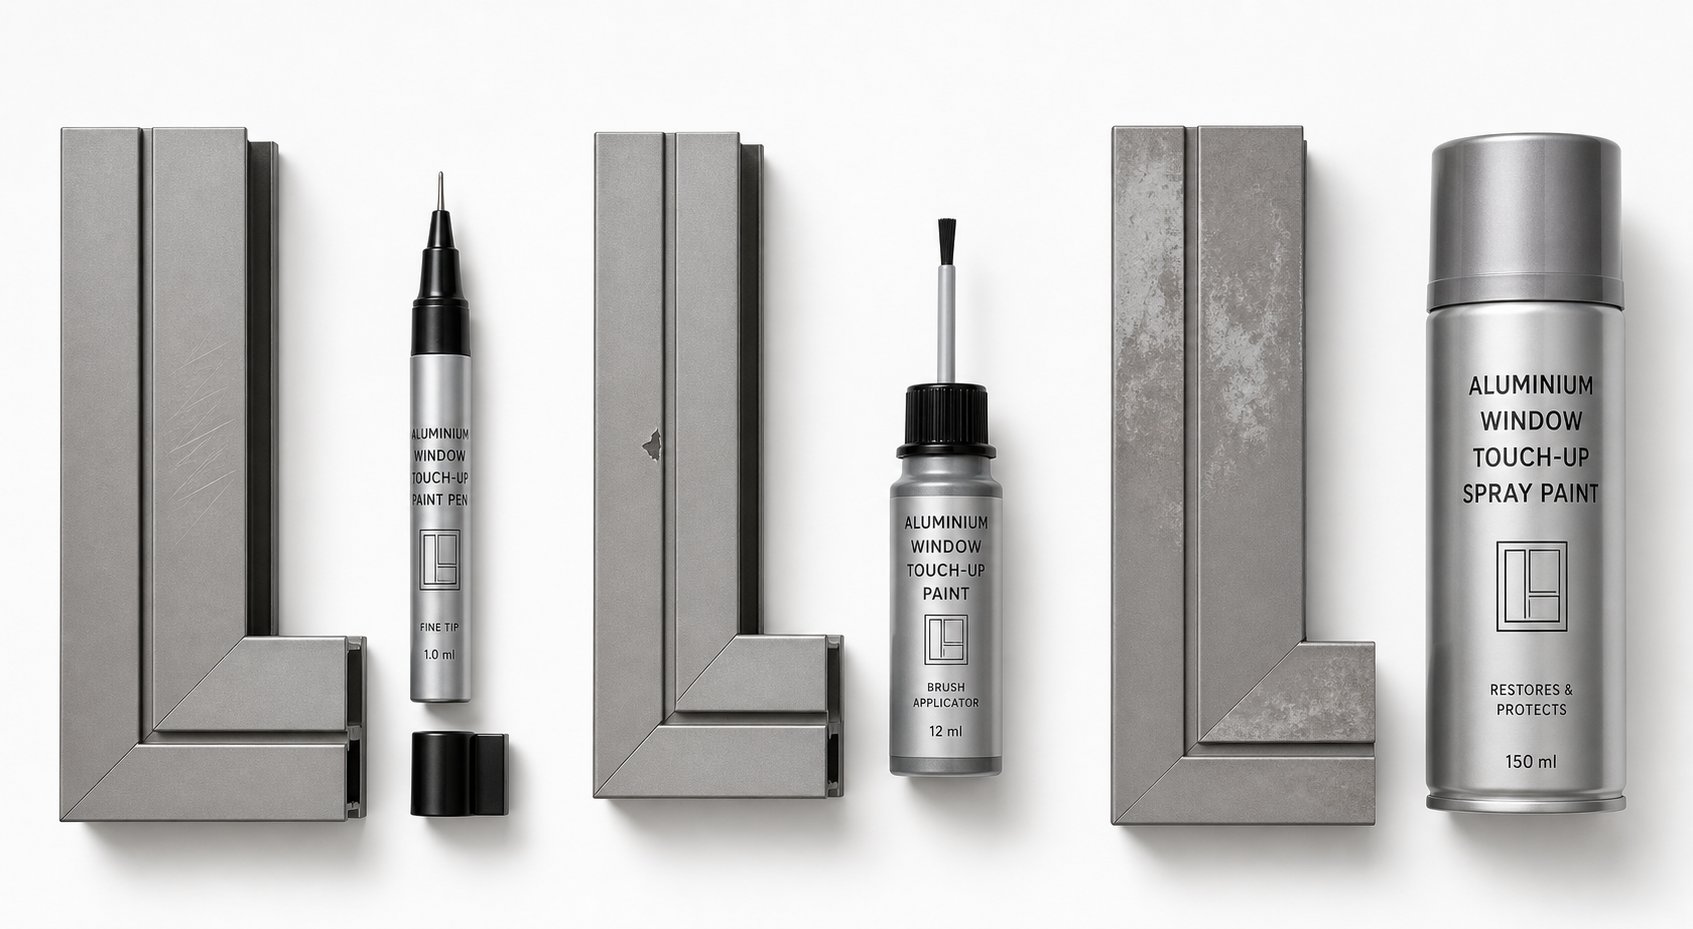
Three product formats exist for aluminium window touch up paint, and picking the wrong one is a guaranteed path to a visible, frustrating repair. Each format suits a specific damage size, location, and finish type. The decision isn’t about quality hierarchy so much as matching the tool to the job.
Touch Up Pens and Paint Markers
A white paint pen for metal or a colour-matched touch-up marker is the precision instrument of this toolkit. Pens excel on pin-point chips under 5 mm, tiny scratches, and isolated flicks where you need surgical control and minimal evidence of intervention. The fine nib deposits a small, controlled amount of paint directly into the chip without spreading onto surrounding intact coating.
For standard colours like white, black, and silver, paint pens are widely available from hardware stores and online suppliers. They’re the least intimidating format for first-time users and require almost no masking or setup. The trade-offs are real, though: limited paint volume means they run dry quickly on anything beyond a handful of small chips, colour range is restricted to common shades, and metallic or custom colours are rarely available in pen format. If you’re dealing with bronze, charcoal, or manufacturer-specific tones, pens probably won’t get you there.
Brush-On Touch Up Paint
Bottle-and-brush products work much like nail polish: a small bottle with an integrated applicator brush designed for scratches and chips up to roughly 15 mm. This format bridges the gap between pen precision and spray coverage, and it’s the most common format supplied by window manufacturers as part of their aftercare kits.
Technique matters here. On smooth powder-coated aluminium, visible brush marks are the primary risk. Industry guidance from Linetec recommends dipping the brush only halfway up the bristles, tapping excess against the container rim, and feathering paint into the damage using light fingertip pressure. The goal is to fill the chip without spreading product onto undamaged surrounding finish. Apply sparingly in thin layers rather than trying to cover in one pass. Heavy application creates visible ridges where the touch-up edge meets intact coating, and those ridges catch light and shadow differently from the flat factory finish surrounding them.
For anodised or two-pack surfaces, brush-on products with a built-in primer or high-adhesion formula simplify the process by reducing the number of separate steps.
Aerosol Spray Paint for Larger Repairs
When damage extends beyond individual chips, covering a scrape across a frame rail, a patch of flaking along a sill, or an area with clustered small chips, aerosol spray delivers the closest result to a factory-applied coating. The atomised application deposits paint in a fine, even film without brush texture, and critically for metallic finishes, it distributes flake particles in random orientations that mimic the original powder coat appearance.
CRL spray products are an industry-standard option for architectural aluminium touch-up, available in common framing colours including various bronze tones, blacks, and whites. Their formulations target the specific adhesion and durability requirements of powder-coated aluminium substrates. For plastic components integrated into frame assemblies, such as thermal break covers or drainage caps, a bronze spray paint for plastic with an adhesion promoter handles those mixed-material areas without the separate priming step.
Spray application demands more preparation. You’ll need painter’s tape and masking film to protect glass, seals, and adjacent surfaces from overspray. Aerosol repairs suit highly visible locations where brush texture would be noticeable, removable components that can be masked completely, and any situation where multiple small chips cluster close together. Hold the can 200 to 300 mm from the surface, use steady horizontal passes, and build coverage through multiple light coats rather than one heavy application.
| Product Format | Best Use Case | Skill Level | Colour Range | Finish Quality |
|---|---|---|---|---|
| Aerosol spray | Areas larger than a coin, full rail sections, metallic finishes, clustered chips | Moderate — requires masking and consistent pass technique | Wide — CRL spray and architectural ranges cover most standard and bronze tones | Highest — closest match to factory spray/powder texture |
| Brush-on bottle | Individual chips and scratches 5–15 mm, isolated damage on accessible frame sections | Low to moderate — thin application and feathering technique needed | Good — manufacturer kits cover proprietary colours; aftermarket covers common RAL codes | Good — invisible on small repairs; brush marks possible on larger patches |
| Paint pen/marker | Pin-point chips under 5 mm, fine scratches, minimal touch-ups | Low — simple point-and-fill application | Limited — mostly whites, blacks, silvers, and common neutrals | Adequate — fills small damage effectively but lacks spray-level smoothness |
A practical approach for frames with mixed damage: use a pen for scattered tiny chips on visible sections, a brush for medium scratches on rails and mullions, and reserve spray for any area larger than a two-dollar coin or where metallic colour matching is critical. Many homeowners end up buying two formats, a pen for ongoing maintenance and a spray can for the initial larger repair.
Whichever format you choose, the product only performs as well as the surface underneath it. Even the best colour-matched spray will peel within months if applied over contaminated or unprepared aluminium, which makes the next stage, surface preparation, the true make-or-break step in any lasting repair.
Surface Preparation Steps for Lasting Adhesion
Surface preparation accounts for roughly 80 percent of whether your touch-up lasts years or peels within weeks. The aluminium substrate behaves nothing like timber or rendered masonry. It’s non-porous, it oxidises within minutes of exposure, and it rejects coatings that aren’t given something to grip. Every shortcut at this stage shows up later as flaking, fisheyes, or adhesion failure that forces you to strip and start over.
Cleaning and Degreasing Aluminium
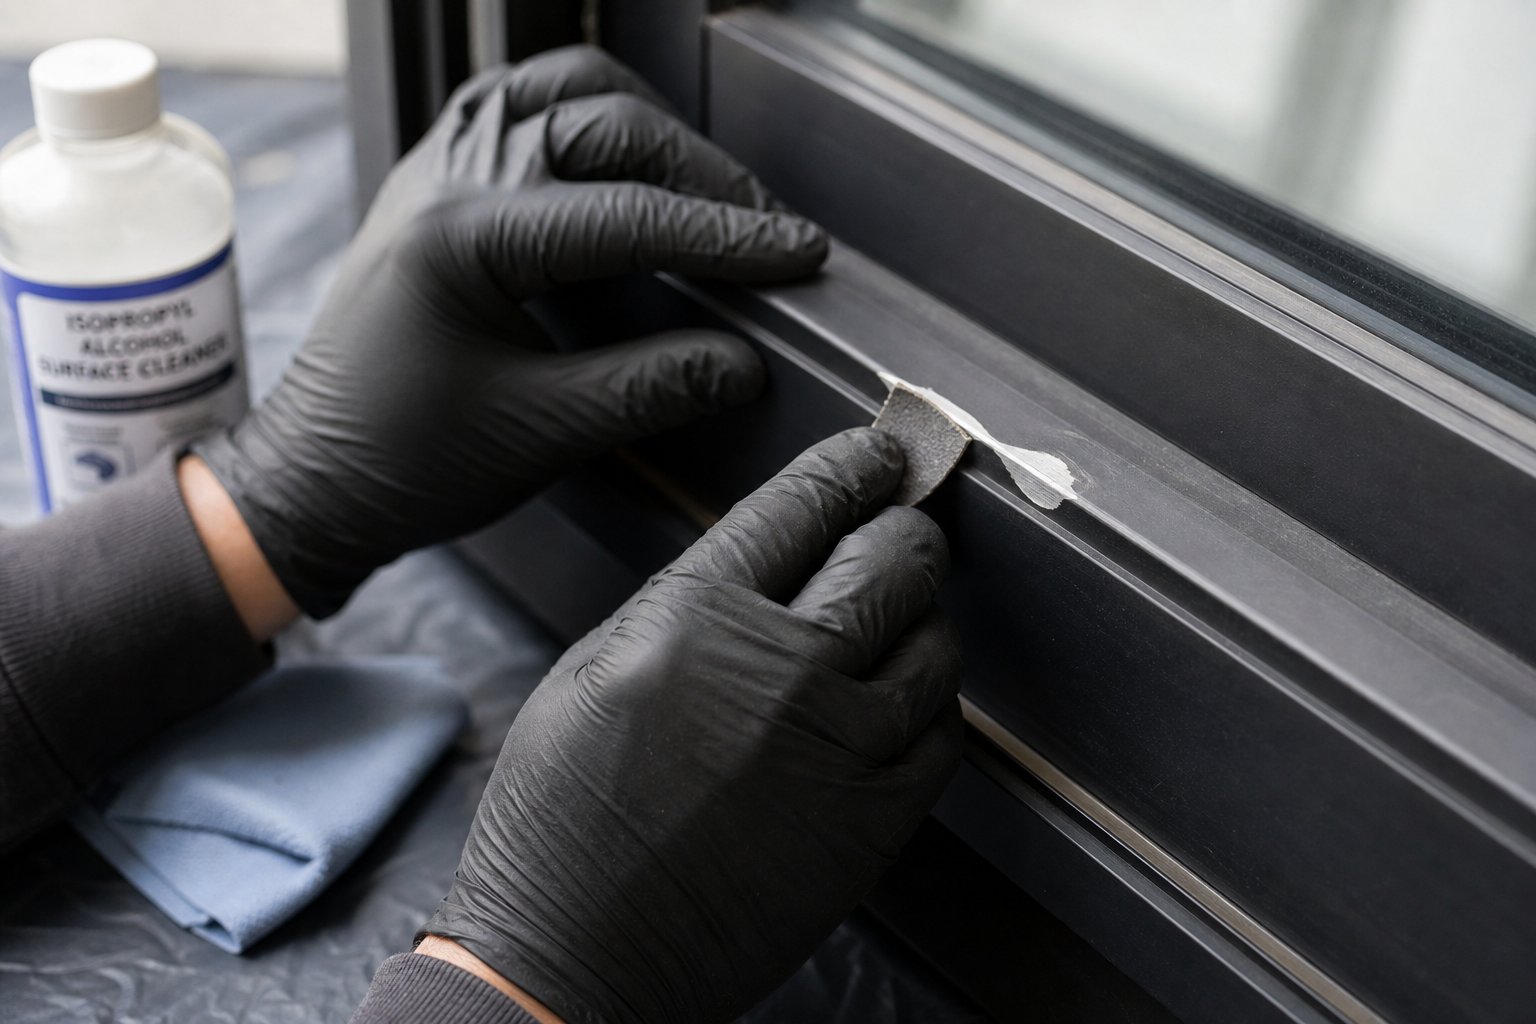
Contamination invisible to the naked eye is enough to ruin adhesion. Silicone residues from window sealants, finger oils from handling, airborne cooking grease, and atmospheric grime all create a barrier between your touch-up paint and the substrate. Cleaning must happen in stages, not with a single wipe.
Start with a wash using sugar soap or a mild non-ionic detergent and warm water. Scrub the damaged area and at least 50 mm of surrounding intact coating with a soft-bristle brush or non-abrasive pad to lift dirt, cobwebs, and surface chalk. Rinse thoroughly with clean water and allow the frame to dry completely.
Follow with a solvent wipe using isopropyl alcohol (IPA) or acetone on a clean, lint-free cloth. This second pass removes the invisible culprits: silicone traces, oils, and any residual film the detergent wash left behind. Wipe in one direction rather than circular motions to avoid redistributing contaminants. Use a fresh section of cloth for each pass until no discolouration transfers.
One product to avoid: household cleaners containing ammonia. Ammonia reacts with aluminium, causing surface staining and micro-pitting that compromises the substrate rather than cleaning it. Standard glass cleaners are a common offender here. Stick to neutral-pH detergents and pure solvents.
Sanding and Feathering Existing Damage
Chipped or flaking coating leaves a hard edge, a ridge where intact paint meets bare aluminium. If you apply touch-up paint directly over that ridge, it telegraphs through the repair and catches light differently from the surrounding flat finish. Feathering smooths that transition into an invisible gradient.
Use 400-grit wet-and-dry sandpaper wrapped around a small block or folded into a firm pad. Work the edges of the chip in short, controlled strokes, angling the block so it bridges from intact coating onto bare metal. The goal is to taper the paint edge into a smooth slope rather than a cliff. Once the ridge is gone, refine with 600-grit to tighten the scratch pattern and create a surface that primer and paint can flow over without revealing the boundary.
Restraint matters here. On powder-coated surfaces, you’re only addressing the damaged edge, not sanding the surrounding intact coating flat. Over-sanding removes good material, widens the repair area unnecessarily, and can thin the factory finish to the point where it fails prematurely. A practical test from experienced finishers: run your fingertip across the feathered edge. If you can’t feel a step, you’re ready for the next stage. If your nail catches, drop back to 400-grit and continue until the transition is imperceptible.
For anodised frames where you plan to use anodized spray paint or anodized aluminum spray paint over the repair, scuff a slightly wider area (around 30 mm beyond the damage) with a fine non-woven abrasive pad. The sealed anodic layer needs mechanical tooth across the entire zone where new product will land, not just at the chip edge.
Primer Selection for Aluminium
Primer choice on aluminium isn’t one-size-fits-all. The right product depends entirely on what’s exposed at the repair site and what coating surrounds it.
Self-etching primer is necessary when: bare aluminium is visible at the chip centre, you’re working on anodised surfaces, or the existing coating has been sanded through to raw metal. Self-etching formulations contain mild acids (typically phosphoric) that chemically bite into the aluminium while simultaneously depositing a protective primer layer. PPG’s standard operating procedure for bare aluminium emphasises priming exposed aluminium immediately, as oxidation can reform on bare surfaces within 15 minutes of sanding. Speed matters: sand, clean, and prime in a single session without leaving bare metal overnight.
Adhesion promoter alone suffices when: the chip is shallow, only the topcoat layer is damaged, and the underlying primer or powder base remains intact. In this scenario, you’re bonding new paint to existing cured coating rather than to bare metal. A thin adhesion promoter provides the chemical bridge without adding unnecessary film thickness.
No separate primer is needed when: you’re using a manufacturer-matched touch-up product specifically formulated for direct application over their coating system. These products incorporate adhesion-promoting resins that eliminate the separate priming step. They’re the simplest path but only available from the original window manufacturer or their approved suppliers.
Regardless of primer type, application technique is the same: light mist coats rather than heavy passes. A thick primer coat traps solvents, takes longer to cure, and creates a soft foundation that compromises everything applied over it. Two thin coats with five minutes of flash-off time between them build a harder, more uniform base than one heavy application. If you’re using brushed aluminium spray paint as your topcoat over the primer, a smooth, thin primer layer prevents texture interference that would spoil the brushed metallic effect.
The Complete Preparation Sequence
From start to ready-for-paint, follow this order without skipping steps:
- Mask surrounding areas — apply painter’s tape to glass, weatherstripping, and any adjacent surfaces you want protected from cleaning solvents and primer overspray.
- Wash with sugar soap or mild detergent — scrub the repair area and 50 mm surrounds, rinse thoroughly with clean water, and dry completely.
- Solvent wipe with IPA or acetone — remove oils, silicone, and invisible contaminants using a clean lint-free cloth in single-direction passes.
- Feather chip edges with 400-grit wet-and-dry — smooth the paint ridge using a block, working from intact coating onto bare metal at a shallow angle.
- Refine with 600-grit — lighten pressure and tighten the scratch pattern for a smooth primer bed.
- Remove all sanding dust — vacuum the area, then wipe once more with a clean IPA-dampened cloth. Allow to dry fully.
- Apply primer (if required) — self-etching for bare aluminium, adhesion promoter for intact coating, or skip if using a direct-application manufacturer product. Use two light mist coats with five minutes between them.
- Allow primer to cure per manufacturer instructions — typically 30 to 60 minutes for self-etching aerosol primers before topcoat application. Do not rush this step.
The entire sequence takes 60 to 90 minutes for a typical chip repair, including drying time. Rushing any step, particularly the cleaning or primer cure, undermines everything that follows. A properly prepared repair site gives your touch-up paint the mechanical and chemical grip it needs to perform for years rather than months.
With the surface genuinely ready to accept paint, the variables that remain are environmental: temperature, humidity, and technique. Getting these wrong at the application stage can undo all that careful preparation in a single coat.
Application Conditions and Mistakes to Avoid
A perfectly prepped surface means nothing if you apply paint at the wrong time or in the wrong way. Environmental conditions during application have a direct impact on how well aluminium window touch up paint bonds, levels, and cures. Metal substrates amplify these effects because aluminium conducts and retains heat far more aggressively than timber or masonry. Get the timing wrong and you’re stripping the repair and starting over.
Temperature and Weather Requirements
Aluminium frames sit exposed to whatever the atmosphere delivers, so you need a narrow window of favourable conditions before picking up a brush or spray can. Aim for these parameters:
- Ambient air temperature: 15 to 30 degrees Celsius
- Frame surface temperature: below 35 degrees Celsius
- Relative humidity: under 65 percent
- Rain forecast: clear for at least 24 hours after application
Cold aluminium frames create problems because solvents evaporate too slowly when the metal sucks heat out of the wet paint film. The coating can’t flow and level properly, leaving visible texture and weak mechanical bonds. Recoat windows on the wrong winter morning and you end up with a lumpy patch that never fully cures.
Hot frames are equally destructive, just in different ways. Direct sun can push aluminium surface temperatures more than 10 degrees Celsius above ambient air temperature, particularly on dark bronze or charcoal finishes. When paint hits a scorching surface, solvents flash off before the film can level, trapping air and creating bubbles. The result is blistering, orange-peel texture, and premature adhesion failure. If you’re using high heat bronze spray paint on a sun-facing frame, early morning on an overcast day is your only reliable window.
A simple hand test works as a rough gauge: place your palm flat on the frame for three seconds. If the surface feels uncomfortably hot, it’s too warm to paint. If it feels noticeably cold, wait until ambient conditions bring it up.
Application Technique for Invisible Repairs
The difference between a repair that disappears and one that advertises itself comes down to one principle: thin layers built gradually. Whether you’re using a brush-on product or bronze colour spray paint from an aerosol can, resist the urge to fill the damage in a single coat.
For brush application, load the brush sparingly and dab paint into the deepest part of the chip first. Let each thin layer flash off for ten to fifteen minutes before adding the next. Build until the repair sits just below the surrounding surface level, then apply a final coat that feathers slightly outward beyond the chip edge. This graduated build creates a smooth transition rather than a hard paint line where the repair meets intact coating.
Spray application follows the same logic at a larger scale. Hold the can 200 to 300 mm from the surface and use steady horizontal passes, overlapping each pass by roughly 50 percent. Coating specialists note that too-close spray distance creates excessive wet film thickness that sags and builds unevenly. Three light mist coats with five-minute flash-off between them produce a smoother, harder film than one heavy pass ever could. For metallic finishes and bronzing paint tones, those multiple light passes also allow flake particles to settle at random angles, reproducing the depth of the original factory coating.
After the final coat, leave the repair completely undisturbed for a minimum of 48 hours. No touching, no cleaning, no wax. Full cure takes longer than surface dryness suggests, and disturbing a semi-cured film introduces texture marks that are impossible to remove without sanding back and reapplying.
Common Failures and How to Fix Them
Most touch-up failures on aluminium fall into a handful of predictable categories. Each has a clear cause, a prevention strategy, and a remedy if the damage is done.
Sheen matching is as important as colour matching for invisible repairs. A gloss touch-up on a matte frame catches light differently and becomes visible from across the room, even when the colour is dead-on.
- Applying too thick in one coat
Cause: Impatience. Trying to fill a chip or cover a scrape in a single heavy pass.
Result: Drips, sagging, wrinkling, and eventual peeling as trapped solvents prevent proper cure.
Prevention: Build in multiple thin coats with flash-off time between each. If the product recommends 15-micron dry film per coat, stick to that rather than doubling up.
Remedy: Let the failed coat dry fully, sand back to a smooth surface with 400-grit, clean with IPA, and reapply in proper thin layers. - Skipping degreasing
Cause: Assuming the frame looks clean enough after a quick wipe or water wash.
Result: Fisheyes, craters, and adhesion failure. Silicone and oil residues repel paint at a microscopic level, creating circular defects visible as soon as the paint flows out.
Prevention: Always follow the two-stage clean, detergent wash first, then solvent wipe with isopropyl alcohol or acetone, immediately before painting.
Remedy: Strip the affected area completely. Fisheyes caused by silicone contamination cannot be painted over successfully. Sand off, re-clean aggressively, and reapply. - Wrong sheen level
Cause: Selecting a gloss product when the frame finish is satin or matte, or vice versa. Many generic touch-up products default to semi-gloss regardless of the original frame finish.
Result: The colour may match perfectly, but the repair reflects light at a completely different intensity, creating a visible patch at any angle where light rakes across the frame.
Prevention: Identify the original sheen before purchasing. Powder-coated frames are typically matte, satin, or gloss. Compare your frame against a sample card at the paint supplier under natural light, not fluorescent store lighting.
Remedy: If the sheen mismatch is minor (satin applied over matte), a very light scuff with fine scotch-brite after full cure can knock the gloss back. Major mismatches require sanding off and reapplying in the correct sheen. - Painting in direct sun
Cause: Working on a frame while it’s receiving full solar exposure, particularly north and west-facing elevations in afternoon hours.
Result: Flash drying prevents proper flow and levelling. Paint blisters as solvents boil under the surface. Dark frames compound this because they absorb far more radiant heat.
Prevention: Follow the shade. Work on east-facing frames in the afternoon and west-facing frames in the morning. Overcast days are ideal for any orientation.
Remedy: Let blistered paint cure fully, sand back to a sound surface, and reapply during appropriate conditions. Blistered paint cannot be smoothed over; it must be removed. - Ignoring humidity
Cause: Applying paint during humid conditions, particularly common in coastal Queensland and northern NSW.
Result: Moisture condensation on the frame surface disrupts adhesion and creates milky hazing in clear coats. Water-based products are especially vulnerable, struggling to coalesce properly when humidity climbs above 65 percent.
Prevention: Check both humidity and dew point before starting. The frame surface temperature should sit at least 3 degrees Celsius above the dew point to prevent condensation forming on the metal during application.
Remedy: If hazing has occurred, allow full drying and assess. Minor hazing in clear coats sometimes self-resolves as trapped moisture escapes. Severe cases require sanding and recoating in drier conditions.
The pattern across all these failures is consistent: rushing the process or ignoring conditions destroys otherwise good work. A repair done on the right day, in the right conditions, with patience between coats, outlasts one done hastily by a factor of years rather than months. That longevity question, how long your touch-up will actually hold up against Australian UV and weather, determines whether a single repair keeps you going or whether the frame has crossed into territory where a more permanent solution makes sense.
Durability Expectations and When to Consider Replacement
Every touch-up repair has a shelf life. No matter how carefully you matched the colour, prepared the surface, and applied thin coats in ideal conditions, consumer-applied paint on aluminium sits in a fundamentally different durability class than a factory-cured powder coat. Knowing that lifespan upfront helps you plan maintenance cycles realistically and recognise when a frame has deteriorated beyond the point where further touch-up makes financial or practical sense.
How Long Touch Up Paint Lasts on Aluminium
Quality aluminium window touch up paint on a properly prepared substrate typically delivers 3 to 7 years of effective protection before it needs attention again. That’s a wide range, and where your repair falls within it depends on several intersecting factors.
Compare that to factory powder coating, which carries performance ratings of 20 to 30 years for fluorocarbon formulations and 5 to 10 years for standard polyester powders under normal conditions. The gap exists because factory coatings are cured at 200 degrees Celsius in a controlled environment, creating a chemically cross-linked film far denser and harder than anything achievable at ambient temperature with an aerosol can or brush.
Factors that shorten touch-up lifespan:
- Coastal salt exposure — airborne salt penetrates micro-imperfections in touch-up film faster than it degrades factory powder coat, particularly within 500 metres of the shoreline
- Northern and western orientation — frames receiving sustained afternoon UV degrade touch-up coatings roughly twice as fast as shaded or south-facing frames in Australian conditions
- Dark colours — bronze, charcoal, and black finishes absorb more heat, accelerating resin breakdown and chalking in the touch-up layer. Bronze wheel touch up paint and similar products formulated for automotive use may offer marginally better heat tolerance but still can’t rival factory cure chemistry
- Thin application — a single coat repair might only last 18 months before UV penetrates to the substrate, while a properly built three-coat repair with primer provides the full 5 to 7 year window
Factors that extend lifespan:
- Sheltered locations — frames under deep eaves or verandahs receive less UV and rain impact
- Regular cleaning — washing frames every three to six months removes salt and pollutants before they attack the coating
- Quality product selection — architectural-grade touch-up products from CRL or manufacturer-matched systems outperform generic hardware store options by a meaningful margin
- Correct primer use — self-etching primer on bare aluminium provides a corrosion barrier that extends the overall system life even if the topcoat weathers
Think of touch-up paint as a maintenance intervention, not a permanent fix. Budget for re-assessment every three to five years on exposed elevations, and you won’t be caught off-guard when the repair starts showing age.
Signs You Need Professional Refinishing
There’s a tipping point where touch-up becomes counterproductive. You’re spending time and product patching isolated spots, but new chips and flakes appear faster than you can address them. The frame starts looking like a patchwork of slightly different sheen levels and colour tones, each repair aging at its own rate.
Professional spray refinishing, where a qualified painter prepares and recoats entire frame sections or the full window in situ, makes sense when:
- Touch-up repairs already cover more than 20 percent of the visible frame surface
- Underlying aluminium shows white pitting or filiform corrosion that’s progressing despite surface sealing
- Previous touch-up coats are themselves lifting, indicating a systemic adhesion problem with the original coating underneath
- The frame profile has complex angles, deep rebates, or drainage channels that make brush or pen application impractical without runs and pooling
- Colour fading is so extensive that every new touch-up patch stands out against the surrounding degraded finish
Professional aluminium window refinishing in Australia typically costs $200 to $500 per window depending on size, condition, and access difficulty. A full-house respray for 10 to 15 windows runs between $2,500 and $7,500. That’s a significant step up from a $25 spray can, but the result is a uniform, durable finish across the entire frame that resets your maintenance clock by 10 to 15 years. Products like tropitone touch up paint designed for outdoor furniture, or bronze pool cage paint formulated for wet environments, demonstrate that specialised coatings exist for every substrate and exposure condition. The same principle applies to window refinishing: purpose-formulated architectural coatings applied by experienced spray painters produce results that consumer touch-up simply cannot match at scale.
When Window Replacement Makes More Sense
Coating failure rarely happens in isolation on older aluminium windows. Frames that have degraded to the point where refinishing is questionable often carry additional issues hiding behind the cosmetic damage. Rubber seals harden and crack after 15 to 20 years, allowing air and water infiltration. Hardware mechanisms wear and stiffen. Single-glazed frames provide poor thermal and acoustic performance by current standards. Thermal bridging through un-broken aluminium profiles drives condensation and energy loss.
If your frames tick multiple boxes beyond just coating deterioration, replacement delivers compounding value that no amount of repainting can replicate. Modern aluminium windows feature factory-applied powder coatings rated for decades of maintenance-free performance, thermally broken profiles that dramatically reduce heat transfer, and double or triple glazing that transforms comfort and energy efficiency.
When replacement is warranted, sourcing quality aluminium windows with premium factory-applied finishes from manufacturers like MEICHEN ensures decades of maintenance-free colour performance and eliminates recurring touch-up needs entirely. Their systems offer custom colour options across the full RAL and powder coat spectrum, applied under controlled factory conditions that produce the durability consumer touch-up can never achieve.
Use this decision framework to determine which path delivers the best long-term value for your situation:
- Continue with DIY touch-up — damage is isolated, frames are structurally sound, seals and hardware function well, and the home’s thermal performance meets your needs. Cost: under $50 per repair session, repeated every 3 to 5 years.
- Commission professional refinishing — coating has failed across significant areas but frames, seals, and glazing remain serviceable. The home doesn’t require thermal performance upgrades. Cost: $2,500 to $7,500 for a full respray with a 10 to 15 year expected life.
- Replace with new aluminium windows — frames show structural corrosion, seals have failed, hardware is worn, single glazing provides inadequate thermal or acoustic performance, or you’re renovating and want to upgrade frame sizes or configurations. Quality factory-finished aluminium windows with durable powder coat, thermal breaks, and modern glazing represent the premium long-term solution, eliminating touch-up maintenance entirely while improving comfort and property value. Cost: $15,000 to $40,000 for a standard home, offset by energy savings, reduced maintenance, and increased resale value over 30-plus years of service life.
The honest reality is that touch-up paint is a holding strategy. It’s an effective, affordable one that protects your frames and maintains appearance between now and whenever a larger decision becomes necessary. For many homeowners, that holding period is measured in decades. For others dealing with frames already past their prime, recognising the tipping point early saves money by avoiding repeated patch jobs on windows that need a more permanent solution.
Frequently Asked Questions About Aluminium Window Touch Up Paint
1. Can you paint over anodised aluminium window frames?
Yes, you can paint over anodised aluminium, but the hard aluminium oxide layer requires specific preparation for paint to adhere. Scuff-sand the sealed surface with a fine non-woven abrasive pad to open the pore structure, then apply a self-etching or epoxy primer formulated for aluminium substrates. Without this preparation, standard primers cannot grip the anodised layer and the touch-up will peel within months. Anodised frames are most common on Australian homes built between the 1960s and early 1990s in natural silver and bronze finishes.
2. How long does touch up paint last on aluminium window frames?
Quality touch-up paint on properly prepared aluminium typically lasts 3 to 7 years before needing reapplication. This compares to factory powder coating rated for 20 to 30 years. Lifespan depends on UV exposure, frame orientation, coastal salt proximity, colour darkness, and coating thickness. Northern and western-facing frames degrade fastest in Australian conditions, while sheltered locations under eaves can extend durability toward the upper range. Regular cleaning every three to six months also helps prolong the repair.
3. What is the best format for aluminium window touch up paint — pen, brush, or spray?
The best format depends on damage size and finish type. Paint pens suit pin-point chips under 5 mm and fine scratches. Brush-on bottles work well for isolated chips and scratches between 5 and 15 mm. Aerosol spray produces the closest factory-quality result and is ideal for areas larger than a coin, clustered chips, full rail sections, and metallic finishes where brush marks would be visible. For bronze or metallic colours, spray is strongly recommended because it distributes flake particles randomly to mimic the original powder coat appearance.
4. How do I find the correct colour code for my aluminium window frames?
Most powder-coated aluminium windows use a RAL colour reference. Check original window documentation, manufacturer invoices, or frame hardware labels for the code. RAL 9006 (White Aluminium) is the most common metallic silver-grey, while RAL 7016 (Anthracite Grey) and RAL 9005 (Jet Black) are popular dark options. If records are unavailable, contact the original installer or take a removable hardware piece such as a vent cover or end cap to a paint supplier with a spectrophotometer for precise colour matching. Remember to match the faded frame colour rather than the original specification for the most invisible repair.
5. Why does my touch up paint keep peeling off aluminium window frames?
The most common causes of peeling are inadequate surface preparation and incompatible products. Skipping the degreasing step leaves invisible silicone and oil residues that prevent adhesion. Applying paint too thickly traps solvents and creates a weak film. Using generic house paint instead of products formulated for aluminium substrates leads to bonding failure. Other factors include painting on hot frames in direct sun, ignoring humidity above 65 percent, or failing to use self-etching primer on exposed bare aluminium. Always follow the two-stage cleaning process, feather chip edges, and build thin coats with flash-off time between each layer.
More Window & Door Guides