What Aluminium Window Friction Stays Actually Are
You open your window for some fresh air, let go of the sash, and it drifts shut on its own. Or worse, it slams. That frustrating behaviour usually points to one piece of hardware you never think about until it fails: the friction stay.
Search for information on these components online and you will mostly find product listings. This guide takes a different approach, giving you a proper explanation of what friction stays are, how they work, and why they matter in modern aluminium window systems.
Definition and Core Purpose
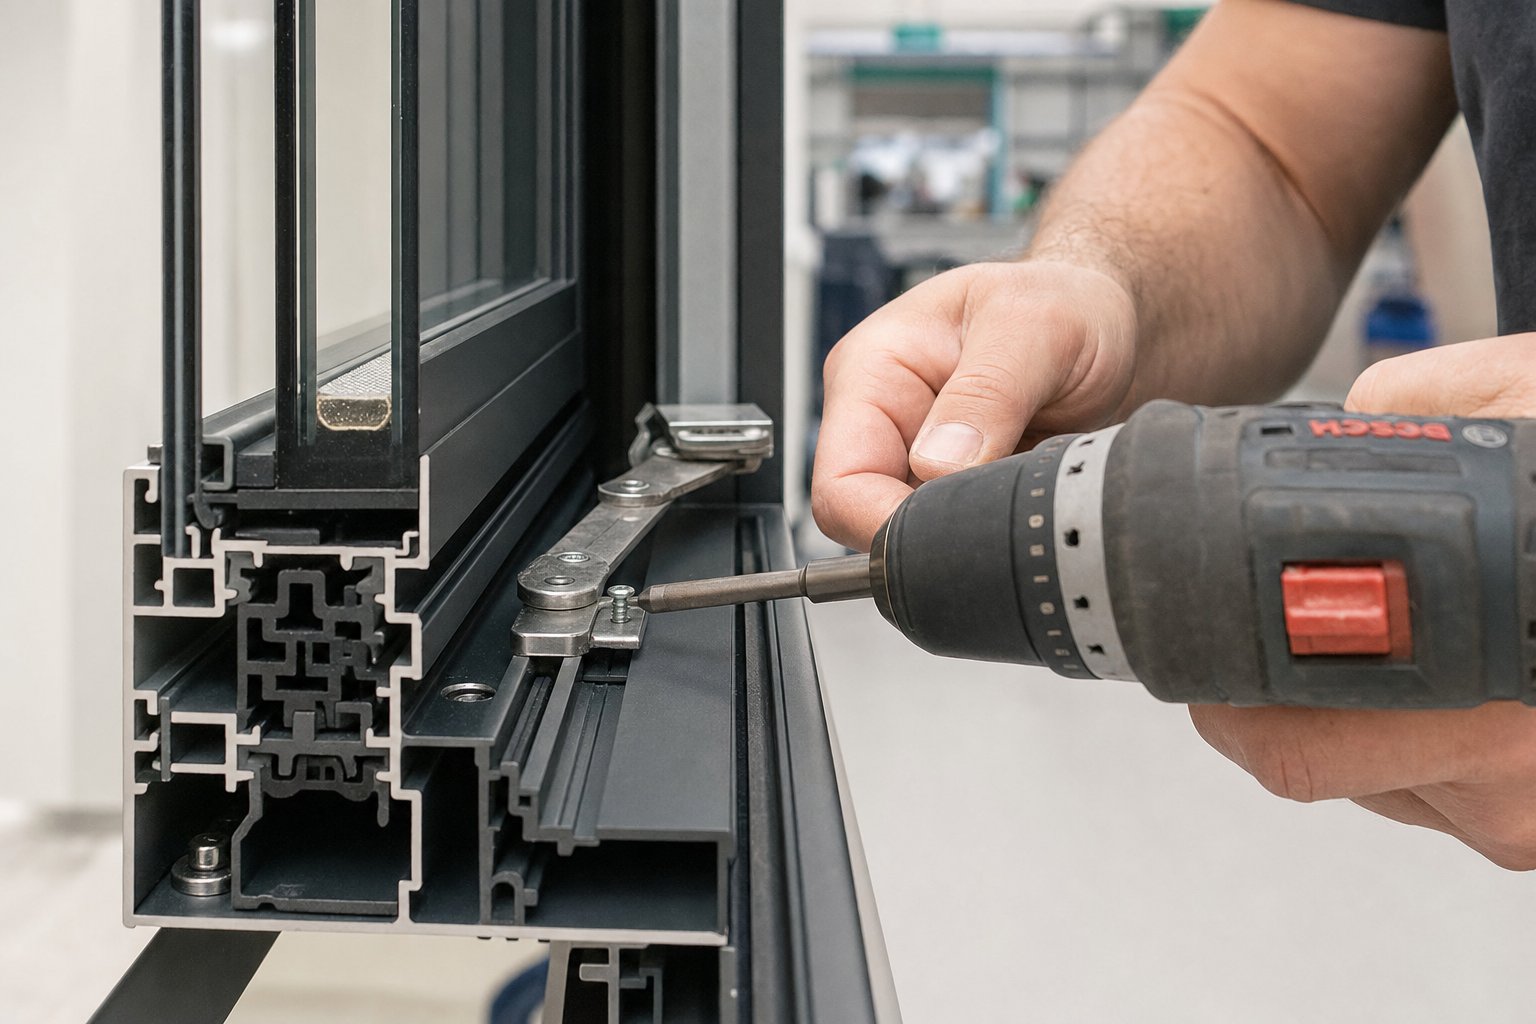
So, what is a friction stay on a window? In simple terms, it is a concealed mechanical arm fitted inside the rebate (the recessed channel) of a window frame. It serves two jobs simultaneously: it acts as the hinge that lets the sash pivot open, and it provides controlled resistance that holds the sash at whatever angle you choose.
An aluminium window friction stay is a dual-function hardware component that both pivots the window sash open and holds it in position at any angle through adjustable mechanical friction, eliminating the need for separate latches, props, or support arms.
Unlike a standard butt hinge, which only allows fully open or fully closed positions, a friction stay lets you park the window at a narrow gap for light ventilation or swing it wide for maximum airflow. The resistance is continuous across the full travel arc, so there are no fixed notches or preset stopping points.
Why Friction Stays Exist
Older casement windows relied on a stay bar and peg system: a metal arm with a series of holes that hooked over a pin on the frame. These traditional casement stay bars only held the window at a handful of predetermined angles, rattled in the wind, and wore out quickly as pegs loosened over time.
Friction stays solved every one of those problems. They consolidated hinge and hold-open functions into a single streamlined unit, removed the visible arm crossing the window, and introduced infinite position holding. The friction stay vs casement stay bar comparison really comes down to precision versus limitation.
Today, these stays are standard hardware in residential and commercial aluminium window construction across Australia. They suit our climate demands well, from coastal salt exposure to high wind loads, and their concealed design keeps frame profiles clean and uncluttered.
How do friction stays hold windows open without drifting or slamming? The answer lies in the specific mechanical principle inside the stay, which involves sliding arms, friction washers, and carefully calibrated resistance.
How the Sliding Friction Mechanism Works
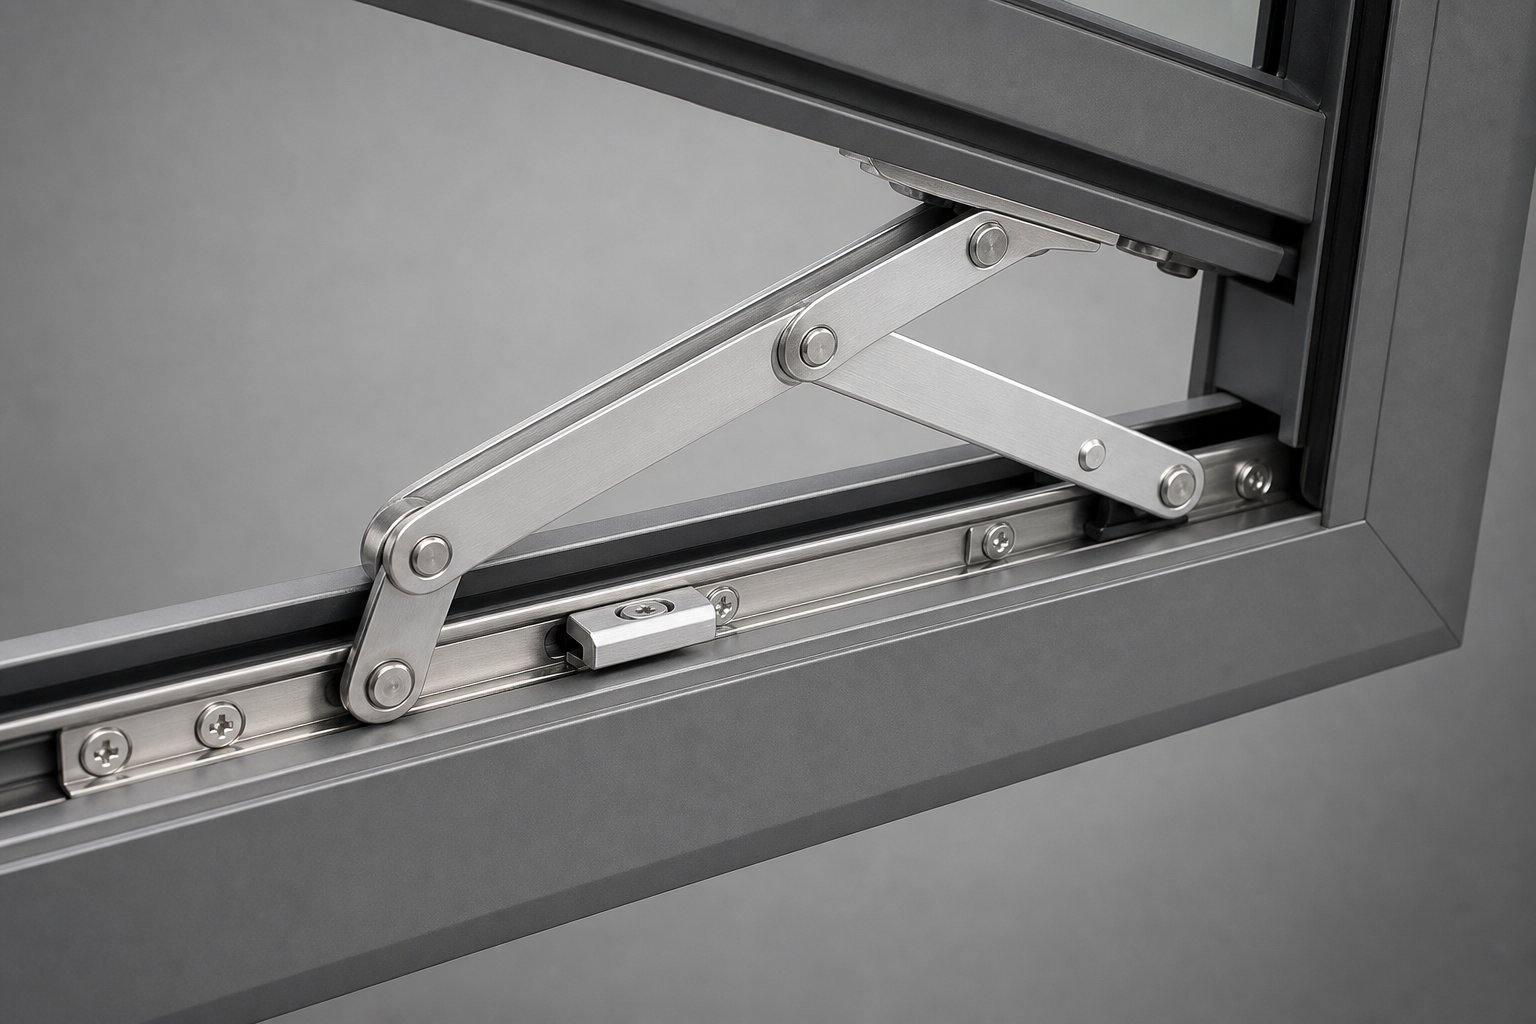
Think of an adjustable desk lamp: you move the arm to any position, release it, and it stays put. A friction stay operates on the same core principle. Two interlocking metal arms slide along a track with precisely calibrated resistance, so the window sash holds wherever you leave it rather than swinging freely under its own weight.
The Sliding Friction Principle
The friction stay mechanism explained in its simplest form comes down to controlled resistance between metal surfaces. A slide shoe travels inside a track channel, and a stack of friction washers presses against the contact surfaces with enough force to counteract gravity and moderate wind pressure. This resistance is not a lock or a catch. It is continuous drag that the sash must overcome to move in either direction.
When a gust hits the open sash, the friction hold resists displacement. When you push the window further open, you override the resistance with deliberate force. The balance point is set by a tension screw that compresses or releases the friction washer stack. Tighten it and the window holds more firmly. Back it off slightly and the sash moves with less effort. That single adjustment lets an installer fine-tune the stay to match the exact weight and wind exposure of a given window.
Key Components Inside a Friction Stay
Strip away the outer casing and every friction stay contains the same core parts working together:
- Track channel — the fixed rail screwed to the window frame that guides linear movement of the slide shoe.
- Slide shoe — a compact block that travels inside the track, converting the sash’s rotational opening into controlled linear displacement.
- Scissors arm (connecting arm) — the pivoting link between slide shoe and sash bracket that transfers load and changes angle as the window opens.
- Friction washers — thin pads compressed against the shoe or track surfaces, generating the resistance that holds the sash steady.
- Rivets and pivot pins — fasteners connecting the arms at pivot points while allowing smooth rotational movement.
- End caps — stops at each end of the track that prevent the shoe from over-travelling and define maximum opening angle.
The scissors arm typically reaches approximately 45 degrees at full extension, a geometry that balances force distribution, buckling resistance, and wear minimisation across the mechanism.
Why Stays Hold at Any Angle
Ratchet mechanisms and notched stay bars offer fixed positions: three, five, maybe seven preset stops. If you want the window slightly more open than a notch allows, you are out of luck. Friction stays work differently because their resistance is continuous along the entire travel path. There are no detents. The slide shoe function creates uniform drag from the first millimetre of movement to the last.
This infinite-position holding means you can crack a window open just 20mm for overnight ventilation, swing it to a moderate angle for airflow during the day, or push it to maximum opening for cleaning access. Every position is a valid holding position, provided the friction is set correctly for the sash weight.
The question of how to adjust friction on window stays usually amounts to a quarter-turn of a single screw. But getting that adjustment right depends on understanding what your stay is working against, and that varies significantly depending on whether the window is hinged from the top, the side, or configured for a specific opening style.
Which Window Styles Rely on Friction Stays
Not every window type benefits from a friction stay. Some don’t need one. Others physically can’t use one because of how they move. The distinction comes down to whether the sash pivots outward on a hinge axis or travels along a separate path entirely. If it pivots, there’s a good chance friction stays are doing the heavy lifting behind the scenes.
The term “hinge window” gets thrown around loosely, but it actually covers several distinct configurations, each placing different demands on the stay hardware. Here’s how the main types break down.
Casement Windows and Friction Stays
Side-opening casement windows are the primary application for friction stays, and it’s not close. In Australian homes and commercial buildings alike, casement windows appear more than any other operable style, and nearly all modern aluminium casements rely on friction stays for casement windows rather than the old stay-bar-and-peg arrangement.
The reasons are practical. A casement sash swings outward from one vertical edge, creating a sweeping arc that traditional hardware struggled to control smoothly. Friction stays replaced casement stay arms because they deliver cleaner aesthetics (no visible arm crossing the glass line), quieter operation (no rattling pegs), and that infinite-position holding discussed earlier. You get full control over ventilation with a single hand movement, and the hardware disappears into the frame rebate when the window is closed.
Side-hung friction stays typically allow opening angles between 60 and 90 degrees depending on the stay length and window proportions, making them well suited to bedrooms, living areas, and any space where maximum airflow matters.
Awning and Top-Hung Windows
Do awning windows use friction stays? Absolutely, and they’re the second most common application in Australia. An awning window hinges at the top and swings outward from the bottom, which makes it ideal for wet areas like bathrooms and kitchens because light rain can’t enter even when the window is open.
The key difference here is load direction. In a side-hung casement, gravity pulls the sash downward perpendicular to the hinge axis, so the stay mostly resists rotational torque. In an awning or top-hung configuration, the full sash weight pulls directly downward along the opening arc. The friction stay for a top-hung window must bear that gravitational load through its entire travel, which is why these stays require higher load ratings than side-hung equivalents of the same length.
Top-hung stays are mounted horizontally across the top of the frame, and their friction washers work harder from the moment the sash begins to open. If the stay is underrated for the sash weight, you’ll notice drift almost immediately: the window creeping closed under its own mass despite the friction being set at maximum.
Window Styles That Do Not Use Friction Stays
Several common window types operate on entirely different mechanical principles, making friction stays irrelevant to their design. The simplest way to understand which windows need friction stays is to ask: does the sash pivot outward from a fixed hinge edge? If the answer is no, a different hardware system applies.
| Window Type | Uses Friction Stays? | Reason |
|---|---|---|
| Casement (side-hung) | Yes | Sash pivots outward from vertical edge; stay controls position and holds against wind |
| Awning (top-hung) | Yes | Sash pivots outward from top edge; stay bears sash weight and prevents drift |
| Sliding | No | Sash travels horizontally on a track; rollers and locks control movement |
| Double-hung | No | Sashes slide vertically in channels; balance springs or spiral balances hold position |
| Louvre | No | Multiple glass blades rotate on individual pins; an operator handle links them |
| Fixed | No | Sash does not open at all; no moving hardware required |
| Bi-fold | No | Panels fold and stack on a track system; heavy-duty pivot and roller carriages manage movement |
Sliding and double-hung windows rely on balance mechanisms and track systems that manage weight through counterweights or spring tension rather than surface friction. Louvre windows use a worm-gear operator to rotate blades in unison. None of these styles involve a sash swinging outward from a hinge edge, so there is simply no role for a friction stay to play.
For the window types that do use friction stays, the next decision involves configuration and orientation: whether to mount the stay at the top or the side of the frame, and how that choice affects load distribution, opening angle, and overall performance.
Top-Hung vs Side-Hung Friction Stay Configurations
Configuration isn’t something you pick off a menu. It’s determined by how the window was designed to open, and the physics change dramatically depending on whether that pivot axis runs horizontally across the top or vertically down the side. Getting this wrong means the stay fights the sash weight instead of managing it.
Top-Hung Configuration Explained
In a top-hung setup, friction stays mount horizontally along the top rail of the frame. The sash swings outward from the bottom edge, creating an awning-style opening that sheds rain while ventilating the room. It’s the go-to configuration for bathrooms, kitchens, and high-level openings across Australian homes.
The critical engineering factor here is gravity. When the sash opens, its full weight pulls straight down on the stay mechanism. The slide shoe, track channel, and friction washers must resist that constant gravitational load at every angle of travel. This is why the top-hung window stay load rating matters so much: an underrated stay will allow the sash to creep closed, and over time the internal components wear rapidly under sustained stress.
Opening angles in top-hung configurations typically range from 30 to 60 degrees depending on stay length and sash dimensions. The geometry limits how far the sash can travel before the scissors arm reaches full extension.
Side-Hung Configuration Explained
Side-hung friction stays mount vertically on the jamb (the side of the frame), and the sash swings outward from the opposite edge like a door. This is the classic casement arrangement and the most common side hung window friction stay installation you’ll encounter in residential construction.
Load distribution works differently here. Gravity still pulls the sash downward, but because the hinge axis is vertical, the weight creates a torque that tries to rotate the sash around the stay’s pivot points rather than pulling directly along the track. The slide shoe experiences shearing forces rather than pure tensile loading, which generally means a side-hung stay of the same length can handle a wider opening arc before hitting its mechanical limits.
The result? Side-hung stays commonly achieve opening angles approaching 90 degrees, making them preferable for rooms that need maximum ventilation, easy cleaning access, or compliance with emergency egress requirements under the National Construction Code.
Choosing Between Configurations
You don’t choose between top-hung and side-hung based on personal preference. The window’s design dictates the configuration. Several factors lock in the decision before hardware selection even begins:
- Window width-to-height ratio — Wide, short windows suit top-hung configurations; tall, narrow windows work better side-hung.
- Ventilation requirements — Top-hung provides weather-protected airflow; side-hung delivers greater volume when fully open.
- Weather exposure — Top-hung stays shield the opening from rain, making them ideal for windward facades in coastal areas.
- Egress compliance — Bedrooms and habitable rooms often require minimum clear openings for emergency escape, which typically demands side-hung windows with wider angles.
- External clearance — Limited space outside (paths, neighbouring walls) may rule out a full side-opening swing.
The friction stay opening angle differences between configurations are significant enough that specifying the wrong type compromises both function and compliance. For particularly wide sashes, some designs pair a side-hung friction stay with an additional restrictor device that limits travel to a safe distance for child safety while still permitting full release by an adult when needed.
Configuration determines how the stay handles load. But what the stay is made from determines how long it handles that load before corrosion, fatigue, or galvanic reactions start working against it.
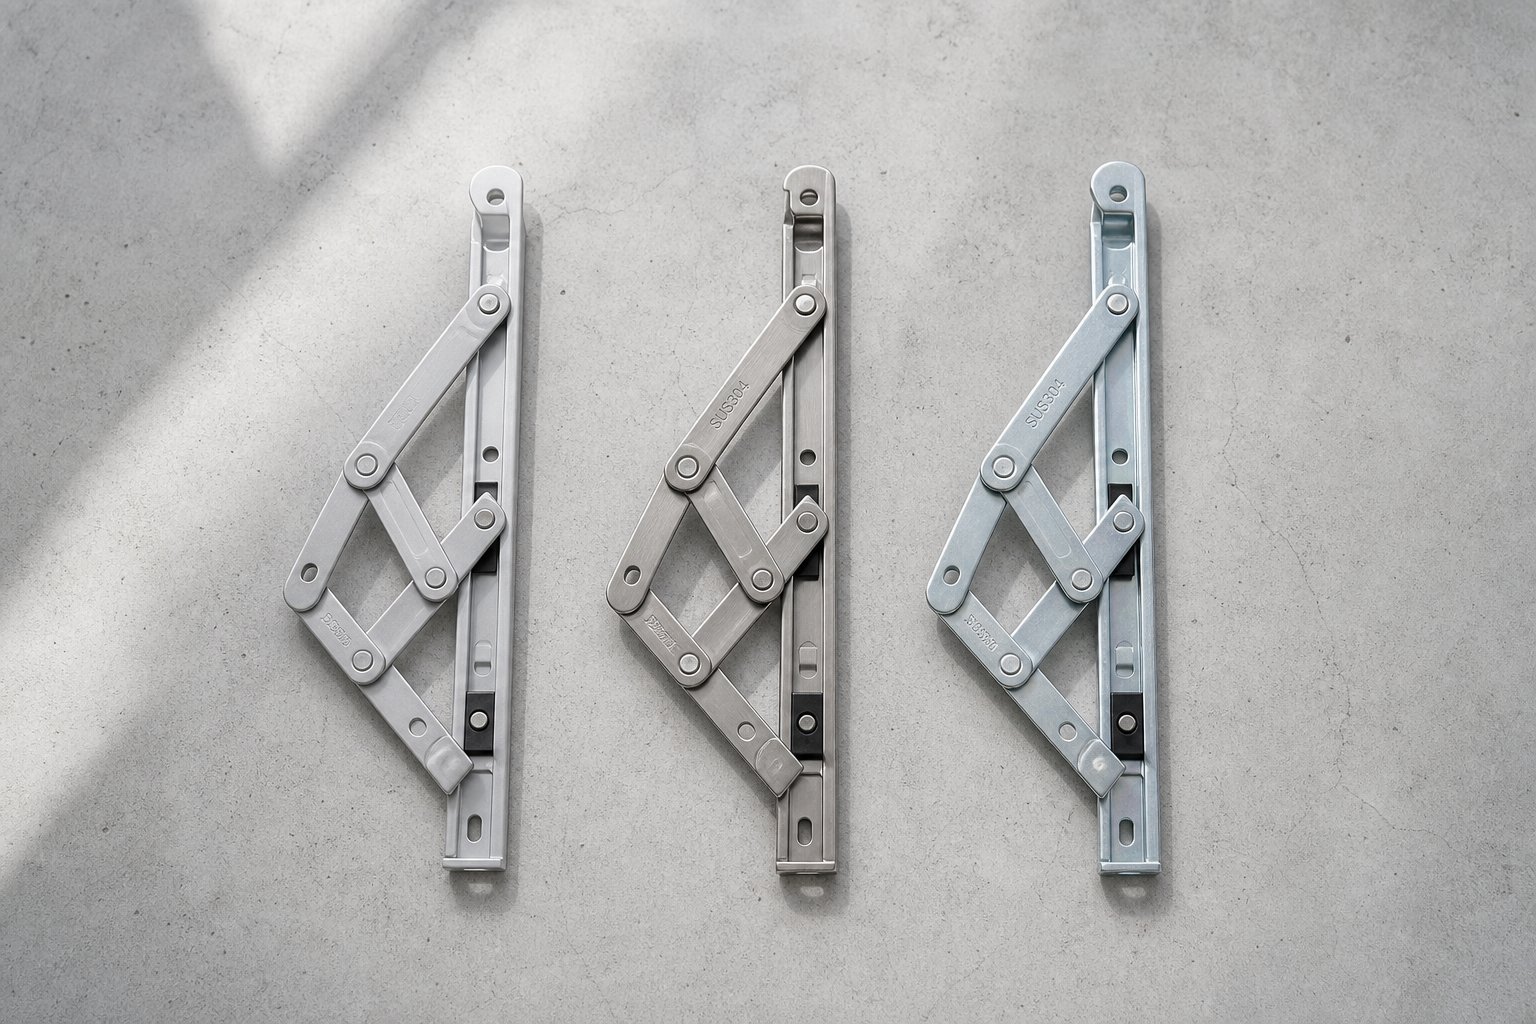
Aluminium vs Steel vs Stainless Steel Friction Stays
Material choice shapes everything about a friction stay’s working life: how long it resists corrosion, how much sash weight it can carry, and whether it plays nicely with the surrounding frame without triggering an electrochemical reaction that eats away at both components. Three materials dominate the market, and each suits a different set of conditions.
Aluminium Alloy Friction Stays
The best friction stay material for aluminium windows is often aluminium itself. Pairing an aluminium stay with an aluminium frame eliminates galvanic corrosion entirely because no dissimilar metals are in contact. Both components share near-identical thermal expansion rates too, so seasonal temperature swings don’t create stress at mounting points or cause binding in the track channel.
Pros
- No galvanic reaction — same metal touching same metal means no electrochemical degradation at contact points.
- Lightweight — adds minimal mass to the sash assembly, keeping overall operating effort low.
- Lower cost — generally the most affordable option for standard residential windows.
- Matched expansion — expands and contracts at the same rate as the frame, maintaining consistent friction and clearances year-round.
Cons
- Lower maximum load capacity — aluminium alloy cannot match the tensile strength of stainless steel, making it less suitable for very heavy double-glazed sashes.
- Softer track surface — the slide channel may show wear marks earlier under high-load conditions.
- Limited for extreme environments — while it resists atmospheric corrosion well in mild climates, severe salt exposure can still attack unprotected aluminium over time.
For standard residential casement and awning windows in inland or suburban Australian locations, aluminium alloy stays deliver reliable performance at an accessible price point. They are the default choice specified by most aluminium window manufacturers for good reason.
Stainless Steel Friction Stays
When strength and corrosion resistance must be maximised, stainless steel takes over. Two grades appear in window hardware: SUS304 (the general-purpose workhorse) and SUS316 (the marine grade). The difference comes down to chemistry. Grade 316 contains molybdenum, which provides specific resistance to chloride attack from salt water and salt-laden air.
Stainless steel friction stays for coastal areas are not optional in Australia’s beachside suburbs. Properties within five kilometres of the ocean face salt spray that corrodes standard hardware within a few years. Grade 316 marine grade friction stay windows resist this degradation for 10 to 20 years when maintained properly, making them the long-term economical choice despite higher upfront cost.
Pros
- Highest structural strength — supports heavy sashes including large double-glazed units without track deformation.
- Excellent corrosion resistance — Grade 304 handles humid environments; Grade 316 withstands direct salt exposure.
- Longest lifespan — outlasts both aluminium and zinc-plated steel stays significantly, particularly in demanding environments.
Cons
- Higher cost — typically 50 to 100 percent more expensive than aluminium alloy equivalents.
- Galvanic corrosion risk — stainless steel in direct contact with an aluminium frame can trigger galvanic corrosion of the aluminium unless isolated with nylon washers or protective coatings.
- Heavier — adds more mass to the assembly, though the difference is minor for most residential windows.
The galvanic corrosion friction stay aluminium frame issue deserves attention. When two dissimilar metals touch in the presence of moisture, an electrochemical cell forms and the less noble metal (aluminium) corrodes preferentially. Reputable manufacturers address this by isolating stainless steel stays from aluminium frames with nylon bushings, protective tape, or barrier coatings. If you’re specifying aluminium vs stainless steel window stays, always confirm the installer uses appropriate isolation.
Zinc-Plated Steel Friction Stays
Mild steel with a zinc-plated finish is the budget tier. These stays are common on timber-framed windows where galvanic corrosion is not a concern and the operating environment stays relatively dry. For aluminium window systems, they present problems.
The zinc plating provides a sacrificial barrier — it corrodes before the underlying steel does — but it’s a thin layer that breaks down quickly in humid or salt-rich air. Once exposed, the bare steel rusts rapidly. Worse, placing zinc-plated steel against an aluminium frame creates a galvanic couple that accelerates deterioration of both the zinc layer and the aluminium around screw holes and mounting surfaces.
General guidance is clear: zinc-plated steel stays are not recommended for aluminium windows. They suit budget timber installations in dry inland environments, but for any aluminium frame application — especially in coastal QLD, NSW, or WA — they are a false economy that leads to premature failure and potential frame damage.
Material Comparison at a Glance
| Criteria | Aluminium Alloy | Stainless Steel (304/316) | Zinc-Plated Steel |
|---|---|---|---|
| Corrosion resistance | Good (inland/suburban) | Excellent (304) to Superior (316 coastal) | Poor to moderate; fails in humidity |
| Load capacity | Moderate — suits standard sashes | High — supports heavy double-glazed units | Moderate — adequate for light sashes |
| Cost | Low to moderate | High (304) to Very high (316) | Lowest |
| Best frame pairing | Aluminium frames (galvanically compatible) | Any frame with isolation; ideal for timber or aluminium with nylon washers | Timber frames only |
| Coastal suitability | Limited — needs additional protection | Grade 316 required within 5 km of ocean | Not suitable |
| Galvanic risk with aluminium frame | None | Moderate — requires isolation | High — causes frame corrosion |
For most Australian homeowners fitting standard-weight casement or awning windows on aluminium frames away from the coast, aluminium alloy stays strike the best balance of compatibility, cost, and durability. Upgrade to Grade 304 stainless where humidity is consistently high (think tropical Queensland or poorly ventilated wet areas), and step up to Grade 316 for any property in a coastal salt zone.
Material determines longevity, but it doesn’t tell you which physical size you need. A stay can be the right alloy and still fail if it’s too short for the sash weight it’s supporting, which brings the conversation to sizing, load ratings, and the less obvious measurement that catches people out: stack height.
Matching Friction Stay Size to Window Weight
Getting the material right is only half the equation. A perfectly corrosion-resistant stay will still fail if it’s physically too short to handle the sash mass hanging from it. The relationship between friction stay length and sash weight is direct and unforgiving: too short means the mechanism is overloaded from day one, leading to sagging, premature wear on the slide shoe, and a window that drifts closed within months. Too long, and the stay may not fold flat within the frame rebate, or it forces an awkward opening geometry on a small sash.
So what size friction stay do I need? The answer depends on three measurements working together: the stay’s physical length, its rated load capacity in kilograms, and its stack height.
How Stay Length Relates to Load Capacity
A longer friction stay distributes force over a greater length of track. More track engagement means the slide shoe has a longer travel path, spreading the gravitational and wind loads across a wider bearing surface rather than concentrating stress at a single point. This is why large commercial awning windows require stays in the 400mm to 600mm range, while a small bathroom ventilation window might only need a 200mm or 300mm unit.
Manufacturers rate every stay by both its physical length and its maximum supported weight in kilograms. A typical friction stay weight capacity chart might show a 250mm stay rated for 12 kg, a 350mm stay handling 20 kg, and a 500mm+ stay supporting 35 kg or more. These figures assume a pair of stays working together, one on each side of the sash, so the per-stay rating represents half the total sash weight it can manage.
The critical mistake is sizing based on frame width alone. Two windows with identical frame dimensions can have wildly different sash weights depending on glass thickness, whether single or double glazing is fitted, and the density of the aluminium profile itself. Always size from actual sash weight, not just opening dimensions.
Understanding Stack Height and Frame Clearance
Stack height is the measurement that catches people out. It refers to the folded depth of the stay mechanism when the window is closed, essentially how much vertical space the collapsed arms occupy within the frame rebate. If the stack height exceeds the available rebate depth, the stay physically won’t fit, or it prevents the sash from closing flush against the weather seals.
With friction stay stack height explained simply: a standard residential stay might have a stack height of 13mm to 17mm, while heavy-duty commercial units run 20mm or more. Aluminium frame profiles vary significantly in rebate depth depending on the manufacturer and series. A slimline residential profile might offer only 15mm of rebate clearance, meaning a heavy-duty stay with a 20mm stack won’t work regardless of its load rating.
This is why you can’t just pick the longest, strongest stay available and assume it fits. The frame profile dictates what stack height it can accommodate, and that constraint may limit your load capacity options. When replacing stays on existing windows, measuring the rebate depth with a caliper before ordering saves a return trip to the supplier.
Window Restrictors and Safety Limiters
Beyond holding the sash open, there’s a safety dimension to friction stay specification. A window restrictor for child safety limits how far the sash can travel, typically capping the opening at 100mm to comply with Australian building regulations for windows above a certain height from floor level.
Restrictors come in several forms: cable limiters that tether the sash to the frame, mechanical arms that lock at a set distance, and friction-based limiters integrated directly into the stay mechanism. Some friction stays ship with a built-in restrictor that engages automatically and requires a deliberate key release or two-action override for full opening. Others are designed for standalone operation with an add-on restrictor device fitted separately to the frame.
When selecting stays, check whether the model accommodates the restrictor type your installation requires. Not all stays are compatible with all restrictors, and retrofitting a mismatched combination often compromises one or both devices.
Here are the key specification points to verify before purchasing:
- Length — measured in millimetres, matched to sash dimensions and opening geometry.
- Load rating — maximum sash weight in kilograms the stay can support (per pair).
- Stack height — folded depth in millimetres, which must fit within the frame rebate clearance.
- Restrictor compatibility — whether the stay accepts integrated or add-on safety limiters as required by your installation.
Getting these four specifications right ensures the stay matches both the window’s physical demands and the safety requirements of the building. But even a perfectly sized stay will underperform if the installation itself introduces problems, particularly on aluminium frames where screw selection, thermal breaks, and frame wall thickness all add complexity to what might seem like a straightforward hardware fitting.
Installing Friction Stays on Aluminium Window Frames
Aluminium frames introduce installation variables that simply don’t exist with timber or uPVC. The material is thin-walled, rigid, and increasingly features internal thermal barriers that can be compromised by a single misplaced screw. Knowing how to install friction stays on aluminium windows correctly is the difference between hardware that performs for a decade and hardware that loosens, binds, or damages the frame within a year.
Screw Selection and Frame Thickness
Timber frames accept standard wood screws that bite into solid material and grip through fibre compression. Aluminium doesn’t work that way. The frame walls are typically 1.4mm to 2.0mm thick depending on the profile system, so fasteners need to engage that thin metal without punching straight through the other side.
The friction stay screw size for aluminium frame applications is almost always a self-tapping or self-drilling type, commonly ST4.2 x 10mm or ST4.8 x 12mm in stainless steel with a countersunk or pan head depending on the stay’s hole type. Countersunk head screws must be used in countersunk holes, and pan head screws in channel slots or plain holes to ensure the stay sits flush and operates without obstruction.
Getting the screw length wrong creates problems in both directions. Too short and the thread doesn’t fully engage the frame wall, leaving the stay prone to pulling out under sash weight. Too long and the screw tip protrudes into the frame cavity, potentially puncturing weather seals or interfering with drainage channels. Frame wall thickness varies between manufacturers and profile series, so checking the specific frame datasheet before selecting fasteners saves costly mistakes.
Every screw hole in the stay must be filled. Leaving even one empty reduces load-bearing capacity and concentrates stress on the remaining fasteners, accelerating loosening over time.
Thermal Break Considerations
Modern thermally broken aluminium profiles use a polyamide or polyurethane strip inserted between the interior and exterior aluminium sections. This non-conductive barrier prevents heat transferring through the frame, which is critical for meeting NCC energy efficiency requirements and achieving decent NatHERS ratings in Australian climate zones.
Here’s the installation risk: screws that penetrate through or across the thermal break strip create a direct metal-to-metal bridge, effectively short-circuiting the insulation the profile was engineered to provide. A compromised thermal break means localised condensation, energy loss, and potential frame corrosion at the breach point.
Thermal break window friction stay installation requires confirming exactly where the polyamide strip sits within the profile cross-section. Friction stays mount into the frame rebate on the outer section of the profile, so screws should engage the outer aluminium wall only, stopping well short of the thermal barrier. Quality aluminium window manufacturers like MEICHEN engineer frame profiles with precise rebate dimensions matched to specific friction stay hardware, ensuring proper fitment and thermal break integrity from factory. This integrated approach eliminates the guesswork that leads to thermal bridge failures when retrofitting aftermarket hardware to generic profiles.
Common Installation Mistakes to Avoid
Most friction stay problems trace back to the original installation rather than the hardware itself wearing out. These are the common friction stay installation mistakes that lead to callbacks and premature replacement:
- Incorrect screw length — screws too short for the frame wall thickness work loose under repeated loading; screws too long puncture internal cavities or weather seals.
- Misaligned stays causing binding — if the two stays (one on each side of the sash) are not positioned symmetrically, the sash racks in the frame during opening and the slide shoes bind against the track walls unevenly.
- Failing to check friction adjustment before completing installation — once the sash is hung and sealed, accessing the adjustment screw can require partial disassembly. Test the friction setting with the sash loaded but before final trim and seals go on.
- Not accounting for weather seals — foam or rubber compression seals add resistance to the closing action. If friction is set without seals installed, the window may feel too stiff to close once the seals are fitted, or the seals may prevent full closure entirely.
- Penetrating the thermal break — using screws that are too long or drilling pilot holes too deep can bridge the polyamide strip, creating thermal and condensation problems that only appear months later.
A properly installed pair of friction stays should allow the sash to open smoothly to any angle, hold firmly when released, and close flush against the seals without excessive force. If any of those conditions aren’t met immediately after fitting, something in the installation needs correcting before the window goes into service.
Even with flawless installation, friction stays are mechanical components subject to wear, debris accumulation, and environmental degradation. Knowing what routine maintenance looks like and how to diagnose early signs of trouble keeps them performing well beyond their initial break-in period.
Maintenance, Common Problems, and How to Fix Them
A friction stay that worked perfectly on installation day won’t stay perfect on its own. Dust, salt, moisture, and simple mechanical wear gradually change how the mechanism performs. The good news is that most friction stay problems announce themselves early with subtle symptoms, and routine attention takes only minutes per window.
How long do friction stays last? Under normal conditions with basic maintenance, expect 10 to 15 years of reliable service from quality aluminium or stainless steel units. Coastal properties, high-traffic commercial windows, and oversized heavy sashes push that figure down considerably. A stay on a frequently operated kitchen window facing salt-laden air in a beachside Queensland home might show wear within five to seven years. One on a spare bedroom window in suburban Melbourne could easily exceed 15 years without complaint.
The variable isn’t just time. It’s cycles, load, and environment working together. Regular friction stay maintenance and lubrication extends that lifespan regardless of location.
Routine Maintenance Schedule
You don’t need specialised tools or technical expertise to keep friction stays in good working order. A basic maintenance routine performed once or twice a year prevents the majority of problems before they develop into hardware failures:
- Inspect tracks for debris — open the window fully and visually check the track channel for accumulated dirt, paint flakes, insect nests, or grit. Even small particles create drag points that accelerate wear on the slide shoe.
- Clean with a dry brush — use a stiff-bristled brush or old toothbrush to sweep debris out of the track and from between the scissors arm joints. Avoid compressed air, which can drive particles deeper into the mechanism.
- Apply silicone spray to slide channels — a light application of silicone-based lubricant along the track and pivot points reduces friction between metal surfaces without attracting dust. Avoid petroleum-based oils or heavy greases, which collect grit and create a grinding paste over time.
- Check and tighten mounting screws — with the window open, try each screw with the appropriate driver. Vibration and repeated loading can gradually back out fasteners, especially in thin aluminium frame walls. A loose screw means the entire sash load concentrates on fewer fixing points.
- Test friction adjustment — open the window to roughly 45 degrees and release. It should hold steady without drifting. If it creeps closed, the friction screw needs a quarter-turn clockwise. If it’s too stiff to move smoothly, back off slightly.
For properties near the coast or in tropical areas of northern Australia, run through this routine every six months. Salt deposits are invisible but corrosive, and humidity accelerates oxidation at every metal-to-metal contact point. Inland suburban homes can often get away with annual checks unless the windows face prevailing wind or high dust exposure.
Diagnosing Common Friction Stay Problems
When something feels off, the symptom usually points directly to the cause. Here’s how to fix a window that won’t stay open and address the other common failure modes:
| Symptom | Likely Cause | Fix |
|---|---|---|
| Sash drops when released | Friction washers worn smooth; friction screw at maximum with no effect | Replace the friction stay pair. Worn washers cannot be restored by further tightening. |
| Window drifts closed slowly | Friction set too low, or minor washer wear reducing grip | Tighten the friction adjustment screw in quarter-turn increments. Retest after each turn. |
| Stay feels gritty or stiff | Debris in the track channel or corrosion forming between the slide shoe and rail | Clean the track thoroughly, remove any visible corrosion with fine abrasive pad, and apply fresh silicone lubricant. |
| Sash wobbles or rattles | Worn pivot pins, loose mounting screws, or elongated mounting holes in the frame | Tighten all screws. If holes are stripped, use one size larger screw or relocate the stay slightly. Replace the stay if pivot joints have excessive play. |
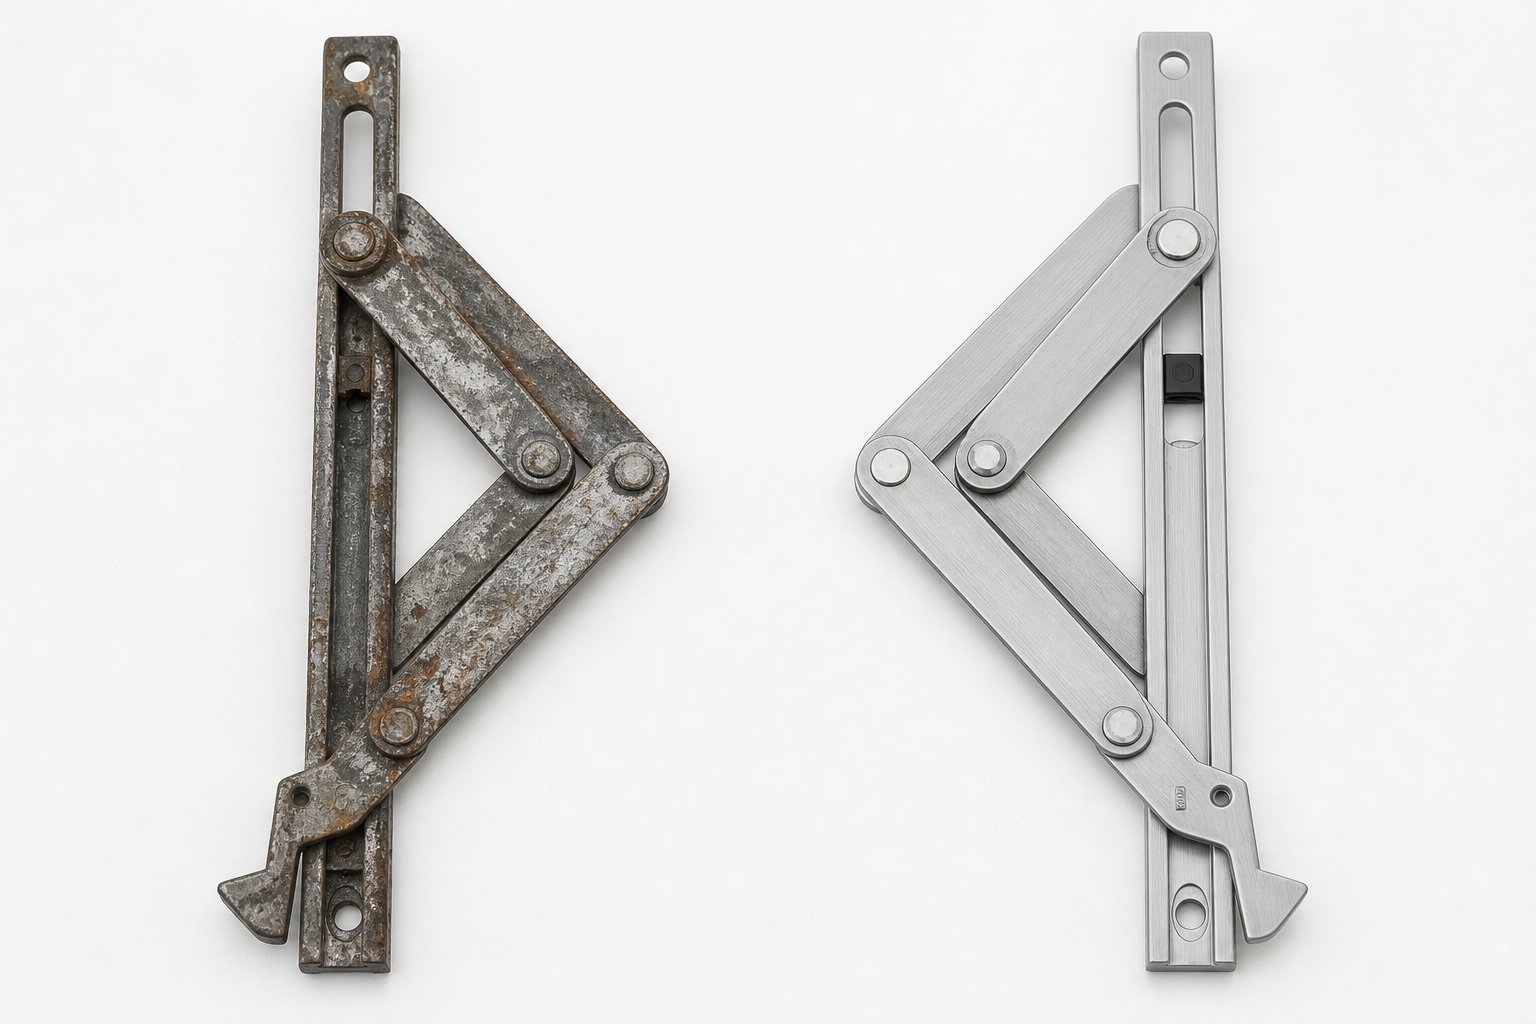
| Visible corrosion on track | Salt exposure, incompatible metals in contact (galvanic corrosion), or protective coating failure | Light surface corrosion can be cleaned and protected. Deep pitting or structural corrosion requires full stay replacement, ideally upgrading to a more corrosion-resistant material. |
| Grinding noise during operation | Metal-on-metal contact from worn slide shoe, dry track, or fractured friction washer fragments | Clean and lubricate first. If the friction stay grinding noise fix doesn’t resolve it, inspect the slide shoe for visible wear grooves or deformation. Replace if damaged. |
A pattern worth noting: problems rarely appear on just one stay. Because friction stays work in pairs, wear tends to progress at similar rates on both sides of the sash. If one stay shows symptoms, inspect its partner immediately. Replacing only one creates uneven resistance that causes racking and accelerates failure of the remaining original unit.
When Friction Adjustment Is Not Enough
The friction screw is the first thing people reach for when a window starts to drift, and rightly so. A quarter-turn can restore holding power that’s been lost as washers bed in during the first year of use. But there’s a limit to what that single screw can achieve.
If you’ve tightened the adjustment screw to its maximum and the window still won’t hold position, the friction washers inside the mechanism are worn beyond their service range. No amount of additional compression will restore the surface texture that creates grip. At this point, the stay needs replacing rather than further adjustment. Continuing to overtighten risks stripping the adjustment thread or deforming the washer stack housing, which can make removal harder when replacement finally happens.
Window friction stay sagging repair follows the same logic. A sash that visibly drops at the opening edge when extended — the top corner pulling away from the frame — indicates either worn pivot bushes, a cracked scissors arm, or mounting screws that have loosened in the frame. Tightening screws is a valid first step. But if the screws spin without gripping, the frame holes may be stripped. And if the arm itself shows lateral play at its pivot points, the internal bushes are done.
The practical rule: if a friction stay has been in service for more than a decade and requires constant re-tightening, it owes you nothing. A replacement pair costs far less than a window sash that falls out of its frame or a cracked seal from years of racking.
Knowing when maintenance ends and replacement begins is the judgement call that separates a quick fix from throwing effort at hardware that’s past saving. The next consideration is whether that replacement should be a like-for-like swap or an opportunity to upgrade the specification entirely.
Deciding Whether to Replace, Adjust, or Upgrade
A friction stay showing symptoms doesn’t automatically mean it’s destined for the bin. Some problems resolve with a 30-second adjustment. Others demand a full swap. And occasionally, the smarter move isn’t replacing like-for-like at all but stepping up to a different size or material that better suits what the window now demands. The trick is reading the signs correctly so you don’t waste time adjusting hardware that’s already past its useful life, or spend money replacing stays that just needed a quick tune.
Signs You Only Need an Adjustment
Friction stay adjustment vs replacement is a judgement call, but the indicators for a simple adjustment are fairly clear. If your window still holds open but doesn’t feel as firm as it once did, you’re almost certainly looking at a friction screw correction rather than a hardware failure:
- Window holds at wider angles but drifts when nearly closed — the friction is marginal, not gone. A quarter-turn clockwise on the adjustment screw usually restores adequate grip.
- Slight drift that started recently — friction washers bed in over the first 12 months of use, settling into their contact surfaces. This is normal and expected. A minor tighten brings them back.
- The friction screw hasn’t been touched since installation — if nobody has adjusted the stay since it was fitted, there’s almost certainly room to increase tension before the washers are anywhere near their wear limit.
- Operation feels smooth with no grinding or clicking — clean, quiet movement tells you the internal components are in good condition. The resistance just needs recalibrating.
Adjustments are free, take seconds, and require nothing more than a screwdriver or hex key. Start here before assuming anything worse.
Signs You Need a Full Replacement
How to tell if friction stays are worn out? The symptoms are more pronounced than a simple drift issue, and they don’t respond to the adjustment screw no matter how much you tighten it:
- Visible wear grooves on the slide track — shiny, polished channels cut into the track surface indicate metal-on-metal contact has ground past the friction washer interface.
- Corroded or missing rivets — compromised rivets mean the scissors arm joints have excessive play, and the sash will wobble regardless of friction setting.
- Sash has dropped noticeably — a gap appearing at the top corner of the sash when open signals worn pivot bushes or fractured arm components that can’t be restored by adjustment.
- Friction screw at maximum tightness but window still drifts — this is the definitive sign. The washers are worn smooth and no amount of compression will regenerate their grip surface.
- Mounting screws spin without gripping — stripped screw holes in the frame mean the stay can’t maintain secure contact regardless of the hardware’s internal condition.
When replacing, always swap both stays as a matched pair. One new stay working against one worn stay creates uneven resistance that racks the sash and shortens the new unit’s life. Match the replacement to the original in type, length, handing, and screw pattern. If you’re unsure of the specification, remove the old stay and photograph both sides before ordering.
DIY replacement is realistic for anyone comfortable with a screwdriver and willing to support the sash weight safely during the swap. Budget roughly $30 to $70 per pair of stays for quality aluminium or stainless steel residential units, plus basic tools you likely already own. Professional installation makes more sense when the sash is particularly heavy, when frame holes need repairing, or when the window sits at height and requires scaffolding or specialised access.
When to Upgrade Size or Material
Sometimes a like-for-like replacement doesn’t cut it. The original stays may have been adequate when first fitted, but circumstances change. Upgrading friction stays for double glazing is the most common scenario: a homeowner replaces single-pane glass with double-glazed units to improve thermal performance and noise reduction, but the existing stays were rated for a sash weight that just doubled. The old 250mm stays rated for 12 kg can’t manage a sash that now weighs 22 kg. New stays with a longer track length and higher load rating become mandatory.
Other scenarios that warrant a specification upgrade rather than a straight swap:
- Environmental change — a property that was once sheltered by neighbouring buildings might now face direct coastal exposure after surrounding development cleared. Aluminium alloy stays corroding within a few years signal the need to step up to Grade 316 stainless steel.
- Original stays were undersized — budget installations sometimes fit stays that barely meet the minimum weight rating. If the stays wore out prematurely or never held the sash firmly from the start, upgrading to the next length up provides a proper safety margin.
- Switching from zinc-plated steel to aluminium — older aluminium-framed windows sometimes came with zinc-plated steel stays that have now corroded at the contact points. Replacing with aluminium alloy stays eliminates the galvanic issue permanently.
- Added restrictors — if child safety requirements now apply (a change in room use, or new regulations for upper-storey windows), the replacement stays may need built-in restrictor compatibility that the originals lacked.
For readers whose friction stay issues point to broader window system aging — sagging frames, failed seals, single glazing that no longer meets NCC energy requirements — replacing stays alone may be treating symptoms rather than the underlying problem. In that situation, MEICHEN’s aluminium window range comes with friction stays factory-matched to each window’s weight, size, and configuration, removing the specification burden entirely. When the frame, glass, and hardware are engineered as a single system, you avoid the mismatches that come from retrofitting individual components to an aging assembly.
Whether the path forward is a quick adjustment, a straightforward swap, or a full upgrade depends on honestly assessing what the hardware is telling you. The symptoms rarely lie. Trust them, act on them proportionally, and your windows will keep holding exactly where you leave them.
Frequently Asked Questions About Aluminium Window Friction Stays
1. What is a friction stay on a window and how does it work?
A friction stay is a concealed mechanical arm fitted inside the rebate of a window frame that serves as both a hinge and a hold-open device. It works through two interlocking metal arms sliding along a track channel with calibrated resistance generated by compressed friction washers. This continuous drag allows the window sash to hold at any position along its travel arc without drifting closed or slamming open. A single tension screw lets you adjust how firmly the window holds by compressing or releasing the friction washer stack.
2. How do I know what size friction stay I need for my window?
Sizing a friction stay requires matching three specifications to your window: stay length (in millimetres), load rating (maximum sash weight in kilograms per pair), and stack height (the folded depth that must fit within your frame rebate). Always size from actual sash weight rather than frame dimensions alone, since glass type and profile density significantly affect mass. A typical 250mm stay handles around 12 kg per pair, while a 500mm stay supports 35 kg or more. Measure your frame rebate depth with a caliper to confirm the stack height will fit before ordering.
3. How do I fix a window that won’t stay open?
Start by tightening the friction adjustment screw in quarter-turn increments and testing after each turn. If the screw is already at maximum tightness and the window still drifts, the internal friction washers are worn beyond their service range and the stay pair needs full replacement. Other causes include loose mounting screws that can be retightened, debris in the track channel that needs cleaning, or corroded components requiring a complete hardware swap. Always replace stays as a matched pair to avoid uneven resistance that racks the sash.
4. Should I use aluminium or stainless steel friction stays on my aluminium windows?
For standard residential aluminium windows in inland or suburban Australian locations, aluminium alloy stays are the best choice because they eliminate galvanic corrosion risk, match the frame’s thermal expansion rate, and cost less. However, properties within five kilometres of the coast need Grade 316 stainless steel stays for their superior resistance to salt-air corrosion. If using stainless steel on aluminium frames, ensure the installer uses nylon washers or barrier coatings to prevent galvanic reaction between the dissimilar metals.
5. How often should friction stays be maintained and how long do they last?
Quality aluminium or stainless steel friction stays typically last 10 to 15 years under normal conditions with basic maintenance. Coastal properties or high-traffic windows may see wear within five to seven years. Maintain stays once or twice yearly by inspecting tracks for debris, cleaning with a dry brush, applying silicone spray to slide channels, checking mounting screw tightness, and testing friction adjustment. Coastal and tropical Australian properties benefit from six-monthly attention due to invisible salt deposits that accelerate corrosion at metal contact points.
More Window & Door Guides