Why Installation Details Matter More Than the Window Itself
A premium thermally broken aluminium window can still leak, rattle, and underperform within months of going in. The product itself might be flawless. The failure sits in the gap between frame and wall, in a flashing tape applied out of sequence, or in a fixing that ignores thermal movement. Forensic building investigations consistently show that improper installation practices, not manufacturing defects, are behind the majority of window failures related to water intrusion.
Installation defects cause more window failures than manufacturing defects. The most expensive aluminium frame on the market cannot compensate for a poorly prepared opening or incorrect flashing sequence.
This guide exists to close that gap. Every aluminium window installation detail covered here, from rough opening preparation through to final commissioning, is grounded in building science rather than trade shortcuts. You will understand the reasons behind each step, not just the method.
How Installation Quality Affects Window Performance
Your window’s rated performance only holds true when the frame-to-wall junction is done right. A window rated at a U-value of 1.0 W/m2K can perform far worse if thermal bridging occurs at the installation interface. Water resistance depends on correct drainage plane integration and flashing laps that follow shingle principle, directing moisture down and out. Structural integrity relies on fixing centres matched to wind load calculations and wall substrate type. Even long-term operability, how smoothly sashes slide or casements latch after five years, ties back to whether the frame was shimmed plumb and level with adequate clearance for thermal expansion.
These are not abstract concerns. They connect directly to the building science principles that govern real-world performance: thermal movement in aluminium profiles under sun exposure, pressure equalisation that prevents wind-driven rain from being pushed past seals, and drainage planes that manage water behind cladding.
Who This Guide Serves and How to Use It
Whether you are a homeowner researching your renovation, a builder confirming best practice before a complex install, or an architect specifying window systems for a new project, this guide works as a reference. DIY readers will gain the foundational knowledge needed to assess an installer’s work or tackle simpler openings with confidence. Professional installers will find the building science rationale behind techniques they may already use instinctively, providing the language to explain decisions to clients and colleagues.
Each section builds on the last. The terminology and principles covered early on inform the step-by-step processes, weatherproofing strategies, and troubleshooting methods that follow. Treat it as a complete aluminium window installation resource, or jump to the section that matches your immediate question.
Essential Installation Terminology Every Builder Should Know
Technical guides assume you already speak the language. Most skip straight to instructions without explaining what a reveal actually does, or why a sub-sill matters to your drainage strategy. Before you can fit aluminium windows with any confidence, whether reading a manufacturer’s installation manual or briefing a contractor, you need a working vocabulary that connects each component to its role in the assembly.
The terms below are not just labels. Each one describes a functional element that affects how your window resists water, withstands wind loads, or accommodates thermal movement over decades of service.
Structural Components of the Window Opening
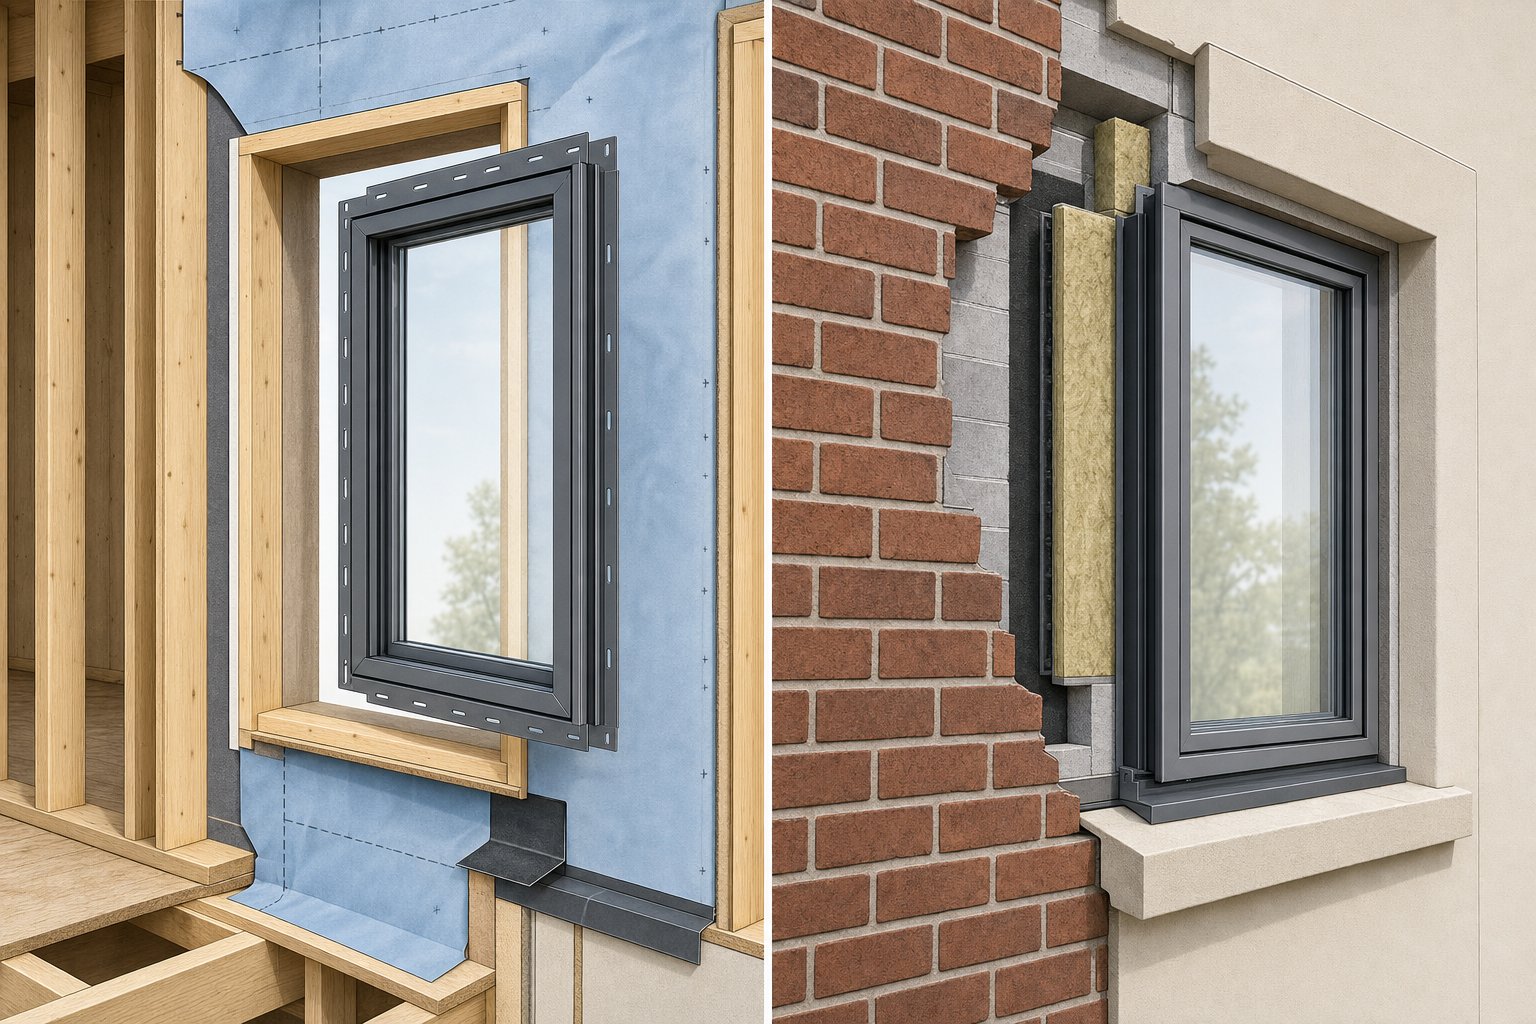
The opening in your wall where the window sits is not simply a hole. It is a precisely prepared assembly with named parts that each serve a structural or weatherproofing purpose.
The rough opening is the framed gap in your wall structure, typically 10mm larger on each side than the window frame itself. That clearance gap is deliberate, allowing room for shimming, levelling, and thermal expansion. The head spans horizontally across the top of this opening and carries structural load above. The sill forms the bottom horizontal surface, serving as both a structural platform and the primary drainage path for any moisture that enters the frame-to-wall junction. The jambs are the vertical sides, providing the fixing substrate and containing the tracks or channels that guide a sliding frame in a window system.
In Australian construction, the visible return between the window frame edge and the interior wall surface is called the reveal. American sources often use the term “buck,” particularly for timber linings within masonry openings. Same concept, different terminology, and worth knowing if you encounter US-sourced installation literature.
Frame and Fixing Terminology Explained
When fitting aluminium windows into an opening, several frame-specific components come into play beyond the basic structure.
| Term | Definition | Why It Matters |
|---|---|---|
| Mullion | A vertical or horizontal structural member dividing a window frame into separate sections | Carries additional wind load and requires its own fixing strategy independent of the outer frame |
| Transom | A horizontal bar separating a window into upper and lower sections | Creates separate drainage zones within the frame and affects how flashing integrates at mid-height junctions |
| Horn | The extension of the sill or head beyond the jamb line on traditional window frames | Provides additional bearing surface and helps shed water past the frame edge on masonry installations |
| Nail Fin (Nailing Flange) | A thin perimeter flange projecting from the outer face of the frame, designed to be fastened directly to wall framing | Integrates with building wrap as part of the drainage plane and is the primary fixing method for new construction in timber-framed walls |
| Sub-Sill | A separate aluminium or PVC tray installed beneath the window frame’s bottom rail | Captures and redirects any moisture that passes the primary weather seal, draining it to the outside via weep slots |
The nail fin method is standard for new builds in Australian timber-framed construction. When you are dealing with brick veneer or masonry, through-frame mechanical fixings or bracket systems replace the flange approach entirely.
Sealing and Weatherproofing Terms
The final layer of terminology relates to keeping weather on the outside, a critical consideration across every Australian climate zone from tropical Queensland to coastal Victoria.
| Term | Definition | Why It Matters |
|---|---|---|
| Weatherstrip | Flexible sealing material (brush, foam, or rubber) applied where the operable sash meets the fixed frame | Prevents air infiltration and wind-driven rain entry at the moving joint, directly affecting both energy performance and water resistance ratings under AS 2047 |
| Reveal (External) | The exposed wall surface between the frame edge and the cladding line on the exterior | This is where sealant joints sit and where flashing tape terminates, making it critical to waterproofing integrity |
| Backer Rod | A compressible foam rope inserted into the gap between frame and wall before sealant is applied | Controls sealant depth, ensures correct joint geometry for adhesion, and prevents three-sided adhesion failure |
Understanding these terms transforms an installation manual from jargon into a logical sequence. Each component relates to the next. The rough opening dictates clearance. Clearance determines shimming. Shimming positions the frame for correct fixing. Fixing holds the frame while sealing and flashing complete the weather barrier. That sequence, from structure through to seal, sets the foundation for choosing the right installation method for your project type.
New Construction vs Retrofit Replacement Installation
The right installation method depends entirely on what is already standing. A brand-new timber frame with exposed studs and no cladding calls for a completely different approach than replacing sliding windows in a 1980s brick veneer home where the surrounding structure stays intact. These are two distinct processes with different fixing strategies, waterproofing sequences, and levels of disruption, yet most guides treat them as interchangeable.
New Construction Installation Fundamentals
In new construction, the window arrives before the cladding goes on. The frame gets secured directly to the wall framing via a nail fin (nailing flange) that sits flat against the stud face and integrates into the building wrap as part of the drainage plane. Timing matters here. The water-resistive barrier must be installed and lapped correctly at the sill before the window is set, with jamb and head flashing applied in strict shingle-lap sequence after the frame is fixed in place.
This sequencing within the construction timeline gives you full access to the structural substrate, clean integration with the drainage plane, and the ability to size the rough opening precisely for the specified window. It also means the window installer, waterproofing trade, and cladding contractor must coordinate closely. As LuxHaus notes, sequencing failures are almost always coordination failures: the wrong trade on site at the wrong time.
Retrofit and Replacement Installation Approach
When you are looking at how to replace a sliding window in an existing home, the cladding stays put and the existing opening dictates what is possible. The process begins with careful removal of the old frame, cutting through fixing points and sealant joints without damaging surrounding renders, brick, or weatherboard.
Once the old frame is out, you assess what remains. Is the timber reveal sound or rotted? Is the masonry opening plumb and square, or has it shifted over decades? Packing and shimming to existing reveals compensates for imperfections, but the structural substrate must be solid enough to hold mechanical fixings under wind load. The critical challenge with retrofit work is maintaining weatherproofing continuity with the existing cladding, since you cannot access or replace the building wrap behind a rendered wall.
Through-frame fixings or bracket systems replace the nail fin approach entirely, and sealant joints between the frame edge and the existing cladding become your primary weather barrier rather than a secondary backup.
Deciding Which Method Suits Your Project
The choice is rarely just about cost. Structural condition, code compliance, and aesthetic goals all factor in. The table below breaks down how to replace sliding windows using each approach across the criteria that matter most.
| Criteria | New Construction | Retrofit / Replacement |
|---|---|---|
| Fixing Method | Nail fin to exposed framing | Through-frame or bracket fixing to existing substrate |
| Waterproofing Strategy | Full drainage plane integration with building wrap and flashing tape | Perimeter sealant to existing cladding; limited drainage plane access |
| Design Flexibility | High. Opening size, position, and style can be specified freely | Limited to existing opening dimensions unless structural work is included |
| Cost Implications | Higher labour if retrofitting (requires cladding removal to expose framing) | Lower overall cost when existing opening is in good condition |
| Disruption Level | Major. Involves cladding, wrap, and potentially internal linings | Moderate. Contained to the immediate window area |
| Typical Timeframe | 4-6 hours per opening (excluding cladding reinstatement) | 2-3 hours per opening for straightforward replacements |
| Best Suited To | New builds, major renovations, extensions, cladding replacements | Window upgrades in sound existing structures |
If the existing frame is rotted, racked, or undersized for the new window, a full new-construction approach with cladding removal may be the only path to a proper result. If the opening is square, the substrate is solid, and the cladding is in good shape, a retrofit installation delivers excellent outcomes with far less disruption. Either way, the method you choose dictates every decision that follows: which tools you need, which fixings are appropriate, and how you achieve a weathertight seal around the finished frame.
Tools, Materials, and Pre-Installation Preparation
Your installation method is locked in. The next question is practical: what do you actually need on site, and what should you check before any frame goes near the opening? Most online guides skip this entirely or offer a bare-bones list with no context. Knowing the tools needed to install aluminium windows is one thing. Understanding why each item earns its place on the checklist prevents the kind of mid-job improvisation that leads to poor outcomes.
Complete Tools List With Purpose Explained
Every tool here serves a specific function during installation. Skipping one usually means compromising accuracy or creating rework later.
Measuring and marking tools:
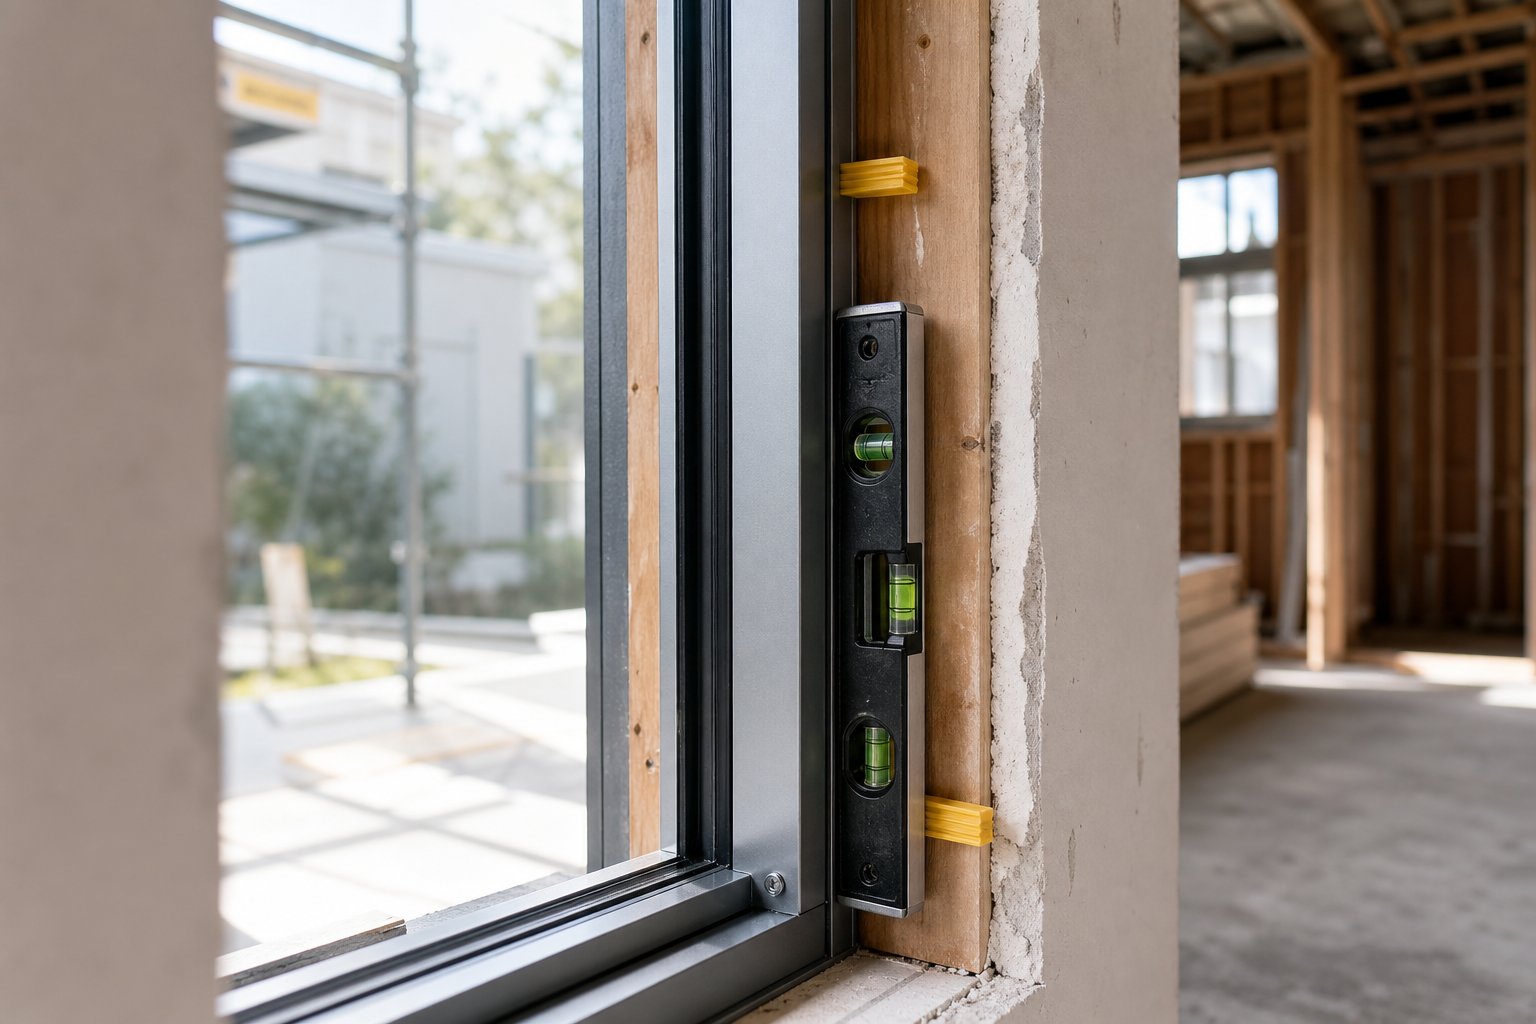
- Spirit level (1200mm minimum) — confirms plumb and level at frame and opening; shorter levels miss bowing across wider spans
- Laser level — projects reference lines across multiple openings for consistent head heights and sill alignment on multi-window elevations
- Tape measure (5m or 8m) — measures rough opening dimensions and cross-checks against frame sizes
- Combination square — verifies that reveals are at 90 degrees to the wall face, which affects how flush the frame sits
Cutting and fitting tools:
- Angle grinder with metal cutting disc — trims packers, cuts bracket fixings to length, or removes old frame sections during retrofit
- Reciprocating saw — essential for retrofit work, cuts through old timber reveals, nails, and seized fixings without damaging surrounding cladding
- Multi-tool (oscillating cutter) — precision cuts in tight spaces where a reciprocating saw is too aggressive
Fixing tools:
- Drill/driver with hammer drill function — drives masonry anchors into brick or concrete reveals; standard drill mode for self-tapping screws into timber or steel studs
- Masonry anchors (sleeve or wedge type) — required for brick veneer, rendered masonry, or concrete openings where nail fins cannot be used
- Self-tapping screws (10-gauge, hex head) — through-frame fixing into timber or light-gauge steel framing
Materials and Consumables Checklist
Beyond tools, installing aluminium windows requires consumable materials that become permanent parts of the weatherproofing system.
- Plastic packers and shims (various thicknesses from 1mm to 10mm) — level and plumb the frame within the rough opening
- Backer rod (closed-cell foam, sized to suit gap width) — controls sealant depth and prevents three-sided adhesion
- Exterior-grade neutral-cure silicone sealant — seals the frame-to-wall junction without corroding aluminium profiles; acidic cure variants attack the metal over time
- Flashing tape (minimum 150mm wide, self-adhesive butyl) — integrates the frame perimeter with the building wrap drainage plane
- Building wrap or peel-and-stick membrane — used at sill pan areas to create a secondary drainage layer beneath the sub-sill
- Sub-sill tray or sill pan (aluminium or PVC) — captures and redirects moisture that passes the primary seal
One detail that separates professional work from amateur attempts: always use neutral-cure sealant on aluminium frames. Acetoxy (acidic) silicone is cheaper and widely available, but it causes long-term corrosion on aluminium profiles. Check the tube label before loading the caulking gun.
Pre-Installation Opening Inspection Steps
A solid window installation preparation checklist starts well before you pick up a drill. These checks catch problems when they are still cheap to fix.
- Dimension check: Measure the rough opening width at top, middle, and bottom. Repeat for height on both jambs. Compare against the window frame dimensions — you need 5-10mm clearance per side for shimming and thermal movement.
- Diagonal check: Measure corner to corner both ways. If diagonals differ by more than 3mm, the opening is out of square and needs packing or trimming before the frame is positioned.
- Plumb and level: Hold a spirit level against each jamb and across the sill. An opening that is out of plumb puts uneven stress on fixings and causes sash binding over time.
- Substrate condition: Inspect the reveals for cracks, rot (in timber), crumbling mortar (in masonry), or corrosion (in steel studs). The substrate must be structurally sound enough to resist the pull-out load on your chosen fixing type under design wind pressures.
- Drainage path: Confirm that the sill slopes outward or that a sub-sill can be installed with adequate fall. Water must drain away from the building, never pool against the frame bottom rail.
Sash and glass removal for safe handling: Professional manuals recommend removing operable sashes and, where possible, fixed glass panels before lifting the frame into position. Aluminium frames are light, but a complete unit with double-glazed panels is both heavy and fragile. Slider windows typically lift out of their tracks by raising the sash and pulling the base forward. Casement or awning sashes release from friction stays or hinges via retaining clips. Removing these components reduces the frame weight, lowers the risk of glass breakage during manoeuvring, and makes it far easier for two people to position the frame accurately within the opening.
With tools staged, materials ready, and the opening confirmed as sound, square, and draining correctly, the actual frame installation can proceed with confidence rather than guesswork.
Step-by-Step Aluminium Window Installation Process
A confirmed opening, staged tools, and the right materials only matter if the installation sequence itself is executed correctly. Each step in a sliding window installation builds on the last, and the building science reasoning behind the sequence is what separates a watertight, long-lasting result from one that develops problems within its first winter.
Setting the Sub-Sill and Positioning the Frame
The sub-sill goes in first because everything above it depends on proper drainage. Set the sub-sill tray or sill pan into the opening with a minimum fall of 5 degrees toward the exterior. This slope ensures any moisture that reaches the secondary drainage layer runs outward to the weep slots rather than pooling against the bottom rail. On masonry openings, bed the sub-sill on a continuous bead of neutral-cure sealant, keeping the weep drainage ports clear of any sealant squeeze-out.
With the sub-sill secured, position the aluminium frame into the opening. Maintain clearance gaps of 5-10mm on each side, at the head, and above the sub-sill. These gaps are not wasted space. Aluminium expands and contracts with temperature change, and a frame fixed hard against the substrate will bow, bind sashes, and crack sealant joints as the profile moves with thermal cycles. On a north-facing elevation in full Australian sun, an aluminium frame can experience surface temperatures exceeding 60 degrees Celsius, making this movement allowance essential rather than optional.
Place shims at each planned fixing point before adjusting for plumb and level. Shims belong at fixing locations because that is where clamping force is applied. A shim positioned between fixings creates a fulcrum point, and tightening the screw will flex the frame inward, causing distortion that affects sash operation. As professional installation manuals note, packers should span the full depth of the outer frame and must not be over-tightened, as this leads to distortion.
Fixing Types and When to Use Each One
The correct fixing method depends on your wall construction and the loads that the frame must resist, primarily wind load, operating loads from sash movement, and gravity on larger units.
| Wall Type | Recommended Fixing | Minimum Penetration | Typical Fixing Centres |
|---|---|---|---|
| Timber frame (new construction) | Nail fin / nailing flange | Flange screw into stud, 25mm min. | 150mm from corners, 600mm max. intermediate |
| Brick veneer / masonry | Through-frame with masonry anchors | 50mm into solid masonry | 150mm from corners, 600mm max. intermediate |
| Light-gauge steel stud | Through-frame with self-drilling screws | Three full thread engagements min. | 100-150mm from corners, 450mm max. intermediate |
| Concrete or precast | Through-frame with sleeve anchors | 50mm embedment into concrete | 150mm from corners, 600mm max. intermediate |
Fixing centres, the spacing between fasteners, directly relate to wind load resistance. In high-wind regions such as coastal Queensland or exposed sites in Western Australia, these centres tighten to 400mm or less depending on the engineer’s calculation for the specific design wind speed. A frame with fixings spaced too far apart deflects under wind pressure, breaking sealant bonds and allowing air and water infiltration at the frame-to-wall junction.
Bracket fixing (also called lug fixing) is common in retrofit situations where through-frame holes are undesirable on visible faces. A twist-in anchor attaches to the outer frame, and a separate screw connects the bracket to the substrate. This method accommodates slight opening irregularities without requiring the frame to sit hard against the reveal.
Securing the Frame and Checking Alignment
Fix the bottom of the frame first, then work upward. Start with one screw at each lower corner, check level, then secure the upper corners. This approach, confirmed by Fine Homebuilding, allows you to push the frame top sideways to achieve plumb and square before locking everything in place.
Once corner fixings are in, check diagonal measurements. Both diagonals must match within 2mm for a standard residential opening. If they differ, the frame is racked, and sash operation will suffer. Adjust by loosening one upper corner, shifting the frame, and re-measuring before adding intermediate fixings. For slider window installation specifically, racking creates uneven track gaps that cause the sliding sash to bind or derail over time.
After all fixings are driven, verify three things:
- Both jambs are plumb (spirit level on each side)
- Head and sill are level (or the sill maintains its designed drainage fall)
- The frame face is not bowed inward or outward at any point (straight edge across the face)
If any fixing has pulled the frame out of plane, back it off, re-shim, and re-drive. Forcing a fix at this stage guarantees ongoing operational problems.
Final Commissioning and Operation Testing
Commissioning is where you prove the installation works, not just that it looks right. This stage covers every operable element and weather seal before the plasterer or trim carpenter closes access to the frame perimeter.
For sliding windows installation, refit the sashes by lifting them into the upper track channel and dropping the base onto the lower rail. The sash should glide smoothly from end to end without binding, jumping, or excessive resistance. If how to install sliding window sashes feels stiff, check for frame distortion at the fixing points or debris in the track.
Run through this commissioning sequence:
- Operation check: Open and close every sash fully, multiple times. Casements and awnings should swing freely without scraping the frame. Sliders should track smoothly without lifting off the rail.
- Lock engagement: Engage all locking points. Multi-point locks should draw the sash tight to the weatherstrip evenly. If one lock engages but another does not, the frame or sash is slightly out of alignment and needs adjustment.
- Hardware adjustment: Most modern aluminium hardware includes adjustment screws for height, lateral position, and compression. Use these to fine-tune sash alignment rather than forcing locks against a misaligned frame.
- Weatherstrip compression: Close the window and inspect the seal line from inside. The weatherstrip should compress evenly around the full perimeter. Gaps indicate frame distortion or incorrect sash adjustment.
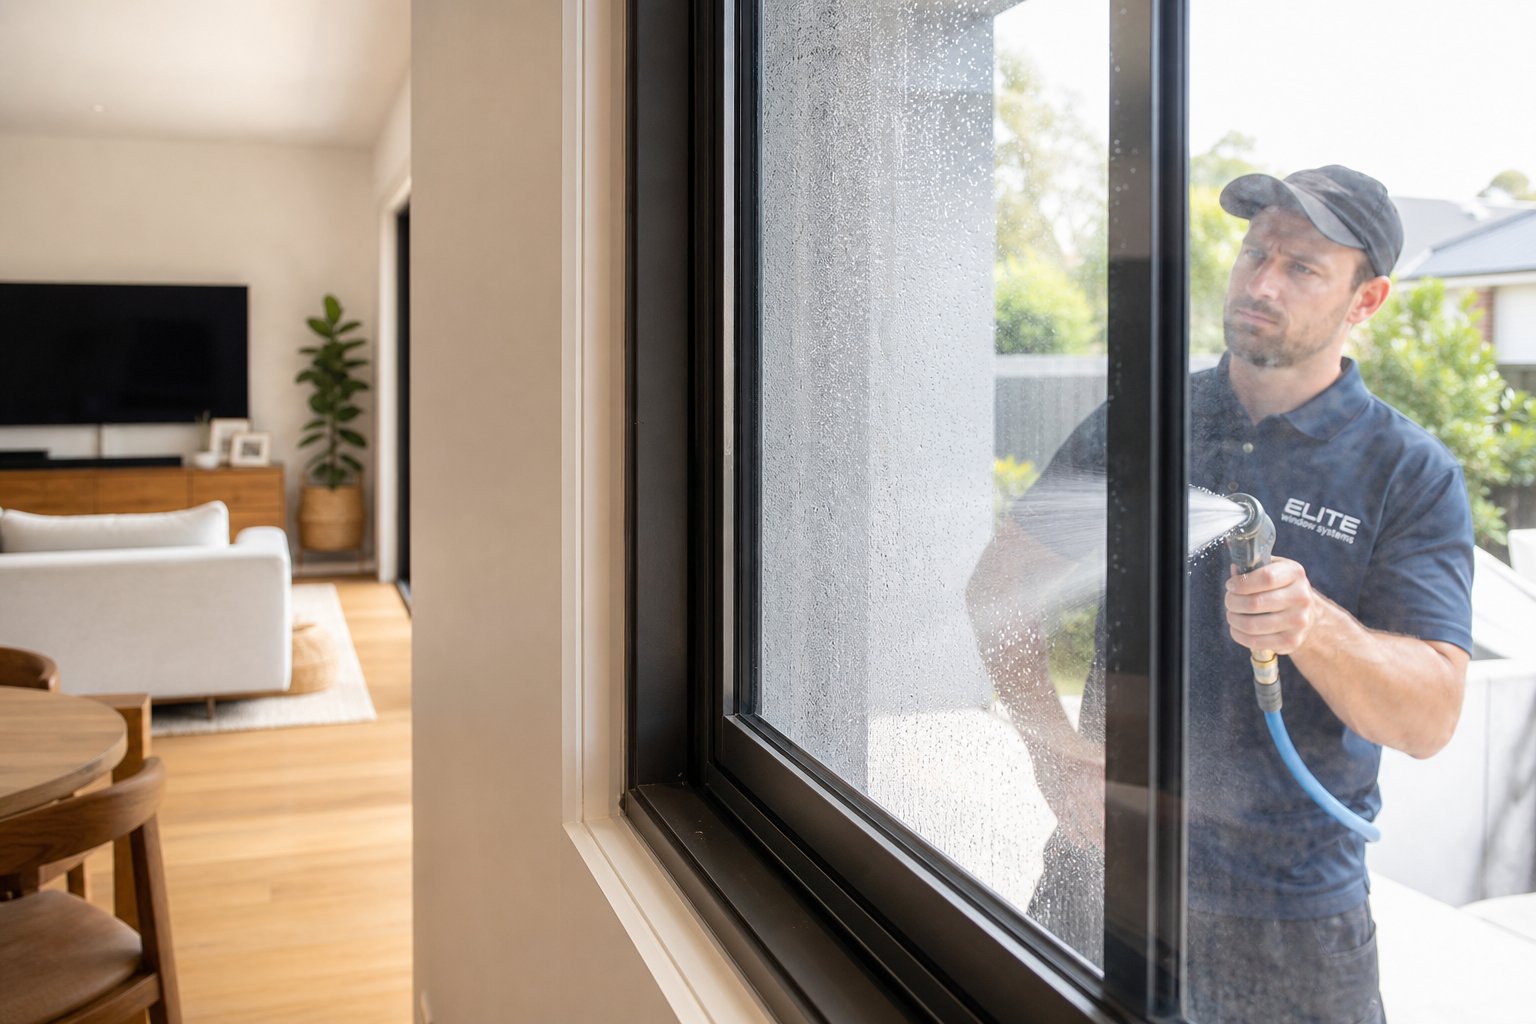
- Water testing: Before internal reveals are finished, spray water across the frame exterior using a hose with a fine spray nozzle. Work from the sill upward. Watch for any moisture appearing inside at the frame-to-wall junction or at sash meeting rails. This simple test catches flashing failures and sealant gaps while they are still accessible to fix.
A frame that passes all five checks is properly commissioned. Document the result with photos before the internal linings go on, particularly at the sill corners and head flashing areas. These are the zones where problems surface months later, and having a record of the correct installation state protects everyone involved.
With the frame secured, operating correctly, and water-tested, the installation is structurally complete. What remains is the weatherproofing layer that ties the frame into the wall assembly as a complete system, a process where the sequence of flashing and sealant application matters just as much as the materials themselves.

Weatherproofing, Flashing, and Sealing Techniques
A secured frame that operates perfectly still fails if the weather barrier around it is incomplete. Wind-driven rain does not politely stop at your sealant bead. Under storm conditions, negative pressure develops on the leeward side of a building, effectively sucking moisture inward through any gap in the frame-to-wall junction. Understanding this pressure dynamic explains why weatherproofing aluminium windows demands a layered system rather than a single line of silicone.
The Three-Layer Weather Resistance System
Correct window installation relies on three distinct sealing layers, each performing a different job. If one layer is compromised, the others provide redundancy. The principle is straightforward: the outer layer stops bulk water, the middle layer manages any moisture that gets through, and the inner layer controls air movement.
- Layer 1 — Primary weather seal (exterior): The outer face sealant joint between the aluminium frame and the surrounding cladding or reveal. This joint deflects the majority of wind-driven rain. It must be vapour-permeable or backed by a drainage path so that any trapped moisture can escape outward rather than being locked within the wall assembly.
- Layer 2 — Secondary drainage (mid-layer): The sub-sill with weep slots, head flashing with an upstand, and jamb flashing tape together form a continuous drainage channel. Any water that bypasses the primary seal hits this layer and is redirected downward and outward. The sub-sill pan installed earlier in the process serves exactly this function at the most vulnerable point, the bottom of the frame.
- Layer 3 — Back-up air seal (interior): An airtight seal on the room side of the frame-to-wall gap, typically achieved with backer rod and sealant, expanding foam trimmed and sealed, or a proprietary membrane tape. This layer prevents warm, moist interior air from migrating into the wall cavity where it would condense on cold surfaces.
The illbruck i3 system formalises this concept as “inside tighter than outside.” The inner seal has a lower vapour permeance than the outer seal, so any moisture trapped within the junction can dry outward while interior humidity cannot enter. Violating this principle, say by making the exterior seal completely vapour-tight while leaving the interior open, traps condensation within the wall assembly and promotes mould growth and timber rot.
Air sealing and weather sealing are not the same task. Weather sealing stops liquid water. Air sealing stops uncontrolled air movement, which carries both heat energy and moisture vapour. Modern energy-efficient homes with high NatHERS ratings demand both. Older Australian homes were draughty enough that small gaps self-ventilated without obvious consequences. A well-sealed contemporary build has no such forgiveness. Any discontinuity in the air barrier at the window perimeter creates a moisture pump under pressure differential, driving humid air into framing cavities on every windy day.
Flashing Tape Sequence and Drainage Plane Integration
Whether you are working with a nail fin frame on a timber-framed wall or a flangeless frame against masonry, the window flashing tape application sequence follows the same shingle-lap logic that governs every drainage plane detail. Water flows downhill. Every upper layer must lap over the lower layer so gravity carries moisture outward rather than behind the next piece of tape.
The correct sequence, as outlined in building science guidance on WRB integration, is critically order-dependent. Getting even one step out of sequence creates a reverse lap where water runs behind the tape rather than over it.
- Sill flashing first: Apply a strip of self-adhesive flashing tape across the rough opening sill, extending at least 150mm up each jamb. This forms the base of the drainage pan. On timber-framed walls with building wrap, the sill tape adheres directly to the sheathing or wrap surface, tucking under any cut wrap edges.
- Set the window frame: Position and fix the frame (or nail fin) over the sill flashing. If you are learning how to install a vinyl window with nailing flange or an aluminium equivalent, the flange sits directly on top of this sill tape so water flowing down the face of the flange drains onto the taped sill beneath.
- Jamb flashing second: Run flashing tape vertically along each jamb, overlapping the sill tape by at least 75mm. The jamb tape covers the nail fin edge (in new construction) or bridges the frame-to-substrate gap (in flangeless installations). This layer laps over the sill tape beneath it.
- Head flashing last: Apply the head flashing tape horizontally across the top of the frame, overlapping both jamb tapes. This is the final shingle layer. Any water running down the building wrap above hits this tape and is directed over the jamb tapes rather than behind them.
- Building wrap integration: If using mechanically attached house wrap, fold the upper wrap layer down over the head flashing tape. This final lap means bulk water running down the wall face travels over the wrap, over the head tape, and continues down the wall without entering the frame junction.
Think of it as roofing a tiny wall section around each window. Every layer shingles over the one below. Reverse any step and you create a collection point rather than a drainage path. This sequence applies regardless of frame material or fixing method, making it the universal constant across all installation approaches.
Climate-Specific Sealing Considerations
Australia spans climate zones from tropical monsoonal in the Top End to cold alpine conditions in the Snowy Mountains. A sealing strategy that works in temperate Melbourne may be dangerously inadequate in Cairns or non-compliant in a bushfire-prone area of the Adelaide Hills.
Coastal and high-wind zones: Properties along exposed coastlines or in cyclone-prone regions of northern Queensland, the Northern Territory, and parts of Western Australia face extreme wind-driven rain loads. Negative pressure during severe weather events can exceed the capacity of standard sealant joints. As structural performance research confirms, negative pressure (suction) on leeward walls is often the real enemy, pulling frames away from seals and driving water inward through gaps that would otherwise remain dry. In these zones, enhanced mechanical fixings at tighter centres combine with wider flashing tape coverage and dual-bead sealant joints to resist these forces. Selecting window systems tested to higher water resistance ratings under AS 2047 is essential rather than optional.
High-rainfall areas: Regions like the NSW North Coast, Sunshine Coast hinterland, and parts of Tasmania that receive sustained heavy rain benefit from wider head flashings (200mm minimum upstand rather than the standard 150mm) and deeper sill pan drainage channels. The volume of water reaching the frame-to-wall junction in these areas during prolonged rain events overwhelms minimal flashing details that perform adequately in drier climates.
Bushfire zones (BAL-rated areas): Properties assessed at BAL-12.5 and above under AS 3959 face specific requirements for sealing materials. Standard polyurethane foams and some flashing tapes are not suitable where ember attack is a risk. Non-combustible or fire-rated sealants, intumescent backing materials, and metal flashings replace the standard products used in non-BAL areas. Gaps in the frame-to-wall junction that might allow ember entry must be sealed completely, with no exposed foam visible from the exterior.
Cold climate and alpine areas: In zones 7 and 8 under the NCC climate zone map, condensation management becomes the dominant concern. The interior air seal must be completely continuous to prevent warm interior air contacting cold surfaces within the wall cavity. Thermal break frames are practically mandatory, and the junction detailing must prevent thermal bridging around the frame perimeter where a conductive aluminium profile could otherwise create a cold stripe that attracts condensation on the internal reveal.
Regardless of climate zone, the underlying principle holds: layered defence with correct sequence. What changes between zones is the robustness of each layer, the width of flashing coverage, the specification of materials, and the testing standard the finished installation must achieve. Getting the layers and sequence right gives you a foundation that adapts to any Australian condition by simply scaling the details rather than reinventing the approach.
Building Codes, Standards, and Aluminium Window Building Code Compliance
Every weatherproofing layer and fixing detail discussed so far exists within a regulatory framework. Builders often reference standards as line items on a quote or disclaimers at the bottom of a scope document. That tells you nothing about what those standards actually require or how they affect the installation decisions you are making. Aluminium window building code compliance is not a box-ticking exercise bolted on at the end. It shapes the specification, the fixing strategy, and the sealing approach from day one.
AS 2047 and Australian Window Standards Explained
AS 2047 is the national standard governing windows, external glazed doors, and associated hardware in Australia. Rather than telling you how to install a window, it sets minimum performance thresholds that the finished product must achieve under testing. In practical terms, the AS 2047 window standard requirements cover five core areas:
- Structural adequacy: The frame and glazing must withstand wind pressures specific to the building’s location, height above ground, and terrain category. A window on the 10th floor of a coastal tower faces dramatically higher design pressures than a ground-floor unit in suburban Melbourne. The standard links directly to AS/NZS 1170.2 (wind actions) to determine what those pressures are.
- Water penetration resistance: Tested using simulated rainfall under pressure, the window must resist water entry at a specified threshold measured in Pascals. Higher-rated windows are required for exposed elevations and high-wind zones. Installation quality directly affects whether this tested performance holds in the real world, because a perfectly rated window installed with a reverse-lapped flashing will leak regardless of its test certificate.
- Air infiltration: Limits how much air passes through the closed window, measured in litres per second per metre of operable joint length. Excessive air leakage degrades both energy performance and acoustic insulation. Weatherstrip condition and sash compression, both affected by frame alignment during installation, determine whether the installed window meets its rated air infiltration performance.
- Operating force: Sashes must open and close within specified force limits, ensuring accessibility for all occupants including elderly residents and people with limited mobility.
- Durability: Hardware and sealing components must perform reliably over the window’s expected service life under the conditions typical of its installed location.
Every compliant window carries a performance label, typically on the inside of the frame or head, showing its wind and water ratings in Pascals. A certificate of compliance from the manufacturer, ideally backed by testing through an AGWA (Australian Glass and Window Association) accredited laboratory, confirms the product meets AS 2047. But here is the critical point most people miss: that certificate covers the manufactured product under laboratory test conditions. It does not guarantee performance once installed. If your frame is racked, your flashing is reversed, or your fixings are under-specified for the site’s wind pressures, the installed window will not achieve its rated performance despite holding a valid test certificate.
AAMA Installation Standards in Plain Language
While AS 2047 governs the product, installation practice standards provide the methodology. The American Architectural Manufacturers Association (AAMA) publishes guidelines that, while developed for the US market, influence best-practice installation methodology globally and inform Australian practice where local standards do not prescribe specific installation procedures.
AAMA 2400 (Standard Practice for Installation of Windows with a Mounting Flange in Wood Frame Construction) outlines the process for applying flashing and sealing materials to establish an effective moisture barrier. It specifies the sequence and overlap dimensions for flashing application, precisely the shingle-lap logic covered in the previous section. For an AAMA window installation compliant approach, the standard also categorises flashing materials by type:
- Mechanically attached flexible flashing (AAMA 712) — fastened with staples or button-cap nails in conjunction with sealants
- Self-adhering flexible flashing (AAMA 711) — pressure-sensitive adhesive with a release liner, the most common type used in Australian timber-frame construction
- Liquid-applied flashing (AAMA 714) — spray, brush, or trowel applied, increasingly popular for irregular substrates and complex geometries
- Rigid flashing — custom-made metal pieces sealed together in the field, typical for masonry and commercial applications
AAMA 711 and 714 both require flashing products to demonstrate adhesive strength, UV resistance, cold-temperature flexibility, water penetration resistance around fasteners, and crack-bridging ability. They categorise flashings into exposure levels: Level 1 for temperatures up to 50 degrees Celsius, Level 2 up to 65 degrees Celsius, and Level 3 up to 80 degrees Celsius. Given that north-facing wall surfaces in Australian summer frequently exceed 60 degrees Celsius, Level 2 or Level 3 rated flashing tapes are the appropriate choice for most Australian installations rather than budget Level 1 products that may soften and lose adhesion under heat exposure.
On the sealant side, AAMA 808.3 specifies requirements for joint sealants used in fenestration installation, covering adhesion to multiple substrate types, expected joint movement capacity, UV resistance, and compatibility with adjacent materials. The key takeaway: your sealant must accommodate thermal movement without losing adhesion, resist UV degradation over decades of exposure, and remain compatible with your flashing tapes and frame finishes.
How Building Codes Affect Installation Planning
In Australia, the National Construction Code (NCC) references AS 2047 as the deemed-to-satisfy pathway for window compliance. This means installing windows that meet AS 2047 satisfies the NCC’s performance requirements for structural adequacy and weather resistance. But the NCC also imposes energy efficiency requirements through Section J (commercial) and NatHERS ratings (residential) that directly connect to how well windows are installed.
A home targeting a 7-star NatHERS rating, now the minimum for most new residential construction, relies on accurate U-values and solar heat gain coefficients (SHGC) from its glazing systems. Those rated values assume a properly sealed, thermally broken installation. If the frame-to-wall junction creates a thermal bridge, or if air leakage at the installation perimeter undermines the assumed infiltration rate in the energy model, the as-built home will not achieve its modelled rating. The window might be compliant. The installation makes the building non-compliant.
Permit and inspection requirements:
- When permits are needed: In most Australian states, replacing windows in existing openings (like-for-like replacement) does not require development approval. However, changing the size, position, or number of openings typically triggers a requirement for council approval or a complying development certificate. New construction always requires building approval that covers window specifications.
- What inspections cover: Building inspectors check that installed products match the approved plans, carry appropriate compliance labels, and are installed in a manner consistent with the manufacturer’s recommendations. Frame-stage inspections (before internal linings) are the relevant checkpoint for window installations in new construction.
- Documentation required: Retain the AS 2047 compliance certificate, the manufacturer’s installation guide, and any engineering computations for non-standard fixings or openings exceeding standard sizes. These documents form part of the building compliance file and may be requested at final inspection or during future property transactions.
Planning for compliance before installation begins, rather than scrambling to produce paperwork after the fact, eliminates delays and rework. This is where working with a project-capable supplier makes a measurable difference. A supplier like MEICHEN that understands AS 2047 requirements, NCC energy provisions, and local council processes can align system recommendations to code requirements from the project outset, provide compliance documentation as a standard part of supply, and coordinate installation planning that accounts for inspection timing and permit conditions. It transforms standards compliance from a reactive scramble into a built-in feature of your project workflow.
Standards and codes define what the installation must achieve. Troubleshooting reveals what happens when those benchmarks are not met, and knowing how to diagnose failures after the fact is the other half of the compliance picture.
Troubleshooting Common Aluminium Window Installation Problems
Compliance certificates and careful sequencing do not guarantee a trouble-free result years down the track. Buildings settle. Sealants age. Fixings that seemed adequate at sign-off prove insufficient during the first serious storm. Knowing how to diagnose and resolve post-installation failures saves the cost and disruption of a full replacement when the problem often sits in a single detail rather than the entire window system.
Diagnosing Water Infiltration After Installation
A window water leak after installation is the most common complaint builders field, and the most commonly misdiagnosed. Water appearing at the sill does not always mean the sill is the failure point. Moisture that enters at the head or jamb can travel along the frame profile or behind the internal lining before emerging at the lowest point, making the source appear far from the actual breach.
- Cause — Incorrect flashing sequence: A reverse lap at the head-to-jamb junction allows water to run behind the flashing tape rather than over it. Even a 20mm mis-lap creates a collection point under sustained rain.
- Cause — Failed or incomplete sealant joints: Sealant applied without backer rod fails in adhesion because three-sided bonding restricts the joint’s ability to stretch with thermal movement. The sealant tears away from one substrate, creating gaps that allow water intrusion progressively worse over each wet season.
- Cause — Blocked drainage paths: Weep holes and drainage channels clogged with construction debris, mortar droppings, or accumulated dirt prevent the sub-sill from doing its job. Water pools inside the frame and eventually overflows inward.
Systematic diagnosis: Use a garden hose with a fine spray nozzle, starting at the sill and working upward in sections. Have someone inside monitoring for moisture. When water appears, you have isolated the failure zone to the section you were spraying. This methodical bottom-up approach prevents upper water from masking the true entry point. Once located, the fix depends on the cause: re-sequencing flashing requires partial cladding removal, failed sealant needs cutting out and reapplying over backer rod, and blocked drainage simply needs clearing and confirming flow.
Fixing Frame Misalignment and Operational Issues
An aluminium window frame alignment fix often becomes necessary when sashes start binding, locks refuse to engage evenly, or visible gaps appear between the sash and weatherstrip. These symptoms point back to the frame rather than the hardware.
- Cause — Inadequate shimming: Shims placed between fixing points rather than at them allow the frame to deflect inward when screws are tightened. Over time, this distortion worsens under repeated thermal cycling.
- Cause — Building settlement: Particularly in new construction, framing timbers shrink as they season. A frame fixed rigidly without clearance gaps absorbs this movement as racking, pulling the head out of level or the jambs out of plumb.
- Cause — Insufficient fixing centres: Wide spacing between fixings allows the frame to bow under wind load. Each deflection stresses the sealant, works the shims loose, and progressively worsens alignment.
Solutions: Remove internal trims to access the frame perimeter. Check plumb and level at each jamb. Where the frame has moved, loosen the affected fixings, re-shim at the correct locations (always at fixing points), and re-drive. If original fixing centres exceed 600mm, add intermediate fixings to stiffen the frame against deflection. For sliding windows where the sash has derailed or jammed, correcting the frame alignment first is essential. Once the tracks run true, knowing how to put sliding window back in frame is straightforward: lift the sash into the upper track channel, swing the base inward, and lower it onto the bottom rail. If the sash still binds after frame correction, the rollers or guides may need adjustment or replacement.
Lock misalignment from frame racking responds to the same fix. Re-square the frame, then use the adjustment screws built into modern multi-point lock keeps to fine-tune striker engagement. Forcing a lock against a racked frame damages the hardware and masks the underlying installation defect.
Preventing Thermal Bridging at Frame Junctions
Thermal bridging at the frame-to-wall junction is invisible until its consequences appear: condensation lines on internal reveals, mould growth at the frame perimeter, or energy bills that do not match the modelled performance. Research into facade thermal bridging confirms that window-to-wall junction details are frequently overlooked, yet the cumulative interface length across all windows in a typical home represents a significant linear thermal bridge.
- Cause — Direct frame contact with structure: An aluminium frame fixed hard against a steel lintel or concrete reveal creates a conductive pathway that bypasses the wall insulation entirely. The frame’s thermal break is irrelevant if heat flows around it through the fixing detail.
- Cause — Incomplete air seal: Gaps in the interior backer rod and sealant line allow warm humid air to contact cold surfaces within the wall cavity, causing concealed condensation that degrades insulation and framing over time.
- Cause — Misalignment with insulation plane: When the window sits on the inner face of the wall rather than aligning with the insulation layer, the frame perimeter acts as a thermal fin exposed to exterior conditions. The optimal position places the window near the mid-point of the wall insulation, reducing heat flow by up to 64% compared to conventional placement.
Solutions: For existing installations showing condensation, apply a continuous interior air seal using backer rod and neutral-cure sealant around the full frame perimeter, leaving no gaps at corners. Where the frame contacts a conductive substrate, thermal isolation pads (nylon or EPCM) between the frame and the fixing point reduce direct conduction. In new builds or major renovations where you have design control, positioning the window within the insulation plane rather than inside the structural wall line eliminates the bridge at its source. Combined with a thermally broken frame, this approach delivers installed U-values that match the manufacturer’s rated performance rather than degrading it by 20-40% through poor junction detailing.
These three failure categories, water, alignment, and thermal performance, account for the vast majority of post-installation problems. Each traces back to a specific installation detail covered earlier in this guide. Diagnosing correctly means you fix the cause rather than chasing symptoms, and understanding the underlying building science helps you prevent the same issues on your next project rather than repeating them.
Planning Your Aluminium Window Installation Project
Diagnosing problems after the fact is useful knowledge. Preventing them entirely is a better strategy. Every failure mode covered in this guide, whether water infiltration, frame racking, or thermal bridging, traces back to a decision made (or missed) before any frame touched the opening. The most reliable aluminium window installation planning guide you can follow is simple in principle: get the specification, coordination, and scheduling right, and the physical installation becomes an exercise in execution rather than improvisation.
Key Decisions Before Installation Begins
Your situation shapes where to focus. A DIY homeowner replacing a single sliding window in a sound opening needs accurate measurements and the right sealant. A builder running fifteen openings across a new build needs a window schedule, coordinated trades, and delivery timing that matches the construction programme. An architect specifying for a multi-storey project needs performance data, compliance documentation, and section details that resolve the frame-to-wall junction for each wall type in the design.
Regardless of scale, three planning decisions prevent the majority of installation problems:
- Match the window system to the wall type: A nail-fin frame specified for a masonry opening, or a flangeless commercial section used in lightweight timber framing without appropriate brackets, creates fixing complications that cascade through the entire installation. Confirm the wall construction at each opening before locking in the frame profile.
- Confirm climate zone and exposure requirements: Wind region, coastal proximity, BAL rating, and NCC climate zone all affect minimum performance ratings under AS 2047, fixing centre calculations, and sealing material specifications. These are not afterthoughts to check at inspection. They determine what you order.
- Size accurately with clearance included: Rough opening dimensions minus 10-20mm total (5-10mm per side) give you the frame size to order. Measuring incorrectly means either a frame that does not fit, or one packed so tight it has no room for thermal movement. For how to install a sliding window successfully, this clearance is especially critical because the sliding sash amplifies any frame distortion into binding and derailing.
Window schedules, the detailed documents listing every opening with its dimensions, type, glazing specification, hardware, and performance requirements, are not just for large commercial projects. Even a modest renovation with four or five openings benefits from a simple schedule that captures rough opening sizes, frame dimensions, sill heights, and fixing methods in one place. As project coordination research confirms, mistakes tied to long lead times and late changes are among the most expensive errors in window procurement, and a clear schedule is your primary defence against ordering the wrong size, type, or configuration.
Material calculations flow directly from the schedule. Knowing the total lineal metres of flashing tape, the number of fixing points (and therefore anchors or screws), the volume of sealant, and the quantity of packers required prevents mid-installation trips to the hardware store that break momentum and invite shortcuts.
Most installation failures originate in the planning stage, not on site. A correct specification, accurate schedule, and coordinated delivery sequence eliminate the conditions that produce water leaks, frame distortion, and thermal bridging before any tool leaves the bag.
Working With a Project-Capable Window Partner
Understanding aluminium window installation details puts you in a stronger position to manage your project, but knowledge alone does not produce windows. Between deciding what you need and physically installing it sits a chain of coordination: system selection, custom sizing to your openings, material calculation, manufacturing lead times, quality control, logistics, and delivery scheduling that aligns with your build programme or renovation timeline.
For aluminium sliding windows Sydney projects or anywhere across Australia, working with a supplier who handles this full chain, rather than simply dispatching product from a warehouse, materially reduces installation risk. A project-capable partner like MEICHEN bridges the gap between your installation knowledge and execution by supporting system recommendations matched to your wall type and performance requirements, providing drawings and schedules that confirm dimensions before manufacturing begins, coordinating material calculations so nothing is missing on install day, managing quality control through production, and planning logistics and delivery around your site programme rather than their convenience.
This approach matters most when your project involves multiple openings, non-standard sizes, or performance requirements driven by coastal exposure, bushfire zones, or high energy ratings. The complexity compounds quickly. A single incorrect dimension on one opening can delay an entire elevation if lead times run to several weeks.
The knowledge in this guide equips you to ask better questions of your supplier, evaluate the quality of work on site, and understand why each detail matters to long-term performance. Pair that understanding with a supplier who treats your project as a coordination exercise rather than a transaction, and you have the foundation for aluminium windows that perform as rated for decades rather than developing problems within their first year.
Frequently Asked Questions About Aluminium Window Installation
1. What clearance gap should I leave around an aluminium window frame during installation?
Allow 5-10mm clearance on each side between the aluminium frame and the rough opening. This gap accommodates shimming for plumb and level adjustment, and critically, provides room for thermal expansion. Aluminium expands significantly under heat, with north-facing frames in Australian conditions reaching surface temperatures above 60 degrees Celsius. A frame fixed hard against the substrate without adequate clearance will bow, bind operable sashes, and crack perimeter sealant joints as it moves through seasonal temperature cycles.
2. What is the correct order for applying flashing tape around a window?
The correct flashing tape sequence follows shingle-lap logic: sill flashing first, then set the window frame, then jamb flashing overlapping the sill tape by at least 75mm, and finally head flashing overlapping both jamb tapes. Building wrap folds down over the head tape last. Every upper layer must lap over the lower layer so gravity directs water outward. Reversing even one step creates a collection point where water runs behind the tape rather than over it, leading to concealed moisture damage within the wall cavity.
3. How do I know if my aluminium window installation needs new construction or retrofit method?
The deciding factor is the condition of the existing structure and whether cladding is already in place. New construction method suits new builds, extensions, or situations where cladding has been removed, giving full access to wall framing for nail fin attachment and drainage plane integration. Retrofit method suits window replacements in sound existing openings where surrounding cladding remains intact, using through-frame or bracket fixings and relying on perimeter sealant as the primary weather barrier. If the existing opening is out of square, the substrate is degraded, or the opening size needs changing, a full new-construction approach with cladding removal may be the only path to a proper result.
4. Why is my aluminium window leaking water even though it has a valid AS 2047 compliance certificate?
An AS 2047 certificate confirms the manufactured product passed laboratory testing under controlled conditions. It does not guarantee performance once installed. Water leaks after installation typically stem from incorrect flashing tape sequence creating reverse laps, sealant joints applied without backer rod leading to three-sided adhesion failure, or blocked weep holes and drainage channels preventing the sub-sill from redirecting moisture. Systematic diagnosis using a hose spray from the sill upward helps isolate the actual entry point, which is often different from where water appears inside. Working with a project-capable supplier like MEICHEN who supports installation planning alongside product supply helps prevent these failures from occurring in the first place.
5. What type of sealant should I use on aluminium window frames?
Always use neutral-cure silicone sealant on aluminium frames. Acetoxy (acidic-cure) silicone is cheaper and more readily available at hardware stores, but it causes long-term corrosion on aluminium profiles through chemical reaction with the metal surface. Check the tube label before use. The sealant must also be exterior-grade with UV resistance for exposed joints, and should have sufficient movement capacity to accommodate thermal expansion without losing adhesion. For the interior air seal, the same neutral-cure product works well over closed-cell backer rod sized to suit your gap width.
More Window & Door Guides