Understanding Window Locks for Sliding Aluminium Windows
Window locks for sliding aluminium windows are hardware devices engineered to secure horizontal or vertical sliding sashes in place, preventing unauthorised opening from outside. Unlike locks designed for casement or awning windows that latch against a frame edge, sliding window locks must restrict movement along a track — a fundamentally different mechanical challenge that demands purpose-built solutions.
What Are Sliding Aluminium Window Locks
A sliding window lock works by pinning, clamping, or blocking the sash so it cannot travel along its rail. These devices mount to the sash frame, the track itself, or the meeting rail where two panels overlap. The goal is simple: hold the window exactly where you want it, whether fully closed or open to a fixed ventilation position. Every lockable window in this category relies on engaging directly with the aluminium profile or track channel rather than a traditional strike plate set into timber.
Sliding aluminium window locks range from basic push-in pin locks costing under $10 AUD to keyed multi-point systems integrated into the window frame at manufacture. What connects them all is their relationship to the track — they either penetrate it, press against it, or obstruct it.
Why Sliding Windows Need Dedicated Locking Solutions
Sliding windows ride on tracks rather than swinging on hinges. Standard window hardware — cam latches, crank-operated locks, friction stays — simply has no way to interface with a horizontal sliding sash. A window lock designed for this configuration must engage with the track, the frame channel, or the meeting rail to physically restrict sash movement.
Approximately 30% of residential break-ins occur through unsecured or poorly secured windows, and sliding aluminium windows are among the most frequently targeted entry points due to their track-based operation, which can be exploited if locks are absent, worn, or incorrectly specified.
Ground-floor sliding windows are particularly vulnerable. Their horizontal travel means a weak or missing lock allows an intruder to simply push the sash open — no tools, no noise, no broken glass. That vulnerability is exactly why choosing the right lock matters, and why understanding how these mechanisms physically engage with aluminium frames is the first step toward getting it right.
How Sliding Aluminium Window Locks Work Mechanically
Every sliding window lock performs one fundamental job: it stops the sash from travelling along its track. But the way it achieves that varies significantly depending on the lock’s design, mounting position, and engagement method. Understanding the actual mechanics helps you identify why a lock might fail — and what to look for in a replacement.
How Lock Mechanisms Engage With Aluminium Tracks
A sliding window lock operates by creating a physical obstruction or connection between the moving sash and the stationary frame. In most configurations, the lock body mounts to the operable sash panel while the strike, receiver, or engagement point sits on the fixed frame or track rail. When you engage the lock, a bolt, pin, or lever extends from one component into a corresponding hole, channel, or surface on the other — binding the two together.
Consider a basic slide window lock that uses a pin mechanism. The lock housing sits on the inner rail of the sliding sash. When you push the pin down, it drops through a pre-drilled hole in the sash rail and into a matching hole in the track or fixed frame below. The sash physically cannot move because the pin bridges both components. A lever-based sliding lock window design works differently — a cam or hook rotates into a keeper on the adjacent frame, drawing the sash tight against the meeting rail. This cam-action approach, common in sash lock designs, not only prevents lateral travel but also applies a clamping preload that compresses weatherstripping and eliminates rattle.
Friction-clamp locks take a third approach entirely. Rather than penetrating the frame or hooking into a keeper, they press a pad or shoe against the track rail with enough force to hold the sash stationary through friction alone. These are often used as a sliding window stopper for ventilation positions, where you want the window held partially open without drilling additional holes into the aluminium profile.
The three primary engagement methods break down as follows:
- Pin-based engagement — A removable or spring-loaded pin drops through aligned holes in the sash and frame, creating a rigid mechanical connection that resists both lateral force and lifting.
- Lever-based engagement — A rotating cam, hook, or bolt extends into a keeper or receiver on the fixed frame, often applying draw-together clamping force that compresses seals and resists separation.
- Friction-clamp engagement — A pressure pad, screw-down shoe, or spring-loaded block presses against the track rail to hold the sash through friction, allowing tool-free repositioning without permanent modifications to the frame.
Each method has a different relationship with force. Pin locks resist shear loads directly — an intruder would need to snap the pin or tear out the hole. Lever locks resist both shear and separation, making them harder to defeat by prying. Friction clamps resist only as much force as the friction coefficient and clamping pressure allow, which is why they serve better as secondary devices or a window slide stop for child safety rather than primary security hardware.
Single-Track vs Multi-Track Locking Configurations
The number of tracks in your window system directly determines how many locking points you need and where they must be positioned. Get this wrong, and you leave entire panels unsecured.
A single-track sliding window has one operable sash and one fixed panel. The sliding lock for windows in this configuration typically mounts at the meeting point — the vertical stile where the moving sash overlaps the fixed panel when closed. A window slide lock at this junction prevents the sash from being pushed sideways. Some designs add a secondary window stop lock at the head or sill track to prevent the sash from being lifted out of its channel, which is a common forced-entry technique on older aluminium frames.
Multi-track systems — 2-track and 3-track configurations — introduce more complexity. A 2-track window has two independently sliding panels that pass each other on parallel rails. Each panel needs its own locking point, and the meeting stile between them requires a lock that engages one sash to the other or to the central mullion. A 3-track system with three operable panels multiplies the problem further, creating multiple meeting points and potential entry paths that each demand independent security.
The practical consequence is straightforward: every operable sash that can be pushed open from outside needs at least one dedicated sliding window lock. Wide panels — anything over roughly 900 mm — benefit from two locking points to prevent the sash from flexing away from a single lock under prying force. Multi-track configurations also create more potential lift-out points, since each panel sits in its own channel and can potentially be levered upward if the track tolerances are loose and no anti-lift device is fitted.
This distinction between single-track and multi-track systems matters most when you are selecting or specifying locks. A lock designed for a meeting-rail junction on a 2-track window won’t necessarily fit a 3-track system where the panels stack differently. The track width, sash depth, and overlap dimensions all change with the configuration — and the lock hardware must match precisely to engage correctly.
Types of Locks Available for Sliding Aluminium Windows
Knowing how a lock engages with the track is one thing. Choosing the right type for your specific situation is another problem entirely. The market offers several distinct categories of sliding window locks and latches, each built around a different mechanism and suited to a different security scenario. Here is a functional breakdown of every major type, what it actually does, and where it belongs.
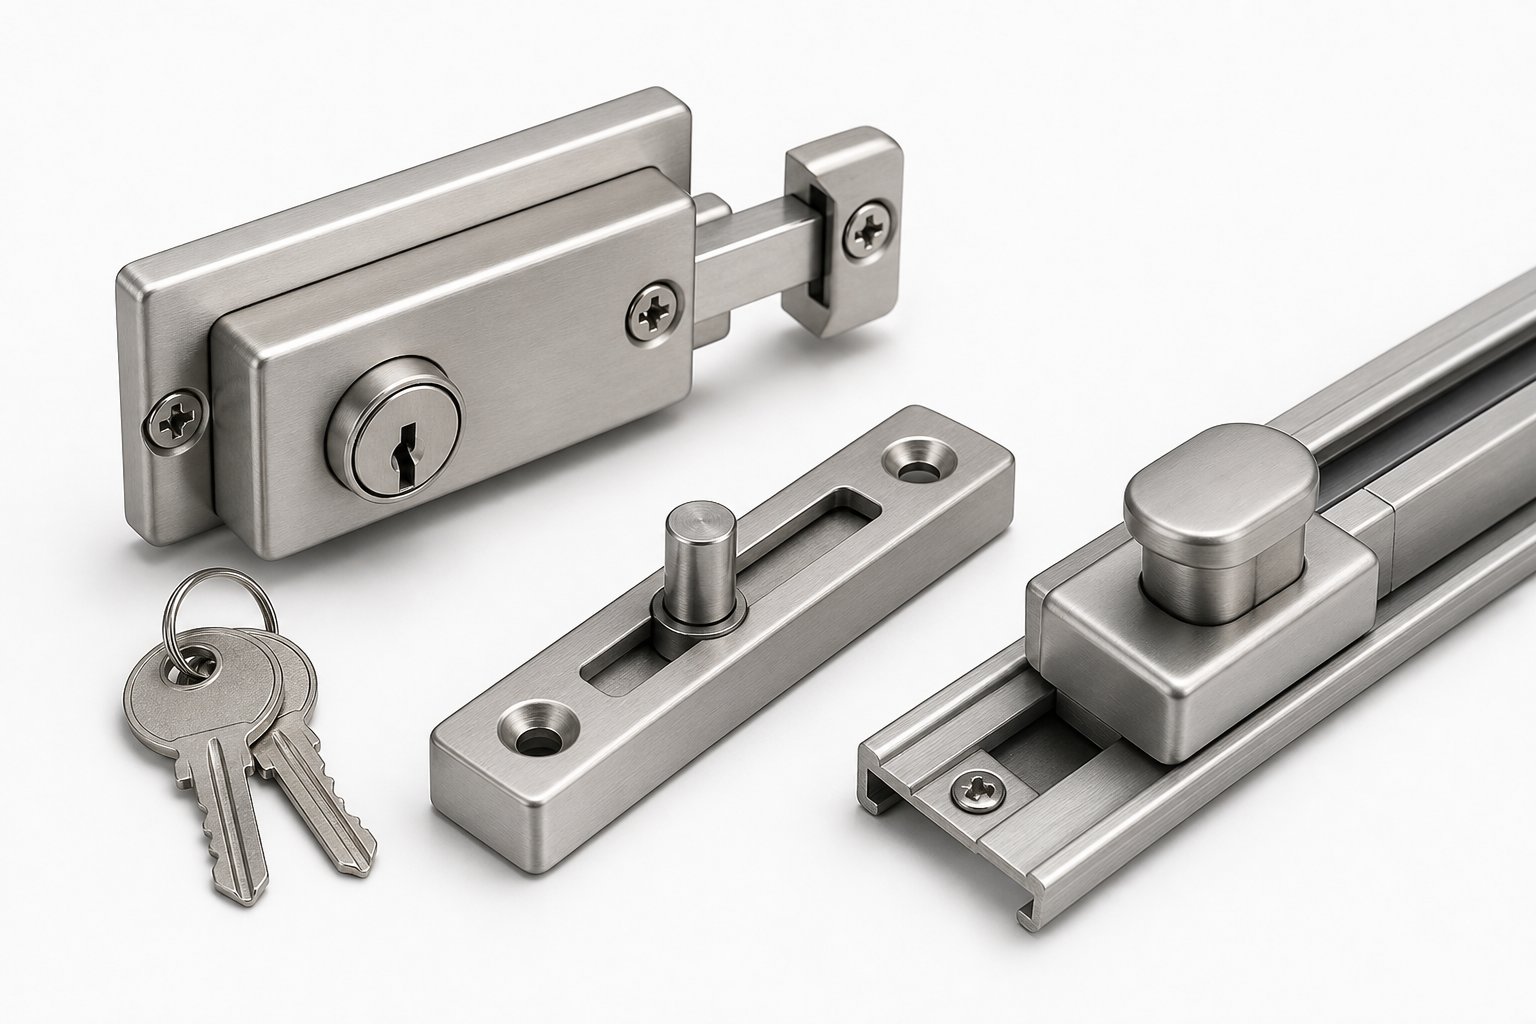
Keyed Locks and Thumb-Turn Locks
Keyed window locks represent the highest-security option for sliding aluminium windows. These locks require a physical key to disengage the bolt or pin, which means even if an intruder smashes the glass and reaches inside, they cannot open the window without the key. The lock body typically mounts on the sash stile and drives a hardened bolt into a receiver on the fixed frame or meeting rail. For ground-floor windows or any opening accessible from outside, a keyed lock is the standard recommendation.
Thumb-turn locks use the same bolt-and-receiver principle but replace the key cylinder with a lever or knob that rotates by hand. They are faster to operate from inside — useful for windows you open frequently or for emergency egress. The trade-off is clear: anyone who can reach the thumb-turn can unlock the window. If an intruder breaks a corner of glass near the lock, a thumb-turn offers no resistance. This makes them better suited to upper-storey windows or low-risk locations where convenience outweighs forced-entry concerns.
Pin Locks and Bolt Locks
A pin lock is one of the simplest and most effective types of sliding window locks. It works by inserting a removable or spring-loaded steel pin through aligned holes drilled in the sash and the fixed frame. When the pin is seated, the sash cannot slide because the pin bridges both components and resists shear force directly.
What makes pin locks particularly versatile is their ability to provide ventilation security. By drilling multiple pin holes at set intervals along the track rail — say at 50 mm and 100 mm open positions — you can lock the window partially open for airflow while still preventing it from being pushed wider. This lockable window latch alternative gives you fixed ventilation positions without sacrificing security, which is why pin locks remain popular across Australian homes despite their basic appearance.
Bolt locks operate on a similar principle but use a sliding metal bolt rather than a drop-in pin. The bolt extends horizontally from the lock body into a strike plate or receiver mounted on the adjacent frame. Bolt locks tend to be more robust than pin locks because the bolt is captive within the housing — it cannot be lost or dropped — and the engagement depth is typically greater, offering more resistance to prying. A quality sliding window lock latch of this type will have a hardened steel bolt and a positive-locking mechanism that prevents the bolt from vibrating loose over time.
Push-Locks and Track Blockers
Push-locks — sometimes called snap locks or button locks — take a different approach. Rather than connecting the sash to the frame, they sit directly in the track channel and physically block the sash from travelling past that point. You press a spring-loaded button to release the lock body, position it where you want the sash to stop, and let the button snap back to lock it in place. No drilling, no screws, no permanent modification to the aluminium profile.
Track blockers and adjustable stoppers work on the same obstruction principle but often use a screw-down clamp rather than a spring button. You tighten a thumbscrew against the track rail, and the device holds its position through friction. These are commonly used as secondary security devices or child safety measures — they limit how far the window can open rather than locking it fully closed. Locking window catches of this style are particularly useful on wide multi-track windows where you want to allow partial ventilation on one panel while keeping the opening too narrow for entry.
Both push-locks and track blockers are easy to install and reposition, making them accessible for renters or anyone who cannot drill into their window frames. However, their security rating is lower than keyed or bolt locks because they rely on friction or spring tension rather than a rigid mechanical connection. A determined intruder with a pry bar can often dislodge them. For this reason, they work best as a supplementary layer alongside a primary window locks and latches system rather than as standalone security.
| Lock Type | Security Level | Ease of Installation | Ventilation Capability | Best Use Case |
|---|---|---|---|---|
| Keyed Lock | High — resists break-and-reach attacks | Moderate — requires drilling and precise alignment | Limited — locked in closed position only unless multiple keyed positions are fitted | Ground-floor windows, high-risk areas, insurance compliance |
| Thumb-Turn Lock | Moderate — vulnerable if glass is broken near lock | Moderate — similar install to keyed locks | Limited — same as keyed unless multi-position | Upper-storey windows, frequently opened windows, egress routes |
| Pin Lock | Moderate to High — depends on pin diameter and material | Easy to Moderate — requires drilling pin holes | Excellent — multiple hole positions allow fixed ventilation gaps | Bedrooms needing airflow, multi-position security, DIY installs |
| Bolt Lock | High — captive bolt with deep engagement | Moderate — requires mounting screws and strike plate | Limited — typically single locked position | Primary security on meeting rails, wide sash panels |
| Push-Lock / Track Blocker | Low to Moderate — friction or spring retention only | Very Easy — no drilling, tool-free placement | Excellent — infinitely adjustable position along track | Child safety, secondary security, rental properties, ventilation limiting |
Each lock type fills a specific role, and the strongest security setups often combine two or more — a keyed bolt lock at the meeting rail for primary security, paired with a track blocker set to a ventilation position for daily use. That layered approach matters more than any single product choice, especially on aluminium frames where the material itself introduces its own set of challenges.
Why Aluminium Frames Need Special Lock Considerations
Aluminium is not timber. It is not vinyl. It behaves differently under heat, reacts differently to other metals, and has a fundamentally different structural profile. These material properties directly affect how window locks for aluminium windows perform over time — and they explain why locks that work perfectly on other frame types can fail prematurely on aluminium sliding windows.
Thermal Expansion and Frame Movement
Aluminium has a coefficient of thermal expansion roughly twice that of steel and significantly higher than timber. In practical terms, a 2-metre aluminium sash rail can expand by over 1 mm between a cold winter morning and a hot summer afternoon. That might sound trivial, but for a lock mechanism relying on precise alignment between a bolt and a receiver hole, even half a millimetre of shift can mean the difference between smooth engagement and a lock that jams or refuses to latch.
Australian conditions make this worse. A west-facing window in Perth or Adelaide can see surface temperatures climb well above 50°C in direct summer sun. On-site observations confirm that at these temperatures, aluminium profiles expand both lengthwise and laterally, causing locks to go out of alignment and sliding systems to lose their smooth operation. The frame literally moves beneath the lock hardware with every temperature cycle.
Window locks for wooden windows rarely face this issue because timber expands far less with heat (though it swells with moisture). Vinyl window locks contend with a different problem — vinyl creeps and deforms under sustained load. Aluminium’s challenge is specifically its rapid, repeatable thermal cycling. Locks installed on aluminium frames must tolerate slight positional drift without binding or failing to engage, which means oversized bolt receivers, tapered engagement pins, or spring-loaded mechanisms that self-compensate are all preferable to rigid, tight-tolerance designs.
Galvanic Corrosion Between Metals
When two dissimilar metals sit in direct contact and moisture bridges the gap, an electrochemical reaction begins. The less noble metal — in this case, aluminium — becomes the anode and corrodes, while the more noble metal acts as the cathode and stays intact. This is galvanic corrosion, and it is one of the most common reasons metal window locks fail on aluminium frames.
A brass or plain steel lock bolted directly to an aluminium sash creates exactly this galvanic cell. In coastal areas of Australia — Sydney’s eastern suburbs, the Gold Coast, Fremantle — salt-laden air provides the electrolyte that accelerates the reaction. Engineering research confirms that aluminium paired with more noble metals in wet environments corrodes at the contact point, weakening the mounting area and eventually causing the lock to loosen or the frame to pit around fastener holes.
The solution is material compatibility. Window frame locks made from stainless steel (particularly 316 marine grade) pose less galvanic risk because stainless and aluminium are closer on the galvanic series than brass or carbon steel. Zinc-plated hardware offers moderate protection. The safest approach uses nylon or plastic isolation bushings between the lock body and the aluminium surface, breaking the electrical path entirely. Window locks for vinyl windows never face this problem because vinyl is non-conductive — another reason you cannot simply transfer lock specifications between frame materials.
Frame Profile and Wall Thickness
Aluminium window profiles are hollow extrusions with wall thicknesses typically ranging from 1.2 mm to 2.0 mm for residential frames. Compare that to a solid timber sash rail at 40-50 mm thick, and the difference in fastener holding capacity becomes obvious. A screw driven into timber bites into dense material across its full length. The same screw in a thin aluminium wall engages only 1-2 mm of material — barely enough to resist the lateral forces a lock must withstand during a forced-entry attempt.
This means window locks for aluminium windows often need backing plates or reinforcement channels behind the mounting point to distribute load across a wider area. Without them, repeated operation or a single hard impact can deform the thin aluminium wall, strip the screw holes, and leave the lock hanging loose. Longer self-tapping screws are not the answer either — they can punch through the opposite wall of the hollow profile, creating a moisture entry point and a potential corrosion site.
- 316 Stainless Steel — Highest corrosion resistance; ideal for coastal and high-humidity environments. Minimal galvanic reaction with aluminium.
- 304 Stainless Steel — Strong corrosion resistance for most inland and suburban locations. Suitable for the majority of Australian residential applications.
- Zinc-Plated Steel — Moderate protection; the zinc layer acts as a sacrificial barrier. Acceptable for sheltered, dry installations but degrades in salt air.
- Powder-Coated Steel — Corrosion resistance depends entirely on coating integrity. Any scratch or chip at the contact point exposes bare steel to galvanic attack.
- Brass — Poor compatibility with aluminium. High galvanic potential difference accelerates aluminium corrosion at the contact zone. Avoid for direct-mount applications.
Selecting the right lock material is not optional — it is a structural decision. A lock that corrodes its own mounting point or deforms the frame it sits on is worse than no lock at all, because it creates a false sense of security while the connection weakens invisibly beneath the surface. This distinction between primary factory-fitted hardware and aftermarket additions becomes critical when evaluating whether your existing locks are adequate or need reinforcement.

Primary Locks vs Secondary Locks for Sliding Windows
A lock’s material and mounting method matter enormously — but so does its origin. The distinction between a lock that ships with your window and one you bolt on later is not just about convenience. It affects fit, security rating, and long-term reliability in ways that most homeowners never consider until something fails.
Factory-Installed Primary Locking Systems
Quality aluminium sliding windows arrive with integrated locking hardware designed specifically for that window’s profile, track width, and sash weight. These primary locks are not generic components pulled from a bin — they are engineered to match the frame dimensions precisely, positioned at the optimal engagement point, and tested as part of the complete window system before it leaves the factory.
A well-designed primary lock accounts for the aluminium-specific challenges covered earlier: thermal movement tolerances are built into the bolt-and-receiver clearances, fastener points align with internal reinforcement ribs within the extrusion, and material compatibility is resolved at the design stage. The lock and frame function as a single system rather than two separate products forced together.
Primary locks on windows manufactured to AS 2047 should meet baseline window locks security requirements for residential applications. This standard governs the performance of windows and doors in buildings, including resistance to forced entry. If your sliding windows were installed by a reputable manufacturer and are relatively recent, the factory lock may already provide adequate security for upper-storey or low-risk locations.
When to Add Secondary and Auxiliary Locks
Primary locks have limits. A single-point factory latch on a 1.8-metre-wide sash can be defeated by flexing the panel away from the lock at the opposite end. Ground-floor windows face direct physical access. Older windows may have primary locks that met standards at installation but have since worn beyond effective engagement. These are the scenarios where extra window locks earn their place.
Secondary window security locks work alongside the primary system — they do not replace it. A keyed bolt at the meeting rail supplements the factory latch. A track-mounted pin lock adds a second engagement point on a wide panel. Window limiters restrict opening distance for child safety while the primary lock handles full closure security. Safety locks for windows in these configurations create layered defence: an intruder who defeats one lock still faces another.
Situations that warrant adding security locks for sliding windows include windows accessible from ground level, flat roofs, or balconies; properties in areas with higher break-in rates; windows where child safety requires restricted opening; and any installation where the primary lock shows signs of degradation.
Watch for these indicators that your primary lock needs supplementing:
- Visible wear on the bolt face or receiver — rounded edges, scoring, or metal shavings in the track
- Loose engagement where the bolt no longer seats firmly, allowing the sash to rattle or shift slightly when locked
- Single-point locking on wide windows (over 900 mm), leaving the far end of the sash unsecured against prying
- Inability to lock in a ventilation position — the window is either fully closed and locked or fully unlocked with no intermediate secure state
- Stripped or corroded mounting screws that no longer hold the lock body tight against the frame
If any of these apply, the window still has a functioning primary lock — it simply is not enough on its own. Adding secure window locks as a secondary layer addresses the specific weakness without requiring a full window replacement. The real question becomes which lock type to add and where to position it, which depends entirely on your window’s track configuration and your property’s risk profile.
How to Choose the Right Lock for Your Sliding Window
Knowing you need better locks is one thing. Picking the right ones from a wall of options at Bunnings or a catalogue of online listings is a different challenge entirely. The best window locks are not the most expensive or the most heavily marketed — they are the ones that match your specific window configuration, your property’s risk profile, and the aluminium frame they need to attach to. Here is a practical framework for narrowing that decision down.
Matching Locks to Your Window Track Configuration
Start with the window itself. Before browsing products, you need four measurements and two observations:
- Measure the track rail width — Use a vernier calliper or accurate ruler to measure the width of the rail your sash rides on. Track-mounted locks must fit within this channel without obstructing sash travel when disengaged.
- Count the tracks — Identify whether you have a single-track (one fixed panel, one slider), 2-track (two sliders passing on parallel rails), or 3-track system. Each operable sash needs its own locking point.
- Check the sash stile thickness — Measure the vertical frame member of the sliding panel where a sash-mounted lock would attach. This determines which lock bodies will physically fit without overhanging the edge.
- Measure the meeting rail overlap — Where two panels meet when closed, measure how much they overlap. Bolt locks and window latches for sliding windows need sufficient overlap to accommodate both the lock body and the strike plate.
- Determine the rolling method — Is the sash bottom-rolling (sits on the lower track) or top-hung (suspended from the upper rail)? Bottom-rolling windows allow track-mounted locks at the sill; top-hung systems require locks at the head rail or meeting stile.
- Check for internal reinforcement — Tap the sash stile and listen. A solid sound suggests internal webbing or a reinforcement rib — good mounting points for screw-fixed locks. A hollow ring means you may need backing plates to distribute load.
For multi-track aluminium sliding windows, lock placement must account for each operable sash independently. A 2-track system where both panels slide needs a latch for sliding window engagement at the central meeting point plus individual anti-lift devices on each panel. Purpose-built window systems handle this complexity at the design stage — for example, MEICHEN’s MA100 2-track sliding window is engineered with lock hardware matched to its specific track and profile dimensions, giving builders and architects a complete system where lock compatibility is resolved before installation rather than retrofitted after the fact.
Security Level Assessment for Your Property
Your window configuration tells you what will physically fit. Your security assessment tells you what level of protection you actually need. Not every window demands the same investment.
Ground-floor windows accessible from a street, laneway, or shared path face the highest risk. These need keyed window locks — full stop. A sliding window lock with key prevents the break-and-reach attack where an intruder smashes a small section of glass, reaches through, and flips a thumb-turn. Insurance providers often require key-operated locks on all ground-floor openings, and failing to fit them can void your cover if a claim arises.
Upper-storey windows with no external access (no adjacent flat roof, balcony, or climbable downpipe) carry lower forced-entry risk. Here, thumb-turn locks or pin locks offer a practical balance between security and daily convenience. If child safety is the primary concern — bedrooms on upper floors, for instance — window limiters or track-mounted push-locks that restrict opening to 100 mm provide fall prevention without requiring a key for ventilation.
Properties in bushfire-prone areas face an additional consideration: emergency egress. Window key locks that require a specific key to open from inside can trap occupants if the key is misplaced during an emergency. In BAL-rated zones, consider keyed locks with a thumb-turn override on the interior face, or keep keys permanently mounted on a hook beside the window frame.
| Window Configuration | Recommended Lock Type | Security Rating | Installation Complexity |
|---|---|---|---|
| Single-track, ground floor, street-facing | Keyed bolt lock at meeting rail + track pin lock | High | Moderate — drilling required for both components |
| 2-track, ground floor, rear of property | Sliding window locks with key at each meeting point | High | Moderate to High — two independent lock sets needed |
| Single-track, upper storey, no external access | Thumb-turn bolt or pin lock with ventilation positions | Moderate | Easy to Moderate |
| Any configuration, child safety required | Track-mounted push-lock limiting opening to 100 mm | Low (security) / High (safety) | Very Easy — no drilling |
| Wide sash over 1200 mm, any floor | Two-point locking: keyed lock at meeting rail + secondary pin at mid-span | High | Moderate — two mounting locations |
A quick lock selection checklist ties this all together:
- Identify your window type (single-track, 2-track, or 3-track) and count the operable sashes.
- Measure rail width, stile thickness, and meeting rail overlap to determine physical compatibility.
- Assess the floor level and external accessibility of each window.
- Check your home insurance policy for specific lock requirements (most require key-operated locks for sliding windows on ground-floor openings).
- Determine whether child safety or ventilation locking is needed alongside security.
- Select a primary lock type based on the table above, then decide if a secondary device adds value.
- Verify material compatibility — stainless steel or zinc-plated hardware for aluminium frames, with isolation bushings in coastal locations.
This framework eliminates guesswork. You are not choosing locks based on price or packaging — you are matching hardware to measurable physical dimensions and a defined risk level. The next step is getting those locks onto the frame correctly, because even the best sliding window locks with key operation will fail if they are poorly installed on thin-walled aluminium profiles.
Step-by-Step Installation Guide for Sliding Window Locks
A lock is only as strong as its installation. Poorly mounted hardware — crooked bolts, stripped screw holes, misaligned pins — accounts for more lock failures than product defects ever will. Aluminium frames demand more care than timber because the material is thinner, softer, and less forgiving of mistakes. Whether you are a homeowner fitting a single window pin lock or an installer working through an entire project, the process below applies.
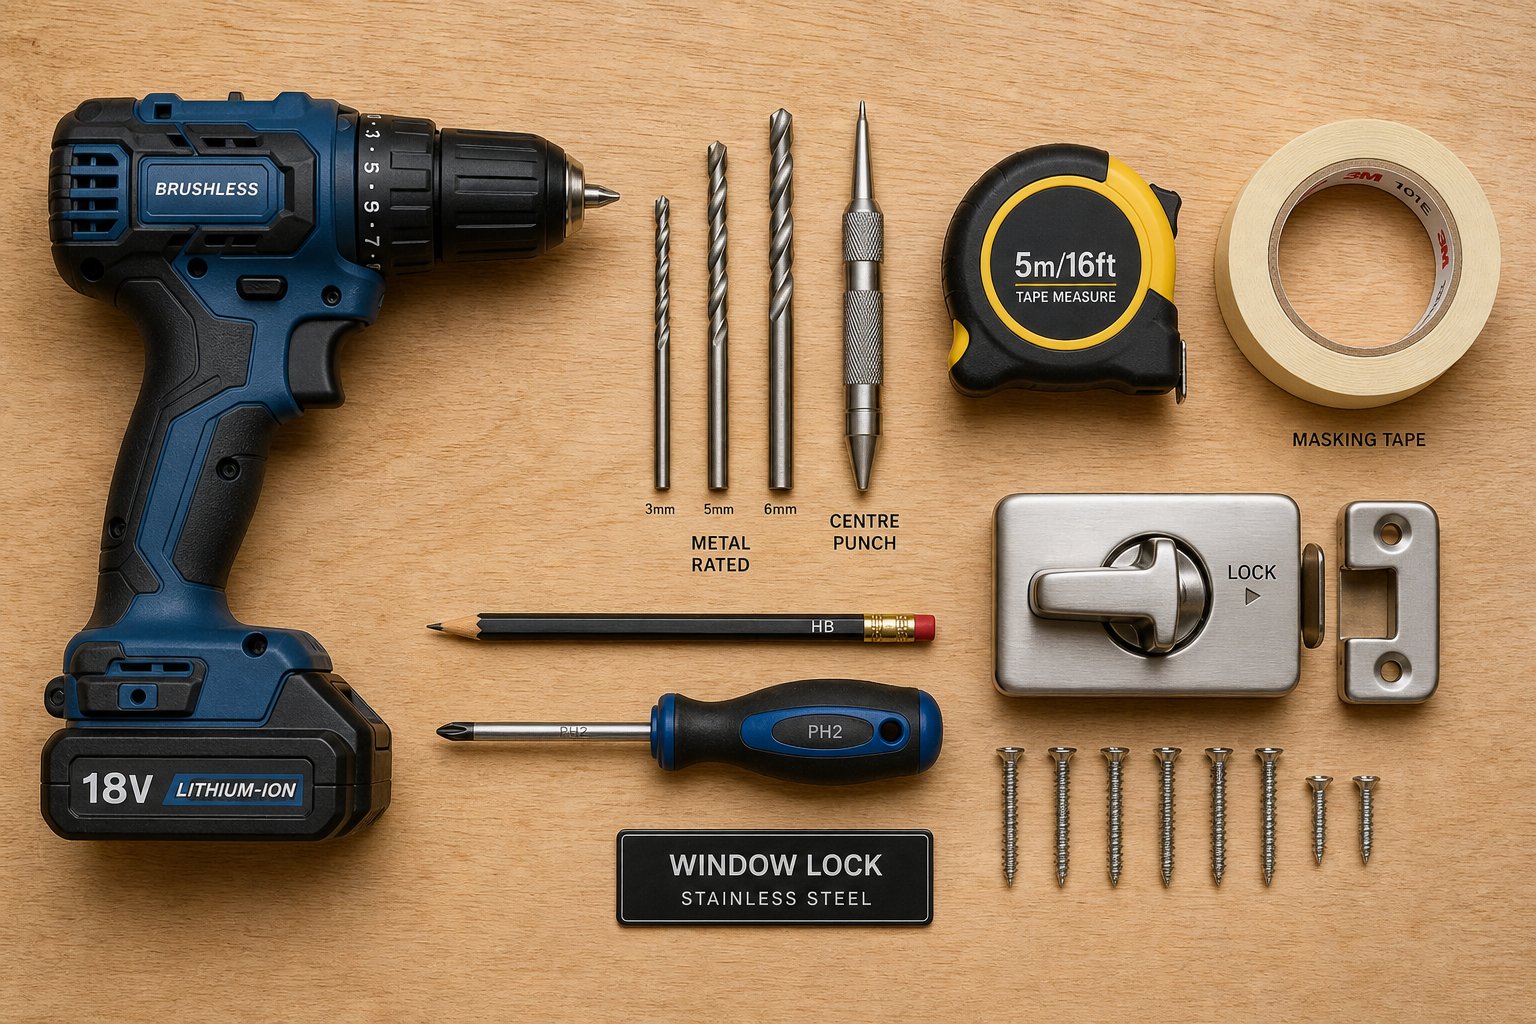
Tools and Preparation for Aluminium Lock Installation
Gather everything before you start. Stopping mid-drill to hunt for a centre punch invites errors.
- Drill — Corded or cordless with variable speed control. Aluminium requires slower RPMs than timber to avoid overheating and burring.
- Drill bits — HSS (high-speed steel) or cobalt bits rated for metal. Standard wood bits will wander on aluminium surfaces and produce ragged holes.
- Centre punch and hammer — Essential for creating a starter dimple so the bit does not skate across the smooth aluminium profile.
- Masking tape — Apply over drill points to reduce surface scratching and give your pencil marks better visibility.
- Measuring tape and pencil — For marking precise positions. A fine-tip permanent marker works on bare aluminium where pencil does not show.
- Screwdriver or driver bit — Matched to the fastener head (typically Phillips or hex) supplied with your lock.
- Silicone spray or light cutting fluid — Reduces heat and prevents the bit from binding in the aluminium.
Before touching a drill, clean the track channel and sash rail of grit, oxidation, and debris. Slide the window back and forth to confirm it moves freely — if the sash is binding or jumping, fix the track issue first. A lock installed on a misaligned sash will never engage properly. Finally, check for existing mounting holes or reinforcement points in the frame that might offer better fastener grip than a random location.
Always wear safety goggles when drilling aluminium. The swarf (metal shavings) produced is sharp, lightweight, and easily flicked toward your face by the spinning bit. After drilling, clear all metal chips from the track channel using a vacuum or damp cloth — shavings left in the rail will score the sash rollers and degrade smooth window operation over time.
Fitting a Track-Mounted Pin Lock Step by Step
Track-mounted window track locks are the most common aftermarket addition for sliding aluminium windows. They sit on the sill rail or inner track and physically block sash travel with a spring-loaded or drop-in pin. Here is the process:
- Close the window fully and engage the primary lock so the sash is stationary and the meeting rails are aligned.
- Position the lock body on the inner track rail, tight against the sash frame edge. The lock should sit where the sash meets the fixed frame or at the point where you want to limit travel.
- Mark the drill points through the lock’s mounting holes using a sharp pencil or marker. Remove the lock body and apply masking tape over the marks for visibility.
- Centre-punch each mark with a firm tap. This dimple prevents the drill bit from wandering on the smooth aluminium surface — a step that drilling guides for aluminium consistently identify as critical for accuracy.
- Drill pilot holes using a bit slightly smaller than the self-tapping screws supplied. For most screw in window locks, a 2.5 mm pilot hole suits a 4 mm screw. Keep the drill speed moderate — around 1000-1500 RPM — and apply steady, light pressure. Let the bit do the work rather than forcing it through.
- Secure the lock body with the self-tapping screws provided. Drive them until snug but do not overtighten — aluminium strips easily, and a stripped hole means starting over with a larger fastener or relocating the lock.
- Test the pin engagement by dropping or pushing the pin into its locked position. It should seat fully without resistance. If it binds, the lock body may be slightly misaligned — loosen the screws, adjust fractionally, and re-tighten.
- Drill ventilation-position holes if your lock design supports them. With the window open to your desired ventilation gap (typically 50-100 mm), mark where the pin needs to drop through the track rail. Centre-punch and drill these secondary holes at the same diameter as the pin. Test each position to confirm the pin seats cleanly.
For window screw locks that clamp onto the track rather than pin through it, skip the ventilation holes — these locks can be repositioned anywhere along the rail by loosening and retightening their clamping mechanism.
Fitting a Sash-Mounted Keyed Lock
Sash-mounted keyed locks offer higher security than track-mounted pins because they drive a hardened bolt into a strike plate on the fixed frame. The installation is more involved but follows the same principles of precise measurement and careful drilling.
- Close and align the window so the meeting rails overlap fully. Confirm the sash sits square in its track with even gaps top and bottom.
- Position the lock body on the inner face of the sliding sash stile, centred vertically on the meeting rail overlap. The bolt must extend into the overlap zone where it can reach the fixed frame.
- Mark the mounting holes through the lock body onto the sash stile. Remove the lock and centre-punch each mark.
- Drill pilot holes through the sash stile wall. If the aluminium profile is hollow with a wall thickness under 1.6 mm, consider using a backing plate on the inside of the extrusion to distribute screw load and prevent pull-through under force.
- Mount the lock body with the supplied screw locks for windows — typically stainless steel self-tappers or machine screws with nylon-insert nuts if the profile allows through-bolting.
- Extend the bolt fully using the key, and mark where the bolt tip contacts the fixed frame. This is your strike plate position.
- Mount the strike plate (or drill the receiver hole) on the fixed frame at the marked position. Ensure the bolt slides fully into the receiver with no lateral binding. A latch lock window design with a tapered bolt tip will self-centre during engagement, compensating for minor thermal movement.
- Test the complete cycle — lock and unlock several times with the key. The bolt should extend and retract smoothly without scraping. Close the window from open and confirm the bolt aligns with the receiver consistently.
If the bolt engages but feels tight in summer and loose in winter, thermal expansion is shifting the alignment. Elongate the receiver hole by 1 mm in the direction of sash travel using a round file — this gives the bolt room to find its seat across seasonal temperature swings without compromising security.
A properly installed latch lock for window security should feel positive and smooth: no rattling when locked, no forcing when engaging, and no visible gap between the lock body and the frame surface. If you achieve that, the hardware will perform reliably for years. If you cannot — if the frame deforms, the screws strip, or the alignment drifts beyond adjustment — the issue likely sits with the window system itself rather than the lock, which brings maintenance and troubleshooting into focus.
Maintaining and Troubleshooting Sliding Window Locks
Even a perfectly installed lock degrades over time. Aluminium dust, salt air, thermal cycling, and simple mechanical wear all conspire against the window lock mechanism until one morning the bolt refuses to seat or the key grinds instead of turning. Routine care prevents most failures, and knowing how to diagnose the rest saves you from replacing hardware that only needed cleaning.
Routine Maintenance to Keep Locks Operating Smoothly
Aluminium window locks operate in a hostile micro-environment — the track channel collects grit, airborne salt, insect debris, and oxidation particles that work their way into every moving part. A maintenance routine does not need to be complicated, but it does need to be consistent.
Apply a silicone-based lubricant to all moving components — bolt slides, pin housings, key cylinders, and window lock clips or retaining springs — every 6 to 12 months. Never use oil-based products. Oil attracts and binds dust into a paste that accelerates wear rather than preventing it. Window maintenance specialists consistently recommend silicone spray specifically because it lubricates without creating a sticky residue that traps contaminants in the track.
Use this checklist each time you service your locks:
- Vacuum the track channel to remove grit, metal shavings, and debris that can obstruct bolt or pin engagement
- Wipe the lock body and strike plate with a damp cloth to clear oxidation buildup from contact surfaces
- Spray silicone lubricant into the key cylinder, bolt channel, and any pivot points — work the mechanism several times to distribute it
- Check all mounting screws for tightness — vibration and thermal cycling loosen fasteners gradually over months
- Inspect the strike plate alignment by slowly engaging the bolt and watching for lateral scraping or incomplete seating
- Test window sash lock engagement at every locking position, including ventilation pin holes if fitted
- Examine window lock clips and retaining hardware for cracks, corrosion, or loss of spring tension
Seasonal checks matter most in coastal areas where salt accelerates corrosion and in regions with wide temperature swings where thermal expansion shifts alignment between summer and winter.
Troubleshooting Locks That Won’t Engage or Feel Stiff
Three problems account for the majority of window lock failures. Each has a distinct cause and a specific fix.
The bolt won’t align with the strike plate. This is almost always thermal expansion, building settlement, or track debris pushing the sash out of position. Clean the track first — a single pebble or paint chip lodged in the rail can shift the sash by a millimetre, which is enough to throw a tight-tolerance bolt off its receiver. If cleaning does not resolve it, check whether the misalignment is seasonal. A lock that engages perfectly in winter but jams in summer points to thermal expansion. File the receiver hole 0.5-1 mm in the direction of drift rather than relocating the entire lock.
The window lock mechanism feels stiff or jammed. Corrosion inside the bolt channel, dried lubricant residue, or paint overspray on moving parts are the usual culprits. Flush the mechanism with silicone spray and work the bolt back and forth repeatedly. For a window lock with key operation, apply graphite powder into the keyway — hardware specialists note that graphite outperforms liquid lubricants inside key cylinders because it does not attract moisture or gum up the pin tumblers.
The lock engages but feels loose or rattles. Worn bolt faces, enlarged receiver holes, or stripped mounting screws allow play in the system. Tighten screws first. If the screw holes are stripped — common in thin-walled aluminium after years of thermal cycling — fill them with a two-part epoxy and re-drill, or move the lock body 5 mm along the rail to fresh material. Worn window sash locks with rounded bolt edges need replacement rather than adjustment; no amount of repositioning compensates for metal that has lost its engagement profile.
When to Replace Rather Than Repair
Not every lock is worth saving. A sliding window lock replacement is warranted when the hardware has degraded beyond the point where maintenance restores reliable function. Look for these end-of-life indicators:
- Visible corrosion that pits the bolt surface or weakens the lock body’s structural integrity — surface oxidation is cosmetic, but deep pitting compromises strength
- A key cylinder that won’t turn smoothly even after lubrication with graphite, indicating worn internal tumblers or a bent keyway
- A bolt that no longer extends to its full travel, reducing engagement depth below the minimum needed to resist prying force
- Mounting screw holes enlarged to the point where no fastener holds firm, meaning the aluminium around the lock has fatigued
- Cracked or deformed lock housing from impact, UV degradation, or repeated overtightening
When sourcing replacement sliding window locks, match the new hardware to your frame’s profile dimensions and material compatibility requirements. A window lock replacement is also the right time to upgrade — if your original lock was a basic thumb-turn, stepping up to a keyed bolt addresses the security gap without waiting for the next failure.
For properties where lock maintenance has become a recurring headache — repeated misalignment, chronic corrosion, or locks that never quite fit the frame properly — the underlying issue is often a mismatch between aftermarket hardware and the window system itself. Purpose-built aluminium sliding windows like MEICHEN’s MA100 are designed with lock hardware matched to the frame profile from the factory, eliminating the compatibility and alignment problems that plague retrofit installations. For new builds or full window replacements, an integrated system where the lock, track, and frame are engineered as a unit delivers lower long-term maintenance and more consistent security than any aftermarket addition bolted onto a generic frame.
The pattern is consistent across every failure mode covered here: locks fail not because they are inherently weak, but because they are fighting their environment — thermal movement, corrosion, thin walls, poor alignment. Maintenance slows that fight. Correct material selection and proper installation tilt the odds further. But the locks that last longest and fail least are the ones that never had to fight in the first place — the ones built into a system designed around them from the start.
Frequently Asked Questions About Window Locks for Sliding Aluminium Windows
1. What is the most secure type of lock for a sliding aluminium window?
Keyed bolt locks offer the highest security for sliding aluminium windows because they require a physical key to disengage, preventing the break-and-reach attack where an intruder smashes glass and flips a thumb-turn. For maximum protection on ground-floor windows, pair a keyed bolt lock at the meeting rail with a secondary pin lock or track blocker. Many Australian insurance policies specifically require key-operated locks on accessible sliding windows, so a keyed bolt also helps maintain valid home insurance cover.
2. Can I install aftermarket locks on aluminium sliding windows myself?
Yes, most aftermarket sliding window locks are suitable for DIY installation with basic tools. Track-mounted pin locks and push-lock stoppers are the simplest, often requiring no drilling at all. Sash-mounted keyed locks need pilot holes drilled with metal-rated HSS bits and a centre punch to prevent the bit skating on the aluminium surface. The key considerations are using the correct drill speed (around 1000-1500 RPM), avoiding overtightening screws into thin-walled aluminium profiles, and ensuring material compatibility to prevent galvanic corrosion between the lock hardware and the frame.
3. Why does my sliding window lock keep jamming or going out of alignment?
The most common cause is thermal expansion. Aluminium expands roughly twice as much as steel with temperature changes, so a 2-metre sash rail can shift over 1 mm between winter and summer. This is enough to throw a tight-tolerance bolt off its receiver. Other causes include track debris pushing the sash out of position, corrosion inside the bolt channel, or dried lubricant residue binding moving parts. Clean the track, apply silicone-based lubricant, and if the problem is seasonal, file the receiver hole 0.5-1 mm in the direction of drift rather than relocating the lock.
4. What lock material should I use on aluminium window frames in coastal areas?
In coastal Australian locations, use 316 marine-grade stainless steel locks to minimise galvanic corrosion. When dissimilar metals like brass or plain carbon steel contact aluminium in the presence of salt-laden moisture, the aluminium corrodes at the contact point and weakens the mounting area. If 316 stainless is unavailable, 304 stainless steel is acceptable for most suburban coastal areas. Always use nylon or plastic isolation bushings between the lock body and the aluminium surface to break the electrical path that drives galvanic corrosion.
5. How often should I maintain the locks on my sliding aluminium windows?
Service your sliding window locks every 6 to 12 months, with more frequent attention in coastal or high-dust environments. Apply silicone-based lubricant (never oil-based, which attracts grit) to bolt slides, pin housings, key cylinders, and retaining springs. Vacuum the track channel to remove debris, check mounting screw tightness, and inspect strike plate alignment by slowly engaging the bolt. For keyed locks, use graphite powder in the keyway rather than liquid lubricant, as graphite does not attract moisture or gum up the pin tumblers over time.
More Window & Door Guides