Window Anatomy at a Glance
When something goes wrong with a window — a draft, a rattle, condensation creeping between panes — the first question is always the same: which part is actually failing? And that’s where most people get stuck. You can’t fix, replace, or upgrade what you can’t name the parts of a window for.
Most online glossaries hand you a list of terms with one-line definitions and call it a day. This guide goes deeper. Every section covers what each component does, what it’s made of, how it fails, and whether you can replace it without swapping the entire unit. Think of it as a working reference, not a vocabulary quiz.
What Are the Main Parts of a Window
So what are the parts of a window, really? Every residential window — regardless of style or material — is built from five core component groups that work together as a system:
- Frame — the structural skeleton (head jamb, side jambs, and sill) that anchors the window into the wall opening.
- Sash — the movable or fixed panel that holds the glass and controls ventilation.
- Glazing — the glass unit itself, including pane count, gas fills, coatings, and spacers that drive energy performance.
- Hardware — locks, handles, balances, and operators that let you open, close, and secure the window.
- Weathersealing — weatherstripping, flashing, and caulking that block air, water, and dust infiltration.
Those five groups cover every window type you’ll encounter, from double-hung to casement to fixed picture windows. The specific parts within each group shift depending on the style, but the categories stay consistent.
How to Use This Visual Anatomy Guide
This article is structured from the outside in. You’ll start with the frame and exterior components, move through the sash and glazing, then work inward to trim and interior finishing pieces. From there, the guide shifts to type-specific differences — how parts change across double-hung, casement, sliding, and bay windows — before closing with troubleshooting and energy performance.
[Diagram: parts of a window labeled — standard double-hung window with callouts to frame, sash, glazing, hardware, and weathersealing components.]
Each section goes beyond naming. You’ll learn what wears out first, what’s replaceable without a full window swap, and which components have the biggest impact on your energy bills. Whether you’re scoping a renovation, quoting a build, or just trying to describe a problem to a contractor, this is the reference that gets you there.
Window Frame Parts and Their Functions
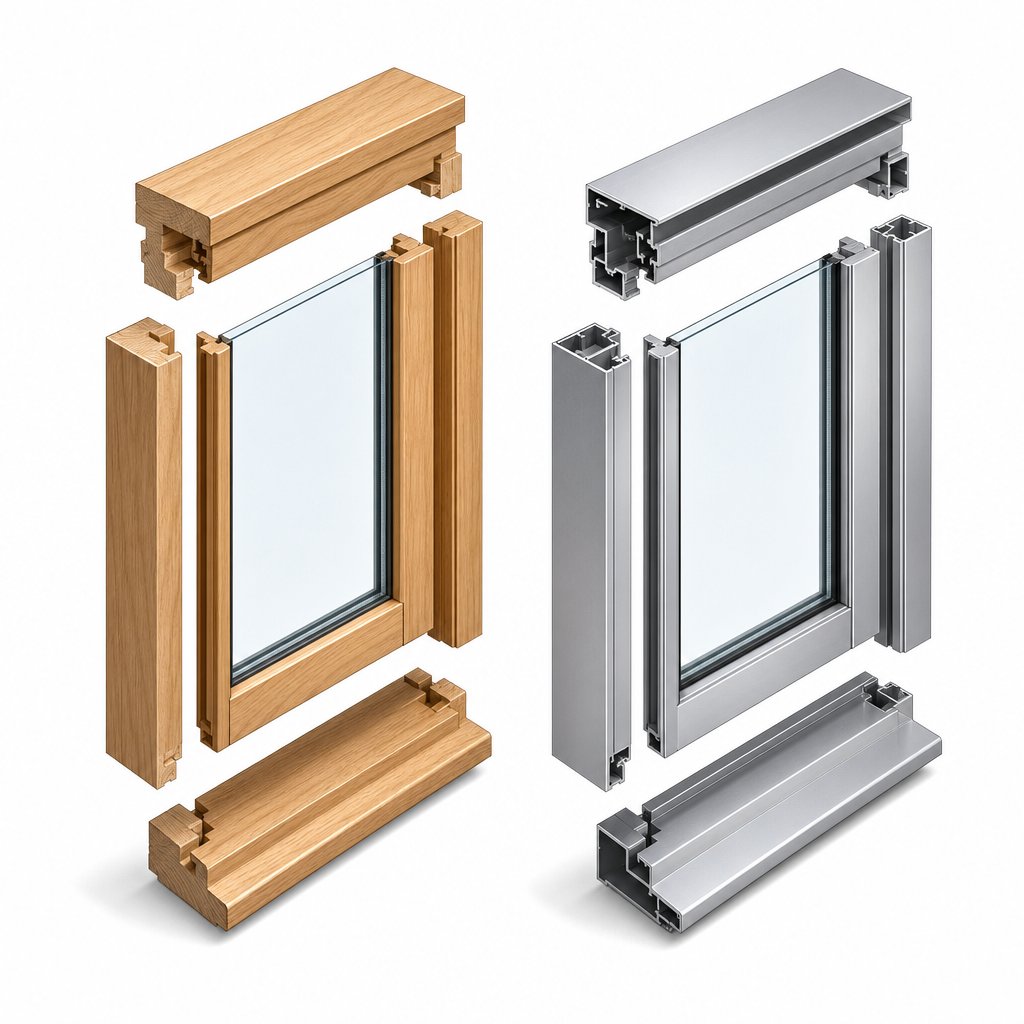
The frame is the part of a window frame that does the heaviest lifting — literally. It’s the rigid skeleton anchored into your wall opening, and every other component depends on it for structural support, alignment, and weatherproofing. If the frame fails, nothing else works properly. Knowing the names of parts of a window frame helps you spot problems early and communicate clearly with contractors or suppliers.
Head Jamb, Side Jambs, and Sill Explained
Imagine looking at a window straight on. The jamb assembly forms the rectangular pocket that receives the sash. Three pieces make it up: the head jamb runs horizontally across the top, two side jambs run vertically down each edge, and the sill sits at the bottom. Together, they create the structural channel that everything else — sash, hardware, weatherstripping — mounts into.
The sill deserves extra attention. It slopes slightly outward so rainwater drains away from the wall rather than pooling against the glass. That slope is critical because the bottom part of a window frame takes the worst beating from moisture. Water collects there by gravity, and if the sill material can’t handle prolonged exposure, rot and deterioration set in fast.
Here’s a quick-reference breakdown of each jamb component, useful as a parts of a window frame diagram in table form:
| Part Name | Location | Function | Common Materials | Signs of Failure |
|---|---|---|---|---|
| Head Jamb | Top of frame, horizontal | Supports upper frame structure; bears load from above | Wood, vinyl, aluminium, fiberglass | Sagging, visible gaps at corners, paint cracking |
| Side Jambs | Left and right edges, vertical | Guide sash movement; anchor hardware and weatherstripping | Wood, vinyl, aluminium, fiberglass | Sash sticking or binding, warping, soft spots in wood |
| Sill | Bottom of frame, horizontal with outward slope | Drains water away from the window; supports sash weight at rest | Wood, vinyl, aluminium, stone composite | Rot, discoloration, standing water, spongy texture |
Material choice matters here. Parts of a wood window frame offer natural insulation and a classic look, but they demand regular sealing and painting to resist moisture. Vinyl jambs are virtually maintenance-free and resist rot, though they can warp under extreme heat. Aluminium is the strongest and most weather-resistant option — it won’t swell, shrink, or attract termites.
Mullions, Nailing Fins, and Frame Accessories
Beyond the core jamb assembly, several accessory components round out the frame system:
- Mullions — vertical or horizontal structural dividers that separate multiple window units within a single rough opening. They carry load and allow you to combine, say, a fixed picture window flanked by two casements in one assembly.
- Nailing fins — thin flanges that extend outward from the frame perimeter. They’re the defining feature of new-construction windows, designed to be fastened directly to wall studs before siding or brick goes on.
- Subsills — support elements installed beneath the main sill to add rigidity and improve drainage in certain installation methods.
Here’s a distinction most guides skip entirely: new-construction frames and replacement frames are not the same product. New-construction frames include nailing fins and installation clips, and they attach to the structural framing of the house before exterior cladding is applied. Replacement (retrofit) frames, on the other hand, are built without nailing fins. They’re sized to slide into an existing frame opening after the old sash and hardware are removed, then secured with screws through the jambs. The existing exterior trim stays in place, which makes installation faster and less invasive — but it also means you’re relying on the old frame’s structural integrity.
Frame Material and Why It Matters
The material your frame is made from affects durability, thermal performance, and long-term maintenance more than almost any other variable. Here’s how the main options compare:
- Wood — excellent natural insulator, easy to shape and paint, but vulnerable to rot, swelling, and termite damage without consistent upkeep.
- Vinyl (uPVC) — affordable, low-maintenance, good thermal performance. Can become brittle over time in extreme cold or warp in intense heat.
- Aluminium — superior strength-to-weight ratio, resists warping, swelling, and termite damage. Slim profiles allow more glass area. Popular in Australian construction for its durability in harsh climates. Thermally broken aluminium profiles add an insulating barrier to reduce heat transfer.
- Fiberglass — strong, dimensionally stable, and paintable. Performs well thermally but typically costs more than vinyl.
- Composite — blends wood fibers with polymer resins for rot resistance and the appearance of wood. A middle ground between natural aesthetics and engineered durability.
Your climate, budget, and willingness to maintain the finish should drive the decision. In wet or coastal environments, aluminium and vinyl pull ahead. In heritage restorations where appearance is non-negotiable, wood or composite often wins.
With the frame locked in as the foundation, the next layer to understand is what sits inside it — the sash and glazing components that actually hold the glass and control how your window opens, closes, and performs.
Sash, Glazing, and Glass Components
The frame gives a window its structure, but the parts sitting inside it are what you actually see and touch every day. The sash holds the glass. The glazing controls how much heat, light, and sound passes through. And a handful of smaller components — balances, spacers, coatings — quietly determine whether the whole system feels smooth and efficient or sluggish and drafty. Here’s how each part of a window’s interior assembly works.
Window Sash and How It Moves
So what part of a window is the sash? The simplest window sash definition: the movable part of a window that holds the glass pane within a rigid framework. It’s the piece you push up, crank open, or slide sideways — depending on the window type.
The parts of a window sash break down into a few key structural members:
- Stiles — the two vertical side pieces of the sash frame.
- Rails — the horizontal top and bottom pieces. In a double-hung window, the bottom rail of the upper sash and the top rail of the lower sash overlap at the center.
- Meeting rail (check rail) — the specific point where upper and lower sashes overlap, forming a weather seal that blocks air infiltration when the window is closed.
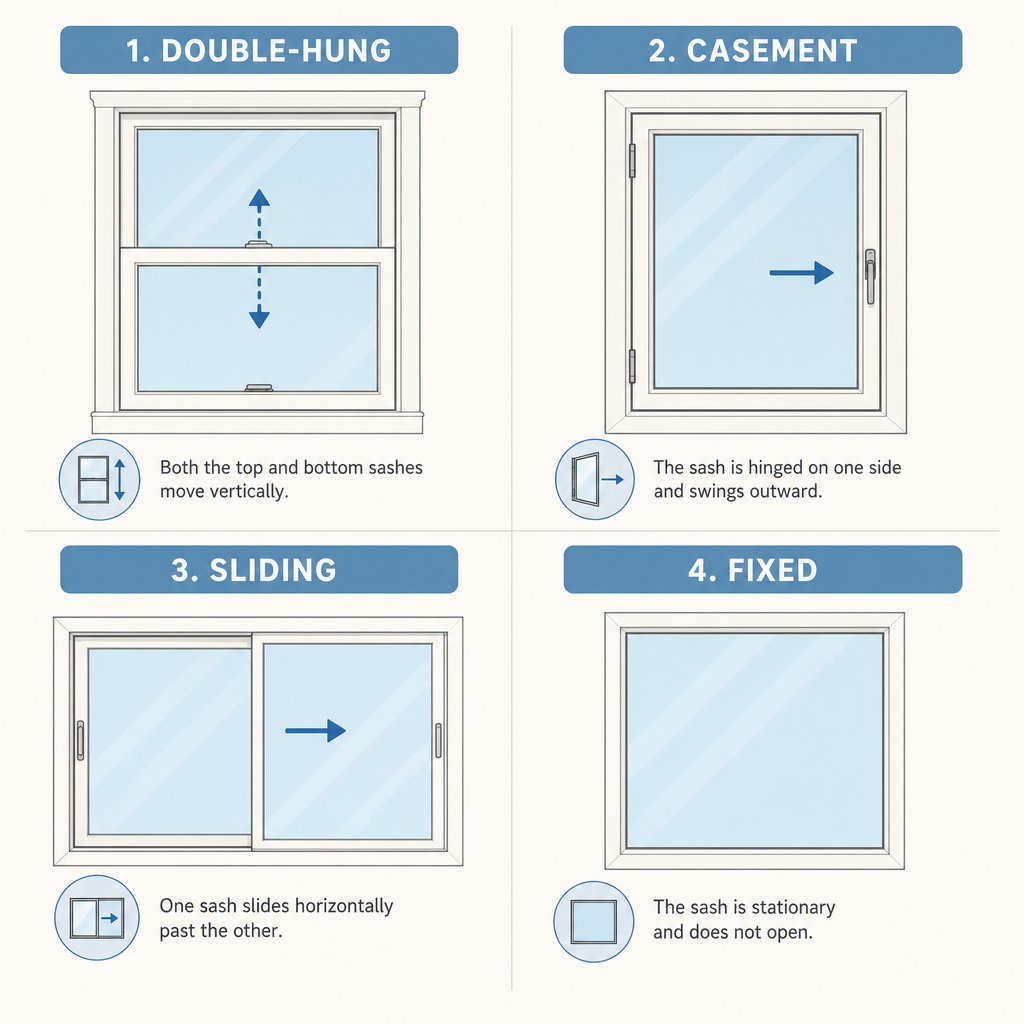
How the sash moves depends entirely on the window style. When you look at the parts of a double hung window, you’ll find two independent sashes — upper and lower — that slide vertically within the frame’s side jambs. A casement window swings its sash outward on hinges mounted to one side. A sliding window sends the sash horizontally along a track.
What keeps a vertically sliding sash from slamming shut the moment you let go? That’s the balance system. Spring balances or block-and-tackle mechanisms act as counterweights, offsetting the sash’s weight so it stays open at any position you choose. When a sash won’t stay up or creeps down on its own, a worn or broken balance is almost always the culprit.
Glazing, Spacers, and Gas Fills
Glazing refers to the glass unit as a whole — not just the pane itself, but the full assembly of glass layers, coatings, gas fills, and spacers that determine thermal and acoustic performance. It’s the single biggest factor in how energy-efficient your window actually is.
Modern residential windows come in three main configurations: single glazing (one pane, minimal insulation), double glazing (two panes with a sealed air gap), and triple glazing (three panes with two insulating cavities). Double glazing is standard in most homes today, while triple glazing targets cold climates or high-performance builds.
Here’s what each glazing component does for energy performance:
- Glass panes — the transparent layers that admit light. Thickness (typically 4mm to 6mm) affects strength and sound insulation.
- Spacer bar — a perimeter frame that separates the glass panes and maintains a precise, sealed air gap. Warm-edge spacers made from composite or stainless steel materials reduce thermal bridging at the glass edge, where edge-of-glass heat loss can account for 20-30% of total window heat loss.
- Gas fill — argon or krypton gas injected between panes to slow heat transfer. Argon is the practical standard, offering roughly 30% lower thermal conductivity than air at a reasonable cost. Krypton performs even better but comes at a premium.
- Low-E coating — a microscopically thin metallic layer applied to a glass surface that reflects infrared heat while still letting visible light through. Coating placement (on the cavity-facing surface of the outer or inner pane) is tuned to the climate — prioritizing solar heat rejection in warm regions or heat retention in cold ones.
- Desiccant — a moisture-absorbing material packed inside the spacer bar that keeps the sealed cavity dry and fog-free for the life of the unit.
These components work as a system. A quality Low-E coating paired with argon gas and a warm-edge spacer delivers dramatically better insulation than the same glass panes with an air-filled cavity and a basic aluminium spacer. When any single element is substandard, it drags down the performance of the entire glazing unit.
Grilles, Muntins, and Decorative Elements
Grilles — also called grids — are decorative bars placed over or between glass panes to simulate the look of divided-light windows. They’re purely aesthetic in modern windows, creating patterns like colonial, prairie, or craftsman styles without actually splitting the glass into separate pieces.
True muntins are a different story. These are narrow structural bars that physically divide and hold individual panes of glass within the sash. You’ll find them in older or heritage-style windows where each small pane is a separate piece of glass set into the muntin framework. Most contemporary windows skip true muntins in favor of grille options that are easier to clean and don’t interrupt the sealed glazing unit.
Common grille configurations include grilles-between-glass (sealed inside the IGU for zero-maintenance cleaning), simulated divided light (bars applied to both exterior and interior glass surfaces), and removable grilles that snap on and off. The choice is largely about appearance and how much cleaning convenience matters to you.
With the sash and glazing covered, there’s still a layer of components most homeowners never think about — the exterior parts that sit between the window and the wall, quietly keeping water out and the whole assembly weathertight.
Exterior Window Parts Most Guides Skip
You’ll probably never admire these components from the curb. But the exterior parts of a window are the reason water stays outside your wall cavity instead of rotting the framing from within. Most of these pieces sit hidden behind siding or tucked under trim, doing thankless work every time it rains. When they fail, the damage is slow, invisible, and expensive. Here’s what’s actually out there protecting your windows.
Exterior Casing, Brick Mould, and Drip Cap
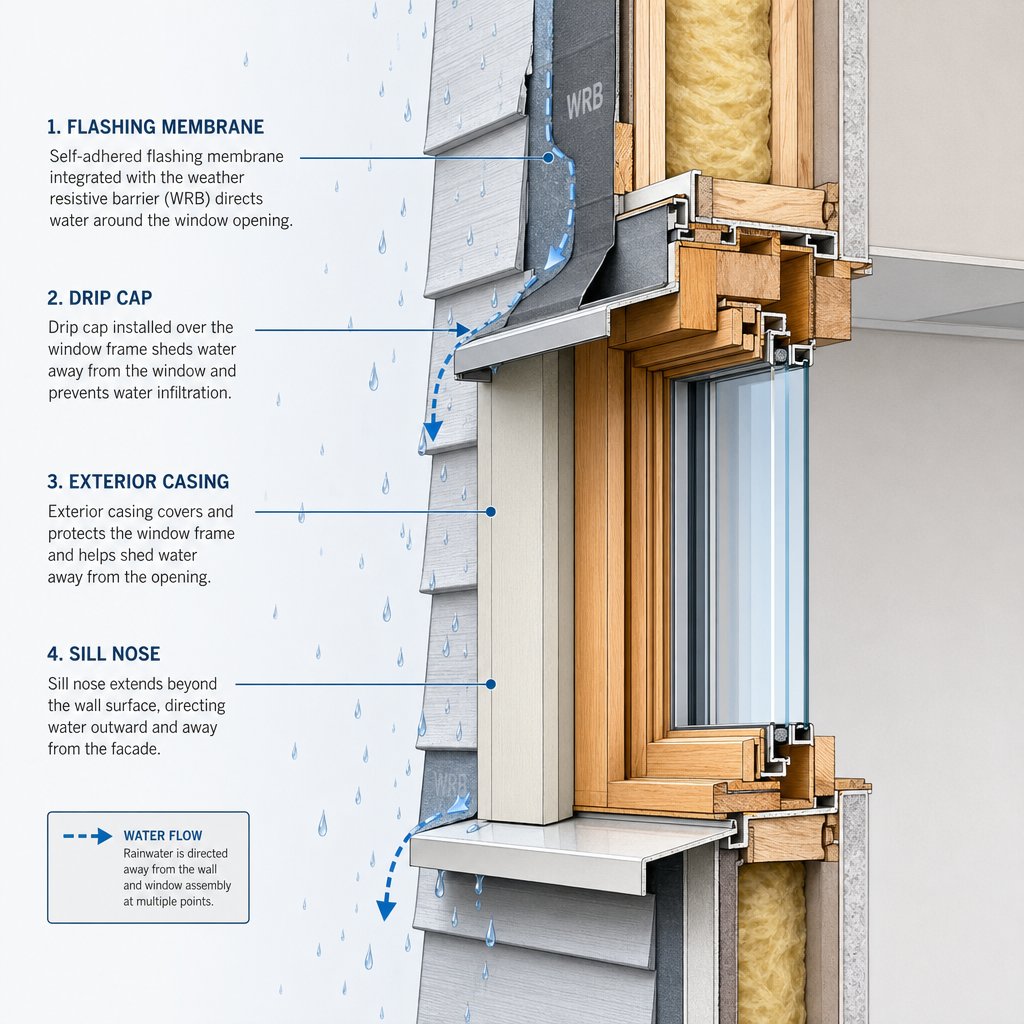
Exterior casing is the trim that covers the gap between the window frame and the surrounding wall framing. It serves double duty — giving the window a finished look from outside while providing a mounting surface for sealant and weatherproofing. Without it, you’d see raw sheathing and shims around every opening.
Where windows meet masonry or siding, you’ll often find brick mould instead of standard flat casing. Brick mould is a specific moulding profile — typically thicker and more contoured — designed to bridge the transition between the window frame and the wall cladding material. It’s common on both new-construction and replacement installations where a clean, durable exterior finish matters.
Sitting above it all is the drip cap, sometimes called head flashing. Imagine a small angled piece of metal or vinyl installed directly above the window’s top casing. Its only job is to kick rainwater outward, away from the top of the frame, so it doesn’t seep behind the casing and into the wall. A missing or bent drip cap is one of the most common — and most overlooked — causes of water damage around windows.
Flashing, Sill Nose, and Weatherstripping
Flashing is the waterproof barrier integrated into the wall assembly around the entire window perimeter. It can be self-adhesive membrane, metal strips, or a combination of both, layered in a specific sequence so water always drains outward and downward. Proper flashing is what separates a window that survives decades from one that rots the wall behind it within a few years. The parts of a window frame exterior that you can’t see — flashing chief among them — often matter more than the ones you can.
The sill nose is the visible front edge of the exterior sill, projecting slightly beyond the wall surface. That small overhang sheds water away from the wall below, preventing staining and moisture wicking into the cladding.
Then there’s weatherstripping — the flexible seal compressed between the sash and frame every time the window closes. The U.S. Department of Energy identifies several types suited to windows, and the three you’ll encounter most often around sash perimeters are:
- Compression weatherstripping — a foam or rubber strip that compresses when the sash closes, filling gaps with consistent pressure.
- Fin seal (pile weatherstripping) — a brush-like strip with a plastic Mylar fin centered in the pile, commonly used on aluminium sliding windows and sliding glass doors for durable, low-friction sealing.
- Bulb weatherstripping — a tubular rubber or vinyl profile that deforms against the frame to create a tight air and water seal, often found on casement and awning windows.
Here’s a quick summary of each exterior component and its weatherproofing role in the parts of a window exterior assembly:
- Exterior casing — covers the frame-to-wall gap and anchors perimeter sealant.
- Brick mould — provides a finished transition where windows meet masonry or siding.
- Drip cap — deflects rainwater away from the top of the frame.
- Flashing — waterproof membrane or metal directing moisture out of the wall cavity.
- Sill nose — projects beyond the wall to shed water from the sill edge.
- Weatherstripping — seals the sash-to-frame joint against air and water infiltration.
Window Screens and Storm Window Components
Screens and storm panels are the outermost accessories, and their anatomy is simpler than you might expect. The parts of a screen window include a lightweight frame (usually extruded aluminium), mesh material (fiberglass or aluminium woven screen), and spline — the flexible rubber cord pressed into a groove around the frame’s perimeter to lock the mesh in place. Spline diameter needs to match the frame’s groove precisely; too small and the mesh pulls loose, too large and it won’t seat properly.
The parts of a window screen are easy to replace individually. Torn mesh, cracked frames, and hardened spline are all common wear items that don’t require professional help — just a spline roller and the right materials.
Storm windows add a different layer of protection. The parts of a storm window typically include a rigid aluminium or vinyl frame, a glass or acrylic panel, and a mounting system (clips, tracks, or compression-fit edges) that secures the panel over the exterior of the primary window. The sealed air gap between the storm panel and the main window creates an insulating buffer that reduces heat loss and dampens outside noise — a practical upgrade for older single-pane windows that aren’t ready for full replacement.
These exterior components rarely get attention until something leaks. But they form the first line of defense for the entire window system. The interior side of that system — trim, casing, stools, and aprons — picks up where the exterior leaves off, finishing the opening and connecting the window to the room.
Interior Window Parts and Trim
Step inside and the window tells a different story. The parts of a window interior aren’t fighting rain or UV exposure — they’re managing aesthetics, concealing rough construction, and providing mounting points for everything from curtains to blinds. Get these components wrong and the window looks unfinished, even if it performs perfectly.
Interior Casing and Trim Profiles
Interior casing is the moulding applied around the inside perimeter of the window opening. Its job is straightforward: cover the gap between the window jamb and the drywall surface, creating a clean visual frame. But here’s a distinction worth knowing — “trim” is the broader term for all decorative moulding around a window, while “casing” refers specifically to the pieces that frame the opening itself. All casing is trim, but not all parts of a window trim qualify as casing.
Profile styles range widely. Colonial casing features curved, layered profiles with a traditional feel. Craftsman-style casing strips away ornamentation in favor of flat stock, square edges, and bold proportions — a look rooted in the early 1900s Arts and Crafts movement that still holds up in modern homes. Modern flat stock keeps things minimal with clean, squared-off boards. The choice is primarily aesthetic, but casing also conceals insulation, shims, and any irregularities between the jamb and the wall framing behind it.
Stool, Apron, and Extension Jambs
Here’s one of the most common mix-ups in window terminology. What most people call the “window sill” on the inside is technically the stool. The parts of a window sill that you rest a coffee mug on, set a plant on, or lean against while looking outside? That flat horizontal board extending into the room at the base of the window is the stool, not the sill. The actual sill is the exterior-facing component that slopes outward for drainage — covered back in the frame section.
Directly beneath the stool, flat against the wall, sits the apron. This trim piece provides visual support for the stool and covers the gap between the stool’s underside and the drywall below. A good rule of thumb from experienced finish carpenters: the apron’s width should align with the outer edges of the side casings so the whole assembly reads as one cohesive frame.
Extension jambs solve a different problem entirely. When the window frame is shallower than the wall is thick — common with thicker insulated walls or older plaster-and-lath construction — the jamb doesn’t reach the interior wall surface. Extension jambs are strips of wood, MDF, or PVC added to the frame edges, bringing them flush with the room-side wall so casing has a flat, consistent surface to mount against.
Blinds, Shades, and Mounting Hardware
Window treatments connect directly to the interior parts of a window you’ve just mapped out, and the mounting method depends on which components you’re attaching to. Two options exist: inside mount and outside mount.
Inside-mount brackets attach to the head jamb or the inside face of the casing, tucking the parts of a window blind or shade neatly within the window opening. This creates a clean, built-in look and lets you showcase the casing profile — but it requires enough jamb depth for the headrail to fit. Window boxes with less than 3/4 inch of depth typically can’t support an inside mount.
Outside-mount brackets attach to the wall surface or the face of the trim above the casing. This approach works on virtually any window, covers imperfect trim, and can make windows appear taller when mounted high. The trade-off is that the parts of a window shade or blind sit in front of the casing rather than inside it, creating a different visual profile.
What matters practically is that casing depth, stool projection, and jamb dimensions all dictate which treatments fit and how they’re installed. Choosing a part of a window blind setup without measuring these interior components first is a reliable way to end up with brackets that don’t seat properly or shades that snag against the frame.
Stool, casing, apron, trim — these terms get swapped, confused, and misused constantly, even by professionals. And they’re not the only ones. Several core window terms are used interchangeably across the industry when they actually mean very different things.
Window Terms That Even Pros Mix Up
Ever asked a contractor about a part of a window and gotten three different names for the same thing? You’re not imagining it. Manufacturers, retailers, and installers routinely swap terms that actually refer to different parts of a window called by distinct names for good reason. Here’s how to sort out the ones that cause the most confusion.
Muntin vs Mullion and Grille vs Grid
A muntin is a narrow bar that divides and holds individual panes of glass within a single sash. Picture an old colonial window with six small rectangles of glass — the thin wooden strips between those panes are muntins. A mullion is something else entirely. It’s a heavier structural member that divides two separate window units within one rough opening. Think of a wide wall opening filled with a fixed picture window flanked by two casements — the vertical bars separating those units are mullions.
In modern windows, grilles (also called grids) muddy the water further. These are decorative overlays or inserts sandwiched between double-pane glass to mimic the look of muntins — without actually dividing the glass. Many window companies lump muntins, mullions, and grilles under one label, which is why what are the parts of a window called remains such a common search.
Glazing vs Pane vs Lite
These three get treated as synonyms, but each has a specific meaning. “Glazing” refers to the complete glass unit — panes, coatings, gas fills, and spacers included. “Pane” means a single sheet of glass. And “lite” is the industry term for a section of glass within a window, whether it’s a separate physical pane or just a visual division created by grilles. A window with grilles forming a six-section pattern? That’s a six-lite window — even though it may contain only one sealed glazing unit.
Casing vs Trim vs Moulding
“Trim” is the umbrella term covering all decorative woodwork around a window. “Casing” is the specific trim that frames the window opening on either the interior or exterior side. “Moulding” describes the shaped profile of any trim piece — the curves, bevels, and contours that give it visual character. So a colonial casing is a type of trim with a specific moulding profile. All casing is trim, all trim pieces have a moulding profile, but the terms aren’t interchangeable.
Here’s a quick-reference table covering the different parts of a window that get mixed up most often:
| Commonly Confused Terms | Correct Definition | Where It Is Located |
|---|---|---|
| Muntin | Narrow bar that divides and holds individual glass panes within a sash | Inside the sash, between separate panes of glass |
| Mullion | Structural member that separates two or more window units in one opening | Between adjacent window units within a shared rough opening |
| Grille (Grid) | Decorative bar that simulates divided-light patterns without structurally dividing the glass | Between glass panes (sealed inside IGU), on glass surfaces, or as removable snap-on overlays |
| Glazing | The complete glass unit, including panes, coatings, gas fills, and spacers | Seated within the sash frame |
| Pane | A single sheet of glass | One layer within a single- or multi-pane glazing unit |
| Lite | A section of glass within a window, whether physically separate or visually divided by grilles | Any distinct glass area within the sash |
| Trim | Umbrella term for all decorative woodwork around a window | Interior and exterior perimeter of the window opening |
| Casing | The specific trim pieces that frame the window opening | Mounted where the jamb meets the wall surface, inside and outside |
| Moulding | The shaped profile (curves, bevels, contours) of any trim piece | Describes the cross-sectional shape of casing, baseboard, or any trim |
Getting the terminology right matters beyond trivia. When you’re ordering replacement parts, describing a problem to a glazier, or comparing quotes from different installers, precise language saves time and prevents costly miscommunication. And that precision becomes especially important when you realize the same part name can mean something slightly different depending on the window type you’re working with.
How Parts Change Across Window Types
A double-hung window and a casement window share the same five component groups — frame, sash, glazing, hardware, weathersealing — but the specific parts inside each group can look completely different. The sash on one slides vertically. On the other, it swings outward on hinges. Same category, different anatomy. Understanding these type-specific differences is what separates someone who can name parts from someone who can actually diagnose, repair, or spec the right window for a given opening.
Double-Hung and Single-Hung Window Parts
These two types share more DNA than any other pairing, which is exactly why they’re so easy to confuse. A parts of a double hung window diagram reveals two independently operable sashes — upper and lower — each riding on its own balance system within the side jambs. Where the two sashes overlap at the center, a meeting rail creates a weather-tight seal. Most modern double-hung windows also include tilt latches on both sashes, allowing each one to swing inward for exterior glass cleaning from inside the home.
The parts of a single hung window tell a simpler story. The frame, sill, jambs, and lower sash are essentially identical to a double-hung. The key difference? The upper sash is fixed — it doesn’t move. That eliminates the upper balance system, the upper tilt mechanism, and one set of operable hardware entirely. Fewer moving parts means single-hung windows can be slightly more energy efficient, since there are fewer potential air infiltration points. They also tend to cost less for the same reason.
Here’s a side-by-side comparison of the parts of a sash window in each configuration:
| Component | Double-Hung | Single-Hung |
|---|---|---|
| Upper Sash | Operable — slides down | Fixed — does not move |
| Lower Sash | Operable — slides up | Operable — slides up |
| Balance Systems | Two (one per sash) | One (lower sash only) |
| Tilt Latches | Both sashes tilt inward | Lower sash only (varies by material) |
| Meeting Rail | Interlocking — both sashes move to engage | Lower sash rail meets fixed upper sash rail |
| Weatherstripping Points | More — around both operable sashes | Fewer — around lower sash and fixed upper perimeter |
When you’re on the second floor and need to clean exterior glass without a ladder, double-hung tilt functionality on both sashes is a genuine practical advantage. For ground-floor openings or windows placed high on a wall where the upper sash is out of reach anyway, single-hung saves money without sacrificing much.
Casement and Awning Window Parts
The parts of a casement window swap out the entire vertical sliding mechanism for a hinge-and-operator system. Instead of balances and meeting rails, you get hinges mounted along one vertical side of the sash and a crank operator (or friction stay) that swings the sash outward like a door. The operator arm — a folding or scissor-style linkage connecting the crank handle to the sash — is the component that does the heavy lifting.
Awning windows use the same concept, just rotated. The hinges sit at the top of the sash, and the bottom swings outward. This lets you crack the window open during light rain without water entering the room — a practical detail that makes awning windows popular in bathrooms and basements.
Unique parts you’ll find on casement and awning windows but not on hung types include:
- Operator arm and crank handle — the mechanical linkage that opens and closes the sash. Operator arm fatigue is the most common mechanical failure in casement windows.
- Multi-point locking hardware — instead of a single lock at the meeting rail, casement locks engage at multiple points along the sash perimeter, pulling it tight against the frame.
- Friction hinges (friction stays) — hinges with built-in resistance that hold the sash at any open angle without a prop or crank.
That multi-point lock design is why casement windows typically achieve tighter seals than hung types. When you close the sash, the hardware actively presses it into the weatherstripping around the full perimeter, compressing the seal evenly rather than relying on gravity and a single latch.
Sliding and Fixed Window Parts
The parts of a sliding window flip the hung-window concept on its side — literally. Instead of vertical travel, one or both sashes glide horizontally along a track built into the head jamb and sill. Roller assemblies mounted to the bottom of the sash reduce friction and keep movement smooth. Where the two panels overlap, an interlock (similar in concept to a meeting rail) creates the weather seal.
Sliding windows don’t need balances, crank operators, or hinges. Their hardware is minimal: a latch lock at the interlock point, rollers, and sometimes a secondary foot lock at the base for security. That simplicity makes them low-maintenance, but the trade-off is that the sash doesn’t press into the weatherstripping the way a casement does — it slides past it. Over time, that sliding contact wears the seal faster.
Fixed windows — also called picture windows — strip the anatomy down to its bare minimum. There’s a frame, a glazing unit, and that’s it. No operable sash, no hardware, no balance system, no weatherstripping around a moving part. The glass is sealed directly into the frame. This makes fixed windows the most energy-efficient and airtight option available, since there are zero operable joints where air can leak. They’re ideal for openings where ventilation isn’t needed but natural light and views are the priority.
Bay and Bow Window Assemblies
Bay and bow windows aren’t single units — they’re assemblies of multiple windows joined together to project outward from the wall. The parts of a bay window typically include three window units: a large fixed center panel flanked by two operable windows (often casement or double-hung) set at angles, usually 30 or 45 degrees. Bow windows expand on this with four or more same-sized units arranged in a gentle curve.
What makes these assemblies structurally distinct is the joining and support hardware. Mullions connect the individual units at their angled junctions. Head boards and seat boards — horizontal panels at the top and bottom of the assembly — tie the units together and provide a finished interior surface. These boards are typically constructed with a fiberboard core and veneer finish, with the fiberboard core reducing the possibility of warping or cupping over time.
Beneath the assembly, cable support systems or knee brackets carry the weight of the projecting structure back to the wall framing. The parts of a bay window exterior also include a roof panel or copper/lead cap over the top of the projection, plus flashing where the assembly meets the house wall — critical waterproofing details that are easy to overlook during inspection.
Each window type reshapes the parts list in ways that affect maintenance, repair options, and long-term performance. But knowing which parts your window has is only half the equation. The real payoff comes when you can connect a specific symptom — a draft, a rattle, condensation between panes — back to the exact component that’s failing.
Troubleshooting Window Problems by Part
You feel a cold draft near the window. You notice fog between the panes that won’t wipe away. The sash creeps down the moment you let go. Every one of these symptoms points to a specific component — and once you know which part is failing, you can figure out whether it’s a quick fix or a full replacement conversation. Let’s reverse the usual format and start with the problem.
Drafts, Condensation, and Which Parts Cause Them
A draft sneaking past a closed window almost always traces back to one of three culprits: degraded weatherstripping that no longer compresses tightly against the sash, a failed glazing seal where the spacer has cracked and allowed insulating gas to escape, or gaps in the casing and flashing where the frame meets the wall. In older parts of a house window, all three can happen simultaneously.
Condensation tells a more specific story depending on where it appears. Fog or moisture trapped between panes means the sealed glazing unit has failed — the spacer seal broke, the gas fill leaked out, and outside air carrying humidity has infiltrated the cavity. No amount of wiping fixes this; the insulated glass unit (IGU) needs replacing. Condensation on the interior surface of the glass, on the other hand, usually points to insufficient glazing performance for your climate or poor room ventilation rather than a broken seal. Single-glazed windows in poorly ventilated rooms are especially prone to this, since the temperature difference between indoor air and the cold glass surface triggers moisture to condense.
Sticking, Rattling, and Hardware Failures
A sash that won’t stay open or slowly slides shut? That’s a balance system failure — a broken spring, a snapped cord, or a worn block-and-tackle mechanism that can no longer counterweight the sash. In traditional sash windows, cords made from cotton or hemp degrade over time, fraying and eventually snapping from years of use or moisture exposure.
Rattling when the wind picks up points to worn weatherstripping or a loose meeting rail — the sash has too much play within the frame. Wood shrinkage from humidity changes can widen the gap between sash and jamb over time, turning a snug fit into a noisy one. Difficulty locking usually means the keeper (the strike plate the lock engages) has shifted out of alignment, or the lock hardware itself is worn.
For casement windows, operator arm fatigue is the most common mechanical failure. The folding linkage that connects the crank handle to the sash weakens with repeated use, eventually making the window difficult to open or impossible to pull fully closed.
Water Leaks and Structural Deterioration
Water showing up around a window can be traced to failed flashing, deteriorated caulking at the frame-to-wall junction, a cracked sill nose, or blocked weep holes in the sill that prevent drainage. The bottom part of a window takes the hardest hit from water — gravity ensures moisture collects there first. What is the bottom part of a window called? The sill, and it’s the component most vulnerable to rot in parts of a wooden window frame. If you’re dealing with a deteriorated sill on a double-hung, understanding how to remove the bottom part of a window sash gives you access to inspect and address sill damage without pulling the entire unit.
Frame material plays a major role in how water damage progresses. Parts of a vinyl window resist rot and swelling entirely, and aluminium frames are equally immune. Wood frames, while beautiful and thermally efficient, demand consistent maintenance in wet climates — once moisture penetrates the finish, decay can compromise the structural jambs surprisingly fast.
Here’s a practical reference mapping symptoms to the parts most likely responsible:
| Symptom | Likely Part Failing | Repair vs Replace |
|---|---|---|
| Cold drafts around closed window | Weatherstripping, casing sealant, or glazing seal | Repair — weatherstripping and caulk are replaceable without removing the window |
| Fog or moisture between glass panes | Sealed glazing unit (failed spacer seal) | Replace the IGU — the glass unit can often be swapped without replacing the full window |
| Condensation on interior glass surface | Insufficient glazing for climate; poor ventilation | Upgrade glazing or improve room airflow |
| Sash won’t stay open or creeps down | Balance system (broken spring, cord, or block-and-tackle) | Repair — balances are a standard serviceable part |
| Rattling in wind | Worn weatherstripping or loose meeting rail | Repair — replace weatherstripping or adjust meeting rail |
| Lock won’t engage | Misaligned keeper or worn lock hardware | Repair — hardware is replaceable |
| Casement hard to crank open/closed | Operator arm fatigue | Repair — operator mechanisms are replaceable |
| Water leaking around frame | Failed flashing, deteriorated caulking, cracked sill nose, or blocked weep holes | Repair if caught early; replace if water has caused structural frame damage |
| Soft, spongy wood on frame or sill | Rot in wood jambs or sill | Replace — structural rot typically means full window replacement |
| Vinyl frame cracking or separating at corners | Failed welds in vinyl frame | Replace — welded vinyl joints can’t be effectively re-sealed |
The pattern is clear: weatherstripping, hardware, glazing units, and screens are all parts of a replacement window repair toolkit — serviceable components you can swap without tearing out the whole unit. Frame rot, structural jamb damage, and failed welds in vinyl frames cross the line into full replacement territory. Knowing which side of that line your problem falls on saves you from overspending on a new window when a $30 part would have solved it — or from patching a frame that’s already too far gone to save.
Fixing a failing part restores function. But if you’re choosing new windows or evaluating upgrades, the next question shifts from “what’s broken” to “which parts actually drive energy performance” — and that answer determines long-term comfort and cost.
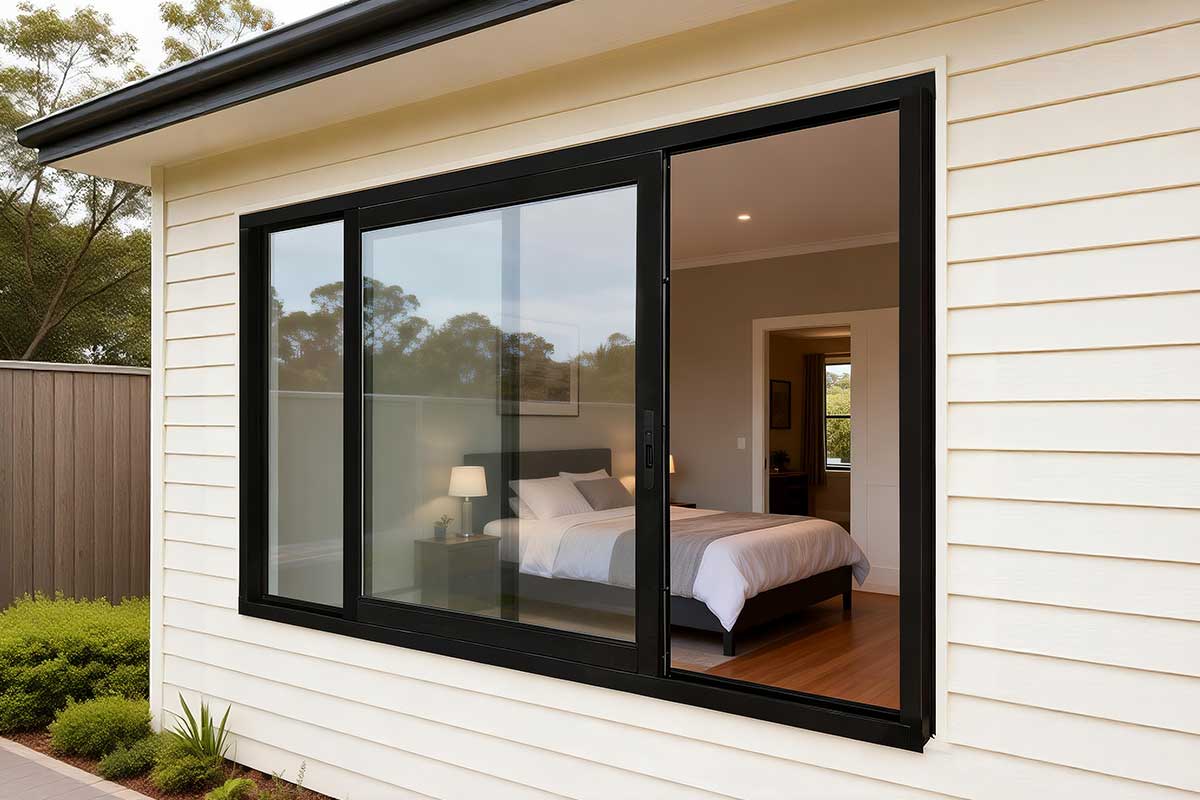
Parts That Drive Energy Efficiency and How to Choose Well
Every part of a window in a house contributes something to the overall system, but not every part carries equal weight when it comes to energy performance. Some components are cosmetic. Others — glazing, frame material, weatherstripping, spacers — directly determine how much heat escapes, how much solar energy enters, and how much conditioned air leaks out. If you can describe the parts of a window that influence these three factors, you can read a performance label with confidence and make smarter choices for any project.
Which Parts Control Energy Loss and Comfort
Window energy performance boils down to a handful of measurable ratings. The U.S. Department of Energy identifies U-factor, solar heat gain coefficient (SHGC), and air leakage as the core metrics — and each one maps directly to specific components within the parts of a window assembly.
Here’s how each part contributes:
- Glazing type and gas fills → U-factor. U-factor measures the rate of non-solar heat transfer through the entire window. Double or triple glazing with argon or krypton gas fills between panes slows conductive heat loss dramatically. The lower the U-factor, the better the window insulates. For most Australian climates, a U-value between 1.6 and 2.5 W/m²K is the target range, with colder regions like Canberra or Hobart pushing toward the lower end.
- Low-E coating placement → SHGC. Solar heat gain coefficient tells you what fraction of solar radiation passes through the glass. Low-E coatings applied to specific glass surfaces within the IGU control this number. In hot climates, you want a low SHGC (0.35 or below) to block heat. In cooler zones, a higher SHGC lets beneficial winter sun in.
- Weatherstripping condition → air leakage. Even the best glazing can’t compensate for worn seals. Degraded weatherstripping around the sash perimeter lets conditioned air escape and outside air infiltrate, undermining the entire thermal envelope.
- Frame material → thermal bridging. The frame accounts for 10-30% of the total window area, and its material determines how much heat conducts through the perimeter. Wood and vinyl naturally insulate well. Aluminium conducts heat rapidly on its own, but thermally broken aluminium profiles insert a polyamide barrier between the inner and outer frame sections, cutting that heat transfer significantly.
- Warm-edge spacers → edge-of-glass performance. Traditional aluminium spacers act as thermal bridges at the glass edge. Warm-edge spacers made from composite or stainless steel materials reduce heat loss in this zone and lower the risk of condensation forming along the perimeter of the pane.
Building codes and climate zones dictate which specifications are required. In Australia, the National Construction Code (NCC) mandates that glazing meet AFRC-rated U-values and SHGC thresholds aligned to your specific climate zone, and new homes must achieve a minimum 7-star NatHERS rating under the Whole of Home assessment. The right combination of all parts of a window — not just the glass — is what gets a build across that compliance line.
Choosing Windows With the Right Parts for Your Project
Performance ratings give you the numbers. Matching those numbers to the right product means choosing a window system where frame, glazing, hardware, and seals are engineered to work together — not assembled from mismatched specs.
For many Australian projects, aluminium-framed windows with thermally broken profiles hit a practical sweet spot. You get the structural strength and slim sightlines that aluminium is known for — allowing more glass area and more natural light — combined with the thermal performance that a polyamide break delivers. Parts of a wood window frame offer natural insulation, but they demand ongoing maintenance that aluminium simply doesn’t. Vinyl resists rot but can lack the rigidity needed for larger openings or high-wind zones.
MEICHEN’s aluminium window range is engineered to meet Australian standards and offers options across multiple window types — casement, sliding, double-hung, and fixed configurations — so homeowners and builders can match the right operating style and component set to each opening in a project. Whether you’re specifying parts of a home window for a single renovation or selecting across an entire multi-unit development, having a range that covers every type under one compliance framework simplifies the process considerably.
The real value of understanding every component covered in this guide isn’t just vocabulary. It’s leverage. When you can evaluate a window system part by part — frame material, glazing configuration, spacer type, weatherstripping quality, hardware durability — you stop relying on brand claims and start making decisions based on what actually performs. That knowledge helps you diagnose problems accurately, compare quotes meaningfully, and choose systems built to last well beyond the warranty period.
Frequently Asked Questions About Parts of a Window
1. What are the 5 main parts of a window?
Every residential window is built from five core component groups: the frame (head jamb, side jambs, and sill that anchor the unit into the wall), the sash (the movable or fixed panel holding the glass), the glazing (the glass unit including panes, gas fills, coatings, and spacers), the hardware (locks, handles, balances, and operators for opening and securing), and the weathersealing (weatherstripping, flashing, and caulking that block air and water infiltration). These five groups apply to every window style, from double-hung and casement to sliding and fixed picture windows, though the specific components within each group vary by type.
2. What is the difference between a window sill and a window stool?
The terms are commonly swapped, but they refer to two different parts. The sill is the exterior-facing bottom component of the window frame that slopes outward to drain rainwater away from the wall. The stool is the flat horizontal board on the interior side that extends into the room at the base of the window opening — the surface where you might place a plant or rest your arm. Directly beneath the stool sits the apron, a trim piece that covers the gap between the stool and the wall below. When someone refers to the indoor window sill, they almost always mean the stool.
3. Which window parts can be replaced without replacing the entire window?
Several key components are serviceable without a full window swap. Weatherstripping can be pulled out and replaced to restore a tight seal against drafts. Balance systems in hung windows — springs, cords, or block-and-tackle units — are standard repair items when a sash won’t stay open. Lock hardware, crank operators on casement windows, and keeper plates can all be swapped individually. Even a failed sealed glazing unit (the insulated glass panel showing fog between panes) can often be replaced within the existing sash. Screens, spline, and mesh are simple DIY replacements. However, structural frame rot, cracked vinyl welds, or warped jambs typically cross the line into full window replacement.
4. Why is there condensation between my window panes?
Moisture trapped between the glass panes signals a failed sealed glazing unit. The spacer bar that separates the panes and maintains the airtight cavity has cracked or degraded, allowing the insulating gas fill to escape and humid outside air to enter. Once the seal breaks, the desiccant inside the spacer becomes saturated and can no longer absorb moisture, resulting in persistent fog that cannot be wiped away from either side. The fix requires replacing the insulated glass unit (IGU) itself. In many cases, a glazier can swap the IGU within the existing sash and frame without replacing the entire window, which is significantly more cost-effective.
5. How do window parts affect energy efficiency?
Specific components map directly to measurable performance ratings. The glazing configuration and gas fills (argon or krypton between panes) primarily determine the U-factor, which measures heat transfer rate — lower means better insulation. Low-E coating placement on glass surfaces controls the solar heat gain coefficient (SHGC), dictating how much solar radiation passes through. Weatherstripping condition directly impacts air leakage ratings, since worn seals let conditioned air escape. Frame material influences thermal bridging around the window perimeter, with thermally broken aluminium and vinyl performing well. Warm-edge spacers reduce heat loss at the glass edge where traditional aluminium spacers create a thermal bridge. Choosing windows where all these parts are engineered to work together, such as aluminium-framed systems with thermal breaks, delivers the best overall energy performance.
More Window & Door Guides