Why Cement on Aluminium Frames Needs Special Care
A few splashes of mortar on your aluminium window frames might seem like a minor nuisance after a build or renovation. It happens constantly — bricklayers working adjacent walls, tilers grouting a bathroom, render being applied to an exterior facade. Cement splatter finds its way onto frames with almost predictable regularity. The real trouble starts when you grab the wrong product to clean it off.
Aluminium is not like timber or uPVC. It carries a protective oxide layer (on raw or anodized finishes) or a factory-applied powder coat, and both can be permanently damaged by aggressive chemicals or abrasive tools. Understanding why cement bonds so stubbornly to these surfaces — and why the most common removal products on hardware store shelves are the worst possible choice — is the first step toward getting your frames clean without leaving scratches, etching, or discolouration behind.
Why Cement Sticks to Aluminium Frames
Portland cement is highly alkaline, typically sitting between pH 12 and 13 when wet. As it cures, calcium silicate hydrate crystals form and physically grip any surface they contact. On aluminium, this alkaline chemistry creates a secondary problem: fresh concrete reacts with the alkaline-sensitive aluminium oxide layer, liberating hydrogen gas and forming a tight chemical bond at the interface. The result is cement that doesn’t just sit on the frame — it partially etches into it.
Left in place, dried cement continues to trap moisture against the aluminium surface, accelerating localised corrosion. The longer it stays, the harder it becomes to remove without also removing part of the finish beneath it.
The Risk of Using the Wrong Removal Method
Most off-the-shelf cement removers in Australia are formulated around hydrochloric acid (also sold as muriatic acid). These products work brilliantly on brick, concrete paths, and ceramic tiles. On aluminium, they’re destructive. Hydrochloric acid attacks the aluminium itself — not just the cement — causing pitting, blackening, and irreversible surface damage within minutes of contact.
Never use muriatic acid or hydrochloric acid-based cement removers on aluminium window frames. These products dissolve the protective oxide layer and pit the metal surface permanently, regardless of whether the frame is anodized, powder-coated, or raw mill-finish aluminium.
Wire brushes and metal scrapers present the other common trap. They’ll shift the cement, sure — along with the finish underneath. Even a single careless pass with a steel blade can score a powder-coated surface deeply enough to expose bare metal to the elements.
The good news: safe removal is entirely achievable with the right combination of tools, technique, and aluminium-compatible chemistry. The process varies depending on whether your cement is still fresh or fully cured, and on what type of finish your frames carry — factors that shape every decision from here forward.
Step 1 — Assess the Cement Type and Frame Finish
Picking up a scraper and going straight at the problem feels productive, but five minutes of assessment can save you from a costly mistake. The removal method that works perfectly on one frame finish may ruin another, and a technique suited to fresh mortar splatter will barely dent a cement deposit that has been curing for six months. Before anything else touches your frames, you need to know two things: what finish you’re dealing with, and how far along the cement has cured.
Identifying Your Aluminium Frame Finish
Australian homes typically feature one of three aluminium frame finishes, and each responds differently to scraping pressure, chemical agents, and abrasion. If you’re unsure what year your house was built or what specification the builder used, the finish itself offers clear visual clues.
- Anodized aluminium — Look for a subtle metallic sheen with a slightly translucent quality. The colour appears to come from within the metal rather than sitting on top of it. Anodized frames are common on older Australian homes and higher-end installations. The anodizing process forms a hard oxide layer that becomes part of the metal itself, making it scratch-resistant but difficult to repair if damaged.
- Powder-coated aluminium — The most common finish on modern Australian window frames. It has a matte, satin, or semi-gloss texture and sits as a distinct coating layer on the metal surface. Colours range from white and cream through to charcoal, black, and bold architectural tones. Powder coat can be chipped or scratched if scraped aggressively, but small areas can be touched up with matching paint.
- Raw or mill-finish aluminium — Uncommon on residential windows but sometimes found on older commercial frames or DIY installations. The surface appears as bare silver-grey metal with a slightly dull patina of natural oxidation. Without a factory-applied protective layer, raw aluminium is the most vulnerable to chemical damage and staining.
Run your fingernail lightly over a clean section of the frame. Powder coat feels like a smooth painted surface with slight texture. Anodized aluminium feels like bare metal — hard, cool, with no distinct coating edge. If you can see areas where the finish has worn through to reveal a different colour or bare metal underneath, that tells you the coating type and thickness you’re working with.
Fresh Cement Versus Dried Cement — Know the Difference
Cement changes dramatically as it cures. According to industry data, concrete reaches its initial set within 24 to 48 hours and continues hardening for weeks — hitting roughly 70 per cent strength at seven days and full design strength at 28 days. That same timeline applies to mortar and render splatter on your frames.
Here’s what this means in practice:
- Still wet or tacky (under 24 hours) — The cement has not yet formed strong calcium silicate bonds. It wipes or scrapes off with minimal effort and almost no risk to the frame finish. This is the easiest scenario by far.
- Recently dried (1–7 days) — A hard crust has formed on the surface, but the deposit hasn’t reached full hardness. Soaking with water can soften it enough for careful mechanical removal.
- Fully cured (7+ days) — The cement has reached significant structural strength. Mechanical removal alone may not be enough, and a safe chemical agent will likely be needed to dissolve the calcium compounds before scraping.
Press a fingernail into the edge of the deposit. If it dents or crumbles slightly, curing is incomplete and you can likely rely on water and a plastic scraper. If it feels rock-hard with no give at all, you’re dealing with fully cured material that will require a more methodical approach.
The extent of contamination also matters. A few isolated splatter spots from a bricklayer next door are a different job than an entire frame caked in render overspray, or years-old cement residue left behind on a renovation property. Small spots might take ten minutes each. Heavy coverage across multiple frames can stretch into a full afternoon of soaking, scraping, and repeating — so set realistic expectations before you begin.
With your finish type confirmed and the cement’s condition assessed, you can select tools and products that match both variables — avoiding unnecessary risk to the frame surface while choosing the most efficient path to clean aluminium.

Step 2 — Gather the Right Tools and Safe Cleaning Agents
Knowing your frame finish and cement condition tells you what you can safely use — but having those items ready before you start prevents mid-job improvisation that leads to scratches. Lay everything out in advance so the process flows without interruption.
Mechanical Tools for Safe Scraping
The goal with any scraping tool is to be softer than the frame finish itself. Aluminium oxide and powder coat are relatively hard surfaces, but they’ll mark instantly if met with steel or hardened metal edges. Your mechanical toolkit should include:
- Plastic scrapers or plastic putty knives — the primary workhorse for lifting cement deposits. Choose one with a smooth, flat edge rather than a serrated or textured blade.
- Wooden craft sticks or bamboo skewers — ideal for picking dried cement out of narrow frame channels, around hardware, and in corners where a wider scraper won’t reach.
- Nylon bristle brushes — a stiff nylon brush (or even a firm toothbrush) loosens softened cement from textured surfaces without scoring the finish.
- Microfibre cloths — for wiping residue, buffing after cleaning, and applying chemical agents without leaving lint behind.
- Spray bottles — one for plain water (soaking), one for your chosen cleaning solution.
What stays off this list matters just as much. Wire brushes, steel wool, metal paint scrapers, and razor blades have no place near aluminium frames. A single stroke from a steel edge can cut through powder coat and gouge the oxide layer beneath, creating a scratch that traps moisture and starts corrosion. The same logic applies if you’re working near flyscreens for doors or windows — metal tools snag and tear mesh just as easily as they damage frame finishes.
Chemical Agents That Won’t Damage Aluminium
When mechanical methods need chemical backup, the agent you choose determines whether the frame survives unscathed. Phosphoric acid and citric acid are the two primary active ingredients in aluminium-safe cement dissolvers. Both break down calcium compounds in cured cement without aggressively attacking the aluminium oxide layer the way hydrochloric acid does.
For lighter deposits or as a household alternative, undiluted white vinegar (acetic acid, roughly pH 2.5) softens thin cement residue with a 10–15 minute soak. A baking soda paste — three parts baking soda to one part water — provides gentle abrasion for surface haze without chemical risk. These same mild solutions work well if you ever need to clean mould from outside limestone walls or other alkaline-sensitive surfaces around the home.
| Factor | Phosphoric Acid-Based Remover | Citric Acid-Based Remover |
|---|---|---|
| Safety for aluminium | High — does not attack the oxide layer at recommended dilutions | High — very mild on metals, food-grade acid |
| Effectiveness on cured cement | Strong — dissolves calcium silicate bonds efficiently | Moderate — better suited to thinner deposits or partially loosened cement |
| Typical dwell time | 5–15 minutes | 15–30 minutes |
| Availability in Australia | Hardware stores (Bunnings, independent trade suppliers) — sold as “aluminium-safe cement remover” or phosphoric acid cleaner | Hardware stores and supermarkets — sometimes marketed as eco-friendly descaler or natural cement dissolver |
A phosphoric acid product is the stronger option for heavily cured deposits. Citric acid suits readers who prefer a less aggressive approach or who are working on delicate anodized finishes where even minor etching risk is unacceptable.
Safety Gear Checklist
Even mild acids and cement dust warrant basic protection. Before you begin:
- Chemical-resistant rubber gloves — nitrile or heavy-duty household rubber. Cement is abrasive on skin, and acid solutions cause irritation on prolonged contact.
- Safety goggles — not just glasses. Splashes from spray bottles and cement chips flicked by a scraper can reach your eyes from unexpected angles.
- Ventilation — work with windows open or outdoors. Phosphoric acid produces mild fumes in enclosed spaces, and dried cement generates fine calcium dust when scraped.
- Dust mask (P2 rated) — useful when scraping larger dried deposits that generate airborne particles.
Budget your time realistically based on what you assessed in step one. Fresh cement that’s still within the first 24 hours typically cleans up in under 30 minutes per window. Dried deposits that have cured for a week or more will demand 1–2 hours of soaking and scraping cycles. Heavy contamination across multiple frames — the kind left behind after a full render job or major bricklaying project — can stretch into a full afternoon of repeated passes.
With your tools assembled and safety gear on, the temptation is to dive straight in on the worst spot. Resist that urge. A quick test on a hidden section of frame first confirms your chosen method won’t leave you with a bigger problem than a cement stain.
Step 3 — Test Your Method on a Hidden Area First
Every aluminium frame finish reacts slightly differently to chemicals, pressure, and abrasion. Even products labelled “aluminium safe” can behave unpredictably on aged anodizing, a specific powder coat colour, or frames that have already sustained minor surface wear. A two-minute test on a hidden patch eliminates the guesswork — and protects the visible surfaces you actually care about.
How to Choose a Test Spot
The ideal test location is somewhere you’ll never notice if things go wrong. Look for:
- The bottom edge of the frame behind a curtain or blind
- The inside face of an opening sash that sits against the frame when closed
- A section concealed by fly screen channels or hardware covers
- The very bottom corner of a fixed pane frame, close to the sill
Choose a spot roughly the size of a two-dollar coin. That’s enough surface area to see a clear reaction without risking a conspicuous area if the result isn’t what you expected.
Reading Your Test Results Correctly
Apply your chosen method to the test patch using the same technique you plan to use across the frame — same chemical, same concentration, same scraping tool and pressure. Follow the recommended dwell time exactly. Then rinse, dry, and inspect under good natural light.
- Clean the test spot with a damp microfibre cloth to remove loose dirt and cement dust.
- Apply the chemical agent (or begin your mechanical technique) on the small patch.
- Wait the full recommended dwell time — typically 5–15 minutes for phosphoric acid products, or 15–30 minutes for citric acid solutions.
- Rinse thoroughly with clean water and dry with a fresh cloth.
- Inspect the area at eye level and at an angle. Compare it to an untreated section of frame immediately beside it.
- Run your fingertip across the patch. It should feel identical in texture to the surrounding finish.
A successful test leaves the frame surface looking and feeling exactly as it did before — no colour shift, no texture change, no haze. The cement should show signs of softening, lifting, or dissolving.
A failed test is equally obvious if you know what to look for:
- On anodized aluminium — the metallic sheen dulls to a flat, chalky appearance. The surface may feel slightly rough or powdery where the oxide layer has been chemically attacked.
- On powder-coated aluminium — tiny bubbles form under the coating, the finish softens or becomes tacky, or the colour lightens noticeably in the treated area. In severe cases, the coating lifts or chips when touched.
- On raw mill-finish aluminium — white spots or dark staining appear where the unprotected metal has reacted with the acid. The surface may feel pitted or gritty underhand.
If your test fails, don’t repeat the same method hoping for a better outcome. Instead, step down in aggression: dilute the chemical further, halve the dwell time, or abandon chemicals entirely and rely on soaking with warm water followed by careful plastic scraping only. Switching to a citric acid product from a phosphoric one, or to plain white vinegar, reduces the reaction intensity considerably. For delicate anodized finishes — particularly older frames common in ensuite bedroom windows or internal shower design areas where moisture exposure has already thinned the oxide layer — mechanical-only removal with plenty of water is often the safest path.
Skipping this step might save five minutes. Repairing a visible patch of etched or discoloured aluminium — or replacing an entire frame — costs far more in time and money than a quick trial behind the curtain. With a clean test result confirmed, you’re ready to tackle the cement itself with confidence that your technique won’t trade one problem for another.
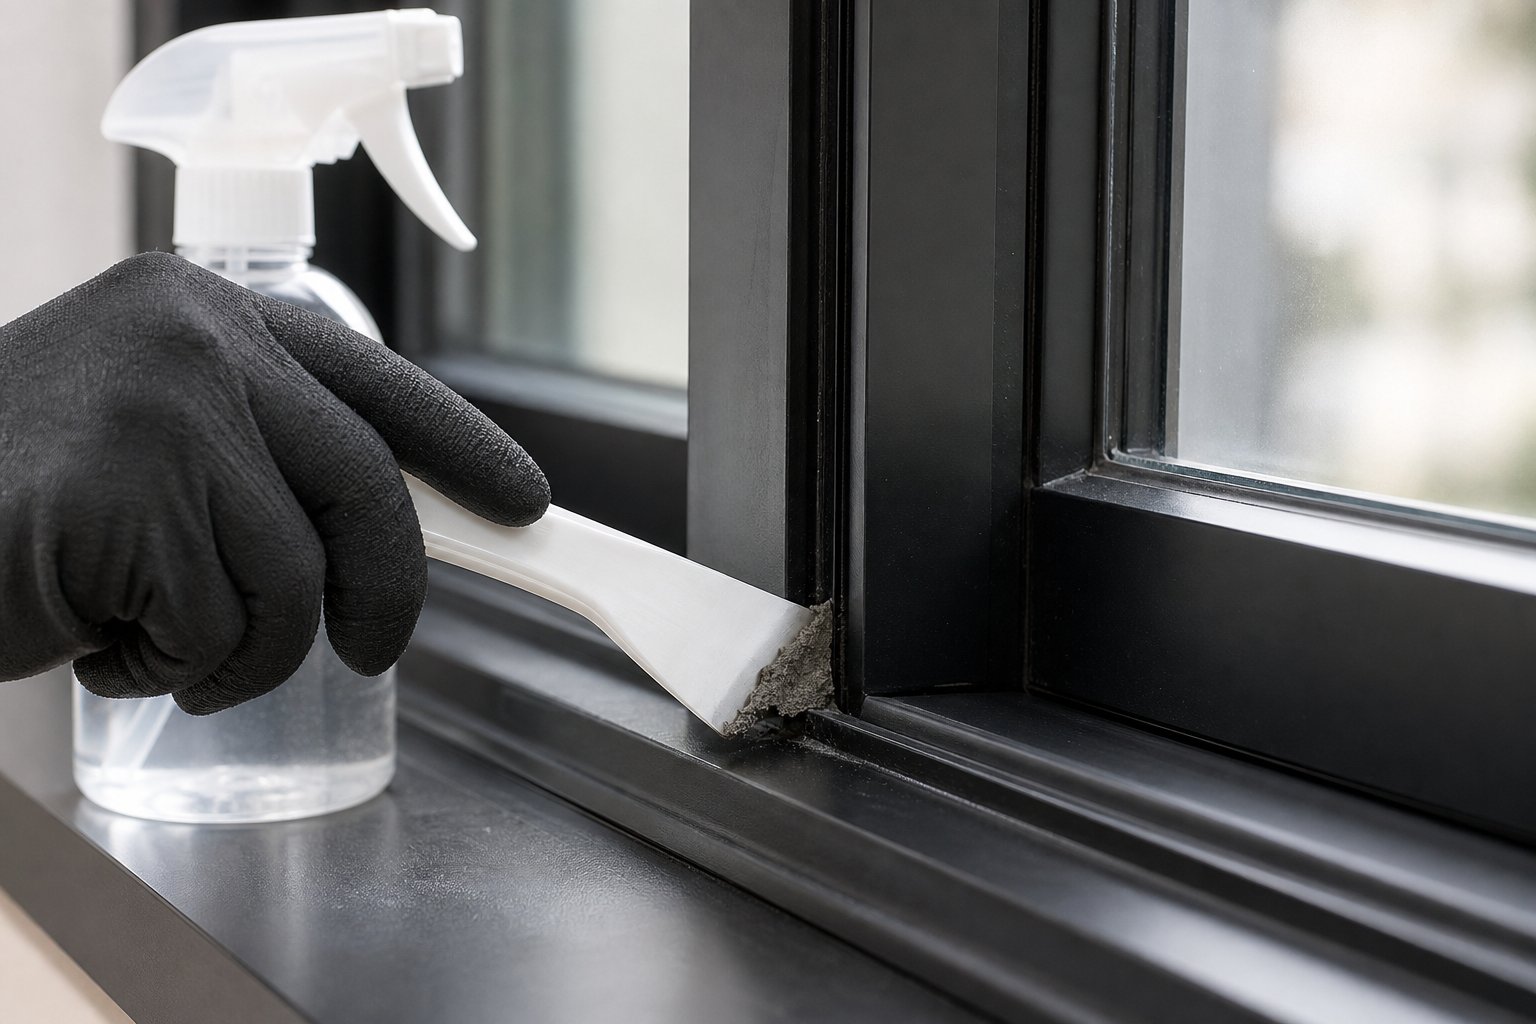
Step 4 — Remove Fresh or Wet Cement Immediately
A clean test result gives you the green light — but if the cement on your frames is still fresh, you may not need chemicals at all. Wet or recently applied cement (anything within roughly 24 to 48 hours) lifts off aluminium with surprisingly little effort because the calcium silicate bonds that make cured concrete so tenacious simply haven’t formed yet.
The Window of Opportunity for Easy Removal
Portland cement gains strength through hydration — a chemical reaction where tricalcium silicate reacts with water to produce calcium silicate hydrate crystals that lock together over time. During the first few hours, this crystalline network is barely established. The material remains soft, chalky, and only loosely bonded to the frame surface. Every hour that passes allows more crystals to form and interlock, tightening the grip on the aluminium beneath.
In practical terms, cement wiped away within the first two to three hours barely requires any pressure. By 12 hours, you’ll notice resistance. At 24 hours, a firm crust has developed. Beyond 48 hours, you’re dealing with a material that’s approaching structural hardness — and the job transitions from a quick wipe-down to a multi-step soak-and-scrape process. If you spot mortar splatter during a build, stop and clean it then. The five minutes spent immediately saves an hour or more later.
Technique for Lifting Wet Cement Safely
Fresh cement removal is straightforward, but working methodically prevents you from smearing residue into areas that were previously clean.
- Dampen the deposit — Mist the cement and surrounding frame with water from a spray bottle. This prevents dry particles from scratching the finish as you scrape and keeps the cement from bonding further.
- Scrape at a low angle — Hold your plastic scraper almost flat against the frame (under 30 degrees). Push gently beneath the cement to lift it away from the surface rather than grinding downward into the finish. Work from the edges of the deposit inward.
- Wipe with a damp microfibre cloth — After each pass of the scraper, wipe the loosened material off the frame immediately. Rinsing the cloth frequently stops gritty residue from being dragged across clean aluminium.
- Address channels and corners — Cement loves to settle in the narrow drainage channels along the frame sill and around handle hardware. Use a damp wooden craft stick or bamboo skewer to trace these grooves, dislodging any mortar that has pooled in the recess. A stiff nylon-bristled toothbrush works well for textured areas where a flat scraper can’t make full contact.
- Rinse the entire frame thoroughly — Flush the cleaned area with fresh water to carry away all dissolved calcium residue. Any alkaline film left behind can continue to react with the aluminium over days, potentially leaving a faint ghost stain even after the bulk material is gone.
- Dry and inspect — Wipe down with a clean, dry microfibre cloth and check under natural light for any spots you missed. Thin smears that looked invisible when wet often become visible once the frame dries.
For frames with multiple splatter spots — common after a day of bricklaying beside a window — work systematically from top to bottom so dirty rinse water doesn’t run over sections you’ve already cleaned. Around hinges and locking hardware, take extra care not to push wet cement deeper into mechanisms; angle your scraper to draw material outward rather than packing it in.
Caught early, fresh cement is genuinely a minor inconvenience rather than a restoration project. The real challenge begins when mortar has had days, weeks, or months to cure into rock-hard deposits that water alone won’t budge — a scenario that demands a different technique entirely.
Step 5 — Mechanical Removal of Dried Cement Deposits
Fully cured cement is a different beast. Where fresh mortar yielded to a damp cloth and gentle scraping, hardite deposits that have been sitting for weeks — or months — have developed the calcium silicate hydrate matrix that gives concrete its structural strength. You can’t muscle through this with a dry scraper. The approach shifts to a deliberate soak-and-scrape cycle that softens the bond before you ask your tools to do any lifting.
Soaking to Soften Cured Cement
Water alone won’t dissolve cured cement, but it does penetrate the porous surface and weaken the bond between the deposit and the aluminium beneath. Warm water accelerates this — temperatures around 60–80°C reduce cement paste viscosity by 40–60% compared to cold water, making the material significantly easier to dislodge mechanically.
Saturate the deposit thoroughly with warm water from a spray bottle. Don’t just mist it — you want the cement visibly wet and glistening, with water pooling around its edges. For thicker deposits (common after render work on a 3 story townhouse project or bricklaying near ground-floor windows), lay a soaked cloth or paper towel over the area to maintain contact rather than letting gravity pull the water away. Leave it for 30 to 60 minutes. Heavier or older deposits benefit from the full hour. Re-wet every 15 minutes if the cloth begins to dry.
This patience pays off. Cement that felt rock-hard before soaking will develop a softer, slightly chalky outer layer — that’s your signal to pick up the scraper.
Scraping Technique Without Scratching the Frame
The angle of your scraper matters more than the force behind it. Press too steeply and the blade digs into the finish. Hold it too flat and you can’t get beneath the deposit. The sweet spot sits right around 20–30 degrees from the frame surface.
Keep your plastic scraper at a shallow angle — under 30 degrees to the frame surface. This lets the edge slide beneath softened cement without biting into the powder coat or oxide layer. If you find yourself pushing hard, stop and soak longer. Force is a sign the cement needs more dwell time, not more pressure.
Work from the edges of the deposit inward, chipping small pieces away rather than trying to peel the entire mass in one pass. After each scraping pass, wipe loose material away with a damp microfibre cloth so you can see your progress clearly. For channelled sections of the frame — drainage slots, gasket grooves, and the recesses around hinges — switch to a wooden craft stick or bamboo skewer that fits the profile without wedging against the aluminium.
Nylon bristle brushes handle textured surfaces well. Where cement has spread thinly across a wide area (a common outcome on blocks of houses or townhouse projects where render overspray coats entire frame runs), a stiff nylon brush scrubbed in small circular motions lifts the softened residue without concentrating pressure on any single point. Rinse and re-wet the area between passes to keep particles from scratching as you work.
When Mechanical Methods Aren’t Enough
Some deposits simply refuse to budge after two or three soak-and-scrape cycles. This typically happens with cement that has cured for several months, mortar that was applied under direct sun (accelerating the hydration reaction), or thick splatter left behind during large-scale construction — duplex construction plans often involve extended bricklaying phases where frames accumulate layer upon layer of overspray before anyone notices.
If you’ve soaked for a full hour and scraped patiently with a plastic tool, yet a stubborn film or hard nodule remains bonded to the frame, you’ve reached the limit of what water and mechanical effort can achieve alone. Continuing to scrape harder or switching to a stiffer tool at this point risks gouging the finish — exactly the outcome you’ve been working to avoid.
This is the cue to introduce a chemical agent that dissolves the remaining calcium compounds without attacking the aluminium beneath. The transition from mechanical to chemical doesn’t mean the soaking was wasted; you’ve already removed the bulk material and reduced what remains to a thin, stubborn layer that a targeted acid application can handle quickly and safely.
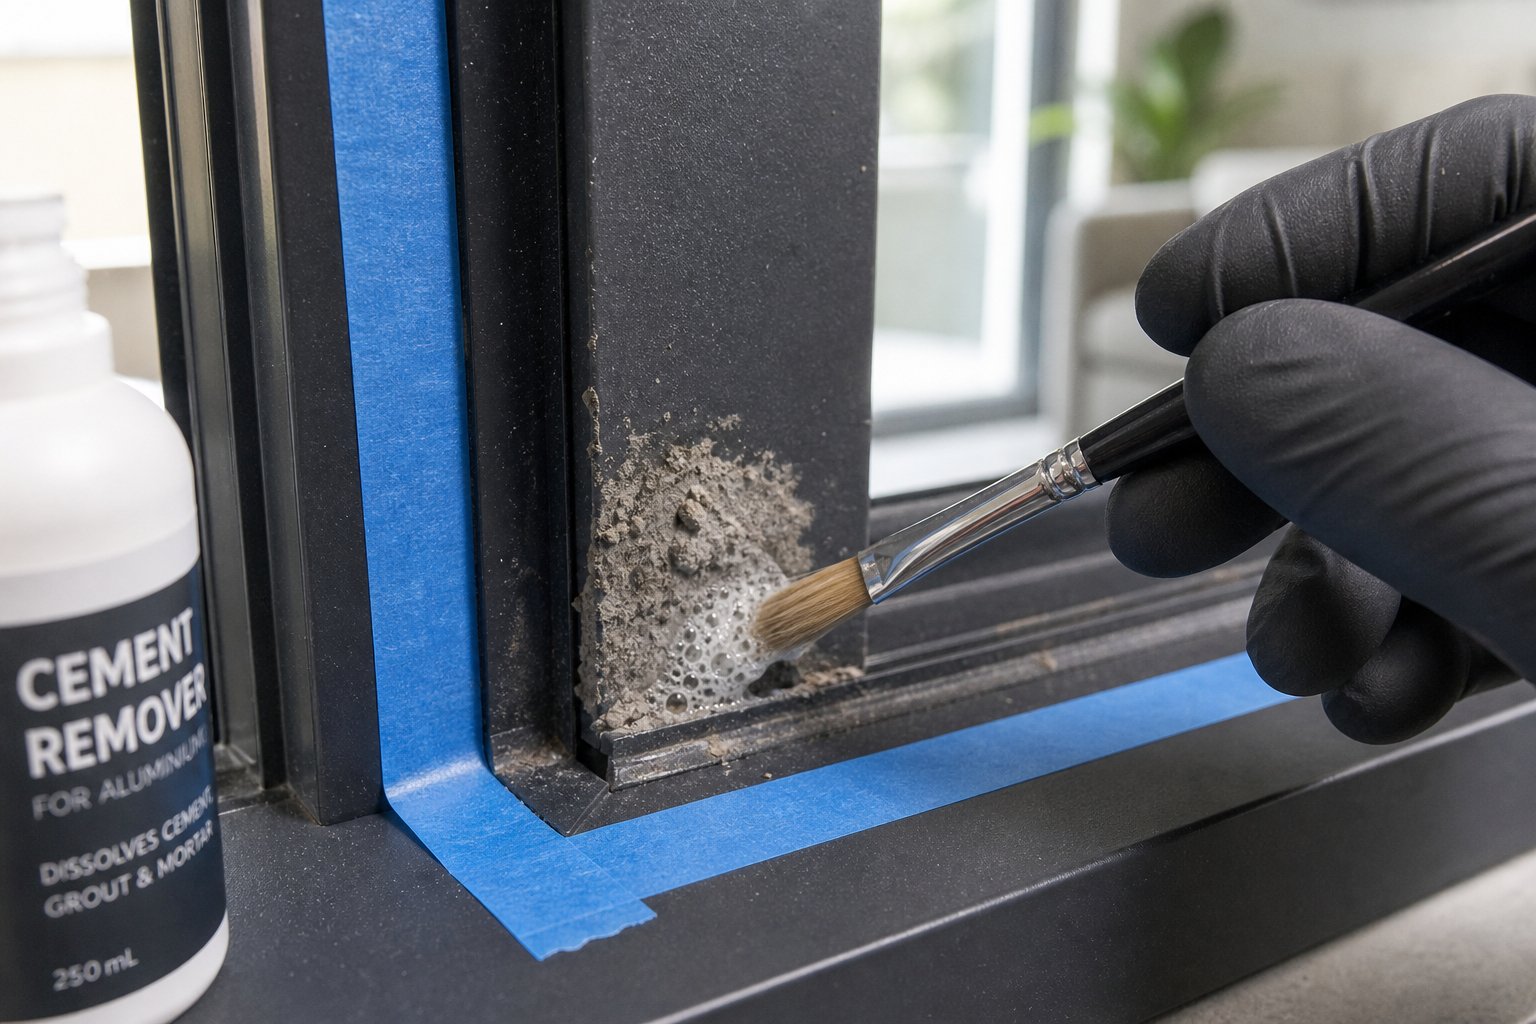
Step 6 — Chemical Removal for Stubborn Cured Cement
A thin film of cement still clinging to the frame after repeated soaking and scraping calls for chemistry rather than elbow grease. The trick is choosing an acid that targets the calcium compounds in cement while leaving the aluminium oxide layer — or powder coat — intact. Two options fit that brief. One does not.
Phosphoric Acid Method for Stubborn Deposits
Phosphoric acid dissolves calcium silicate hydrate (the binding compound in cured cement) through a controlled reaction that converts it into soluble calcium phosphate salts — easily rinsed away with water. Crucially, phosphoric acid does not aggressively attack the aluminium oxide layer at recommended dilutions, making it the strongest safe option for this job.
Here’s the application process:
- Protect surrounding areas — Mask any adjacent glass, rubber seals, or hardware with painter’s tape. Apply the product to the cement deposit only, not the entire frame.
- Apply the remover — Use a small brush or cotton bud to place the phosphoric acid solution directly onto the remaining cement. Avoid flooding the surface; precision keeps acid off clean aluminium.
- Allow dwell time — Leave the product in contact with the deposit for 5 to 15 minutes, depending on concentration and the manufacturer’s directions. You’ll see the cement start to fizz slightly as calcium compounds dissolve.
- Agitate with a nylon brush — After the dwell period, scrub the softened residue using a stiff nylon bristle brush. Work in small circular motions to lift dissolved material without spreading it onto clean frame surfaces.
- Rinse thoroughly — Flush the area with generous amounts of clean water. Any acid residue left behind continues reacting — even slowly — and can eventually dull the finish over time.
- Neutralise — Wipe the cleaned area with a cloth dampened in a mild baking soda solution (one tablespoon per litre of water). This neutralises any trace acidity trapped in frame grooves or gasket channels, stopping the reaction completely.
Most phosphoric acid cement removers sold in Australian hardware stores come pre-diluted at around 10–20% concentration. If you’re working with a concentrated product, dilute to no more than 20% for aluminium work — stronger concentrations speed the reaction but narrow the safety margin. Always confirm the product label states it’s suitable for use on aluminium or non-ferrous metals.
Citric Acid as a Gentler Alternative
Citric acid works on the same principle — dissolving calcium compounds — but reacts more slowly and with less intensity. It’s a sensible choice for thinner residue films, for delicate anodized finishes, or for anyone uncomfortable handling stronger acid products around their home.
Mix citric acid powder (available at supermarkets as a natural descaler) at roughly 50–100 grams per litre of warm water. Apply to the cement deposit, allow 15 to 30 minutes of dwell time, then agitate and rinse as described above. You may need two or three applications for thicker patches — citric acid’s gentleness comes at the cost of speed. The trade-off is worthwhile on frames in strata apartments or multi-unit buildings where the consequences of finish damage extend beyond your own property. In strata complexes — where shared façades mean what happens to one frame affects the entire building’s appearance — a cautious approach avoids disputes and potential involvement of strata unit underwriters if insurance claims arise from surface damage.
Chemical Comparison: Know What You’re Working With
| Factor | Phosphoric Acid | Citric Acid | Hydrochloric (Muriatic) Acid |
|---|---|---|---|
| Safety for aluminium | High — does not attack the oxide layer at ≤20% concentration | High — extremely mild on metals | Destructive — dissolves aluminium itself |
| Cement dissolution strength | Strong — effective on fully cured deposits | Moderate — best for thin films and partial residue | Very strong — dissolves cement rapidly |
| Recommended use case | Stubborn cured cement on powder-coated or anodized frames | Light residue, delicate finishes, strata properties | Brick, concrete paths, tiles — never aluminium |
| Risk level | Low when diluted correctly and rinsed | Very low | Extreme — causes irreversible pitting and blackening |
The chemistry behind that extreme risk rating is straightforward. Hydrochloric acid reacts directly with aluminium metal (2Al + 6HCl → 2AlCl₃ + 3H₂↑), dissolving both the protective oxide layer and the base metal beneath it. The reaction produces hydrogen gas and aluminium chloride, leaving pitted, corroded metal that no amount of polishing can restore. This isn’t a matter of concentration or dwell time — even brief contact causes visible damage. It’s the single most common mistake homeowners make when tackling cement on window frames, often because the product was already in the shed from a path-cleaning job.
When to Call a Professional
DIY chemical removal handles the vast majority of cement contamination on residential aluminium frames. But certain situations warrant professional intervention:
- The cement has been in place for years and has already etched into the anodized layer — removal at this stage may expose damage that requires professional re-finishing or frame replacement.
- Large-scale contamination across many frames — full render overspray on a multi-storey building, for instance, where safe scaffold access and industrial-grade equipment make the job faster and lower-risk than DIY.
- You’ve failed two patch tests — if both phosphoric and citric acid options show signs of finish damage in your hidden test area, the frame surface may already be compromised. A window restoration specialist can assess whether remediation is possible or whether replacement is the more cost-effective path.
- Strata or body corporate requirements apply — some strata schemes require licensed contractors for external maintenance on shared façades. Check your by-laws before starting work that’s visible from common property.
Whether you’ve dissolved the last trace of cement yourself or handed the job to a specialist, the frame surface that emerges will likely look slightly different from its untouched neighbours — a faint dullness, minor residue haze, or simply the contrast between a freshly cleaned section and years of accumulated grime. Bringing that surface back to a uniform finish is a separate step, and it’s one that protects the frame against future contamination just as much as it restores its appearance.
Step 7 — Restore Polish and Protect the Aluminium Surface
Cement is gone, but the frame probably doesn’t look quite right yet. Even careful removal — whether mechanical, chemical, or both — tends to leave behind a faint residue haze, slight dullness where the finish was agitated, or a noticeable contrast between the cleaned area and the rest of the frame that hasn’t been touched in years. This is normal. Restoration brings everything back to a uniform appearance and, just as importantly, adds a protective layer that makes future contamination far easier to deal with.
Post-Removal Cleaning and Residue Check
Before applying any polish or sealant, the frame needs to be genuinely clean — not just cement-free, but free of chemical residue, fine calcium dust, and any alkaline film left behind from the cement’s reaction with the surface.
Mix a small amount of mild dish detergent (a few drops per litre) into warm water. Using a fresh microfibre cloth, wash the entire frame — not just the areas where cement was removed. This accomplishes two things: it removes any trace of phosphoric or citric acid from earlier steps, and it brings the whole frame to the same baseline so you can accurately assess the condition of the finish.
Rinse with clean water, then dry completely with a separate dry microfibre cloth. Water spots on aluminium are cosmetic but annoying, particularly on darker powder-coated finishes where they show up as faint white marks once dried.
Inspect the frame under natural light at several angles. Run your fingertips over the cleaned sections. You’re checking for:
- Residue haze — a white or grey film that indicates incomplete rinsing of the acid product or dissolved cement salts still clinging to the surface
- Texture changes — roughness where the finish may have been lightly etched or where scraping removed a microscopic layer of coating
- Colour variation — cleaned areas that appear lighter or more vibrant than adjacent untreated sections (this usually just means the rest of the frame needs the same wash)
If residue haze persists, a second wash with the baking soda solution mentioned in the previous step (one tablespoon per litre of water) neutralises any remaining acidity and lifts stubborn mineral films. Rinse and dry again before moving on.
Polishing and Protecting Your Frame Finish
The products you reach for next depend entirely on which finish type you identified back in step one. Powder-coated aluminium, anodized aluminium, and raw mill-finish each respond to different care.
Powder-coated frames — These respond well to a thin application of high-quality automotive wax, which restores sheen and deposits a hydrophobic barrier that repels water, dust, and future cement splatter. Apply the wax with a soft cloth in gentle circular motions, allow it to haze, then buff lightly. Avoid cutting compounds, abrasive polishes, or anything marketed as a “rubbing compound” — these contain micro-abrasives designed to level clear coat on cars, and they’ll dull a powder-coated finish rather than enhance it. For frames that have lost their lustre through UV exposure or chalking over time, a dedicated powder coat restorer product (available at automotive detailing suppliers) can revive colour depth without removing material.
Anodized aluminium — The hard oxide layer that gives anodized frames their distinctive metallic sheen can be restored using clear protective coatings purpose-built for the task. Products such as Everbrite protective coating seal the oxide layer, restore colour depth on faded or chalky surfaces, and guard against salt corrosion — particularly relevant for coastal properties where salt-air exposure accelerates anodized surface degradation. Apply with a solvent-rated brush or foam applicator in thin, even passes and allow 15–40 minutes to dry to touch.
Raw mill-finish aluminium — Without a factory-applied coating, bare aluminium relies on its natural oxide layer for protection. A metal polish designed for aluminium (not chrome or steel) removes surface oxidation and restores brightness. Follow with a clear protective sealant to slow re-oxidation. These frames benefit most from regular maintenance because they lack the engineered durability that coated frames provide.
That durability difference is worth noting. Premium powder-coated aluminium window systems engineered with multi-layer finishes resist cement staining more effectively in the first place — the denser, harder coating surface gives mortar fewer points of adhesion, and the bond that does form breaks away more cleanly during removal. Frames specified with quality powder coat also restore more easily after construction exposure, returning to their original colour and texture with minimal intervention. For anyone planning a renovation or new build in an area where ongoing construction activity is likely, the finish quality specified at the outset directly reduces how much restoration work you’ll face down the track.
Maintenance Product Checklist
- Mild dish detergent (for general washing)
- Baking soda (for neutralising acid residue)
- High-quality automotive wax (for powder-coated frames)
- Clear protective sealant such as Everbrite or ProtectaClear (for anodized frames)
- Aluminium metal polish (for raw mill-finish frames)
- Microfibre cloths — at least three: one for washing, one for drying, one for buffing
- Soft foam applicator pads (for even wax or sealant distribution)
Once the frame is polished and sealed, the surface becomes significantly less hospitable to future contaminants. Wax and sealant layers create a sacrificial barrier — if cement does land on the frame again, it bonds to the wax layer rather than the finish itself, making subsequent clean-ups faster and virtually risk-free. A maintenance wash every few months with soapy water and a re-wax once or twice a year keeps that barrier effective year-round.
Restoration brings the frame back to where it should be. But if you’re about to start another round of construction work — or you’d simply rather not repeat this entire process — a few minutes of prevention before the next trade arrives is worth far more than the best polish afterwards.

Preventing Cement Damage During Future Renovations
A polished, sealed frame is satisfying — but repeating a multi-hour cement removal process every time a tradie works near your windows is not. Prevention takes a fraction of the time and eliminates the risk entirely. Whether you’re managing a single bathroom tiling job or overseeing a full external render across a double-storey home, a few minutes of preparation before wet trades begin keeps your aluminium frames untouched.
Masking and Covering Frames Before Construction
The principle is simple: create a physical barrier between the cement source and the frame surface. What you use and how thoroughly you apply it depends on the scale of work.
For small jobs — a tiler grouting a splashback, a bricklayer repointing a single wall — painter’s tape along the frame edges closest to the work area is often sufficient. Use a quality low-tack masking tape that won’t leave adhesive residue when removed. Press the edges down firmly so mortar can’t wick beneath the tape line.
For larger projects — full renders, extensive bricklaying, concrete pours near ground-floor windows — tape alone won’t cut it. Combine it with plastic sheeting secured over the entire window opening, or use a purpose-designed window protection film with low-tack adhesive that peels off cleanly after the job. These films adhere directly to both glass and frame surfaces, blocking splatter, dust, and render overspray from making contact at all.
Australian builders working across major residential projects — from apartment developments in big cities like Sydney and Melbourne through to suburban estates in Brisbane and Perth — increasingly treat window protection as a standard site practice rather than an afterthought. As surface protection specialists recommend for Australian sites, protection should be applied the moment glazing goes in and remain in place until final handover.
Here’s a pre-construction window protection checklist to follow before any wet trade starts work:
- Clean frames and glass with a non-abrasive cleaner so protection products adhere properly — dirt trapped beneath film or tape causes scratches.
- Apply low-tack painter’s tape along all exposed frame edges, pressing firmly into corners and around hardware.
- Cover the full window opening with plastic sheeting or self-adhesive protection film, ensuring no gaps at edges or joints.
- Seal the bottom frame channel and drainage slots with tape to prevent wet mortar pooling in tracks.
- For multi-storey work, extend protection to frames on lower levels where render or concrete can drip or splash from above.
- Inspect protection weekly on longer projects — replace any torn, peeling, or UV-degraded film before it fails.
- Remove all protection promptly once wet trades are complete. Film left on too long (particularly in direct sun) can bake adhesive residue onto the surface.
Timing matters. Apply protection before bricklaying, rendering, tiling, concrete pouring, plastering, or any activity that generates wet calcium-based material. If scaffolding is going up for external work, protect every window the scaffold passes — tradies moving materials overhead create splatter patterns you won’t predict.
Choosing Low-Maintenance Frames for Future Projects
Prevention isn’t only about masking. The frame system you specify at the design stage fundamentally changes how much maintenance you’ll face across the building’s life.
Quality powder-coated aluminium window systems resist cement adhesion better than bargain alternatives for a measurable reason: denser, harder coating surfaces provide fewer microscopic anchor points for mortar to grip. When cement does make contact — and on any active construction site, some contact is inevitable — it releases more easily during cleaning and causes less underlying damage. The finish bounces back to its original state with basic washing rather than the intensive restoration process described in earlier steps.
For homeowners and builders planning renovations or new constructions, specifying durable aluminium window systems with advanced powder-coated finishes pays dividends long after the build wraps up. Systems engineered for Australian weather performance — UV resistance, coastal salt-air durability, and thermal stability — inherently handle incidental construction exposure with minimal consequence. The combination of robust hardware, quality coatings, and precision manufacturing (available across residential, apartment, and commercial configurations) means these frames forgive the occasional cement splash far more gracefully than budget alternatives with thinner, softer finishes.
It’s a decision that compounds over time. A building’s windows face decades of maintenance cycles — cleaning, potential renovation work next door, repainting of adjacent surfaces, and general weathering. Frames that shrug off contaminants from day one reduce cumulative maintenance hours significantly. For anyone building across Australian cities by population density — from high-rise apartments in Sydney’s CBD to suburban family homes in Adelaide’s outer ring — the specification choice made at tender stage echoes through every year of ownership.
Pair quality frames with the habit of masking before construction, and you’ll likely never need to repeat this cement removal process again.
Frequently Asked Questions About Removing Cement From Aluminium Window Frames
1. What is the safest chemical to remove cement from aluminium window frames?
Phosphoric acid-based cement removers are the safest strong option for aluminium frames. They dissolve calcium compounds in cured cement without attacking the aluminium oxide layer or powder-coated finish when used at concentrations of 20% or less. Citric acid offers a gentler alternative for thinner residue or delicate anodized finishes, though it requires longer dwell times of 15 to 30 minutes and may need multiple applications. Both are widely available at Australian hardware stores. Never use hydrochloric or muriatic acid, as it reacts directly with aluminium metal, causing irreversible pitting and blackening within minutes of contact.
2. Can vinegar remove cement from aluminium frames?
White vinegar (acetic acid at roughly pH 2.5) can soften thin cement residue and light mortar haze on aluminium frames when applied undiluted and left for 10 to 15 minutes. It works best on recently dried splatter that hasn’t fully cured or on residual films left after mechanical scraping. For thick, fully cured cement deposits that have been in place for weeks or months, vinegar alone is unlikely to dissolve the calcium silicate bonds effectively. In those cases, step up to a phosphoric acid-based remover for stronger dissolution while still maintaining safety for the aluminium surface.
3. Will a razor blade or metal scraper damage aluminium window frames?
Yes. Metal scrapers, razor blades, wire brushes, and steel wool will scratch or gouge aluminium window frames regardless of their finish type. On powder-coated frames, a metal edge cuts through the coating and exposes bare metal to moisture and corrosion. On anodized frames, it scores the hard oxide layer permanently. Use plastic scrapers, wooden craft sticks, or nylon bristle brushes instead. These tools are softer than the frame finish, allowing you to lift cement without damaging the surface beneath. Always hold your scraper at a shallow angle under 30 degrees to further reduce the risk of finish damage.
4. How do I remove dried cement from powder-coated aluminium windows?
Start by soaking the dried cement with warm water for 30 to 60 minutes using a saturated cloth held against the deposit. Once the outer layer softens, use a plastic scraper at a shallow angle to chip away loosened material in small passes. Wipe residue between passes with a damp microfibre cloth. If a stubborn film remains after two or three soak-and-scrape cycles, apply a phosphoric acid-based cement remover directly to the deposit for 5 to 15 minutes, then agitate with a nylon brush and rinse thoroughly. Finish by neutralising with a mild baking soda solution and applying automotive wax to restore the powder coat’s sheen and add a protective barrier against future contamination.
5. How can I prevent cement from sticking to my aluminium window frames during construction?
Apply low-tack painter’s tape along all exposed frame edges before wet trades begin, then cover the full window opening with plastic sheeting or self-adhesive protection film. Seal bottom drainage channels with tape to prevent mortar pooling. For larger projects involving rendering, bricklaying, or concrete work, keep protection in place until all wet trades are complete and inspect it weekly on longer builds. Choosing premium aluminium window systems with durable powder-coated finishes at the specification stage also helps, as denser coatings provide fewer microscopic anchor points for cement and release mortar more easily if contact does occur.
More Window & Door Guides