Assess Whether You Need Full Frame or Sash-Only Removal
Before you pick up a pry bar, the first question worth answering is this: does the entire frame need to come out, or can you get away with removing just the sash? Getting this wrong means either doing unnecessary demolition or, worse, bolting a shiny new sash into a frame that is already failing.
Full Frame Removal vs Sash-Only Removal
Old aluminium windows installed in Australian homes from the 1970s through the early 1990s are often candidates for full frame removal. Decades of UV exposure, coastal salt air, and thermal cycling take their toll. If your old aluminium window frames still sit square, operate smoothly, and show no visible corrosion or seal failure, a sash-only swap can save time and money. The existing frame stays in place and a new sash or glazed unit slots in.
Full frame replacement becomes the smarter path when the frame itself is the problem. Corroded tracks, warped profiles, and degraded weatherseals all compromise the performance of any new glass you install. A structurally sound frame is essential for long-term sealing and thermal efficiency — installing fresh glazing into a compromised frame simply pushes the problem forward.
Look for these signs that full frame removal is necessary:
- Visible white or grey powdery corrosion (oxidation) on the aluminium profiles
- Frame distortion — the sash no longer slides freely or locks securely
- Failed or hardened weatherseals that allow drafts and water ingress
- Single-glazed units that cannot accept modern double-glazed IGUs without a frame change
- Persistent condensation between the frame and the wall, suggesting concealed moisture damage
How to Identify Structural vs Non-Structural Elements
This is where many DIYers run into trouble. Not every vertical bar in a window assembly is the same. A mullion that functions as a structural post carries load from the header above and transfers it down to the sill or structure below. Cutting or removing it can compromise the opening. Non-structural mullions, by contrast, are simply dividers between sashes — they bolt to the head and sill of the frame and can be unbolted safely.
A quick way to tell the difference: structural posts are typically thicker, often fixed directly into the brickwork or timber stud at top and bottom, and may have a steel reinforcement inside. Non-structural mullions are usually the same slim profile as the rest of the frame and are mechanically joined with screws or crimps. If you are unsure, consult your local council’s building records or have a builder inspect the opening before you start cutting. Misidentifying a load-bearing element can crack lintels, shift brickwork, or create a genuine safety hazard.
With a clear picture of what needs to come out — and what must stay — you can gather the right tools and approach the job with confidence rather than guesswork.
Tools and Materials Checklist for Aluminium Frame Removal
Having the right gear laid out before you start makes window frame removal far smoother — and far less likely to damage the surrounding wall. Scrambling for a missing tool mid-job, with a half-detached frame hanging in the opening, is a recipe for cracked render and sore language. Gather everything on this list first, and you will move through each step without interruption.
Essential Cutting and Prying Tools
Aluminium is relatively soft compared to steel, but old frames are anchored with screws, sealant, and sometimes nailing fins that all need different approaches. Here is what to have on hand for how to remove a window frame cleanly:
- Reciprocating saw with a metal-cutting blade — the fastest way to cut through nailing fins, corroded screws, or frame sections that refuse to budge. Choose a bi-metal blade with 18-24 teeth per inch (TPI) for aluminium.
- Oscillating multi-tool with a scraper and cutting blade — ideal for slicing through old sealant in tight spaces where a reciprocating saw cannot reach, particularly between the frame flange and the wall cladding.
- Utility knife with fresh blades — used to score caulk lines, cut weatherseals, and separate paint skins before prying. Swap blades often; a dull knife requires more force and slips more easily.
- Flat pry bar (300 mm to 450 mm) — your primary lever for easing the frame away from the rough opening once fasteners are removed. The flat profile spreads force and minimises gouging.
- Putty knife or stiff scraper — gets behind glazing beads, pops off screw caps, and helps peel old sealant without scratching surrounding surfaces.
- Cold chisel and hammer — useful for breaking through stubborn mortar packing around frames set into brick or masonry, common in older Australian brick veneer homes.
- Screwdriver set (Phillips and flat head) — many aluminium frames use a mix of screw types for fixing into jambs and sill plates.
If you do not own a reciprocating saw, a hacksaw with a bi-metal blade rated for metal cutting will handle the same tasks — it just takes longer and more elbow grease. Similarly, a sharp wood chisel can stand in for a cold chisel on lighter sealant work, though it will dull faster against masonry.
Safety Gear and Workspace Supplies
Cutting and prying aluminium throws off sharp slivers, fine dust, and noise. Protect yourself and the surrounding space with these essentials:
- Safety glasses or goggles — non-negotiable when cutting metal or prying old frames; aluminium shavings are thin and travel fast.
- Heavy-duty work gloves — cut-resistant gloves are best, since raw aluminium edges can slice skin easily.
- Dust mask (P2 rated) — especially important in older homes where decades of accumulated dust or potential lead paint may be disturbed during removal.
- Hearing protection — reciprocating saws and oscillating tools are loud in enclosed rooms; foam ear plugs or over-ear muffs keep noise to safe levels.
- Drop cloths — lay canvas or heavy plastic over flooring and furniture near the window to catch debris and old sealant.
- Painter’s tape — mask off wall edges, skirting boards, and sills adjacent to the frame to protect painted or rendered surfaces from tool scrapes.
- Plastic sheeting — drape over exterior landscaping below the window to catch falling debris and simplify clean-up outside.
- Heavy-duty garbage bags or a small skip bag — aluminium frames, broken glass, and old sealant add up quickly. Have disposal ready so the work area stays clear.
With your tools checked off and your workspace protected, you are set to move into the preparation steps that keep both you and the building safe throughout the removal process.
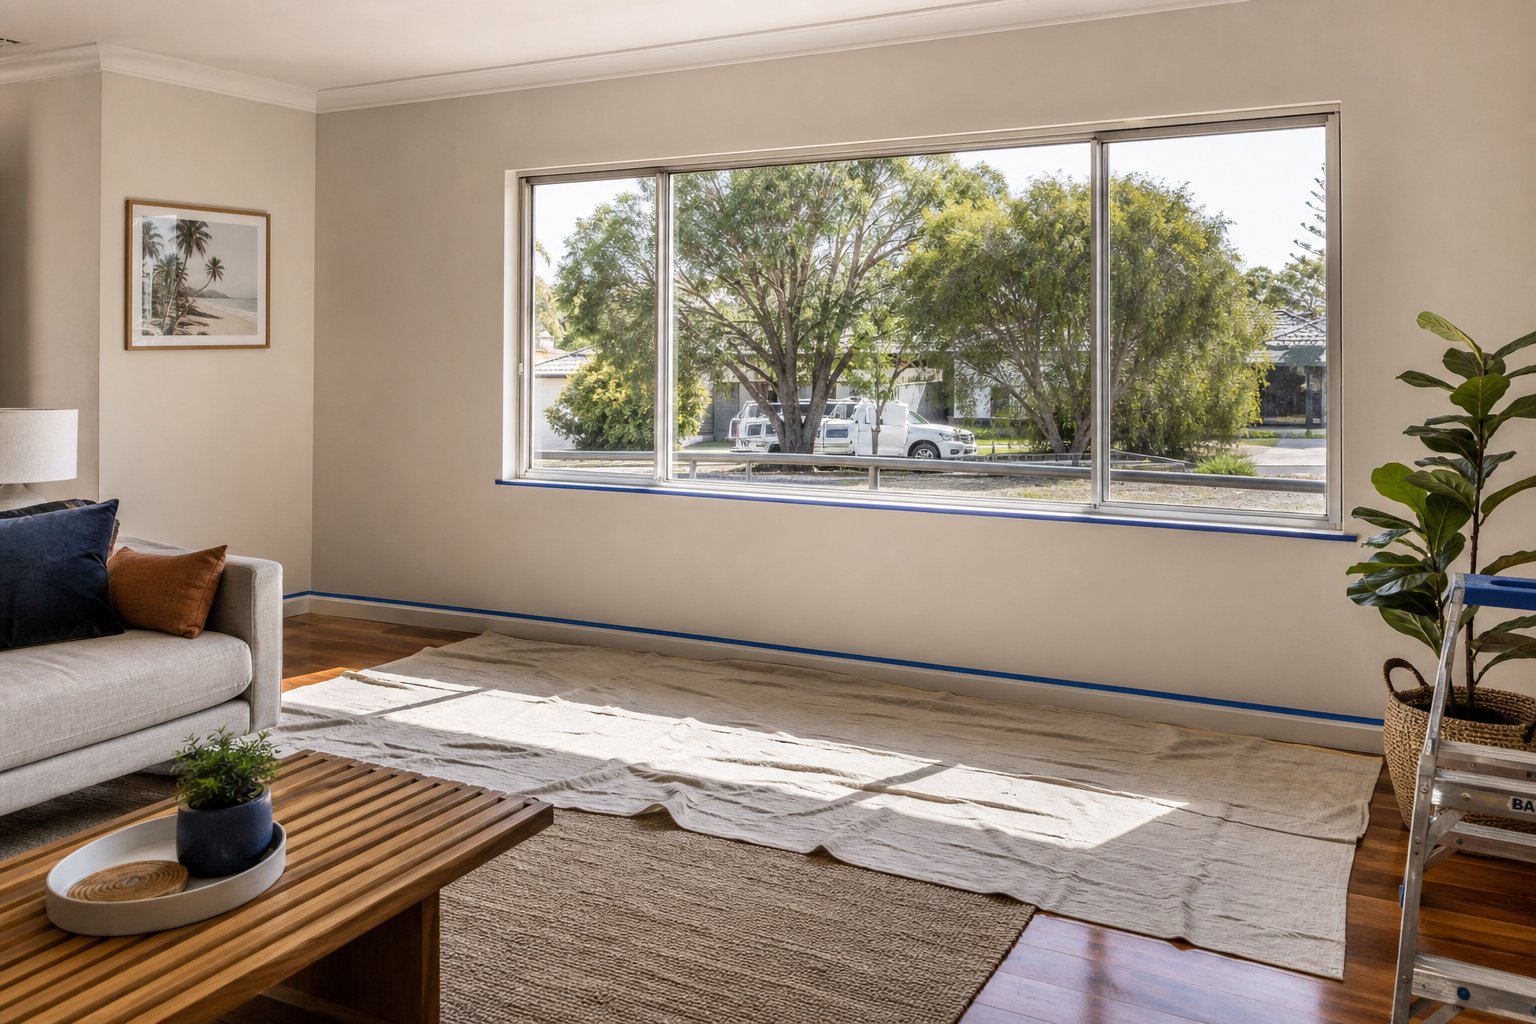
Step 1 – Prepare the Work Area and Ensure Safety
Pulling an aluminium frame out of a wall generates debris, dust, and noise — none of which are kind to carpet, furniture, or freshly painted trim. Spending fifteen minutes on preparation now prevents hours of repair later.
Protect Interior and Exterior Surfaces
Start inside the room. Remove all window treatments — blinds, curtains, pelmets, and their mounting hardware. If you need to take off window bars or security grilles, unbolt them from the frame or wall anchors and set them aside before touching the frame itself. Pull furniture back at least 1.5 metres from the window to give yourself working room and keep upholstery clear of aluminium shavings.
Lay canvas drop cloths over the floor directly beneath the window and tape them to the skirting board with painter’s tape so they stay put as you move around. For carpet, doubling up with a sheet of heavy cardboard underneath offers extra protection from dropped tools.
Outside, drape plastic sheeting over garden beds, pavers, or any outdoor furniture sitting below the opening. Old sealant, screws, and frame offcuts will fall — catching them on plastic makes clean-up a two-minute job instead of a weekend scavenger hunt through mulch.
Asbestos warning: Homes built before the mid-1980s in Australia may contain asbestos in window surrounds, fibre cement cladding, eaves linings, or the putty-like compounds used around older frames. Disturbing these materials can release harmful fibres. You cannot reliably identify asbestos by sight — if your home dates from this era, have a licensed assessor test the surrounding materials before you begin any removal work. Do not sand, scrape, or drill suspect surfaces.
Check for Electrical Connections and Permit Requirements
Many Australian homes have reed switches or alarm sensor contacts wired into window frames. Before you learn how to remove a window frame from the inside the hard way — by triggering a siren at 7 a.m. — deactivate your alarm system and disconnect any sensor wiring at the frame. If the wiring ties into a monitored security system, let your provider know in advance so they do not dispatch a response.
Check the frame edges for low-voltage cabling as well. Some older homes have intercom wiring or even phone lines routed through the window cavity.
On the permit side, most Australian councils do not require approval for a like-for-like window replacement where the opening size, type, and location stay the same. Changing the opening dimensions, adding a new window where none existed, or altering structural elements typically triggers a development application (DA) or at minimum a complying development certificate (CDC). If you are simply learning how to remove the window and fit a same-sized replacement into the existing opening, you are generally fine — but check with your local council before cutting anything structural, especially in heritage overlay zones.
With the room cleared, surfaces protected, electrics sorted, and compliance confirmed, the real hands-on work begins: getting the glass out of the frame safely.
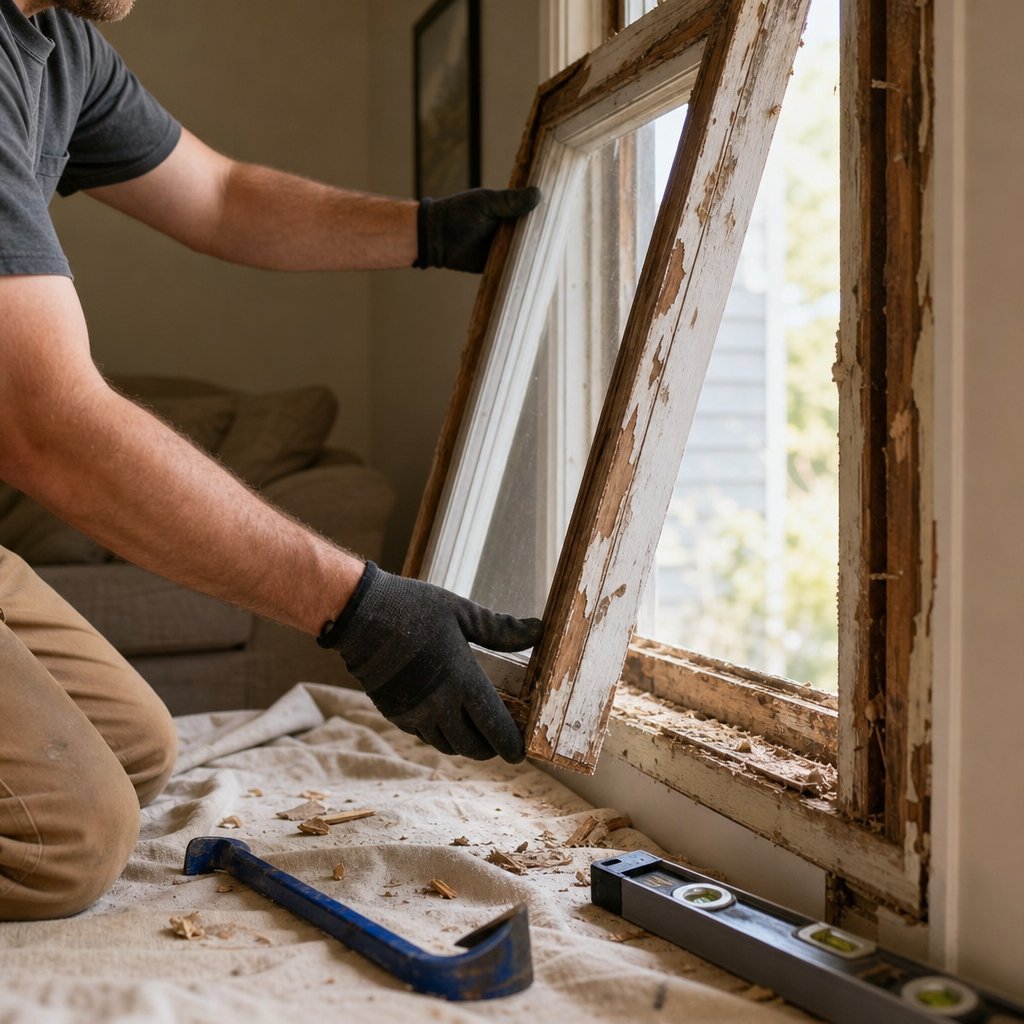
Step 2 – Remove the Glass Sash or Panel from the Frame
Lighter frame, less resistance, less risk of cracking surrounding walls — removing the glass sash or panel first makes the frame itself far easier to detach later. The technique depends entirely on the window type, so identify what you are working with before reaching for a tool.
Safety note: Before attempting to lift or pry any sash, score along every visible caulk or paint line where glass meets aluminium with a sharp utility knife. Old sealant bonds glass to frame over decades, and trying to force a pane free without breaking that bond first can flex the glass enough to crack it. A clean score line releases the tension safely.
Removing Sliding Window Sashes
Sliding aluminium windows are the most common type in Australian homes built from the 1970s onward, and fortunately they are also the simplest to remove. Here is how to remove a sliding window sash without drama:
- Check for anti-lift blocks. Run your finger along the inside of the top head track. Some frames have small plastic or metal blocks screwed into the track to prevent the sash being lifted out accidentally. If present, unscrew and remove them first — skipping this step is the most common reason a sash refuses to budge.
- Unlatch the window handle so the sash can slide freely.
- Grip both sides of the sash firmly and lift it straight up into the head track. This creates clearance at the bottom.
- Swing the bottom of the sash inward toward you, angling it away from the sill track.
- Lower and remove. Once the base clears the sill, bring the sash inside and lay it flat on a padded drop cloth.
If your window has two sliding sashes, remove the interior panel first — it sits in the inner track and comes out without obstruction. The exterior sash follows the same lift-and-tilt process once the inner one is gone.
Removing Casement, Awning, and Fixed Panes
Casement and awning windows hinge open rather than slide, so the removal sequence is different. To remove a window from the frame on a hinged type:
- Crank or push the sash fully open to expose the operator arm and hinge hardware.
- Disconnect the operator arm at the sash end. On most aluminium awning and casement windows, the arm attaches via a retaining clip or split-arm shoe at the bottom rail — slide the clip back with a putty knife or flathead screwdriver to release it.
- Remove the hinge screws or pry the hinge arms off their pivot pins on both sides. Support the sash weight as you release the final hinge — it will come free suddenly.
- Lift the sash clear and set it down on a stable, padded surface.
Fixed windows have no moving parts, which means the glass is held in place by a rubber gasket or a snap-in aluminium glazing bead running around the perimeter. Use a stiff putty knife to pry the glazing bead out of its channel, starting at one corner and working around. Once the bead is removed, the glass panel can be pushed or carefully pulled from the frame. Suction cups rated for the pane weight make handling fixed panels significantly safer — they give you controlled grip instead of relying on friction against smooth glass.
For any pane wider than 600 mm, have a second person ready to share the weight. Large glass is not just heavy; it flexes under its own load and can crack if tilted at the wrong angle by a single pair of hands. A helper at the opposite edge keeps the pane stable and your fingers out of harm’s way.
With all glazing removed, the bare aluminium frame is exposed and ready for the next phase — locating and releasing the fixings that anchor it to the wall.
Step 3 – Detach and Remove the Aluminium Frame
The bare frame sitting in the opening is now just aluminium, fixings, and decades of sealant holding it against the rough opening. How you detach it depends on how it was installed — and Australian homes use several different methods depending on the wall type and the era of construction. Getting the sequence right here is what separates a clean removal from a damaged reveal.
Start on the exterior side. Run a sharp utility knife along the full perimeter where the frame meets the wall cladding, cutting through the old caulk or paint seal. Score a line between the old aluminium frame and the wall surface on the interior as well — this breaks the bond on both sides and minimises tearing of plaster or drywall when you begin prying. Go deep with the blade; surface-level scoring will not release a sealant joint that has cured for twenty or thirty years.
Locate and Remove Frame Fixings
Aluminium window frames in Australia are typically secured by one of two methods, and identifying which yours uses determines how to take out a window frame without wrecking the surrounding wall.
Screw-fixed frames are the most common in older retrofit installations and timber-framed walls. The screws run through the frame jambs (the vertical sides) and sometimes through the head and sill, directly into the timber studs or packing behind. Look for them in these locations:
- Inside the sash track — once the sliding sash is removed, exposed screw heads or filled screw holes become visible along the jamb channel.
- Under plastic or aluminium screw caps snapped into countersunk holes along the frame face.
- Behind removable track inserts or weatherpile strips that conceal the fixings.
Pop the caps off with a putty knife, then remove each screw with the appropriate driver. If any screws spin without backing out (a sign the anchor behind has deteriorated), leave them for now — you will deal with stubborn fasteners in the next step.
Fin-nailed frames (also called flange-mounted or nailing-fin frames) are standard in newer construction where the window was installed before the cladding went on. A thin aluminium flange extends around the perimeter of the frame and sits flat against the wall wrap or sheathing, nailed or screwed through into the timber framing. The cladding — brick veneer, fibre cement sheet, or weatherboard — then covers the flange, hiding it completely.
Do not try to pry a fin-nailed frame out by force. The flange is trapped behind the cladding and will buckle, tearing the surrounding material with it. Instead, use a reciprocating saw or oscillating multi-tool fitted with a metal-cutting blade to slice through the nailing fin between the frame and the wall framing. Work the blade flat against the rough opening, cutting the fin flush. Once severed on all four sides, the frame lifts out freely.
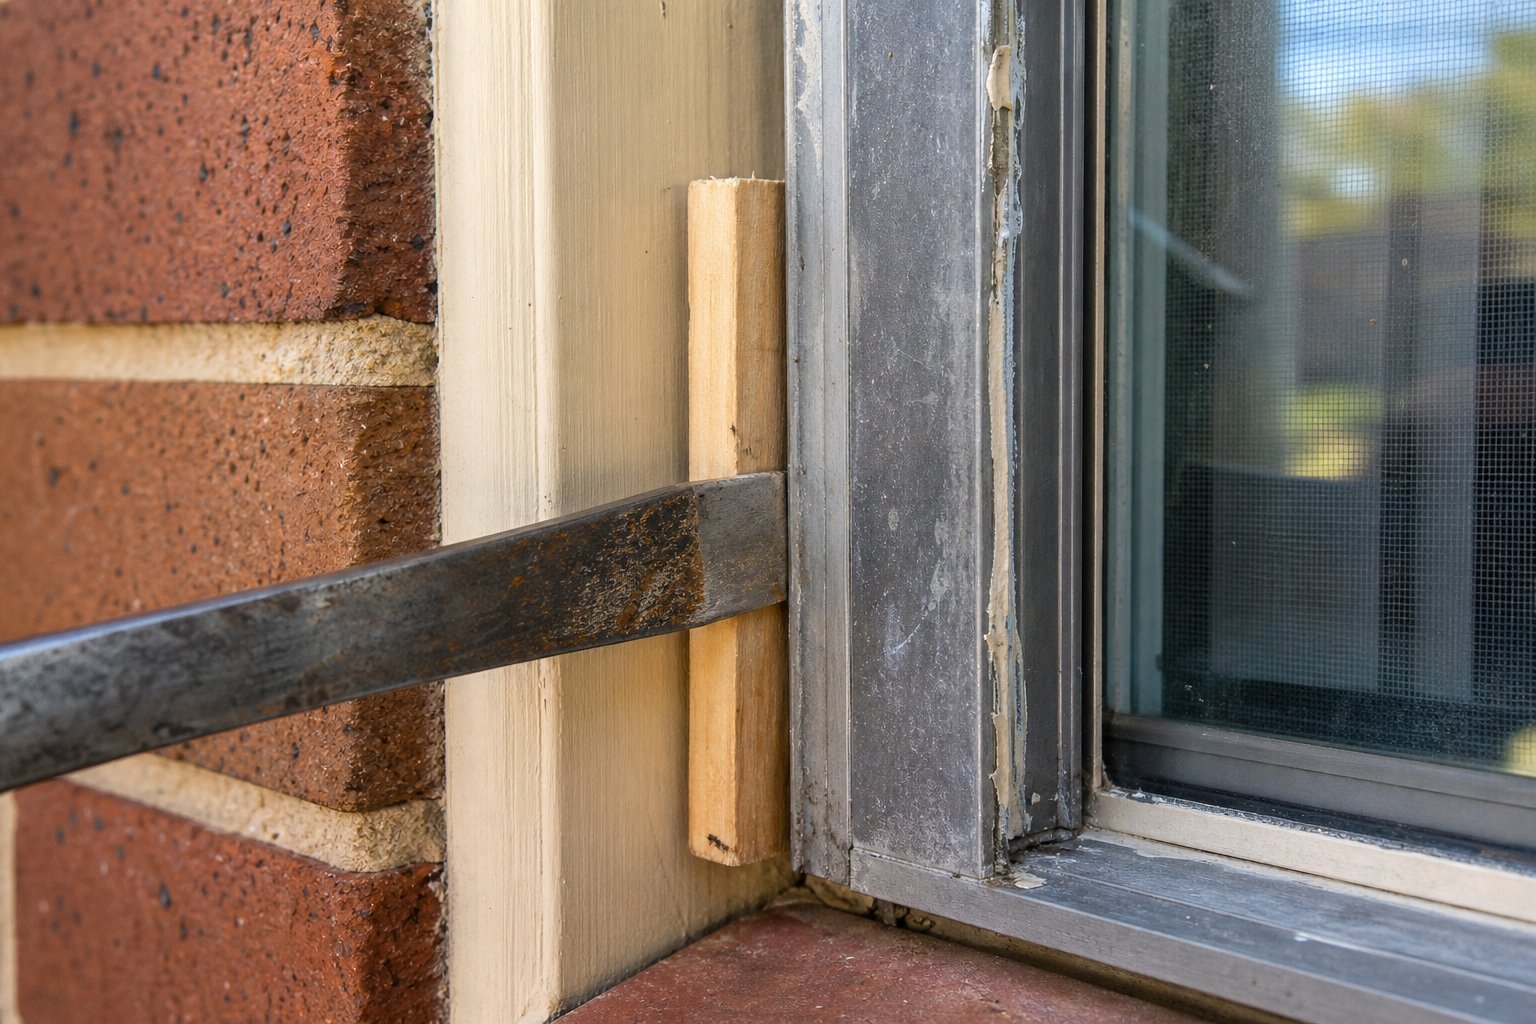
Lever the Frame Away from the Rough Opening
With all fixings removed (or fins cut), the frame should be loose — but sealant residue, friction, and years of paint will still hold it in place. Here is how to remove a window cleanly at this stage:
- Position a flat pry bar at the sill corner where the frame meets the rough opening. Place a thin offcut of timber or a plastic shim behind the bar to protect the reveal surface.
- Apply gentle, even pressure to lever the sill away from the framing at the centre. You only need 10–15 mm of separation to confirm the frame is free.
- Work progressively around the perimeter — sill to jamb to head to opposite jamb — easing each section out by small increments rather than yanking one side hard.
- Once the frame stands clear of the opening on all sides, tilt it inward (or outward, depending on access) and lift it out. Have your helper support the opposite end if the frame is wider than about 1200 mm.
A few wall-type specifics worth noting for Australian homes:
- Brick veneer or double brick: Frames may be secured with expansion bolts (Dynabolts) driven into the masonry rather than screws into timber. These require a socket wrench or nut spinner to remove. If the bolt will not turn, cut it flush with an angle grinder or reciprocating saw and leave the anchor embedded — it will sit behind the new frame.
- Rendered or stucco walls: A stucco return (a thin lip of render that wraps onto the frame face) locks the frame in place. Score the render deeply with a utility knife or oscillating tool along the frame edge before prying. Trying to lever through an unscored stucco return will crack the render well beyond the frame line.
- Timber-clad walls (weatherboard or fibre cement): The cladding often overlaps the frame flange by 10–20 mm. You may need to pry the bottom edge of the overlapping board away slightly or remove a course of cladding to expose and cut the fin beneath.
Once the frame clears the opening, set it aside on a flat surface — you will deal with disposal later. What matters now is the condition of what is left behind. Corroded screws, seized bolts, and decades of bonded sealant do not always cooperate with the clean process described above, so the next section tackles those real-world complications head on.
Step 4 – Troubleshoot Stuck Frames and Corroded Fasteners
Textbook removal is rare on an old aluminum window that has sat in a coastal or high-UV environment for thirty-plus years. Screws seize, sealant bonds to masonry like concrete, and paint layers turn the frame into one solid mass with the wall. Brute force at this point is tempting — and almost always the wrong call. Aggressive prying on a corroded frame transfers shock into the surrounding render or plaster, cracking it well beyond the work zone. Controlled cuts and patient chemical softening produce better results with far less collateral damage.
Dealing with Corroded or Stripped Fasteners
Aluminium oxidation around steel screws is the most common headache when you try to remove an old window frame. Galvanic corrosion locks the steel fastener to the aluminium, and the screw head often strips the moment you apply torque. Here is a reliable sequence to work through it:
- Apply penetrating oil — spray a quality penetrant (CRC, Inox MX3, or similar) directly into the screw recess and around the screw shaft where it enters the frame. Let it soak for at least 15 minutes. For heavily corroded fixings, a second application after 30 minutes improves your odds significantly.
- Attempt removal with firm, steady pressure. Use a screwdriver that fits snugly in the recess — a loose fit accelerates stripping. A rubber band placed over the screw head can add just enough traction to grip a partially stripped slot.
- If the head strips completely, switch to a screw extractor bit. Drill a small pilot hole into the centre of the damaged screw head using a metal-rated drill bit at low speed, then seat the extractor bit and run the drill in reverse. The extractor’s tapered, left-hand threads bite into the pilot hole and back the screw out.
- If the extractor cannot grip (common when the screw is deeply corroded into the substrate), drill the head off entirely. Use a bit slightly wider than the screw shaft and drill just deep enough to remove the head. The frame will then lift free of the headless shaft, which can be gripped with locking pliers and twisted out later — or simply left embedded if it sits below the surface of the rough opening.
A word on patience: each failed attempt at a corroded screw makes the next attempt harder because you are removing material the extractor needs to grab. If the first method does not work after two solid tries, move directly to drilling the head off rather than rounding the recess further.
Breaking Free Frames Sealed with Old Caulk or Paint
Decades-old silicone or polyurethane sealant does not peel away the way fresh caulk does — it essentially becomes a structural adhesive between the aluminium frame and the wall. Multiple paint coats compound the problem, creating a continuous skin that bonds frame to render, timber reveal, or brick.
The approach is methodical rather than forceful:
- Score both sides. Use a sharp utility knife to cut deeply along the joint between frame and wall on the interior and exterior. One pass is not enough on old silicone; make three or four firm passes in the same line to sever through the full depth of the sealant bead. Silicone caulk forms an extremely strong bond with metal surfaces over time, and surface scoring alone will not release it.
- Apply a chemical caulk remover into the scored line. Products designed for silicone breakdown (available at most hardware stores) soften cured sealant over two to three hours. Plan this step first thing in the morning so you can proceed with physical removal after lunch.
- Use an oscillating multi-tool with a rigid scraper blade to slice between the frame flange and the wall. A scraper blade applied at a low angle lets the oscillating motion shear through hardened sealant without gouging the wall surface beneath. Work slowly around the full perimeter — the vibration breaks the adhesive bond incrementally, which is far safer than levering against it.
- For paint-sealed frames, score the paint skin with the utility knife first, then follow with the oscillating scraper. Trying to pry through an unbroken paint film will tear chunks of render or plaster off the wall rather than releasing the frame cleanly.
Frames bonded into stucco or brick present the toughest scenario. The sealant has essentially fused the aluminium to the masonry texture, and no amount of prying will separate them without cracking the render. The oscillating multi-tool earns its keep here — fitted with a bi-metal cutting blade, it can slice through the sealant layer right at the interface, vibrating it loose millimetre by millimetre. Keep the blade flat against the frame back and let the tool do the work; forcing it risks blade breakage or a gouge in the masonry.
Below is a quick-reference table covering the five most common stuck-frame problems and how to resolve them:
| Problem | Cause | Solution | Tool Needed |
|---|---|---|---|
| Screw heads strip when turning | Galvanic corrosion between steel screw and aluminium frame | Apply penetrating oil, wait 15 min, then use a screw extractor bit in reverse | Penetrating oil, screw extractor bit, drill |
| Frame will not separate from rendered wall | Decades-old silicone or polyurethane bonded to textured render | Score both sides deeply, apply caulk remover, then shear with oscillating scraper blade | Utility knife, caulk remover, oscillating multi-tool with scraper blade |
| Paint skin holds frame to reveal | Multiple paint coats bridging the frame-to-wall joint | Score paint film on interior and exterior before any prying; follow with oscillating tool | Utility knife, oscillating multi-tool |
| Expansion bolt seized in masonry | Corrosion and calcium build-up locking the bolt in brick | Cut bolt flush with frame using reciprocating saw; leave anchor in masonry | Reciprocating saw with metal-cutting blade |
| Nailing fin trapped behind cladding | Fin was fixed before cladding was applied during original construction | Slide reciprocating saw or oscillating cutting blade between fin and framing to sever | Reciprocating saw or oscillating multi-tool with bi-metal blade |
The common thread across all of these scenarios: controlled cutting beats brute-force prying every time. A stuck frame that you slice free methodically leaves the rough opening intact and ready for a clean replacement fit. One that you lever and wrench at leaves you with cracked plaster, chipped brickwork, and a repair bill that makes the whole DIY exercise feel pointless.
With the frame finally clear of the opening — stubborn fasteners and all — the exposed rough opening tells the real story of what lies beneath: timber condition, moisture damage, and whether the cavity is square enough to receive a new window without remedial work.
Step 5 – Clean the Opening and Measure for Your Replacement Window
The old frame is out, and the rough opening is staring back at you — probably looking rougher than you expected. Remnants of old sealant, embedded fastener shanks, dust, and possibly some suspect-looking timber are all part of the scene. What you do in this step directly determines whether your new window fits perfectly or fights you on installation day. Rushing through clean-up and measurement is the single most common reason DIY window replacements end up with air gaps, water ingress, and warranty headaches down the track.
Inspect and Repair the Rough Opening
Grab a putty knife, a stiff wire brush, and a good torch (even in daylight, the cavity shadows hide problems). Work through the opening systematically:
- Remove old sealant residue. Scrape hardened silicone and caulk from the reveal faces using a stiff putty knife or oscillating tool with a scraper blade. On timber reveals, work with the grain to avoid gouging. On masonry, a wire brush clears britite silicone remnants without damaging the brick face.
- Pull remaining fasteners. Any screw shanks left from the drilling-out process in Step 4 should be gripped with locking pliers and twisted free. Expansion bolt sleeves embedded in masonry can stay if they sit flush or below the surface — they will not interfere with the new frame. Anything protruding beyond the reveal face needs to be cut flush or extracted so the new frame sits flat.
- Check timber reveals for rot and moisture damage. Press a screwdriver tip firmly into the timber at the sill corners and along the bottom 100 mm of each jamb — these are the areas most exposed to condensation run-off from old single-glazed aluminium windows. Soft, discoloured, or crumbly timber means moisture has been wicking in for years. Minor surface softness (less than 3–4 mm deep) can be treated with a timber hardener and allowed to cure before the new window goes in. Anything deeper — particularly at the sill — warrants cutting back to solid timber and sistering in a new section or replacing the sill plate entirely.
- Inspect masonry openings for cracking. In brick veneer or double-brick walls, check the lintel above the opening for rust staining, sagging, or cracked mortar joints. Examine the brick courses on either side of the opening for stepped cracks that suggest movement. These are structural issues that need a builder’s attention before you install a replacement window on top of them.
- Vacuum and wipe clean. Run a shop vac around the full perimeter of the opening to remove debris, dust, and old weatherseal fragments. A clean surface is essential for the new window’s sealant and flashing to bond properly.
Water damage around old aluminium frames is more common than most homeowners expect, particularly in coastal areas where salt air accelerates corrosion and moisture finds every gap in degraded weatherseals. Discovering rot at this stage is actually good news — it means you will fix it before the new window conceals it again for another thirty years.
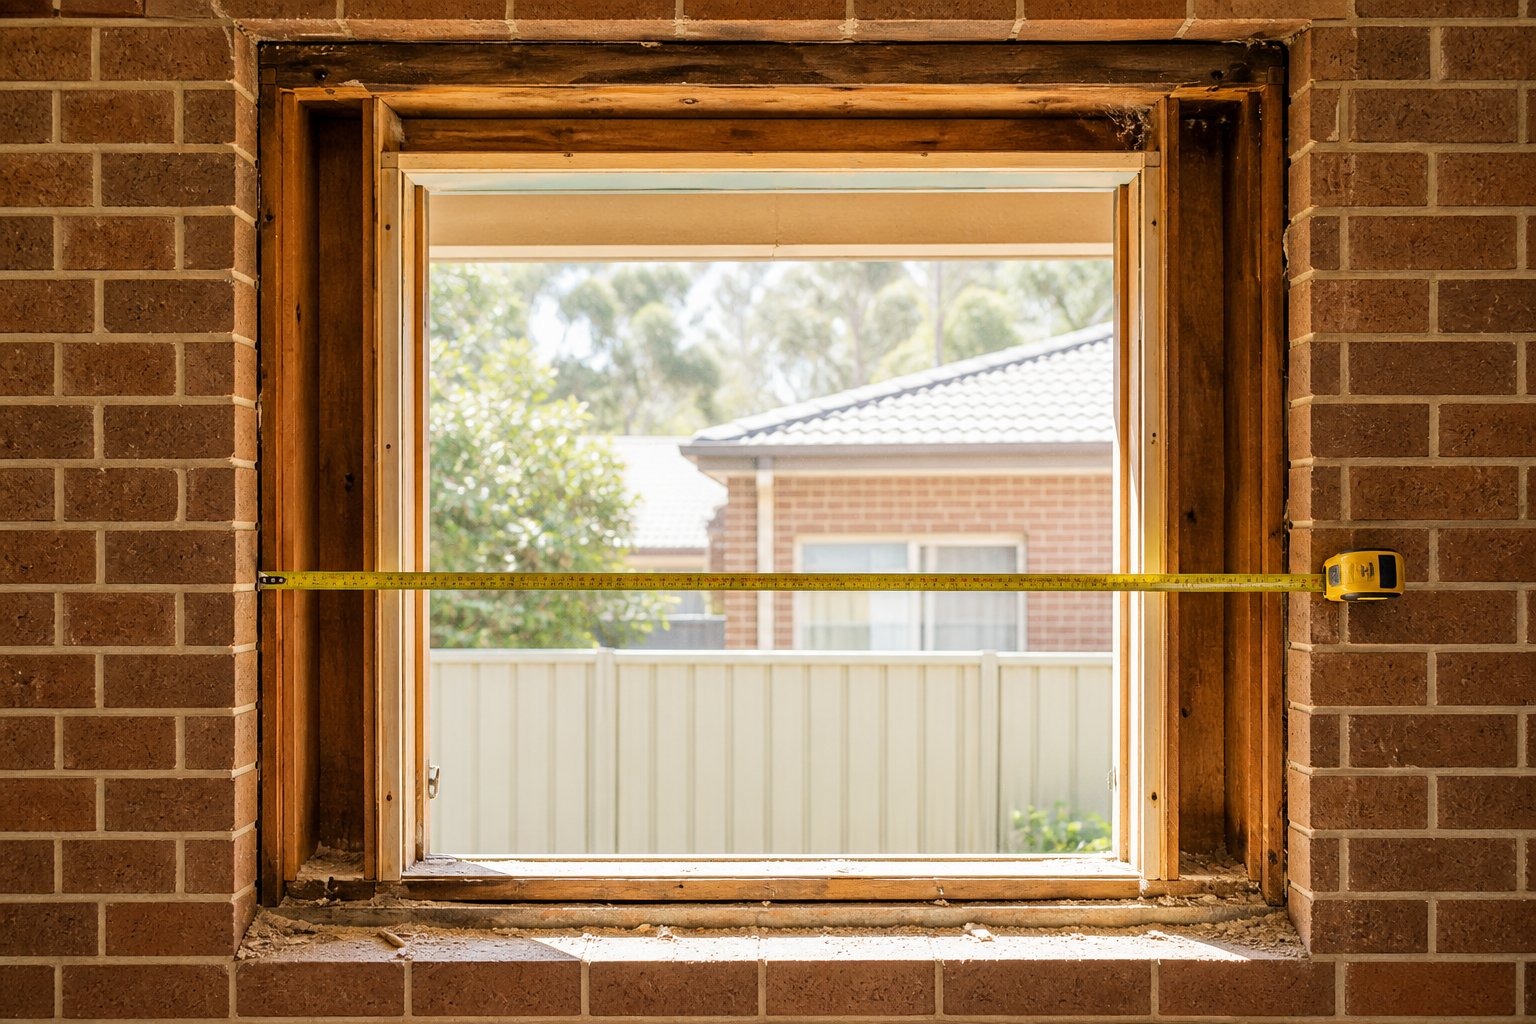
Measure Accurately for Your Replacement Window
Accurate measurement of the prepared rough opening is what separates a window that slides into place with uniform gaps from one that arrives too large to fit or too small to seal. The technique is straightforward but unforgiving — even a few millimetres of error can mean reordering or relying on excessive packing to compensate.
Here is the method used by professional installers to measure a window rough opening correctly:
Width — measure jamb to jamb at three points:
- Near the top of the opening (about 50 mm below the head)
- At the centre
- Near the bottom (about 50 mm above the sill)
Height — measure sill to head at three points:
- Near the left jamb (about 50 mm in from the edge)
- At the centre
- Near the right jamb (about 50 mm in from the edge)
Record all six figures. The smallest width and the smallest height are the dimensions you use when ordering your replacement window. Using the smallest measurement guarantees the new unit will physically fit into the opening even at its narrowest point — the remaining gaps get packed with shims and sealed during installation.
Check for square: Measure both diagonals of the opening — top-left corner to bottom-right, then top-right corner to bottom-left. If the two figures match within 3 mm, the opening is square enough for a standard installation. A discrepancy greater than 3 mm means the opening has racked over time (common in older timber-framed homes that have settled). Shimming can correct minor racking during installation, but significant out-of-square conditions may require the rough opening to be re-framed or packed before the new window is ordered.
Also measure the depth of the reveal — the distance from the interior wall face to the exterior face. This dictates whether the new frame can sit flush with the interior, flush with the exterior, or somewhere in between, and it affects trim and flashing details.
These measurements become the specification your replacement window is built to. Getting them wrong means delays, return freight costs, and potentially a second attempt at the entire process. For homeowners who have successfully completed the removal but want certainty on the specification side, professional window suppliers like MEICHEN offer drawing review, custom sizing, and dedicated measuring services — you submit your rough opening dimensions and they handle system selection, engineering support, and manufacturing coordination to ensure the replacement unit matches your prepared opening precisely. It bridges the gap between a confident DIY removal and a professionally specified replacement without guessing at off-the-shelf sizes that may not suit Australian conditions or your particular wall build-up.
With the opening cleaned, inspected, and measured to the millimetre, the physical removal work is complete. What remains is dealing responsibly with the old frame materials — and recognising the scenarios where stepping back and calling in a professional is the smartest move you can make.
Step 6 – Dispose of Old Frames and Know When to Call a Pro
Your old aluminium frame is out, your opening is measured, and a pile of metal, glass shards, and dried sealant is sitting on a drop cloth. Tossing it all into the general waste bin is tempting — but it is also wasteful, potentially illegal depending on your council area, and overlooks the fact that aluminium is one of the most valuable materials in the recycling stream. Meanwhile, some homeowners reach this stage only to discover problems that turn a confident DIY job into a situation requiring professional intervention. Knowing which path applies to you saves both money and risk.
Recycle Aluminium Frames Responsibly
Aluminium is infinitely recyclable without any loss of quality, and recycling it requires roughly 95 per cent less energy than producing new aluminium from raw bauxite ore. Old window frames are classified as non-ferrous scrap metal — they hold real value at recycling centres and scrap metal yards across Australia. Rather than filling landfill space, a single aluminium window frame re-enters the supply chain and gets turned into new extrusions, building products, or consumer goods.
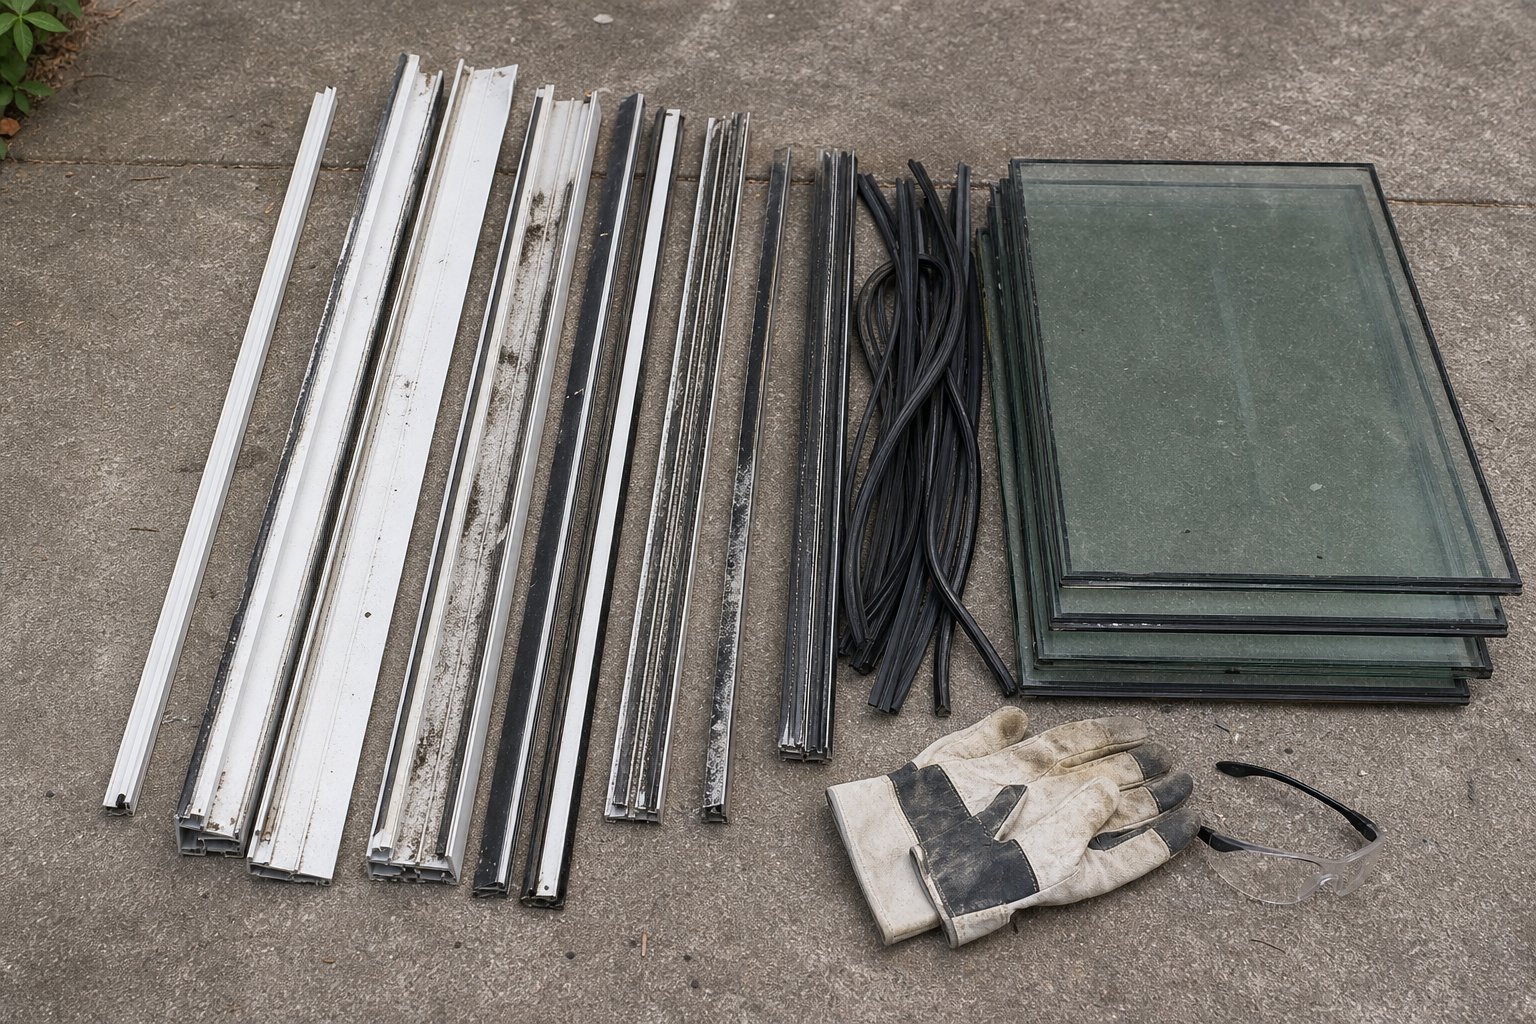
Before you load the frames into your vehicle, separate the materials to maximise their recycling value and meet facility requirements:
- Remove rubber gaskets and weatherseals. Pull or pry the rubber strips from the frame channels. These are non-recyclable with the metal and should go into general waste.
- Tap out retained glass. Lay the frame flat on a padded surface and gently tap any remaining glass panes free using a rubber mallet. Wear heavy gloves and safety glasses — small shards cling to dried sealant. Collect glass separately; many recyclers will not accept metal contaminated with glass fragments.
- Remove screws, brackets, and hardware. Steel screws mixed into an aluminium load downgrade its value because facilities must separate ferrous from non-ferrous material. A few minutes with a screwdriver keeps your aluminium clean and gets you the premium rate rather than a mixed-load discount.
- Scrape off thick sealant residue. A small amount of old caulk is acceptable at most yards, but large chunks of silicone or polyurethane attached to the frame add contamination weight. A quick pass with a putty knife is enough.
Most scrap metal recyclers in Australian metro areas accept aluminium window frames for cash payment by weight. Call ahead to confirm their current buy price — non-ferrous aluminium rates fluctuate with commodity markets but typically sit well above steel. Some recyclers offer free drop-off for small quantities even if the weight does not warrant a cash payout.
For the glass, check your local council’s waste guidelines. Many councils accept flat glass at their transfer stations or tip shops, though it usually cannot go in the kerbside recycling bin (bottle and container glass is a different composition). Construction and demolition debris — including sealant scrapings, old weatherseals, and broken fixings — generally falls under your council’s building waste or hard rubbish rules. Some councils allow small quantities in general waste; others require a trip to the transfer station or a booked hard rubbish collection. A quick check of your council’s website clarifies what is accepted and avoids potential fines for incorrect disposal.
When to Call a Professional Instead
Completing the frame removal yourself is satisfying and saves on labour costs. But there are situations where stopping the DIY process and bringing in qualified trades is the genuinely smart decision — not a failure, but a recognition that the job has moved beyond window removal into structural or safety territory.
Call in a professional if you encounter any of the following red flags:
- Structural concerns around the opening — if the window shares a wall with a load-bearing element, or if the lintel above the opening shows signs of rust, sagging, or cracking, a licensed structural engineer needs to assess the situation before anything else is disturbed. Walls that carry load from above can cause ceiling deflection, uneven floors, and cracked plaster if their support system is compromised — issues that sometimes take months to fully reveal themselves.
- Rot or termite damage in the timber reveal — minor surface softness is repairable, but if your screwdriver sinks deep into the jamb or sill framing, or you find active termite galleries, the structural timber needs replacement before a new window can be installed safely. This is carpentry work that directly affects how the new frame is supported.
- Frames larger than one person can safely manage — full-width lounge room windows, stacker doors, and corner window assemblies can weigh well over 50 kg once you include the frame and any remaining hardware. Trying to wrestle these out of an opening solo risks dropping the frame onto your toes, damaging the reveal, or losing control on a ladder.
- Multi-storey removal requiring scaffolding or elevated work platforms — working at height changes the risk profile entirely. Australian work health and safety regulations treat falls from above 2 metres as a serious hazard. If the window sits on an upper storey and cannot be accessed safely from inside the room, scaffolding or a cherry picker is required — and operating that equipment without training is both illegal and dangerous.
- Asbestos confirmed in surrounding materials — if your pre-work testing (mentioned in Step 1) returned a positive result for asbestos in the window surrounds, cladding, or cavity, a licensed asbestos removalist must handle the work. No exceptions.
- Heritage-listed property constraints — some heritage overlays in Australian councils require specific methods, materials, or even retention of original window frames. A heritage consultant or council-approved builder can navigate the approval process and ensure compliance.
Recognising these scenarios early saves time and prevents compounding problems. A structural deficiency hidden behind an old frame is not something you want to discover halfway through installing a new window — it is far cheaper and safer to resolve before the replacement arrives.
For homeowners who reach this point and decide professional help is the right path — whether for structural remediation, complex multi-storey access, or simply wanting confidence that the replacement phase is handled correctly — services like MEICHEN cover the full workflow from drawing review and system selection through engineering support, manufacturing coordination, and delivery planning. Rather than juggling separate trades for measurement, specification, and supply, a single point of contact manages the replacement phase end to end, picking up exactly where your DIY removal left off.
Whether you recycle the old frames yourself or hand the entire project to a specialist, the hard work of removal is done. What ties the whole process together is a clear understanding of the steps that got you here — and the handful of safety principles that apply from first assessment through to final clean-up.
Recap and Final Tips for a Clean Frame Removal
Six steps, one opening, and a clear path from old frame to ready-for-replacement cavity. The process of learning how to remove windows from frame to finished rough opening is methodical — not complicated — but skipping any stage or rushing through it shows up later as air leaks, water ingress, and a new window that never quite sits right. Poor sealing and incorrect measurements are among the most common causes of performance issues in replacement windows, and both trace directly back to how well the removal and preparation were done.
Quick-Reference Step Summary
Pin this list to your workbench or save it on your phone before you start:
- Assess the frame condition — decide whether you need full frame removal or a sash-only swap based on corrosion, distortion, and seal integrity.
- Gather all tools and materials — cutting tools, prying tools, safety gear, and workspace protection laid out before the first screw turns.
- Prepare the work area — protect floors, clear furniture, remove window treatments, disconnect alarm sensors, and confirm permit requirements.
- Remove the glass sash or panel — lift sliding sashes out of their tracks, disconnect hinged sashes from operator arms, or pry glazing beads on fixed panes. Score caulk lines first, always.
- Detach the aluminium frame — locate and remove all fixings (screws or nailing fins), then lever the frame away from the rough opening progressively around the perimeter.
- Troubleshoot stuck components — use penetrating oil on corroded fasteners, an oscillating tool on bonded sealant, and controlled cuts rather than brute force.
- Clean, inspect, and measure the opening — remove residue, check timber for rot, verify square with diagonal measurements, and record width and height at three points each.
- Dispose responsibly — separate glass from aluminium, recycle metal at a scrap yard, and follow council guidelines for construction waste.
Final Safety Reminders Before You Start
Three non-negotiable principles apply across every step of the process:
- Identify structural elements before cutting anything. Structural mullions and posts carry load. Removing or cutting them without engineering advice can crack lintels and shift brickwork — damage that costs far more to repair than the window replacement itself.
- Wear appropriate PPE throughout. Safety glasses, cut-resistant gloves, hearing protection, and a P2 dust mask are not optional extras. Aluminium slivers are sharp, fast-moving, and nearly invisible in flight.
- Use a helper for any pane or frame wider than 600 mm. Large glass flexes under its own weight and can crack without warning. A second pair of hands keeps the load stable and your fingers clear of edges.
The quality of your removal work determines how well the replacement window performs for the next twenty or thirty years. A rushed job leaves an uneven opening, residual sealant lumps that prevent flush seating, or undetected rot that worsens behind a fresh frame. Taking an extra hour to get this phase right pays for itself in airtight seals, proper drainage, and a warranty that remains valid because the installation conditions were met.
Aluminium frame removal is well within reach for any confident DIYer who follows proper technique, works patiently through stubborn fasteners, and knows when a problem has outgrown the toolkit. Where DIY removal ends and professional specification begins — particularly around precise measurement, system selection, and engineering for Australian conditions — engaging a specialist for the replacement phase can save costly reordering and rework. Handle the removal with care, and the new window has every chance of fitting like it was always meant to be there.
Frequently Asked Questions About Removing Aluminium Window Frames
1. Can I remove an aluminium window frame myself or do I need a professional?
Most aluminium window frames in Australian homes can be removed as a DIY project if you have basic tools like a reciprocating saw, flat pry bar, and utility knife. The job is well within reach for confident DIYers who can identify structural versus non-structural elements. However, you should call a professional if the frame sits in a load-bearing wall, you discover rot or termite damage in the timber reveal, the window is on an upper storey requiring scaffolding, or asbestos is confirmed in surrounding materials. For the replacement specification phase, services like MEICHEN offer drawing review, custom sizing, and measuring to ensure the new window fits your prepared opening precisely.
2. How do I remove a sliding aluminium window from its frame?
Start by checking for anti-lift blocks in the top head track and removing them if present. Unlatch the window handle, then grip both sides of the sash and lift it straight up into the head track to create clearance at the bottom. Swing the bottom of the sash inward toward you, angling it away from the sill track, then lower and remove. For double-sliding windows, always remove the interior panel first since it sits in the inner track. Score any old caulk lines with a utility knife before attempting removal to prevent glass breakage from stuck sealant.
3. What should I do if the screws in my aluminium window frame are corroded and won’t come out?
Corroded screws are common in older aluminium frames due to galvanic corrosion between steel fasteners and the aluminium. Apply penetrating oil such as CRC or Inox MX3 directly into the screw recess, wait at least 15 minutes, then attempt removal with steady pressure using a snugly fitting screwdriver. If the head strips, use a screw extractor bit drilled into a small pilot hole and run in reverse. As a last resort, drill the screw head off entirely with a bit slightly wider than the shaft, which allows the frame to lift free of the headless fastener. Avoid repeated attempts that round the recess further.
4. Do I need a permit to remove and replace an aluminium window in Australia?
In most Australian council areas, a like-for-like window replacement where the opening size, type, and location remain unchanged does not require a permit or development application. However, changing the opening dimensions, adding a window where none previously existed, or altering structural elements typically triggers a development application (DA) or a complying development certificate (CDC). Properties in heritage overlay zones may have additional restrictions requiring council-approved methods and materials. Always check with your local council before cutting any structural elements.
5. How do I measure the rough opening after removing an old aluminium window frame?
Measure the width from jamb to jamb at three points: near the top, at the centre, and near the bottom. Then measure the height from sill to head at three points: near the left jamb, at the centre, and near the right jamb. Record all six figures and use the smallest width and smallest height when ordering your replacement window. Check for square by measuring both diagonals — if they match within 3 mm, the opening is square enough. Also measure the reveal depth from interior to exterior wall face, as this affects frame positioning and flashing details.
More Window & Door Guides