Why Your Sliding Aluminium Windows Need Better Locks
Sliding aluminium windows are everywhere in Australian homes. They let in light, ventilate well, and suit our climate. They also happen to be one of the easiest entry points for intruders. The factory-fitted latches on most sliding windows were designed for convenience, not security. A flat-head screwdriver or a firm upward push is often all it takes to defeat them. That gap between “closed” and “secure” is exactly where aftermarket locks for aluminium sliding windows earn their place.
Learning how to install sliding aluminium window locks is one of the most cost-effective security upgrades you can tackle in a single afternoon. No electrician, no council approval, no major renovation. Just a drill, the right lock, and a bit of know-how.
Why Sliding Aluminium Windows Need Dedicated Locks
Standard latches rely on a simple hook or cam mechanism that holds the sash in the closed position. They were never engineered to resist forced entry. Research into break-in methods shows that roughly 30% of burglaries occur through insufficiently protected windows, with sliding designs particularly vulnerable because they can be lifted from their tracks or jimmied along the rail. A dedicated aftermarket lock physically prevents the sash from moving, even under significant lateral force. That single addition transforms a weak point into a genuine deterrent.
What This Guide Covers and Who It Is For
This guide walks you through the complete decision-making journey, from identifying your window profile to long-term maintenance. Each lock type includes a difficulty rating and an estimated installation time so you can plan your weekend accordingly. Whether you own your home or rent, there is a sliding aluminium window security upgrade here that fits your situation.
Here are the five lock types we cover:
- Keyed sash locks — the most common all-round choice
- Pin locks — discreet double-sash security
- Track-channel locks — no drilling, ideal for renters
- Bolt locks — heavy-duty protection for ground-floor windows
- Loop locks — non-permanent, clamp or adhesive-mounted options
Skill level ranges from beginner to intermediate, and total project time for a single window sits between 5 and 40 minutes depending on the lock you choose. If you want to know how to secure sliding aluminium windows at home without hiring a locksmith, you are in the right place.
Choosing the best locks for sliding aluminium windows starts with understanding what you are working with. The profile of your specific window determines which locks will actually fit, and getting that match right before you buy saves time, money, and frustration.
Step 1 – Identify Your Window Profile and Choose the Right Lock
Every aluminium sliding window looks similar from across the room, but the differences in profile dimensions are what determine which lock fits my sliding aluminium window and which one ends up back in the packaging. Spending five minutes with a tape measure now prevents a wasted trip to the hardware store later.
How to Identify Your Aluminium Window Profile Type
The profile refers to the cross-sectional shape of the aluminium extrusion that forms your window frame and sashes. Key characteristics you need to note include the track count (single, two-track, or three-track systems), sash thickness, rail depth, and whether the frame incorporates thermal breaks — those non-conductive inserts that separate the interior and exterior faces of the aluminium.
To identify your aluminium window profile type accurately, grab a digital caliper or a standard tape measure and record the following dimensions:
- Sash rail width — the horizontal top and bottom edges of the sliding panel
- Stile depth — the vertical side members where most locks mount
- Track channel width — the groove the sash rollers sit in
- Frame material gauge — thicker extrusions (typically 1.4 mm to 2.0 mm) support screw-mounted locks better than budget-grade thinner profiles
The aluminium window profile affects both insulation properties and lock compatibility. Some profiles are slimmer and more modern, while others include thermal breaks that create hollow chambers inside the frame — chambers you need to avoid when drilling.
| Profile Feature | What to Measure | Why It Matters for Lock Compatibility |
|---|---|---|
| Sash thickness | Front-to-back depth of the sliding panel (mm) | Determines whether pin locks can pass through both sashes without protruding |
| Rail height | Top-to-bottom dimension of the horizontal sash rail (mm) | Keyed sash locks need enough rail height to seat the housing flush |
| Track width | Internal width of the bottom channel (mm) | Track-channel locks must fit snugly inside without jamming the rollers |
| Frame material gauge | Wall thickness of the aluminium extrusion (mm) | Thin-gauge frames may strip screws; bolt locks need at least 1.4 mm gauge |
Matching Lock Types to Your Window Configuration
Use this as a quick sliding window lock compatibility guide based on your measurements. Keyed sash locks work on most standard two-track profiles because they mount on the rail surface and only need two screw holes. Pin locks require adequate stile depth — at least 25 mm combined across both sashes — since the pin must pass through one panel into the next. Track-channel locks depend entirely on the internal track width; if your channel is narrower than the lock body, it simply will not fit. Bolt locks need sufficient frame thickness to anchor the receiver plate securely, making them better suited to heavier commercial-grade profiles. Loop locks skip the compatibility question altogether — they clamp or adhere to the surface and work on virtually any configuration.
If you are unsure about your aluminium window sash thickness measurement, take readings at three points along the rail. Aluminium extrusions can vary slightly due to manufacturing tolerances, and the tightest measurement is the one that matters for lock fitment.
Rental Property and Warranty Considerations
Drilling into an aluminium frame may void the manufacturer’s warranty, particularly on newer windows still within their guarantee period. If your windows carry a current warranty, check the documentation before picking up a drill. For renters, the safest path is a non-drilling option — track-channel locks and loop locks provide genuine security without leaving permanent marks. Always get written permission from your landlord before making any permanent modification, even a small pilot hole. A quick email confirming approval protects you when the lease ends.
With your profile identified and the right lock type narrowed down, the next step is making sure you have the correct tools and materials on hand before any work begins.
Step 2 – Gather the Right Tools and Materials
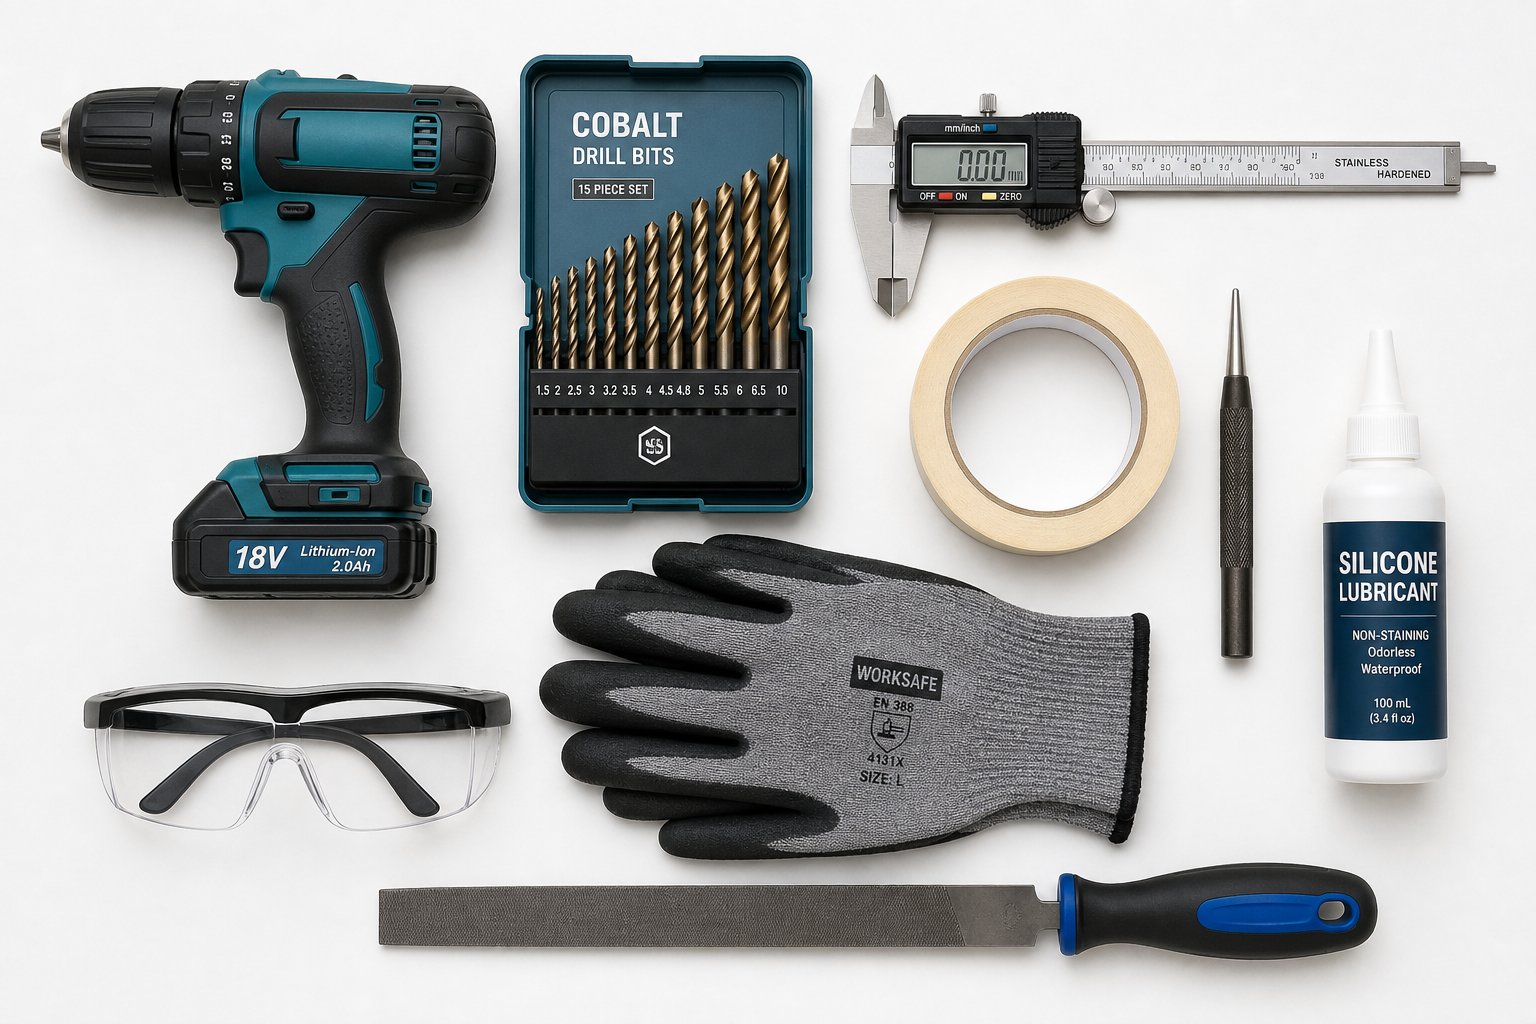
Nothing stalls a project faster than realising you are missing a drill bit halfway through. A complete sliding window lock installation kit checklist, laid out before you start, keeps the job moving from first measurement to final test without interruption.
Essential Tools for Every Lock Type
The tools needed to install aluminium window locks are straightforward, and most homeowners already own half of them. Here is the full list:
- Power drill with variable speed control
- Cobalt or titanium drill bits sized to your lock’s instructions
- Centre punch
- Measuring tape or digital caliper
- Pencil or metal scribe
- Masking tape
- Deburring tool or fine metal file
- Safety glasses
- Work gloves
- Vacuum or magnetic chip collector for metal shavings
A quick note on the best drill bits for drilling aluminium window frames: standard HSS bits tend to grab and tear soft aluminium, leaving ragged holes that weaken screw grip. Cobalt bits (M35 or M42 alloy) offer superior heat resistance and edge retention, making them the professional choice for harder metals and repeated use. Titanium-coated bits work adequately for a one-off job on softer alloys, but the coating wears through quickly and cannot be resharpened. If you plan to install locks on multiple windows, cobalt pays for itself in longevity.
Materials and Hardware You Will Need
- The lock kit itself — confirm it includes screws, strike plate, and any required spacers
- Thread-locking compound (e.g., Loctite 243) for vibration resistance
- Silicone-based lubricant for the lock mechanism and track
- Rubbing alcohol or acetone for surface preparation
Use stainless steel or aluminium screws where possible. Zinc-plated steel fasteners in direct contact with aluminium can trigger galvanic corrosion over time, especially in coastal areas of Australia where salt air accelerates the reaction.
Where to Source Quality Locks and Compatible Hardware
Hardware chains like Bunnings and Mitre 10 stock common keyed sash locks and track locks. Specialist security retailers carry a wider range, including pin locks and heavy-duty bolt options. When deciding where to buy sliding aluminium window locks, prioritise compatibility with your actual window system over brand loyalty.
Manufacturer documentation is your best friend here. For example, the MEICHEN MA100 Sliding Window product page details how a two-track aluminium system is constructed — rail dimensions, hardware provisions, glazing configurations, and sealing profiles. Reviewing this type of specification helps you confirm that the lock you purchase matches the specific stile depth and rail width of your window, rather than guessing from generic product descriptions.
With every tool and component accounted for, the real hands-on work begins: preparing the window frame itself so your drill hits exactly where it should.
Step 3 – Prepare the Window Frame Safely
Aluminium is forgiving in many ways — it does not rust like steel, it machines cleanly, and it accepts screws without splitting. But it punishes sloppy preparation. A dirty surface weakens adhesion, a misplaced hole cannot be undone, and a drill bit wandering across polished aluminium leaves a scratch you will see every time you open the curtains. Spending ten minutes on preparation saves an hour of corrective work.
Clean and Inspect the Window Frame
Start by cleaning the aluminium window frame before installing any lock hardware. If your window design allows it, lift the sliding sash out of the track to expose the full mounting surface. Most two-track aluminium windows release by lifting the panel upward until the bottom rollers clear the rail, then angling the base outward. Set the sash on a padded surface to avoid scratching the finish.
Wipe the mounting area with rubbing alcohol or acetone on a lint-free cloth. This removes the thin layer of oxidation, accumulated grime, and any silicone residue from previous weatherstripping. A clean surface ensures screw threads bite properly and adhesive-mounted locks bond at full strength.
While the surface is bare, inspect it closely. Look for:
- White powdery patches — early signs of aluminium oxidation
- Hairline cracks near existing screw holes or corners
- Previous drill holes from old hardware that may overlap with your new lock position
- Dents or warping that could prevent the lock housing from sitting flush
If you find significant corrosion or cracking, reconsider drilling into that section. Compromised aluminium will not hold screws reliably, and forcing the issue risks splitting the extrusion wall.
Safety Precautions When Drilling Aluminium
Aluminium shavings are razor-sharp and virtually invisible once airborne. Always wear safety glasses and use a magnetic chip collector or vacuum to capture swarf immediately. A single metal sliver in the eye can cause serious injury.
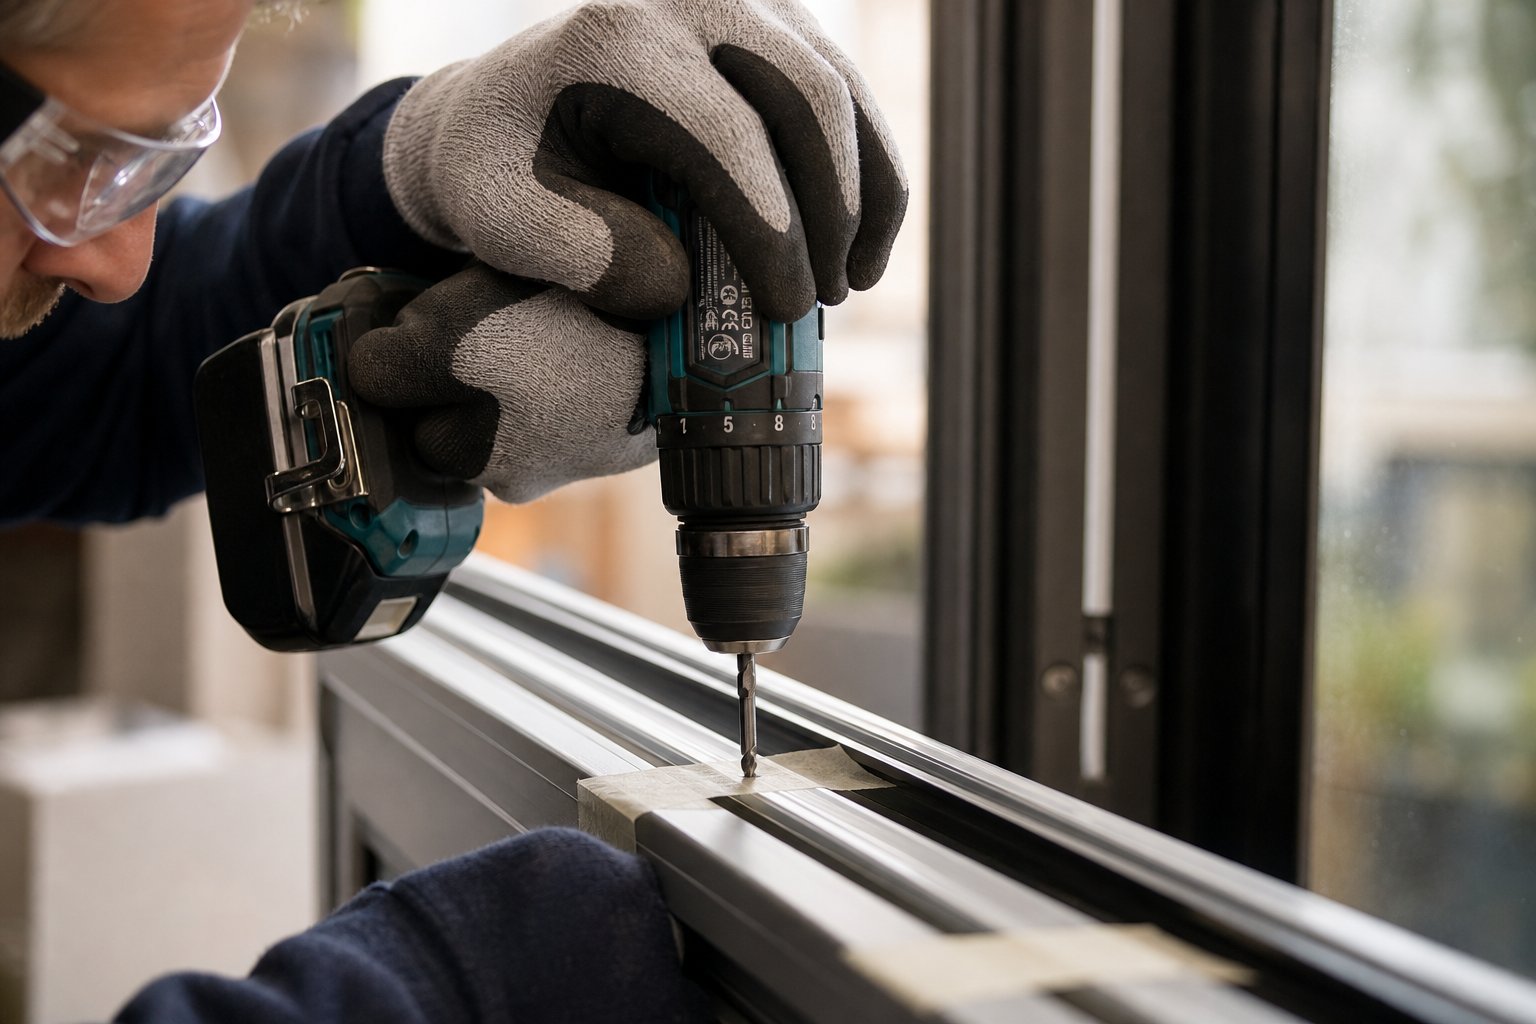
Beyond eye protection, the most critical safety tip for drilling into aluminium windows is speed control. Drilling aluminium at excessive RPM generates heat that can warp thin-walled extrusions — particularly the 1.4 mm gauge profiles common in residential windows. Set your drill to a low-to-medium speed. For pilot holes in window-grade aluminium, somewhere around 1,000–1,500 RPM with steady, moderate pressure produces clean results without thermal distortion.
Use a centre punch to create a small dimple at each marked point before the drill bit touches the surface. Aluminium’s smooth anodised finish gives the bit nothing to grip, and without that starter indent, the tip will skate sideways and gouge the frame. One firm tap with the punch is enough.
A final caution: know what is inside the extrusion before you drill. Many modern aluminium profiles contain thermal break chambers or structural webs — internal walls that provide rigidity and insulation. Drilling through these sections can weaken the frame and void the manufacturer’s warranty. If your window documentation shows a cross-section diagram, use it. If not, drill conservatively into solid outer walls only, and stop immediately if resistance drops suddenly mid-hole — that drop indicates you have broken through into a hollow chamber.
Mark and Verify Lock Placement
Knowing how to mark drill holes on an aluminium window frame accurately is the difference between a lock that engages perfectly and one that binds or misses the strike plate entirely. Hold the lock body in its intended position — typically where the sliding sash meets the fixed panel — and mark each screw hole with a sharp pencil or metal scribe.
Apply a strip of masking tape directly over your marks. The tape serves two purposes: it gives the centre punch a slightly textured surface to grip, and it prevents the drill bit from skating if it catches the edge of the dimple at an angle. You will still see your pencil marks through standard painter’s tape.
Before drilling, close the window fully and hold the lock in position one more time. Confirm that the bolt, pin, or latch engages the corresponding receiver or fixed panel at the exact marked location. If anything looks off by even a millimetre, adjust now. Aluminium does not forgive a misplaced hole — you cannot fill it with wood putty and start over. Aluminium epoxy exists, but it is a repair, not a plan.
Once your marks are verified and taped, the frame is prepped, and your safety gear is on, you are ready to pick up the drill and start mounting hardware with confidence.
Step 4 – Install Keyed Locks and Pin Locks
Your frame is clean, your marks are verified, and the masking tape is in place. This is where the project shifts from planning to permanent hardware. Keyed sash locks and pin locks account for the vast majority of aftermarket sliding window security installations in Australian homes, and for good reason — they offer genuine forced-entry resistance with minimal tools and modest skill requirements.
Each lock type below includes a difficulty rating and time estimate so you can gauge the commitment before you commit a drill bit to aluminium.
Installing a Keyed Sash Lock on a Sliding Aluminium Window
Difficulty: Beginner | Time: 15–25 minutes
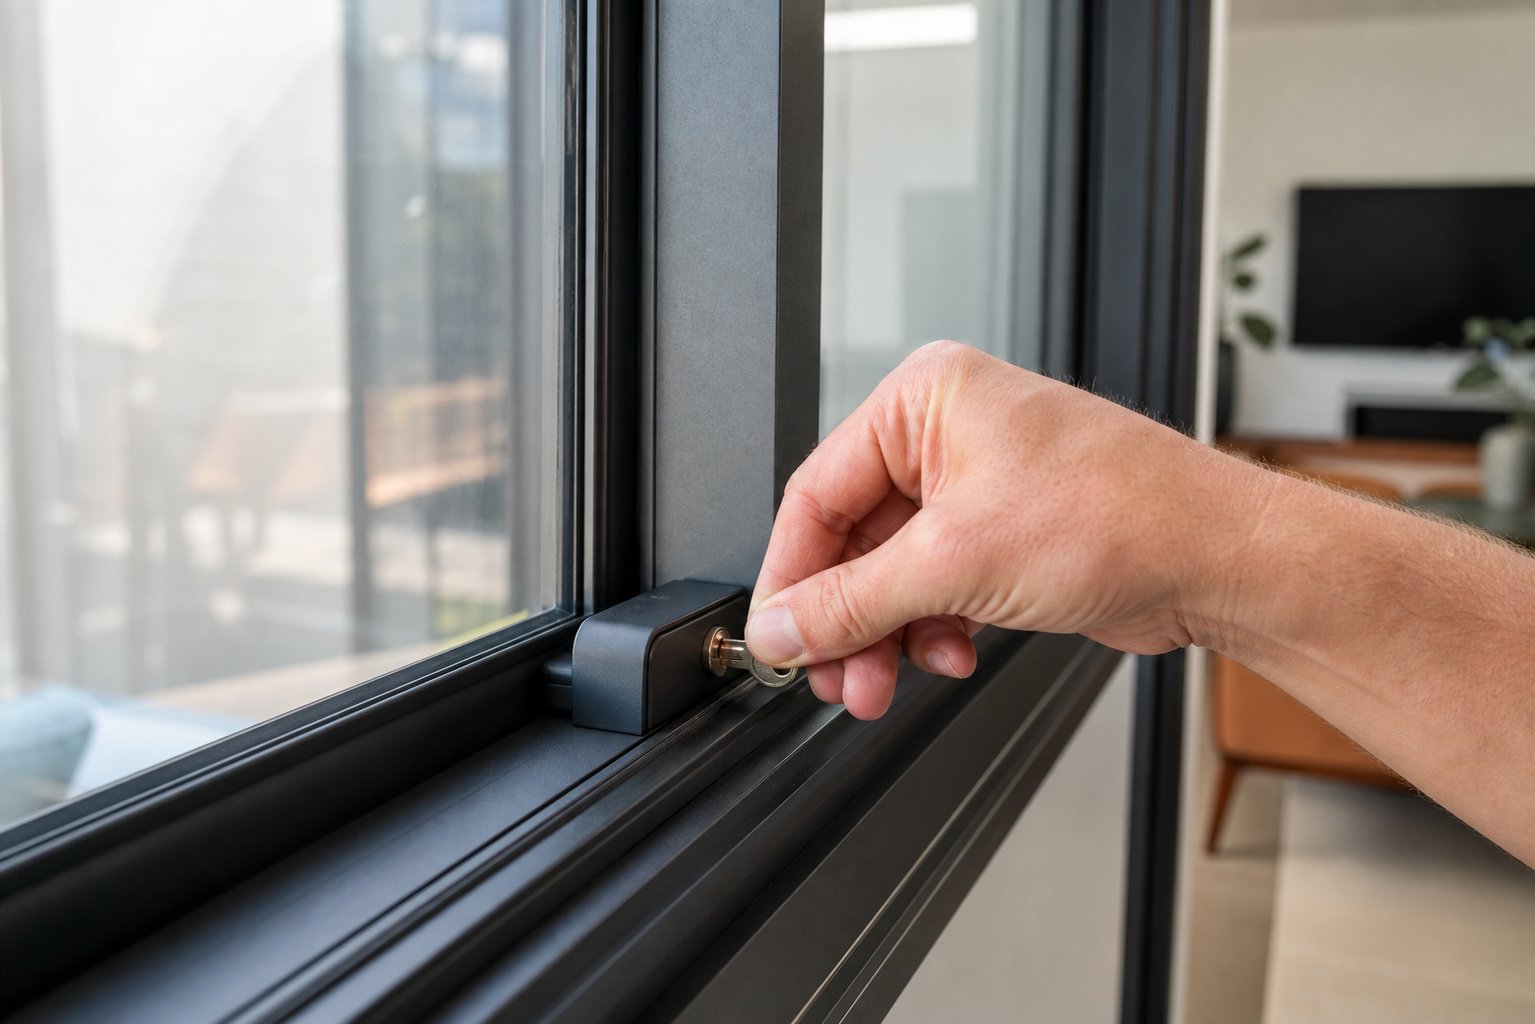
A keyed sash lock mounts on the inner rail of the sliding panel, right where it meets the fixed panel when closed. The lock body prevents the sash from sliding until you turn the key. It is the most popular step by step sliding window lock installation for homeowners who want visible, key-operated security without complex drilling.
Follow these steps in order:
- Position the lock housing on the inner sash rail at the meeting point between the sliding panel and the fixed panel. The lock face should sit flush against the rail surface with no rocking or gaps.
- Mark the two screw holes with a centre punch. Press firmly enough to leave a clear dimple in the aluminium — this prevents the drill bit from wandering on the smooth surface.
- Drill pilot holes using a bit one size smaller than the supplied screws. For most keyed sash lock kits, that means a 2.5 mm or 3.0 mm bit for screws in the 3.5–4.0 mm range. Keep your drill at low-to-medium RPM and apply steady, even pressure.
- Apply a small drop of thread-locking compound to each screw thread. This stops vibration from loosening the fasteners over months of window operation — sliding sashes generate repetitive micro-movement every time they open and close.
- Fasten the lock body with the supplied self-tapping screws. Tighten until the housing is firm against the rail, but stop before the screw head begins to deform the aluminium. Over-torquing strips the pilot hole and weakens the mount.
- Close the window fully and test the key mechanism. The lock should engage and disengage smoothly without forcing. If the key feels stiff, the housing may be slightly misaligned — loosen the screws a quarter turn, reposition, and retighten.
- Install the strike plate or receiver on the fixed panel or frame if your kit includes one. Mark, drill, and mount it using the same pilot-hole technique. The bolt or latch should seat into the receiver with a positive click when locked.
That is the complete process for how to install a keyed sash lock on an aluminium window. The entire job typically takes under 20 minutes once you have done it once, and subsequent windows go faster because you have already dialled in your drill speed and pressure.
A few practical tips worth noting: position the lock at a height that is comfortable to reach but not immediately visible from outside. Placing it on the inner face of the meeting rail, rather than the top rail, keeps it out of sight from anyone peering through the glass. Store the spare key in a separate location from the window — a nearby drawer works, but not the windowsill itself.
Installing a Pin Lock for Double-Sash Security
Difficulty: Beginner to Intermediate | Time: 20–30 minutes
Pin locks work on a different principle. Rather than clamping or latching the sash in place, a pin lock passes physically through the inner sash and into the outer sash or frame, creating a mechanical bond between the two panels. The window cannot slide because the overlapping sections are literally pinned together. It is a simple, elegant solution — and one of the hardest for an intruder to defeat from outside because there is no visible mechanism to manipulate.
Pin lock installation for sliding aluminium windows requires slightly more precision than a keyed lock because you are drilling through two layers of aluminium that must align perfectly. Here is the process:
- Close the window fully so the inner and outer sashes overlap at their normal locked position. Confirm the panels are seated properly in their tracks with no lateral play.
- Measure and mark the drilling point on the inner sash stile. Choose a spot where the two sashes overlap by at least 20–25 mm, and position your mark so the hole will pass into the outer sash by a minimum of 10 mm. This depth ensures the pin engages enough material to resist forced sliding.
- Apply masking tape over the marked point on both the inner and outer sash surfaces. The tape reduces the chance of the bit skating and protects the anodised finish around the hole.
- Drill through both sash rails in a single pass using a bit that matches the pin diameter exactly. Most pin lock kits supply a 4 mm or 5 mm pin — use the corresponding bit size. Keep the drill perpendicular to the sash face and maintain a slow, steady feed rate. Rushing this step produces an oval hole that lets the pin wobble.
- Deburr both the entry and exit holes using a deburring tool or fine metal file. Aluminium leaves sharp raised edges around drilled holes, and these will score the pin surface and make insertion difficult if left untreated. A few light twists of a countersink bit also work well.
- Insert the pin and test withdrawal and insertion for smooth operation. The pin should slide in with light finger pressure and pull out without excessive force. If it binds, the holes between the two sashes are slightly misaligned — ream gently with the correct bit until the pin moves freely.
One of the real advantages of pin locks is positional flexibility. You can drill additional pin holes at intervals along the rail to allow ventilation at a fixed opening width. A common setup is one hole with the window fully closed and a second hole with the sash open 100 mm — enough airflow for a mild evening without compromising security. Some homeowners add a third position at 50 mm for cooler nights. Each additional hole takes only a few minutes once you have the technique down.
Keyed Lock vs Pin Lock — Which Suits Your Situation?
Both lock types deliver solid security, but they serve slightly different needs. A keyed sash lock is more convenient for daily use — turn the key and slide the window open without removing anything. A pin lock is more discreet and arguably harder to defeat, but you need to physically pull the pin out each time you want to open the window. For maximum protection, many security professionals recommend combining both: a keyed lock at the meeting rail for everyday convenience and a pin lock at the top rail as a secondary barrier. That layered approach is what makes the difference between a window that resists a casual attempt and one that resists a determined one.
With your primary locks mounted and tested, the remaining lock types — track locks, bolt locks, and loop locks — round out the security options and open up solutions for renters and multi-lock setups.
Step 5 – Install Track Locks, Bolt Locks, and Loop Locks
Keyed sash locks and pin locks handle the heavy lifting for most sliding window security setups, but they are not the only tools in the kit. Track-channel locks, bolt locks, and loop locks each fill a specific gap — whether that is a no-drill option for renters, heavy-duty resistance for ground-floor windows, or a quick temporary solution while you plan something more permanent. Covering the full range means you can match the right lock to the right situation without compromise.
Installing a Track-Channel Lock
Difficulty: Beginner | Time: 5–10 minutes
Track-channel locks are the simplest aftermarket security device you can add to a sliding aluminium window. They sit inside the bottom track channel and act as a physical stop — the sash slides until it hits the lock body and cannot travel any further. No drilling, no screws, no permanent modification. If you want to know how to install a track lock on a sliding window, the answer fits on a single hand.
Here is the process:
- Open the window to your desired locked position. For full security, close the window completely. For ventilation, leave it open 50–100 mm.
- Place the track lock in the bottom channel directly behind the sliding sash. The lock body should sit flat in the channel with its adjustment mechanism facing upward for easy access.
- Tighten the thumb-screw until the lock grips the track firmly. Most track locks use a simple screw-down foot that expands against the channel walls. Turn until the lock resists movement when you push it with your finger — snug, not forced.
- Close the window against the lock to confirm it cannot be forced past. Apply moderate pressure to simulate someone trying to push the sash open from outside. The lock should hold without shifting position in the channel.
That is genuinely all there is to it. Track locks rank among the best renter-friendly sliding window locks because they leave zero marks on the frame and can be removed in seconds when you move out. They also make excellent secondary locks — even if an intruder defeats a keyed sash lock, the track stop prevents the window from opening far enough to climb through.
A few practical notes: choose a track lock with a metal body rather than plastic. Plastic versions crack under sustained lateral pressure, especially in Australian summer heat where track temperatures can climb significantly. Also confirm that the lock body height does not interfere with the sash rollers — it should sit below the roller axle line so the window still glides smoothly when the lock is removed.
Installing a Bolt Lock or Loop Lock
Bolt Lock — Difficulty: Intermediate | Time: 25–40 minutes
Bolt locks deliver the heaviest resistance of any aftermarket sliding window lock. The mechanism works like a deadbolt on a door — a solid metal bolt extends from the lock housing on the sliding sash into a receiver mounted on the fixed frame, physically anchoring the two together. Bolt lock installation on an aluminium window frame requires more precision than a keyed sash lock because you are aligning two separate components that must meet perfectly when the window closes.
Follow these steps:
- Position the bolt housing on the meeting rail of the sliding sash. The bolt should extend horizontally toward the fixed frame when engaged. Hold the housing in place and confirm the bolt, when extended, will reach the fixed panel with at least 10 mm of engagement.
- Mark and drill pilot holes for the bolt housing using the same technique from Step 3 — centre punch, masking tape, low RPM, bit one size smaller than the supplied screws.
- Mount the bolt housing with screws and thread-locking compound. Ensure the housing sits perfectly level so the bolt extends in a straight line without binding against the edges of the receiver.
- Close the window fully. Extend the bolt so it contacts the fixed frame, and mark the exact point where the bolt tip meets the surface. This is where the receiver plate mounts.
- Drill and mount the receiver on the fixed frame. The receiver hole or slot must align precisely with the bolt — even 2 mm of offset will cause the bolt to jam or fail to seat fully.
- Test bolt extension and retraction with the window closed. The bolt should slide smoothly into the receiver and withdraw without catching. If it binds, loosen the receiver mounting screws, adjust position fractionally, and retighten.
Bolt locks suit ground-floor windows, windows accessible from flat roofs or balconies, and any opening where maximum forced-entry resistance is the priority. The trade-off is installation complexity — this is not a five-minute job, and misalignment means re-drilling. Take your time with the marking stage and you will avoid headaches during mounting.
Loop Lock — Difficulty: Beginner | Time: 10–15 minutes
Loop locks take the opposite approach to bolt locks. Instead of drilling into the frame, they use adhesive pads or adjustable clamps to attach a looped cable or rigid arm between the sliding sash and the fixed frame. The loop limits how far the window can open — typically 100–150 mm — allowing ventilation while preventing the sash from opening wide enough for entry.
Installation is straightforward:
- Clean both mounting surfaces (sliding sash and fixed frame) with rubbing alcohol to remove dust and oils.
- Peel the adhesive backing and press the mounting plates firmly into position, or tighten the clamp mechanism around the frame edge if using a clamp-style lock.
- Attach the loop or restrictor arm between the two plates.
- Allow adhesive to cure for the time specified by the manufacturer — usually 24 hours for full bond strength.
- Test by attempting to slide the window beyond the loop’s limit. The restrictor should hold firm without the mounting plates peeling or shifting.
Loop locks are among the best no-drill lock options for aluminium sliding windows. They suit renters, apartment dwellers, and anyone who cannot or does not want to make permanent modifications. Their limitation is strength — a determined intruder with sustained force can potentially peel adhesive mounts. For that reason, loop locks work best as part of a layered setup rather than as a sole security measure.
Multi-Lock Security Setups
A single lock deters opportunistic attempts. Multiple locks on the same window deter determined ones. The concept behind a multi-lock setup for sliding window security is simple: each lock type protects against a different attack method, and an intruder facing three obstacles is far more likely to move on than one facing just one.
The recommended combination for maximum residential protection:
- A keyed sash lock at the meeting rail — your primary, everyday lock that prevents the sash from sliding
- A pin lock at the top rail — a secondary barrier that physically bonds the two sashes together, invisible from outside
- A track lock in the bottom channel — a failsafe that limits travel even if the upper locks are somehow defeated
This three-point approach covers the top, middle, and bottom of the window. An intruder cannot lift the sash out of the track (pin lock prevents it), cannot slide it open (keyed lock and track lock both block movement), and cannot force the meeting rail apart (bolt or keyed lock resists lateral pressure).
The following table summarises all five lock types, their ideal mounting positions, and key characteristics to help you plan your setup:
| Lock Type | Position | Difficulty | Time | Drilling Required | Renter Friendly |
|---|---|---|---|---|---|
| Keyed sash lock | Meeting rail (inner sash) | Beginner | 15–25 min | Yes | No |
| Pin lock | Top rail or stile (through both sashes) | Beginner–Intermediate | 20–30 min | Yes | No |
| Track-channel lock | Bottom track channel | Beginner | 5–10 min | No | Yes |
| Bolt lock | Meeting rail (with receiver on fixed frame) | Intermediate | 25–40 min | Yes | No |
| Loop lock | Sash face and fixed frame (adhesive/clamp) | Beginner | 10–15 min | No | Yes |
For renters, a track lock paired with a loop lock provides two layers of protection with zero drilling. For homeowners wanting full perimeter security, the keyed-plus-pin-plus-track combination on every accessible window creates a level of resistance that most opportunistic burglars simply will not bother testing.
Hardware mounted is only half the job done. Every lock needs verification under real-world conditions — and that means systematic testing, adjustment, and knowing exactly what to do when something does not engage the way it should.
Step 6 – Test, Adjust, and Troubleshoot Your New Locks
A lock bolted to a frame is not a secure lock — it is just hardware occupying space. Security only exists once you have confirmed the mechanism holds under pressure, operates smoothly in daily use, and does not interfere with normal window function when disengaged. Skipping this verification step is how homeowners end up with a sliding window lock not engaging properly six weeks after installation, wondering what went wrong.
Functional Testing Checklist
Run through this sequence for every lock you have installed. It takes less than five minutes per window and catches problems while they are still easy to fix.
- Lock and unlock the mechanism ten times in succession. You are checking for consistent, smooth operation — any grinding, stiffness, or intermittent catching indicates misalignment or burrs in the pilot holes.
- Attempt to slide the window while the lock is fully engaged. Push with moderate force, roughly what someone might apply from outside. The sash should not budge or rattle in the track.
- Disengage the lock and confirm the window slides freely. The lock body, strike plate, or pin housing should not drag against any surface when the mechanism is in the open position.
- For keyed locks, verify the key turns without excessive wrist force from both sides if the lock is designed for dual access. A stiff key usually means the housing is twisted slightly on its mounting screws.
- For pin locks, insert and withdraw the pin at least five times. It should glide in with light finger pressure and pull out cleanly. Excessive resistance means the holes between sashes are not perfectly aligned.
- For track locks, apply firm lateral pressure against the locked sash to confirm the window cannot jump over the lock body. If the sash lifts and clears the stop, the lock is sitting too low in the channel — tighten the thumb-screw further or choose a taller lock body.
If everything passes, your installation is solid. If something feels off, the troubleshooting table below covers the most common issues.
Troubleshooting Common Installation Problems
Most problems trace back to one of five root causes. Knowing how to test a sliding window lock after installation also means knowing what to look for when the test fails.
| Problem | Likely Cause | Fix |
|---|---|---|
| Lock does not engage fully | Misaligned mounting holes — bolt or latch cannot reach the receiver | Loosen mounting screws, reposition the housing or strike plate to correct alignment, and re-drill if the offset exceeds 1 mm |
| Screws spin freely and will not tighten | Pilot hole drilled too large for the screw gauge | Use the next screw size up, or fill the hole with aluminium epoxy, allow to cure, then re-drill a fresh pilot hole |
| Pin lock binds on insertion | Holes between inner and outer sashes are not aligned | Ream the receiving hole gently with the correct diameter bit until the pin slides without force |
| Window rattles when locked | Lock body not sitting flush against the rail — gap allows play | Add the supplied spacer or a thin shim behind the housing to eliminate the gap, then retighten |
| Drill bit wandered across the surface | No centre punch dimple created before drilling | Always dimple first. For the damaged hole, fill with epoxy, re-mark with a centre punch, and drill again at the correct position |
The most frequent issue — and the easiest to prevent — is misalignment. Adjusting aluminium window hardware often comes down to loosening screws by a quarter turn, shifting the component a fraction of a millimetre, and retightening. Patience here pays off in years of trouble-free operation.
Adjusting for Smooth Window Operation
Even a correctly installed lock sometimes needs micro-adjustment once the window has been opened and closed a dozen times. Aluminium frames flex slightly under thermal load, and the repeated vibration of a sliding sash can shift a housing that was borderline tight during installation.
To adjust aluminium window lock alignment after the initial install:
- Reposition the housing: Loosen the mounting screws a quarter turn, slide the lock body until the bolt or latch seats perfectly into the receiver, then retighten. Do not force the mechanism into alignment by over-tightening — that warps the housing and creates new problems.
- File the strike plate: If the latch catches on the edge of the receiver rather than dropping cleanly into the slot, use a fine metal file to remove a sliver of material from the strike plate opening. Work slowly — you can always remove more, but you cannot add metal back.
- Lubricate moving parts: Apply a light coat of silicone-based lubricant to the lock mechanism, the key cylinder, and the track surface where the sash rides. Silicone does not attract dust the way petroleum-based oils do, so it keeps things moving without creating a gritty buildup over time. Regular lubrication is one of the simplest ways to extend the working life of any window lock mechanism.
Once your locks pass every test and the window glides without resistance in the unlocked position, the installation is complete. The job ahead shifts from building security to preserving it — and aluminium, for all its strengths, has specific maintenance needs that determine whether your locks still work flawlessly in five years or start binding after two.
Step 7 – Maintain Your Locks and Prevent Aluminium Corrosion
Locks that tested perfectly on installation day will not stay that way indefinitely. Aluminium frames expand in summer heat, contract in winter cold, and accumulate salt, pollen, and grit in the tracks year-round. Knowing how to maintain aluminium window locks long term is what separates a fitting that lasts a decade from one that seizes up after two seasons.
Seasonal Maintenance Schedule for Aluminium Window Locks
A structured seasonal maintenance routine for sliding window locks keeps every mechanism operating smoothly and catches small problems before they become security gaps. The schedule below aligns maintenance tasks with the specific environmental stresses each Australian season brings.
| Season | Maintenance Task | Why It Matters |
|---|---|---|
| Spring | Clean tracks, lock housings, and pin holes of accumulated debris, pollen, and dust | Grit buildup acts as an abrasive paste inside mechanisms, accelerating wear on moving parts and causing locks to bind |
| Summer | Check for thermal expansion effects — test that keyed locks still turn freely and pin locks insert without resistance | Aluminium expands in heat, and tight-tolerance locks may bind as frame dimensions shift by fractions of a millimetre |
| Autumn | Lubricate all moving parts with silicone-based spray before winter arrives | Silicone lubricant does not attract dust and protects against moisture ingress during the wetter months ahead |
| Winter | Inspect screw heads, lock housings, and strike plates for condensation-related corrosion or white oxidation deposits | Condensation collects around metal-to-metal contact points and accelerates galvanic corrosion if dissimilar metals are present |
This four-pass cycle takes roughly ten minutes per window each quarter. Industry maintenance data shows that well-maintained aluminium window hardware can deliver 10 to 20 years of reliable service, while neglected locks and handles often fail within half that timeframe. A silicone spray and a soft cloth are cheap insurance against premature replacement.
Signs of Lock Failure and When to Replace
Even with diligent care, every lock eventually wears out. Recognising the early warning signs tells you when to replace aluminium window locks before they fail at the worst possible moment — like during a storm or while you are away on holiday.
Watch for these indicators:
- Key no longer turns smoothly, requiring increasing wrist force or jiggling to engage
- Visible white powdery oxidation forming on the lock housing, screw heads, or strike plate
- Lock body wobbles or shifts laterally when the mechanism is engaged — mounting screws have lost grip
- Pin lock no longer seats fully into the receiving hole, stopping short or requiring force to insert
- Bolt does not extend to its full length, retracting partway or sticking mid-travel
- Track lock loses grip and slides under lateral pressure, no longer holding the sash in position
Any single symptom warrants investigation. Two or more appearing together on the same lock means replacement, not repair. A compromised lock creates a false sense of security — you believe the window is locked, but the mechanism no longer resists the forces it was designed to handle.
Protecting Against Aluminium Corrosion
Aluminium itself resists rust, but it is highly susceptible to galvanic corrosion when it contacts dissimilar metals in the presence of moisture. This electrochemical reaction occurs because metals positioned far apart on the galvanic series create an electrical potential difference — the less noble metal (aluminium, in this case) corrodes preferentially, eating away at the frame around screw penetrations.
The most common culprit in window lock installations is zinc-plated steel screws. They are cheap, widely supplied in generic lock kits, and they will slowly destroy your aluminium frame from the inside out. The fix is simple: use stainless steel or aluminium screws exclusively. Stainless sits closer to aluminium on the galvanic series, dramatically reducing the reaction rate. If your lock kit came with zinc-plated fasteners, replace them before installation — a packet of stainless self-tappers costs a few dollars and saves the frame.
For aluminium window lock corrosion prevention beyond screw selection:
- Apply a thin layer of marine-grade anti-corrosion wax around every screw penetration annually. The wax creates a moisture barrier that prevents the electrolyte (water) from completing the galvanic circuit.
- Inspect lock housings for white powdery deposits each winter. This aluminium oxide buildup indicates active corrosion — clean it with a nylon brush and reapply protective wax immediately.
- In coastal environments (anywhere within 5 km of the ocean), increase your maintenance frequency to bi-annual. Salt spray accelerates oxidation dramatically, and locks in these zones often show corrosion signs within 12 months if left unprotected.
Homes along the Queensland coast, Sydney’s eastern suburbs, or Perth’s beachside corridors face the harshest conditions. If you live in a salt-air zone, consider locks with stainless steel housings rather than zinc-alloy bodies — the upfront cost is higher, but the longevity difference in a marine environment is substantial.
Maintenance keeps your locks functional. But there comes a point where the window itself — not just the hardware — determines whether aftermarket security remains viable or whether a broader upgrade makes more practical sense.

Choosing the Best Lock Setup for Your Home Security Needs
Every window in your home faces a different threat profile. A ground-floor bedroom window beside a dark laneway needs heavier protection than a second-storey bathroom window overlooking a busy street. The best sliding window lock for home security is not a single product — it is the right combination matched to your specific situation, budget, and tenancy status.
Choosing the Right Lock Based on Your Situation
The table below distils the entire guide into a quick-reference decision matrix. Find the row that matches your circumstances, and you have your starting point.
| Your Situation | Recommended Lock Type | Difficulty | Estimated Cost Range (AUD) |
|---|---|---|---|
| Homeowner wanting maximum security | Keyed sash lock + pin lock combo | Beginner–Intermediate | $40–$80 per window |
| Renter needing a non-permanent option | Track lock or loop lock | Beginner | $15–$35 per window |
| Parent wanting child safety | Keyed lock mounted at top rail | Beginner | $25–$45 per window |
| Budget-conscious first step | Single track-channel lock | Beginner | $10–$20 per window |
| Full perimeter security | Multi-lock setup (keyed + pin + track) | Intermediate | $60–$120 per window |
If you are still wondering which aluminium window lock is right for renters, the answer is almost always a track lock. It delivers genuine resistance, installs in under ten minutes, leaves no marks, and costs less than a takeaway dinner. Pair it with a loop lock for two-layer protection without touching a drill.
For homeowners focused on cost effective sliding window security solutions, a single keyed sash lock on every accessible window provides the highest security-per-dollar return. Add pin locks to ground-floor windows and you have covered the most vulnerable openings for well under $100 each.
When Upgrading the Entire Window Makes More Sense
Aftermarket locks assume the frame they mount to is structurally sound. That assumption breaks down when the aluminium shows significant corrosion, the extrusion walls have thinned below 1.2 mm, or the profile has warped enough that the sash no longer sits square in its track. In those cases, drilling new holes into compromised material creates a weak point rather than a strong one.
Consider a full window replacement when:
- White oxidation covers large sections of the frame and flakes when touched
- The sash rocks visibly in the track even when the rollers are adjusted
- Previous drill holes have stripped out and epoxy repairs have already failed
- The profile is too thin to grip self-tapping screws without spinning
- Seals have degraded to the point where air and water infiltrate freely
When the frame itself is the weak link, knowing when to replace aluminium sliding windows instead of adding locks saves you from investing in hardware that cannot perform its job. A modern two-track aluminium sliding window system — such as the MEICHEN MA100 Sliding Window — is engineered with integrated hardware provisions, thicker extrusion walls, multiple glazing options, high-performance sealing, and fixed screen configurations. These design features make aftermarket lock installation more straightforward and structurally reliable, whether the opening serves a home, apartment, or commercial space. Upgrading the window and then fitting quality locks gives you a security foundation that lasts decades rather than years.
Final Security Recommendations
Your locks are installed, tested, and maintained. A few final habits ensure they keep doing their job long after the installation tools go back in the shed.
- Document everything. Photograph each lock position, the brand and model, and any serial numbers. Store these images with your home insurance documents — they serve as proof of security measures if you ever need to make a claim. RACV notes that insurers increasingly consider window security when assessing risk profiles.
- Register keyed locks. Many manufacturers offer key registration so replacements can be cut without the original. Store spare keys in a separate location from the windows they operate — a key safe near the front door or a locked drawer in another room.
- Re-test after environmental events. Any major temperature swing, severe storm, or seismic activity can shift aluminium frames by fractions of a millimetre. Run through the functional testing checklist from Step 6 after these events to confirm every lock still engages fully.
- Lock every window, every time. The best hardware in the world fails if it is not engaged. Build the habit of checking locks as part of your leaving-the-house routine, the same way you check that the stove is off.
A properly installed aftermarket lock on a quality aluminium sliding window is one of the most cost effective home security improvements available. It requires no subscription, no power source, and no professional installation — just a weekend afternoon, the right tools, and the willingness to close the gap that opportunistic intruders rely on.
Security is not a single purchase. It is a system of decisions — choosing the right lock, mounting it correctly, testing it honestly, and maintaining it consistently. You have now covered every step in that chain. The windows that were once your home’s weakest point can become one of its strongest.
Frequently Asked Questions About Installing Sliding Aluminium Window Locks
1. What is the easiest sliding window lock to install without drilling?
Track-channel locks are the simplest no-drill option. They sit inside the bottom track channel and act as a physical stop, preventing the sash from sliding open. Installation takes 5 to 10 minutes — you simply place the lock in the channel behind the sliding sash and tighten the thumb-screw until it grips firmly. Loop locks are another no-drill alternative that use adhesive pads or clamps to restrict window travel. Both options are ideal for renters since they leave no permanent marks on the aluminium frame and can be removed in seconds when you move out.
2. Can I install aftermarket locks on any aluminium sliding window?
Most aluminium sliding windows accept aftermarket locks, but compatibility depends on your specific window profile. You need to measure the sash thickness, rail height, track channel width, and frame material gauge before purchasing. For example, pin locks require at least 25 mm of combined stile depth across both sashes, while track locks must fit within the internal channel width without jamming the rollers. Reviewing manufacturer specifications — such as those available for two-track aluminium systems like the MEICHEN MA100 Sliding Window — helps confirm exact rail and stile dimensions so you choose a lock that fits properly.
3. Will installing a lock on my aluminium window void the warranty?
Drilling into an aluminium frame may void the manufacturer’s warranty, particularly on newer windows still within their guarantee period. The risk increases if you drill through thermal break chambers or structural webs inside the extrusion. Before picking up a drill, check your warranty documentation for clauses about modifications. If your windows are under warranty or you rent the property, non-drilling options like track-channel locks and loop locks provide genuine security without permanent alterations. Always get written landlord permission before making any permanent modification to a rental property.
4. How many locks should I install on each sliding window?
For maximum residential security, a three-point multi-lock setup is recommended: a keyed sash lock at the meeting rail as your primary everyday lock, a pin lock at the top rail as a secondary barrier that bonds both sashes together, and a track lock in the bottom channel as a failsafe. This combination covers the top, middle, and bottom of the window, preventing the sash from being lifted out of the track, slid open, or forced apart at the meeting rail. For lower-risk windows on upper storeys, a single keyed sash lock typically provides sufficient protection.
5. How often should I maintain my aluminium window locks?
A quarterly seasonal maintenance routine keeps locks operating reliably. In spring, clean tracks and lock mechanisms of debris and pollen. In summer, check that locks still turn freely despite thermal expansion. In autumn, lubricate all moving parts with silicone spray before winter. In winter, inspect for condensation-related corrosion around screw heads and housings. Coastal properties within 5 km of the ocean should increase maintenance to bi-annual due to accelerated salt-air corrosion. Replace any lock showing white powdery oxidation, wobbling housings, or mechanisms that no longer engage fully.
More Window & Door Guides