Understanding Aluminium Window Glazing Before You Start
Search for how to glaze aluminium windows and you’ll find plenty of pages that talk around the topic without ever walking you through the actual process. This guide is different. It covers the full sequence, from identifying your frame type through to snapping the final bead into place, so you can decide whether this is a job you’re comfortable tackling yourself.
What Does Glazing an Aluminium Window Mean
Aluminium window glazing is the process of fitting glass panes into aluminium frames and securing them with a combination of beads, rubber gaskets, packers, and sealants. The beads clip or screw into channels on the frame to hold the glass firmly. Packers (small plastic blocks) sit beneath and beside the glass to keep it centred and prevent direct contact between glass and metal. Gaskets and sealants provide the weathertight seal that stops water and air from getting through.
It sounds straightforward, and mechanically it is. But getting the details right—correct packer placement, proper bead sequence, the right sealant type—is what separates a clean, long-lasting result from cracked glass or a fogged-up unit six months down the track.
New Glazing vs Reglazing Scenarios
Glazing aluminium windows falls into two broad categories. New glazing means fitting glass into a frame for the first time, typically during a build or after a frame replacement. Reglazing means removing a failed or damaged unit and installing a new one into the existing frame. Both follow the same core steps, but reglazing adds the challenge of safely removing old glass and beads without damaging the aluminium profiles.
This guide covers the scenarios Australian homeowners and renovators encounter most often:
- New build aluminium glazing windows during construction
- Replacing cracked or misted sealed units in existing frames
- Upgrading single-glazed aluminium frames to double glazing
- Retrofit double glazing into older aluminium joinery
You’ll need moderate DIY confidence—comfort with hand tools, patience for precise measurements, and ideally a second pair of hands for handling glass. Each step ahead builds on the one before it, starting with the single most important thing to get right before you buy any materials: identifying exactly what type of aluminium frame and bead system you’re working with.
Step 1 – Identify Your Aluminium Window Type and Bead System
Every aluminium frame holds its glass differently. Buy the wrong glazing bead or gasket and you’ll be making a return trip to the supplier before you’ve even touched the glass. Spending ten minutes identifying your specific profile saves hours of frustration later.
How to Identify Your Bead System
The aluminium window glazing bead is the trim strip that locks the glass unit into the frame. It sits in a channel machined into the aluminium profile and either clips in or fastens with screws. There are two main types you’ll encounter in Australian homes:
- Snap-in glazing beads – the most common in residential aluminium frames. These click into a recessed channel and can be released with a stiff putty knife or dedicated bead lifter. You’ll recognise them by a fine seam line running along the inside face of the frame where the bead meets the main profile.
- Screw-fixed beads – more typical in light commercial or older residential installations. Small countersunk screws hold the bead in place, usually concealed beneath a rubber gasket or plastic cap. Look for evenly spaced screw heads or filled holes along the bead length.
To confirm which system you have, run your fingernail along the inside edge of the frame where the glass meets the aluminium. A visible join line or slight lip indicates the glazing bead on aluminium window frames. If you can gently flex the bead inward with a putty knife, it’s a snap-in system.
Different manufacturers use different aluminium window and door glazing profiles, which means gasket cross-sections and bead dimensions vary even between frames that look identical. Before ordering replacement parts, remove one short bead section and take it to your supplier for matching. Measure the bead width, depth, and the gasket groove dimensions—getting these wrong by even a millimetre means the bead won’t seat properly.
Residential frames tend to be slimmer (typically 44mm to 52mm face width) with simpler snap-in bead channels. Light commercial profiles run wider (65mm to 100mm+), often with screw-fixed beads and heavier-duty gaskets rated for larger glass panels and higher wind loads.
Internal vs External Beading Explained
Beyond the fastening method, you need to determine whether your frame is internally or externally beaded. This tells you which side of the window the glass gets installed from—and it has real implications for security and DIY accessibility.
Internally beaded frames have the glazing bead on the room side. The glass is inserted from inside, and the beads can only be removed from inside. Externally beaded frames position the bead on the weather side, meaning the glass is fitted from outside.
Most modern Australian residential aluminium windows use internal beading. It’s considered more secure because an intruder can’t pop the beads out from the exterior to remove the glass. It also makes DIY reglazing more practical since you’re working from inside the room rather than up a ladder.
| Feature | Internal Beading | External Beading |
|---|---|---|
| Security | Higher – beads only accessible from inside | Lower traditionally, though modern designs are security-rated |
| Ease of DIY | Easier – work from inside the room | Harder – requires external access, scaffolding for upper floors |
| Common Applications | Most residential aluminium windows, ground and upper floors | Some commercial facades, older residential frames, heritage profiles |
| Gasket Type | Wedge gasket or flip-fin rubber seated in bead channel | Compression gasket or foam-backed rubber for weather exposure |
Knowing your bead system and orientation determines everything that follows—what tools you’ll need, which direction the glass goes in, and how you’ll seal it. With that sorted, you can confidently put together your materials list without guessing.
Step 2 – Gather the Right Tools and Materials
Your bead system and frame orientation dictate exactly what goes on the shopping list. Getting everything together before you start means you won’t be halfway through a removal with glass balanced on packers and no sealant in sight. Here’s the complete kit, broken into tools and materials.
Essential Tools for Aluminium Window Glazing
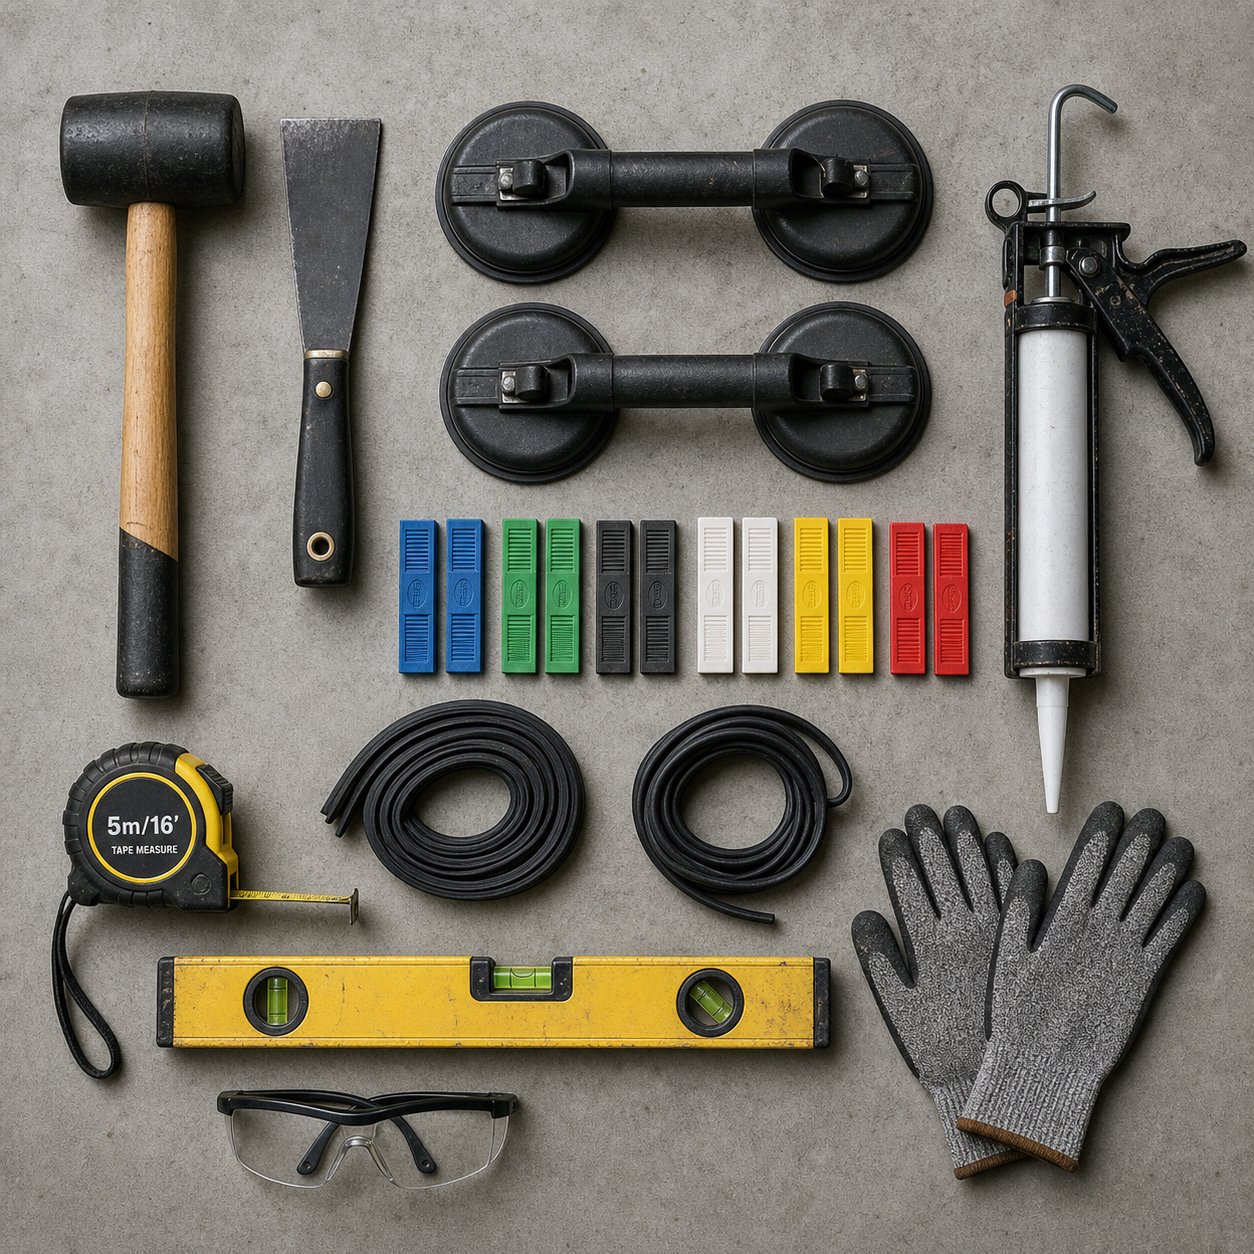
Most of these are standard hand tools. A few are glazing-specific and worth picking up from a glass or window hardware supplier rather than a general hardware store.
- Stiff putty knife or dedicated bead lifter – for releasing snap-in glazing beads without gouging the aluminium
- Rubber mallet – to tap beads home with firm, controlled force that won’t crack glass or dent the frame
- Suction cups (pair) – essential for lifting and positioning glass safely, especially sealed double-glazed units which are heavier than they look
- Tape measure – for verifying rebate depth, glass dimensions, and packer clearances
- Spirit level – to confirm the glass sits plumb and square once packed
- Gasket roller – helps seat rubber gaskets evenly into bead channels without stretching or bunching
- Utility knife – for trimming gaskets, cutting glazing tape, and cleaning old sealant residue
- Silicone gun (skeleton type) – for applying sealant in wet-glazed systems
For personal protection, you’ll also need:
- Cut-resistant gloves (EN 388 rated or equivalent)
- Safety glasses with side shields
- Steel-toe boots – a dropped sealed unit can weigh 20 kg or more
- Long sleeves to protect forearms during glass handling
Dry Glazing vs Wet Glazing Materials
The materials you need depend on whether your frame uses dry glazing, wet glazing, or a combination of both. Most modern Australian aluminium windows are dry-glazed—rubber gaskets and compression seals do all the weatherproofing work. Wet glazing adds a sealant layer for extra protection and is more common in commercial or high-exposure installations.
Dry glazing relies entirely on aluminium window glazing gaskets—pre-formed rubber or EPDM profiles that compress between the glass, frame, and bead to create a watertight seal. No sealant is applied. The gaskets do the sealing, and the beads provide the mechanical retention. This method allows for straightforward glass replacement down the track since there’s no cured sealant to cut through.
Wet glazing uses a continuous bead of neutral-cure silicone sealant between the glass face and the frame rebate, sometimes in combination with gaskets. It creates a bonded, airtight seal that performs well in high wind-load or driving-rain situations. The trade-off is messier application and harder future removal.
Materials for dry glazing:
- Replacement aluminium double glazing window seals (wedge gaskets, flip-fin gaskets, or compression gaskets matched to your bead profile)
- Glazing packers – flat packers (1 mm to 6 mm thick) for setting blocks, plus bridge packers for toe-and-heel positioning
- Replacement glazing beads (if originals are damaged or you’re changing glass thickness)
Materials for wet glazing:
- Neutral-cure silicone sealant (never acidic cure—it attacks sealed-unit edge seals)
- Glazing tape for aluminium windows – a foam-backed or butyl tape applied to the frame rebate before the glass goes in, providing a bed and secondary moisture barrier
- Glazing packers – same as dry glazing
- Backing rod (closed-cell foam) – fills deep gaps behind the sealant to control joint depth
- Methylated spirits and lint-free cloth – for cleaning rebate surfaces before sealant application
Quality matters with packers. Cheap ones compress or crack under sustained load, leading to glass movement and seal failure over time. Look for high-impact polystyrene or polypropylene packers that are colour-coded by thickness so you can identify sizes at a glance on site.
With your tools laid out and materials matched to your glazing method, the next job is getting the old glass out safely—a step where the right technique protects both you and the frame.
Step 3 – Safely Remove Old Glass and Failed Sealed Units
Removing aluminium window glazing is where the physical risk sits in this project. A double-glazed sealed unit in a standard 1200 mm x 600 mm opening can weigh upwards of 15 kg, and the edges are sharp enough to cut through regular work gloves. Rushing this step is how glass gets cracked, frames get gouged, and fingers get stitched. A methodical approach keeps everyone intact.
Safety Gear You Need for Glass Removal
Before you touch a bead lifter, gear up properly. The recommended PPE for glass handling includes:
- Cut-resistant gloves – rated to at least EN 388 Level C. Standard leather gardening gloves won’t stop a glass edge.
- Safety glasses with side shields – small glass chips can flick sideways when beads release under tension.
- Long sleeves – a close-fitting shirt or chore jacket, not loose fabric that can snag on frame edges.
- Steel-toe boots – a sealed unit dropped from waist height will break bones in regular shoes.
Lay a drop sheet or old towel along the base of the window to cushion any accidental contact between glass and the sill. Clear the floor area of trip hazards—cables, tools, furniture—so you have an unobstructed path to wherever you’re setting the removed unit down.
How to Remove Glazing Beads Without Frame Damage
To remove aluminium window glazing beads without scratching or bending the frame, you need the right tool angle and the right sequence.
Slide a stiff putty knife or dedicated bead lifter into the seam between the bead and the frame. Angle the blade slightly toward the bead rather than the frame—this way, any minor marking happens on the replaceable bead, not the permanent aluminium profile. Apply steady lateral pressure until the bead unclips from its channel. You’ll hear a distinct pop as each clip releases.
Sequence matters. Start with one of the shortest beads (typically the top or bottom on a portrait window). Work along its length, releasing each clip point progressively rather than trying to lever the whole bead out from one end. Remove the second short bead next, then the remaining side bead. Leave the longest bead until last—it provides the most support and keeps the glass stable while you remove the others. Forcing the longest bead out first lets the glass shift unpredictably.
If a bead feels stuck, don’t force it. Dirt, paint overspray, or old sealant residue can bond the bead into its channel over time. Run a utility knife along the seam to break the bond, then try again with the lifter. Aggressive levering bends the bead’s clip tabs and can crack the anodised finish on the frame.
Safe Glass Handling and Disposal
Safety warning: Never work alone when handling glass panels wider than 600 mm. A two-person lift is not optional—it’s the minimum safe practice. One person stabilises the panel from the room side while the second controls the tilt and guides it clear of the frame.
Once the final bead is out, the glass unit is held only by friction against the gaskets and packers. Attach suction cups to the interior face of the glass before removing that last bead—this gives you a controlled grip point. Tilt the top of the unit inward, lift it clear of the bottom packers, and carry it vertically to a safe resting spot. As ToughGlaze’s handling guidelines note, keeping glass close to your body and never overhead significantly reduces injury risk if something goes wrong.
For disposal, misted or cracked double-glazed units can’t go in standard kerbside recycling in most Australian council areas. The sealed unit contains a desiccant-filled spacer bar and butyl sealant that contaminate glass recycling streams. Check your local council’s waste facility—many accept flat glass separately from bottle glass. If the unit is intact but failed (condensation between panes), some glass recyclers will take it whole. Wrap cracked units in the drop sheet or old cardboard before transporting them to prevent loose shards in your vehicle.
Older sealed units manufactured before the early 2000s may contain lead-based solder on spacer bar corners. Handle these with extra care and dispose of them through your council’s hazardous waste stream if you’re unsure of their age.
With the old unit out and the frame empty, you can inspect the rebate for damage, clean out old gasket material, and measure the exact dimensions you’ll need when ordering replacement glass.
Step 4 – Select the Correct Glass Type and Thickness
Your frame is clean, measured, and ready for new glass. But ordering the wrong unit—too thick for the rebate, wrong safety rating for the location, or a build-up that doesn’t match the frame’s thermal performance—means starting over. Glass selection is where building regulations, energy performance, and physical frame constraints all intersect.
Matching Glass Thickness to Frame Rebate Depth
The rebate is the recessed channel in the aluminium profile where the glass sits. Its depth dictates the maximum thickness of glass unit you can install. Measure from the back of the rebate to the face where the gasket or bead seats—that’s your available depth. You need at least 2 mm clearance on each side for gaskets and thermal movement, so a 24 mm rebate realistically accommodates a 20 mm glass unit.
Here’s what you’ll typically encounter in Australian aluminium frames:
- Single glazing (4–6 mm) – found in older aluminium frames from the 1970s through to the early 2000s. Rebate depths are usually 12–15 mm. These frames were never designed for sealed units, so upgrading to double glazing requires either a frame with a deeper rebate or a slim-profile IGU.
- Standard double glazed sealed units (20–24 mm) – the most common replacement in modern aluminium double glazing windows. A typical build-up is 4 mm glass / 12 mm air or argon gap / 4 mm glass, totalling 20 mm. Frames designed for IGUs have rebate depths of 24–28 mm.
- Triple glazing (32–44 mm) – triple glazing aluminium windows use three glass layers with two gas-filled cavities. These units are substantially thicker and heavier, requiring purpose-built frames with deep rebates (36 mm+) and reinforced hardware to handle the weight.
If your existing frame has a shallow rebate and you want to move from single to double glazing, slim-profile IGUs with a 12–14 mm total thickness (3 mm glass / 6 mm gap / 3 mm glass) can sometimes fit. The trade-off is a narrower cavity, which reduces insulation performance compared to a full 20 mm unit. Check with your glass supplier whether a slim unit still meets your energy performance targets before committing.
Toughened vs Laminated Glass Requirements
Not all glass is interchangeable. Australian Standard AS 1288 Glass in buildings mandates safety glazing in specific locations where human impact is likely. You can’t simply order standard annealed glass and install it anywhere you like.
Safety glazing is required in:
- Doors – all glass within swinging, sliding, and fixed doors
- Adjacent to doors – glass within 300 mm of a door edge
- Low-level glazing – any glass with its bottom edge less than 500 mm above finished floor level
- Wet areas – bathrooms, ensuites, laundries where glass is within 2 m of a shower or bath
- Stairways and landings – glass adjacent to or forming part of a balustrade
In these locations, you must use either toughened (tempered) or laminated glass. Both qualify as safety glass under AS 1288, but they behave differently on failure:
- Toughened glass is heat-treated to be four to five times stronger than standard annealed glass. When it breaks, it shatters into small, relatively blunt granules rather than dangerous shards. It’s the default choice for most residential safety-glazing locations.
- Laminated glass bonds two or more glass layers with a polyvinyl butyral (PVB) interlayer. If broken, the fragments adhere to the interlayer rather than falling free. It offers superior security (harder to break through entirely), better acoustic performance, and blocks up to 99% of UV radiation. It’s preferred for overhead glazing, balustrades, and situations where post-breakage retention matters.
For double glazed hermetically sealed glazing in aluminium windows, you can specify toughened or laminated glass on one or both panes of the IGU. A common residential configuration is toughened on the exterior pane (impact resistance) and standard or laminated on the interior pane, depending on the location’s safety requirements.
Energy Performance and Low-E Glass Options
Beyond safety, glass selection directly affects how much heat your home gains and loses. The two key metrics are the U-value (thermal conductance—lower is better) and the SHGC (solar heat gain coefficient—context-dependent). Data from the Window Energy Rating Scheme (WERS) shows that a standard aluminium-framed single-glazed window has a U-value around 6.9 W/m²K, while double glazing with a 6 mm air gap drops that to approximately 4.2 W/m²K.
Adding a Low-E (low emissivity) coating pushes performance further. Low-E glass has a microscopically thin metallic coating that reflects infrared heat while transmitting visible light. In cooler climates like Melbourne, Hobart, or Canberra, a high-transmission Low-E coating on the inner pane lets solar warmth in during winter while reducing heat loss at night. In warmer climates from Brisbane north, a low-transmission Low-E coating on the outer pane reduces solar heat gain and cuts cooling loads.
Argon gas fill in the IGU cavity improves insulation over standard air by roughly 15–20%, bringing U-values for aluminium windows double glazing down toward 2.8–3.2 W/m²K depending on frame type and glass configuration.
The frame itself plays a significant role. Standard aluminium conducts heat readily—it’s why older aluminium-framed windows feel cold to the touch in winter and can develop condensation. Thermally broken aluminium frames insert a structural polymer barrier between the interior and exterior aluminium sections, dramatically reducing heat transfer through the frame. This lower frame U-value means the overall window system can support and benefit from higher-performing glass build-ups. There’s little point installing premium Low-E double glazing into a frame that bleeds heat around the glass edges.
Modern thermally broken systems like MEICHEN’s MC100 Awning/Fixed Window illustrate how frame design and glass selection work together. The MC100 accommodates various glass configurations—from standard double glazing through to high-performance Low-E units—with project-specific support for choosing the right build-up based on climate zone, orientation, and NatHERS requirements. That kind of integrated approach ensures the glass and frame perform as a system rather than working against each other.
The table below summarises common glass options for double glazing aluminium windows and helps you match the right type to your situation:
| Glass Type | Typical Thickness | U-Value Range (Whole Window) | Best Application |
|---|---|---|---|
| Single clear (annealed) | 4–6 mm | 6.2–6.9 W/m²K | Older frames, internal partitions, mild climates only |
| Double glazed IGU (clear/air/clear) | 20 mm (4/12/4) | 3.5–4.2 W/m²K | Standard replacement in aluminium frames |
| Double glazed IGU (Low-E/argon/clear) | 20–24 mm | 2.4–3.2 W/m²K | Energy-efficient upgrade, all climate zones |
| Triple glazed IGU (Low-E/argon/Low-E) | 32–44 mm | 1.0–1.8 W/m²K | High-performance builds, Passive House, alpine regions |
| Laminated (single or within IGU) | 6.38–12.76 mm per pane | Depends on IGU configuration | Safety locations, acoustic control, security, overhead glazing |
| Toughened (single or within IGU) | 4–12 mm per pane | Depends on IGU configuration | Doors, low-level glazing, wet areas, high-impact zones |
When ordering your replacement unit, provide the glass supplier with your rebate depth measurement, the window’s location in the home (so they can confirm safety-glass requirements under AS 1288), and your climate zone if you want Low-E recommendations tailored to your region. A reputable supplier will confirm the build-up fits your frame and meets the National Construction Code before manufacturing.
With the right glass unit specified and on order, the next critical step happens inside the empty frame—positioning packers precisely so the glass sits exactly where it needs to without stress points that could lead to cracking.
Step 5 – Install Packers and Position the Glass
Packers are small plastic blocks that do an outsized job. They carry the full weight of the glass, keep it centred in the frame, and—when placed correctly—prevent the sash from dropping, the frame from distorting, and the sealed unit from developing stress fractures. Skip this step or get the positions wrong, and you’ll be dealing with cracked glass, failed seals, or a window that won’t close properly within months.
Where to Place Glazing Packers
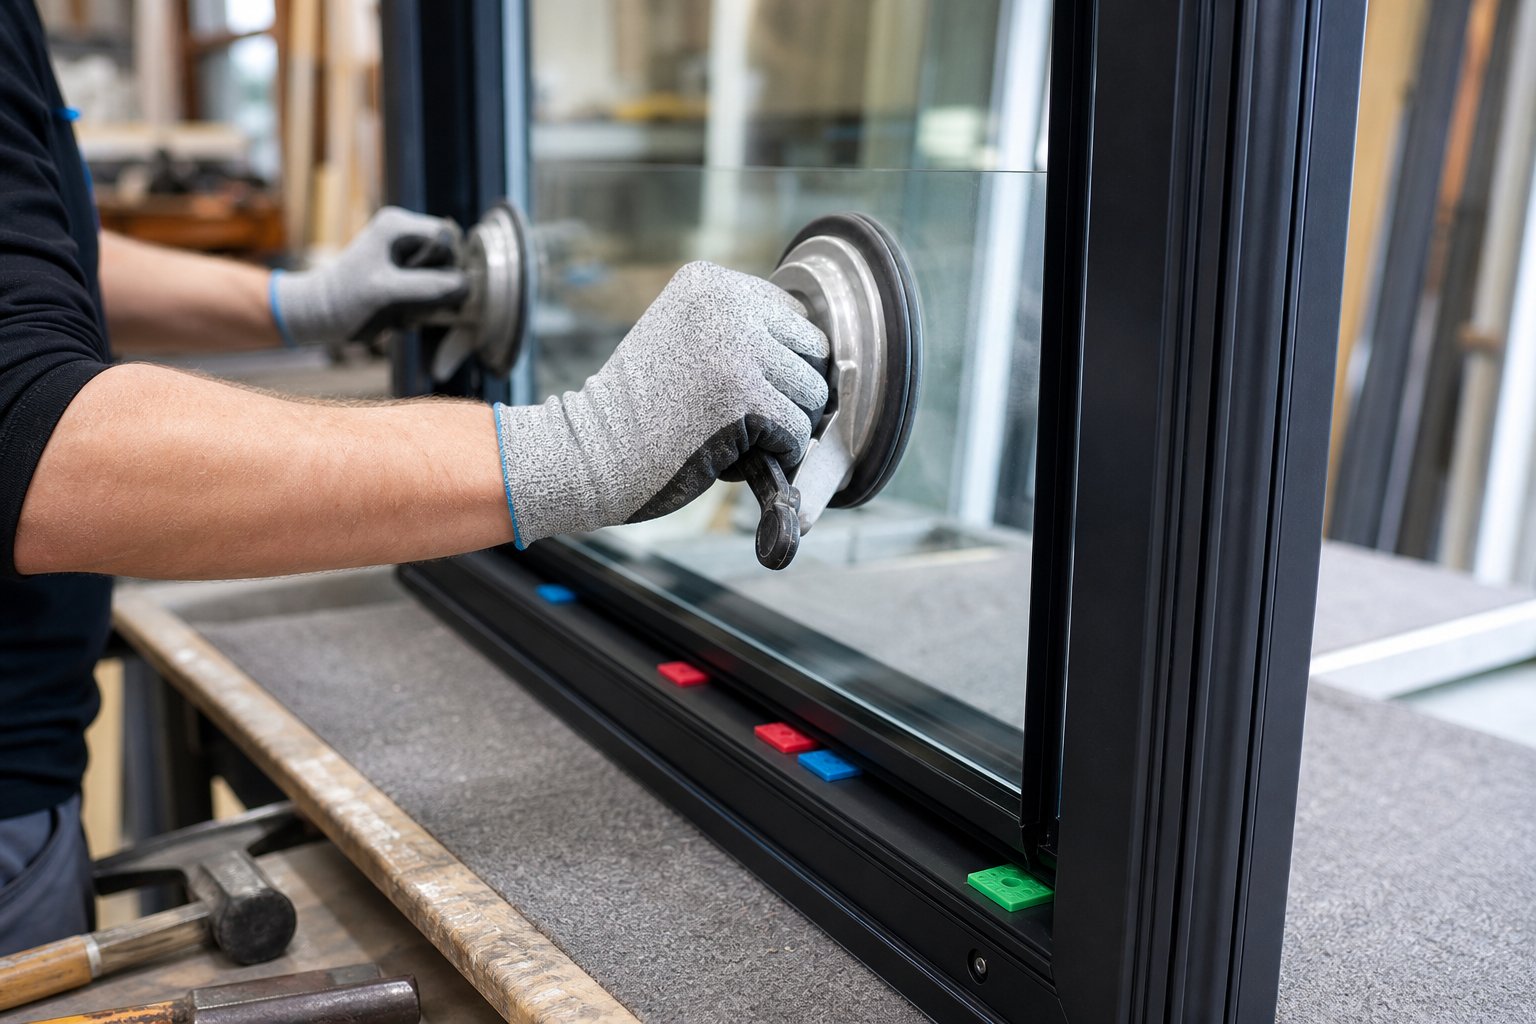
Two types of packers work together in every aluminium double glazing window. Setting blocks sit at the bottom of the frame and bear the unit’s weight. Location packers (also called bridge or side packers) sit along the sides to keep the glass centred and, in opening windows, to lock the sash geometry square through a technique called toe and heel.
Placement differs depending on whether you’re glazing a fixed pane or an opening sash. Get this distinction right—it’s the single biggest factor in long-term window performance.
Fixed windows: Place setting blocks at the quarter points along the bottom rail—roughly 25% in from each corner. This distributes weight evenly across the frame rather than concentrating it at the corners, which can bow the bottom rail over time. Side packers go at matching quarter points on both vertical edges to centre the glass and maintain equal clearance all round.
Opening sashes (side-hung casement): The toe-and-heel method places packers at diagonally opposite corners to counteract the sash’s tendency to drop under its own weight. Pack the bottom hinge corner and the top lock corner. This creates a structural triangle that keeps the sash square and prevents it sagging away from the hinge over time.
Top-hung awning windows: Pack both bottom corners (hinge side and lock side) to prevent the sash bowing downward when it opens outward. Side packers at the top lock corners keep the unit from shifting laterally.
Incorrect placement—or worse, no side packers at all—lets the glass shift inside the frame. That movement creates uneven pressure on the sealed unit’s edge seal, leading to premature failure and condensation between panes. It also throws the sash out of square, causing misaligned locks, draughts, and difficulty closing.
| Window Type | Bottom Packers Position | Side Packers Position | Purpose |
|---|---|---|---|
| Fixed pane | Quarter points along bottom rail (25% in from each end) | Quarter points on both vertical edges | Even weight distribution, centred glass, no frame bow |
| Side-hung casement | Bottom hinge corner | Top lock corner (diagonal opposite) | Toe-and-heel support prevents sash drop |
| Top-hung awning | Both bottom corners (hinge and lock side) | Top lock corner | Prevents sash bowing when open, maintains square geometry |
Use rigid, colour-coded flat packers in the correct thickness to achieve 3–5 mm clearance between the glass edge and the aluminium frame on all sides. If the gap is too tight, thermal expansion in summer can stress the glass. Too loose, and the unit rattles or shifts off its packers.
Positioning the Glass Unit Correctly
With packers placed, it’s time to set the glass. Attach suction cups to the interior face of the unit before lifting—they give you a controlled grip and let you guide the panel precisely rather than wrestling it by the edges.
For aluminium glass windows glazing, tilt the top of the unit toward you slightly, lower the bottom edge onto the setting blocks, then push the top into the frame until the unit sits upright in the rebate. Check that it rests squarely on both bottom packers and that the clearance gap is even on all four sides. A quick measurement with a tape or a visual check against the gasket groove confirms alignment.
If the gap is uneven, slide a flat packer behind the tight side to nudge the glass across. Don’t force it—if you can’t achieve even gaps, the glass unit may be slightly oversized or the frame may have racked. Re-measure both before proceeding.
For aluminium windows with double glazing, the sealed unit’s weight makes repositioning difficult once it’s seated. Get it right on the first placement rather than trying to shuffle a 20 kg panel sideways on its packers. A second pair of hands makes this dramatically easier and safer.
Once the glass is centred and sitting firmly on its packers with consistent gaps all round, it’s ready to be locked in place with beads and gaskets—the step that turns a balanced panel into a weathertight, secure window.
Step 6 – Secure Glazing Beads and Apply Sealant
The glass is sitting on its packers, centred and stable. It’s not going anywhere—yet. Until the aluminium window glazing beads are locked into their channels, that panel is held by nothing more than gravity and friction. This step turns a balanced piece of glass into a fully secured, weathertight window.
Fitting Gaskets and Snapping Beads Into Place
Before any bead goes near the frame, the glazing gasket for aluminium windows needs to be seated first. Depending on your system, the rubber gasket either slides onto the glass edge itself (a wraparound or U-channel gasket) or presses into a groove machined into the bead (a wedge or flip-fin type). Check which arrangement your frame uses—trying to snap a bead in without its gasket seated properly results in a loose fit, rattling, and water ingress at the corners.
For gaskets that sit in the bead channel, lay the bead flat and press the aluminium window glazing rubber into the groove along its full length. Use a gasket roller if you have one—it seats the rubber evenly without stretching it. Stretched gaskets shrink back over time and leave gaps. For wraparound gaskets, slide the U-channel over the glass edge before positioning the bead, ensuring it sits flush against both faces of the glass.
The installation sequence is the reverse of removal: fit the shortest beads first, then the longest bead last. On a portrait window, that typically means the top and bottom beads go in first, followed by the longer side beads. Starting with the short beads locks the glass laterally while still giving you room to manoeuvre the longer pieces into position. If you try to fit the longest bead first, the glass can shift sideways before the shorter beads are there to hold it.
To seat each bead, align one end into its channel and press firmly along the length by hand. Once the bead is sitting in the groove, use a rubber mallet to tap it home with controlled, even strikes. Work from one end to the other rather than hitting the middle—this prevents the bead bowing and popping out at the ends. Keep the mallet strikes light and directed squarely onto the bead face. Angled blows can dent the aluminium frame or, worse, transmit shock through to the glass. If a bead resists, don’t hit harder. Pull it back out and check for debris in the channel, a misaligned aluminium window glazing wedge, or a gasket that’s bunched up and blocking the clip tabs.
Once all four beads are snapped in, run your fingers around the perimeter. Every section should feel flush with the frame—no raised edges, no gaps, no movement when you press inward. A bead that clicks but doesn’t sit flat usually means the glass unit is fractionally too thick for the rebate, or the gasket profile is wrong.
Wet Sealing Technique and Weather Considerations
Dry-glazed systems rely entirely on gasket compression for their weather seal. Wet-glazed systems add a layer of silicone sealant between the glass face and the frame rebate for extra protection against wind-driven rain—common in exposed coastal locations or commercial installations across Australia.
Pro tip: Always use neutral-cure silicone for glazing sealed units. Acetoxy (acid-cure) silicone releases acetic acid as it cures, which attacks the butyl edge seals on double-glazed IGUs. A compromised edge seal leads to moisture ingress between the panes and a fogged unit within months—an expensive mistake caused by a $12 tube of the wrong sealant.
To wet-glaze, apply a continuous bead of neutral-cure silicone into the frame rebate before setting the glass. The sealant should form an unbroken line around the full perimeter—any gaps become water entry points. Once the glass is positioned and the beads are fitted, back-fill any visible voids between the bead and glass face with a neat fillet of the same sealant. Tool the joint smooth with a wetted finger or plastic spatula for a clean finish that sheds water rather than trapping it.
Weather conditions matter more than most people realise when applying sealant. Most neutral-cure silicones require a minimum substrate and ambient temperature of 5°C for proper adhesion and curing. Below that threshold, the sealant won’t bond reliably to the aluminium or glass surface. High humidity actually helps neutral-cure silicone cure faster since it’s a moisture-curing chemistry—but rain is a different story. Water running across an uncured sealant joint washes it out of the rebate or prevents skin formation, leaving you with a failed seal that looks fine on the surface but has no adhesion beneath.
Plan your glazing for a dry day with temperatures above 5°C. If you’re working in winter, store the sealant cartridges indoors overnight so they’re at room temperature when you apply them—cold sealant is thick, hard to gun, and difficult to tool smoothly. Allow 24 to 48 hours of dry weather after application for the sealant to skin over and begin curing before the joint is exposed to rain.
With beads locked, gaskets compressed, and sealant cured, the glazing itself is complete. But a finished installation doesn’t always mean a problem-free one—the next section covers what to check if something doesn’t look or feel right after you’ve buttoned everything up.
Step 7 – Troubleshoot Common Glazing Mistakes
Sometimes everything looks right from the inside—beads flush, gaskets seated, sealant tooled—and problems still show up days or weeks later. Misting between panes, water pooling on the sill, or a faint rattle in the wind all point to specific causes with specific fixes. Knowing which issues you can resolve yourself and which need a glazier saves time and prevents making things worse.
Why New Glazing Mists Up Quickly
Condensation appearing between the panes of a freshly installed sealed unit is disheartening, but it’s almost always caused by damage to the unit’s edge seal during handling—not a glazing technique error. The hermetic seal around a double-glazed IGU relies on an unbroken butyl primary seal and a structural secondary seal (usually polysulphide or silicone) to keep moisture out of the cavity. Even small nicks or compression damage to this edge seal allow humid air to migrate between the panes, where it condenses on the cooler inner glass surface.
Common causes of seal damage during DIY double glazing existing aluminium windows include:
- Resting the unit on a hard surface without edge protection during transport or staging
- Over-tightening packers that compress the sealed unit’s edge beyond its tolerance
- Using acidic-cure silicone that chemically attacks the butyl seal (covered in Step 6)
- Dropping the unit onto its corner, even from a short height
If misting appears within the first few weeks, the sealed unit itself has failed—no amount of resealing the beads or gaskets will fix it. The unit needs to be replaced. Contact your glass supplier, as manufacturing defects in the original seal application are covered under warranty in most cases. If the damage occurred during your installation, it’s a lesson in handling care rather than a glazing method problem.
Fixing Water Ingress and Drainage Issues
Water appearing on the inside of the sill or pooling at the bottom corners of the frame after rain points to one of two issues: insufficient sealant coverage or blocked drainage slots.
Aluminium window frames are designed to manage small amounts of water that inevitably get past the outer gaskets. Weep slots machined into the bottom rail allow this water to drain back outside rather than building up inside the frame cavity. Blocked or covered weep holes cause water to stagnate below the glass, eventually overflowing inward or degrading the sealed unit’s edge seal through prolonged contact.
Diagnostic steps:
- Check weep slots – look at the exterior face of the bottom rail for small rectangular slots (typically 5 mm x 16 mm). Clear any dirt, paint, or insect debris with a thin wire or compressed air. Weep hole covers should be present but not sealed shut.
- Inspect corner joints – water ingress at frame corners usually means the sealant bead was broken or missed at the mitre joint. Remove the affected bead, clean the area, and re-apply neutral-cure silicone into the corner before refitting.
- Check gasket continuity – a gasket that’s short-cut at the corners or bunched up leaves a gap where wind-driven rain enters. Replace the gasket section if it’s not sitting flush around the full perimeter.
For anyone undertaking diy double glazing existing aluminium windows, water management is the detail most often overlooked. The glass itself may be perfectly installed, but if drainage paths are compromised during the process, leaks follow.
When to Call a Professional
Some problems sit firmly outside DIY territory. Persistent condensation between panes means a failed hermetic seal—the unit must be replaced, and if it keeps happening across multiple windows, the supplier or a glazing specialist should assess whether the frame design or installation environment is contributing. Beads that refuse to snap in despite correct technique usually indicate the glass unit is too thick for the rebate depth, or you’ve been supplied the wrong bead profile. A glazier with access to the manufacturer’s profile library can confirm compatibility and source the correct parts.
If you’re attempting to retrofit double glazing to aluminium windows that were originally single-glazed, frame limitations often surface at this stage. Shallow rebates, inadequate drainage, and frames not engineered for the weight of a sealed unit can all create ongoing issues that no amount of troubleshooting resolves. In these cases, professional assessment of whether the frame can be adapted—or whether replacement makes more sense—is money well spent.
The table below summarises the most common post-installation issues and helps you decide your next move:
| Problem | Likely Cause | DIY Fix | Professional Required |
|---|---|---|---|
| Misting between panes within weeks | Edge seal damaged during handling or by acidic silicone | None – sealed unit must be replaced | Yes (warranty claim or new unit) |
| Water pooling on interior sill | Blocked weep slots or missing sealant at frame corners | Clear weep holes, reseal corner joints | No |
| Rattling glass in wind | Undersized packers, missing gaskets, or gasket shrinkage | Add packers to fill gaps, replace gaskets | No |
| Beads won’t snap fully into channel | Wrong bead profile, glass unit too thick, or debris in channel | Clean channel and retry; if still failing, check unit thickness against rebate | Yes (if wrong profile supplied) |
| Condensation between panes (older unit) | Hermetic seal failure from age, UV, or thermal cycling | None – unit replacement required | Yes |
| Draughts around glass edge | Gasket not seated fully or bead not clipped at all points | Remove bead, reseat gasket, refit bead | No |
Most rattling and draught issues are straightforward fixes—pull the bead, address the gasket or packer, and refit. Water and misting problems require more careful diagnosis because the root cause isn’t always visible from inside the room. When in doubt, a qualified glazier can pressure-test the window with a hose to pinpoint exactly where water is entering, saving you from chasing the wrong fix.
Troubleshooting only goes so far when the underlying frame isn’t suited to the glass you’re trying to install. The final consideration is whether your particular situation calls for continued DIY glazing work—or whether a different approach altogether delivers a better long-term result.

Step 8 – Decide Between DIY Glazing and Professional Replacement
You’ve now seen the full process—from identifying bead systems through to troubleshooting post-installation issues. The honest question at this point is whether your specific situation actually suits a DIY approach, or whether the smarter move is handing the job to a professional or replacing the window entirely.
DIY-Appropriate Glazing Tasks
Replacing a single failed sealed unit in an internally beaded aluminium frame at ground level is the sweet spot for confident DIYers. The beads are accessible from inside, the glass dimensions are manageable with two people, and the process follows the steps outlined in this guide without requiring specialist equipment or scaffolding.
Tasks that sit comfortably within DIY territory include:
- Replacing a misted or cracked IGU in a standard residential frame (under 1200 mm x 1200 mm)
- Swapping gaskets and reseating beads to fix rattling or minor draughts
- Clearing blocked weep holes and resealing corner joints
- Upgrading single glazing to a slim-profile double-glazed unit where the existing rebate depth allows it
Beyond these scenarios, the risk-to-reward ratio shifts. Large panels over 1.5 m² require mechanical lifting equipment and carry serious injury risk if mishandled. Upper-storey windows with external beading demand scaffolding and working-at-height compliance. Any glazing adjacent to doors, in wet areas, or below 500 mm from floor level must meet AS 1288 safety-glass requirements—getting this wrong creates a compliance issue that affects insurance and resale. Structural glazing, curtain wall systems, and bushfire-rated assemblies (BAL-29 and above) all require professional installation with documented compliance.
When Full Window Replacement Makes More Sense
Reglazing assumes the frame itself is worth keeping. That assumption breaks down in several common situations Australian homeowners face—particularly with older aluminium joinery from the 1980s and 1990s that was never designed for sealed units.
Replacement typically outperforms reglazing when:
- Frames lack a thermal break—non-thermally-broken aluminium conducts heat so readily that even premium Low-E glass can’t compensate for the energy lost through the frame perimeter
- Visible corrosion, pitting, or white oxidation has weakened the aluminium profiles, particularly in coastal homes exposed to salt air
- Rebate depths are too shallow to accept a properly performing IGU (anything under 18 mm limits you to slim units with compromised insulation)
- Hardware, hinges, and locking mechanisms are worn beyond adjustment—new glass in a sash that won’t close tightly still leaks air and noise
- Multiple windows across the home have failed simultaneously, suggesting systemic frame deterioration rather than isolated glass failure
- You’re renovating and walls, cladding, or reveals are already being opened up—integrating new frames during broader works is far less disruptive than retrofitting later
Can you retrofit double glazing to aluminium windows that were originally single-glazed? Sometimes, yes—but the practical limitations often make it a compromise rather than a solution. The frame’s thermal performance remains poor, drainage may be inadequate for the heavier sealed unit, and the overall system U-value stays well above what a purpose-built double-glazed window achieves.
Modern thermally broken aluminium systems eliminate these compromises entirely. A system like MEICHEN’s MC100 Awning/Fixed Window arrives with glazing factory-configured—the glass build-up, Low-E coatings, sealing performance, and packer placement are all engineered as an integrated unit. There’s no on-site guesswork about rebate depth compatibility, no risk of edge-seal damage during manual handling, and the thermal break ensures the frame performs in concert with the glass rather than undermining it. For homeowners who’ve worked through this guide and concluded their frames are beyond reglazing, a factory-sealed replacement system is the path that delivers reliable long-term performance without the ongoing maintenance cycle of patching an aging frame.
It’s also worth considering alternatives that sit between reglazing and full replacement. Secondary glazing aluminium windows—adding a discrete internal panel to the existing frame—can improve thermal and acoustic performance without removing the primary window. This approach suits heritage-listed properties or strata buildings where external changes aren’t permitted. The aluminium secondary glazing cost per window varies widely depending on opening size and operator type, but it’s generally lower than full frame replacement while still delivering meaningful comfort gains. For period homes with original joinery, aluminium secondary glazing sash windows preserve the streetscape appearance while addressing the thermal shortcomings of single glazing from the room side. Research the aluminium secondary glazing windows cost for your specific window sizes before committing to either path—in some cases, secondary glazing delivers 80% of the thermal benefit at 40% of the replacement cost.
Replacing aluminium windows with double glazing is a bigger upfront investment than reglazing a single unit, but the maths often favours it when you factor in energy savings, reduced maintenance, improved security hardware, and the elimination of repeat seal failures. A factory-built window resets the clock entirely—new frame, new glass, new seals, new warranty—rather than extending the life of components that were never designed for the performance you’re asking of them.
Whichever path you choose, the knowledge in this guide gives you the language and understanding to brief a glazier accurately, assess quotes critically, and recognise quality workmanship when you see it. That’s valuable whether you’re snapping beads in yourself or watching a professional do it on your behalf.
Frequently Asked Questions About Glazing Aluminium Windows
1. Can you replace double glazing in aluminium windows yourself?
Yes, replacing a single failed sealed unit in an internally beaded aluminium frame at ground level is a manageable DIY task. You need moderate confidence with hand tools, a second person for lifting glass panels over 600 mm wide, and the correct replacement gaskets and packers matched to your specific frame profile. Tasks beyond this, such as large panels over 1.5 square metres, upper-storey externally beaded frames, or safety-glass locations requiring AS 1288 compliance, are better left to a qualified glazier.
2. What is the difference between dry glazing and wet glazing aluminium windows?
Dry glazing uses pre-formed rubber or EPDM gaskets compressed between the glass, frame, and bead to create a weathertight seal without any sealant. Wet glazing adds a continuous bead of neutral-cure silicone between the glass face and the frame rebate for enhanced protection against wind-driven rain. Dry glazing is standard in most Australian residential aluminium windows and allows easier future glass replacement. Wet glazing is more common in commercial or high-exposure coastal installations where additional weather resistance is needed.
3. Why do my newly glazed aluminium windows have condensation between the panes?
Condensation appearing between panes shortly after installation almost always indicates damage to the sealed unit’s edge seal during handling rather than a glazing technique error. Common causes include resting the unit on hard surfaces without edge protection, using acidic-cure silicone that attacks the butyl seal, or dropping the unit onto a corner. Once the hermetic seal is compromised, moisture migrates between the panes and no amount of external resealing will fix it. The sealed unit must be replaced, and if the damage occurred during manufacturing, it should be covered under warranty.
4. Can you retrofit double glazing to existing aluminium window frames?
It depends on your frame’s rebate depth. Standard double-glazed units are 20 to 24 mm thick and require rebate depths of at least 24 mm. Older single-glazed aluminium frames typically have rebates of only 12 to 15 mm, which limits you to slim-profile IGUs with reduced insulation performance. Even where a slim unit fits physically, the frame’s lack of a thermal break means overall window performance remains poor. Modern thermally broken systems like MEICHEN’s MC100 offer factory-configured glazing with integrated Low-E options and proper sealing, delivering significantly better long-term performance than retrofitting older frames.
5. What order should glazing beads be removed and refitted on aluminium windows?
For removal, start with the shortest beads first (typically top or bottom on a portrait window), then remove the remaining side bead, and leave the longest bead until last. This keeps the glass stable while you work. For refitting, reverse the sequence: install the shortest beads first to lock the glass laterally, then fit the longest bead last. This approach gives you room to manoeuvre longer pieces into position without the glass shifting. Always use a rubber mallet with controlled, even strikes working from one end to the other rather than hitting the middle.
More Window & Door Guides