Step 1 – Identify the Type of Frame Damage
Your aluminium door frame worked perfectly for years. Then one morning you notice the door drags on the threshold, or a gap lets cold air whistle through at night. Before reaching for tools or calling a contractor, you need to figure out exactly what kind of damage you’re dealing with. Aluminium door repair starts with diagnosis — the wrong fix for the wrong problem wastes time and can make things worse.
Common Types of Aluminium Frame Damage
Most frame failures fall into four categories, and each one points toward a different repair method later in this guide:
- Bent frame – Physical impact (a heavy object striking the frame, or even kids swinging off the door) can dent or bow aluminium sections. Minor bends are repairable; severe distortion often means the profile has lost structural integrity.
- Loose frame – Fasteners corrode, wall plugs crack, and brackets pull away from the structural opening over time. The frame may rattle or shift when you push against it.
- Corroded frame – White powdery oxidation on the surface, or deeper pitting in coastal and high-humidity environments. Salt air along Australia’s coastline accelerates this significantly.
- Misaligned frame – The frame sits out of plumb or level, causing the door to bind, drag, or leave uneven gaps. This is the most common issue, and it’s frequently tied to what’s happening beneath the house.
How Building Settlement Affects Your Door Frame
Buildings move. Reactive clay soils — common across much of Sydney, Melbourne, and Adelaide — swell with moisture and shrink in drought. That movement transfers through the structure and pushes door frames out of square. Foundation settlement pulls a frame’s corners away from their original right angles, so the door no longer sits evenly within the opening.
A single misaligned door might be a hinge or fastener issue. But if multiple doors and windows in your home are sticking at the same time, that pattern points toward ground movement rather than localised hardware wear. Thermal expansion adds another variable — aluminium expands roughly 23 micrometres per metre for every degree Celsius of temperature change, which matters in climates that swing between cold winters and scorching summers.
Signs Your Frame Needs Attention Now
How do you fix a sagging storm door or any hinged aluminium door that isn’t performing? Start by checking for these visible symptoms:
- Gaps along the frame edge, especially at the top corners
- Door dragging on the threshold or scraping the floor
- Rattling or vibration in wind, even when the door is closed
- Visible daylight around the weatherseal when the door is shut
- White corrosion spots or surface pitting on the frame profile
- Latch or lock that no longer engages without lifting or forcing the door
If you spot one or two of these, the frame likely needs a targeted fix. Three or more symptoms appearing together usually signals that the underlying cause — settlement, worn fasteners, or cumulative corrosion — has progressed beyond a quick adjustment. Identifying which category your damage fits into determines the tools you’ll need and the repair approach that will actually hold long-term.
Step 2 – Gather Tools and Materials for Your Repair
Knowing the damage type is only useful if you have the right gear on hand to address it. Nothing stalls a weekend repair faster than a missing drill bit or the wrong grit sandpaper halfway through the job. The checklist below is organised by category so you can pull together exactly what your specific repair demands — no more, no less.
Measuring and Diagnostic Tools You Need
Accurate measurement separates a lasting repair from one that fails within a season. A spirit level (at least 1200 mm long) reveals whether your jambs are plumb, while a plumb bob confirms vertical alignment in deeper openings where a short level can mislead. A quality measuring tape and a straight edge or long aluminium rule help you quantify gaps and detect bowing along the frame’s length. These tools apply to virtually every repair type — alignment, shimming, joint work, and even corrosion filling where you need to assess surface depth.
Fasteners and Repair Materials by Damage Type
Your fastening toolkit depends on whether you’re re-securing a loose frame, repairing separated joints, or doing both. A cordless drill with masonry and metal bits covers most fixing work. A pop rivet gun handles permanent joins on thin aluminium sections, while a nut rivet tool lets you install threaded inserts for hardware that may need future removal. Keep a full screwdriver set handy for adjusting hinges and strike plates.
For surface repairs, stock aluminium-specific filler (an epoxy-based product rated for non-ferrous metals), sandpaper in grits from 120 through to 400, an etch primer designed for aluminium, and colour-matched touch-up paint. These cover everything from shallow corrosion pitting to deeper dents that need building up before finishing.
Shimming and Sealing Supplies
Re-aligning a settled frame calls for plastic packers in assorted thicknesses (typically 1 mm to 10 mm), timber shims for larger adjustments, and offcuts of 5/8 plywood for packing behind brackets where the gap is substantial. Pair these with appropriate wall anchors — either nylon plugs for masonry or metal toggles for lightweight construction.
Sealing supplies round out the kit: replacement weatherstripping or rubber gaskets sized to your frame’s channel, a tube of neutral-cure silicone sealant (avoid acetic-cure types that corrode aluminium), and a caulking gun for clean application.
| Tool / Material | Purpose | Repair Type |
|---|---|---|
| Spirit level (1200 mm) | Check jamb plumb and head level | Alignment, shimming |
| Plumb bob | Verify true vertical in deep openings | Alignment |
| Measuring tape and straight edge | Quantify gaps, check for bowing | All repairs |
| Cordless drill with masonry/metal bits | Drive fixings, drill pilot holes | Loose frame, joints, shimming |
| Pop rivet gun | Permanent flush joins on aluminium sections | Joint repair |
| Nut rivet tool | Install threaded inserts for removable hardware | Joint repair, bracket fixing |
| Screwdriver set (Phillips and flat) | Adjust hinges, locks, strike plates | All repairs |
| Aluminium filler (epoxy-based) | Fill pitting and dents on frame surface | Corrosion, dent repair |
| Sandpaper (120, 240, 400 grit) | Smooth filler and prep for primer | Corrosion, surface repair |
| Etch primer and touch-up paint | Seal bare aluminium, restore finish | Corrosion, surface repair |
| Plastic packers (1–10 mm) | Fine adjustment at fixing points | Alignment, shimming |
| Timber shims and 5/8 plywood offcuts | Pack larger gaps behind brackets | Alignment, shimming |
| Weatherstripping / rubber gaskets | Restore seal after frame adjustment | Sealing, post-repair finishing |
| Neutral-cure silicone sealant | Seal frame-to-wall junction | Sealing, corrosion prevention |
Print or screenshot this table before heading to the hardware store. Having every item ready means you can work through the repair in a single session — especially important if the door needs to stay open while you re-shim or re-fix the frame to the structural opening.
Step 3 – Decide Whether to Repair or Replace the Frame
You’ve identified the damage and your tools are ready. But here’s the question that saves people the most money — or the most regret: is this frame worth fixing, or has it crossed the line where replacement actually costs less in the long run? The answer depends on a handful of measurable factors rather than gut feeling.
When Aluminium Frame Repair Makes Financial Sense
Repairing an aluminium frame typically costs between $100 and $350 AUD in materials for a DIY job — plastic packers, fasteners, filler, primer, and sealant. Compare that to a full aluminium door frame replacement, which generally runs $800 to $2,000+ AUD supply and install depending on the door type, opening size, and whether structural work is needed around the reveal.
Repair makes sense when:
- Corrosion is surface-level only — white oxidation powder that hasn’t eaten into the wall thickness of the profile
- Misalignment measures less than 5 mm out of plumb across the full jamb height
- Only one or two joints have separated, with the remaining corners still tight
- The door hardware (hinges, locks, seals) is still serviceable or cheaply replaceable
- The frame is less than 15–20 years old and the overall door system functions well
In these situations, the techniques covered in Steps 4 through 7 of this guide will restore performance without the disruption and expense of pulling the frame out entirely.
Damage Thresholds That Signal Full Replacement
Some damage goes beyond what shimming, filling, or riveting can recover. Professional door specialists recommend replacement when widespread rot or structural failure has occurred, repeated repairs have already been attempted, or ongoing gaps cannot be sealed properly. For aluminium specifically, watch for these red flags:
- Corrosion has penetrated through the profile wall, weakening the section structurally
- Three or more mitre joints have failed or been previously repaired and failed again
- The frame is more than 8 mm out of plumb and the structural opening itself has shifted
- Hinge screw holes are stripped beyond rescue with larger anchors
- The thermal break (if present) is compromised, defeating energy performance
At this stage, pouring more money into patching delivers diminishing returns. The frame has reached end-of-life, and the smarter financial move is a purpose-built replacement that addresses the underlying issues from scratch.
Choosing a Replacement Frame System
If replacement is the verdict, avoid buying a generic off-the-shelf frame that may repeat the same problems. Look for a system where the frame profile, hardware, glass specification, and finish are matched to your specific opening and climate conditions. This is particularly relevant in Australia, where coastal salt exposure, UV intensity, and cyclone ratings vary dramatically between regions.
For residential, apartment, and commercial projects, systems like the MEICHEN MC100 Hinged Door take a project-specific approach — frame finish, glass options, hardware, and colour selection are all reviewed before production rather than pulled off a warehouse shelf. That level of customisation means the replacement frame is engineered for your exact opening dimensions, performance requirements, and environmental exposure, which directly reduces the chance of premature failure down the track.
| Factor | Repair | Replace |
|---|---|---|
| Cost range (AUD) | $100 – $350 (materials, DIY) | $800 – $2,000+ (supply and install) |
| Time investment | 2 – 5 hours depending on damage | Half day to full day (professional) |
| Longevity of result | 3 – 10 years if done correctly | 20 – 30+ years with quality system |
| Skill level required | Moderate DIY confidence | Professional installation recommended |
| Final outcome quality | Functional but may show repair evidence | Factory-finish appearance, full warranty |
Use this comparison honestly. If your frame sits comfortably in the repair column, the following steps will walk you through exactly how to bring it back to proper alignment, secure the joints, and seal everything up. The first hands-on task — correcting frame alignment caused by building settlement — is where most DIY repairs begin.
Step 4 – Fix Frame Alignment Caused by Building Settlement
Misalignment is the repair most homeowners face, yet detailed re-shimming instructions are surprisingly hard to find. The concept is straightforward: you’re bringing the frame back to plumb and level by packing the gaps that building movement has created. The execution, however, demands patience and precision — a millimetre off at the bottom of a jamb translates to a much larger gap at the top.
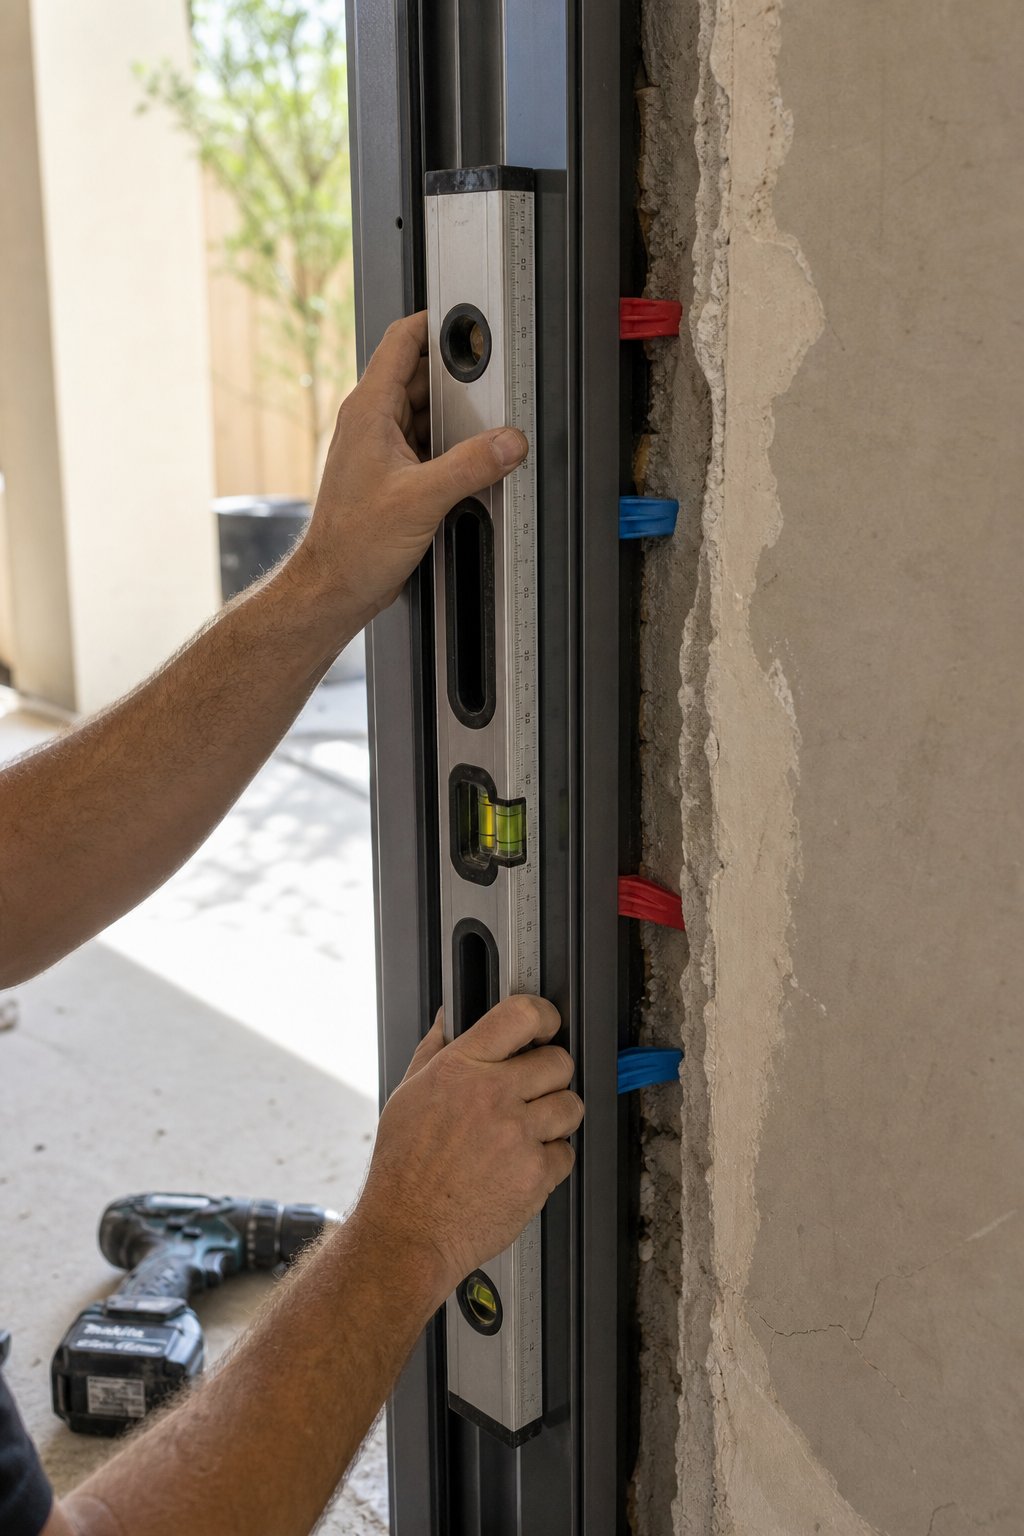
How to Check Frame Plumb and Level Accurately
Start by removing architraves, cover strips, or any trim concealing the junction between frame and wall. You need to see the fixing points and the gap behind the jamb. Hold your spirit level (minimum 1200 mm) against the hinge-side jamb first — this is your reference side, just as it would be during original window framing or door installation. Note where the bubble sits and measure any deviation at the top and bottom with your tape. Repeat on the strike-side jamb.
Then check the head (top) of the frame with the level held horizontally. A frame that has dropped on one side due to foundation settlement will typically show one jamb leaning inward at the top while the opposite lower corner has pulled away from the reveal. Mark the areas of deviation directly on the frame with a pencil so you know exactly where shimming is needed.
If the frame measures more than 5 mm out of plumb across its full height, consider seeking professional assessment before proceeding. Deviation beyond this threshold often indicates ongoing structural movement that shimming alone cannot permanently resolve.
Re-shimming Technique for Settled Openings
With your deviation points marked, follow this sequence to bring the frame back into alignment:
- Back off the existing fixings on the hinge-side jamb — loosen screws or remove nails at each fixing point without fully extracting them yet. Support the door’s weight by wedging a packer beneath it at the threshold.
- Insert plastic packers behind the jamb at each hinge location and at the midpoint between hinges. Plastic shims are moisture-resistant and won’t rot, making them the better choice for exterior aluminium door frames exposed to weather.
- Use packers in opposing pairs — one from each side — so the combined thickness is consistent and the jamb doesn’t tilt sideways. Tap them gently with a mallet, sliding in or out until the spirit level reads true.
- Confirm plumb again before fastening. Check the full length of the jamb, not just at individual shim points, using your straight edge to detect any bowing between fixings.
- Drive fixings through the jamb and shims into the structural framing or masonry. Use appropriate anchors — nylon wall plugs for brick, metal toggles for lightweight construction, or direct screws into timber studs.
- Repeat the process on the strike-side jamb, adjusting packers until the reveal (gap between door edge and frame) is even — aim for approximately 3 mm clearance on all sides.
- Shim the head jamb last, packing it level and confirming a consistent gap across the top of the door.
- Score and snap any protruding packer material flush with the jamb using a utility knife, then refit architraves or cover strips.
After re-securing all fixings, close the door and verify that it swings freely, latches without resistance, and shows even gaps on all four edges. If the latch still doesn’t engage cleanly, a minor strike plate adjustment usually resolves it — the frame itself should now be true.
Allowing for Thermal Movement in Your Fix
Aluminium expands and contracts more than timber or PVC framing. In Australian climates — particularly in regions like western Sydney or inland Queensland where summer temperatures can exceed 45°C — an aluminium frame may expand by over 1 mm across a standard 2100 mm door height on the hottest days. If you shim the frame dead-tight with zero clearance in winter, it can bind when heat arrives.
Allow a minimum 2–3 mm clearance between the door panel and frame on the hinge and lock sides to accommodate this seasonal movement. Avoid over-tightening fixings to the point where the frame is rigidly clamped with no flex — the shims should hold the frame plumb while still permitting a tiny degree of longitudinal expansion within the reveal. This balance between precision alignment and thermal tolerance is what separates a repair that lasts years from one that starts binding again next summer.
With the frame sitting plumb, level, and properly packed, the next vulnerability to address is the joints themselves — corners and brackets that may have loosened or separated entirely during the same settlement that shifted the frame.
Step 5 – Repair Loose Joints and Separated Frame Sections
A frame that’s been re-shimmed and plumbed can still rattle and flex if its internal joints have separated. Aluminium door frames rely on mitre joints at the corners and mechanical brackets or rivets to hold sections together — and these are often the first connections to fail under building movement or repeated impact. Fixing them properly requires understanding which fastening method suits each situation.
Repairing Separated Mitre Joints at Frame Corners
Mitre joints are the 45-degree cuts where the head and jamb sections meet. When these pull apart, you’ll see a visible gap at the corner and may notice the frame flexes if you push against it. The fix involves pulling the joint back together, clamping it, and permanently fastening it with rivets.
Before riveting, clean any debris or old sealant from inside the joint. Apply a thin bead of structural adhesive (a two-part epoxy rated for aluminium) along the mating surfaces, then clamp the corner square using a right-angle clamp. Wipe away any adhesive squeeze-out immediately — once cured, it’s difficult to remove without damaging the frame finish.
With the joint clamped and adhesive still wet, drill pilot holes through one face of the mitre into the adjoining section. Position holes at least 15 mm from the edge to avoid splitting the thin aluminium wall. This is where your choice of rivet type matters.
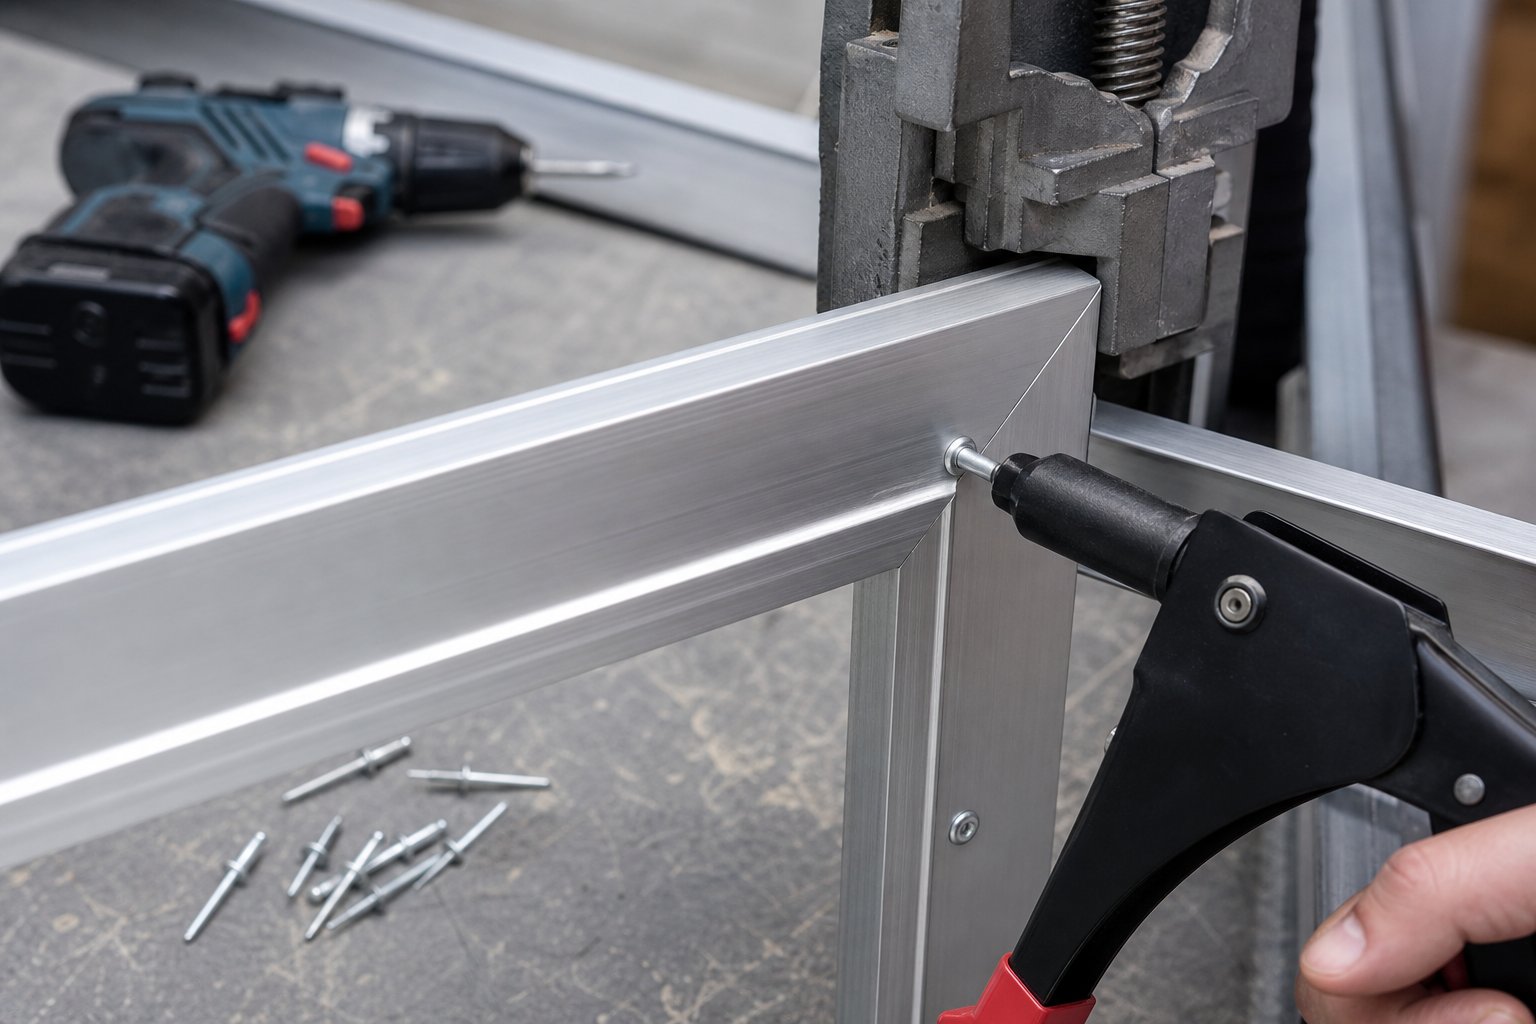
Pop Rivet vs Nut Rivet Method Explained
Both fastener types work by expanding on the blind side of the material — meaning you only need access from one face. But they serve different purposes, and choosing wrong means either a joint you can’t maintain later or one that doesn’t hold firmly enough.
Pop rivets (technically called blind rivets) create a permanent, flush connection. You insert the rivet body through pre-drilled holes in both pieces, then pull the mandrel with a rivet gun until it snaps off, expanding the tail and locking the sections together. The result is a smooth, low-profile join that won’t loosen from vibration — ideal for aluminium frame corners where you want a clean finish and zero movement.
Nut rivets (also called rivet nuts or rivnuts) work differently. They install into a single sheet of material, creating a threaded socket that accepts a machine screw. This makes them removable — perfect for attaching brackets, hardware, or components you may need to service or replace later. They’re not the right choice for joining two frame sections permanently, but they’re excellent for re-fixing hinge brackets or lock reinforcement plates.
| Factor | Pop Rivet | Nut Rivet |
|---|---|---|
| Best use case | Joining two thin aluminium sections permanently (mitre joints, corner brackets) | Creating threaded fixing points for hardware that may need removal (hinges, brackets, lock plates) |
| Tools required | Hand-operated or cordless pop rivet gun, drill with correct diameter bit | Nut rivet tool (manual or pneumatic), drill, Allen key or spanner |
| Skill level | Beginner to moderate — straightforward squeeze-and-snap action | Moderate — requires correct torque to set without spinning |
| Removability | Permanent — must be drilled out to remove | Threaded insert stays in place; attached bolt or screw is fully removable |
For corner mitre repairs on a standard aluminium door frame, pop rivets in 4 mm or 4.8 mm diameter aluminium body are the go-to. Use aluminium rivets on aluminium frames to avoid galvanic corrosion — steel rivets in contact with aluminium will corrode rapidly in humid or coastal Australian environments.
Re-securing Loose Wall Brackets and Fixings
Brackets that anchor the frame into the structural opening fail for a simpler reason: the wall plug has cracked, the screw hole has stripped, or the masonry behind has crumbled slightly. The fix follows a logical sequence:
- Remove the existing fixing completely — pull out the old wall plug or anchor.
- If the hole is still solid, insert a wall plug one size larger than the original (e.g., move from a 6 mm to an 8 mm nylon plug) and drive a correspondingly larger screw.
- If the masonry has crumbled, inject a chemical anchor resin into the hole, insert a threaded rod or coach bolt, and allow it to cure before tightening — typically 10 to 15 minutes depending on ambient temperature.
- For lightweight framed walls (timber or steel stud), switch to metal toggle anchors that spread load across a wider area behind the lining.
- Where the aluminium bracket itself has an elongated or stripped hole, install a nut rivet into the bracket to create a fresh threaded socket. Insert the nut rivet, set it with your rivet nut tool until it grips firmly, then bolt through into the wall anchor behind.
Check each bracket after re-fixing by pushing firmly against the frame — there should be zero movement. Tighten progressively across all fixing points rather than fully torquing one bracket at a time, which can pull the frame out of the alignment you established in the previous step.
Solid joints and secure brackets give the frame its structural rigidity back. But if the aluminium surface around those joints shows white powder, pitting, or flaking finish, corrosion is already undermining the material itself — and that requires a different approach entirely.
Step 6 – Address Corrosion and Surface Deterioration
White powdery residue on aluminium isn’t dirt — it’s the metal itself breaking down. That chalky substance is aluminium oxide, and it forms when moisture and environmental contaminants compromise the frame’s protective finish. Left untreated, surface oxidation progresses into deeper pitting that weakens the profile structurally. The good news: if you’ve caught it early, this damage is entirely repairable with the right materials and technique.
Treating Surface Oxidation on Aluminium Frames
Start by washing the affected area with a non-abrasive cleaner — a pH-neutral detergent or a dedicated aluminium cleaner works well. Avoid anything containing ammonia, which reacts with aluminium and accelerates damage. A soft nylon brush lifts the white powder without scratching sound metal beneath. Rinse thoroughly with clean water and allow the frame to dry completely before moving to abrasion. As aluminium restoration specialists note, the frame must be bone-dry before any sanding or coating — residual moisture trapped under new primer will cause it to fail almost immediately.
For light surface oxidation where the underlying profile is still smooth, a wipe-down with a mild acid solution (white vinegar or an oxalic acid-based cleaner) dissolves the oxide layer without aggressive sanding. Neutralise the acid with a fresh water rinse, dry the surface, and you’re ready to seal.
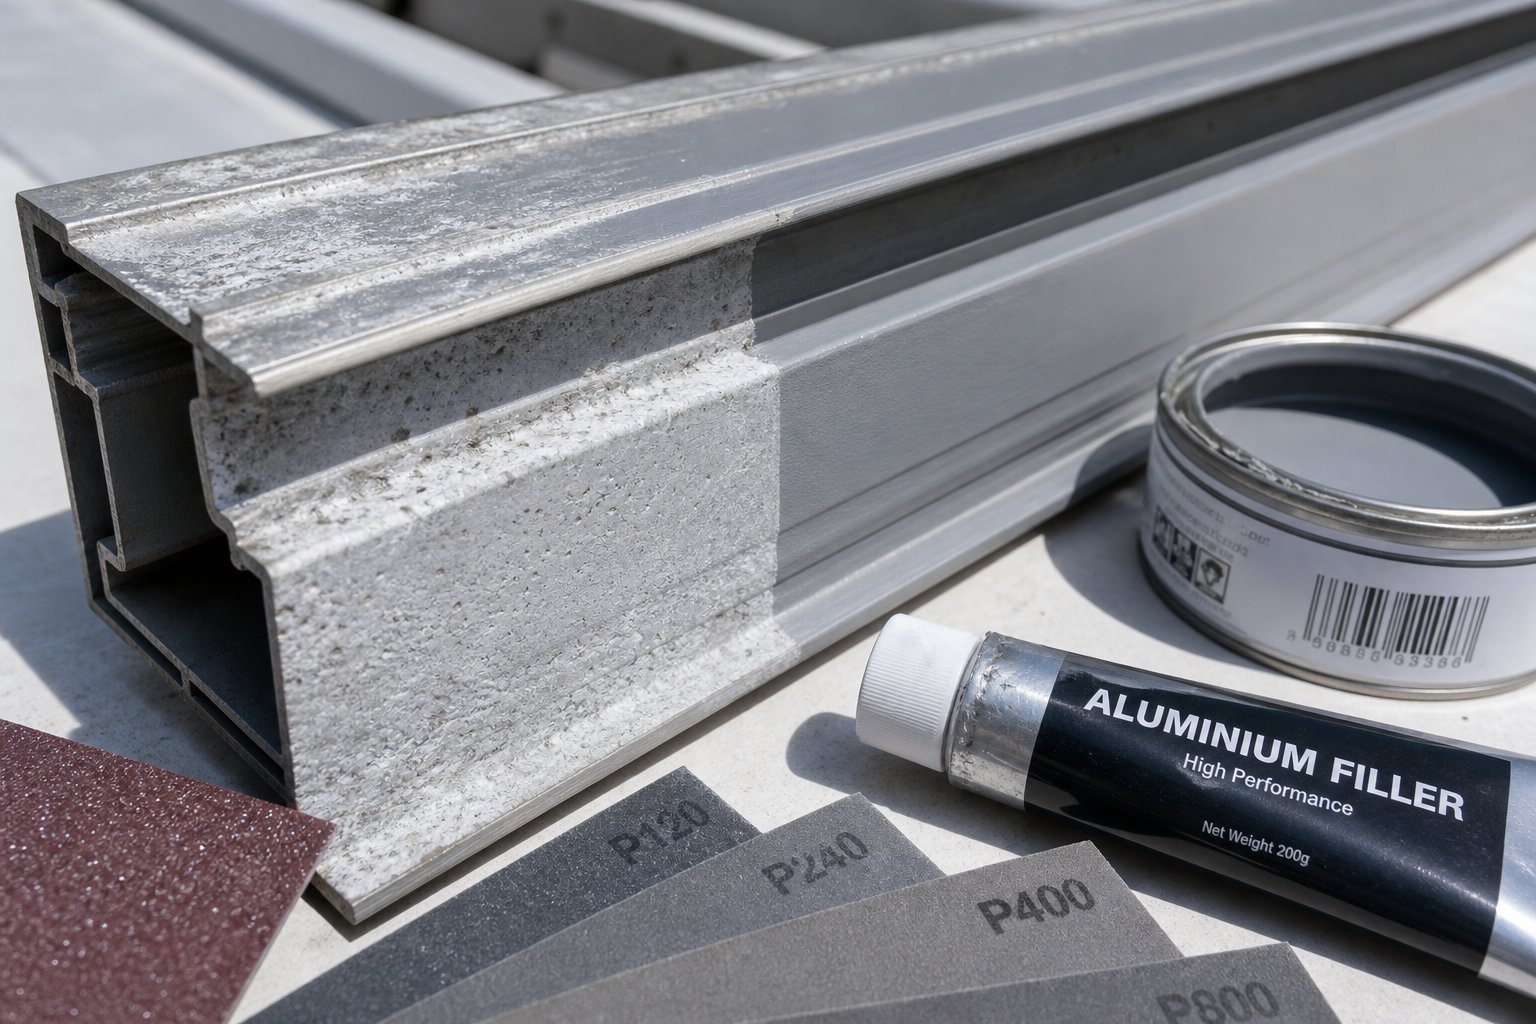
Filling and Smoothing Pitted Frame Sections
Deeper corrosion — small craters or rough patches where the metal has eroded — requires building the surface back up before any paint will look right. Follow this sequence:
- Sand the corroded area with 120-grit paper to remove all loose material and flaking coating. Work only the affected zone, feathering out 10–15 mm into the surrounding sound surface.
- Switch to 240-grit and smooth the transition between bare metal and the intact finish. You want a consistent matte texture with no sharp edges where filler could later crack.
- Apply aluminium-specific epoxy filler into the pits using a flexible spreader. Slightly overfill each pit — you’ll sand it flush in the next step. Allow the filler to cure fully per the product’s directions (typically 30–60 minutes depending on temperature).
- Sand the cured filler with 320-grit paper until it sits level with the surrounding frame surface. Finish with 400-grit for a smooth base that accepts primer evenly.
- Wipe away all sanding dust with a clean, dry cloth or tack rag.
- Apply one even coat of self-etching primer formulated for non-ferrous metals. This primer uses a mild acid to chemically key into the aluminium, creating far better adhesion than standard primers designed for steel or timber.
- Once the etch primer has flashed off (5–10 minutes in warm conditions), apply two light coats of colour-matched exterior paint or a powder-coat touch-up pen. Keep coats thin to avoid runs — multiple light passes build a more durable film than one heavy application.
The finished repair should be flush, sealed, and virtually invisible once the paint cures. For best durability, allow 24–48 hours before closing the door tightly against new paintwork.
Climate Factors That Accelerate Frame Corrosion
Not all Australian homes face the same corrosion risk. Your geographic position dramatically influences how quickly an aluminium frame deteriorates — and how aggressively you need to maintain the repair you’ve just completed.
- Coastal salt air — Properties within 500 metres of the ocean face severe exposure. Salt spray breaks down the aluminium’s passive oxide layer and can cause visible pitting within just two to five years on unprotected frames. Queensland’s Gold Coast, Sydney’s Northern Beaches, and Perth’s coastal suburbs are prime examples.
- Galvanic corrosion from dissimilar metals — Steel screws, brass fittings, or copper flashings in direct contact with aluminium create an electrochemical reaction in the presence of moisture. The aluminium sacrifices itself, corroding far faster than it would in isolation. Replace steel fixings with stainless steel (Grade 316 for coastal, Grade 304 elsewhere) or isolate metals with nylon washers and plastic shims.
- High humidity and tropical rainfall — Northern Queensland, Darwin, and other tropical regions experience persistent moisture that keeps the electrolyte active on metal surfaces year-round. Frames here rarely get a chance to fully dry between weather events.
- Industrial pollutants — Homes near heavy industry, power stations, or major roads encounter airborne sulphates and nitrates that attack aluminium finishes. These aren’t limited to coastal zones — suburban areas downwind of industrial precincts carry the same risk.
- Poor drainage at the frame base — Water pooling against the threshold or sitting in frame channels creates a constant wet contact point. Blocked weep holes or missing drip edges keep moisture trapped exactly where it does the most damage.
Understanding which of these factors apply to your property helps you set a realistic maintenance interval. A frame on a sheltered inland property might need inspection annually. The same frame 200 metres from a surf beach may need a protective wax reapplied every three months to prevent the repair from breaking down again.
Corrosion repair restores the surface — but the frame’s long-term weather performance depends equally on the seals and weatherstripping that keep moisture, wind, and air infiltration out of the home entirely.
Step 7 – Re-seal Weatherstripping and Test Your Repair
A frame that’s plumb, structurally sound, and free of corrosion still won’t perform properly if the seals are shot. Weatherstripping is the final barrier between your home and the outside — it blocks drafts, keeps rain from tracking in, and dampens noise. The problem is that rubber and foam gaskets degrade long before the aluminium frame itself wears out. UV exposure hardens them, compression set flattens them permanently, and once they lose elasticity, gaps reappear regardless of how precisely you’ve aligned the frame. Re-sealing after a repair isn’t optional — it’s what turns a structural fix into a finished one.
Replacing Weatherstripping and Rubber Gaskets
Most aluminium door frames use either a keyed rubber gasket that slides into a channel (a continuous groove extruded into the frame profile) or adhesive-backed foam or pile strip that sticks directly to the frame surface. Before you install anything new, the old material has to come out completely.
Pull degraded gaskets from their channel by gripping one end with pliers and drawing the strip out in a continuous length. If it crumbles rather than pulling cleanly, use a flathead screwdriver or a plastic scraper to lever fragments from the groove. For adhesive-backed foam or felt strips, peel them off and scrape residual adhesive with a plastic putty knife — avoid metal blades that gouge the aluminium. Cleaning the channel thoroughly before installing new seals is non-negotiable; any debris or old adhesive left behind prevents the new strip from seating properly and creates gaps in the barrier.
Once the channel is clear, wipe it down with rubbing alcohol or a mild solvent to remove greasy residue, then allow it to dry fully. Gather your replacement materials:
- Replacement rubber gasket matched to your frame’s channel profile (take a sample piece to the hardware store for sizing)
- Adhesive-backed EPDM foam tape or V-strip for secondary sealing at the door stop
- Door sweep or brush seal for the threshold gap
- Sharp utility knife or scissors for cutting to length
- Measuring tape
- Mild solvent or rubbing alcohol for surface prep
Measure each run of the frame — both jambs and the head — individually. Cut each piece 2–3 mm longer than the measured length so the seal compresses slightly at the corners rather than leaving a short gap. For keyed gaskets, start at one end of the channel and press the gasket’s spine into the groove with your thumb, working progressively along the length. Avoid stretching the material as you install it; stretched rubber contracts over time and pulls away from corners.
For adhesive-backed foam or V-strip, peel the backing in short sections as you go rather than exposing the full adhesive at once. Press firmly and consistently along the entire length. Start from the top and work down each side — this sequence helps prevent water from tracking behind the strip if the outer seal is ever compromised.
Sealing the Frame-to-Wall Junction
The gap between the outer edge of the aluminium frame and the surrounding wall is a separate sealing task from the weatherstripping. This junction is exposed to wind-driven rain and temperature cycling, so it needs a flexible, durable sealant — not caulk designed for interior trims.
Use a neutral-cure silicone sealant rated for exterior use and compatible with aluminium. Avoid acetic-cure (vinegar-smell) silicones; they release acetic acid during curing which corrodes aluminium and can compromise the frame finish over time. For best results, push the sealant into the joint rather than dragging it along — this fills voids completely and creates stronger adhesion on both contact surfaces. Work in short sections of around 300–400 mm, tooling each section smooth with a profiling tool before moving to the next.
Key points for a lasting frame-to-wall seal:
- The gap must be clean, dry, and free of dust before application
- Apply sealant to two faces only (frame and wall) — bonding three sides creates a rigid joint that cracks under thermal movement
- For gaps wider than 10 mm, insert a foam backer rod first to control depth and reduce sealant consumption
- Cut the nozzle straight across at 90 degrees, sized to match the joint width — angled cuts reduce control
Allow the silicone to cure for a full 24 hours before testing or closing the door against it. In cooler weather, curing takes longer — check the product label for its minimum application temperature.
Post-Repair Testing Checklist
With the frame aligned, joints secured, corrosion treated, and seals replaced, you need to verify the whole system works together. Run through these checks in order:
- Swing test — Open and close the door slowly several times. It should move freely through its full arc without dragging on the threshold, catching on the head, or brushing against either jamb. Any binding indicates a spot where the seal is too thick or the clearance is too tight.
- Gap inspection — With the door closed, visually check the reveal on all four edges. The gap between door and frame should appear consistent — roughly 3 mm on the hinge and lock sides, and even across the head. Use a credit card or 3 mm drill bit as a quick gauge.
- Latch and lock engagement — The latch should click into the strike plate without you needing to lift, push, or force the door. If the lock bolt doesn’t align with the strike plate opening, shim the strike plate rather than readjusting the entire frame — minor adjustment here is normal after re-alignment.
- Light test — Wait until dark, then have someone stand outside with a torch and slowly trace it around the frame perimeter. From inside, watch for any pinpoints of light bleeding through. Light leaks indicate where the weatherstrip isn’t compressing evenly or where a gap remains in the silicone seal.
- Compression check — Close the door on a strip of paper at several points around the frame. Pull the paper out gently. You should feel consistent, moderate resistance everywhere. If the paper slides freely at any point, the seal isn’t making contact there. If it won’t budge at all, the strip may be over-compressed, which accelerates wear.
- Draught test — On a windy day, hold a lit incense stick or a thin strip of tissue near the frame edges with the door shut. Movement indicates air infiltration that the seals haven’t caught.
If any test reveals a problem, address it at the specific point of failure rather than reworking the entire repair. A short gap in the weatherstrip at a corner can usually be fixed by adding a small overlap of foam tape. A single light leak at the frame-to-wall junction just needs a touch more silicone at that spot.
Passing all six checks confirms your aluminium door frame is performing as intended — sealed, aligned, and secure. The remaining variable is time. Even a well-executed repair deteriorates without ongoing care, and knowing what to inspect each season is what keeps the frame in service for years rather than months.

Step 8 – Maintain Your Frame and Know When to Upgrade
A successful repair only holds if you back it up with regular attention. Aluminium frames are low-maintenance — not no-maintenance. The difference between a repair that lasts three years and one that lasts ten often comes down to whether someone spent fifteen minutes each season checking the basics. Here’s how to protect the work you’ve already put in.
Seasonal Maintenance Schedule for Aluminium Frames
Set a recurring reminder twice a year — once in autumn before wet weather arrives, and again in spring when temperatures start climbing. These checks catch small problems before they escalate into the kind of damage that sent you searching for how to fix aluminium door frame in the first place.
- Lubricate hinges and locks — Apply a silicone-based spray or light machine oil to all hinge pins and the lock mechanism. Avoid petroleum-based greases that attract dust and eventually gum up the moving parts. A few drops into the keyway keeps the lock barrel turning smoothly.
- Inspect weatherstripping for compression set — Close the door and check that the rubber or foam seals still spring back when you release pressure. Seals that stay permanently flattened have lost their elasticity and need replacing before gaps develop.
- Check fixings for looseness — Give the frame a firm push at each bracket point. Any movement means a screw has backed out or a wall plug is deteriorating. Tighten immediately — a loose fixing under repeated wind loading will enlarge the hole until it can’t hold at all.
- Clean frame channels and drainage slots — Debris, leaves, and grit accumulate in the bottom track and weep holes. Blocked drainage holes accelerate frame ageing by trapping moisture exactly where corrosion starts. A stiff brush and a vacuum clear these in seconds.
- Touch up scratches and chips in the finish — Any breach in the powder coat or paint exposes bare aluminium to moisture. A dab of colour-matched touch-up paint over a fresh scratch takes thirty seconds and prevents months of oxidation.
- Test door operation — Swing the door through its full arc. Listen for scraping, watch for uneven gaps appearing, and confirm the latch clicks cleanly. Changes in operation between seasons often indicate thermal movement or settling that needs minor adjustment before it compounds.
Coastal properties — particularly along Australia’s eastern seaboard and the Perth coastline — benefit from a quarterly wipe-down with fresh water to remove salt deposits. Regular cleaning with a mild, pH-neutral detergent prevents salt from sitting long enough to attack the protective finish between your biannual maintenance sessions.
When Repeated Repairs Signal It Is Time to Upgrade
There’s a point where maintenance stops being proactive and starts being a holding pattern. If your frame needs re-shimming every year or two because the building continues to move, or if you’re replacing weatherstripping annually because the profile has warped beyond what seals can compensate for, you’re spending time and money on diminishing returns.
Watch for these patterns that suggest the frame has reached end-of-life:
- You’ve re-shimmed the same jamb more than twice and it keeps drifting out of plumb
- Mitre joints that were riveted previously have separated again
- Corrosion keeps returning in the same areas despite proper treatment and repainting
- The thermal break has degraded — condensation appears on the interior face of the frame in winter
- Hardware mounting points are stripped beyond what nut rivets or larger anchors can recover
Each of these individually might justify one more repair attempt. But two or three occurring together tells you the system as a whole is failing — not just a single component. At that stage, further patching delays the inevitable while leaving you with a door that never quite seals, latches, or insulates properly.
Choosing a Long-Term Aluminium Door Solution
When replacement becomes the rational decision, the goal shifts from fixing what you have to investing in a system that won’t repeat the same failure cycle. Generic off-the-shelf frames are manufactured to standard dimensions and tolerances that may not match your specific opening, climate zone, or performance needs — which is often why the original frame failed prematurely in the first place.
Purpose-engineered systems take a different approach. The MEICHEN MC100 Hinged Door, for example, is reviewed on a project-specific basis before production — frame finish, glass specification, hardware selection, and colour are all matched to the individual installation rather than pulled from generic inventory. For homeowners dealing with persistent frame failures, this means a replacement that accounts for your exact opening dimensions, local wind ratings, and environmental exposure (coastal salt, tropical humidity, or high UV). The same system scales across apartment, townhouse, commercial, education, and healthcare projects where long-term frame integrity isn’t negotiable.
This isn’t about choosing the most expensive option for the sake of it. It’s about recognising that a frame engineered for your conditions — with hardware and seals specified for the actual loads they’ll face — eliminates the cycle of re-shimming, re-sealing, and re-riveting that brought you to this guide in the first place. A quality aluminium door system, properly installed, delivers 30 to 45 years of service with nothing more than the seasonal maintenance routine above.
Whether you’ve successfully repaired your existing frame or you’re planning an upgrade, the principles remain the same: keep it plumb, keep it sealed, keep it maintained. That’s how any aluminium door frame — repaired or new — stays functional for decades.
Frequently Asked Questions About Fixing Aluminium Door Frames
1. Can you repair a bent aluminium door frame without replacing it?
Minor bends and dents in aluminium door frames are repairable using aluminium-specific epoxy filler, progressive sanding from 120 to 400 grit, etch primer, and colour-matched paint. However, if the bend has compromised the structural integrity of the profile — meaning the section has creased or cracked rather than simply bowed — the affected piece typically needs replacing rather than filling. A good test is pressing the bent area gently: if the aluminium flexes back partially, filling and refinishing can restore it. If it feels brittle or cracked, the metal has fatigued beyond repair.
2. How do you fix a sagging aluminium storm door?
A sagging aluminium storm door usually results from either worn hinge screws, a frame that has shifted out of plumb due to building settlement, or both. Start by tightening or replacing hinge screws with longer alternatives that bite into solid timber framing. If the frame itself has moved, remove the architraves, check both jambs with a 1200 mm spirit level, and insert plastic packers at each fixing point to bring the frame back to plumb. Re-secure fixings into the structural opening and verify the door swings freely with even gaps on all sides. Allow 2-3 mm clearance for thermal expansion in warmer months.
3. What causes white powder on aluminium door frames?
White powder on aluminium frames is aluminium oxide — a form of surface corrosion where moisture and environmental contaminants break down the protective finish. Coastal salt air, galvanic corrosion from dissimilar metals (such as steel screws in aluminium), high humidity, and industrial pollutants all accelerate this process. Treatment involves cleaning with a pH-neutral detergent, sanding with progressively finer grits, applying etch primer formulated for non-ferrous metals, and finishing with colour-matched exterior paint. Properties within 500 metres of the ocean face the highest risk and may need quarterly salt removal to prevent recurrence.
4. How much does it cost to repair an aluminium door frame in Australia?
A DIY aluminium door frame repair in Australia typically costs between $100 and $350 AUD in materials, covering plastic packers, fasteners, filler, primer, sealant, and weatherstripping. Professional repair services cost more depending on the extent of damage and labour rates in your area. By comparison, full aluminium door frame replacement generally runs $800 to $2,000+ AUD supply and install. Repair makes financial sense when corrosion is surface-level, misalignment is under 5 mm, and no more than one or two joints have separated.
5. When should you replace an aluminium door frame instead of repairing it?
Replacement becomes the better investment when corrosion has penetrated through the profile wall, three or more mitre joints have failed or been previously repaired and failed again, the frame is more than 8 mm out of plumb with the structural opening itself shifting, or hinge mounting points are stripped beyond recovery. Repeated annual repairs also signal end-of-life. Purpose-engineered replacement systems like the MEICHEN MC100 Hinged Door offer project-specific frame finishes, hardware, and performance specifications matched to your exact opening and climate conditions, delivering 30 to 45 years of service compared to the 3 to 10 years a repair typically provides.
More Window & Door Guides