What Window Flashing Does for Aluminium Frames
What Is Window Flashing and Why Does It Matter
Every window starts as a hole in your wall. Fill it with the most advanced glazing system available, and that opening still represents a vulnerability where water can find its way inside. This is where window flashing earns its keep.
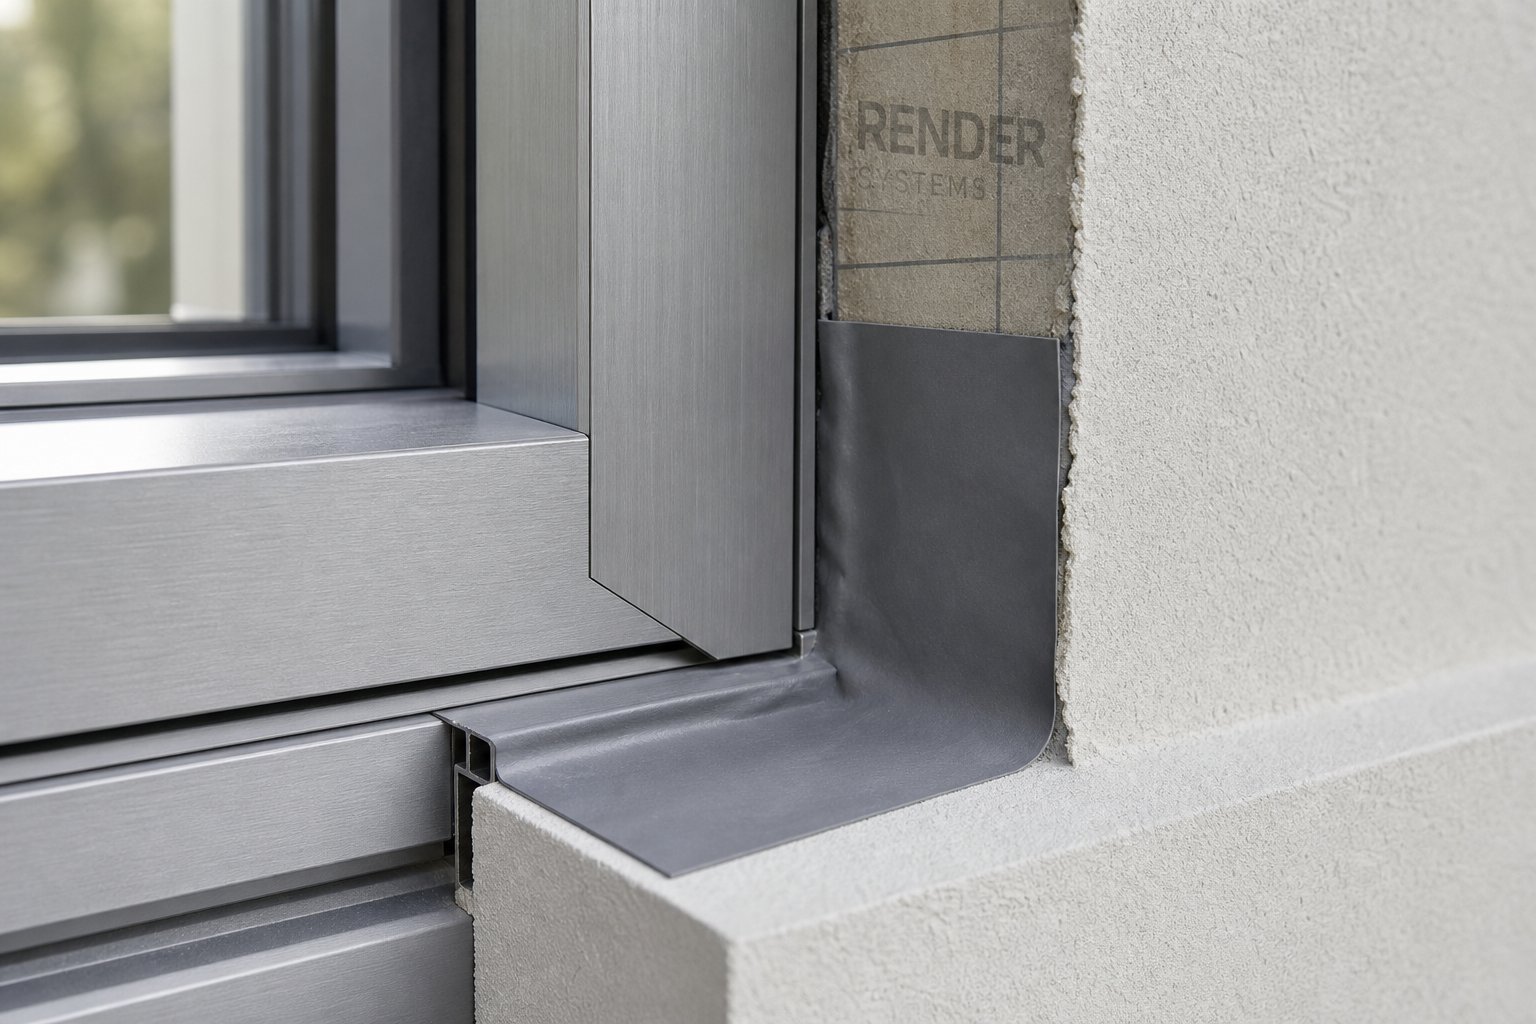
Window flashing is any durable material installed around a window opening to divert bulk water away from the building envelope. It forms the weatherproof connection between the window frame and the wall’s weather-resistive barrier, directing moisture outward before it can reach structural framing or insulation.
Flashing on windows typically takes the form of self-adhesive membranes, metal profiles, or liquid-applied coatings layered in a shingle pattern from sill to head. Done right, it’s invisible once cladding goes on. Done poorly, it delivers rot, mould, and five-figure repair bills a few years down the track.
Why Aluminium Frames Demand a Different Approach
Most generic guides treat flashing around a window as a one-size-fits-all process. They assume timber or vinyl frames that are porous, dimensionally stable, and forgiving. Aluminium plays by different rules, and those differences catch builders out in three specific ways.
Galvanic corrosion risk. Aluminium sits high on the galvanic series. Pair it with copper or plain steel flashing without an isolating barrier, and an electrochemical reaction eats into the frame over time. Material selection matters more here than with any other frame type.
Thermal movement. With a thermal conductivity around 200 W/mK and a coefficient of expansion roughly twice that of steel, aluminium frames expand and contract significantly through seasonal temperature swings. Sealant joints and flashing overlaps must accommodate that movement or they’ll crack open.
Surface adhesion. Aluminium’s smooth, non-porous surface resists the bond of standard self-adhesive membranes. Without proper priming and compatible tape chemistry, flashing around window perimeters can delaminate within a single heating season.
These three factors mean that aluminium window flashing demands its own material choices, preparation steps, and installation sequences. The sections ahead unpack each challenge in detail, covering both new builds and retrofit scenarios so you can get flashing around aluminium windows right the first time.
How Aluminium Properties Affect Flashing Performance
Aluminium is a brilliant structural material — light, strong, and naturally corrosion-resistant in open air. But the same physical traits that make it ideal for window frames create genuine complications when you’re trying to seal, bond, and weatherproof around it. Understanding these properties isn’t academic; it’s the difference between metal window flashing that lasts decades and flashing that fails within a few seasons.
Thermal Expansion and Contraction Cycles
Every material grows when heated and shrinks when cooled. Aluminium does this more aggressively than most metals used in construction. Its coefficient of thermal expansion sits at approximately 23 × 10⁻⁶ per degree Celsius — nearly double that of steel (12 × 10⁻⁶ per °C) and roughly twice the rate of concrete.
What does that mean in practice? Consider a 1,500 mm aluminium window frame in a climate where surface temperatures swing from 5°C on a winter morning to 55°C under direct summer sun — a realistic range across much of Australia. That 50°C differential produces approximately 1.7 mm of linear movement along a single frame edge. Across a full perimeter, the cumulative expansion and contraction is enough to stress sealant joints, buckle poorly fixed flashing membranes, and open small gaps at overlap points.
Cold weather pulls joints apart; heat compresses them. If your window flashing metal relies on tight sealant beads or rigid overlaps with no allowance for this cycle, failure is a matter of when, not if. Sealants used at aluminium frame perimeters need a movement capability rating of at least ±25%, with ±50% recommended for exposed facades in harsh climates. Flashing overlaps should be generous enough — typically 75 mm minimum — so that even at full contraction, metal profiles never pull clear of one another.
Galvanic Corrosion Between Dissimilar Metals
Galvanic corrosion is an electrochemical reaction that occurs when two dissimilar metals sit in direct contact and an electrolyte — even condensation or rainwater runoff — bridges the gap between them. Aluminium is relatively “less noble” on the galvanic series, which means it becomes the sacrificial metal when paired with copper, plain steel, or lead. Over time, localised pitting eats into the aluminium frame at every contact point.
This is especially relevant for metal flashing around windows, because flashing materials often come from a different part of the supply chain than the window itself. A plumber might default to lead or copper for head flashings, not realising the damage it will cause against an aluminium frame. Hydro’s engineering guidance on galvanic corrosion confirms that the risk is highest in coastal environments with elevated chloride levels — a description that covers a significant portion of Australia’s population centres.
Here’s a quick reference for choosing compatible aluminium flashings and fasteners:
- Compatible with aluminium: Stainless steel (316 grade preferred near the coast), zinc, hot-dip galvanised steel, pre-coated aluminium, and non-metallic materials (butyl membranes, PVC drip caps).
- Incompatible — avoid direct contact: Copper, brass, plain carbon steel, lead, and weathering (Corten) steel.
Where an incompatible pairing is unavoidable, you can prevent the reaction by electrically isolating the metals. A simple EPDM gasket, nylon washer, or bituminous paint layer between surfaces breaks the circuit. The key point: the isolation must be continuous. A single bare fastener penetrating both metals reintroduces the problem.
Surface Adhesion Challenges
Self-adhesive flashing membranes bond beautifully to timber, OSB, and even fibre-cement sheet — porous substrates that give the adhesive something to grip. Aluminium offers none of that texture. Its mill-finish surface is smooth, and anodised or powder-coated finishes are smoother still. Standard rubberised-asphalt membranes can appear well-adhered at install, only to delaminate weeks later once temperature cycling or moisture undermines the weak bond.
Laboratory peel-adhesion testing bears this out. AAMA 711-07 testing data shows that some self-adhesive membranes applied without primer to aluminium substrates fail to reach the minimum 0.26 N/mm peel-adhesion threshold — even under ideal lab conditions. On a real job site with dust, moisture, or residual oils, the numbers drop further.
The fix isn’t complicated, but it does require an extra step most installers skip. Before applying any window metal flashing membrane to aluminium:
- Clean the surface with isopropyl alcohol or a manufacturer-specified solvent to remove oils, dust, and oxidation.
- Apply a compatible primer designed for non-porous substrates. The primer consolidates surface contaminants and creates a chemical bridge between the aluminium and the adhesive layer.
- Allow full drying before membrane application — typically 10 to 20 minutes depending on ambient temperature.
Skipping any of these steps gambles the entire flashing system on adhesive alone. Given that the membrane’s job is to redirect bulk water away from the frame, delamination at even a small section can channel moisture straight into the wall cavity.
With these material behaviours mapped out, the logical next question becomes: which specific flashing products are actually engineered to handle aluminium’s expansion, corrosion risk, and slick surface all at once?
Choosing Flashing Materials Compatible With Aluminium
Not every flashing product on the shelf belongs near an aluminium frame. The expansion, corrosion, and adhesion challenges outlined above eliminate a surprising number of common materials before you even open the packaging. What follows is a practical selection guide — focused purely on products that reliably bond to, or work alongside, aluminium window systems across Australian climate conditions.
Self-Adhesive Membrane Tapes for Aluminium
Two adhesive chemistries dominate the flashing tape market: rubberised asphalt and butyl rubber. Both claim suitability for window flashings, but their behaviour on non-porous aluminium surfaces differs significantly.
Rubberised-asphalt tapes use a petroleum-based adhesive that achieves excellent grip on porous substrates like timber sheathing and fibre-cement. On aluminium, however, the bond is marginal at best. The adhesive relies partly on mechanical keying into surface texture — texture that aluminium simply doesn’t provide. Temperature cycling accelerates delamination, and in hot Australian climates, the asphalt layer can soften and creep, further weakening the joint. Comparative testing data confirms that asphalt tapes demonstrate poor long-term adhesive stability on smooth surfaces and are prone to cracking under repeated thermal movement.
Butyl-based tapes perform differently. Butyl rubber maintains a stable, tacky bond on glass, aluminium, PVC, and stainless steel without requiring surface porosity. Its molecular structure resists UV degradation and remains flexible across a wide temperature range — critical for aluminium flashing for windows that must accommodate frame movement through seasonal extremes. Butyl tapes also emit fewer volatile organic compounds and won’t soften or ooze oil in high heat, keeping the frame surface clean over time.
Even with butyl’s superior adhesion characteristics, a primer step remains best practice on mill-finish or anodised aluminium. The primer consolidates surface oxides and creates a chemical bridge that pushes peel-adhesion values well above minimum thresholds. Skip the primer on timber if you like — on aluminium, it’s non-negotiable for long-term performance.
Metal Flashing Profiles and Coatings
Where membrane tapes handle concealed perimeter flashing, metal profiles do the heavy lifting at exposed locations — particularly head flashings, window z flashing profiles, and sill drip edges. Choosing the right metal for aluminium window frames comes down to galvanic compatibility, formability, and coating longevity.
Pre-coated aluminium flashing is the simplest option. Same base metal as the frame means zero galvanic risk, and modern polyester or PVDF coatings offer colour-matching to popular powder-coat finishes. Stainless steel (grade 316 for coastal zones) is galvanically close enough to aluminium to pose minimal corrosion risk, and it delivers superior rigidity for longer spans. Zinc-coated steel — including ZINCALUME and COLORBOND profiles common in Australian construction — also pairs safely with aluminium, provided the zinc layer remains intact.
According to Lysaght’s metal flashing design guide, aluminium flashing is particularly recommended in coastal or industrial environments due to its lightweight properties and high corrosion resistance, while proper material compatibility checks remain essential for all metal-to-metal junctions.
| Material | Adhesion to Aluminium Frame | Corrosion Risk | Flexibility | Typical Application Zone |
|---|---|---|---|---|
| Pre-coated aluminium | Excellent (same metal) | None | High — easy to form on site | Head, sill, jamb |
| Stainless steel (316) | Good (low galvanic potential) | Minimal | Moderate — stiffer at bends | Head drip edge, sill pan |
| Zinc-coated steel (COLORBOND/ZINCALUME) | Good (zinc is compatible) | Low while coating intact | Moderate | Head, z-flashing, parapet junction |
| Copper | Poor — requires isolation | High (aggressive galvanic attack) | High | Avoid at aluminium frames |
| Lead | Poor — requires isolation | High | Very high | Avoid at aluminium frames |
For sill flashing for windows, pre-coated aluminium or stainless steel pans with soldered or welded end dams provide the most reliable long-term performance. The key installation detail: secure metal flashings at intervals no greater than 500 mm, and allow a 2–5 mm gap at horizontal surfaces for thermal expansion relief.
Liquid-Applied Flashing Membranes
Liquid-applied (or fluid-applied) membranes occupy a niche that tapes and metal profiles struggle to fill — complex geometry, irregular substrates, and retrofit situations where traditional flashings can’t be lapped in proper sequence.
These products are typically single- or two-component elastomeric coatings applied by brush, roller, or spray. Once cured, they form a seamless, fully bonded membrane that follows every contour of the rough opening without joints or laps that could separate. Research published by IIBEC documents successful use of fluid-applied waterproofing membranes as sill flashing systems beneath aluminium window frames — particularly on concrete substrates where the membrane bonds monolithically and accommodates fastener penetrations without water migration.
On aluminium surfaces specifically, liquid-applied systems offer a distinct advantage: they chemically bond to the primed substrate rather than relying on pressure-sensitive adhesion. This makes them less vulnerable to the delamination issues that plague standard tapes on non-porous surfaces. They also bridge minor cracks and accommodate a degree of substrate movement as they cure into a flexible film.
The trade-off is application skill. Liquid membranes demand consistent wet-film thickness (typically 1–1.5 mm cured), proper coverage at inside corners, and adequate drying time between coats. IIBEC’s field mock-ups revealed that initial applications were often too thin at corners and left voids — defects that only became apparent during water testing. For this reason, mock-ups and quality control inspections are strongly recommended when specifying fluid-applied flashing for windows on aluminium frames.
Material selection sets the foundation, but even the best products fail when installed out of sequence. The critical variable isn’t what you use — it’s where each layer sits relative to the one below it.
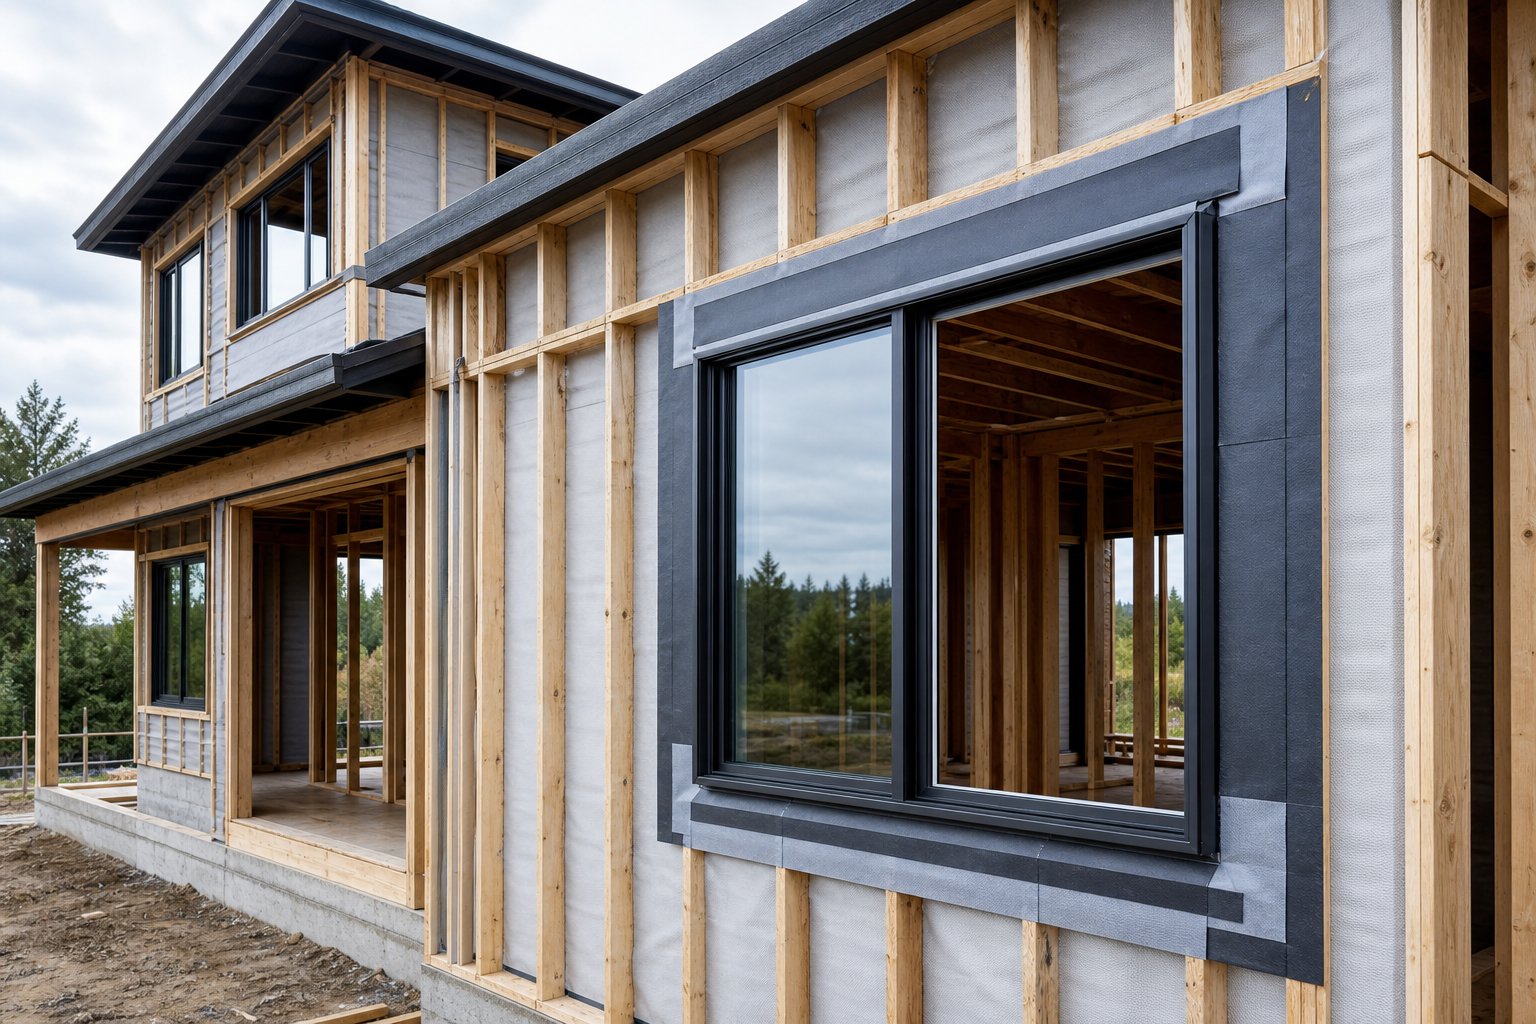
Step-by-Step Window Flashing Installation for New Builds
Sequence is everything. You could select the perfect butyl tape, the ideal pre-coated aluminium drip edge, and a premium liquid membrane — and still end up with a leaking window if you install them in the wrong order. The shingling principle governs every layer: each upper piece overlaps the one below it, so gravity pulls water outward rather than behind the barrier. Violate that logic anywhere in the assembly and you create a water trap instead of a drainage path.
What follows is a window flashing how to guide specific to aluminium frames in new timber- or steel-framed construction. The steps differ slightly from vinyl nailing-fin windows because aluminium frames often use screw-fixed flanges or clip systems rather than integral nailing fins, and their thermal movement demands more generous overlap allowances.
Preparing the Rough Opening and Sill Pan
The sill is where most leaks originate — IIBEC research on aluminium windowsill flashing identifies inadequate sill pan design as the single most common cause of water damage beneath aluminium window systems. Proper window pan flashing starts before the frame arrives on site.
Begin by confirming the rough opening is square, plumb, and sized to the manufacturer’s specified clearances — typically 10 mm per side for aluminium frames to accommodate thermal movement. Then build the sill pan:
- Slope the sill substrate. A minimum 5-degree slope toward the exterior ensures water drains outward rather than pooling against the back dam. Bevelled packers or a tapered filler strip achieve this on flat framing.
- Install the sill membrane or metal pan. The window sill flashing must extend at least 150 mm up each jamb to form dam corners, and the back dam should rise a minimum of 25 mm — higher in high-exposure zones. Use a wallpaper squeegee or J-roller to fully bond membrane tapes into inside corners where voids commonly form.
- Leave the front edge free. The forward lip of the sill pan must remain unsealed and unlapped so collected water can weep out. Sealing or taping across this edge defeats the entire drainage principle.
Unlike vinyl windows with flexible integral nailing fins, aluminium frames sit on the sill pan as a rigid assembly. Their screw-fixed flanges mean fasteners often penetrate the horizontal sill surface — a known weak point. Where possible, anchor the frame through vertical jamb surfaces rather than the sill pan to keep the drainage plane intact.
Jamb and Head Flashing Sequence
With the sill pan complete, the remaining perimeter flashing follows a strict bottom-to-top order. Each layer laps over the one below, creating continuous shingle-style drainage. Here’s the correct sequence for installing window flashing on a new aluminium frame:
- Install sill pan flashing across the full width of the rough opening, with dam corners extending up each jamb.
- Set the aluminium window frame into the opening. Apply sealant to the jamb and head flanges only — never along the sill.
- Fasten the frame according to the manufacturer’s schedule, checking for level, plumb, and straight jambs.
- Apply jamb flashing tape from the window flange onto the wall sheathing, overlapping the sill pan by at least 50 mm at the bottom. Extend 75 mm above the head flange at the top.
- Install the metal head flashing (drip cap) above the window, sized at least 100 mm wider than the frame to overhang the jamb tapes on each side.
- Apply head flashing tape over the metal drip cap’s upper leg, sealing it to the wall sheathing and overlapping the top of both jamb tapes.
The critical point most guides gloss over: flashing a window correctly means the bottom edge of the sill pan always remains the lowest, unobstructed exit point for any moisture that enters the system. Nothing — no tape, no sealant, no cladding trim — should block that weep path.
Integrating With the Weather-Resistive Barrier
The weather-resistive barrier (WRB) — whether a mechanically fastened housewrap or a self-adhered membrane — must integrate with the window flashing in a specific lap order that confuses even experienced builders. The principle is simple once you see it: the WRB sheds bulk water down the face of the wall, so it must sit over any flashing at the top and behind flashing at the sides and bottom.
In practice, this means:
- At the head: The WRB laps over the head flashing tape. Water running down the wall face flows across the housewrap, over the top of the head flashing, and drips clear of the window. Fine Homebuilding’s installation guidance notes that whether you install windows before or after the WRB, the head lap direction remains non-negotiable.
- At the jambs: The WRB tucks behind the jamb flashing tape, or is sealed to it with compatible construction tape. This prevents lateral moisture migration between the housewrap and frame.
- At the sill: The WRB apron sits behind the sill pan and hangs loose at its lower edge — never taped across the bottom — so water exiting the pan drains freely over the apron and down the wall.
For builders using self-adhered WRB products, the two-inch cutback method offers cleaner integration. The membrane covers the rough opening during wall wrap installation, then gets cut back 50 mm from the opening perimeter. Flashing tapes with stronger adhesive bond directly to the sheathing in this cutback zone, bridging the gap between window flange and WRB without relying on membrane-to-membrane adhesion alone.
A window flashing how to sequence only works if every trade on site understands the lap hierarchy. Pin the drainage diagram to the site shed wall, because a single reversed lap at the head — WRB tucked under instead of over — turns an entire installation into a concealed water trap that won’t reveal itself until the damage is done.
Correct installation technique applies universally, but the specific flashing details shift depending on whether you’re working with a fixed pane, an awning sash, or a sliding track — each operation type introduces its own weak points.
Flashing Requirements by Aluminium Window Type
A fixed pane and a sliding sash live in the same wall, but they fail in completely different ways. The operation type determines where water concentrates, how it travels along the frame, and which flashing zone carries the highest load. Treat every aluminium window the same and you’ll over-engineer some openings while leaving others dangerously exposed.
Fixed and Picture Windows
Fixed windows are the simplest scenario from a flashing perspective. No moving sash means no operable seals to deteriorate, no hardware penetrations that weaken the frame’s water barrier, and no weep system to maintain. Industry testing data confirms that fixed units routinely achieve tighter air infiltration ratings than operable styles at equivalent glazing specifications — and the same logic extends to water resistance.
The flashing strategy here is straightforward perimeter protection. A properly shingled membrane at jambs, head, and sill — with a functional sill pan beneath — handles virtually all water-ingress risk. The primary vulnerability sits at the junction between frame and cladding, where thermal expansion can stress sealant joints over time. Above window flashing in the form of a simple metal drip cap completes the assembly with minimal complication.
Awning and Casement Windows
Outward-opening sashes change the water dynamics dramatically. When a casement or awning window is closed, the sash compresses against weatherstripping seals — seals that degrade with UV exposure and repeated cycling. But the more immediate flashing concern is geometry: an outward-swinging sash redirects wind-driven rain back toward the frame-to-wall junction rather than shedding it clear of the building.
This makes window drip cap flashing at the head absolutely critical. The drip edge must project far enough to throw water clear of the open sash hinge point — typically a minimum 25 mm projection beyond the face of the frame. Without adequate window cap flashing above these openings, water tracks along the top rail, follows the hinge jamb downward, and enters at the frame-to-sill junction where sealant is most vulnerable to movement stress.
For awning windows specifically, the top-hinged configuration means the open sash acts as a small canopy during light rain. While this seems protective, it concentrates runoff at the bottom corners of the sash opening — precisely where the operable seal meets the fixed frame. Robust jamb flashing at these lower corners provides the critical backup layer.
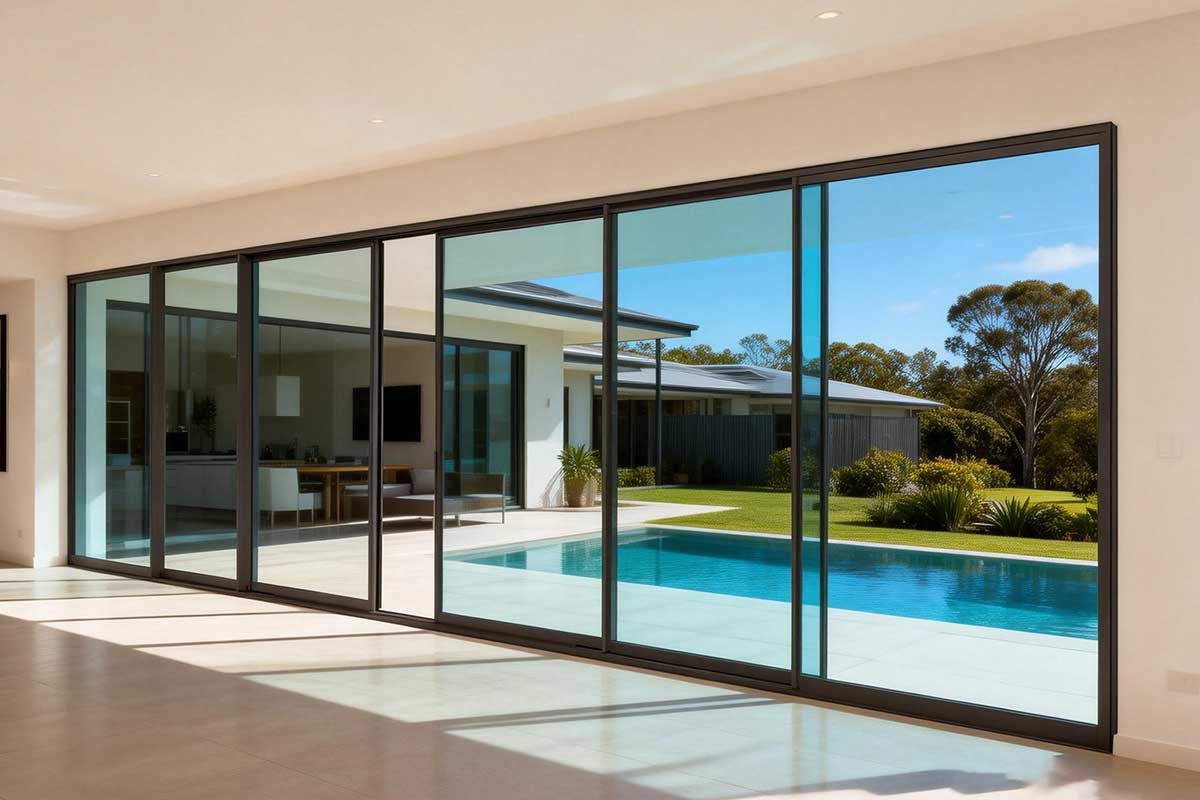
Sliding and Double-Hung Windows
Sliding windows and double-hung units share a common vulnerability: their sill tracks collect water by design. The horizontal rails that guide the sliding sash form shallow channels where wind-driven rain accumulates during storms. Under normal conditions, weep holes machined into the sill extrusion drain this collected moisture to the exterior. But weep holes face persistent challenges — insects nest in uncovered slots, dirt and debris clog the drainage path, and homeowners occasionally seal them with caulk in misguided attempts to stop draughts.
When weep holes fail, water overflows the sill track and spills inward. This is why sill pan flashing beneath sliding and double-hung aluminium windows functions as more than a code requirement — it’s an active secondary drainage system. The pan catches overflow that the window’s internal drainage cannot handle during high-intensity rain events, then redirects it outward through the unlapped front edge. Forensic engineers consistently identify blocked weep systems as the origin point of wall and floor damage beneath sliding windows, with moisture manifesting as a characteristic “halo” of discolouration around the sill.
A properly detailed window drip edge flashing at the head of sliding units also deserves attention. Because these windows don’t project outward when open, the head flashing primarily defends against water running down the wall face above — flashing over windows in this position should extend at least 50 mm beyond the frame width on each side to prevent edge bypass.
| Window Type | Primary Leak Point | Critical Flashing Zone | Recommended Drip-Edge Profile |
|---|---|---|---|
| Fixed / Picture | Frame-to-cladding sealant joint | Full perimeter (even priority) | Simple L-profile, 15–20 mm projection |
| Awning | Bottom sash corners at seal junction | Head and lower jamb corners | Extended drip cap, 25 mm+ projection with end dams |
| Casement | Hinge-side jamb where water tracks downward | Head drip edge and hinge jamb | Hooked drip cap with returned ends, 25 mm+ projection |
| Sliding | Sill track overflow when weep holes block | Sill pan with back dam and end dams | Standard L-profile at head; robust sill pan below |
| Double-Hung | Meeting rail junction and sill track | Sill pan and head | Standard L-profile at head; sill pan with 25 mm back dam |
Quality aluminium window systems are engineered with integrated drainage channels and flashing compatibility factored into their frame profiles from the design stage. MEICHEN’s aluminium window range is designed to work with standard flashing details across all operation types — fixed, awning, casement, and sliding — with drainage provisions and flange geometries that simplify correct installation rather than fighting against it. When frame profiles align with proven flashing methods, the risk of installer error drops considerably.
Getting the flashing right for each window type is one piece of the puzzle. The other is ensuring those details actually satisfy the building codes and energy performance standards that govern every Australian project.
Building Code and Energy Performance Considerations
Flashing details that satisfy a builder’s eye don’t always satisfy a certifier’s checklist. Australian building codes set explicit requirements for weatherproofing at wall penetrations, and aluminium windows — with their unique thermal and corrosion properties — sit at the intersection of moisture management and energy performance compliance. Understanding what the codes actually demand helps you avoid costly rectification orders and ensures your window flashing details hold up to inspection.
What Building Codes Actually Require
The National Construction Code (NCC) Volume 2, which governs residential construction across Australia, mandates that all wall openings — windows, doors, service penetrations — incorporate flashing arranged in shingle fashion to direct water outward and prevent it from entering wall cavities or reaching structural framing. This requirement applies to both new builds and alterations where existing weatherproofing is disturbed.
AS 2047 (Windows and External Glazed Doors in Buildings) sets the performance benchmarks for the window unit itself, while the NCC’s weatherproofing provisions govern how that unit integrates with the surrounding wall assembly. A critical nuance that catches builders out: once a window manufacturer’s installation instructions are referenced on the compliance documentation, those instructions effectively become the enforceable standard. Deviate from the specified flashing method — even if your alternative seems equivalent — and you risk a non-compliance finding at inspection.
In practical terms, codes require approved corrosion-resistant flashing at every exterior window opening, extending to the surface of the exterior cladding or to the weather-resistive barrier. Self-adhered membranes must meet equivalent performance to AAMA 711 specifications, and fluid-applied systems must satisfy AAMA 714 testing requirements. Where manufacturer instructions don’t specify a particular method, the default requirement is a pan flashing at the sill — sealed or sloped to drain outward — with protection at the head and jambs.
Head Flashing and Drip Edge Compliance
Head flashing above aluminium windows demands more attention than above timber or vinyl frames, and the reason is physics rather than code language. Water running down a wall face encounters the top of the window frame and must be thrown clear before it reaches the frame-to-wall junction. On rough-textured materials like timber or rendered masonry, surface tension alone can slow and redirect small volumes of water. Aluminium’s smooth, non-porous surface offers no such resistance — water sheets across it freely, following any path gravity and wind pressure dictate.
This is why every compliant window header flashing detail for aluminium frames includes a defined mechanical drip edge — a projecting lip that forces water to break contact with the frame surface. Minimum projection for standard exposure is 15–20 mm beyond the face of the frame, increasing to 25 mm or more in high-exposure zones (upper storeys, coastal sites, or elevations facing prevailing weather). The drip edge should incorporate a small kick-out or hemmed return at its lower edge to ensure clean water separation rather than allowing sheets of runoff to cling and wrap underneath.
An exterior window flashing diagram is worth posting in the site shed for every trade to reference, because the head flashing interacts with the WRB, cladding cavity, and frame flange simultaneously. Without a clear visual showing these overlapping layers, one reversed lap can funnel water directly behind the cladding — a defect invisible until damage manifests months later.
Energy Efficiency and Thermal Bridging Considerations
Aluminium conducts heat roughly 1,000 times more readily than timber. Thermally broken frame profiles address this at the window itself, but a poorly considered exterior window flashing detail can reintroduce the very thermal bridge the frame design worked to eliminate.
Metal flashing — particularly continuous aluminium or steel drip edges — creates a direct conductive path from the exterior environment to the interior wall cavity when it contacts the window frame without interruption. In heating-dominated climates across southern Australia, this bridge draws warmth out of the building envelope. In cooling-dominated northern zones, it conducts heat inward, increasing air-conditioning loads. Either way, the energy penalty compounds over the life of the building and can compromise NatHERS star ratings if the thermal modelling doesn’t account for it.
Two approaches mitigate the problem. First, membrane-based flashing systems (butyl tapes and liquid-applied membranes) introduce no additional metal-to-metal contact and therefore add no thermal bridging. They’re the preferred option wherever concealed flashing sits directly against an aluminium frame. Second, where metal flashings are necessary at exposed locations — head drip edges, for example — incorporating a thermal break strip between the flashing and the frame limits conductive transfer. A simple 3 mm EPDM gasket or polyethylene separation layer is enough to interrupt the heat path without compromising weatherproofing integrity.
Codes and energy ratings set the minimum bar. But even installations that pass inspection on paper can fail in practice when common site errors — repeated across projects nationwide — undermine the flashing system from within.
Common Aluminium Window Flashing Failures and Fixes
Inspectors and forensic engineers see the same mistakes repeated across hundreds of sites every year. The failures aren’t random — they follow predictable patterns rooted in aluminium’s specific material behaviour and in widespread misunderstandings about how flashing at window openings should perform over time. Knowing how to properly flash a window means understanding not just the correct method, but the exact ways things go wrong when shortcuts are taken.
Membrane Delamination From Aluminium Surfaces
This is the failure mode most unique to aluminium frames, and it’s the one least understood on site. A self-adhesive membrane looks well-bonded the day it goes on. Three months later — after a few thermal cycles and some moisture exposure — the tape peels away from the frame like a sticker off a glass jar. Water bypasses the membrane entirely, running behind it and into the wall cavity.
The root cause is almost always one of two things: using a rubberised-asphalt tape on a non-porous surface it was never designed for, or skipping the primer step entirely. AAMA 711-07 peel-adhesion testing demonstrates that some membranes applied without primer to aluminium substrates fail to reach even the minimum 0.26 N/mm bond strength threshold. On a dusty job site with residual oils on the frame, adhesion drops further still.
Prevention is straightforward but demands discipline:
- Use butyl-based tapes rather than rubberised-asphalt products on aluminium surfaces.
- Solvent-wipe the frame with isopropyl alcohol before any membrane application.
- Apply the manufacturer’s specified primer for non-porous substrates and allow full drying time (typically 10–20 minutes).
- Roll all membrane edges firmly with a J-roller to eliminate air pockets and achieve full contact adhesion.
Skipping a two-minute primer application to save time gambles the entire weatherproofing system. A delaminated flashing membrane isn’t partially effective — it’s a concealed funnel directing water exactly where you don’t want it.
Reverse Lapping and Incorrect Shingling
If delamination is the aluminium-specific failure, reverse lapping is the universal one — and it remains the single most common window installation defect identified in forensic building envelope investigations. The error occurs when upper flashing layers sit behind lower layers instead of over them, reversing the shingle principle that governs all water management in a wall assembly.
Typical scenarios include head flashing installed beneath the weather-resistive barrier (trapping water between the WRB and the sheathing), sill membrane taped across its bottom edge (blocking the drainage exit), or jamb flashing lapped over the sill pan corners (directing water behind the dam). Each variation creates a pocket where moisture accumulates rather than draining outward. The damage stays hidden for months or years until rot, mould, or staining finally reveals the problem — often requiring destructive investigation to confirm the cause.
Properly flashing a window means respecting a strict lap hierarchy from bottom to top. Every layer must shed water onto the one below it:
- Sill pan flashing sits lowest, with its front edge unsealed to allow drainage.
- Jamb flashing overlaps the sill pan dam corners by at least 50 mm.
- Head flashing (metal drip cap) overlaps the top of both jamb tapes.
- Head membrane tape seals the drip cap’s upper leg to the sheathing, overlapping the jamb tapes.
- The WRB laps over the head flashing tape at the top, but tucks behind the jamb and sill flashing at the sides and bottom.
Pin this sequence to the site shed wall. One reversed layer — even a single strip of tape in the wrong position — can convert a compliant installation into a concealed water trap that won’t announce itself until serious structural damage is already underway.
Sealant-Only Reliance Without Mechanical Flashing
Caulk is not flashing. It’s a phrase worth repeating because the substitution happens constantly — particularly on smaller residential projects where speed and material savings tempt installers into relying on a bead of silicone where a metal drip edge or membrane should be. Industry analysis of recurring moisture failures identifies sealant-only approaches as one of the most persistent causes of water damage at window openings, noting that sealants inevitably shrink, crack, and separate from surfaces over time.
The problem is compounded with aluminium frames. Sealants must accommodate the frame’s thermal movement — roughly 1.7 mm of linear expansion per 1,500 mm of frame length across a 50°C temperature swing. Standard construction silicone has a movement capability of ±12.5% to ±25%. On narrow joints (5–8 mm), that percentage translates to barely 1–2 mm of actual movement accommodation. When the aluminium frame contracts in cold weather and pulls the joint beyond its elastic limit, the sealant tears or debonds. Water enters immediately.
Mechanical flashing — metal drip edges, membrane tapes, formed pan flashings — doesn’t rely on adhesion alone to manage water. It works through overlap, gravity, and geometry. Sealant has a legitimate role as a secondary seal between flashing layers or at trim junctions, but it should never serve as the primary water management strategy at any point around the window perimeter. If your flashing window trim detail depends entirely on a bead of caulk staying intact for 20 years, the design has already failed.
Galvanic Corrosion at Fastener Points
A builder might specify compatible flashing materials, use the correct membrane tape, and nail the shingling sequence — then undermine everything by driving plain carbon steel screws through the aluminium frame. It only takes a single incompatible fastener in the presence of moisture to initiate galvanic corrosion. The reaction concentrates at the point of contact, creating localised pitting in the aluminium that deepens with every wet-dry cycle.
Technical guidance from fastener specialists confirms that carbon steel fasteners in contact with aluminium frames can corrode visibly within months in aggressive coastal environments. The corrosion isn’t limited to cosmetic damage — as the fastener degrades, it loses clamping force. Hardware detaches, flashing on window trim loosens, and weatherproofing integrity degrades progressively at every fixing point.
The fix is simple and inexpensive: use austenitic stainless steel fasteners (grade 304 for inland applications, grade 316 for coastal zones within 1 km of the shoreline) for every fixing that penetrates or contacts an aluminium frame. The marginal cost difference per fastener is negligible against the remediation expense of replacing corroded fixings and repairing pitted frame profiles years later. Where dissimilar metal contact is unavoidable — for instance, securing a zinc-coated flashing to an aluminium frame — isolate the junction with nylon washers or EPDM gaskets to break the electrochemical circuit.
These four failure modes account for the vast majority of aluminium window flashing problems documented across Australian residential construction. Identifying them is one thing; the harder question arises when you’re facing an existing installation where the damage is already done and adding or replacing flashing after the fact demands a fundamentally different approach.

Retrofitting Flashing on Existing Aluminium Windows
Discovering failed flashing on an existing aluminium window puts you at a crossroads. The damage is visible — staining below the sill, soft framing behind the plasterboard, or mould creeping along the reveal. The question builders and homeowners ask most often is whether flashing can be added or replaced without ripping the window out entirely. The honest answer: sometimes yes, sometimes no, and knowing which scenario you’re facing saves thousands in wasted effort.
When Retrofit Flashing Is Feasible
Installing window flashing on existing windows is realistic under specific conditions. The most common opportunity arises when exterior cladding is being replaced anyway — weatherboard re-cladding, render remediation, or sheet cladding upgrades. Once the cladding comes off, the weather-resistive barrier and rough opening become accessible, and you can install flashing tape around windows in proper shingle sequence without disturbing the frame itself.
Even without full re-cladding, targeted fixes work in certain situations:
- Surface-mounted drip caps at the head. A pre-coated aluminium drip edge can be mechanically fixed above the window and sealed to the cladding face, redirecting wall runoff clear of the frame. This addresses head-flashing deficiencies without accessing concealed layers.
- Liquid-applied membranes at the sill. Where a sill pan was never installed — or the original has failed — a fluid-applied membrane can be brushed onto accessible substrates beneath the frame. IIBEC’s case studies document successful retrofit sill flashing using fully bonded liquid membranes on concrete and timber substrates, noting that the approach works best where the installer can achieve full coverage across the sill, up the back dam, and into the corners without obstruction.
- Exterior seal upgrades at jambs. Where jamb flashing has delaminated but the WRB behind remains intact, carefully removing trim, cleaning the aluminium surface, priming, and re-applying butyl membrane tape can restore the perimeter seal without frame removal.
The common thread: retrofit flashing is feasible when you can access the critical junction between frame and wall, and when the structural framing behind hasn’t already deteriorated beyond the point of sound substrate.
When Window Replacement Makes More Sense
Retrofit fixes have limits. If you pull back the cladding and discover concealed rot in the rough-opening framing, no amount of new membrane will fix the underlying problem. Building envelope specialists consistently advise that installing new flashing over compromised substrates simply traps moisture against damaged timber — accelerating decay rather than halting it.
Replace window flashing efforts also become impractical when:
- The rough opening lacks adequate clearance for proper flashing installation (older homes often have aluminium frames hard against the framing with zero gap for membrane).
- The original frame was face-fixed without flanges, meaning no surface exists to lap flashing onto without a complete frame redesign.
- Multiple fastener penetrations through the sill have created irreparable corrosion paths that no sealant or membrane can reliably bridge.
- Thermal performance requirements have changed — the existing single-glazed or non-thermally-broken frame fails current NCC energy provisions, making like-for-like reflashing a wasted investment on a window that needs upgrading regardless.
In these scenarios, understanding how to flash window openings correctly matters most at the replacement stage. Full frame removal allows you to start fresh: inspect and repair the rough-opening framing, install a proper sill pan with dams, sequence the WRB integration from scratch, and set the new frame into a fully compliant flashing assembly. The upfront cost is higher, but the long-term value — eliminating the root cause rather than patching symptoms — justifies the investment every time structural compromise is present.
Choosing Aluminium Windows Designed for Flashing Integration
When replacement is warranted, the window you select determines how straightforward or how painful the flashing process will be. Modern aluminium window systems have evolved well beyond the simple face-fixed frames of decades past. Current designs incorporate purpose-built features that work with standard flashing methods rather than against them:
- Integral mounting flanges that provide a defined surface for membrane tapes to lap onto — eliminating the guesswork of how to install flashing on windows without a proper nailing-fin equivalent.
- Recessed drainage channels within the sill extrusion that direct collected water to external weep slots, reducing reliance on the sill pan as the sole drainage path.
- Thermally broken frame profiles that allow flashing connections without introducing additional thermal bridges at the perimeter.
- Standardised clearance specifications that ensure adequate gap between frame and rough opening for membrane application and expansion movement.
Selecting aluminium windows engineered with these integrated flashing provisions — such as MEICHEN’s aluminium window systems — reduces long-term leak risk and simplifies code-compliant installation. Their range covers fixed, awning, casement, and sliding configurations, each with frame geometries and drainage details designed to align with proven Australian flashing practices. When how to install metal flashing around windows becomes a matter of following clear flange lines and manufacturer-specified sequences rather than improvising around inadequate frame profiles, the margin for error shrinks dramatically.
Whether you’re patching a single failed sill or replacing every opening in a full renovation, the principle remains constant: flashing performance depends on substrate integrity, correct material selection, and disciplined installation sequence. Get those three elements right — from the sill pan up — and the window assembly will manage water reliably for the life of the building.
Frequently Asked Questions About Flashing Around Aluminium Windows
1. What type of flashing tape works best on aluminium window frames?
Butyl-based flashing tapes outperform rubberised-asphalt alternatives on aluminium surfaces. Butyl rubber maintains a stable, tacky bond on smooth, non-porous materials without relying on surface texture for grip. It remains flexible across wide temperature ranges and resists UV degradation. However, even butyl tapes require a primer application on mill-finish or anodised aluminium to achieve reliable long-term adhesion. Clean the frame with isopropyl alcohol, apply the manufacturer’s specified primer for non-porous substrates, allow 10 to 20 minutes drying time, then press the tape firmly with a J-roller to eliminate air pockets.
2. Can you add flashing to existing aluminium windows without removing them?
Retrofit flashing is feasible in specific situations. Surface-mounted drip caps can be mechanically fixed above the window head without accessing concealed layers. Liquid-applied membranes can be brushed onto accessible sill substrates beneath the frame. Jamb flashing can be replaced by removing trim, cleaning the aluminium surface, priming, and re-applying butyl tape. These approaches work when the structural framing behind the window remains sound. If concealed rot, inadequate rough-opening clearance, or irreparable fastener corrosion is present, full window replacement with properly integrated flashing from the start delivers better long-term value.
3. What metals are safe to use with aluminium window frames without causing corrosion?
Aluminium is compatible with stainless steel (grade 316 preferred near the coast), zinc, hot-dip galvanised steel, pre-coated aluminium, and non-metallic materials like butyl membranes and PVC drip caps. Avoid direct contact with copper, brass, plain carbon steel, lead, and weathering (Corten) steel — these trigger galvanic corrosion that pits the aluminium frame over time. Where an incompatible metal pairing is unavoidable, electrically isolate the junction using EPDM gaskets, nylon washers, or a bituminous paint layer between surfaces. Use stainless steel fasteners (grade 304 inland, grade 316 coastal) for every fixing that penetrates or contacts the aluminium frame.
4. What is the correct installation order for window flashing on a new build?
The correct sequence follows the shingling principle — bottom to top, with each upper layer overlapping the one below. Install the sill pan flashing first, with dam corners extending up each jamb. Set the window frame, then apply jamb flashing tape from the window flange onto the wall sheathing, overlapping the sill pan by at least 50 mm. Next, install the metal head flashing (drip cap) above the window. Apply head flashing tape over the drip cap’s upper leg, overlapping both jamb tapes. Finally, integrate the weather-resistive barrier: it laps over the head flashing at the top but tucks behind the jamb and sill flashing at the sides and bottom. The sill pan’s front edge must always remain unsealed to allow drainage.
5. Why does caulk alone fail as flashing on aluminium windows?
Sealants cannot accommodate aluminium’s thermal movement over time. A 1,500 mm aluminium frame can move approximately 1.7 mm through a 50-degree Celsius temperature swing — enough to exceed the elastic limits of standard construction silicone on narrow joints. When the frame contracts in cold weather, the sealant tears or debonds, creating immediate water entry points. Sealants also degrade from UV exposure, lose flexibility with age, and cannot redirect bulk water through overlap and gravity the way mechanical flashing does. Caulk has a legitimate role as a secondary seal between flashing layers, but it should never serve as the primary water management strategy at any point around an aluminium window perimeter.
More Window & Door Guides