What Framing Aluminium Windows Actually Involves
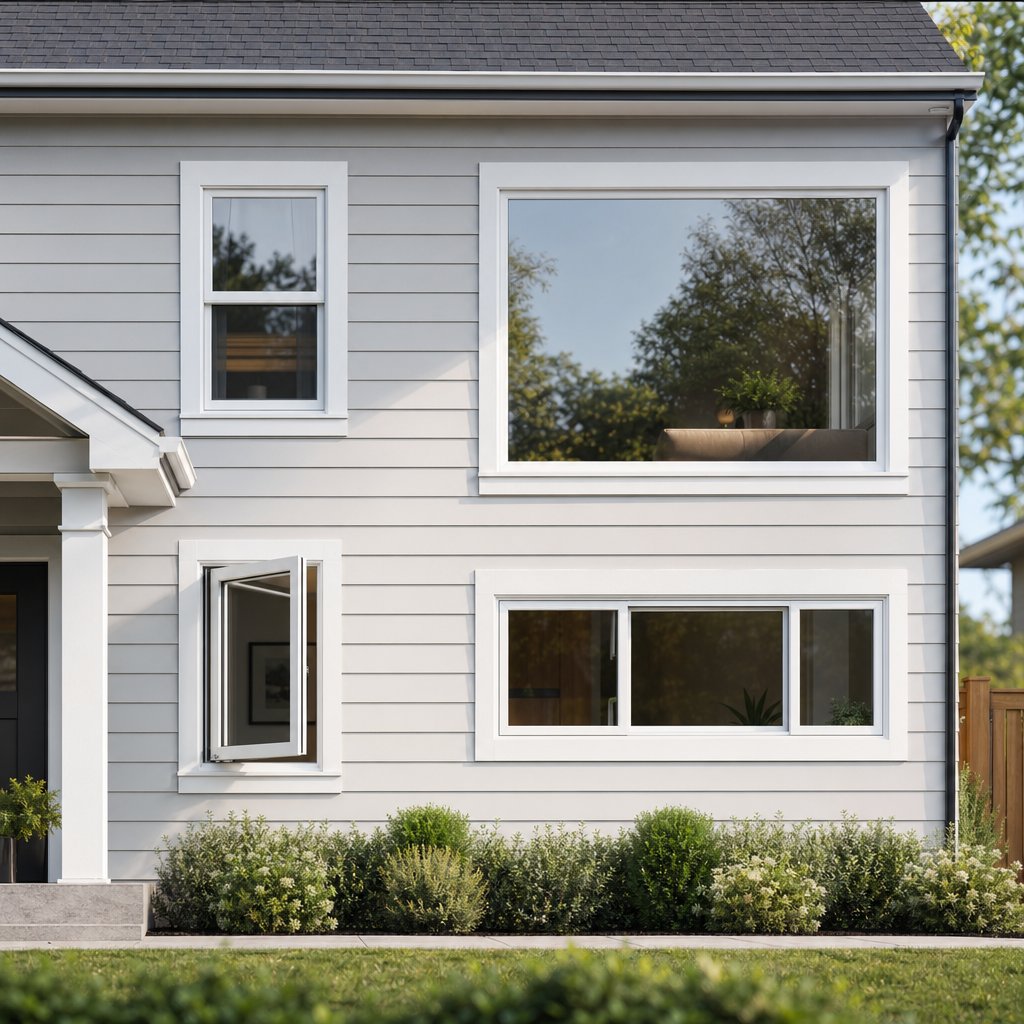
The phrase “framing aluminium windows” refers to two distinct things in construction, and confusing them causes real problems on site. There is the aluminium window frame — the extruded metal unit that holds the glass — and there is the structural framing: the rough opening built from timber studs, a header, and a sill plate that supports that unit within the wall. This guide covers the structural side — preparing, building, and weatherproofing the opening so your aluminium windows perform as intended for decades.
Defining Aluminium Window Framing in Construction
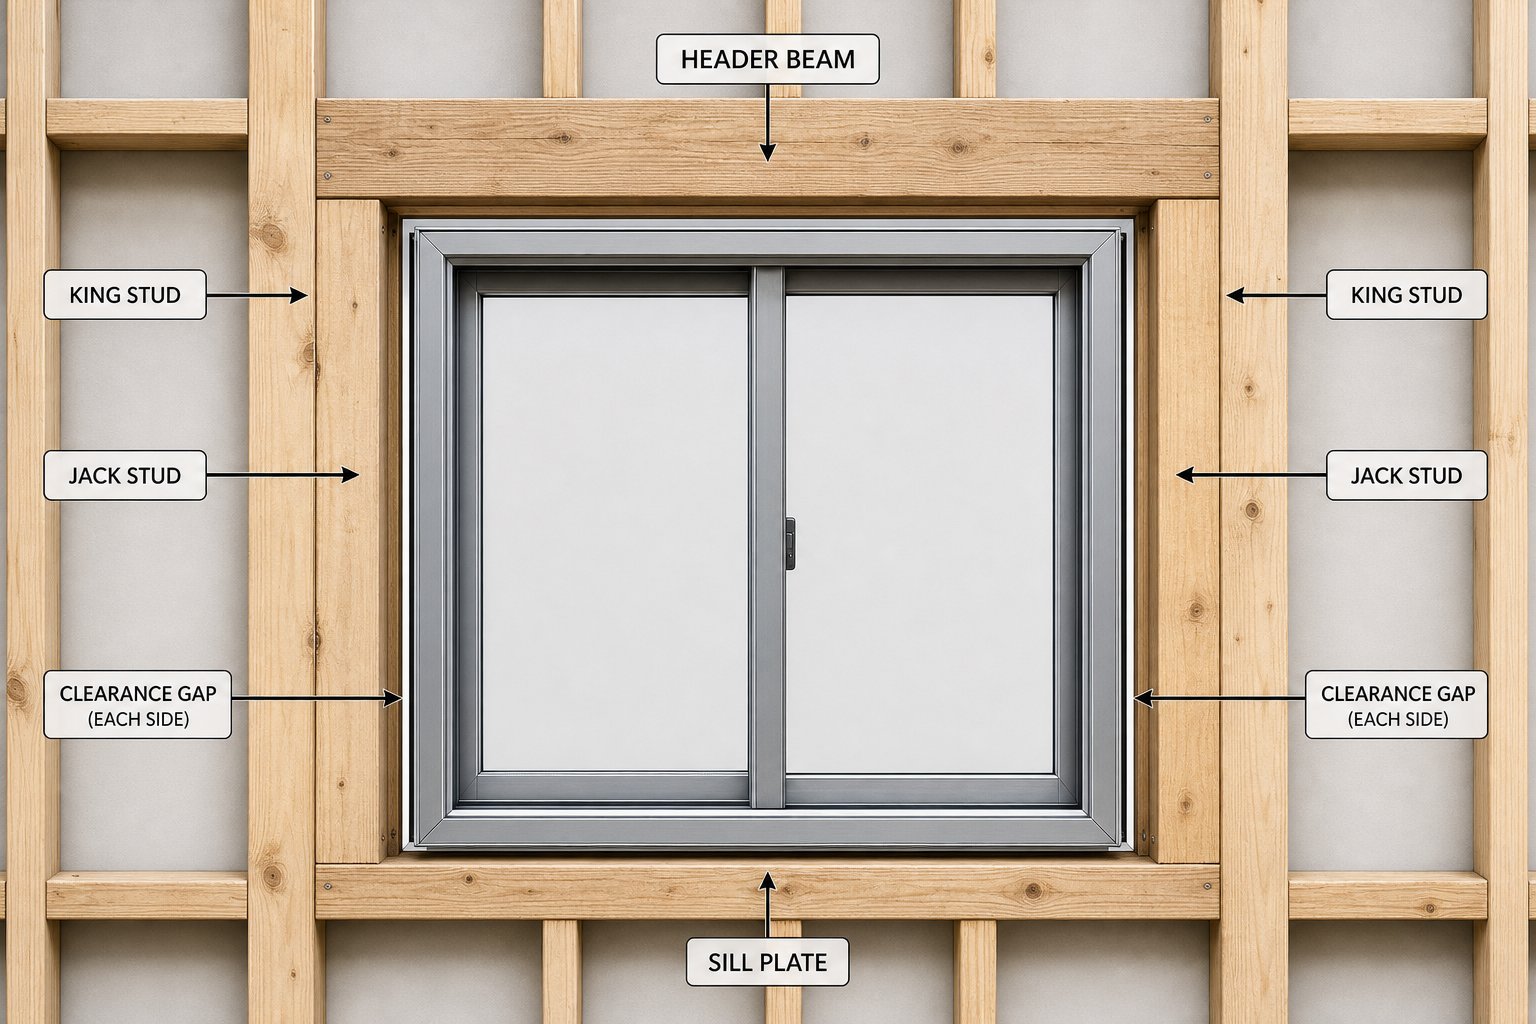
A rough opening is the timber-framed cavity in your wall where the window sits. It consists of king studs on each side, jack studs (trimmers) that carry the load, a header spanning the top, and a sill plate across the bottom. This structure bears weight from above while giving you mounting surfaces for the window unit. The rough opening is deliberately larger than the aluminium frame — that clearance allows for shimming, insulation, flashing, and critically, thermal movement. For windows in aluminium, this clearance matters more than it does for timber or vinyl units, because the metal expands and contracts at a different rate to the surrounding wall structure.
Why Proper Framing Determines Long-Term Window Performance
Get the structural framing wrong, and problems compound over time. A rough opening that is out of square by even a few millimetres forces the rigid aluminium frame into a bind — sashes stick, locks misalign, and seals fail prematurely. Poor shimming or inadequate drainage slope at the sill invites moisture into the wall cavity. Incorrect gap allowances lead to either air leakage in winter or frame distortion in summer as the metal expands against tight surrounds.
Aluminium’s unique combination of high thermal conductivity, a thermal expansion rate roughly twice that of timber, and lightweight rigidity means that aluminium window framing demands techniques distinct from those used for other frame materials. Treating alu frames the same as timber is one of the most common — and costly — installation errors in Australian residential builds.
The sections that follow walk through the complete workflow: sizing and building the rough opening, installing and fixing the frame, flashing correctly for aluminium’s non-porous surface, and managing thermal expansion so your alu frames operate smoothly across every season. Whether you are a builder working on new construction or a homeowner planning a retrofit, the structural framing is where performance begins — or fails.
Why Aluminium Frames Need Different Treatment Than Wood or Vinyl
Every window material behaves differently inside a wall, yet most rough openings get built using the same dimensions and methods regardless of what sits in them. That approach works passably for timber. It creates real problems for an aluminium frame. The physical properties of the metal — how it moves with heat, how it conducts energy, how it sheds water — demand specific adjustments to the structural framing that supports it.
Thermal Expansion and Tolerance Differences
Aluminium has a coefficient of thermal expansion of approximately 23 x 10⁻⁶ per degree Celsius. That is roughly twice the rate of vinyl (PVC sits around 50-80 x 10⁻⁶, but its flexibility absorbs some movement) and nearly three times that of timber. In practical terms, a 1.5-metre aluminium frame can expand by over 1mm across a 30°C temperature swing — the kind of daily range common in parts of Western Australia or inland Queensland during summer.
This matters because aluminium frames are rigid. Unlike vinyl, which flexes and deforms slightly to absorb its own expansion, metal frame windows hold their shape and push outward against whatever constrains them. If the rough opening gap is too tight, the frame binds against the studs. Sashes jam. Seals compress unevenly. The fix is straightforward but specific: aluminium frame windows need a minimum 10mm clearance gap on each side and at the head, compared to the 5-6mm commonly used for timber units.
Structural Load and Header Sizing
Here is where aluminium actually works in your favour. A standard residential aluminium frame weighs significantly less than an equivalent timber-framed unit with the same glass area. The strength-to-weight ratio of extruded aluminium — particularly in 6063-T5 alloy — means the window unit itself places less dead load on the header and jack studs.
For standard-width openings (under 1200mm), this lighter weight can allow a reduced header size compared to what a heavy hardwood-framed window demands. That said, header sizing must still account for the structural load from above — roof, upper storey, or rafter loads — so consult your engineer before downsizing. The aluminium frame contributes less weight, but the opening still carries everything above it.
Moisture Management at the Frame-to-Wall Junction
Timber absorbs moisture. That is a problem in itself, but it also means timber frames create capillary pathways that draw water inward, making generous overlap flashing essential. Aluminium frames do the opposite — they are completely non-absorbent. Water hitting the frame surface sheets off rather than wicking in.
This sounds like an advantage until you consider flashing adhesion. Self-adhesive flashing tapes bond reliably to porous substrates like timber and building wrap. On aluminium’s smooth, non-porous surface, that same tape can lose adhesion over time unless a compatible primer is applied first. The flashing strategy for aluminium frames must account for this: use a primer rated for metal surfaces before applying adhesive-backed membranes, or opt for mechanically fixed flashings at critical junctions.
| Framing Consideration | Aluminium | Vinyl (PVC) | Timber | Fibreglass |
|---|---|---|---|---|
| Expansion gap needed (each side) | 10mm minimum | 6-8mm | 5-6mm | 5-6mm |
| Header requirements | Can be reduced for lighter units | Standard sizing | May need upsizing for heavy hardwood | Standard sizing |
| Flashing approach | Primer required for adhesive tapes; mechanical fixing preferred | Standard adhesive tapes bond well | Generous overlap; capillary breaks essential | Standard adhesive tapes bond adequately |
| Shimming method | Rigid packers at fixing points; no compression shims | Standard shims; some flex tolerance | Standard shims; frame absorbs minor irregularities | Standard shims; moderate flex tolerance |
| Flex tolerance | Very low — frame will not compensate for out-of-square openings | Moderate | High | Moderate |
These differences are not minor installation preferences — they are the reason aluminium frames fail when treated like any other material. The good news is that once you understand what the metal needs from its surrounding structure, building the correct rough opening is no more difficult. It just requires the right specifications from the start, along with the correct materials to make them work.
Essential Tools and Specifications for the Job
Knowing what aluminium demands from a rough opening is one thing. Having the right materials on hand to deliver it is another. Compatibility between the aluminium window frame material and every fastener, sealant, and membrane touching it will determine whether your installation lasts five years or twenty-five. Here is what to gather before you pick up a saw.
Framing Lumber and Hardware Checklist
The structural components are straightforward, but the hardware selection needs care. Galvanic corrosion — where dissimilar metals react in the presence of moisture — is the primary risk when fixing into or adjacent to aluminium joinery. Standard carbon steel fasteners can corrode within months in coastal environments, degrading both the fixing and the surrounding frame.
- Treated timber studs (minimum MGP10 grade for load-bearing walls)
- Galvanised framing brackets and joist hangers
- Austenitic stainless steel fixings for all connections touching the aluminium frame — not carbon steel, which triggers galvanic corrosion
- Rigid packers and shims rated for the expected load (plastic or stainless steel, not timber offcuts that can swell)
- Closed-cell polyethylene backing rod in sizes matching your perimeter gap
- Compatible neutral-cure sealant (see below)
- Flashing membrane with metal-surface primer
Understanding Aluminium Extrusion Specs That Affect Framing
Not all aluminium window frame kits are created equal, and the specs of the unit you are installing dictate how you support it. Most residential extruded aluminium window frames use 6063-T5 alloy — a composition optimised for clean surface finishes and corrosion resistance. Wall thicknesses on standard residential profiles typically sit between 1.4mm and 2.0mm.
Why does this matter for framing? Thinner-walled profiles (1.4mm) have less material around fixing lug points, so fixings must be spaced closer together — typically 150-200mm from corners and no more than 600mm apart — to distribute load without deforming the frame. Heavier commercial profiles (2.0mm and above) tolerate wider fixing intervals. Check the manufacturer’s datasheet before marking out your fixing positions; a glass aluminium frame designed for large fixed-light panels may have different structural support requirements than an operable casement of similar external dimensions.
Sealant and Membrane Selection
Sealant chemistry is where many DIY installations come unstuck. Acetoxy-cure silicones — identifiable by the vinegar smell during curing — are corrosive to aluminium and have limited adhesion to metal substrates. They are cheap and widely available at hardware stores, which is precisely why they end up on so many aluminium joinery installations where they should not be.
Use neutral-cure silicone for all exterior perimeter joints on aluminium frames. It bonds reliably to both powder-coated aluminium and masonry substrates without releasing corrosive by-products. Where the interior joint needs paint coverage — common in residential fit-outs — an MS polymer sealant provides adhesion to aluminium without primer and accepts all standard paint systems.
For flashing membranes, remember that adhesive-backed tapes need a primer coat on aluminium’s smooth surface to achieve long-term adhesion. Without it, the tape eventually lifts, and water finds its way behind the frame. With your materials sorted and matched to the metal, the next step is building the opening itself — measured and squared to tolerances that aluminium’s rigidity will not forgive.
Preparing the Rough Opening for an Aluminium Window
Materials and fixings are only half the equation. The rough opening itself — its dimensions, its structure, and its squareness — is the single biggest factor in whether your aluminium window frame operates smoothly or binds within the first summer. This is where you frame a wall with a window that performs for the life of the building, not just the week of installation.
Measuring and Sizing the Rough Opening
Start with the manufacturer’s unit dimensions — the actual external frame size, not a nominal measurement. For aluminium frames for windows, add a minimum of 10mm clearance on each side and at the head. This gives you a total rough opening width of the frame width plus 20mm, and a height of the frame height plus 10mm above the unit (the sill packer height is set separately below). Compare that to the 5-6mm per side you would use for a timber window with frame, and the reason is clear: aluminium’s thermal expansion rate demands that extra breathing room.
A 1500mm-wide aluminium frame in a Western Sydney summer can expand by more than 1mm in width alone. Restrict that movement with a tight opening, and the sashes bind. Leave too much gap — anything over 15mm per side — and your shims lose bearing surface and the perimeter seal becomes unreliable. The 10mm figure balances thermal movement against structural support.
To verify square, measure both diagonals of the opening corner to corner. If those two measurements differ by more than 2mm, the opening needs correction before any window goes in. A simple tape measure and a spirit level are enough — measure twice, mark clearly, and do not assume the bottom plate is level just because it was when the slab was poured.
Building the Structural Frame — Studs, Header, and Sill
Whether you are working in new stud framing or cutting into an existing wall, the sequence matters. Each component depends on the one before it being positioned and fixed correctly.
- Mark the layout on top and bottom plates. Transfer your calculated rough opening width to both plates, marking the positions of the king studs. Double-check that the marks align vertically using a plumb bob or laser level.
- Install king studs. These full-height studs run continuously from bottom plate to top plate and carry the structural load from the header down to the footing. Fix them plumb and flush with your plate marks.
- Cut and install jack studs (trimmers) to the correct height. Jack studs sit inside the king studs and support the header directly. Their height equals the rough opening height plus the header depth — measure from the top of the bottom plate. Nail or screw them tight against the king studs with fixings at 300mm centres.
- Install the header assembly. The header spans between king studs, resting on the jack studs. Size it according to the span and load above (refer to NCC span tables or your engineer’s specification). For most residential openings under 1200mm wide with aluminium windows, a double 90 x 45mm treated pine header is adequate where no concentrated loads bear from above.
- Install the sill plate with a slight slope for drainage. The rough sill spans between jack studs at the base of the opening. Set it with a 5-degree back slope — roughly 2-3mm fall over a 35mm sill depth — so any moisture that enters the cavity drains outward rather than pooling behind the frame.
- Verify plumb and level on all components. Check each jack stud for plumb, the header for level, and the sill for consistent height across its length. Make adjustments now, not after the window arrives on site.
Checking for Plumb, Level, and Square Before Installation
This final check is non-negotiable when you frame a wall with a window destined to hold an aluminium unit. The tolerance threshold is tight: a maximum 2mm deviation over the full height or width of the opening. That is roughly half what you might accept for a timber-framed window, which has enough flex in its joints to absorb minor irregularities.
An aluminium window frame is an extruded rigid rectangle. It does not rack, twist, or compress to accommodate an opening that is out of shape. Force it into a trapezoidal or bowed opening and the result is predictable — gaskets unseat, hardware binds, and weatherseals gap at the corners. Unlike timber, there is no “close enough” with aluminium.
Run your checks methodically:
- Plumb both jack studs independently with a 1200mm spirit level. A stud that bows mid-height will not show up on a short level held at the top.
- Level the header and sill with the same 1200mm level. If the sill shows a hump or dip mid-span, pack or plane it flat before proceeding.
- Measure diagonals again after all fixings are tightened — studs can shift slightly during nailing.
If any measurement falls outside the 2mm tolerance, correct the framing before ordering or unwrapping the window. An aluminium window frame that arrives on site to find a rough opening 4mm out of square will either need to go back on the truck or get installed poorly. Neither outcome is worth the time saved by skipping this step.
New Construction Framing Step by Step
Your rough opening is plumb, level, and square within 2mm. Your materials are compatible with the metal. This is where all that preparation pays off — setting and securing the aluminium window frame into the opening you have built for it. Rush this stage and you undo everything that came before. Take it methodically and the result is an aluminium frame window that operates smoothly, seals completely, and stays that way through years of thermal cycling.
Positioning and Shimming the Aluminium Frame
The sequence here is non-negotiable. Each step depends on the previous one being completed and verified before you move forward. Skip ahead — particularly by driving permanent fixings before checking sash operation — and you may be pulling the entire frame back out.
- Apply sill pan flashing. Before the frame touches the opening, your sill pan must be in place with end dams formed at both jambs. The pan should slope outward at approximately 5 degrees and extend past the face of the weather-resistive barrier. On aluminium installations, prime the sill framing timber with a membrane primer to ensure adhesion of self-adhesive flashing — skipping this step is where water entry problems begin.
- Set the frame on packers at fixing points. Lift the aluminium window frame into the opening and rest it on rigid packers positioned directly beneath each fixing lug location — typically 150mm in from each corner. Use plastic or stainless steel packers, not timber offcuts. The packers establish your sill height and must be sized so the frame sits centred in the opening with even gaps on both sides.
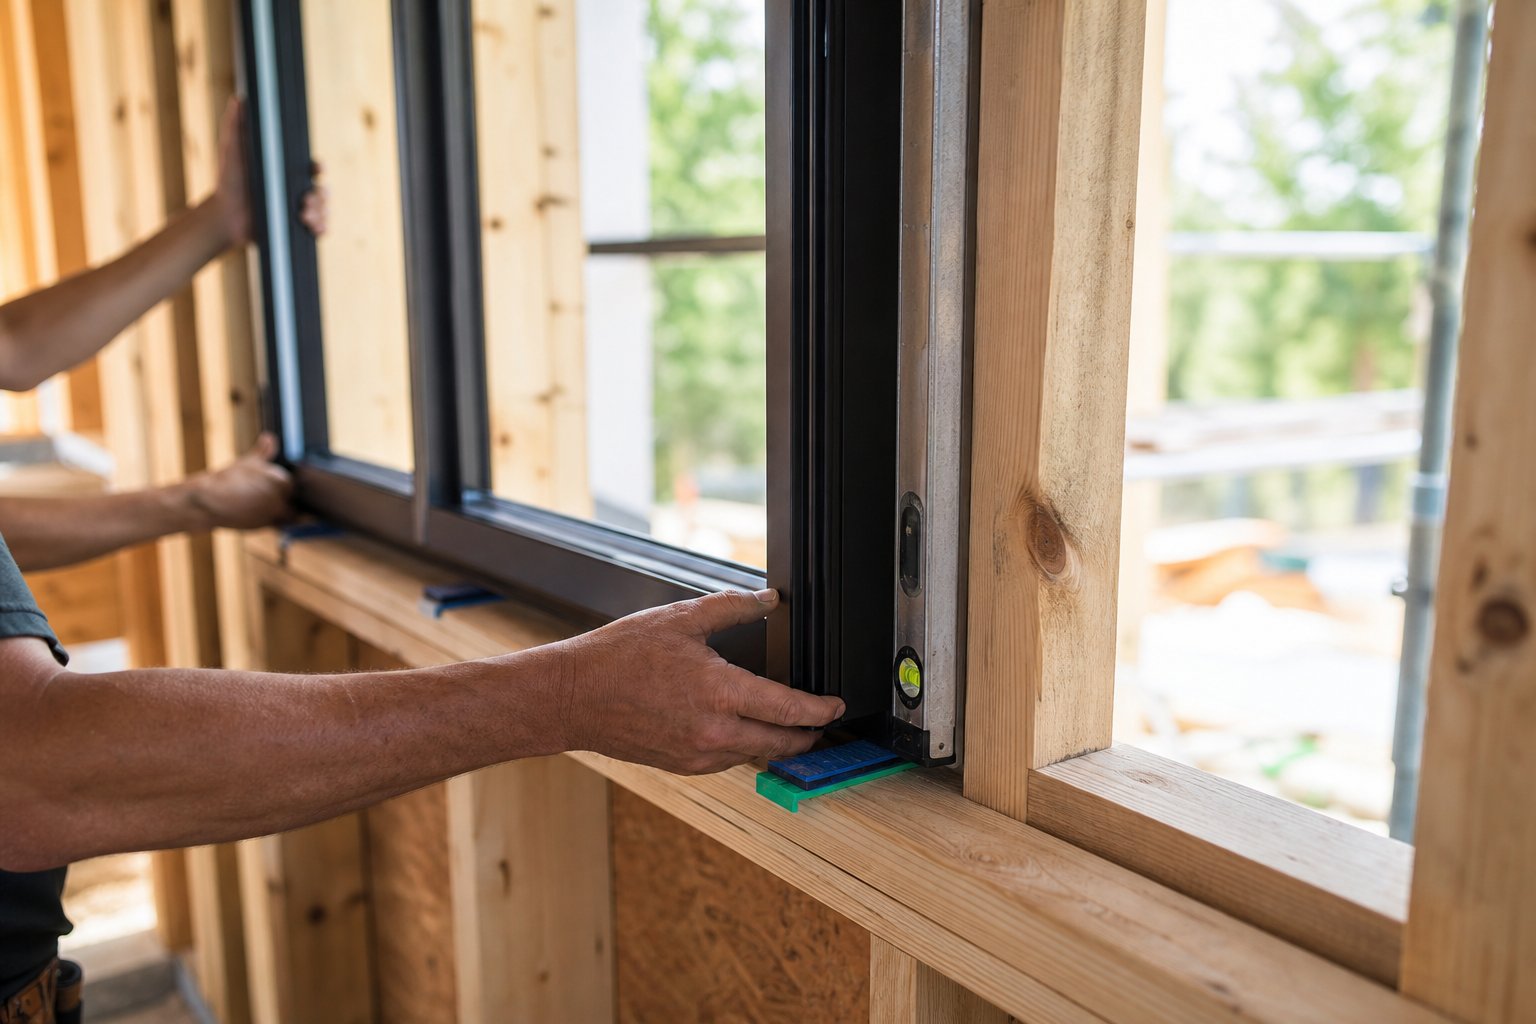
- Check plumb and level. With the frame resting on its packers, check both jambs for plumb using a 1200mm spirit level. Check the head and sill for level. Adjust packer heights incrementally until the frame sits true. Do not force the frame — if it will not sit level on packers alone, the rough opening needs correction.
- Insert shims at all fixing locations. At each point where a fixing will pass through the frame into the stud, insert shims between the frame and the rough opening timber. These maintain the consistent 10mm gap you sized the opening for. The shims must be rigid enough to prevent the frame from deflecting inward when fixings are tightened — compressible shims defeat the purpose entirely.
- Verify operation of all opening sashes. Before driving a single permanent fixing, open and close every operable sash. Check that casement stays extend freely, that sliding panels track without resistance, and that locking hardware engages cleanly. If anything binds at this stage, adjust your shim positions. A frame that operates perfectly when resting on packers but jams after fixing indicates you have introduced a rack during shimming — pull the shims and start that step again.
This test-before-fix principle is the single most important habit in working with aluminium framed windows. The material gives you zero forgiveness once it is locked in place.
Fixing the Frame to the Structural Opening
Two methods dominate residential aluminium window frame installation in Australia: direct screw-fix through the frame, and bracket fixing. The right choice depends on the unit size, the wind load zone, and whether you are working with a standard residential profile or a heavier commercial section.
Direct screw-fix is the standard approach for most residential aluminium window frames. The frame arrives with pre-drilled fixing lugs — recessed points in the jamb profile designed to accept a countersunk screw. You drill through the lug, through your shim, and into the stud behind. Use stainless steel countersunk screws (typically 8-gauge x 75mm for standard stud depth) to avoid galvanic corrosion at the fixing point. The screw head sits flush in the lug recess, leaving a clean profile that accepts a snap-on cover cap.
Bracket fixing suits larger commercial units, multi-panel configurations, or situations where you cannot screw directly through the frame — for example, where continuous thermal breaks would be compromised by a through-fixing. Steel or stainless brackets are pre-fixed to the frame’s rear face and then screwed into the studs independently. This method allows fine adjustment of the frame position without enlarging fixing holes in the aluminium.
Regardless of method, fixing spacing follows consistent rules based on the frame profile and wind conditions:
- First fixing: 150mm maximum from each internal corner of the frame
- Subsequent fixings: maximum 600mm centres along each jamb
- For frames wider than 1800mm: add fixings along the head rail at 600mm centres
- In high wind zones (wind classification N3 and above under AS 4055): reduce spacing to 450mm centres and confirm with the manufacturer’s engineering data
Drive each fixing progressively — do not fully tighten any single screw before all fixings are started. This prevents the frame from pulling out of alignment as you work around it. Tighten gradually in a sequence: bottom corners first, top corners second, then mid-span fixings. Check plumb and level again after the final tightening pass. Over-tightening is a common mistake with aluminium — the metal will not spring back if you distort it, and a pulled-in jamb shows as a visible bow in the sight line.
Verifying Operation Before Completing the Installation
Once all fixings are driven and tightened, test every operable sash again. Open fully, close fully, lock, unlock. This second verification catches any racking introduced during the fixing sequence. It is your last clean opportunity to correct problems — once expanding foam or sealant fills the perimeter gap, removing or repositioning the frame means cutting it free and starting over.
Pay particular attention to:
- Casement sashes that drag at the top corner when opening — this indicates the frame has racked slightly during fixing. Loosen the top jamb fixings, re-shim, and re-tighten.
- Sliding sashes that require force mid-travel — usually caused by a head or sill that has bowed inward under fixing pressure.
- Multi-point locks that do not engage smoothly — the frame is likely pulled out of square by less than 1mm, but that is enough to misalign the lock keeps.
If the sashes operate cleanly after this second check, the frame is correctly set and you can proceed to perimeter sealing with confidence. If they do not, correct the frame now. No amount of hardware adjustment compensates for a frame that is geometrically wrong — aluminium framed windows either sit true or they fight you every time they are operated.
A note on project complexity: the methodology above applies to standard residential aluminium window frames — single casements, awnings, and fixed panels within typical residential spans. Some projects genuinely exceed DIY scope. Multi-panel stacking or sliding door systems with three or more panels, structural glazing where the glass carries wind load, and installations in cyclone-rated wind zones (C1 and above) all involve engineering tolerances and connection details that demand professional installation by accredited window installers. Recognising that boundary is not a failure — it is the same judgement a competent builder makes when they call in a structural engineer rather than sizing a beam by eye.
With the frame fixed and verified, the perimeter gap between the aluminium and the rough opening is exposed — sealed temporarily by your shims but open to air and water. The next critical phase is weatherproofing that junction in a way that accounts for the ongoing thermal movement aluminium will impose on every seal you apply.
Retrofit and Replacement Framing Approaches
Everything covered so far assumes you are building a fresh rough opening in new stud work. Retrofit projects — where you replace aluminium windows in an existing wall or swap old timber units for aluminium — introduce a different set of challenges. The structure already exists, and its condition dictates what is possible.
Removing Old Frames Without Damaging the Opening
Extracting old aluminium window frames requires more care than brute force. Older aluminium units are typically screw-fixed through jamb lugs directly into studs, and decades of paint and sealant effectively glue them in place. Start by removing internal trims and cutting the perimeter sealant with a sharp utility knife. Locate and back out all fixing screws — a magnetic stud finder helps identify buried fasteners concealed by filler or paint layers.
For timber-to-aluminium upgrades, the old timber frame may be nailed rather than screwed, and timber reveals can be integrated into the wall lining. Pry these free carefully with a flat bar, working from the sill upward to avoid cracking surrounding plaster or dislodging brickwork ties in veneer construction.
Once the old frame is out, inspect what is behind it. Check jack studs for rot or termite damage — common in Australian homes older than 30 years, particularly in humid climates. Examine the header for adequate bearing and verify that it meets current NCC span requirements for the replacement unit you are fitting. If the existing studs are softened or undersized, sister new treated timber alongside before proceeding. Skipping this assessment is how aluminium frame window replacement projects develop problems months after completion.
Adapting Existing Rough Openings for New Aluminium Frames
Existing openings rarely match the exact dimensions of a new unit. Three scenarios are common:
- Opening is oversized. If the gap exceeds 15mm per side — beyond what shims can reliably bridge — install a treated timber sub-frame (packing frame) inside the rough opening to reduce it to the correct clearance dimensions. Fix the sub-frame to the existing studs, verify it for plumb and square, then treat it as your new rough opening.
- Opening is undersized. Where the gap is less than 8mm per side, you lack the thermal movement allowance aluminium demands. Options include trimming the studs back (only feasible with non-load-bearing trimmers), ordering a custom-sized unit to fit the available space, or widening the opening by repositioning a jack stud — which requires temporary propping of the header.
- Opening is out of square. Old aluminium windows may have masked years of settlement. Measure diagonals: if they differ by more than 3mm, correct the framing before attempting to replace aluminium windows with a new unit. Pack or plane the offending stud until you achieve the 2mm maximum tolerance that aluminium requires.
Choosing Between Full-Frame and Insert Replacement
The decision between ripping everything back to the rough opening or fitting a new frame inside the existing one depends on what you find after removing trims and inspecting the structure. Each approach suits different project realities.
| Factor | Full-Frame Replacement | Insert (Retrofit) Frame |
|---|---|---|
| Cost | Higher — involves removing all existing frame components, repairing the rough opening, and full re-flashing | Lower — new unit fits within the existing frame, minimising ancillary work |
| Disruption level | Significant — exposes wall cavity, requires internal and external make-good | Minimal — existing trims and external cladding can remain largely intact |
| Thermal performance improvement | Maximum — allows insulation of the full perimeter gap and new thermal break detailing | Limited — existing frame remains as a potential thermal bridge |
| Suitability for damaged openings | Essential when studs, headers, or flashing are compromised | Only viable when the existing frame is structurally sound and square |
| Typical project scenarios | Upgrading old aluminium window frames with visible corrosion or failed seals; changing window size or style; homes with known water ingress issues | Cosmetic upgrades where the existing structure is sound; rental properties or body corporate projects needing fast turnaround; budget-conscious renovations |
Insert replacement is tempting for its speed, but it only works when the existing frame genuinely remains square, corrosion-free, and structurally adequate. In Australian coastal areas where salt air accelerates degradation of old aluminium windows, a full-frame approach more often proves necessary — and it delivers the better long-term result because you control every layer from the stud outward.
Whichever path you take, the aluminium replacement windows still demand the same perimeter gap allowances, the same stainless fixings, and the same flashing principles outlined in earlier sections. The difference is simply where you establish your reference surfaces — against existing framing you have verified, or against a fresh opening you have rebuilt. Either way, the critical weatherproofing layer that seals the frame-to-wall junction comes next, and aluminium’s thermal behaviour makes that layer more demanding than it is for any other frame material.
Flashing, Weatherproofing, and Managing Thermal Expansion
A correctly fixed aluminium frame means nothing if the junction between metal and wall leaks air or water within two summers. This is precisely where most installations deteriorate — not because the frame was set poorly, but because the weatherproofing failed to account for aluminium’s ongoing thermal movement. Every seal, membrane, and insulation layer at the perimeter must flex with the metal rather than fight against it.
Flashing Sequence for Aluminium Window Frames
Flashing around a metal window frame follows a strict layering logic. Each membrane overlaps the one below it in a shingle pattern, directing water downward and outward at every junction. Reverse the order — or skip a layer — and you create a trap that funnels moisture behind the frame and into the wall cavity.
- Install the sill pan flashing first. The sill pan sits across the bottom of the rough opening with turned-up end dams at each jamb, forming a tray that catches and redirects any water that penetrates past the frame. Slope the pan outward at approximately 5 degrees so water drains to the exterior rather than pooling at the back. The pan should extend over the face of the weather-resistive barrier below the opening.
- Apply jamb flashings, lapping over the sill pan. Run self-adhesive flashing membrane up each side of the opening, overlapping the turned-up end dams of the sill pan by at least 50mm. This overlap means any water running down the jamb membrane is directed into the sill pan rather than behind it. Extend the jamb flashing at least 150mm above and below the opening to integrate with the wall wrap.
- Install head flashing last, lapping over the jamb flashings. The head membrane spans the top of the opening and extends down over the top edge of both jamb flashings by a minimum of 50mm. A metal drip cap installed over the head flashing provides a physical edge that sheds water outward, preventing it from creeping behind the membrane through surface tension.
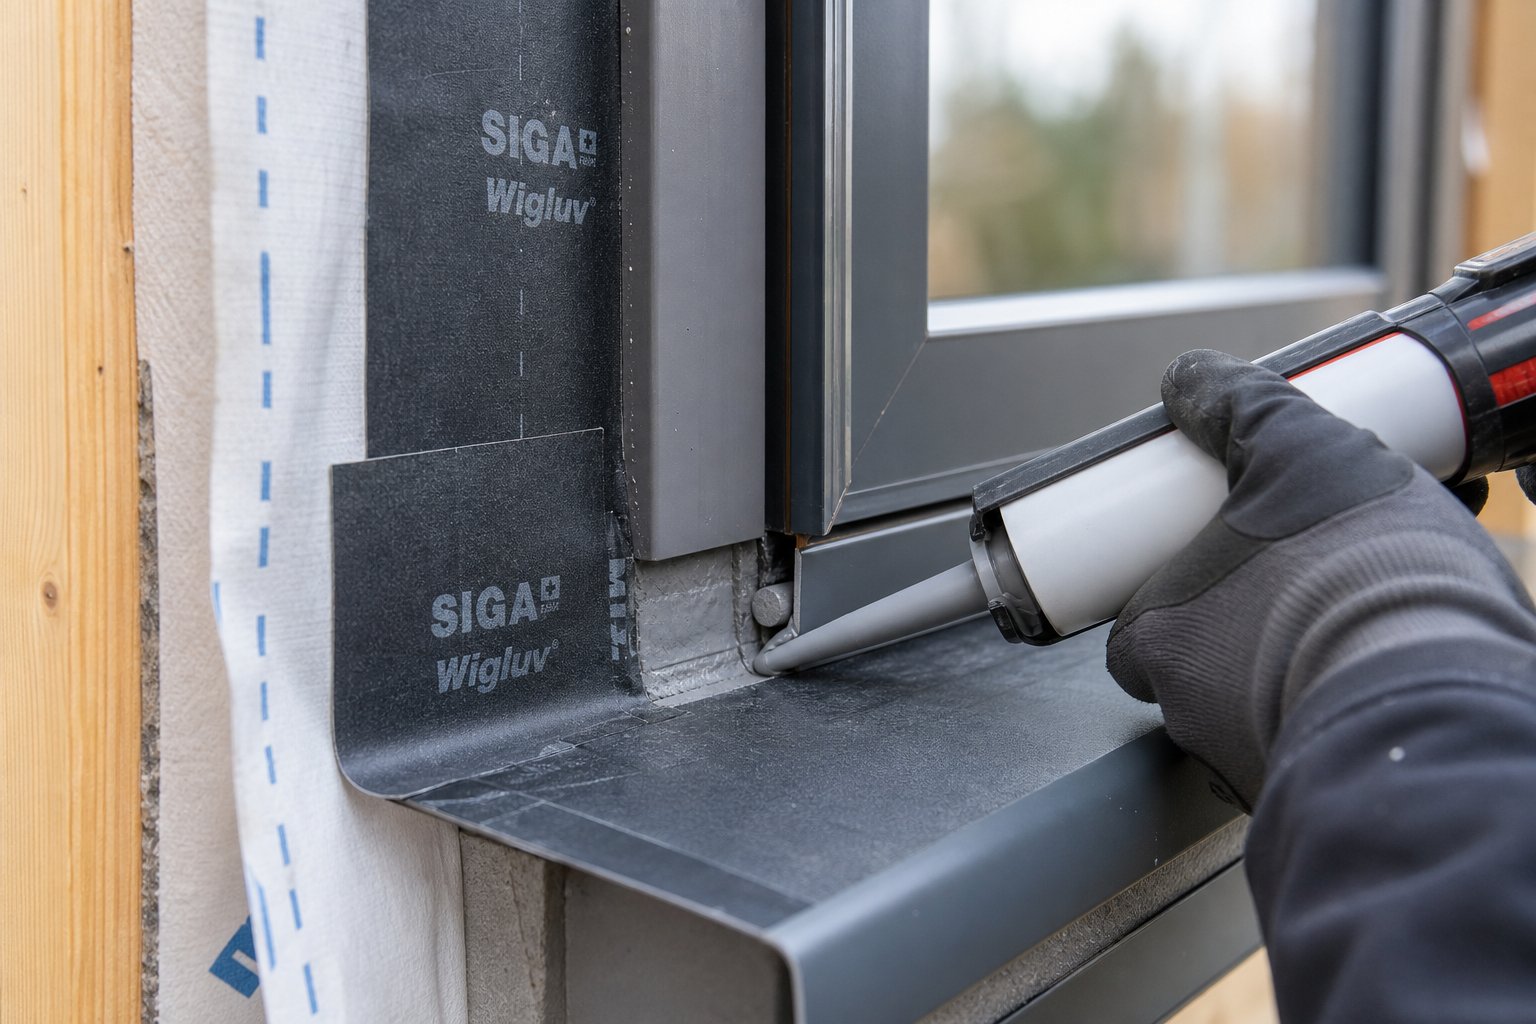
Here is the critical point specific to aluminium: adhesive-backed flashing tapes that bond reliably to timber framing and building wraps will not maintain adhesion on aluminium’s smooth, non-porous surface without preparation. The metal offers no mechanical key for the adhesive to grip. Apply a compatible membrane primer — typically a solvent-based product specified by the flashing manufacturer — to any aluminium surface that will receive adhesive-backed tape. Allow it to tack off before pressing the membrane into place, then roll firmly with a J-roller to eliminate air pockets. Without this step, the flashing lifts progressively as the frame expands and contracts through seasonal temperature swings, and water finds its way behind what looks like a sealed junction.
Sealing Gaps While Allowing Thermal Movement
The perimeter gap between your aluminium frame and the rough opening timber needs to do two things simultaneously: block air and water penetration, and accommodate the frame’s ongoing expansion and contraction. Rigid expanding foam — the product most people reach for — handles the first requirement adequately but fails the second. As the aluminium expands in heat, rigid cured foam resists that movement, generating stress at the foam-to-frame bond. Over repeated thermal cycles, the bond fractures. Gaps open. Draughts follow.
The correct approach uses a two-part system: a compressible backing rod inserted into the gap, followed by a flexible sealant applied over the face of the rod. The backing rod controls the depth of the sealant bead and acts as a bond breaker against the back of the joint, ensuring the sealant adheres only to the two parallel surfaces it needs to stretch between — the aluminium frame and the wall lining or external cladding. This two-sided adhesion allows the sealant to flex like a rubber band rather than tearing under three-sided restraint.
For the aluminum frame for glass installations typical in residential construction, aim for a sealant depth that is roughly half the joint width. A 10mm perimeter gap should receive a backing rod that leaves approximately 5mm of depth for the sealant bead. If the gap is larger — common in retrofit situations — size the rod to sit at least 6mm below the finished surface, but do not exceed a 2:1 width-to-depth ratio in the sealant itself, or it loses the elasticity needed to track the frame’s movement.
Choose a closed-cell backing rod for this application. Unlike open-cell alternatives, closed-cell rod will not absorb moisture that migrates through the joint, and it provides consistent resistance against the sealant without compressing unpredictably over time. Pair it with a neutral-cure silicone sealant — the same chemistry specified earlier for its compatibility with aluminium surfaces.
Insulating the Frame-to-Wall Junction
Knowing how to insulate aluminum window frames at the junction point is where builders most often create unintended problems. The instinct is to pack the perimeter gap with as much insulation as possible — spray foam filling every void — but this approach ignores the thermal bridge the aluminium frame itself represents and can trap moisture at the metal-to-timber interface.
Aluminium conducts heat roughly 1000 times more effectively than timber. At the junction where metal meets wood, temperature differentials cause condensation, particularly in cooler climates or during winter in southern states like Victoria and Tasmania. Open-cell foam insulation at this junction absorbs that condensation, holding moisture against the timber and accelerating decay. Closed-cell foam insulation is the preferred choice here because its impermeable cell structure resists moisture absorption entirely — it insulates the gap without becoming a reservoir for trapped water.
Apply closed-cell expanding foam in the rear portion of the perimeter gap (the cavity side), leaving the outer portion free for your backing rod and sealant system. Do not overfill — the foam should not compress against the aluminium frame when it expands during curing, as this introduces the same binding pressure that rigid foam creates during thermal cycling. A 50-60% fill of the gap depth is sufficient. The foam handles thermal insulation; the backing rod and sealant handle the air seal and movement accommodation at the exterior face.
For aluminum glass frame installations where the frame profile includes a thermal break — an insulating polymer strip between the interior and exterior aluminium sections — take care not to bridge that break with continuous foam or conductive fixings. The thermal break only works if it remains the weakest thermal link in the frame assembly. Fill insulation up to the break location on each side, but do not span across it. This preserves the engineered thermal separation that thermally broken profiles are designed to deliver.
Done correctly, this three-layer approach — flashing on the outside face, closed-cell foam in the cavity, and flexible sealant at the perimeter — creates a junction that stays sealed through years of aluminium expansion without trapping the moisture that degrades everything around it. The weatherproofing principles remain consistent regardless of window type, but the structural and clearance demands of the rough opening shift considerably depending on whether you are framing for a fixed panel, an operable casement, or a multi-track sliding system.

Framing for Different Window Types and Climate Zones
The weatherproofing principles hold constant, but the shape and size of what you are framing around changes everything about the rough opening. A fixed panel sitting passively in a wall has almost nothing in common — structurally — with a three-track stacking door system that spans four metres. Climate compounds the variation further. An identical aluminium window installed in coastal Darwin and alpine Jindabyne faces completely different forces, and the framing must respond accordingly.
Framing Variations by Window Type
Each window configuration places unique demands on the rough opening. Fixed panels are the simplest — they carry no operational hardware, tolerate tighter clearances because there are no moving sashes to bind, and impose minimal structural load beyond their own dead weight plus wind pressure. Casement and awning windows introduce hinged sashes that swing outward, requiring precise plumb on the hinge jamb — even 1mm of deviation shows as an uneven gap along the sash edge when closed.
Sliding systems raise the stakes significantly. The sill must be dead level across its full span because the rollers depend on a flat, consistent track surface. Any hump or dip translates directly into resistance mid-travel. Aluminium sash windows — whether vertical sliding or horizontal — share this demand for sill precision, and their counterbalance mechanisms add fixing points that the rough opening must accommodate. Stacking and bi-fold configurations multiply the issue across multiple panels, each requiring independent clearance while sharing a single continuous head track and sill.
| Window Type | Side Clearance (per jamb) | Sill Requirements | Header Load Considerations | Critical Framing Tolerance |
|---|---|---|---|---|
| Fixed panel | 8-10mm | Standard — slight outward slope for drainage | Minimal unit weight; header sized for load above only | Moderate — no moving parts to bind |
| Casement | 10mm minimum | Standard slope; ensure level for consistent sash gap | Standard residential header adequate for most spans | High — hinge jamb must be perfectly plumb |
| Awning | 10mm minimum | Standard slope; level across full width | Standard residential header; consider wind load on open sash | High — head rail must be level for even top gap |
| Sliding (2-panel) | 10-12mm | Dead level critical — rollers need flat track surface across full span | Increased for wider openings; often requires engineered header | Very high — 1mm sill deviation causes tracking issues |
| Stacking / Bi-fold (3+ panels) | 12-15mm | Dead level essential; reinforced sill plate for concentrated roller loads | Engineered header required for spans over 2400mm; significant glass weight | Extreme — cumulative tolerances across multiple panels |
For residential aluminum windows in standard configurations — single casements, awning combinations, or paired fixed panels — the general 10mm clearance rule and standard framing approach work well. Commercial aluminum windows and large-format residential openings (anything over 2400mm wide) move into territory where the header needs engineering input and the sill may need steel reinforcement to prevent deflection under the combined weight of multiple glass panels and their aluminium tracks.
Climate Zone Considerations for Australian Builds
Australia’s climate range — from tropical monsoon in the Top End to alpine conditions in the Snowy Mountains — imposes wildly different stresses on the frame-to-wall junction. Your framing strategy must respond to the dominant threat in your location.
Coastal corrosion zones (within 1km of breaking surf): Salt-laden air attacks unprotected metals aggressively. In these areas, anodized aluminum windows or marine-grade powder-coated frames are not optional upgrades — they are baseline requirements. All fixings must be austenitic stainless steel (316 grade, not the cheaper 304 that pits in salt air). Framing hardware — brackets, joist hangers, packers — needs the same corrosion resistance. The rough opening itself should use H3-treated timber as a minimum, and stainless fixing plates at all bracket connections. Even galvanised steel corrodes within a few years when exposed to persistent salt attack in Australian coastal environments.
Extreme heat zones (inland WA, NT, western QLD): Where ambient temperatures regularly exceed 40°C and sun-facing surfaces can hit 70°C or higher, thermal expansion reaches its maximum. A dark-coloured aluminium frame on a west-facing wall in these zones can expand well beyond the movement that cooler climates produce. Increase your standard clearance gap to 12-15mm per side for frames wider than 1500mm. Use only high-temperature-rated sealants (those maintaining flexibility above 80°C) and ensure your backing rod material will not soften or degrade under sustained heat.
High wind zones (cyclone regions N of Tropic of Capricorn, elevated coastal sites): Under AS 4055 wind classifications N3 through C4, fixing spacing tightens considerably. Standard 600mm centres drop to 450mm or less, and connections may require engineered brackets rather than simple screw-fix through the frame. Headers in cyclone zones need to resist uplift as well as gravity loads — tie-down strapping from the header through to the roof structure becomes part of the framing scope. An aluminum sash window in a high-wind zone also needs its sash hardware rated for the design wind pressure, which in turn affects the fixing points the rough opening must provide.
Manufacturers who specialise in the Australian market design their systems around these varied conditions. MEICHEN’s aluminium window range, for example, offers window systems with custom sizing and performance ratings suited to coastal, high-heat, and high-wind applications — simplifying the frame-to-opening match for both residential aluminum windows and commercial projects where climate compliance drives the specification. When the window system is designed with your climate zone in mind, the framing work becomes a matter of following confirmed dimensions rather than guessing at tolerances.
Climate and window type rarely operate in isolation. A stacking door system in a cyclone zone compounds the challenges — wide span, heavy glass, extreme wind load, and potentially salt-corrosive air all acting on the same rough opening. These intersections are where product selection and framing preparation must align from the earliest design stage, not be resolved on site during installation.
Choosing Project-Ready Aluminium Windows for Your Build
Framing work done right only delivers its full value when the aluminium window sitting inside that opening was specified correctly from the start. Too many projects treat window selection and rough opening preparation as separate tasks handled by separate people at separate stages. The result is a frame that arrives on site slightly too wide, or with fixing lugs that land between studs rather than on them. Connecting your framing decisions to the right aluminium window system — before timber gets cut — is how you avoid expensive rework.
What to Look for in a Project-Ready Aluminium Window System
Not every manufacturer publishes the information you actually need to frame accurately. When comparing options, prioritise suppliers who provide:
- Accurate published frame dimensions — external width and height to the millimetre, not nominal sizes rounded to the nearest 50mm. You need exact figures to calculate your rough opening.
- Fixing lug positions — documented locations where the frame is designed to accept screws, so you can position studs and packers to align with them.
- Thermal break options — particularly for projects in climate zones where condensation or energy performance drives the specification.
- Colour and finish durability ratings — aluminium window frame colours fade at different rates depending on coating type and UV exposure. Powder-coated finishes rated to meet AS/NZS 1231 provide documented fade resistance for your climate zone.
- Custom sizing availability — non-standard openings in renovation projects need windows built to match, not the other way around. Custom aluminum windows eliminate the sub-framing and packing workarounds that oversized gaps require.
If a supplier cannot provide a dimensioned installation profile or technical datasheet before you order, treat that as a red flag. You are effectively framing blind.
Working with Suppliers Who Support Your Framing Needs
The best outcomes happen when the aluminium window specification lands on site before the framing carpenter marks up the plates. Confirm the unit dimensions, verify fixing centres, and check that the selected window type matches the structural allowances your opening can provide. A stacking system that requires an engineered header is a costly surprise at lock-up stage — but it is a straightforward line item when identified during design.
For homeowners searching for aluminium windows near me, the temptation is to grab the cheapest quote and figure out the framing later. Builders and architects know better: sourcing from manufacturers who document their specifications thoroughly saves hours of site adjustments and eliminates the guesswork that leads to binding sashes and failed seals.
MEICHEN’s aluminium window range is a strong option for project teams seeking this level of documentation. Their systems cover casement, sliding, awning, fixed, and picture window types with custom sizing available for non-standard openings — meaning your framing dimensions drive the order rather than a catalogue size dictating your rough opening. Performance data suited to Australian residential and commercial conditions, combined with multiple finish options across a full spectrum of aluminium window frame colours, gives builders and architects the specifications they need to frame with confidence from day one.
Whether you are a homeowner managing a single renovation or a builder coordinating multiple openings across a new build, the principle remains the same: select the aluminium window first, frame the opening to suit it, and verify the match before anything gets fixed in place. That sequence — product, then structure, then installation — is what separates a window that performs for decades from one that fights you every season.
Frequently Asked Questions About Framing Aluminium Windows
1. What size rough opening do I need for an aluminium window?
For aluminium windows, you need a minimum of 10mm clearance on each side and at the head of the rough opening. This means the total rough opening width should be the aluminium frame width plus 20mm, and the height should be the frame height plus 10mm above the unit. This is larger than the 5-6mm per side used for timber frames because aluminium expands at roughly twice the rate of timber when heated. In extreme heat zones like inland Western Australia or Queensland, increase clearance to 12-15mm per side for frames wider than 1500mm.
2. Why can’t I frame aluminium windows the same way as timber windows?
Aluminium has a thermal expansion coefficient approximately twice that of timber and is completely rigid, meaning it will not flex to absorb movement or compensate for out-of-square openings. It also conducts heat roughly 1000 times more effectively than wood, creating condensation risks at the frame-to-stud junction. Additionally, aluminium’s non-porous surface means standard adhesive-backed flashings require a primer for reliable adhesion. These properties demand wider shimming gaps, stainless steel fixings to prevent galvanic corrosion, and tighter squareness tolerances in the rough opening.
3. What fixings should I use when installing aluminium window frames?
Always use austenitic stainless steel fixings for all connections touching the aluminium frame. Standard carbon steel or even basic galvanised fasteners can trigger galvanic corrosion when in contact with aluminium, particularly in coastal Australian environments. For direct screw-fix installations, 8-gauge x 75mm stainless steel countersunk screws are typical for standard stud depths. In coastal zones within 1km of breaking surf, upgrade to 316-grade stainless steel. Position the first fixing 150mm from each corner, with subsequent fixings at maximum 600mm centres along each jamb.
4. How do I weatherproof the gap between an aluminium frame and the wall?
Use a three-layer system rather than rigid expanding foam alone. First, apply closed-cell expanding foam in the rear portion of the perimeter gap at roughly 50-60% fill depth for thermal insulation. Then insert a closed-cell polyethylene backing rod into the remaining gap to control sealant depth and act as a bond breaker. Finally, apply a neutral-cure silicone sealant over the backing rod at approximately half the joint width in depth. This system accommodates aluminium’s ongoing thermal expansion without cracking or losing adhesion through seasonal temperature cycles.
5. Should I choose full-frame or insert replacement when upgrading old aluminium windows?
Full-frame replacement is necessary when existing studs, headers, or flashing are compromised by rot, termite damage, or corrosion. It delivers maximum thermal performance improvement because you can insulate the full perimeter gap and install new flashing from scratch. Insert replacement is faster and cheaper, fitting a new unit within the existing frame, but only works when the existing frame is structurally sound, square, and corrosion-free. In Australian coastal areas where salt air accelerates degradation, full-frame replacement is more commonly required and delivers better long-term results. Suppliers like MEICHEN offer custom-sized aluminium windows that can be built to match either scenario.
More Window & Door Guides