What Aluminium Window Weather Stripping Actually Does
Every aluminium window relies on a thin, flexible barrier to separate conditioned indoor air from whatever is happening outside. That barrier is weather stripping, and on aluminium frames it works harder than most people realise.
Aluminium window weather stripping is a compressible seal, typically made from EPDM rubber, silicone, or pile fibre, seated in the extruded channels of an aluminium frame to block air infiltration, moisture ingress, and dust entry while allowing the sash to operate smoothly.
What Weather Stripping Does Inside an Aluminium Frame
The sealing system serves three overlapping functions. It redirects rainwater away from the interior cavity, contains conditioned air so heating and cooling systems run efficiently, and reduces operational friction when you slide or swing the sash. Unlike timber rebates that swell to close small gaps naturally, aluminium extrusions hold fixed tolerances. The strip itself is the only flexible element compensating for manufacturing variation and thermal movement. When it degrades, draughts, condensation, and rising energy bills follow quickly because the metal frame offers no secondary cushion.
Where Strips Sit in the Frame Assembly
On a typical residential aluminium window you will find seals in three zones. The sash perimeter carries a compression gasket that forms a continuous loop around the opening leaf. The meeting rail, where two sashes overlap in a sliding configuration, uses pile or fin strips to maintain contact without restricting movement. The sill track houses brush or wiper seals that shed water while guiding the panel along its travel path. Each location demands a different profile shape and material hardness, which is why generic advice about weather stripping aluminium windows often falls short.
This guide takes an aluminium-first approach. Rather than adapting timber or uPVC principles, every section that follows addresses the specific thermal behaviour, channel geometry, and surface chemistry of aluminium extrusions, covering the full workflow from diagnosing failure through material selection, installation, and long-term verification.
How to Tell Your Weatherstripping Needs Replacing
A failing window frame seal rarely announces itself with a single dramatic event. Degradation is gradual, and on aluminium frames it tends to show earlier than on timber or vinyl because the metal itself offers no insulation buffer. That high thermal conductivity means even a minor gap translates into a noticeable cold spot or moisture trace on the interior side of the frame.
Visual and Tactile Warning Signs
Start with a close inspection of the strip itself. Pull the sash open and look along the channel where rubber or pile meets metal. Cracking, permanent flattening, and sections that have pulled away from the groove are obvious giveaways. Discolouration, typically a shift from black to grey or from translucent silicone to a yellowed haze, signals UV or ozone breakdown. On older windows and aluminium seals, the material may feel brittle rather than springy when you press it with a fingernail.
The tactile test is even simpler. On a windy day, run the back of your hand slowly around the closed sash perimeter, paying attention to corners and meeting rail joints. Any localised chill or moving air current points to a breach. An incense stick or thin piece of tissue held near the frame edge makes small leaks visible, as the smoke or paper deflects toward the draught path.
Indirect Evidence of Seal Failure
Sometimes the strip looks intact yet performance has dropped. Secondary clues fill that gap. The following indicators are listed from most to least severe:
- Condensation forming on interior glass edges or the frame itself, particularly near the sill and lower corners where cold air pools
- A measurable rise in energy bills without a change in usage patterns or tariff rates
- Audible wind whistle or hum when gusts exceed around 30 km/h
- Fine dust or insect debris accumulating along the inside edge of the sash track
- Water staining or mildew spots on the interior sill or surrounding plasterwork
Aluminium amplifies several of these signals. Because the frame conducts temperature differences rapidly, condensation appears sooner and more visibly than it would on a less conductive material. A strip that has lost only 20 percent of its compression might go unnoticed on a timber casement yet produce a clear dew line on an aluminium one. That sensitivity is actually useful: it gives you an earlier warning to act before the seal deteriorates further and structural moisture damage sets in.
If two or more indicators from the list above are present, replacement rather than patching is the more reliable path forward. The next consideration is choosing a material that suits both your climate and your specific frame profile.
Comparing Weatherstripping Materials for Aluminium Frames
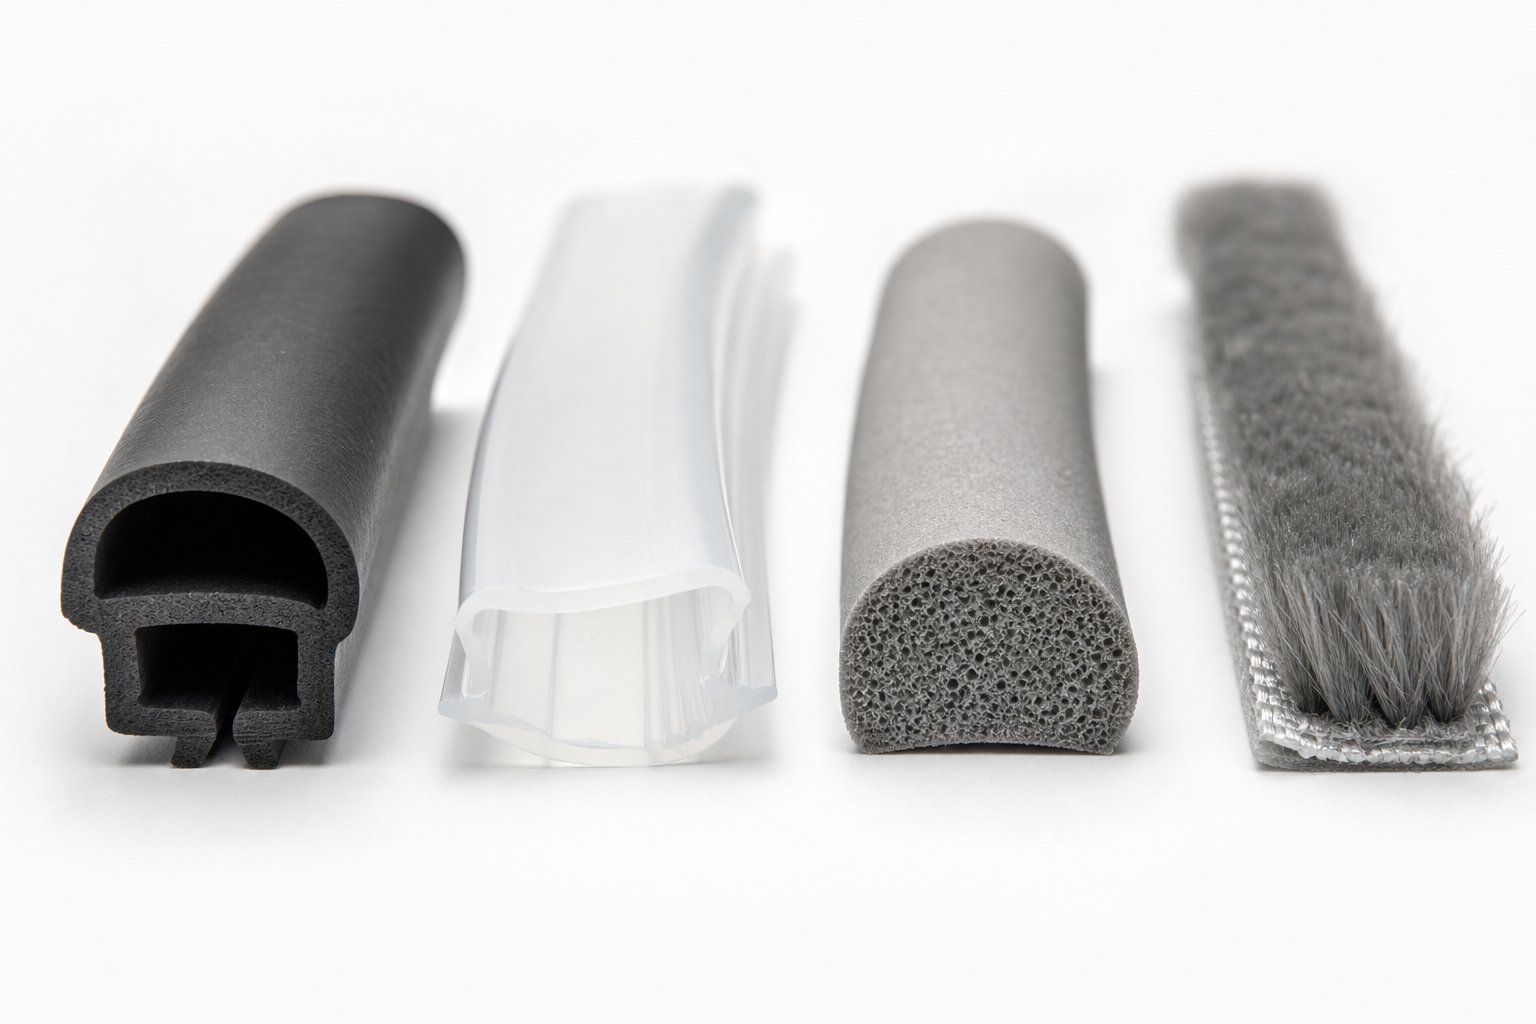
Material choice is where most replacement projects succeed or fail. Aluminium extrusions present a specific environment: smooth channel walls that offer little mechanical grip, precise groove dimensions that reject oversized profiles, and thermal movement that stretches or compresses the strip seasonally. A material that performs well on a timber rebate may behave differently inside a metal weather strip channel where surface chemistry and expansion rates follow their own rules.
Rubber, Silicone, and EPDM Compared
Standard synthetic rubber (typically neoprene-based) is the most common factory-fitted seal on budget aluminium windows. It handles moderate temperatures and provides decent compression recovery in the short term, but it tends to harden and crack after five to eight years of UV exposure. For frames in shaded positions, it remains a cost-effective option.
Silicone steps up in temperature tolerance and longevity. Its silicon-oxygen backbone structure remains stable across a wide operating range, roughly -60 °C to 230 °C, and it resists UV and ozone degradation far better than carbon-based rubbers. The tradeoff is lower abrasion resistance and a higher price point. On aluminium frames where the strip sits in a protected channel and sees minimal friction, that weakness matters less than it would on a sliding track.
EPDM (ethylene propylene diene monomer) occupies the middle ground and dominates commercial aluminium systems for good reason. Its saturated polymer backbone gives it high resistance to ozone, weathering, and steam up to 130 °C, while its cost runs significantly below silicone. EPDM also adheres well to metal surfaces, making it a natural partner for aluminium channels. It won’t shrink or expand as dramatically as foam alternatives when temperatures shift, which matters on frames that are themselves expanding and contracting with the seasons.
Foam Versus Pile and Fin Strips
Compression foam, whether polyurethane or EPDM cellular foam, fills irregular gaps quickly and installs with a self-adhesive backing. It compresses to as little as 10 percent of its original thickness, making it useful for uneven surfaces. The limitation on aluminium frames is adhesive bond life. The smooth, sometimes slightly oily surface of extruded aluminium can cause peel failure within a year or two unless the channel is properly prepared. Foam also suffers from compression set: once flattened beyond its recovery limit, it stays flat and the seal is lost.
Pile strips, sometimes called fin strips, use densely packed polypropylene or nylon fibres anchored to a woven or metal-backed spine. They excel on sliding aluminium windows where the sash moves past the seal hundreds of times a year. Friction is minimal, dust filtration is effective, and the fibres resist permanent deformation. However, pile provides lower air-tightness than a compression gasket, which limits its suitability for hinged or casement frames where a solid seal is expected under locking pressure. A vinyl clad weatherstrip retainer can hold pile in place within the aluminium interlock channel, giving it structural stability without adhesive reliance.
Which Material Suits Your Climate
Australian conditions vary enormously, from the tropical humidity of Far North Queensland to the cold winters of the Victorian highlands and the salt-laden coastal air along much of the eastern seaboard. The table below maps each material type against the criteria that matter most when the frame is aluminium.
| Material | Lifespan (years) | Temperature Range | Compression Recovery | Cost Bracket (AUD, per metre) | Best Application |
|---|---|---|---|---|---|
| Synthetic Rubber (Neoprene) | 5–8 | -30 °C to 100 °C | Moderate; declines with UV exposure | $2–$5 | Budget casement and awning windows in shaded positions |
| Silicone | 15–20 | -60 °C to 230 °C | Excellent; minimal compression set | $8–$15 | High-performance hinged windows, extreme climate zones |
| EPDM | 10–15 | -40 °C to 130 °C | Very good; retains shape in sub-zero conditions | $4–$9 | Commercial and residential aluminium frames, all climates |
| Compression Foam (PU/EPDM cellular) | 2–5 | -20 °C to 80 °C | Poor once fully compressed; limited spring-back | $1–$4 | Short-term fixes, irregular gaps, rental properties |
| Pile/Fin Strip | 8–12 | -30 °C to 110 °C | N/A (fibre based, flexes rather than compresses) | $3–$7 | Sliding window interlocks and sill tracks |
A few patterns stand out. Foam is the cheapest upfront but carries the shortest effective life on aluminium, largely because adhesive bonds fail on metal weather surfaces before the foam itself wears out. Silicone lasts longest yet costs three to four times more per metre, making it hard to justify on standard residential windows unless you are in an extreme climate. EPDM hits the sweet spot for most Australian conditions: it handles coastal UV, cold highland mornings, and tropical humidity without dramatic price inflation.
Aluminium’s smooth channel profiles also influence the decision. Unlike timber, which grips adhesive-backed products through its porous grain, aluminium requires either a mechanical push-fit strip or thorough surface preparation before an adhesive product will hold. That practical reality steers many installers toward EPDM or pile strips designed to press-fit into standard extrusion grooves, bypassing adhesive altogether.
Selecting the right material is only half the equation. Knowing whether to source an OEM profile-specific strip or a universal aftermarket alternative determines whether that material actually fits the channel it needs to seal.
OEM Replacement Versus Universal Aftermarket Strips
An EPDM strip with the right material properties will still fail if its cross-section doesn’t match the groove it sits in. Aluminium extrusions are manufactured to tight dimensional tolerances, and the channels that hold weatherstripping are no exception. The gap between a strip that fits and one that doesn’t can be less than a millimetre, yet that fraction determines whether the seal holds pressure or pops out under wind load.
When OEM Replacement Is the Right Call
OEM (Original Equipment Manufacturer) strips are produced to match the exact groove width, depth, and compression profile of a specific window series. They account for the lip geometry inside the extrusion channel, the closing pressure of that system’s hardware, and the designed compression ratio at full lock. If your windows are less than 15 years old and the manufacturer or their Australian distributor still stocks replacement seals, OEM is the straightforward choice. The fit is guaranteed, the material specification matches what was originally tested, and installation is a direct swap.
Commercial aluminium systems almost always demand OEM replacements. These frames operate under tighter performance specifications, often tied to AS 2047 compliance for air infiltration and water penetration. A universal strip that sits slightly proud or slightly recessed can push the window out of its rated performance band, which creates liability issues on certified buildings.
Universal Strips and Their Limitations
Universal aftermarket strips come in standardised cross-section sizes designed to fit a range of common groove dimensions. They offer a practical solution when the original manufacturer has ceased production, the window series has been discontinued, or the frame is old enough that sourcing exact-match parts becomes impractical. Many older Australian homes from the 1980s and 1990s have aluminium windows from brands that no longer operate, making universal strips the only viable path.
The limitation is precision. A universal profile might seal adequately under calm conditions but lose contact during thermal movement or strong wind pressure because it wasn’t engineered for that specific channel geometry. You may also find that the strip’s compression ratio doesn’t align with the window’s locking hardware, leading to either excessive operating force or insufficient seal pressure.
Several factors determine which route suits your situation:
- Frame age and whether the original manufacturer still supplies parts in Australia
- Groove profile measurements: width, depth, and any internal lip or barb dimensions
- Whether the window must maintain compliance with documented performance standards
- Budget constraints, as OEM strips typically cost 30 to 50 percent more than generic equivalents
- Volume of windows requiring replacement, since bulk OEM orders may bring per-metre cost closer to universal pricing
Sourcing Options for Both Categories
For OEM strips, start with the window manufacturer’s service department or their nominated distributors. Most major Australian aluminium window brands maintain spare parts catalogues, and ordering by series name and frame code ensures you receive the correct profile. Specialist seal suppliers also carry OEM-equivalent profiles extruded to match specific channel dimensions, which can be a faster route when manufacturer lead times are long.
Universal strips are widely available from hardware retailers like Bunnings and specialist weatherstrip suppliers online. When buying universal, bring a short section of the old strip with you or measure the channel cross-section carefully with digital callipers. The critical dimensions are groove width (typically 3 mm to 7 mm on residential aluminium), groove depth, and the required seal height above the channel rim.
Whichever path you choose, the strip still has to contend with aluminium’s particular thermal behaviour and surface characteristics, challenges that generic installation guides tend to gloss over entirely.
Why Aluminium Frames Present Unique Sealing Challenges
Aluminium behaves differently from timber, uPVC, or composite frames in ways that directly affect how long a seal lasts and how well it performs under stress. Most generic weatherstripping advice ignores these differences, which is why strips that work fine on a wooden casement can fail within months on an aluminium door weather stripping application. Three factors deserve closer attention.
Thermal Expansion and Strip Gapping
Aluminium has a linear expansion coefficient of roughly 23 x 10⁻⁶ per degree Celsius, about twice that of steel and significantly higher than timber. In practical terms, a 1.5-metre aluminium frame section can grow or shrink by nearly 1.5 mm across a 40 °C seasonal temperature swing, a common range in much of Australia between a cold July morning and a February afternoon. That movement may sound trivial, but a compression seal engineered for a specific groove depth can lose contact at the corners or mid-span where expansion concentrates.
The result is cyclical gapping. On cold mornings the frame contracts and the strip may be under-compressed; on hot afternoons it expands and the strip can be over-compressed, accelerating permanent set. Materials with strong elastic recovery, like EPDM and silicone, tolerate this cycling far better than foam, which flattens and stays flat once pushed beyond its resilience threshold.
Condensation and the Cold Frame Problem
Aluminium conducts thermal energy roughly 1,000 times faster than timber. Without intervention, the interior face of an aluminium frame closely tracks the exterior temperature, creating a cold surface where humid indoor air deposits moisture. Condensation forming around window edges is often misdiagnosed as a glazing failure when the real culprit is a weatherstrip that no longer maintains an air-tight barrier at the frame-to-glass junction.
That condensation does more than fog the view. Persistent moisture degrades adhesive-backed seals from the backside, causing bond failure that is invisible until the strip physically detaches. On coastal properties where salt-laden humidity is constant, the degradation cycle accelerates. Any aluminium door weather strip system in these environments needs both material resistance and secure mechanical retention rather than adhesive alone.
How Thermal Break Design Affects Sealing
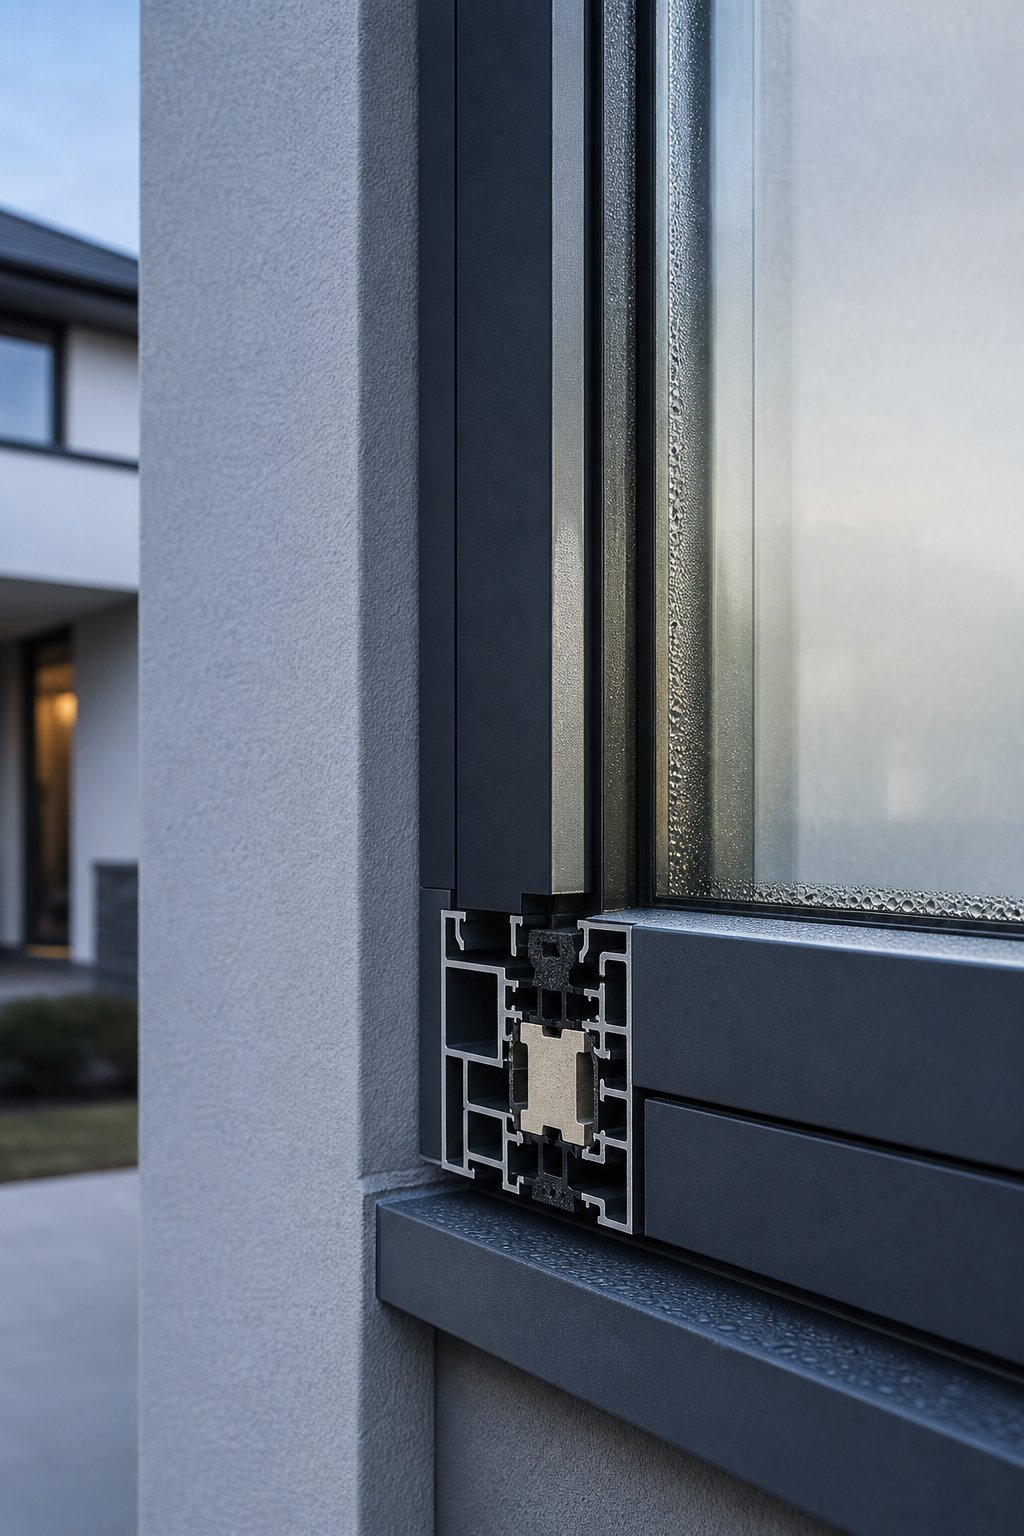
Modern thermally broken aluminium frames split the extrusion into two separate profiles, inner and outer, connected by a low-conductivity polyamide bridge. This design keeps internal frame surfaces warmer, reduces cold bridging, and lowers the risk of condensation forming on frames. It also changes where and how weatherstripping must perform.
In a thermally broken system, the seal sits on the warm side of the thermal break, which means the strip itself experiences less extreme temperature cycling than it would on a non-broken frame. That’s a longevity advantage. However, the polyamide bridge introduces a slight dimensional tolerance stack-up between the inner and outer profiles, so the groove geometry can vary fractionally from unit to unit. Precision-fit OEM strips account for this; universal aftermarket options may not.
Weatherstripping performance is inseparable from overall frame thermal performance. A high-quality seal on a non-thermally broken frame still allows condensation and energy loss through the metal itself, while a thermally broken frame with a degraded seal loses most of its designed advantage at the air barrier.
This is why system-level thinking matters. Manufacturers who engineer their aluminium windows to meet documented compliance standards, such as those outlined on MEICHEN’s compliance and certifications page, integrate weatherstripping as part of a whole-frame performance approach. The strip type, placement, and compression ratio are specified alongside glazing, thermal break width, and hardware pressure to satisfy requirements under AS 2047 and NCC energy provisions as a unified system rather than a collection of aftermarket additions.
For architects, builders, and specifiers evaluating aluminium window systems against Australian standards, that integrated approach is the difference between a frame that performs to its rated U-value in service and one that meets the number only on paper. The weatherstrip is a small component, but it sits at the boundary where air, water, and thermal energy all converge.
Understanding these frame-specific challenges clarifies why installation technique matters just as much as material selection, particularly since sliding and hinged aluminium windows demand fundamentally different sealing strategies.

Installing Weatherstripping on Sliding and Hinged Aluminium Windows
Sliding and hinged aluminium windows place completely different demands on their seals. A sliding sash travels past its weatherstrip hundreds of times a year, so the strip must permit movement while maintaining contact. A hinged sash compresses its seal under locking pressure and stays put, meaning the strip needs to spring back reliably after each opening cycle. Treating both types identically is a common installation mistake. The following pathways address each one on its own terms.
Tools and Preparation Checklist
Regardless of window type, a few preparation steps are non-negotiable on aluminium frames. Skip them and even the best material will underperform.
- Measure the existing strip cross-section before ordering replacements. Use digital callipers to record groove width, groove depth, and seal height above the channel rim. A difference of half a millimetre changes the fit.
- Clean the aluminium channel thoroughly. Remove old strip remnants with a plastic scraper to avoid scratching the anodised surface. Follow with a wipe of isopropyl alcohol to eliminate residual oils and oxidation films. Adhesive-backed strips in particular depend on this step because aluminium’s smooth, non-porous surface gives adhesive very little to grip unless the channel is chemically clean and completely dry.
- Check frame alignment. Close the window and inspect the gap between sash and frame on all four sides. An uneven gap indicates the frame has shifted or a roller has dropped, and no strip will seal a misaligned sash properly.
- Gather tools: plastic scraper or putty knife, isopropyl alcohol and lint-free cloth, digital callipers, sharp utility knife, small flathead screwdriver (for lever-out clips), and a tape measure.
Replacing Strips on Sliding Aluminium Windows
Sliding aluminium windows rely primarily on pile (fin) strips seated in the interlock rail and sill track. These fibre-based seals allow the sash to glide while blocking air and dust. Installation method must match profile design, so confirm whether your system uses a slot-in fin-type pile or an adhesive-backed variant before cutting any material.
- Remove the sliding sash. Lift the panel and tilt the base outward to clear the bottom track. On most residential aluminium sliders, the sash lifts past the upper track gap once the adjustment screws on the rollers are wound in.
- Extract the old pile strip. For slot-in types, grip one end and pull steadily along the groove. If it resists, a flathead screwdriver slid under the backing fin breaks the friction. For adhesive-backed pile, peel slowly and use a plastic scraper on residual adhesive.
- Clean the interlock groove and sill track. Brush out accumulated grit, then wipe with isopropyl alcohol. Debris left in the groove lifts the new strip off-centre and creates uneven compression.
- Check roller alignment and sash height. Spin each roller by hand to confirm free movement. Adjust the height screws so the sash sits level in the frame; misalignment causes localised over-compression of the pile on one side and a gap on the other.
- Install the new pile strip. For slot-in types, feed the backing fin into the groove at one end and push progressively along the channel without stretching. Stretching reduces fibre density at that point and weakens the seal. For adhesive-backed pile, apply at room temperature, pressing firmly and evenly along the full length.
- Replace sill track seals. The bottom track typically carries a brush or wiper seal that sheds water. Slide the old seal out from one end and feed the new one in, trimming flush with a utility knife.
- Refit the sash and test. Slide the panel back and forth several times. Movement should feel smooth with light, consistent drag. If the sash binds or rattles, the pile density or compression clearance needs adjustment.
Replacing Strips on Hinged and Casement Windows
Hinged and casement aluminium windows use continuous compression seals, usually EPDM or silicone gaskets, around the entire sash perimeter. The seal compresses when the window locks shut and must recover its original shape each time the window opens. The approach below applies equally to casement, awning, and tilt-and-turn configurations.
- Open the sash fully and identify the seal retention method. Most aluminium casements use a push-fit gasket with a barbed or arrow-shaped foot that locks into a continuous groove around the frame or sash rebate.
- Pull the old seal free. Start at a bottom corner and peel the gasket out of its groove. Note whether the seal sits on the frame or on the sash edge, as the replacement must go back in the same location.
- Clean the groove with a plastic scraper followed by an isopropyl alcohol wipe. On hinged windows, pay particular attention to the hinge side where grease migration from the hinge mechanism can coat the channel and weaken adhesive bonds.
- Dry-fit the new gasket. Starting at the top centre, press the barbed foot into the groove and work around the perimeter without cutting. At each corner, compress the gasket slightly into the bend rather than stretching it around; stretching thins the seal at the corner and creates a future leak point.
- Address hinge-side clearance. The hinge side of a casement sash has the tightest clearance because the hinge hardware reduces available space. Confirm the gasket doesn’t foul the hinge arm during opening, trimming the gasket profile height by a fraction if necessary rather than removing material length.
- Seal the meeting stile. On double casements or French-configuration windows, the meeting stile where two sashes overlap carries its own compression seal. This strip must compress evenly when both panels lock together. Install it after the perimeter seals so you can confirm alignment with the sash closed.
- Close, lock, and verify. Shut the window using normal locking pressure. Run a visual check around the perimeter for consistent gasket compression. Any section that appears fully flattened or shows daylight indicates a profile mismatch or groove contamination that needs correcting before the job is complete.
Both pathways share one final principle: installation is not finished until operational performance is confirmed. A strip that looks correct in the channel can still underperform if compression ratios are off or if the sash has shifted since the frame was originally glazed. Verifying smooth operation and uniform contact avoids the most common post-installation complaints, yet many of those complaints stem not from installation error but from choosing a material that simply cannot tolerate aluminium’s thermal behaviour over time.
Troubleshooting Common Weatherstripping Failures
Strips that looked perfect on day one can quietly lose function within months. The frustrating part is that the failure often gets blamed on poor installation when the real cause runs deeper. Aluminium frames introduce specific failure mechanisms that timber and uPVC frames simply don’t produce, and recognising which one you’re dealing with saves you from replacing the same strip twice with the same disappointing result.
Adhesive Bond Failure on Aluminium Surfaces
Self-adhesive weatherstripping is convenient, but aluminium is one of the hardest substrates to bond reliably. The problem isn’t the adhesive itself. It’s what sits between the adhesive and the metal.
Freshly extruded aluminium reacts with oxygen almost instantly, forming a thin aluminium oxide layer on the surface. Adhesion actually occurs to this oxide, not to the bare metal beneath. The oxide layer varies in thickness, changes over time with humidity exposure, and can be chemically unstable depending on the alloy and surface treatment. Add to that the microscopic rolling oils and processing residues left over from manufacturing, and you have a surface that looks clean but actively resists long-term bonding.
The result is predictable: a door weather stripping metal seal holds firm for three to six months, then peels away progressively from one end. The adhesive hasn’t failed in the traditional sense. It never formed a durable chemical bond to begin with because the surface chemistry was working against it.
The fix starts with preparation. Clean the channel with isopropyl alcohol, allow it to dry completely, then apply a thin adhesion promoter designed for metal substrates before pressing the strip into place. Better still, avoid adhesive reliance altogether. Mechanical push-fit strips with barbed or arrow-foot profiles lock into the aluminium extrusion groove physically, bypassing surface chemistry issues entirely. If the window’s channel geometry allows a push-fit profile, that is always the more durable path on aluminium.
Compression Set and Premature Flattening
Compression set is the permanent deformation of a seal after sustained squeezing. In sealing terminology, 0% compression set means full recovery, while 100% means the material exerts no sealing force even though it may still physically touch the mating surface. On aluminium window frames, two factors accelerate this process beyond what you’d see on other frame materials.
First, aluminium’s thermal conductivity heats the strip faster during summer. Elevated temperature accelerates crosslink breakdown in elastomers, especially cheaper synthetic rubbers and polyurethane foams. A foam strip compressed against a north-facing aluminium frame in Brisbane or Perth can reach surface temperatures well above 60 °C on a summer afternoon, pushing beyond its rated threshold and permanently flattening in a single season.
Second, aluminium frames expand in heat and contract in cold, meaning the strip alternates between over-compression and under-compression with every thermal cycle. This repeated loading and unloading exhausts the material’s elastic recovery faster than a static load would. Foam strips are particularly vulnerable because once compressed beyond roughly 50 percent of their original thickness, their cell structure collapses irreversibly.
The fix is material selection, not reinstallation. Replace foam with EPDM or silicone gaskets that offer superior compression recovery and tolerate higher operating temperatures. For metal weather stripping door seal applications on aluminium, EPDM maintains its spring-back through thousands of compression cycles across a -40 °C to 130 °C range, a performance window that covers every Australian climate zone comfortably.
Thermal Shrinkage and Expansion Problems
Some strips shrink in cold weather, pulling away from corners and leaving triangular gaps where draughts enter. Others swell in humid conditions, jamming the sash or bulging out of the channel. Both problems trace back to a mismatch between the strip’s dimensional stability and the operating environment.
Shrinkage is most common with cheaper PVC-based strips and low-density foams. As temperatures drop, these materials contract along their length. On a 1.2-metre sash run, even a 1 percent shrinkage rate creates a visible 12 mm gap at one corner. That gap grows on the coldest mornings precisely when you need the seal most.
Swelling occurs when strip materials absorb atmospheric moisture. Open-cell foams are the worst offenders. In tropical or high-humidity environments across northern Queensland and coastal NSW, absorbed moisture expands the strip’s volume, increasing friction against the sash and sometimes preventing the window from closing fully. On sliding windows, swollen pile strips create drag that wears the rollers prematurely.
The fix for shrinkage is to use dimensionally stable materials like EPDM or silicone and to cut strips slightly long at installation, allowing them to compress into corners rather than relying on a friction fit at exact length. For swelling, replace open-cell foam with closed-cell alternatives or solid elastomers that don’t absorb moisture. Weather strip aluminium door and window applications in humid climates should avoid any material with an open cellular structure.
| Failure Type | Common Cause | Recommended Fix |
|---|---|---|
| Adhesive peel-off | Oxide layer instability and residual oils on aluminium surface preventing true chemical bond | Switch to mechanical push-fit strip; if adhesive is unavoidable, use metal-specific adhesion promoter after solvent cleaning |
| Compression set (permanent flattening) | Heat-accelerated crosslink breakdown combined with cyclic over-compression from thermal frame movement | Replace foam with EPDM or silicone gasket rated above the frame’s peak surface temperature |
| Cold-weather shrinkage | PVC or low-density foam contracting along its length as temperature drops | Install dimensionally stable EPDM cut slightly long; avoid PVC-based strips in cold climates |
| Humidity swelling | Open-cell foam absorbing atmospheric moisture in tropical or coastal conditions | Replace with closed-cell material or solid elastomer; ensure strip profile allows slight expansion without binding the sash |
| Corner gap formation | Combination of strip shrinkage and aluminium frame contraction pulling mitre joints apart | Overlap strips at corners rather than mitring; use vulcanised corner joints on continuous perimeter gaskets |
A pattern emerges across all five failure types. The root cause is rarely a botched installation. More often, it’s a material that was never suited to the thermal and chemical environment an aluminium frame creates. Foam on a sun-exposed frame, adhesive-backed strip on an unprepared channel, PVC in a climate with wide temperature swings: each is a predictable mismatch. Circling back to material selection before reaching for a fresh roll of the same product is the single most effective troubleshooting step.
Of course, even the right material degrades eventually. How quickly depends on where you are, what the frame faces, and how consistently you maintain the seal over its service life.

Maintenance and Long-Term Durability Planning
Location dictates pace. An aluminium door weather strip facing salt air in a coastal Sydney suburb degrades faster than the same material on a sheltered window in Ballarat. Building a maintenance rhythm around your specific climate keeps seals performing closer to their rated lifespan rather than failing years early from neglect.
Inspection and Cleaning Schedules by Climate
Seasonal inspections catch problems while they’re still localised. A strip with one cracked corner is a five-minute patch job; the same strip left another winter becomes a full perimeter replacement. How often you check depends on exposure:
- Coastal properties (within 5 km of the shoreline): Inspect every 2 to 3 months. Salt deposits accelerate elastomer breakdown and corrode any exposed metal retaining clips. Clean aluminium frames and seals every 2 to 3 months in these zones to prevent salt sitting long enough to cause pitting or adhesive failure.
- Tropical regions (northern QLD, NT, top of WA): Inspect at the start and end of each wet season. High humidity and UV intensity combine to stress both the strip and its bond to the frame.
- Temperate climates (southern capitals, highland areas): Twice yearly is sufficient, ideally at the transition into winter and again in early spring when you can assess what the cold months did to compression recovery.
When you clean, use only mild soapy water and a soft cloth or microfibre towel. Abrasive pads, steel wool, and solvent-based cleaners damage anodised or powder-coated finishes on the aluminium and can strip protective coatings from the seal material itself. Rinse thoroughly afterward so no soap residue remains in the channel, and clear the drainage holes at the sill while you’re there.
Partial replacement makes sense when damage is confined to one run, typically the sun-exposed side or a single corner. If two or more sides show cracking, flattening, or peel-off, replace the full perimeter as a continuous loop to maintain even seal pressure around the sash.
Realistic Lifespan by Material Type
The material comparison from earlier in this guide translates directly into maintenance planning budgets. On aluminium frames specifically, real-world service life breaks down like this:
- Compression foam: 2 to 4 years before compression set renders it ineffective. Shorter in sun-exposed or tropical positions. Budget for frequent replacement.
- Synthetic rubber (neoprene): 5 to 8 years. UV exposure is the primary degradation driver. Shaded frames extend the upper range.
- Pile/fin strip: 8 to 12 years on sliding windows with normal use. Fibre wear accelerates if the track carries grit or the rollers are misaligned.
- EPDM: 10 to 15 years. Superior ozone and UV resistance keeps it functional well beyond rubber alternatives, even on north-facing aluminium frames.
- Silicone: 15 to 20 years. The longest-lived option on aluminium due to excellent thermal stability and negligible compression set, though the higher upfront cost per metre means it’s typically reserved for high-performance or hard-to-access windows.
The pattern is consistent: silicone and EPDM outlast foam and basic rubber on aluminium because they resist the two forces that aluminium frames amplify most, UV radiation conducted along the metal surface and ozone generated by electrical discharge near urban buildings. For long-term cost planning, a $7-per-metre EPDM seal replaced once in 12 years costs less overall than a $2-per-metre foam strip replaced every three years, and each replacement cycle carries its own labour and downtime cost.
Maintenance keeps the seal alive; material choice determines how much maintenance it needs. Both feed into a broader decision that professionals and homeowners face at specification stage: how does weatherstripping selection fit within the performance requirements of the whole window system?
Selecting Weatherstripping That Meets Performance Standards
Individual material properties and installation techniques only matter if the strip performs within the broader system it serves. A window is not a collection of independent parts. It is a tested assembly where glazing, frame profile, thermal break, hardware pressure, and sealing elements work together to achieve a rated outcome. Choosing an aluminium window seal replacement without considering how it affects whole-window performance is like swapping brake pads without checking whether they match the calliper.
Matching Strip Selection to Performance Requirements
For residential projects, the decision framework is relatively contained. Match the material to your climate zone, confirm the cross-section fits your groove, and verify compression recovery meets the demands of your window type. The earlier sections of this guide give you those answers directly.
Commercial aluminium door weather stripping raises the stakes. Projects governed by the National Construction Code must demonstrate compliance with energy efficiency provisions under NCC Section J, and windows contribute to that compliance through their tested U-values, solar heat gain coefficients, and air infiltration rates. Weatherstripping directly affects the air infiltration component. A strip that underperforms its rated compression allows air leakage that pushes the installed window beyond the modelled performance used in NatHERS or WERS calculations.
Specifiers working to AS 2047 need to verify that any replacement strip maintains the window’s original test performance. AS 2047 sets thresholds for air infiltration, water penetration resistance, and structural performance that were established during type testing with specific seal profiles in place. Substituting a different profile, even one made from the same material, can alter compression geometry enough to void the original test result.
Why System-Level Compliance Matters
Weatherstripping selection should be evaluated as part of whole-window performance, not in isolation. The seal interacts with glazing thermal resistance, frame conductivity, hardware closing force, and drainage design to produce the energy and weather performance that building codes measure.
This system-level reality explains why leading aluminium window manufacturers document their compliance holistically. Rather than listing weatherstrip specs on a separate data sheet, they present weather resistance, energy efficiency, condensation management, and durability as integrated outcomes of a complete assembly. MEICHEN’s compliance and certifications documentation illustrates this approach, detailing how their aluminium window and door systems meet Australian performance benchmarks as unified systems where the weatherstrip is specified, tested, and warranted as part of the whole frame rather than as a field-replaceable afterthought. For architects, builders, and developers evaluating supply options, that kind of documentation provides the verification trail that project certifiers and building surveyors expect.
The practical takeaway for weather stripping for windows is straightforward: if you are replacing seals on a certified system, source the exact OEM profile to preserve compliance. If you are specifying new aluminium windows, choose a manufacturer whose compliance documentation explicitly addresses weatherstrip performance within their tested assembly, not just the frame and glass in isolation.
Next Steps for Your Project
Whether you are a homeowner replacing a single worn gasket or a specifier selecting systems across a multi-storey development, the decision path runs through the same checkpoints:
- Identify the failure mode or performance gap using the diagnostic indicators from earlier in this guide
- Select a material matched to your climate, frame type, and expected service life
- Confirm whether OEM or universal strips are appropriate based on compliance requirements and groove geometry
- Install using the correct pathway for your window operation type, sliding or hinged
- Verify performance post-installation through tactile draught checks and visual compression assessment
- Schedule maintenance inspections at the interval your climate demands
Aluminium window weather stripping is a small component measured in millimetres of cross-section and dollars per metre. Yet it sits at the convergence point of air, water, and thermal energy, the exact boundary where comfort is won or lost. Get the selection right, install it properly, and maintain it on schedule, and a well-chosen seal will quietly outperform the frame it protects for a decade or more.
Aluminium Window Weather Stripping FAQs
1. How often should I replace weather stripping on aluminium windows?
Replacement frequency depends on the material installed and your climate zone. Compression foam typically needs replacing every 2 to 4 years, synthetic rubber lasts 5 to 8 years, pile strips hold up for 8 to 12 years, EPDM performs for 10 to 15 years, and silicone can last 15 to 20 years. Coastal and tropical locations accelerate degradation due to salt air, UV intensity, and humidity, so inspect seals every 2 to 3 months in these zones. Temperate climates allow twice-yearly checks at the start and end of winter.
2. What is the best weather stripping material for aluminium window frames?
EPDM (ethylene propylene diene monomer) is the best all-round choice for most Australian aluminium windows. It offers strong UV and ozone resistance, handles temperatures from -40 °C to 130 °C, maintains compression recovery through thousands of cycles, and bonds well to metal surfaces. Silicone outperforms EPDM in extreme conditions but costs significantly more per metre. For sliding aluminium windows specifically, pile or fin strips are preferred because they allow smooth sash movement while blocking air and dust infiltration.
3. Why does weather stripping fail faster on aluminium frames than timber?
Aluminium conducts thermal energy roughly 1,000 times faster than timber, which heats the strip to higher temperatures in summer and accelerates material breakdown. The metal also expands and contracts more than timber across seasonal temperature swings, cycling the strip between over-compression and under-compression. Additionally, aluminium’s smooth surface and oxide layer make adhesive bonds less reliable than on porous timber. These combined factors mean foam and rubber strips degrade noticeably faster on aluminium, making EPDM or mechanical push-fit profiles the more durable options.
4. Should I use OEM or universal replacement weather stripping for aluminium windows?
Use OEM replacement strips when your windows are under 15 years old, the manufacturer still supplies parts, or the window must maintain AS 2047 compliance for air infiltration and water penetration. OEM strips match exact groove dimensions and compression profiles. Universal aftermarket strips suit older or discontinued frame series where exact-match parts are unavailable. Measure your channel cross-section with digital callipers before purchasing universal strips, as even half a millimetre difference affects seal performance under wind load.
5. How do I stop weather stripping from peeling off aluminium window frames?
Adhesive failure on aluminium is caused by the metal’s oxide layer and residual surface oils preventing a true chemical bond. To improve adhesion, clean the channel with isopropyl alcohol, let it dry completely, then apply a metal-specific adhesion promoter before pressing the strip into place. The more reliable long-term solution is switching to mechanical push-fit strips with barbed or arrow-foot profiles that lock physically into the aluminium extrusion groove, bypassing surface chemistry issues entirely.
More Window & Door Guides