What Aluminium Window Rubber Seals Do and Why They Matter
That cold whisper around a closed window on a winter morning rarely points to a broken frame or cracked glass. More often, the culprit is a small, flexible component most homeowners never think about until it fails.
What Are Aluminium Window Rubber Seals
Aluminium window rubber seals are flexible gaskets pressed or inserted into precision-milled channels within the aluminium frame. Their job is straightforward: create continuous airtight and watertight barriers between the glass pane, the metal frame, and the external environment. Unlike generic adhesive weatherstripping you might stick around a door, these seals are engineered to match the exact geometry of a specific aluminium profile series. They compress when the window closes and rebound when it opens, maintaining a reliable barrier through thousands of cycles.
Glazing Seals vs Frame Seals vs Weather Seals
Every aluminium window relies on not one but three distinct types of seals working together. Understanding the difference between glazing seals and weather seals helps pinpoint which component is causing a specific problem.
- Glazing seals – Seated in the bead channel surrounding the glass pane, these gaskets hold the glazing unit securely in place while cushioning it against wind pressure and thermal movement.
- Frame seals – Positioned where the opening sash meets the fixed outer frame, these close the gap between the two aluminium profiles when the window is locked shut.
- Weather seals – Located at moving joints and exposed edges, these block rain, wind, and dust from penetrating the assembly during operation.
Each seal category sits in a different channel, uses a different cross-section profile, and degrades in its own way. A glazing gasket failure, for instance, won’t cause a draught but may allow moisture migration between panes, while a worn frame seal is the classic source of cold air streaming in around a closed sash.
Why Seals Matter More Than You Think
The most common household complaints tied to window performance trace back to degraded rubber seals rather than structural faults. Persistent draughts suggest frame seals have lost compression. Water pooling on the sill often means weather seals are cracked or detached. Increased traffic noise despite closed windows points to hardened gaskets no longer forming a tight acoustic barrier. Even rising energy bills can stem from seals that have flattened over years of use, letting conditioned air escape around the perimeter. Identifying which seal has failed is the first step toward a targeted fix rather than a costly full-window replacement.
The specific profile shape of each seal determines how well it performs in its role, and that profile choice varies depending on the window’s operating style and the gap it needs to bridge.
Seal Profile Shapes and Where Each One Belongs
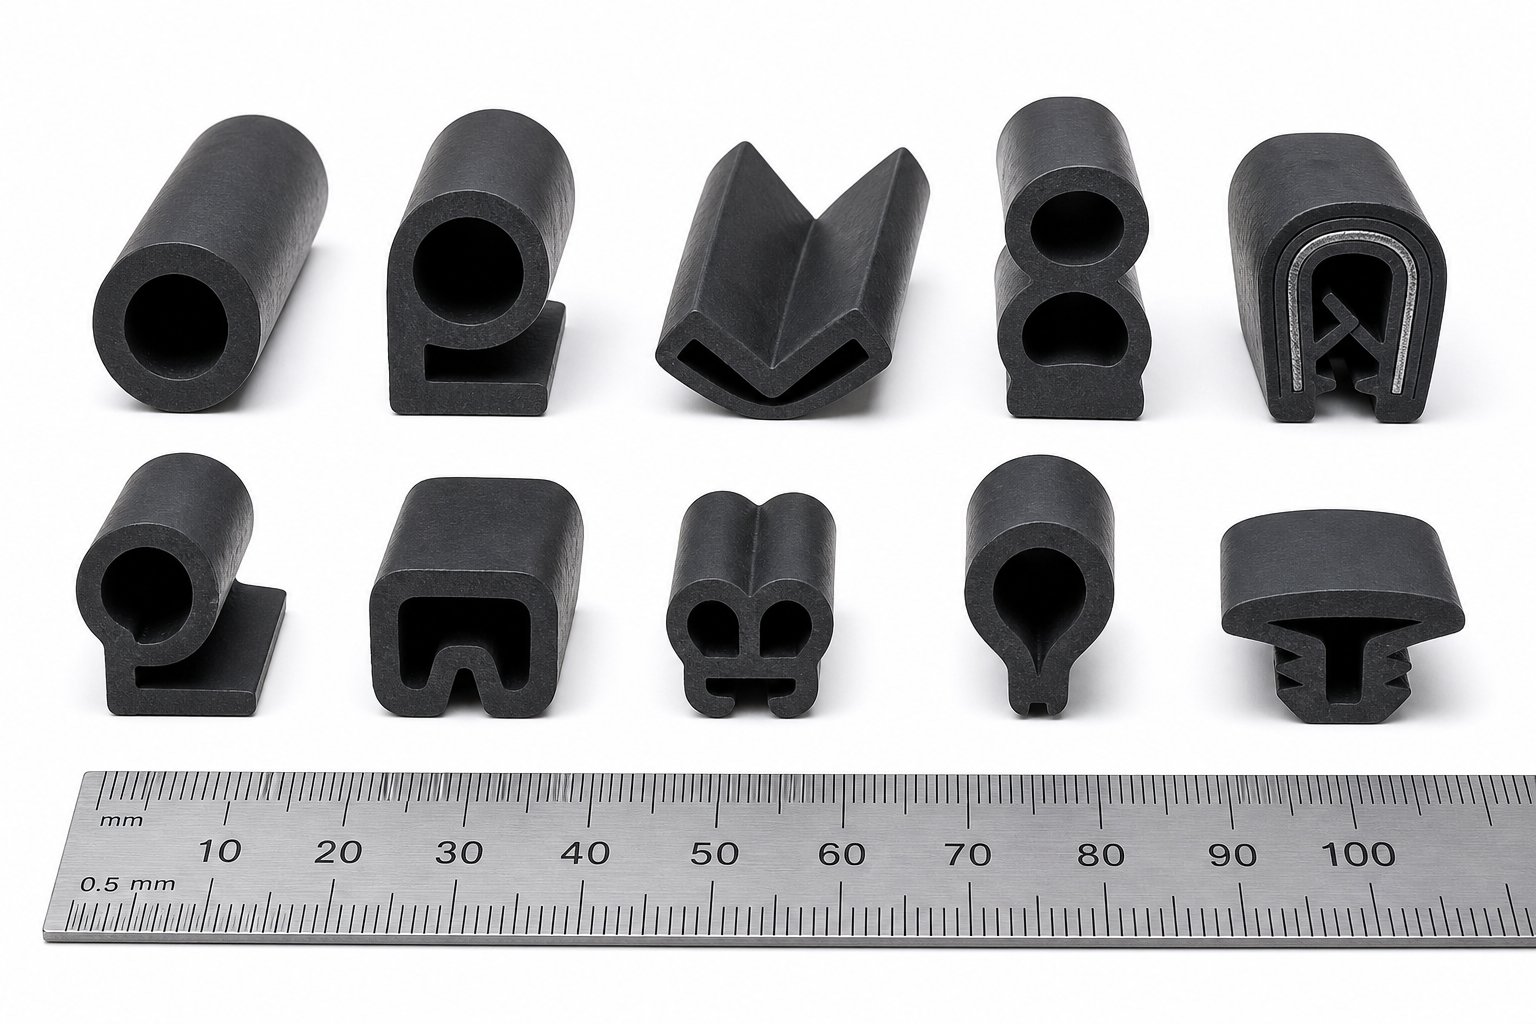
Knowing a seal has failed is one thing. Knowing which rubber seal cross section to order as a replacement is another challenge entirely. Aluminium window channels are not universal, and the cross-section profile of the gasket dictates how it compresses, how much gap it fills, and whether it suits a hinged, sliding, or fixed window. Five common profile shapes cover the vast majority of aluminium window applications found in Australian homes and commercial buildings.
P-Type and D-Type Compression Profiles
P-type seals feature a rounded hollow bulb attached to a flat stem or tail. When the window closes, the bulb compresses against the opposing frame surface to form a tight seal. The flat tail slots into the aluminium channel or is held in place by a retaining groove, keeping the gasket anchored even after repeated open-close cycles. P-type profiles are the go-to choice for casement and awning windows where the sash swings against the frame under latch pressure. They accommodate moderate gaps, typically between 3 mm and 5 mm, and rely on consistent compression to perform well.
D-type seals take a similar compression approach but use a larger, half-moon hollow profile without the flat stem. Their broader cross section fills wider and more irregular gaps, usually in the 3 mm to 7 mm range. Because the D-profile is often manufactured from sponge rubber, it conforms to slight surface irregularities along the aluminium frame, making it effective where machining tolerances are looser or where the frame has shifted slightly over time. You will commonly find D-type seals on larger hinged windows, entry doors with aluminium frames, and commercial window assemblies where gap variation is expected along the span.
E-Type and V-Type Strip Seals
E-type seals are thinner and more compact than their P and D counterparts. The profile resembles a lowercase letter “e” with three contact ridges of varying height. This layered design lets the gasket self-adjust to narrow, tight gaps between 1 mm and 3 mm. Most E-type strips come with a self-adhesive backing rather than a push-in channel fitting, making them a practical retrofit option for older aluminium windows where the original seal channel is shallow or non-standard. They work best on hinged sashes with minimal clearance and low compression force.
V-type seals, sometimes called fin seals or spring-fold strips, use a folded V-shaped fin that flexes open under contact and springs back when released. Instead of relying on compression like bulb profiles, the V-type creates a wiping seal as the sash slides past it. This makes it the natural choice for aluminium sliding windows where the sash moves laterally rather than pressing inward. The spring action maintains contact even as the gap fluctuates along the track. V-type seals typically handle gap ranges from 1 mm to 5 mm and are often paired with pile weatherstrip on the same sliding window for combined draught and dust protection.
Bubble and Bulb Glazing Gaskets
Bubble or bulb-type gaskets serve a different purpose from the frame and weather seals above. These profiles feature a bulbous head connected to a narrow foot or arrow-shaped anchor designed to press firmly into the aluminium glazing bead channel. Their role is to grip the glass pane, cushioning it against wind loads and thermal expansion while maintaining a watertight perimeter seal. Unlike compression seals that deform when the window closes, glazing gaskets remain under constant static compression once installed.
You will find bulb-type gaskets on virtually every aluminium window type, whether casement, sliding, awning, or fixed panel. The key difference lies in the foot profile, which must match the specific bead channel dimensions of the aluminium extrusion. Selecting a bulb gasket with the wrong anchor width or shape means the seal will either pop out under wind pressure or sit too loosely to prevent moisture ingress around the glass.
| Profile Shape | Best Application | Gap Range | Window Style Suitability |
|---|---|---|---|
| P-Type | Frame seal on hinged sashes under latch compression | 3 – 5 mm | Casement, awning |
| D-Type | Frame seal for larger or irregular gaps | 3 – 7 mm | Large casement, commercial hinged frames |
| E-Type | Retrofit strip for narrow channels with adhesive backing | 1 – 3 mm | Older hinged windows, low-compression sashes |
| V-Type | Spring-fold fin seal for lateral sliding contact | 1 – 5 mm | Sliding windows and doors |
| Bubble/Bulb | Glazing gasket pressed into bead channel to hold glass | Profile-specific | All types (casement, sliding, fixed, awning) |
Picking the right profile shape is only half the equation. The rubber compound the seal is made from determines how long that profile holds its shape against UV exposure, temperature swings, and years of repetitive compression.
EPDM vs Silicone vs TPE
Two seals with identical cross-section profiles can deliver vastly different service lives depending on the elastomer they are made from. The rubber compound determines how a gasket handles UV bombardment, temperature cycling, and years of sustained compression in its channel. Three materials dominate the aluminium window seal market in Australia: EPDM, silicone, and TPE. Each brings distinct strengths and limitations that matter more in some climate zones than others.
EPDM Rubber for Long-Term Durability
EPDM (ethylene propylene diene monomer) is the workhorse of the window gasket world. Its saturated polymer backbone gives it strong resistance to UV rays, ozone, and weathering, which is exactly what a seal faces on an exterior aluminium frame year after year. EPDM handles continuous temperatures from around -40°C to 120°C, covering everything Australian weather throws at it, from frosty Canberra mornings to scorching Western Australian summers.
Where EPDM really earns its reputation is compression set resistance. A gasket that stays compressed in a frame channel 24 hours a day needs to maintain its elastic memory over time, and EPDM does this better than most general-purpose elastomers. Properly formulated EPDM window seals typically last 15 to 25 years before degradation becomes noticeable. For coastal properties in Queensland or along the NSW shoreline, EPDM also resists moisture and mild salt exposure without swelling or breaking down. It is widely considered the best choice when weather is the primary threat and petroleum-based chemical exposure is not a concern.
Silicone Seals for Extreme Temperatures
Silicone operates in a league of its own when temperature is the hard constraint. With a functional range spanning -60°C to 230°C, it handles thermal extremes no other common window seal material can match. For inland regions like parts of South Australia or central NSW where summer surface temperatures on dark aluminium frames can spike well beyond what ambient readings suggest, silicone maintains its flexibility without softening or degrading.
Its UV resistance is excellent, and silicone exhibits low compression set at elevated temperatures, meaning the gasket rebounds reliably even after prolonged heat exposure. The trade-offs are real, though. Silicone has lower tensile strength and abrasion resistance compared to EPDM, making it less suited to dynamic applications where the seal experiences regular friction from sliding sashes. It also costs roughly two to three times more than EPDM per metre of gasket, which adds up across a full home. For fixed panels or awning windows in extreme-heat zones, silicone is a strong contender. For high-traffic sliding windows, EPDM is typically the more durable pick.
TPE Gaskets and Their Trade-Offs
Thermoplastic elastomers (TPE) offer a different value proposition. Because TPE can be moulded and extruded using standard thermoplastic processing equipment, it is cheaper to manufacture and easier to produce in complex co-extruded profiles that combine rigid and flexible sections in one piece. Many factory-fitted aluminium window seals use TPE for this reason: it integrates neatly into high-volume production lines.
Performance-wise, TPE sits below both EPDM and silicone in key durability metrics. Its UV resistance is moderate, meaning seals on sun-exposed northern facades in tropical Queensland or the Northern Territory can begin cracking within 8 to 12 years. Compression set resistance is also lower, so TPE gaskets tend to flatten permanently faster than EPDM equivalents, especially in hotter climates. Expected lifespan ranges from 8 to 15 years depending on exposure conditions. TPE works adequately in mild, temperate climates like coastal Victoria or Tasmania where UV intensity and temperature swings are less punishing, but it is not the ideal choice for harsh Australian environments.
Material choice should always match local climate conditions. A seal compound that performs well in Melbourne’s temperate weather may degrade years earlier on a sun-baked frame in Darwin or a salt-sprayed facade on the Gold Coast. Selecting the right elastomer for your specific exposure profile is the single biggest factor in long-term seal longevity.
| Material | UV Resistance | Temp Range | Compression Set | Lifespan | Best Climate Fit |
|---|---|---|---|---|---|
| EPDM | Excellent | -40°C to 120°C | Low (retains shape well) | 15 – 25 years | All Australian zones; coastal, tropical, temperate |
| Silicone | Excellent | -60°C to 230°C | Very low at high temps | 20 – 30 years | Extreme inland heat; fixed or low-friction applications |
| TPE | Moderate | -30°C to 100°C | Higher (flattens faster) | 8 – 15 years | Mild temperate zones; lower UV exposure |
Some industry sources cite up to 20% energy cost reduction from properly sealed windows. That figure provides useful context, but actual savings depend heavily on seal condition, overall window design, glazing type, and the climate zone your home sits in. A degraded TPE gasket in Darwin will not deliver the same thermal performance as a fresh EPDM seal in the same frame, even if the window itself is identical.
Material selection sets the baseline for how long a seal performs. But even the best elastomer will fail prematurely if it is paired with the wrong window operating style, an issue that has as much to do with mechanical demands as it does with chemistry.
Matching Seal Types to Aluminium Window Profiles
A casement window and a sliding window might sit side by side on the same facade, built from the same aluminium alloy, yet their sealing demands are fundamentally different. One slams shut under latch pressure, compressing a gasket perpendicularly into the frame. The other glides laterally along a track, relying on wiping contact rather than direct crush. Fitting the correct seal for your aluminium window style is not a matter of preference; it is a mechanical requirement dictated by how the sash moves, where it contacts the frame, and what forces hold it closed.
Using a compression gasket where a fin seal belongs, or vice versa, leads to premature wear, impeded operation, or gaps that let air and water straight through. Here is what each window type actually needs.
Seals for Casement and Awning Windows
Casement and awning windows share a core operating principle: the sash swings outward on hinges and locks tight against the fixed frame. This creates perpendicular compression along the full perimeter of the closing joint. Both types use what the industry calls a compression sealing system, where the sash presses firmly against the frame gasket when the hardware engages.
For a casement window, the seal configuration consists of continuous compression gaskets (typically P-type or D-type profiles) running around all four edges of the sash. Side-hinged and opening to a wide angle, casement sashes generate even compression pressure when the multi-point lock draws the panel inward. The gasket must rebound consistently after every cycle, and corners require either mitred joints bonded with compatible adhesive or factory-moulded corner pieces to prevent air bypass at the angles.
Awning windows differ in one important respect. Because they hinge at the top and open outward from the bottom, rainwater can track along the sash edge and toward the lower seal during operation. The aluminium awning window gasket type must accommodate drainage allowances at the bottom rail, with the seal positioned so that weep slots remain unobstructed when the window is closed. Blocking those drainage paths with an oversized or incorrectly positioned gasket causes water to pool against the seal, accelerating degradation and eventually leaking into the frame cavity.
Both casement and awning configurations rely on uniform latch pressure across the full perimeter. If the hardware fails to pull the sash squarely against the frame, the compression gasket contacts unevenly, leaving cold spots where air infiltration begins.
Sliding Window Seal Requirements
Sliding windows operate on an entirely different mechanical basis. The sash travels horizontally (or vertically, in some configurations) along a track rather than pressing into the frame. There is no latch compression pulling the panel against a gasket line. Instead, the rubber seal for an aluminium sliding window must accommodate lateral motion without creating excessive friction that would make the sash hard to operate.
This is why sliding windows use a combination of seal types rather than a single perimeter gasket:
- Pile weatherstrip sits in channels along the vertical stiles where the sliding sash overlaps the fixed panel or frame jamb. These fine, brush-like fibres with a flexible fin backing create a wiping seal against dust and air movement without impeding the slide action.
- V-type fin seals supplement pile strips in some systems, providing spring-loaded contact that self-adjusts as the sash shifts slightly on the track over time.
- Glazing gaskets (bulb or bubble type) hold the glass within the sash frame itself, performing the same role as in any other window type.
Attempting to retrofit a casement-style compression gasket onto a sliding window rail introduces friction that makes the sash drag, stutter, or bind. Conversely, fitting pile weatherstrip where a compression seal belongs leaves the window under-sealed, since pile can only block light air movement rather than resist sustained wind pressure.
Tilt-and-turn windows represent a more complex case. These systems operate in multiple modes from a single handle: tilting inward at the top for ventilation, or turning fully inward from the side for cleaning and egress. The internal perimeter gearing pulls the sash directly into the frame gaskets using multi-point locking, creating compression-based sealing around all four edges simultaneously. Because the sash must return to the exact same seal line regardless of which mode it was last in, tilt-and-turn windows use continuous EPDM compression gaskets with specialised corner-transfer pieces that maintain seal continuity through the 90-degree direction changes. Some high-performance systems run two or even three parallel gasket lines to create pressure-equalised chambers between the seals.
Fixed Panel Glazing Gasket Selection
Fixed windows simplify the equation considerably. With no moving sash, there are no frame seals or weather seals to specify. The only gaskets needed are the glazing gaskets that hold the glass unit within the aluminium frame.
These bulb-type or wedge gaskets press into the bead channel on both the interior and exterior face of the glass, cushioning the pane against wind deflection and thermal expansion while creating a watertight perimeter. The critical factor is matching the gasket foot profile to the exact bead channel dimensions of the aluminium extrusion series. Fixed panels often carry heavier, thicker glass packages (particularly in large-format residential designs), which increases the static load on the gaskets and demands a compound with low compression set over decades of constant pressure.
Because fixed panels have no moving parts to wear, their gaskets generally outlast those on operable windows. However, UV exposure remains a factor on sun-facing elevations, and the lack of a weather seal means the glazing gasket alone is responsible for keeping water out of the frame cavity.
To summarise the correct seal configuration for each operating type:
- Casement windows – Continuous compression gaskets (P-type or D-type) around full perimeter, with bonded or moulded corner joints and multi-point latch engagement.
- Awning windows – Perimeter compression gaskets with drainage allowance at bottom rail; seal positioned to avoid blocking weep paths.
- Sliding windows – Pile weatherstrip and/or V-type fin seals at sliding contacts; bulb-type glazing gaskets within sash frame.
- Tilt-and-turn windows – Multi-point compression gaskets with corner-transfer continuity pieces; often dual or triple gasket lines for pressure equalisation.
- Fixed windows – Glazing gaskets only (bulb or wedge type); no frame seals or weather seals required.
Getting the configuration right from the outset prevents a cascade of problems. But even a correctly specified seal eventually degrades, and the way it fails depends on both the material and the mechanical stresses specific to that window style. Recognising the early signs of seal wear before a full breach develops is what separates a quick gasket swap from a water damage repair.
How to Spot Worn Seals and Know When to Replace Them
A rubber gasket does not fail overnight. It degrades gradually, and the symptoms often masquerade as unrelated household annoyances, a stubborn draught in the living room, condensation that keeps returning, traffic noise that seems louder than it used to be. Learning how to tell if aluminium window seals are worn saves you from chasing the wrong problem and helps you act before a minor gasket issue becomes water damage or a ballooning energy bill.
Five Signs Your Window Seals Need Replacing
Aluminium window seal failure signs fall into five distinct modes, each with its own visual clue and consequence. Listed here from most common to least common:
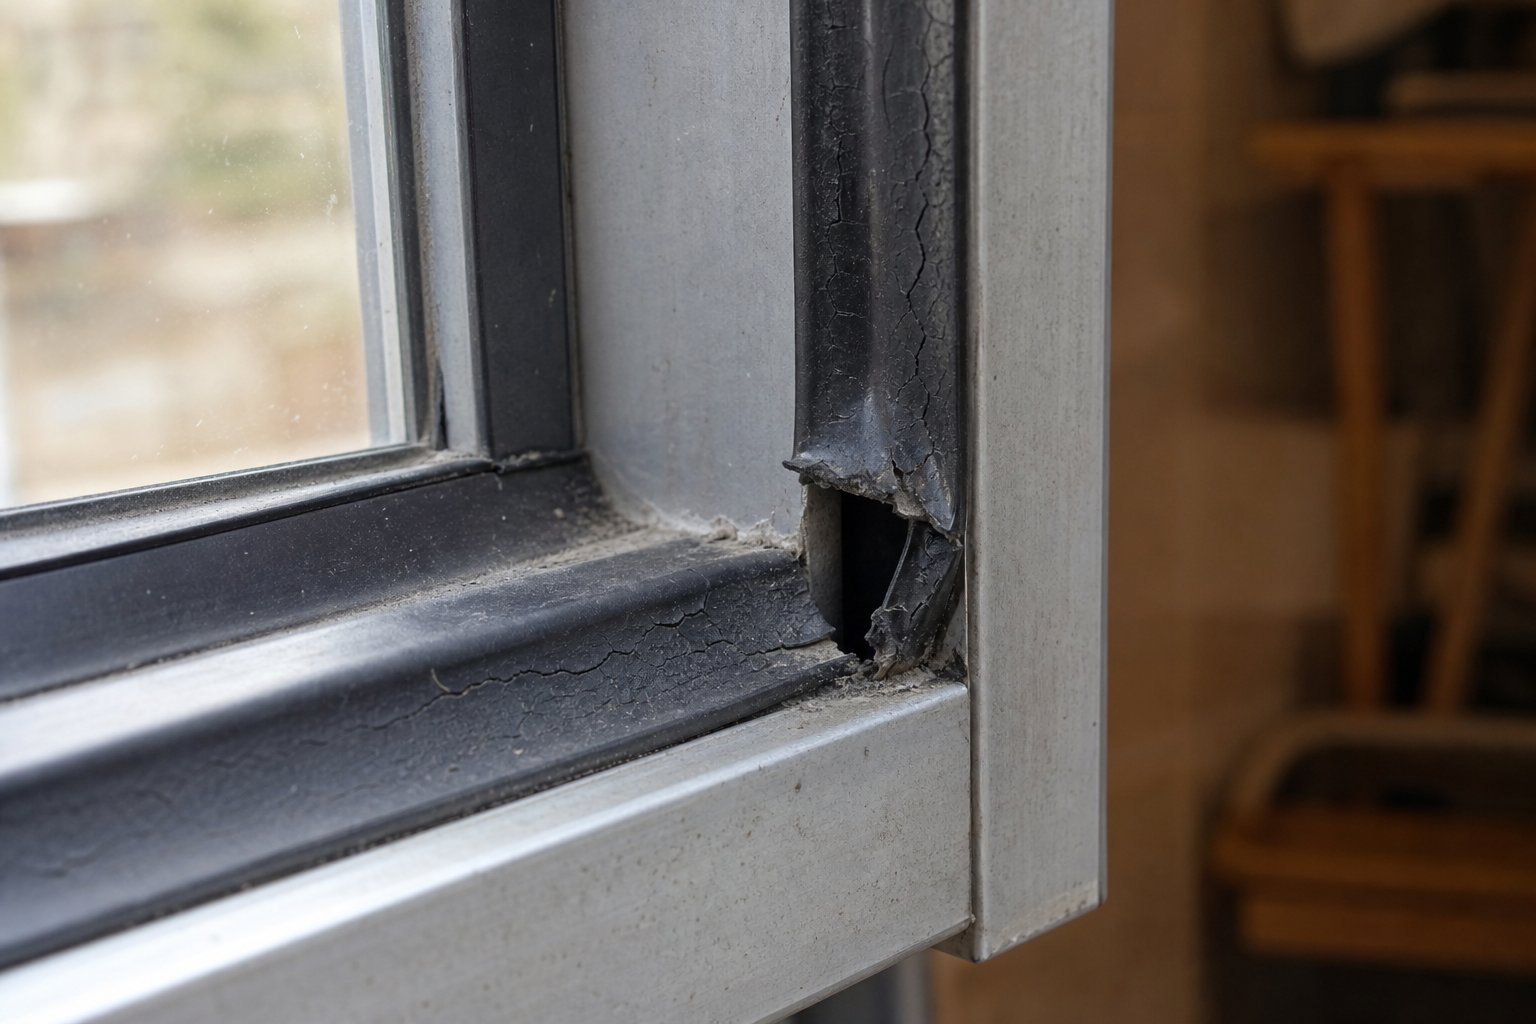
- Compression set (permanent flattening) – The gasket has been squeezed in its channel for years and no longer rebounds when the window opens. Run your finger along the seal: if the profile feels flat rather than rounded or bulbous, it has taken a permanent set. The result is an air gap between sash and frame even when the window is locked shut, producing cold draughts and increased energy consumption. Compression set cannot be reversed. The seal must be fully replaced.
- Hardening (loss of elasticity) – UV exposure and heat gradually drive plasticisers out of the rubber compound, leaving the gasket stiff and rigid. A hardened seal feels brittle rather than supple when you press it with a fingernail. Because it can no longer flex to fill irregular gaps, air and noise pass freely around the perimeter. Once hardened, the material will not soften again. Full replacement is the only effective fix.
- Surface cracking (UV degradation) – Fine crazing or spider-web cracks appear across the seal surface, particularly on north-facing and west-facing windows that cop the most sun. These micro-cracks allow moisture to wick into the gasket body, accelerating internal breakdown. Early-stage surface cracking on an otherwise functional seal can sometimes be managed temporarily with a silicone-based conditioner, but once cracks penetrate deep enough to compromise the seal’s cross-section, replacement is necessary.
- Shrinkage (seal pulls away from corners) – Over time, some elastomers contract slightly, causing the gasket to retreat from mitred corner joints. You will see visible gaps at the top corners or bottom corners of the frame where the seal no longer meets. These gaps are prime entry points for water ingress and can cause staining or mould on interior sills. If the shrinkage is limited to a short section, bonding a new corner piece or applying a compatible sealant at the joint can work as a repair. Widespread shrinkage along multiple edges means the entire gasket run has contracted and needs replacing.
- Adhesion failure (seal detaches from channel) – The gasket physically separates from the aluminium channel, hanging loose or falling out entirely. This happens when the anchor foot wears down, the channel corrodes, or the seal was incorrectly sized at installation. Adhesion failure causes immediate and obvious problems: large gaps allow wind-driven rain inside, and the detached section can interfere with window operation. There is no reliable repair. The gasket must be removed and a correctly profiled replacement pressed into the channel.
The Paper Test for Detecting Air Leaks
You do not need specialised equipment to check window seal air leaks. Two low-tech methods give reliable results in a matter of minutes.
The paper strip test: Close the window on a single sheet of standard copy paper, positioning it so the paper sits between the sash and the frame seal. Try to slide the paper out. If it pulls free with little or no resistance, the seal is not compressing adequately at that point. Repeat at multiple positions around the perimeter, especially at corners where shrinkage and compression set tend to show up first.
The incense stick test: On a breezy day, light an incense stick and hold it approximately 25 mm from the interior face of the window frame. Move it slowly along the seal line, watching the smoke trail. Where the smoke flickers or gets pulled sideways, air is passing through a compromised seal. This method is particularly effective for pinpointing isolated gaps that the paper test might miss between test points. On a calm day, you can run the test with the exhaust fan in a nearby bathroom switched on to create a slight negative pressure indoors, drawing outside air through any breaches.
Repair vs Full Replacement Decision Guide
Not every worn gasket demands a complete strip-and-replace job. The decision hinges on the failure mode, how widespread the damage is, and whether the seal still provides partial function.
Repair may be viable when:
- Damage is localised to one or two corners (shrinkage gaps that can be bonded).
- Surface cracking is superficial and the gasket still compresses and rebounds.
- A short section has detached but the rest of the run remains secure and supple.
Full replacement is necessary when:
- The gasket has taken a compression set along its full length.
- Hardening is evident across the entire perimeter.
- Cracking has penetrated beyond the surface, with chunks missing or the seal crumbling when flexed.
- Multiple failure modes are present simultaneously, indicating end-of-life degradation.
A useful rule of thumb: if the seal is older than 15 years and shows any two failure signs, replacement is almost always more cost-effective than spot repairs that will need revisiting within a season or two. When you do decide to replace, the next challenge is getting the measurements right so the new gasket actually fits the channel it needs to sit in.
How to Measure and Select the Right Replacement Seal
Identifying a worn gasket is the easy part. Finding the correct gasket profile for your aluminium frame is where most DIY replacements go sideways. Aluminium window seals are not interchangeable between brands or even between different product lines from the same manufacturer. A gasket that looks roughly similar can be 0.5 mm too narrow in the foot, too tall in the bulb, or too stiff to compress properly, and the result is a seal that pops out under wind load or fails to close the gap it was meant to bridge.
Getting it right comes down to three precise measurements and one physical sample.
Three Measurements You Need Before Ordering
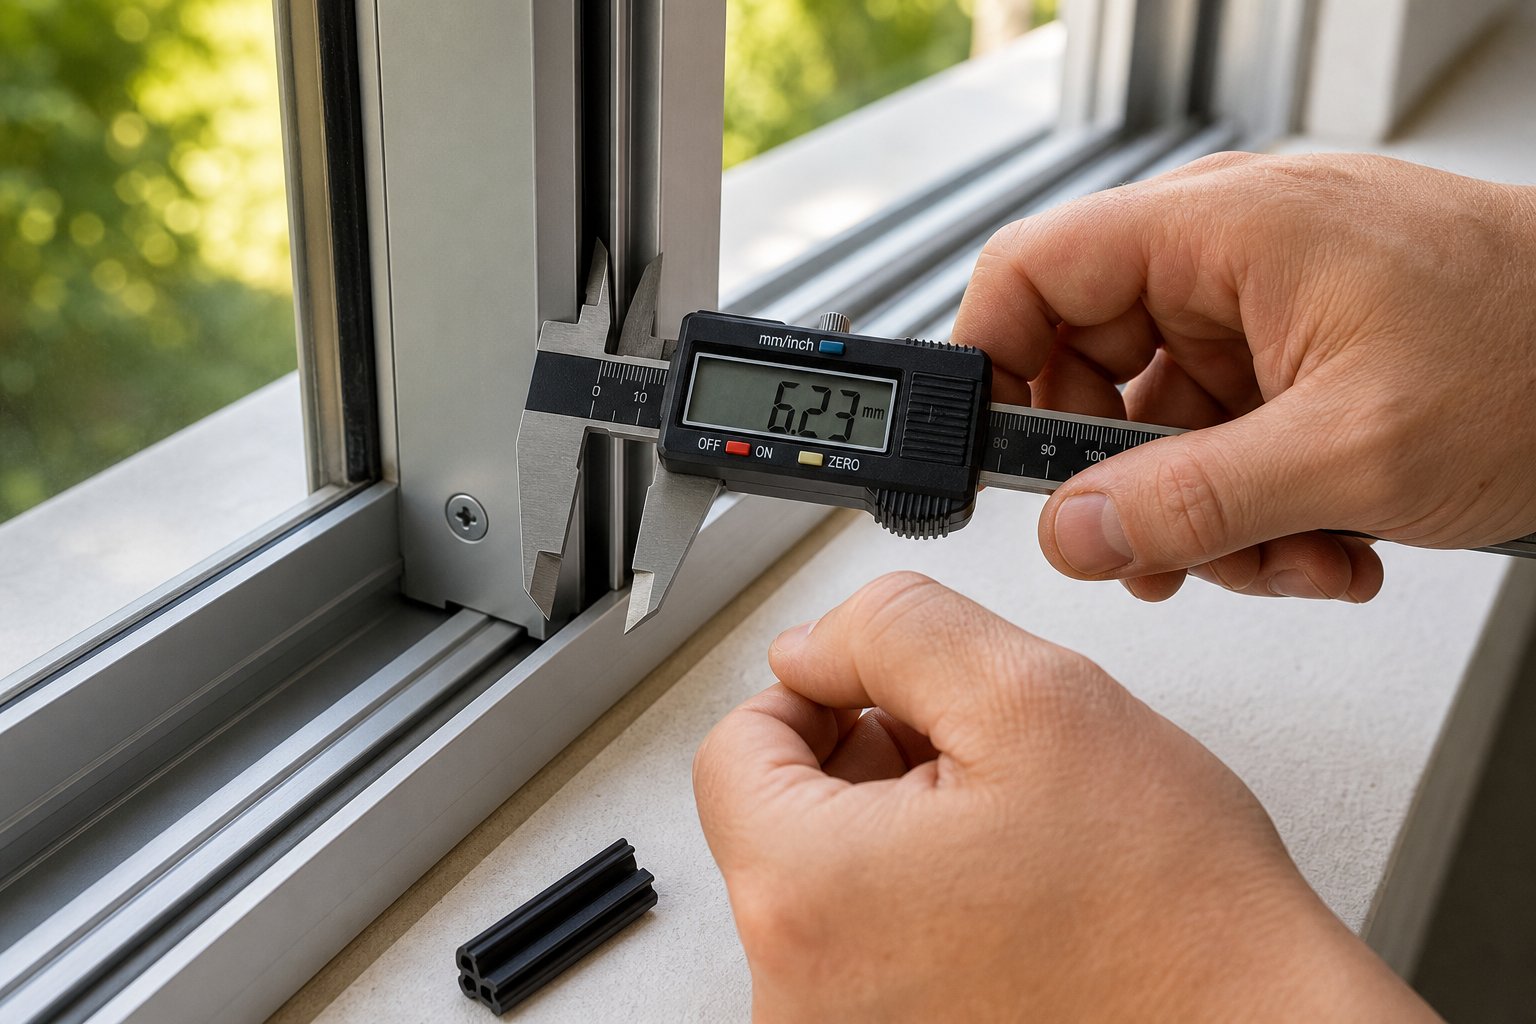
Before browsing supplier catalogues or ordering online, you need three dimensions from the existing seal and its channel. All measurements should be taken in millimetres using digital callipers rather than a tape measure, since the tolerances involved are often less than 1 mm.
- Channel slot width – Measure the opening width of the aluminium channel that the gasket foot sits inside. This is the window seal channel width measurement that determines whether a replacement anchor will physically fit the groove. Use callipers across the slot opening at several points along the frame to check for variation.
- Seal height (depth into channel) – Measure how far the gasket’s foot or anchor section extends down into the channel. This depth ensures the replacement locks securely without riding up or bottoming out against the channel floor.
- Seal width (compressed width at contact) – With the window closed, note the compressed dimension of the sealing bulb or fin where it meets the opposing surface. This tells you how much material fills the gap and confirms whether a replacement profile will generate adequate compression when the sash latches shut.
Take each measurement at a minimum of three locations along the frame: both sides and the top or bottom rail. Aluminium extrusions are consistent by nature, but years of settling, hardware adjustment, or previous seal replacements can introduce slight irregularities that affect fit.
How to Take a Cross-Section Sample
Numbers alone do not always tell the full story. The most reliable method for finding the correct gasket profile for an aluminium frame is to cut a short sample from the existing seal and match it visually against a supplier’s profile chart.
Choose a discreet location, typically a bottom corner where the old gasket is already pulling away or where a small gap will not compromise weatherproofing before the new seal arrives. Using a sharp utility knife, cut a clean 20 mm to 30 mm section straight through the gasket. Slice perpendicular to the gasket’s length so the cut face reveals the full cross-section shape: the anchor foot, any hollow chambers, fin extensions, and the sealing head.
Place the cut piece on a flat white surface and photograph it next to a ruler for scale. Most Australian seal suppliers publish cross-section profile charts showing their range at actual size or with millimetre dimensions annotated. Compare your sample to these charts, paying attention to the foot shape first (arrow-head, flat tab, wedge, or barbed fin) since the foot determines channel compatibility. The head profile, whether P-bulb, D-bulb, flipper, or wedge, confirms the sealing function.
If you are ordering remotely, many specialist gasket suppliers will identify your seal from a clear photo of the cross-section paired with your three calliper measurements. This is far more reliable than describing the seal in words or guessing from a catalogue thumbnail.
Avoiding Common Sizing Mistakes
Three pitfalls trip up homeowners and tradespeople alike when sourcing replacement aluminium window rubber seals:
Ordering by window brand name alone. Knowing you have a particular brand of aluminium window is a starting point, not a specification. Most manufacturers use multiple profile series across their product range, and the gasket channel geometry can differ between a 2012 casement series and a 2020 sliding series from the same company. The aluminium profile series, not the brand badge on the handle, determines which seal fits.
Seal compatibility depends on the specific aluminium profile series your window was fabricated from, not just the window brand. Always verify the actual extrusion profile code or take a physical cross-section sample before ordering replacement gaskets.
Confusing metric and imperial measurements. Australian aluminium windows are manufactured to metric dimensions, but some imported seals or older reference material may quote sizes in fractions of an inch. A 3/16-inch foot width (4.76 mm) is not the same as a 5 mm channel, and that 0.24 mm difference is enough for the gasket to sit loosely and vibrate free under wind pressure. Always confirm that your measurements and the supplier’s specifications are in the same unit system.
Selecting the wrong durometer hardness. Durometer measures rubber hardness on the Shore A scale. Most aluminium window seals fall between 55 and 75 Shore A. A softer gasket (lower number) compresses more easily but may lack the structural integrity to stay anchored in the channel. A harder gasket (higher number) holds its shape but may not compress enough to fill the gap, leaving draughts. If you cannot identify the durometer of your existing seal, 60 to 65 Shore A is a safe middle ground for most residential aluminium frame applications.
Armed with accurate measurements, a cross-section sample, and the correct material hardness, sourcing a compatible seal becomes a straightforward matching exercise rather than a gamble. The real test comes during installation, where technique determines whether that perfectly matched gasket actually performs to its potential once seated in the channel.
Troubleshooting Common Seal Problems and Failures
Sometimes a new gasket goes in, the window closes smoothly, and the draught persists anyway. Or the seal fixes the air leakage but introduces a new annoyance: water at the corners, a rattle you never had before, or a sash that suddenly feels like it is fighting you. These post-installation problems frustrate homeowners precisely because the seal itself looks fine. The issue is usually a mismatch between the gasket and the specific demand being placed on it.
Fixing Drafts After Seal Replacement
An aluminium window still leaking after seal replacement almost always points to one of two root causes: the wrong profile shape, or insufficient compression at the contact line.
If the replacement gasket has a smaller cross-section than the original, it will not fill the gap between sash and frame when the window locks shut. Air passes around the under-compressed seal even though the gasket appears to be seated correctly in its channel. The fix is straightforward: verify your gap measurement with the window latched closed, compare it against the new seal’s compressed height, and replace with a profile that provides 20 to 30 percent over-compression relative to the available gap.
The other common culprit is hardware that no longer pulls the sash tight against the frame. Multi-point locks and espagnolette handles wear over time, reducing the clamping force on the seal. Before blaming the gasket, check that your locking hardware draws the sash firmly and evenly against the frame. On casement windows, adjusting the striker plates or lock keeps by even 1 mm can restore full compression on a seal that otherwise seems to have failed.
Solving Corner Water Leaks
A water leak at aluminium window corner seal joints is one of the most reported issues after DIY gasket replacement. The problem is not the rubber itself but how the two ends of the gasket meet at the mitre.
When a continuous gasket run is cut and butted together at a corner without bonding, capillary action draws wind-driven rain through the microscopic gap between the two cut faces. On awning windows in particular, the bottom corners collect water that runs down the sash edge and pools exactly where these unbonded joints sit. The corrective action is to apply a small bead of compatible adhesive or sealant at every mitred joint, pressing the two faces firmly together before the adhesive skins over. Some manufacturers supply factory-moulded corner pieces that eliminate the cut joint entirely; these are worth sourcing for any window exposed to heavy rain.
Also check that the seal has not been installed over the frame’s weep slots. Blocked drainage forces water to build hydrostatic pressure against the seal corners, eventually forcing its way through even a bonded joint.
Addressing Condensation and Noise Issues
Condensation caused by a failed glazing gasket is a different beast from frame seal problems. When the bulb gasket that holds the glass unit in place loses its watertight integrity, moisture migrates slowly into the airspace between double-glazed panes. The visible symptom is internal fogging that cannot be wiped away. No amount of frame seal replacement will resolve this; the glazing gasket must be removed and renewed, and in some cases the insulated glass unit itself requires replacement if the internal seal has also failed.
A window rattling despite a new rubber seal usually means the weather gasket has inadequate rebound or the wrong durometer for the application. Seals that are too hard or too thin cannot maintain constant contact with the sash as wind pressure fluctuates, allowing the panel to vibrate against the frame. Swapping to a softer-durometer gasket (around 55 to 60 Shore A) with a slightly larger head profile typically eliminates the rattle without making the window difficult to operate.
Difficulty opening or closing a window after seal replacement points in the opposite direction: the new gasket is oversized, creating excessive friction or resistance when the sash travels past the seal. This is particularly common on sliding windows where a compression-style seal was mistakenly fitted instead of a pile weatherstrip or fin seal. The solution is to step down to the correct profile type for the window’s operating style, as covered in the seal-to-window matching guidance earlier in this article.
| Symptom | Likely Cause | Corrective Action |
|---|---|---|
| Persistent draughts despite new seals | Profile too small or hardware not generating sufficient compression | Verify gap dimensions; upsize profile or adjust lock keeps and striker plates |
| Water leaking at corners | Mitred seal joints unbonded or factory corner pieces missing | Bond joints with compatible adhesive; install moulded corner pieces; clear weep slots |
| Condensation between panes | Glazing gasket failure allowing moisture migration into sealed unit | Replace glazing gasket; assess whether insulated glass unit also needs renewal |
| Sash rattling in wind | Weather seal too hard or too thin for adequate rebound | Fit softer-durometer gasket (55-60 Shore A) with larger head profile |
| Window difficult to open or close | Oversized seal or wrong profile type creating excessive friction | Step down to correct profile type; use pile or fin seal for sliding windows |
Resolving these issues is usually a matter of refining the gasket choice rather than starting from scratch. But prevention beats troubleshooting every time, and the way a seal is inserted into its channel and maintained afterward determines whether these problems surface in the first place.
Installation Tips and Maintenance for Longer Seal Life
A perfectly matched gasket can still underperform if the installation technique introduces weak spots, and even a flawless installation will degrade faster without basic upkeep. Getting both right is what separates a seal replacement that lasts a decade from one that starts leaking within a year.
Correct Insertion Techniques for Push-In Gaskets
The push-in gasket installation technique for aluminium frames is deceptively simple, but small errors compound over a full perimeter run. The goal is continuous, even seating without stretching, bunching, or leaving the gasket partially lifted at any point along the channel.
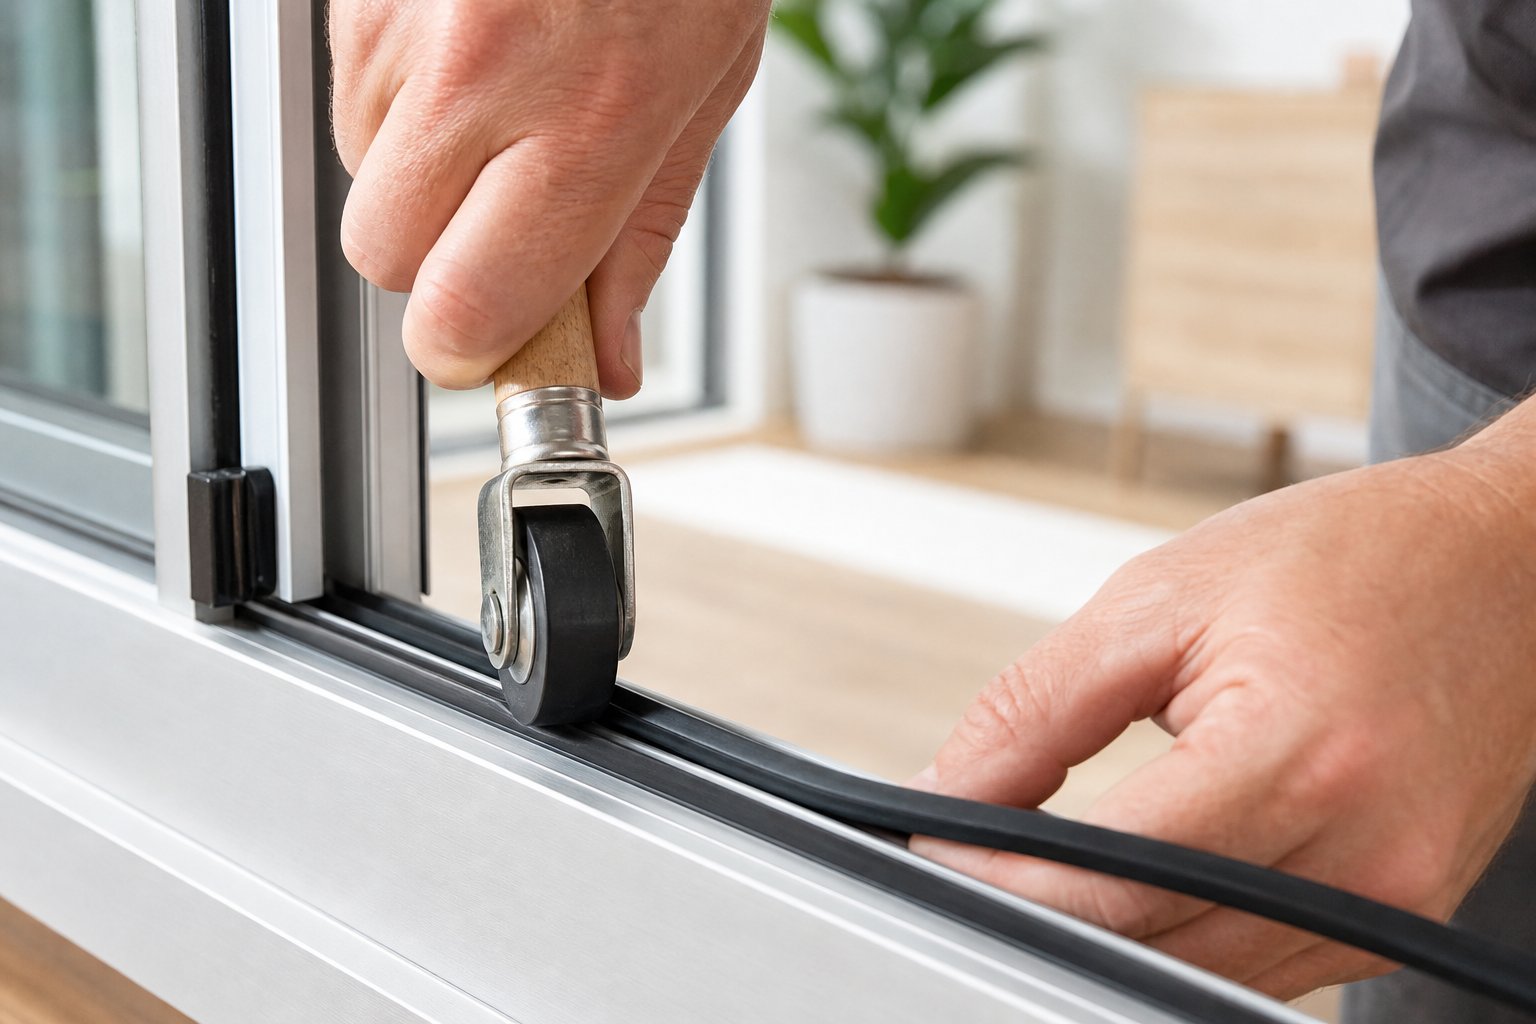
Start at one corner of the frame and work continuously in one direction. Pressing the gasket foot into the channel with your thumb gets the first few centimetres seated, but hand pressure alone will not drive the anchor fully home over longer runs. A blunt rubber roller tool (sometimes called a spline roller or glazing roller) applies consistent downward force without cutting or deforming the gasket head. Roll slowly and firmly along the channel, keeping slight forward tension on the uninstalled section so it feeds naturally into the groove without slack.
Key principles to follow:
- Never stretch the gasket as you work. Rubber that is installed under tension will contract once it relaxes, pulling away from corners and creating gaps. Let it sit at its natural length.
- Navigate corners by pushing excess material into the bend rather than cutting. A continuous gasket around a corner seals far better than a butt joint. If the profile is too rigid to bend 90 degrees, use a factory-moulded corner piece bonded to each straight run.
- Where the two ends meet, cut them flush with a sharp blade and butt them together squarely. Apply a thin line of compatible rubber adhesive between the faces before pressing them together to prevent water wicking through the joint.
For adhesive-backed strip seals (E-type and some retrofit weatherstrips), surface preparation determines whether the gasket stays put. Clean the aluminium channel or contact surface with isopropyl alcohol and a lint-free cloth to remove oils, dust, and old adhesive residue. Allow the surface to dry completely. Apply the strip when ambient temperature is above 10°C; adhesive bonds poorly on cold aluminium because the backing requires warmth to develop full tack. Press firmly along the entire length after positioning, paying extra attention to ends and curves where peeling tends to start.
Compression seals fitted around casement and awning sashes need uniform pressure to function correctly. Over-compressing the gasket by fitting a profile that is too large for the available gap creates excessive closing resistance and accelerates compression set. Under-compressing it leaves draughts. The target is roughly 20 to 30 percent compression of the seal head relative to the uncompressed height. Close the window and check that the latch engages firmly but not forcefully; if you need to slam it or lean on it, the gasket is likely oversized.
Annual Seal Maintenance Routine
Knowing how to make window seals last longer comes down to a handful of simple practices repeated once or twice a year. Rubber degrades faster when dirt, salt, or stagnant moisture sit against it for extended periods, so maintenance is really about keeping the gasket environment clean.
A practical annual routine looks like this:
- Visual inspection – Open each window and run your eye along the full perimeter seal. Look for the five failure signs covered earlier: compression set, hardening, cracking, shrinkage at corners, and sections lifting from the channel. Catching problems early limits damage to a localised repair rather than a full replacement.
- Clean the gaskets – Wipe seals with a soft cloth dampened in mild soapy water (a few drops of dish detergent in warm water). This removes grit, mould, pollen, and salt residue that abrade and chemically attack the rubber surface over time. Avoid petroleum-based solvents or harsh household cleaners, which strip plasticisers from EPDM and accelerate hardening.
- Apply a silicone-based conditioner – Once the seals are clean and dry, apply a thin coat of silicone-based rubber conditioner (available at automotive or hardware stores). This replenishes surface flexibility, provides a UV-resistant barrier, and reduces the friction that causes gaskets to drag or roll during window operation. A light wipe every 12 months is enough; over-application attracts dust.
- Clear drainage channels – Check the weep holes and drainage slots at the bottom rail of each window. Leaves, insect debris, and dried dirt block these paths regularly, causing water to pool against the lower seal instead of exiting the frame. A thin brush or compressed air clears obstructions quickly. Stagnant water sitting against rubber accelerates degradation, particularly for TPE gaskets with lower moisture resistance.
Coastal properties in regions like the NSW North Coast, Queensland’s Gold Coast, or Western Australia’s Perth corridor benefit from cleaning seals every six months rather than annually. Salt deposits are hygroscopic, drawing moisture onto the rubber surface and promoting premature cracking if left unchecked.
Choosing Quality Aluminium Windows with Reliable Seal Systems
Maintenance extends seal life, but longevity truly starts with how well the aluminium frame itself is engineered. A precision-milled gasket channel holds a seal more securely than a rough or undersized groove. Tight manufacturing tolerances mean uniform compression across the entire perimeter rather than loose spots that invite air leakage. And frames designed with multiple seal lines and properly positioned drainage paths reduce the mechanical and environmental load on each individual gasket.
For homeowners, builders, and architects specifying new aluminium window systems, it pays to evaluate the seal engineering alongside glass performance and hardware quality. MEICHEN’s aluminium windows offer a useful reference point here, with precision-fit seal channels across their range of casement, sliding, and fixed window types designed for Australian residential and commercial applications. Their systems accommodate standard EPDM gasket profiles in properly dimensioned channels, reducing the likelihood of premature seal failure that comes with loose-fitting or non-standard grooves.
Investing in well-engineered aluminium profiles from the outset translates directly into lower long-term maintenance. Frames with correctly sized channels, integrated drainage, and hardware calibrated for consistent compression keep gaskets performing within their design parameters for longer. That means fewer replacements, fewer troubleshooting headaches, and more years of quiet, draught-free operation before the seals need attention again.
Your Next Steps for Draught-Free Aluminium Windows
Every seal problem has a logical path to resolution. Whether you are dealing with a persistent draught, a corner leak, or condensation between panes, the process follows the same sequence from symptom to fix. Here is your aluminium window seal replacement step by step action path.
Your Seal Replacement Action Path
- Identify the symptom – Pinpoint the household problem: draught, water ingress, noise, condensation, or difficulty operating the window.
- Inspect the seal – Use the paper test or incense stick method to locate the breach. Open the window and visually examine the gasket along the full perimeter.
- Determine the failure mode – Is it compression set, hardening, cracking, shrinkage, or adhesion failure? This tells you whether a spot repair will hold or a full replacement is needed.
- Measure and identify the profile – Take channel slot width, seal height, and compressed width measurements with digital callipers. Cut a cross-section sample from a discreet corner and match it against supplier profile charts.
- Select the correct material for your climate – Choose EPDM for general Australian conditions, silicone for extreme inland heat, or TPE only for mild temperate zones with low UV exposure.
- Install or seek professional help – Fit the new gasket using the correct technique for its type (push-in roller method, adhesive-backed application, or compression fitting), or engage a professional if the job involves complex multi-point systems or upper-storey access.
When to DIY vs Call a Professional
Most aluminium window seal replacements are achievable as a DIY project when you have confirmed the correct profile match and your windows are accessible at ground level. Standard casement, awning, and sliding windows with single-gasket systems are straightforward for any handy homeowner with a roller tool and a sharp blade.
Call a professional when the situation involves tilt-and-turn systems with multi-point compression gaskets and corner-transfer pieces, windows on upper storeys requiring ladder or scaffold access, or cases where the aluminium frame itself shows corrosion or deformation that affects channel integrity. Also consider professional help if you have already attempted a DIY replacement that failed; repeat failures typically indicate a profile mismatch or hardware issue that benefits from experienced diagnosis. Professional window seal replacement vs DIY is not about skill alone but about matching the complexity of the job to the right level of intervention.
Building Long-Term Window Performance
Seal performance is only as good as the window system it sits within. A gasket can be the perfect profile, the ideal material, and flawlessly installed, yet still underperform if the aluminium frame has imprecise channels, inconsistent tolerances, or hardware that cannot maintain even compression over time. Well-designed frames with precision-milled grooves hold seals more securely and distribute clamping force evenly, which is why the quality of the window itself matters as much as the gasket you press into it.
If your seal problems keep recurring despite correct replacements, or if multiple windows across the home are failing simultaneously, the underlying window system may have reached a point where ongoing gasket replacement is no longer the most practical path. When to replace aluminium windows instead of seals becomes a real consideration once frames are 25-plus years old, showing channel wear, or lacking the thermal break technology that modern systems provide.
For readers ready to explore new aluminium window systems with integrated seal solutions suited to Australian conditions, MEICHEN’s aluminium windows provide a range of casement, sliding, and fixed configurations with precision-engineered gasket channels, custom sizing options, and performance specifications designed for local climate demands. It is the logical next step when maintaining ageing seals no longer delivers the comfort, efficiency, and reliability your home deserves.
Frequently Asked Questions About Aluminium Window Rubber Seals
1. How do I know if my aluminium window rubber seals need replacing?
Check for five key failure signs: permanent flattening where the gasket no longer rebounds when the window opens, hardening that makes the rubber feel brittle to the touch, fine surface cracks from UV damage, shrinkage pulling away from corners, or sections detaching from the channel entirely. A quick test involves closing the window on a sheet of paper. If the paper slides out with no resistance, the seal has lost compression at that point. Multiple failure signs appearing together on seals older than 15 years typically indicate full replacement is more cost-effective than spot repairs.
2. What is the best rubber seal material for Australian climate conditions?
EPDM (ethylene propylene diene monomer) is the best all-round choice for most Australian climate zones. It offers excellent UV resistance, handles temperatures from -40°C to 120°C, resists compression set, and lasts 15 to 25 years. For extreme inland heat zones where aluminium frame surfaces reach very high temperatures, silicone seals provide superior performance with a range up to 230°C and a lifespan of 20 to 30 years, though at higher cost. TPE gaskets suit only mild temperate zones like coastal Victoria or Tasmania, as they degrade faster under intense UV and heat, lasting just 8 to 15 years in harsher conditions.
3. How do I measure aluminium window seals for replacement?
You need three measurements taken with digital callipers: the channel slot width (the opening of the aluminium groove the gasket foot sits in), the seal height (how deep the anchor extends into the channel), and the compressed seal width (the dimension of the sealing head when the window is latched shut). Take each measurement at three points along the frame. For the most reliable match, also cut a 20-30 mm cross-section sample from a discreet corner and compare it against supplier profile charts. Seal compatibility depends on the specific aluminium profile series, not just the window brand name.
4. Can I replace aluminium window rubber seals myself or do I need a professional?
Most single-gasket systems on accessible ground-floor casement, awning, and sliding windows are manageable as DIY projects with a spline roller tool, sharp blade, and correctly matched gasket. The key requirement is confirming the exact profile match before installation. Call a professional for tilt-and-turn windows with multi-point compression gaskets and corner-transfer pieces, upper-storey windows requiring ladder access, frames showing corrosion or channel damage, or situations where a previous DIY attempt has already failed, which usually indicates a profile mismatch or hardware issue needing experienced diagnosis.
5. Why is my aluminium window still draughty after replacing the seal?
Two common causes explain persistent draughts after seal replacement. First, the new gasket may have a smaller cross-section than required, leaving it under-compressed in the gap between sash and frame. Verify the gap with the window latched and ensure the seal provides 20 to 30 percent over-compression relative to that gap. Second, the window hardware may no longer generate sufficient clamping force. Multi-point locks and espagnolette handles wear over time, reducing pressure on the seal. Adjusting striker plates or lock keeps by even 1 mm can restore full compression without needing another gasket change.
More Window & Door Guides