What Is Aluminium Window Sealant and Why Does It Matter
Aluminium window sealant is a flexible, weather-resistant compound applied to joints and junctions around aluminium window frames to prevent water ingress, air leakage, and thermal bridging. Unlike generic caulking products, a proper aluminium silicone sealant or compatible hybrid polymer is chemically formulated to bond with aluminium’s unique surface chemistry without triggering corrosion or losing adhesion over time.
Most search results for this topic dump you on product-listing pages with zero context about why one tube works and another destroys your frames within two years. This guide fills that gap. Whether you are a homeowner resealing a kitchen window or a glazier specifying for a commercial facade, the substrate itself dictates your sealant choice more than any brand name on the cartridge.
What Makes Aluminium Different From Other Window Substrates
Aluminium forms a microscopically thin oxide layer the moment it contacts air. That oxide film is chemically stable, which sounds helpful until you realise most adhesives struggle to grip it reliably without proper preparation. The surface is also non-porous, so sealants cannot mechanically key into it the way they do with timber or masonry.
Then there is galvanic corrosion. When incompatible materials sit against aluminium in the presence of moisture, an electrochemical reaction accelerates deterioration of the aluminium, manifesting as white powdery deposits, pitting, and eventual structural compromise. Certain sealant fillers or metallic pigments can initiate this process if they contain copper or carbon-based compounds in direct contact with the frame.
Why Sealant Choice Matters More on Aluminium Frames
Aluminium’s thermal expansion coefficient is roughly twice that of PVC and several times greater than timber. A three-metre aluminium frame can move over 3 mm across seasonal temperature swings, meaning any rigid or low-movement sealant will crack, peel, or detach entirely.
This movement demand changes the game. Applying silicone on aluminum frames is not simply a case of grabbing the cheapest tube at the hardware store. The sealant must stretch and compress repeatedly across decades of Australian summers and cool winters without losing cohesion or adhesion. Get the chemistry wrong and you pay twice: once for the failed product, and again for the labour-intensive removal and reapplication that follows.
Sealant compatibility, surface preparation, and joint design all interact on aluminium in ways that forgive nothing. The sections ahead break each factor down so you can make a confident, informed decision before you cut the nozzle.
Types of Sealants Compatible With Aluminium Windows
Not every tube labelled “silicone” is safe for aluminium. The curing chemistry inside the cartridge determines whether your sealant protects the frame or quietly eats into it. Four main chemistries work reliably as a silicone for aluminum window frames, and one common type should never come anywhere near them.
The product you must avoid is acetoxy-cure (acid-cure) silicone. You will recognise it by the sharp vinegar smell when dispensed. During curing, acetoxy silicone releases acetic acid that corrodes aluminium, causing white powdery oxidation, adhesion breakdown, and brown or black discolouration — sometimes within six to twelve months. It remains the single most common sealant failure on aluminium frames in Australia, and it is entirely preventable.
Neutral-Cure Silicone for Aluminium Frames
Neutral-cure silicone releases alcohol (typically methanol or ethanol) rather than acid as it crosslinks. This makes it completely safe against aluminium, anodised finishes, and powder-coated surfaces. It delivers outstanding UV resistance, a service temperature range from roughly -40°C to +150°C, and movement accommodation of ±25% to ±50% depending on the grade. For exterior aluminium window perimeters exposed to harsh Australian sun and coastal salt air, a weatherproofing-rated neutral-cure product is hard to beat.
The trade-off? Neutral-cure silicone cannot be painted. If your design requires an overcoat, look at the alternatives below.
Alkoxy and Hybrid Sealant Alternatives
An alkoxy silicone sealant is a subset of neutral-cure chemistry that releases a small amount of alcohol during cure but offers superior adhesion to metals, glass, and plastics with very low odour. It bonds well to coated aluminium and is often specified for mirror-backing and sensitive substrates where even mild fumes pose a risk.
Hybrid MS polymers (modified-silicone or silyl-terminated polyether) combine silicone-like flexibility with polyurethane-like paintability. They accommodate ±25% joint movement, adhere without primers on most surfaces, and accept paint once cured — a real advantage when colour matching is non-negotiable. They do not quite match pure silicone’s UV longevity in extreme exposure, but for protected or semi-exposed joints they perform admirably.
Polyurethane sealants round out the options. They offer strong adhesion, good movement capability, and full paintability. However, they are less UV-stable than silicone and generally require primer on bare aluminium. They suit concealed or sheltered joints better than fully exposed perimeters.
Colour-Matched Sealants for a Clean Finish
Aluminium frames come in dozens of powder-coat colours, and a mismatched sealant bead ruins an otherwise sharp installation. Many neutral-cure silicones are available in aluminium grey — sometimes called aluminum colored caulk — along with white, black, translucent, and custom-tinted options from professional-grade suppliers. MS polymers take this further: because they accept paint, you can colour-match with any topcoat after the sealant cures.
| Chemistry Type | Aluminium Compatibility | Movement Accommodation | Paintability | Typical Use Case |
|---|---|---|---|---|
| Neutral-cure silicone | Excellent — no corrosion risk | ±25% to ±50% | No | Exterior frame perimeters, exposed joints, weatherproofing |
| Alkoxy silicone | Excellent — low-odour, metal-safe | ±20% to ±25% | No | Mirrors, coated glass, sensitive interior substrates |
| MS polymer (hybrid) | Very good — non-corrosive | ±25% | Yes | Paintable joints, semi-exposed perimeters, mixed substrates |
| Polyurethane | Good — primer often required | ±25% to ±35% | Yes | Concealed or sheltered joints, interior fit-outs |
Choosing between these chemistries is rarely about one being universally “best.” It depends on whether the joint is exposed or concealed, whether you need to paint over it, and how much thermal movement it must absorb. Those variables lead directly into the preparation steps that make or break adhesion on aluminium’s notoriously slick oxide layer.
Surface Preparation That Ensures Proper Adhesion
Even the right sealant chemistry fails on a poorly prepared surface. Aluminium’s slick oxide layer and non-porous profile mean there is no mechanical “tooth” for the product to grip, so adhesion depends entirely on chemical bonding between the sealant and the substrate. Contamination, moisture, or residual fabrication oils block that bond at the molecular level. For anyone caulking aluminum window frames, preparation is not an optional extra — it is the difference between a 20-year seal and a two-year callback.
Degreasing and Cleaning Aluminium Surfaces
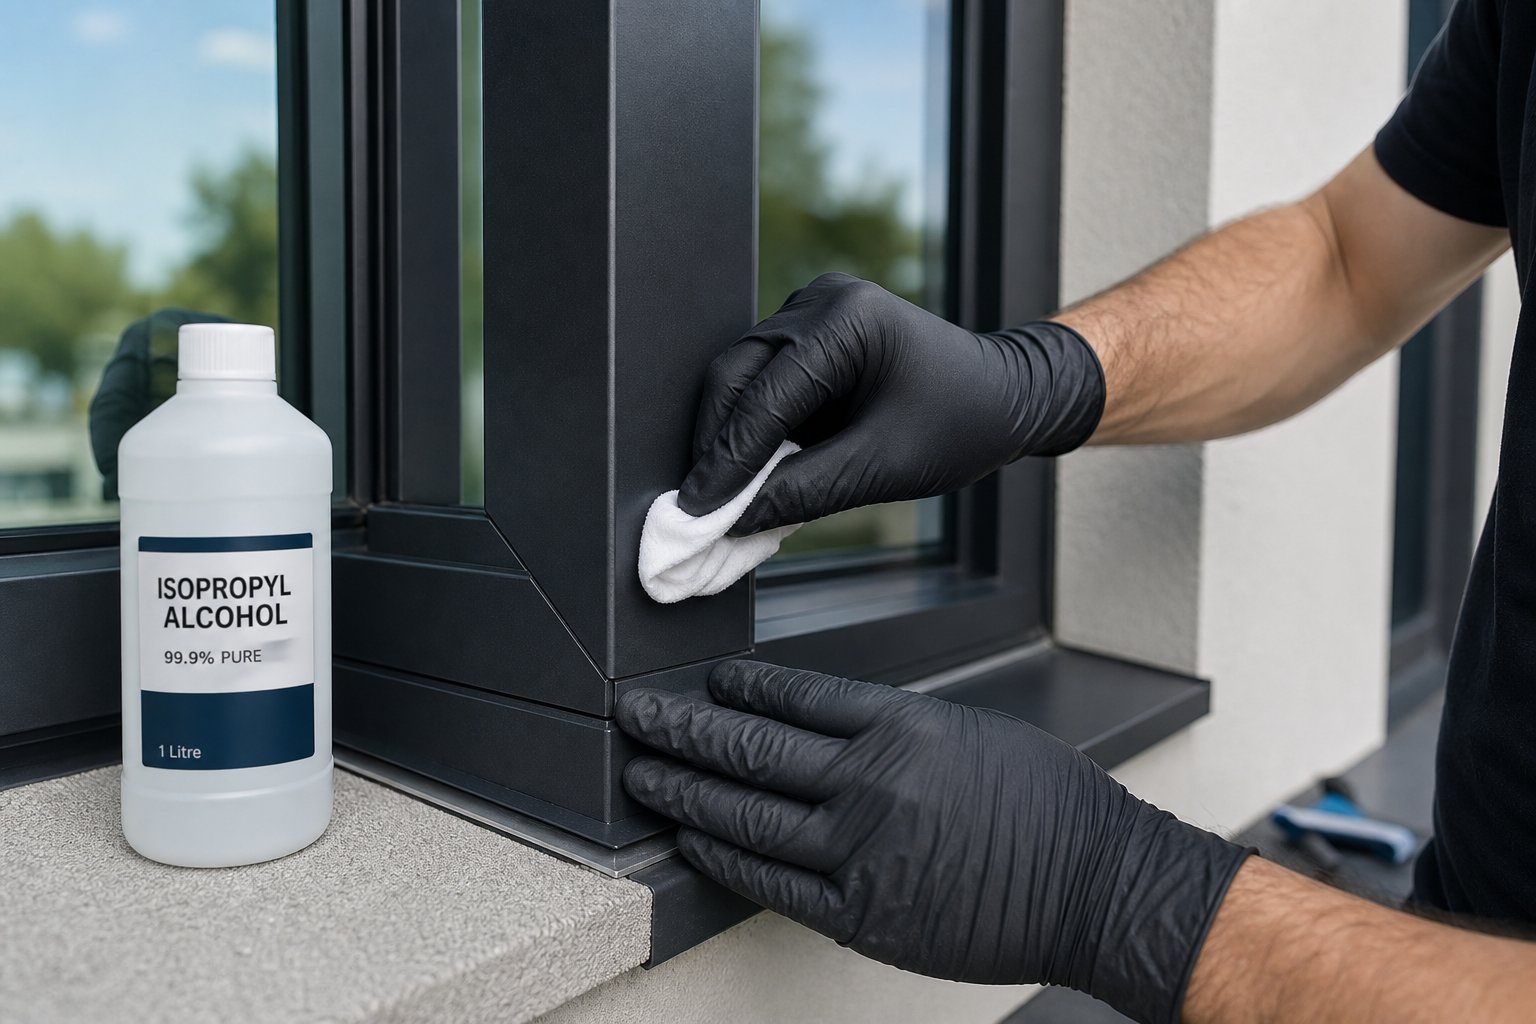
Aluminium window frames arrive from the factory coated in cutting oils, release agents, and handling residues invisible to the naked eye. Isopropyl alcohol (IPA) is the industry-standard solvent for degreasing metal and glass in glazing applications. Use the two-rag method: saturate a clean, white, lint-free cloth with IPA, vigorously wipe the joint faces to loosen contaminants, then immediately follow with a second dry cloth before the solvent evaporates. Letting IPA air-dry simply redeposits the oils you just lifted.
A few practical rules keep things reliable. Never dip your cleaning cloth back into the solvent container — pour fresh solvent onto a clean section each time to avoid contamination. Clean only as much area as you can seal within one hour; exposed cleaned surfaces attract dust and airborne oils quickly, especially on building sites. For deep or narrow joints, wrap the cloth around a clean putty knife to apply pressure against both substrate faces.
Primer Requirements for Aluminium Substrates
Not every aluminium joint needs a primer, but many do. Primer creates a chemical bridge between the oxide layer and the sealant, dramatically improving long-term adhesion. Whether you need one depends on the sealant manufacturer’s adhesion test results for your specific substrate — raw aluminium, anodised, or powder-coated surfaces each behave differently.
When primer is specified, apply a thin film with a lint-free cloth (never a brush) and allow it to dry for at least 15 minutes before applying sealant. Excessive primer leaves a white powdery residue that actually impairs adhesion, so a lighter coat is better than a heavy one. Primers are not a substitute for cleaning; they bond to the prepared substrate, not to dirt sitting on top of it.
Using Backing Rods and Bond Breakers
Joint geometry matters just as much as surface cleanliness. A sealant bead that bonds to both sides of the joint and the back surface is locked in three-sided adhesion — and it will fail the moment the aluminium frame expands or contracts. The sealant cannot stretch freely when it is anchored on three planes, so it tears internally or peels off the substrate under thermal movement.
A backing rod (a compressible foam cylinder) inserted into the joint solves this. It controls sealant depth to achieve the correct width-to-depth ratio and prevents the sealant from adhering to the back of the joint, ensuring a two-sided bond. Size the rod approximately 25% wider than the joint so it compresses and holds itself in place. For joints too shallow to accept a rod, bond breaker tape — a thin polyethylene strip — serves the same purpose across the joint’s rear face.
The result is a sealant bead that grips only the two opposing frame or wall surfaces and stretches freely between them as the joint opens and closes.
- Remove loose debris and dust from the joint with a dry brush or compressed air.
- Degrease both joint faces using IPA and the two-rag method; allow no air-drying.
- Inspect for remaining contamination — fingerprints, silicone residue from previous sealant, or powdery oxidation — and repeat cleaning if needed.
- Apply primer (if specified by the sealant manufacturer) as a thin, even film; wait a minimum of 15 minutes for it to dry.
- Insert a correctly sized backing rod to the required depth, or apply bond breaker tape to the back of the joint.
- Apply masking tape to both sides of the joint for a clean sight line, then proceed immediately to sealant application.
Following this sequence protects against the most common adhesion failures when applying caulk for aluminum window perimeters. Skipping or rushing any single step — particularly the solvent wipe — undermines every product layer that follows. With a clean, primed, and properly backed joint, the sealant has the geometry and surface chemistry it needs to perform for decades rather than months.
Step-by-Step Application for Lasting Results
A clean, primed joint with proper backing rod geometry gives you the foundation. But aluminium caulking technique determines whether that foundation actually delivers a watertight, durable seal or just looks acceptable on day one. The application stage is where DIY homeowners and professional glaziers diverge most sharply — not in tools, but in precision, speed, and understanding of the sealant’s working time.
Gather everything within arm’s reach before you cut the nozzle. Silicone and hybrid sealants do not pause their skinning process while you hunt for a missing tool.
- Caulking gun — a high-thrust-ratio model (18:1 or higher) for thicker aluminium silicone caulk; a 10:1 ratio suffices for lighter hybrid polymers
- Spare cartridge — running out mid-bead creates a cold joint that leaks
- Sharp utility knife or nozzle cutter
- Painter’s tape (already placed during prep)
- Tooling spatula or profiling tool — purpose-made concave profiles give a neater finish than a finger
- Soapy water solution or manufacturer-recommended tooling aid
- Lint-free rags and isopropyl alcohol for immediate cleanup
- Nitrile gloves and safety glasses
Proper Bead Application Technique
Start by cutting the nozzle. The opening diameter should match or be slightly narrower than the joint width — a 6 mm joint gets a nozzle cut to roughly 5–6 mm. Cut at a 45-degree angle so the angled face can ride along the joint while directing sealant into the gap rather than across the surface. Cutting too wide wastes product and makes tooling harder; cutting too narrow forces you to over-squeeze and creates an inconsistent bead.
Puncture the internal foil seal with a stiff wire or the built-in puncture tool on your gun. Apply a few gentle trigger squeezes until sealant appears at the nozzle tip, confirming flow is ready.
Hold the gun at approximately 45 degrees to the joint face. For a frame-to-wall joint, angle the nozzle so that it pushes sealant into the gap as you draw the gun along — not merely lays a bead on the surface. This “pushing” action wets both substrate faces simultaneously and eliminates voids at the back of the joint.
Move at a steady, consistent pace. The most common homeowner mistake is going too slowly, which over-fills the joint and wastes material, or too quickly, which leaves thin spots and air pockets. A consistent trigger squeeze paired with a smooth arm movement produces a uniform bead. Do not stop mid-joint. If you must pause — at a corner or to swap cartridges — overlap the restart point by 10–15 mm and tool the overlap flat to prevent a raised lump.
For simple frame-to-wall perimeter joints, this single-pass technique works well. For professional structural glazing applications where the sealant functions as a bonding agent (not just a weather seal), the process tightens considerably. Structural aluminium caulk beads are typically specified at precise width-to-depth ratios, applied under controlled conditions, and require documented adhesion testing per project specifications. The margin for error in structural work is effectively zero.
Tooling for a Professional Finish
Tooling serves two purposes. First, it forces the sealant into intimate contact with both joint faces, maximising the adhesion footprint. Second, it shapes the bead into a concave profile that handles thermal movement more gracefully — a concave cross-section stretches more evenly than a flat or convex one.
Timing is critical. Most neutral-cure silicone sealants begin to skin over within 5 to 10 minutes of application, depending on temperature and humidity. MS polymers typically offer a slightly longer open time of 10 to 20 minutes. Once that skin forms, tooling tears the surface and leaves a rough, ugly finish that also compromises the cure. Work in manageable sections — apply 1.5 to 2 metres of bead, then tool immediately before moving to the next section.
Dip your tooling spatula in a soap-and-water solution or manufacturer-recommended release agent before each pass. This prevents the tool from dragging sealant out of the joint. Draw the spatula along in a single fluid stroke with light, even pressure. Resist the temptation to go back and rework — overworking the bead pulls material from the joint edges and weakens adhesion at the critical bonding surfaces.
Remove painter’s tape while the sealant is still wet, immediately after tooling each section. Peel the tape away at a 45-degree angle, pulling it back on itself so the sealant edge separates cleanly. Waiting until the product skins over means the tape tears the cured surface, leaving ragged lines that no amount of touching up can fix.
Curing Times and Conditions
Silicone sealants cure through moisture absorption from the air, not through solvent evaporation. This means humidity is the primary driver of cure speed — not temperature alone, though temperature influences the reaction rate.
| Condition | Relative Humidity | Approximate Skin Time | Full Cure (3 mm depth) |
|---|---|---|---|
| Low humidity (dry inland) | 20–40% | 15–20 minutes | 5–7 days |
| Moderate humidity | 40–60% | 8–12 minutes | 2–4 days |
| High humidity (coastal) | 60–90% | 5–8 minutes | 24–48 hours |
Full cure depth matters more than surface skin time. Silicone cures from the exposed surface inward at roughly 2–3 mm per 24 hours under moderate conditions. A deep bead in a wide joint takes considerably longer to crosslink all the way through than a thin perimeter seal. Until full cure is reached, the sealant remains vulnerable to physical disturbance, water immersion, and joint movement that can tear the partially crosslinked interior.
For DIY homeowners sealing a standard frame-to-wall joint (typically 6–10 mm wide, 6 mm deep), expect 24 to 72 hours for a reliable full cure in most Australian climates. Avoid running sprinklers, hosing down the facade, or closing windows tightly against the fresh bead during this window. Light rain after the skin has formed generally does not damage neutral-cure silicone, but heavy rain within the first few hours can wash uncured material from the joint.
MS polymers behave slightly differently — they also cure via atmospheric moisture but tend to build strength faster in the first 24 hours. Full mechanical properties still develop over several days.
Professional tradespeople on commercial projects often schedule aluminium silicone caulk application for mid-morning on moderate days: surfaces have dried from overnight condensation, humidity is adequate to initiate cure, and there is enough daylight left for the skin to form before evening dew settles. This simple scheduling choice avoids the most common field failures caused by applying sealant on surfaces that are still damp or during late-afternoon shifts where dew arrives before the skin has set.
Even with perfect application, the sealant’s long-term performance depends on the environment it faces year after year. Coastal salt air, extreme UV, and wild temperature swings each challenge aluminium window seals in distinct ways — and not every product handles every climate equally well.

Weather and Climate Conditions That Affect Performance
A sealant applied at the wrong temperature or in the wrong conditions can fail before it ever gets a chance to prove itself. Australia’s climate zones span tropical humidity in Far North Queensland to alpine cold in the Snowy Mountains, with coastal salt exposure along nearly the entire perimeter. Each environment stresses aluminium window sealant differently — and the conditions present during application matter just as much as the conditions the cured bead faces over its service life.
Two temperature concepts govern sealant performance: application temperature and service temperature. Application temperature is the range at which you can successfully gun, tool, and cure the product. Service temperature is the range the cured sealant can endure year after year without degrading. Confusing the two — or ignoring either — leads to premature failure regardless of how carefully you prepped the joint.
Optimal Temperature and Humidity for Application
Most neutral-cure silicone sealants specify an application temperature between 5°C and 40°C. Below 5°C, the product becomes stiff in the cartridge, difficult to gun smoothly, and slow to initiate cure. The substrate may also carry invisible condensation or frost at low temperatures, blocking adhesion at the molecular level. Above 40°C — common on dark-coloured aluminium frames baking in direct summer sun — the sealant skins over almost instantly, leaving no working time to tool a clean bead.
Humidity plays an equally critical role. Silicone crosslinks by absorbing atmospheric moisture, so very low humidity slows curing dramatically while excessive moisture on the substrate prevents initial adhesion. The practical sweet spot for application in Australian conditions sits between 40% and 70% relative humidity, with substrate temperatures between 10°C and 35°C.
Can you apply sealant in the rain? In short: no. Water on the joint faces creates a barrier film that blocks chemical bonding to the aluminium. Even if the sealant appears to stick initially, long-term adhesion is compromised. Light drizzle after the bead has skinned over is generally tolerable for neutral-cure silicone, but applying into a wet joint is never acceptable. The same applies to early morning dew — wait until joint surfaces have dried naturally or wipe them down with a clean cloth before proceeding.
For cold-climate applications (alpine regions or winter work in Melbourne, Canberra, or Hobart), store cartridges in a heated vehicle or site shed to maintain product workability. A sealant stored at 15°C to 20°C guns far more consistently than one pulled from a freezing ute tray at dawn. Warming the cartridge does not compromise shelf life; it simply restores viscosity to its intended range.
Climate Considerations for Coastal and High-UV Areas
Australia’s relentless UV index punishes organic-based sealants. Polyurethane and some acrylic products chalk, crack, and lose elasticity within a few years under direct sun exposure. Silicone’s molecular structure — built around a silicon-oxygen backbone rather than carbon chains — resists UV-driven degradation far more effectively. A landmark 40-year weathering study conducted in a high-UV, high-humidity, salt-air environment demonstrated that silicone sealants maintained adhesion, flexibility, and surface integrity over four decades, while polyurethane and acrylic alternatives exhibited cracking, hardening, and adhesion loss within 10 to 15 years.
Coastal properties face a double threat. Salt-laden air accelerates corrosion on any exposed aluminium, and if the sealant has already cracked or peeled, moisture and salt penetrate the joint — attacking both the frame and the substrate behind it. Choosing a UV-stable, neutral-cure silicone siding caulk rated for external exposure is non-negotiable in these areas. MS polymers can work for semi-exposed joints, but fully exposed perimeters on beachfront homes demand silicone’s superior weathering resistance.
Temperature cycling creates its own challenge. In inland areas of NSW, Queensland, and WA, daily temperature swings of 15°C or more (and seasonal swings well beyond that) subject joints to relentless expansion and contraction. A sealant with service temperature ratings from -40°C through +150°C, and movement accommodation of ±25% or greater, handles these cycles without fatigue cracking. Cheaper products with lower flexibility ratings simply cannot keep pace with aluminium’s thermal coefficient over thousands of cycles.
| Climate Type | Recommended Sealant Properties | Expected Lifespan Impact | Special Precautions |
|---|---|---|---|
| Coastal (Sydney, Gold Coast, Perth coast) | Neutral-cure silicone; UV-stable; salt-air resistant; non-corrosive to aluminium | Silicone: 20+ years. PU/acrylic: 5–10 years before visible degradation | Annual inspection for adhesion loss at joint edges; ensure no acid-cure product used; check for galvanic corrosion at fixings |
| High-UV inland (Alice Springs, outback QLD, WA interior) | Silicone with proven UV stability; high service temperature (up to +150°C); high movement accommodation (±25% minimum) | Quality silicone: 15–25 years. MS polymer: 10–15 years in fully exposed positions | Avoid application on surfaces above 40°C; schedule work for early morning; use gray exterior caulk to minimise heat absorption at the bead |
| Temperate (Melbourne, Adelaide, Hobart, ACT) | Neutral-cure silicone or MS polymer; moderate movement accommodation; paintable options viable for sheltered joints | Silicone and MS polymer: 15–25 years with proper preparation | Avoid winter application below 5°C; allow for condensation on morning surfaces; store cartridges in heated space |
| Tropical (Cairns, Darwin, Townsville) | Neutral-cure silicone; mould-resistant formulation; high humidity cure tolerance; cyclone-zone compliance where required | Silicone: 15–20 years. PU: 5–8 years due to hydrolysis risk | Verify product cures reliably above 80% RH; inspect for mould growth on sealant surface annually; confirm compliance with NCC cyclone requirements |
| Alpine / cold climate (Snowy Mountains, Tasmanian highlands) | Silicone with low-temperature flexibility to -40°C; high movement accommodation for freeze-thaw cycling | Quality silicone: 15–20 years. Rigid sealants: 3–5 years before cracking | Store cartridges above 15°C before use; apply only when substrate is dry and above 5°C; allow extended cure time due to low humidity |
The pattern is clear: silicone dominates in exposed, harsh environments because its chemistry resists exactly the forces — UV, heat, moisture, and salt — that destroy carbon-chain alternatives. MS polymers hold up well in moderate or sheltered conditions. Polyurethane works where it is painted or shielded from direct sun. But every chemistry fails prematurely if applied outside its stated temperature window or onto a wet substrate.
Understanding your local climate does more than help you pick the right cartridge. It also tells you when not to apply — and the difference between those two insights is often what separates a single job from a costly repair cycle. Still, even perfect product selection and timing cannot save a joint if the applicator makes one of the structural mistakes that plague aluminium frame installations across Australia.
Common Mistakes That Cause Sealant Failure on Aluminium
Some failures happen slowly — a hairline crack that widens over two winters, a bead edge that lifts so gradually you do not notice until water stains appear on the plasterboard. Others happen fast: a white corrosive bloom erupting beneath fresh sealant within months. Either way, the root causes are predictable and preventable. These are the errors that generate the most warranty callbacks on aluminium window installations across Australia, and most stem from choosing the wrong product or ignoring how aluminium behaves as a substrate.
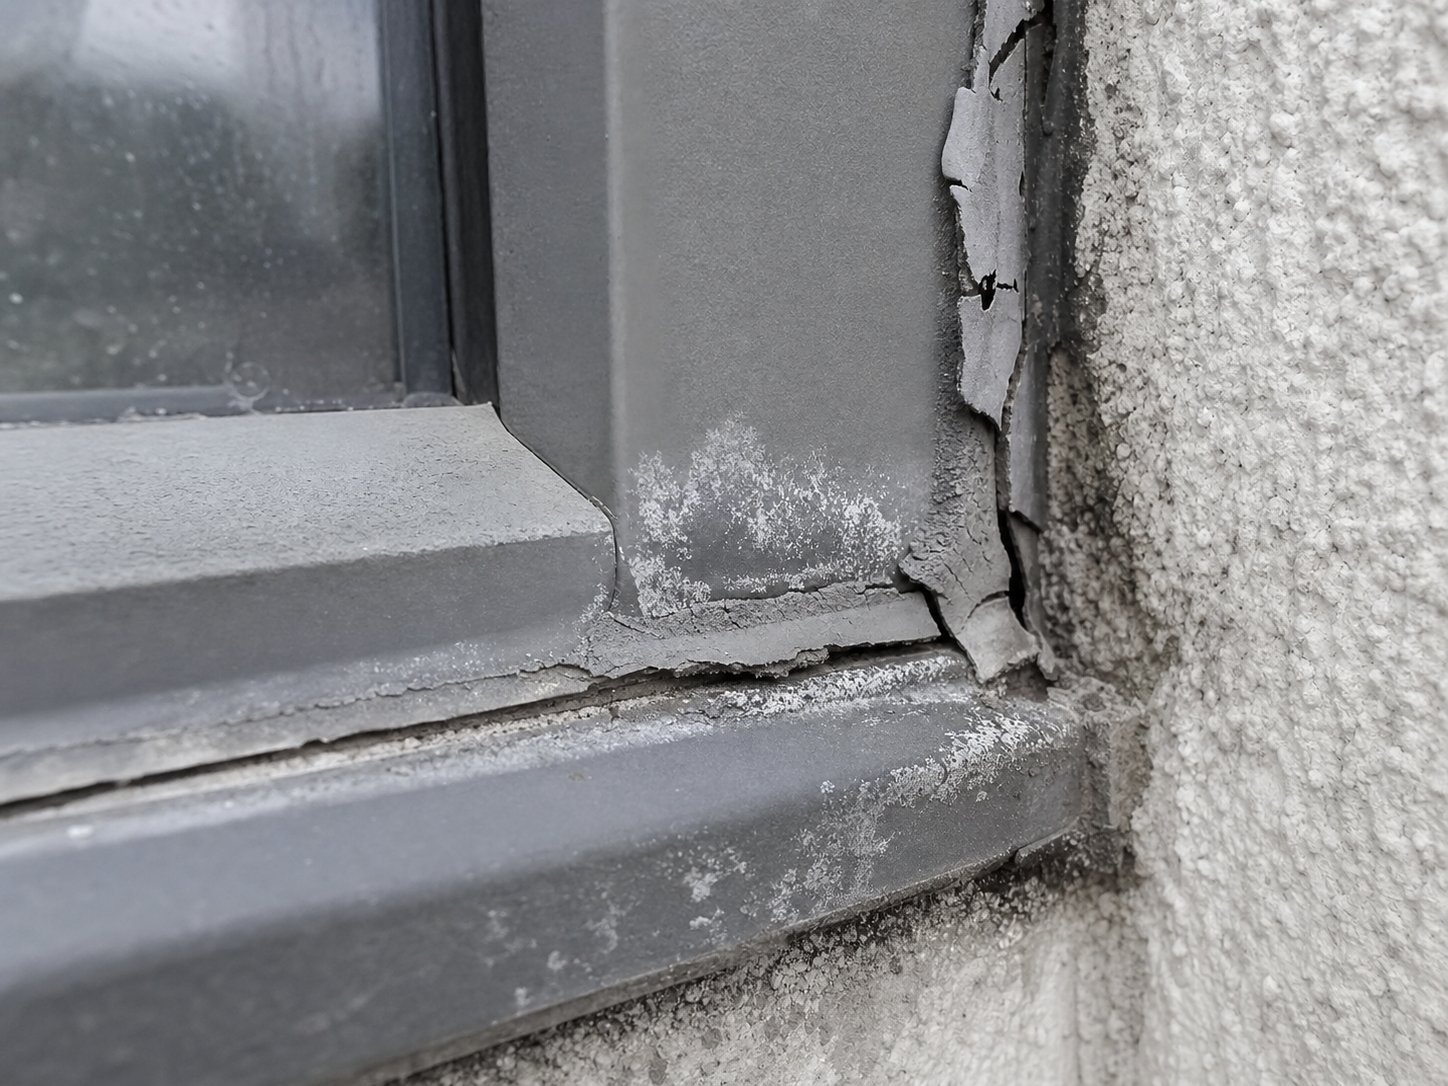
- Using acid-cure silicone on aluminium — Acetoxy (acid-cure) silicone releases acetic acid during crosslinking. On timber or ceramic tile, this is harmless. On aluminium, the acid attacks the oxide layer, creating white powdery corrosion, pitting, and adhesion breakdown. The damage is often hidden beneath the bead itself, only becoming visible once the sealant peels away entirely. Acid cure silicone aluminum contact is the single most avoidable failure in residential glazing.
- Applying over contaminated or wet surfaces — Oils from fabrication, fingerprints, dust, or residual moisture all prevent chemical bonding. Sealant may appear to adhere initially, but the contamination layer acts as a release agent. Under thermal cycling, the bead separates cleanly from the frame — sometimes as a complete ribbon you can peel off by hand.
- Ignoring thermal expansion and joint movement — Aluminium’s coefficient of thermal expansion (23 × 10⁻⁶ per °C) means a 1,500 mm frame section experiences approximately 1.7 mm of movement across a 50°C temperature swing. If the sealant cannot accommodate that stretch and compression cycle thousands of times, it tears internally or pulls from the substrate.
- Overfilling joints beyond proper depth — Packing a joint full of sealant feels thorough but creates three-sided adhesion. The bead bonds to both frame faces and the back of the joint, locking it in place. When the aluminium moves, the sealant has nowhere to flex. Stress concentrates at the edges and the bead fails — cohesively or adhesively — far earlier than a properly backed joint would.
- Galvanic corrosion from incompatible fillers or fixings — Certain sealant formulations contain metallic or carbon-based fillers that, in the presence of moisture, create an electrochemical cell against aluminium. Similarly, pressing a gray silicone sealant bead against a copper flashing or steel fixing without isolation can accelerate corrosion of the aluminium substrate at the contact zone.
- Applying sealant in unsuitable conditions — Gunning a bead onto a frame baking at 50°C in direct afternoon sun gives you seconds of working time before the skin forms. Applying in near-freezing conditions means the product barely flows and may never cure properly against the silicone wall of the joint. Both scenarios produce joints that look finished but lack structural integrity.
Sealant Incompatibility and Corrosion Risks
The acid-cure problem deserves emphasis because it is so common and so easily confused with a “good” product. Acetoxy silicone is cheap, widely stocked, and cures fast — all qualities that make it attractive to homeowners grabbing a tube for a weekend project. The vinegar smell during application is the giveaway. If you detect it, stop immediately. The acetic acid byproduct does not simply evaporate and vanish; it concentrates at the sealant-substrate interface precisely where adhesion is critical, reacting with the aluminium oxide layer and generating aluminium acetate salts that undermine the bond from within.
Galvanic corrosion adds another dimension. Aluminium sits high on the galvanic series (anodic), meaning it corrodes preferentially when paired with more cathodic metals — copper, brass, stainless steel — in the presence of an electrolyte (rainwater). A sealant bead bridging between an aluminium frame and a dissimilar metal flashing can inadvertently create that electrolyte path if the sealant absorbs moisture or cracks. Specify neutral-cure products free of metallic fillers, and ensure any metal-to-metal interfaces behind the sealant line include appropriate isolation gaskets or coatings.
Thermal Expansion Failures on Aluminium
Aluminium moves roughly twice as much as PVC and several times more than timber under the same temperature change. In practical terms, a standard residential aluminium window frame (around 1.5 m in its longest dimension) accumulates nearly 2 mm of total movement across Australian seasonal extremes. That sounds small until you consider a sealant bead only 8 mm wide — the frame is asking the sealant to stretch or compress by over 20% of the joint width.
A sealant rated at ±25% movement capability handles this comfortably. One rated at ±7.5% or ±12.5% — typical of budget acrylic or basic construction sealants — does not. The failure often manifests as a clean split running along the bead’s centreline (cohesive failure) or a peeling away from one substrate face (adhesive failure). Both modes allow water ingress, and once moisture sits behind the frame, secondary damage to wall framing, insulation, and internal linings follows quickly.
Overfilling compounds the problem. When sealant occupies the full depth of a joint and bonds to the back surface, it cannot deform freely. Instead of stretching like a rubber band between two anchor points, it is locked on three sides. Stress concentrates at the weakest plane — usually the adhesion interface — and the bead rips free. The fix is simple: always use a backing rod or bond breaker tape to limit depth and ensure two-sided adhesion only.
Building Code and Standards to Know
Australian building regulations do not specify a particular sealant brand, but they set performance requirements your choice must satisfy. Several standards interact when sealing aluminium window frames:
AS 2047 (Windows and external glazed doors in buildings) governs the performance of the complete window assembly, including weatherproofing at the frame-to-structure interface. Sealants used at this junction must not compromise the window’s tested air and water infiltration ratings. Using an incompatible or underperforming sealant effectively voids the window’s compliance status.
National Construction Code (NCC) includes requirements for fire-rated sealants where windows sit within fire-separation walls or in proximity to boundaries. If your aluminium window is installed in a fire-rated wall assembly, the perimeter sealant must carry the same fire-resistance level (FRL) as the surrounding construction. Standard silicone will not satisfy this — you need an intumescent or fire-rated sealant tested to AS 1530.4. Check your building surveyor’s requirements before sealing.
Movement accommodation factors referenced in AS 1170 (structural design actions) and various glazing guidelines inform how much joint movement your design must handle. For aluminium, specifying a sealant with at least ±25% rated movement capability covers most residential perimeter joints. Commercial curtain wall applications with larger panel spans often require ±50% products, and the calculation should follow the thermal movement formula (ΔL = α × L × ΔT) using actual surface temperatures rather than ambient air readings.
In bushfire-prone areas (BAL-rated zones), sealant selection must also consider flame spread and combustibility. Some polymer-based sealants contribute to surface flame spread in ways that may conflict with NCC bushfire construction requirements. Verify that any sealant used on external faces in BAL-29 or higher zones is non-combustible or tested to the relevant standard.
These code obligations rarely appear on product labels at the hardware store. They sit in project specifications, building surveyor conditions, and Australian Standards documents that most homeowners never see. For straightforward residential resealing work in a non-rated wall, a quality neutral-cure silicone meeting the movement and compatibility requirements discussed above will satisfy the intent of the code. For anything more complex — fire walls, cyclone regions, commercial facades — engage a specifier who can match the sealant to the regulatory context before you pick up a caulking gun.
Avoiding these mistakes keeps your aluminium window seal intact through years of thermal cycling, UV exposure, and rain. But even a perfectly applied bead has a finite service life — and knowing when your existing sealant has crossed the line from “ageing” to “failing” saves you from discovering the problem via a water-damaged wall cavity.
Signs You Need to Reseal Aluminium Windows and When to Upgrade
A sealant bead does not announce its retirement with a loud crack. Failure tends to creep — a subtle edge lift here, a faint discolouration there — until the day you notice damp patches on the window sill or a draught that was not there last winter. Catching these signs early turns a half-hour aluminium window sealant replacement into a simple maintenance task rather than a major remediation project involving plasterboard, insulation, and possibly structural framing.
Walk through the diagnostic checklist below the next time you inspect your aluminium frames. Any single item warrants attention; two or more occurring together generally means the existing sealant has reached end-of-life and full removal and replacement is the appropriate response.
Visual Signs Your Sealant Has Failed
Sealant degradation follows predictable visual patterns. Each failure mode tells a different story about what went wrong — whether the product was wrong for the substrate, the preparation was insufficient, or the material has simply exhausted its service life through years of UV exposure and thermal cycling.
- Surface cracking or alligatoring — Fine cracks across the bead surface indicate the sealant has lost flexibility. UV degradation and thermal fatigue harden the polymer chains until they can no longer stretch with the frame’s movement. Once cracking begins, water finds a path inward within one or two rain events.
- Adhesion loss (peeling from the frame or wall) — The bead pulls away cleanly from one substrate face, often leaving no residue behind. This adhesive failure points to contamination during original application, missing primer, or incompatible chemistry. On aluminium frames where acid-cure silicone was mistakenly used, you may see white corrosion deposits beneath the lifted edge.
- Cohesive splitting — A tear running through the body of the sealant rather than at the bond line. The joint has moved beyond the product’s rated capacity, or three-sided adhesion has concentrated stress internally. You will often see this on wide aluminium frames where no backing rod was installed.
- Hardening and brittleness — Press a fingernail into the sealant. A healthy bead compresses and rebounds; a failed one feels rigid and unyielding, sometimes chalky. Hardened sealant can no longer accommodate movement and will crack or detach under the next significant temperature shift.
- Discolouration or staining — Yellowing, browning, or darkening of the sealant surface can signal UV breakdown, mould colonisation, or chemical reaction with the substrate. In aluminum gray or neutral-toned beads, colour change is easy to spot against the frame’s powder coat.
- Visible gaps or daylight through the joint — The most urgent sign. If you can see light between the sealant and the frame, water is already entering the cavity during wind-driven rain. Gaps also indicate significant energy loss from air infiltration — a problem that compounds quietly on your energy bills season after season.
- Mould growth on or around the sealant — Persistent mould along the sealant line (particularly on interior beads) suggests moisture is tracking behind the seal and condensing within the wall cavity. This goes beyond cosmetic concern; it indicates the waterproofing function has failed entirely.
Expected Lifespan of Different Sealant Types
No single number applies universally — lifespan depends on the sealant chemistry, the severity of environmental exposure, the quality of original preparation, and the joint’s movement demands. That said, industry data and manufacturer specifications establish general ranges that help you plan inspections and budget for aluminium window sealant replacement before failure becomes critical.
Silicone sealants are the longest-lived option on aluminium frames, with well-installed neutral-cure products commonly delivering 20 years or more in moderate climates. Coastal and high-UV environments shorten that ceiling, but silicone still outperforms alternatives significantly. Polyurethane sealants typically offer 5 to 10 years before flexibility loss becomes problematic — shorter than silicone because their carbon-chain backbone is inherently more vulnerable to UV and hydrolysis. MS polymer hybrids sit in between, with 10 to 15 years being a reasonable expectation for semi-exposed joints where UV attack is partially shielded.
Commercial maintenance guidelines recommend a full sealant reapplication cycle every 3 to 5 years for exposed perimeter joints — sooner in coastal, UV-intense, or high-movement-cycle environments. That cadence reflects professional building management where envelope integrity is non-negotiable. For residential homeowners, the more practical approach is annual visual inspection combined with resealing individual joints as they show early signs of distress, rather than wholesale replacement on a fixed schedule.
Always check the specific product’s technical data sheet for rated service life. Manufacturers test their formulations against accelerated weathering protocols, and those published figures — while optimistic — provide a useful upper boundary. If your sealant has exceeded its stated service life, replacement is overdue regardless of how it looks from a distance.
Inspection and Maintenance Schedule
A structured inspection routine catches problems while they are still cheap to fix. A failed sealant joint that costs a few dollars in material and half an hour of labour can escalate into thousands of dollars of water damage remediation if left unaddressed for even two years.
| Frequency | Action | What to Look For |
|---|---|---|
| Every 6 months (spring and autumn) | Visual walk-around inspection of all exterior aluminium window perimeters | Cracking, peeling, gaps, discolouration, mould growth on or near sealant beads |
| Annually | Hands-on check — press sealant with fingernail, check flexibility and adhesion at edges | Hardening, brittleness, edge lift, cohesive splits; clear weep holes of debris |
| After severe weather (storms, hail, extreme heat events) | Targeted inspection of most exposed elevations | New cracks, sections torn away by wind-driven debris, water staining on interior sills |
| Every 3–5 years | Detailed assessment — consider professional inspection for multi-storey or hard-to-reach windows | Adhesion pull-test on representative joints; evaluate whether wholesale reseal is warranted |
Document each inspection with photos. Tracking how a hairline crack progresses over six months tells you whether it is cosmetic surface crazing or an accelerating failure that needs immediate attention. A photo from last spring compared with today’s condition removes guesswork from the decision to reseal.
For routine touch-ups — small sections where a bead edge has lifted or a crack has opened — cut away the failed portion cleanly with a sharp blade, clean the exposed substrate with isopropyl alcohol, and apply fresh sealant using the same preparation and application process covered earlier in this guide. Patching over failed sealant without removing it simply traps moisture beneath the new layer and accelerates hidden damage.
Sometimes, though, persistent sealant failure points to a deeper issue with the window system itself. Frames that have warped, drainage channels that were never properly designed, or outdated single-glazed units with inadequate gasket details place unreasonable demands on field-applied sealant. No product can compensate indefinitely for a window assembly that lacks integrated weatherproofing by design. In these situations, the most cost-effective long-term path is often upgrading to modern aluminium window systems — such as those from MEICHEN — engineered with precision drainage, factory-applied gaskets, and thermally broken profiles that dramatically reduce reliance on perimeter sealant to keep water out. Resealing a fundamentally compromised frame every few years costs more over a decade than a single well-specified replacement.
Whether your inspection reveals a simple reseal job or a broader upgrade decision, knowing which sealant to reach for — based on your specific frame finish, joint location, and climate — prevents repeating the same failure. A structured selection framework turns that choice from guesswork into a confident, evidence-based decision.

Choosing the Right Sealant for Your Aluminium Windows
All the preparation knowledge and application technique in the world funnels down to one practical question: which cartridge do you actually pull off the shelf? The answer depends on five variables specific to your project — not a brand name, not whatever was on special last weekend, and not what worked on your timber deck. Frame finish, location, paintability, movement demand, and climate each narrow the field until only one or two chemistries remain.
Think of sealant selection as a decision tree rather than a product comparison. Each branch eliminates options that would fail in your specific context, leaving you with a chemistry that is genuinely matched to the job rather than merely “compatible with most surfaces” according to marketing copy.
Decision Framework by Finish Type and Location
Your aluminium frame’s surface treatment changes how sealant bonds at the molecular level. Raw aluminium, anodised finishes, and powder-coated surfaces each present different adhesion profiles — and each reacts differently to primers, solvents, and sealant chemistries.
Raw (mill-finish) aluminium is the most demanding substrate. Its oxide layer reforms constantly and is thin enough that aggressive chemistries can penetrate and corrode. Neutral-cure silicone bonds reliably to raw aluminium without primer in most cases, though a field adhesion test (per ASTM C1521 equivalent methodology) confirms this for your specific product. Polyurethane and MS polymer typically need primer on raw aluminium to achieve long-term adhesion.
Anodised aluminium carries a thicker, harder oxide layer created through electrochemical treatment. This surface is chemically stable and offers excellent sealant adhesion — neutral-cure silicone grips it without primer in the majority of formulations. The critical rule is to never abrade anodised surfaces during preparation, as breaking through the anodic layer exposes softer base metal and defeats the coating’s purpose.
Powder-coated aluminium is the most common finish on residential window frames in Australia. Sealant bonds to the paint film rather than the aluminium itself, so adhesion depends on the coating’s integrity and surface energy. Clean with IPA (never harsh solvents that soften the powder coat), and verify adhesion to the specific colour — darker coatings with higher surface temperatures may require products with faster skin times to avoid slumping.
Location — interior versus exterior — adds the next filter. Exterior joints demand UV resistance, weather cycling tolerance, and high movement accommodation. Interior joints are sheltered from UV and temperature extremes, so paintable MS polymers and even quality polyurethane products become viable where they would not survive outside. A bathroom window interior bead, for instance, needs mould resistance more than UV stability.
Matching Sealant to Joint Movement Requirements
Movement capability is the specification most homeowners overlook — and the one that causes the most field failures. The ASTM C920 classification system rates sealants by class: Class 25 accommodates ±25% joint movement, Class 50 handles ±50%, and Class 100/50 manages +100% extension with -50% compression.
For a standard residential aluminium window perimeter (frame-to-wall joint of 6–10 mm width with moderate thermal movement), Class 25 covers the requirement comfortably. Step up to Class 50 when dealing with large-span aluminium curtain wall panels, long frame runs exceeding 2 metres on sun-exposed elevations, or joints narrower than 8 mm where percentage movement climbs sharply relative to width.
If you are researching products online, you will encounter options like DAP 100% silicone window, door and siding sealant — a neutral-cure formulation marketed for general exterior use. Products in this category (100% silicone, neutral-cure) typically deliver Class 25 to Class 50 movement capability depending on the specific formulation. Verify the rated movement accommodation on the technical data sheet rather than relying on front-label marketing. A DAP 100% silicone sealant or equivalent neutral-cure product works well for standard perimeter joints, but confirm it carries a “Use M” (metal) or explicit aluminium compatibility statement before committing.
The joint width calculation from earlier chapters applies here directly. If your calculated movement (using ΔL = α × L × ΔT with a 1.25 safety factor) exceeds 25% of the joint width, either widen the joint or specify a Class 50 product. Picking a lower class than required guarantees a tear within two to three thermal cycles.
Selecting the Right Product for Your Project
The table below synthesises the decision framework into actionable scenarios. Find the row that matches your situation, then verify the key property column against your chosen product’s data sheet before purchasing.
| Scenario (Finish + Location + Movement) | Recommended Sealant Chemistry | Key Property to Verify |
|---|---|---|
| Powder-coated frame, exterior perimeter, moderate movement (±15–25%) | Neutral-cure silicone | Adhesion to powder-coat without primer; UV stability rating; Class 25 minimum |
| Anodised frame, exterior curtain wall, high movement (±25–50%) | Neutral-cure silicone (Class 50) | Class 50 rated; Use M and G codes; structural glazing compliance if load-bearing |
| Powder-coated frame, exterior, paint required over sealant | MS polymer (hybrid) | Paintability after 24-hour cure; UV resistance for exposed portions; Class 25 minimum |
| Raw aluminium, interior fit-out, low movement (±10–15%) | MS polymer or polyurethane | Primer compatibility with bare aluminium; paintability; low-VOC for interior use |
| Any finish, interior wet area (bathroom, laundry) | Neutral-cure silicone with fungicide | Mould-resistant formulation; food-grade or sanitary rating if near food prep |
| Powder-coated frame, coastal exterior, high UV | Neutral-cure silicone (premium weatherproofing grade) | Salt-spray resistance; proven UV stability (40+ year weathering data preferred); non-corrosive fillers |
| Any finish, fire-rated wall assembly | Intumescent or fire-rated sealant (tested to AS 1530.4) | FRL matching surrounding construction; compatible with aluminium; movement accommodation secondary to fire rating |
| Any finish, BAL-29 or higher bushfire zone | Non-combustible sealant or tested to AS 3959 requirements | Non-combustibility certification; aluminium compatibility; adequate movement for perimeter joint |
For DIY homeowners tackling a straightforward reseal on powder-coated residential frames, the practical recommendation is simple: buy a quality neutral-cure 100% silicone sealant in a colour that matches your frame (aluminium grey, white, or black covers most Australian window finishes), confirm “suitable for aluminium” on the data sheet, and follow the preparation and application process outlined in the earlier chapters. Brands available at Australian hardware suppliers — Selleys, Sika, Bostik, and imported lines like DAP — all offer neutral-cure options that work. The chemistry matters more than the logo.
Professional glaziers and builders specifying for new construction or large-scale replacement projects operate with tighter constraints. Movement calculations, adhesion testing, code compliance, and warranty documentation all factor into the decision. In this context, simplifying the field sealing scope at the design stage pays dividends. Specifying high-quality aluminium window systems with factory-applied gaskets, precision-engineered drainage channels, and thermally broken profiles — such as those available from MEICHEN — reduces reliance on field-applied sealant by handling primary weatherproofing within the manufactured frame assembly. The perimeter sealant then serves as a secondary defence rather than the sole barrier, which lowers risk and simplifies maintenance over the building’s life.
Whether you are a homeowner with a single window to reseal or an architect specifying across a 200-unit development, the framework remains the same: identify your finish, define your exposure, calculate your movement, and let those answers choose the chemistry. The product follows the logic — not the other way around.
Frequently Asked Questions About Aluminium Window Sealant
1. Can you use normal silicone on aluminium window frames?
Not all silicone is safe for aluminium. Acid-cure (acetoxy) silicone releases acetic acid during curing, which corrodes aluminium and causes white powdery oxidation and adhesion failure. You need neutral-cure silicone specifically, which releases alcohol instead of acid during crosslinking. Check the cartridge label for ‘neutral cure’ and note that a vinegar smell when dispensing indicates an acid-cure product that should never contact aluminium frames.
2. How long does aluminium window sealant last before it needs replacing?
Lifespan varies by chemistry and exposure. Quality neutral-cure silicone on aluminium frames typically lasts 20 or more years in moderate Australian climates, though coastal and high-UV environments shorten this. MS polymer hybrids generally deliver 10 to 15 years on semi-exposed joints, while polyurethane sealants offer 5 to 10 years before losing flexibility. Annual visual inspections help catch early signs of failure like cracking, edge lift, or hardening before water damage occurs.
3. Do you need to prime aluminium before applying sealant?
It depends on the sealant type and the aluminium finish. Neutral-cure silicone often bonds to powder-coated and anodised aluminium without primer, but raw mill-finish aluminium may require it. MS polymers and polyurethane sealants typically need primer on bare aluminium for reliable long-term adhesion. Always consult the sealant manufacturer’s technical data sheet for your specific substrate, and remember that primer bonds to clean surfaces only — it is not a substitute for proper degreasing with isopropyl alcohol.
4. What causes sealant to peel off aluminium window frames?
The most common causes are surface contamination during application (oils, dust, or moisture preventing chemical bonding), use of incompatible acid-cure silicone that corrodes the substrate, and three-sided adhesion where the sealant bonds to the back of the joint as well as both faces. Thermal expansion then stresses the locked bead until it tears or peels. Proper preparation with solvent cleaning, correct sealant chemistry, and a backing rod to ensure two-sided adhesion prevent most peeling failures.
5. Can you apply aluminium window sealant in cold or wet weather?
Applying sealant to wet surfaces is never acceptable — water creates a barrier film that blocks chemical bonding regardless of how well the product appears to stick initially. For temperature, most neutral-cure silicones require substrate temperatures between 5°C and 40°C. Below 5°C the product becomes stiff, difficult to gun, and slow to cure. In cold conditions, store cartridges in a heated space before use and wait until joint surfaces are completely dry and frost-free before application.
More Window & Door Guides