Why Your Aluminium Window Seals Deserve Attention
You notice it first on a still winter morning. A thin ribbon of cold air curling past the window frame, a faint whistle when the wind picks up, or water pooling on the sill after rain that never used to get in. These aren’t quirks of an old house settling. They’re signals that the rubber sealing for windows in your aluminium frames has started to give up.
What Are Aluminium Window Seals and Why They Fail
So what are window seals in the context of aluminium frames? Put simply, they’re precision-moulded gaskets — typically EPDM rubber or silicone — that sit within extruded channels in the aluminium profile. Their job is threefold: block air and water infiltration, dampen sound transmission, and maintain the thermal envelope between indoors and out.
This is where aluminium systems differ from timber or uPVC windows. Rather than relying on adhesive-backed foam tape or brush pile strips, aluminium frames use engineered gasket profiles that compress into tight-tolerance channels. The window seal definition here is more mechanical than it is for other frame types — these gaskets must maintain consistent compression across the full perimeter to perform. When they harden, crack, or flatten with age and UV exposure, the system loses its weathertight integrity quickly.
Australian conditions accelerate this process. Intense UV on north-facing elevations degrades rubber compounds faster than milder climates, while coastal salt air and repeated thermal cycling between hot days and cool nights stress seals through constant expansion and contraction.
Common Symptoms That Point to Seal Degradation
Each failure symptom typically traces back to a specific seal location within the frame assembly:
- Draughts around the frame edge — perimeter compression gasket has lost elasticity or pulled away from its channel
- Water leaking at the sill or corners — glazing seal or drainage seal has cracked, allowing rain past the glass-to-frame junction
- Condensation forming between double-glazed panes — the insulated glass unit (IGU) edge seal has failed, though perimeter gasket deterioration often occurs simultaneously
- Increased street noise — meeting rail seal on operable sashes or the perimeter gasket no longer creates an airtight closure
If one or more of these sounds familiar, the good news is that aluminium window seal replacement is a targeted repair — not a full window replacement — when caught before frame damage sets in. The challenge lies in diagnosing exactly which seal has failed and whether the fix is straightforward or points to a deeper issue.
How to Diagnose Whether Your Seals Actually Need Replacing
That deeper issue is exactly where most homeowners get stuck. Feeling a draught doesn’t automatically mean you need new seals. Sometimes the gasket just needs cleaning and re-seating. Other times, a simple hardware adjustment restores full compression without touching the seal at all. Jumping straight to replacing window seals on house frames without proper diagnosis wastes time and money — and may not even fix the problem.
A structured approach separates what’s actually failed from what merely looks tired. Two low-tech tests give you most of the information you need.
The Paper-Drag Test and Visual Inspection Method
Start with the paper-drag test. Close the window on a standard sheet of A4 paper, positioning it where the sash meets the frame. Try to pull the paper out. A healthy compression seal grips firmly — you’ll feel real resistance or the paper tears. If it slides free with barely any friction, the seal at that point isn’t making proper contact.
Repeat this at multiple spots around the perimeter: both sides, top, and bottom. Localised weakness (one corner only) often points to hardware misalignment rather than seal failure. Consistent weakness across the full frame suggests the gasket itself has lost compression.
Next, run a visual inspection. Use a torch angled along the gasket surface and look for these telltale signs:
- Hardening — press the seal with a fingernail. Healthy EPDM rubber bounces back immediately. Aged rubber feels stiff and holds the indentation.
- Cracking or splitting — fine surface cracks indicate UV degradation. Deep splits mean the seal can no longer form a continuous barrier.
- Flattening — a gasket that’s permanently compressed flat has lost its memory and won’t spring back to fill the gap when the window closes.
- Discolouration — grey or chalky patches on black EPDM suggest material breakdown from UV or chemical exposure.
- Visible gaps — shine the torch from inside at night and check from outside. Light passing through confirms the seal has pulled away from its channel or shrunk.
One important caveat: premature seal failure — gaskets deteriorating well before their expected lifespan — can signal something beyond normal wear. Frame distortion from building movement, incorrect hardware tension that over-compresses one section while leaving another loose, or a seal profile that was never quite right for the channel width can all cause early breakdown. If your seals are less than five years old and already showing these symptoms, look beyond the gasket itself before replacing seals on windows that may have a structural or hardware root cause.
Decision Matrix for Repair vs Replace vs Adjust
Can a window seal be repaired, or does it always need full replacement? The answer depends on what your inspection reveals. This diagnostic matrix maps common findings to the most appropriate action:
| Symptom | Likely Cause | Recommended Action |
|---|---|---|
| Paper slides free at one corner only; seal looks intact | Hinge or cam lock misalignment reducing compression at that point | Hardware adjustment |
| Seal has surface dirt or debris preventing full contact | Grit or paint residue in the channel lifting the gasket | Clean channel and re-seat existing seal |
| Cracking or splitting in one section; rest of seal still flexible | Localised UV damage or mechanical wear at a high-stress point | Partial replacement (splice in new section) |
| Seal hardened, flattened, or discoloured around entire perimeter | Age-related material degradation across the full gasket | Full seal replacement |
| Paper test fails everywhere; seal appears fine visually | Frame distortion or worn hardware no longer pulling sash tight | Hardware adjustment first; reassess seal after |
| Seal pulls away from channel easily by hand | Wrong profile installed, or channel damaged and no longer gripping | Full replacement with correct profile; inspect channel |
This matrix saves you from the most common mistake in replacing window seals: treating the gasket as the problem when the real culprit is hardware that’s drifted out of adjustment. It also identifies situations where a targeted partial fix is perfectly adequate — no need to strip and replace an entire perimeter gasket because one 200 mm section has cracked at a sun-exposed corner.
With a clear diagnosis in hand, the next question becomes practical: what type of seal does your specific aluminium window system actually use, and where do you find the right replacement profile?
Understanding Aluminium Window Seal Types and Profiles
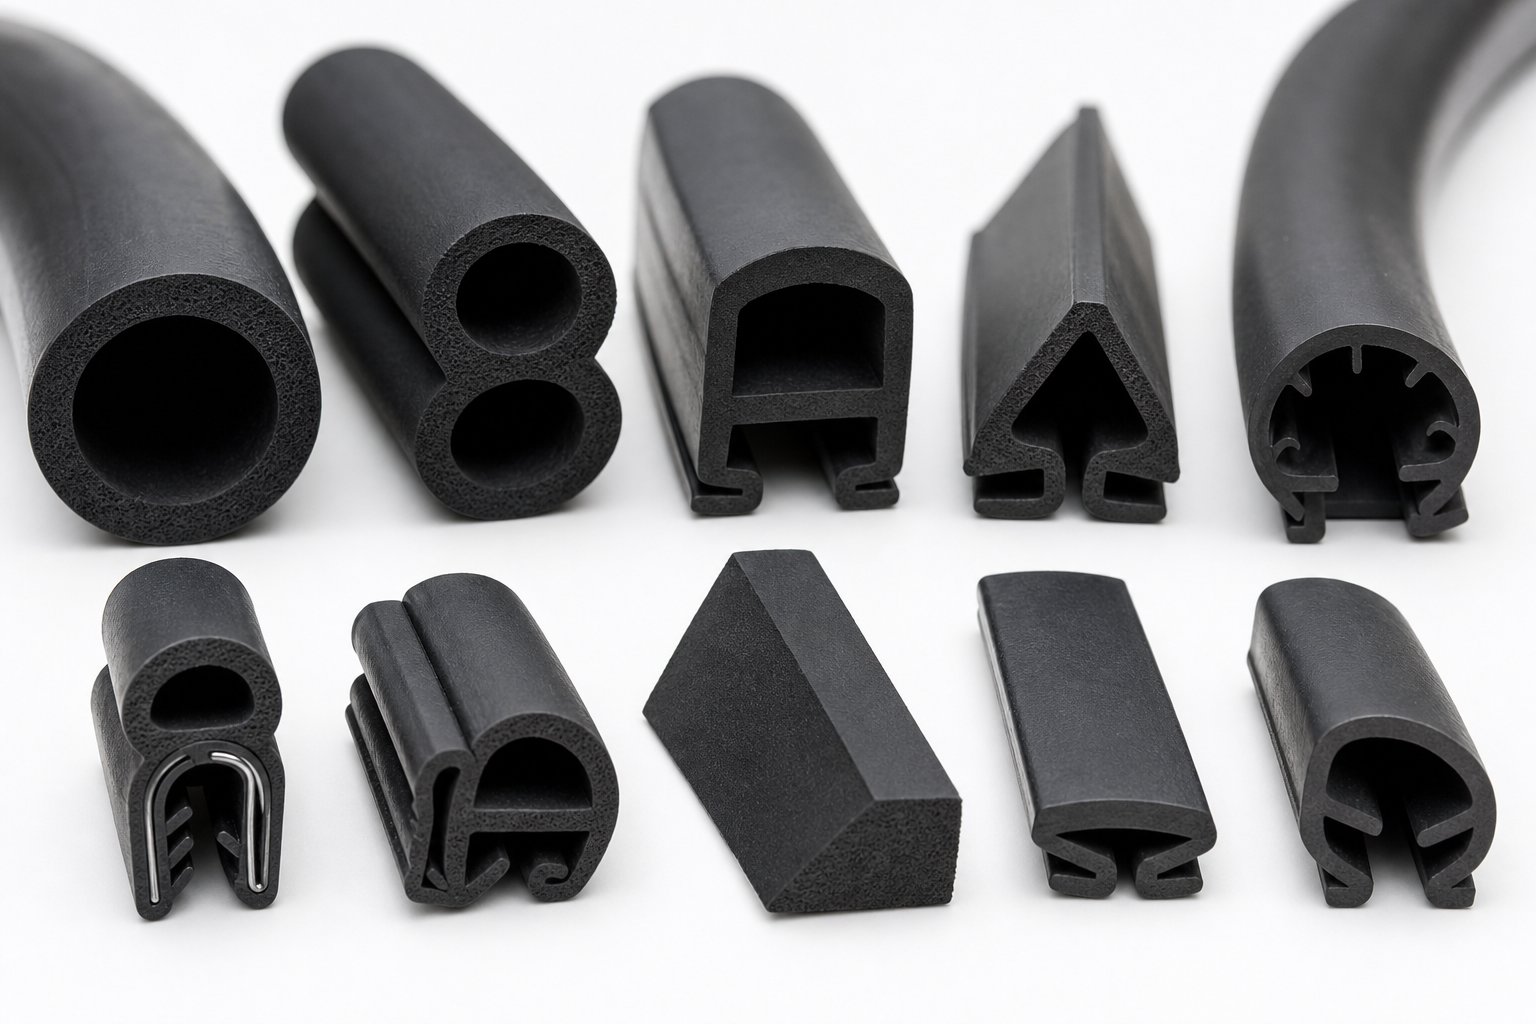
The answer depends entirely on your window system. Aluminium frames don’t use a one-size-fits-all gasket. Each seal location within the frame has a distinct profile shape, material composition, and compression requirement — and getting the wrong one means the replacement won’t perform any better than the degraded original.
Unlike timber windows that often rely on adhesive foam tape, or rubber PVC window systems that use co-extruded seals moulded directly into the sash profile, aluminium frames employ separate gaskets pressed or rolled into precision-machined channels. These channels are cut into the aluminium extrusion during manufacturing, with tolerances measured in fractions of a millimetre. That precision is what makes generic weatherstripping a poor substitute — the seal must match the channel geometry exactly to achieve proper compression.
Glazing Gaskets vs Perimeter Compression Seals
The two broadest categories you’ll encounter are glazing gaskets and perimeter compression seals. They serve different functions and sit in different parts of the frame.
A glazing gasket for aluminium windows holds the glass pane within the sash or fixed frame. It cushions the glass, prevents rattling, and blocks water from reaching the glass edge seal. Perimeter compression seals, by contrast, sit between the operable sash and the outer frame — they’re what creates the weathertight closure when you lock the window shut.
Here’s a breakdown of the main seal types you’ll find across aluminium window systems in Australia:
- Wedge glazing gasket — Location: glass-to-frame junction. Material: EPDM rubber. Pressed into a tapered channel to grip the glass edge. Common in fixed-lite and awning windows.
- Push-in glazing gasket — Location: glazing bead channel. Material: EPDM or TPE (thermoplastic elastomer). Snaps into a dovetail or barbed channel in the glazing bead. Used where beads are removable for glass replacement.
- Perimeter compression seal (bubble gasket) — Location: sash-to-frame perimeter. Material: EPDM. Features a hollow bulb section that compresses when the window closes, springing back when opened. The primary weather seal on casement and awning windows.
- Flipper seal — Location: sliding sash edges. Material: EPDM with a flexible fin. The fin deflects as the sash slides past, maintaining contact without creating excessive friction. Essential for smooth sliding window seal performance.
- Mohair pile weatherstrip — Location: sliding sash tracks and interlocks. Material: polypropylene pile on a woven backing. Acts as a low-friction window rubber seal strip that blocks dust and draughts while allowing the sash to glide freely.
- Blade seal (fin seal) — Location: meeting rails where two sashes overlap. Material: silicone or EPDM fin. Creates a wiper-style contact between moving parts. Common on sliding and double-hung aluminium windows.
- Window trim seal — Location: frame-to-wall junction or decorative cover strips. Material: EPDM or silicone. Prevents water ingress at the point where the aluminium frame meets the building structure.
Understanding these window weatherstripping types matters because each requires a different replacement approach. You can’t swap a bubble gasket into a channel designed for a wedge profile — the geometry simply won’t work.
Aluminium-Specific Material Compatibility Concerns
Aluminium introduces material compatibility issues that timber and uPVC frames largely avoid. Three factors demand attention when selecting replacement seals.
Thermal expansion. Aluminium expands and contracts significantly with temperature changes — roughly twice the rate of steel. On a north-facing window in summer, frame temperatures can exceed 60°C in direct sun, then drop below 10°C overnight in winter. This cycling means seals must tolerate repeated compression changes without taking a permanent set. EPDM handles this well due to its elastic memory. Cheaper PVC-based seals tend to flatten permanently after a few seasons of thermal cycling in Australian conditions.
Galvanic corrosion. When dissimilar metals contact each other in the presence of moisture, galvanic corrosion accelerates the decay of the less noble metal. If replacement seals are secured with steel fasteners, screws, or clips in direct contact with the aluminium frame — particularly in coastal environments — white powdery corrosion can develop around the fixing points. Stainless steel or nylon fasteners eliminate this risk. It’s a detail often overlooked during DIY seal work.
Chemical compatibility. Some silicone sealants and cleaning solvents react with EPDM rubber, causing swelling or premature breakdown. Always check that any adhesive or cleaning product used during installation is compatible with both the seal material and the aluminium frame’s powder-coat finish.
Thermal Break Windows and Their Extra Seal Points
If your aluminium windows feature thermal break technology — a polyamide strip separating the interior and exterior aluminium sections — you’ll find additional seal points that standard non-thermally-broken frames don’t have. The thermal break creates a split in the profile, and each side of that split requires its own gasket to maintain the thermal and weather barrier.
In practice, this means a thermally broken casement window might have four or five distinct seal profiles: an inner perimeter gasket, an outer perimeter gasket, a glazing gasket on each side of the glass, and a drainage seal at the sill. Replacing seals on these systems requires identifying each profile individually — they’re rarely interchangeable, even within the same window.
This complexity is precisely why sourcing the correct replacement profile matters so much. A seal that looks roughly right but sits 1 mm too shallow in the channel won’t compress properly, and one that’s too tall will prevent the sash from closing fully. The next step is knowing exactly how to identify your existing seal and find its match.
How to Identify and Source the Correct Replacement Seal
Knowing your seal type is one thing. Actually finding the right replacement window seals for your specific aluminium frame is where most DIY projects stall. Aluminium window systems are manufactured to proprietary extrusion profiles, and a gasket that looks similar on the shelf can be 0.5 mm off in its base width — enough to either fall out of the channel or prevent the sash from latching shut.
The good news: a methodical approach takes the guesswork out of sourcing. Gather the right information before you contact a supplier, and you’ll avoid the frustrating cycle of ordering, testing, returning, and reordering.
What Measurements and Photos You Need Before Buying
Suppliers can’t help you without specifics. Before reaching out, collect these five pieces of information:
- Window system brand and series — Check the frame edge, hardware, or corner of the glass for a stamped or etched name. Australian homes commonly feature systems from manufacturers like AWS, Capral, Alspec, or Bradnam’s. The series name (e.g., “Series 504” or “Vantage Metro”) narrows the search dramatically.
- Cross-section measurements — Use digital calipers to measure the existing seal’s profile width, height, and base (or “foot”) dimensions. As industry guides note, all measurements are taken from the cross-section of the product — the shape you see when you cut through the gasket. Accuracy to 0.1 mm matters here.
- Channel dimensions — Measure the width and depth of the aluminium extrusion channel the seal sits in. This determines whether the gasket foot will grip properly once installed.
- Photos of the cut end — Slice a small section of the old seal cleanly with a sharp blade and photograph the cross-section against a ruler. This gives suppliers a visual reference that’s often more useful than measurements alone, especially for complex profiles with fins or hollow bulb sections.
- Seal function — Note whether the gasket serves as a glazing seal (holding glass), perimeter compression seal (weather barrier between sash and frame), or drainage seal (directing water out of the frame). Each function uses different geometry even within the same window system.
With these details in hand, the sourcing process becomes straightforward:
- Identify your window system brand and series from frame markings or original documentation.
- Measure the channel width and depth in the aluminium extrusion using calipers.
- Photograph the old seal’s cross-section against a metric ruler for visual matching.
- Contact a specialist supplier with your measurements, photos, and system name.
- Confirm compatibility — request a short sample length to test-fit before ordering full quantities.
Proprietary Seals vs Universal Alternatives
Here’s the practical question: do you need the exact manufacturer-specific gasket, or will a compatible generic work?
For perimeter compression seals and glazing gaskets — the seals doing the heavy lifting on weather performance — proprietary profiles matched to your window system are the safer choice. These are engineered to the precise channel geometry and compression requirements of that specific extrusion. When you replace a window gasket with the OEM profile, you’re restoring the original performance specification.
Universal alternatives have their place, though. Universal gasket ranges cover multiple traditional profiles with just a few sizes, making them useful for older systems where the original aluminium glass rubber profile is discontinued or hard to source. They’re also practical for secondary seals like mohair pile strips or simple flipper gaskets where tolerances are less critical.
A window seal replacement kit — typically containing a length of gasket, corner adhesive, and a roller tool — can be a convenient option for straightforward perimeter seal jobs. Just verify the included profile matches your channel dimensions before committing.
For sourcing windows and aluminium seals in Australia, you have several paths:
- Direct from the window manufacturer — Capral, AWS, and Alspec all supply replacement gaskets for their systems. This guarantees an exact match but may require minimum order lengths.
- Specialist aluminium window suppliers — Trade-focused suppliers stock common profiles and can cross-reference your measurements against their catalogue.
- Online seal suppliers — Useful for universal profiles and standard EPDM gaskets. Look for suppliers that list cross-section dimensions and offer sample lengths.
- Hardware stores — Carry basic weatherstripping and mohair pile, but rarely stock the specific aluminium glass rubber gasket profiles needed for precision-fit applications.
One tip that saves time: if your windows are less than 15 years old and you can identify the manufacturer, start with them directly. Most maintain seal inventories for their current and recent product lines, and their technical team can confirm the correct profile from a photo alone.
Getting the right seal to your door is only half the equation. How it performs once installed depends heavily on something most people overlook entirely — whether the window hardware is pulling the sash tight enough to compress the new gasket properly.
Hardware Adjustment as a Complementary Fix
A brand-new gasket sitting in a perfectly clean channel still won’t stop draughts if the sash isn’t being pulled firmly against it. This is the detail that catches people out — they replace window seal profiles, test the result, and find the draught persists. The seal isn’t the problem. The hardware is.
How Hardware Tension Affects Seal Compression
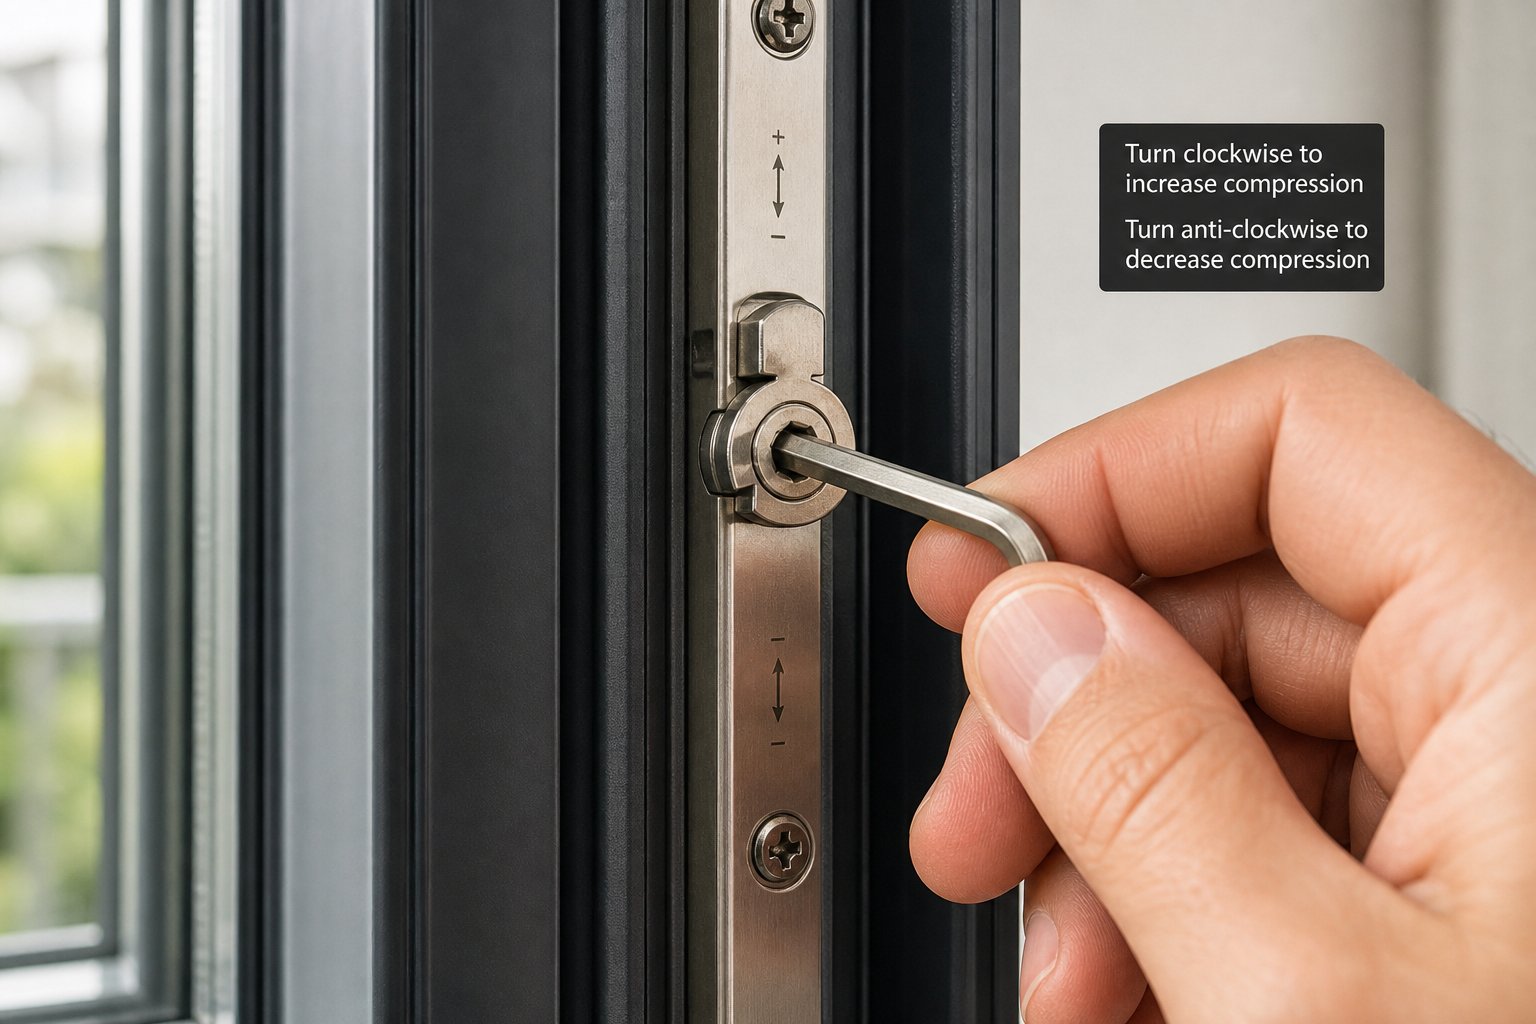
Compression seals work on a simple principle: the sash must press the gasket’s bulb section flat enough to form a continuous air and water barrier, then release it when the window opens. That pressing force doesn’t come from the seal itself. It comes from the locking hardware — specifically, the cam mechanisms on your espagnolette handle, the friction stay hinges, and the keeper (or strike plate) alignment on the frame.
When any of these components drift out of adjustment, the sash no longer seats evenly against the frame. One corner might compress the seal perfectly while the opposite corner leaves a 1–2 mm gap. That gap is all it takes for a noticeable draught, even with seals on windows that are in perfect condition.
Before replacing seals, check whether adjusting your window hardware restores proper compression — this single step resolves many draught complaints without any seal work.
Adjusting Hinges and Cam Locks to Restore Seal Contact
Four hardware components control how tightly your sash meets the frame. Each is adjustable on most aluminium casement and awning windows:
- Espagnolette cam positions — The cams (or mushroom rollers) on the locking bar rotate to pull the sash tighter or allow it to sit looser. Using an Allen key, rotate each cam toward the seal to increase compression. A quarter-turn is usually enough. As espagnolette mechanism guides note, aim for slight compression on the gasket when locked — too tight strains the hardware, too loose causes draughts.
- Hinge friction stays — On casement windows, the friction stay hinge holds the sash in the correct plane. If the hinge has sagged or loosened, the sash drops slightly and no longer aligns with the seal. Most modern aluminium windows use 3D adjustable hinges — small Allen key screws allow vertical, lateral, and compression adjustment without removing the sash.
- Keep (striker plate) alignment — The keeps are the fixed metal pieces on the frame that the locking cams engage with. If a keep has shifted even 1 mm, the cam can’t pull the sash fully home. Loosen the keep’s fixing screws, reposition it so the cam bites firmly, and retighten.
- Lock striker plates — On sliding windows, the striker plate position determines how tightly the sash is drawn against the flipper seal or mohair pile. Adjusting the striker inward increases seal contact across the interlock.
Work through each adjustment point systematically, then repeat the paper-drag test from your earlier diagnosis. If the paper now grips firmly at every point around the perimeter, your existing window seals for houses may have years of life left — no replacement needed.
Hardware adjustment alone is sufficient when the seal still passes a visual inspection: flexible, uncracked, and returning to shape after compression. Both hardware and seals need attention when the gasket shows physical degradation (hardening, splitting, permanent flattening) and the paper test fails. In that scenario, adjust the hardware first, then install new seals — replacing a window seal into a frame with misaligned hardware just sets you up for premature failure all over again.
With hardware dialled in and the correct seal profile sourced, the actual installation process is straightforward — provided you follow the right sequence and account for a few aluminium-specific details that differ from other frame types.
Step-by-Step Aluminium Window Seal Replacement Process
The actual hands-on work of changing window seals on aluminium frames is less about brute force and more about patience and preparation. Aluminium extrusions are precise — the channels are machined to tight tolerances, and any debris, corrosion, or residue left behind will prevent the new gasket from seating properly. Rushing the prep stage is the single most common reason DIY seal replacements underperform.
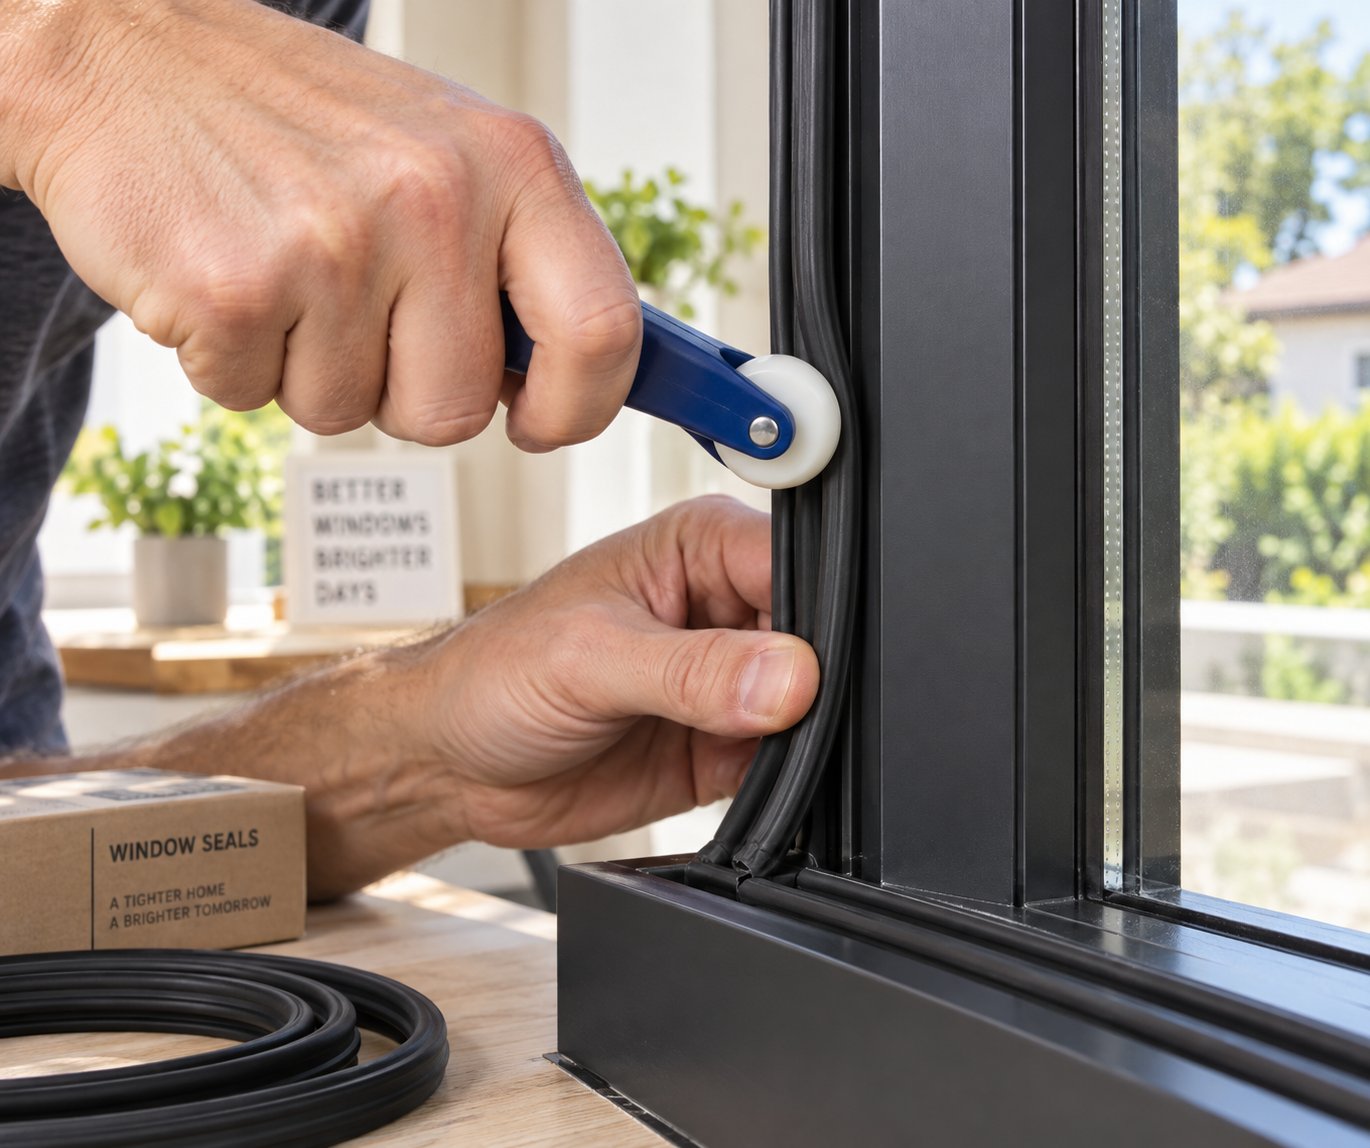
Before you start, gather your tools: a plastic spline roller (not metal — it scratches powder-coat finishes), a sharp utility knife, isopropyl alcohol (IPA), clean lint-free cloths, a small flat-head screwdriver or seal pick, calipers for a final fit check, and your replacement gasket. If you’re working on corner joins, have cyanoacrylate adhesive (super glue) or a specialist gasket corner cement on hand.
Removing Old Seals Without Damaging the Frame
How you remove the old seal depends on which type you’re dealing with. Each requires a slightly different technique to avoid gouging the aluminium channel.
Wedge glazing gaskets: These are pressed into a tapered channel using a spline roller during original installation. To remove, locate a corner or join point and work the tip of a plastic seal pick underneath the gasket foot. Lever gently upward until you can grip the seal, then pull steadily along the channel length. Avoid metal tools — a screwdriver tip can score the channel walls, creating burrs that interfere with the new seal’s grip.
Push-in gaskets (dovetail or barbed foot): Start at a corner where the gasket was originally joined. These profiles snap into an undercut channel, so pulling straight out won’t work. Instead, push the seal inward slightly to release the barb, then angle it out of the channel. Work progressively along the length. If the rubber has hardened and become brittle, it may break into pieces — that’s fine, just ensure every fragment is cleared from the channel.
Adhesive-backed seals: Peel the seal away from the frame surface, then scrape residual adhesive using a plastic scraper or old credit card. Follow up with a cloth dampened in isopropyl alcohol to dissolve remaining adhesive film. Never use acetone or aggressive solvents on powder-coated aluminium — they can dull or damage the finish.
Once the old seal is out, inspect the channel closely. Look for white powdery oxidation (a sign of surface corrosion), paint overspray, accumulated grit, or any deformation in the channel edges. Clean the entire channel with IPA on a lint-free cloth. This removes oils, dust, and residue that would prevent the new gasket from gripping. While you’re at it, check the frame for square using a straight edge across the corners — if the frame has racked or twisted, even a perfectly installed seal won’t compress evenly, and you may need professional frame realignment before proceeding.
Installing New Seals with Correct Orientation and Tension
With a clean, dry, undamaged channel, you’re ready to install. Here’s how to replace window seal profiles correctly on aluminium frames:
- Confirm orientation. Most gaskets have a directional profile — a flat foot that enters the channel and a shaped body that faces the opposing surface. Hold the seal against the channel and check that the compression bulb or fin faces the correct direction (toward the sash on frame-mounted seals, toward the frame on sash-mounted seals).
- Start at the top centre. Beginning mid-way along the top rail gives you the best working access and places the join point in a low-stress, low-exposure location. Press the gasket foot into the channel by hand for the first 100 mm to anchor it.
- Work progressively without stretching. Feed the seal into the channel moving in one direction, pressing firmly with your thumb or a plastic spline roller. The critical rule: never stretch the material. Pulling the gasket taut as you install it causes it to contract once released, creating gaps at corners and a loose fit overall. Allow approximately 10 mm of extra length per metre to account for this — the slight excess is far better than a shortfall.
- Handle corners carefully. For perimeter seals, you have two options at each corner. A mitre join — cutting both meeting ends at 45 degrees — gives the neatest finish and works well for larger bubble gaskets. A butt join with adhesive — cutting the seal square and bonding the ends with cyanoacrylate — is simpler and perfectly adequate for smaller profiles. In either case, apply a small drop of adhesive to bond the corner and prevent the seal from creeping over time.
- Complete the circuit. When you return to your starting point at the top centre, leave approximately 10 mm of overlap rather than cutting flush. Trim to a snug butt fit, then bond the join with adhesive. This ensures no gap develops as the material settles.
- Seat fully with a roller. Run a plastic spline roller along the entire length, pressing the gasket foot firmly and evenly into the channel. Pay extra attention to corners and the join point.
- Test immediately. Close the window, engage the locks, and run the paper-drag test at multiple points. The paper should grip firmly and evenly around the full perimeter. If one section feels loose, check whether the gasket has lifted from the channel at that point and re-seat it.
When replacing rubber seals on windows with adhesive-backed profiles (common for secondary seals or retrofit applications), ensure the aluminium surface is completely free of dust and moisture before applying. Press firmly along the full length and avoid opening the window for at least 12 hours to allow the adhesive to cure fully.
Best Seasonal Conditions for Seal Installation
Timing matters more than most people realise. EPDM and TPE gaskets become stiffer in cold weather, making them harder to press into channels and more prone to cracking at corner bends. In hot conditions, the material is overly pliable and can stretch too easily during handling, leading to a loose fit once temperatures drop.
The ideal working temperature for how to change window seals sits between 10°C and 25°C — conditions where the rubber is flexible enough to handle easily but firm enough to hold its shape during installation. For most of Australia, autumn and spring mornings offer this sweet spot. Avoid replacing seals on days above 35°C (the gasket stretches and you’ll underestimate the length needed) or below 5°C (the material resists bending at corners).
Thermal expansion also plays a role post-installation. Aluminium frames expand in summer heat, slightly compressing the seal channels. In winter, frames contract, marginally widening those channels. A seal installed at moderate temperatures accommodates both extremes without over-compression in summer or gapping in winter. If you must install during temperature extremes, factor in a small additional length allowance for cold-weather fitting (the frame will expand come summer, tightening the seal further) or a slightly snugger cut for hot-weather work.
For adhesive-backed seals specifically, temperature affects bond strength. Most construction adhesives require a minimum surface temperature of 10°C to cure properly. Installing on a cold morning when the aluminium frame is below this threshold risks poor adhesion and early peeling — even if the air temperature feels mild, the metal itself may be colder.
Once your new seals are in and tested, the job isn’t quite finished. A small percentage of replacements reveal issues that the old degraded seal was masking — problems that only become apparent once a fresh gasket is doing its job properly.
Troubleshooting After Seal Replacement
You’ve installed fresh gaskets, run the paper-drag test, and locked the window shut. Everything felt right. Then the next heavy rain arrives, or a cold westerly picks up, and you notice the problem hasn’t fully disappeared. A persistent draught at one corner. A trickle of water at the sill. Fog forming between the glass panes that wasn’t there before — or was it?
Fixing window seals that still underperform after replacement is frustrating, but it’s rarely a sign that the work was wasted. More often, the new seal has exposed an underlying issue that the old degraded gasket was masking — or a small installation detail needs correcting.
Why New Seals Might Still Leak
Work through this troubleshooting sequence in order. Each step eliminates a potential cause before moving to the next:
- Verify seal orientation. A gasket installed with the compression bulb facing the wrong direction won’t form proper contact. Pull a small section from the channel and compare it against the manufacturer’s profile drawing or the orientation of the old seal you removed. The bulb or fin should always face the opposing surface — toward the sash if frame-mounted, toward the frame if sash-mounted.
- Check for frame distortion. Place a straight edge (a spirit level works) diagonally across the frame corners. If the frame has racked — common in older homes where footings shift or brick veneer settles — the sash can’t seat evenly against the seal regardless of gasket quality. A gap of more than 2 mm across the diagonal indicates distortion that needs professional correction.
- Confirm hardware compression. Re-run the paper-drag test with the window locked. If the paper slips at specific points, the cam locks or hinges at those locations aren’t pulling the sash tight enough. Adjust hardware as outlined in the previous section — sometimes a quarter-turn on a cam is all that separates a draught from a tight seal.
- Inspect drainage paths. Aluminium frames rely on weep slots or drainage channels to direct water that penetrates the outer seal safely back outside. If these are blocked by debris, paint, or the new seal itself overlapping a drainage slot, water pools inside the frame and eventually leaks inward. Clear any obstructions and confirm water can exit freely at the sill.
- Assess profile compatibility. A seal that’s slightly too short in its base dimension may sit in the channel without gripping firmly, allowing it to lift under wind pressure. Conversely, a profile that’s marginally too tall can prevent the sash from closing fully, leaving a gap above or below the gasket. Measure the installed seal against the channel dimensions one more time — even 0.5 mm discrepancy matters in aluminium systems.
Frame Misalignment vs Seal Failure Diagnosis
The distinction between these two problems is critical because the solutions are completely different. A seal issue responds to gasket replacement. A frame issue does not — no amount of new rubber will compensate for a frame that’s out of square.
Here’s how to tell them apart: if the paper-drag test fails at the same location regardless of which seal you install, and hardware adjustment doesn’t resolve it, the frame geometry is the culprit. You can confirm this by closing the window without locking it and observing the gap between sash and frame. An even gap all around means the frame is true and the problem lies elsewhere. An uneven gap — wider at one corner, tighter at the opposite — points to frame distortion or building movement.
One scenario deserves special attention: condensation appearing between double-glazed panes after you’ve replaced perimeter seals. This is not a perimeter seal problem at all. It indicates the insulated glass unit (IGU) edge seal has failed, allowing moisture to enter the cavity between the panes. No amount of perimeter glass seal repair will fix this — the IGU itself needs replacing. Perimeter gaskets and IGU edge seals are entirely separate systems. A failed IGU seal shows as internal fogging or moisture droplets trapped inside the glass unit, whereas a perimeter seal failure shows as draughts, external water ingress, or condensation on the room-side glass surface.
The window thermal seal repair cost for an IGU replacement is typically higher than a perimeter gasket job because it involves removing glazing beads, extracting the sealed unit, and fitting a new one — work best handled by a glazier familiar with your aluminium system.
This table maps the most common post-replacement problems to their likely causes and solutions:
| Post-Replacement Problem | Likely Cause | Solution |
|---|---|---|
| Continued draught at one corner | Cam lock at that corner not pulling sash to full compression, or gasket not seated in channel at the corner join | Adjust cam lock inward; re-seat gasket and re-bond corner join with adhesive |
| Water pooling at sill after rain | Weep holes or drainage slots blocked by debris or overlapped by new seal | Clear drainage paths; trim seal away from weep slots; confirm sill has slight outward fall |
| Condensation inside the glass unit (between panes) | IGU edge seal failure — unrelated to perimeter gasket condition | Replace the insulated glass unit; perimeter seal replacement will not resolve this |
| Seal lifts from channel under wind pressure | Profile base dimension too narrow for channel, or channel walls damaged and not gripping | Source correct profile with matching base width; repair or clean channel walls if burred |
| Window won’t close or latch fully | Replacement seal profile too tall, preventing sash from meeting frame | Confirm profile height matches original; swap to correct profile or adjust hardware outward slightly |
| Draught consistent across entire perimeter despite new seal | Frame distortion — sash cannot seat evenly against gasket | Professional frame realignment or shimming; seal replacement alone won’t resolve |
If your troubleshooting points to a correctly installed seal on a sound frame with properly adjusted hardware — and the window still performs well — the job is done. The real question then becomes how long you can expect those new seals to last, and what you can do to push that lifespan as far as possible.
Seal Lifespan Expectations and Maintenance Tips
How long those fresh gaskets serve you depends on two things: what they’re made from, and how you treat them once installed. Most homeowners never think about door window seals or frame gaskets until something fails — but a small amount of annual attention can add years to their service life.
Seal Lifespan by Material in Australian Conditions
Not all seal materials age at the same rate, and Australian conditions — particularly intense UV and wide temperature swings — push some compounds harder than others. Industry data on aluminium window components places rubber gasket replacement cycles at 10 to 15 years as a general baseline, but the actual figure varies significantly by material type and exposure.
EPDM rubber dominates aluminium window systems for good reason: it handles UV, ozone, and thermal cycling better than most alternatives. In sheltered positions, EPDM gaskets regularly reach 15 years. On north or west-facing elevations copping full Australian sun, that drops closer to 8–12 years as UV breaks down the polymer chains and the rubber windows seal compound gradually hardens.
Silicone seals offer superior UV and heat resistance — they won’t degrade as quickly on sun-blasted facades — but they’re less common in aluminium frames due to higher cost and lower tear strength. TPE (thermoplastic elastomer) sits between the two: good weather resistance and easier manufacturing, though it can lose flexibility faster than EPDM in sustained heat. Mohair pile weatherstrips on sliding windows wear through friction rather than UV, with lifespan tied directly to how often the sash moves.
| Seal Material | Expected Lifespan | Best For | Maintenance Needs |
|---|---|---|---|
| EPDM rubber | 10–15 years (8–12 in high UV) | Perimeter gaskets, glazing seals on casement and awning windows | Annual inspection; silicone conditioner every 12 months |
| Silicone | 15–20 years | High-exposure locations, north-facing glazing seals | Minimal — periodic cleaning only |
| TPE (thermoplastic elastomer) | 8–12 years | Push-in glazing gaskets, budget-friendly replacements | Annual inspection; avoid solvent contact |
| Mohair pile | 5–8 years | Sliding window tracks, interlocks, dust exclusion | Vacuum debris from pile regularly; replace when flattened |
Three environmental factors accelerate degradation beyond these baselines. Coastal salt air deposits chlorides that dry out rubber compounds and promote surface cracking — properties within a few kilometres of the shoreline often see gaskets fail 20–30% sooner. Intense UV on unshaded north-facing windows is the single biggest killer of window seal black EPDM gaskets, causing the characteristic chalky grey discolouration that signals material breakdown. And harsh cleaning products — anything solvent-based, acidic, or containing ammonia — strip the plasticisers that keep rubber flexible, effectively ageing the seal years in a single application.
Annual Maintenance Routine to Extend Seal Life
A simple routine keeps window and door seals performing well beyond their minimum expected lifespan. This isn’t complicated work — fifteen minutes per window, once a year, makes a measurable difference.
- Inspect every 12 months — Run a finger along each gasket checking for hardening, cracking, or permanent flattening. Catch early signs before they become draughts.
- Clean with mild soapy water — Use a soft cloth dampened with warm water and a neutral detergent. Wipe the full length of each seal to remove grit, salt deposits, and biological growth. Rinse with clean water and dry. Never use solvents, bleach, or abrasive cleaners — they destroy the rubber’s surface integrity.
- Apply silicone-based conditioner — Once clean and dry, wipe a thin coat of silicone rubber conditioner along the gasket surface. This restores elasticity and prevents the seal from drying out or sticking to the frame. Avoid petroleum-based products — they soften rubber initially but accelerate long-term degradation.
- Schedule professional assessment every 3–5 years — A window technician can check compression performance, identify early seal failure hidden behind glazing beads, and assess whether hardware adjustment is needed to maintain proper gasket contact.
Coastal properties benefit from cleaning door window seals every three to six months rather than annually — salt accumulation between inspections is enough to noticeably shorten gasket life in exposed locations.
Even with diligent maintenance, every seal eventually reaches end-of-life. The question that matters at that point isn’t just whether to replace the gaskets again — it’s whether the window system as a whole still justifies the investment, or whether recurring seal failures are telling you something bigger about the frame’s condition.

Replace Seals or Upgrade Your Windows
Recurring seal failures within a short timeframe are a signal worth listening to. If you replaced gaskets three years ago and they’re already hardening or pulling away, the issue likely isn’t the seal material — it’s the system those seals are trying to protect. At some point, windows seal replacement becomes a band-aid on a deeper problem, and the smarter move is addressing the root cause rather than treating symptoms on repeat.
The decision isn’t always obvious. Plenty of aluminium windows built in the 1990s and early 2000s still have decades of life in them once fitted with fresh gaskets. Others — particularly single-glazed frames from the 1970s and 80s — have reached a point where no amount of new rubber will deliver the thermal performance, acoustic control, or weather resistance that modern living demands.
Signs That New Seals Will Restore Full Performance
For many homeowners searching for window seal replacement near me, the answer is straightforward: new gaskets will do the job. Seal replacement makes strong financial sense when the underlying window system is still fundamentally sound.
Replace seals when:
- The aluminium frame is structurally intact — no visible corrosion, pitting, or distortion when checked with a straight edge
- Hardware operates correctly and maintains full compression after adjustment (cams engage, hinges hold position, locks draw tight)
- Double-glazed units are clear — no fogging or moisture between panes, indicating the IGU edge seals remain intact
- The window meets your current functional needs — correct size, adequate ventilation, acceptable noise reduction for your location
- This is the first seal replacement in the window’s life, or the previous seals lasted close to their expected 10–15 year lifespan
- The frame’s powder-coat finish is in reasonable condition, with no widespread chalking or delamination
When these conditions are met, a broken window seal repair near me is genuinely the most cost-effective path. You’re restoring a system that has plenty of service life remaining — well-maintained aluminium frames can deliver 40 to 50 years of reliable service, far outlasting the gaskets themselves. Spending a fraction of a new window’s cost to restore full weathertight performance for another decade is sound economics.
When a Full Window Upgrade Is the Smarter Investment
Sometimes the diagnosis points in a different direction. If your inspection reveals systemic issues beyond normal seal wear, continued patching delays an inevitable — and increasingly expensive — replacement.
Consider new windows when:
- You want modern aluminium window systems with integrated high-performance seal designs, thermally broken frames, and energy ratings that meet current NCC requirements — MEICHEN’s aluminium windows offer custom configurations with project-ready specifications for Australian residential and commercial builds
- Seals have failed repeatedly within short cycles (under five years), suggesting frame geometry or channel degradation that new gaskets can’t overcome
- Frame corrosion has progressed beyond surface oxidation — pitting in the seal channels prevents gaskets from gripping properly
- You have single-glazed windows in climate zones where NatHERS or WERS ratings demand double-glazed, thermally broken performance
- Hardware is obsolete or worn beyond adjustment — replacement parts are no longer available for the locking system
- Frame distortion from building movement means the sash can never seat evenly against the seal, regardless of gasket quality
- Your renovation goals include improved aesthetics, larger openings, better security ratings, or compliance with current bushfire (BAL) or cyclone standards
The financial comparison isn’t just gasket cost versus window cost. Factor in the cumulative expense of repeated seal replacements, the energy lost through poorly performing single-glazed frames, and the value a modern window system adds to your property. Industry guidance suggests that when frames are warped, seals fail repeatedly, or you want meaningfully better energy efficiency, full replacement delivers a stronger long-term return than ongoing repairs.
For readers whose diagnosis lands firmly in seal-replacement territory — structurally sound frames, functional hardware, intact glass units — the path is clear and cost-effective. Source the correct profile, install with care, maintain annually, and your aluminium windows will continue performing for years to come. For those whose windows are telling a bigger story, exploring modern aluminium window systems with factory-integrated seal technology, thermal breaks, and contemporary hardware eliminates the cycle of degradation entirely and delivers a permanent upgrade to your home’s comfort, efficiency, and value.
Frequently Asked Questions About Aluminium Window Seal Replacement
1. How do I know if my aluminium window seals need replacing?
Run a paper-drag test by closing the window on a sheet of A4 paper and trying to pull it out. If it slides free with little resistance, the seal isn’t compressing properly. Combine this with a visual inspection for hardening, cracking, flattening, or chalky discolouration on the gasket surface. Consistent weakness around the full perimeter typically indicates the gasket has degraded and needs replacement, while localised failure at one corner may only require hardware adjustment rather than new seals.
2. Can aluminium window seals be repaired instead of fully replaced?
In some cases, yes. If only a short section of gasket has cracked due to localised UV damage while the rest remains flexible, you can splice in a new section at that point. Seals with surface dirt preventing full contact can often be cleaned and re-seated in their channel without replacement. However, when the gasket has hardened, permanently flattened, or deteriorated around the entire perimeter, full replacement is the only effective fix. Hardware adjustment alone resolves many draught complaints when the seal itself is still in good physical condition.
3. How long do aluminium window seals last in Australia?
EPDM rubber seals, the most common type in aluminium frames, typically last 10 to 15 years in sheltered positions and 8 to 12 years on sun-exposed north or west-facing elevations. Silicone seals can reach 15 to 20 years due to superior UV resistance. TPE gaskets average 8 to 12 years, while mohair pile weatherstrips on sliding windows last 5 to 8 years depending on usage frequency. Coastal salt air, intense UV, and harsh cleaning products all accelerate degradation beyond these baselines.
4. What type of seal does my aluminium window use?
Aluminium windows use several distinct seal types depending on their location and function. Perimeter compression seals (bubble gaskets) create the weather barrier between sash and frame on casement and awning windows. Wedge or push-in glazing gaskets hold glass within the frame. Sliding windows use flipper seals, mohair pile weatherstrips, and blade seals at meeting rails. Each profile is engineered to fit specific extruded channels in the aluminium frame, so identifying your window system brand and series is essential for sourcing the correct replacement.
5. Should I replace my window seals or upgrade to new aluminium windows?
Seal replacement is the cost-effective choice when your aluminium frame is structurally sound, hardware functions correctly after adjustment, glass units are clear, and this is the first replacement or previous seals lasted close to their expected lifespan. Consider upgrading to new windows when seals fail repeatedly within short cycles, frame corrosion has progressed into the seal channels, you have single-glazed frames that cannot meet current energy performance requirements, or hardware is obsolete. Modern aluminium window systems with thermally broken frames and factory-integrated seal technology eliminate recurring gasket failures entirely.
More Window & Door Guides