What Is an Aluminium Channel for Windows and Why It Matters
Every window needs something to grip the glass, protect its edges, and tie the pane into the surrounding frame. That something is usually an aluminium channel — a simple extruded profile that does a surprising amount of structural and aesthetic work behind the scenes.
An aluminium channel for windows is an extruded aluminium profile — typically U-shaped, C-shaped, or lipped — used to hold, protect, or frame glass within a window system. It provides edge retention, weathersealing support, and a clean finished appearance for both residential and commercial glazing.
Homeowners replacing old glazing, glaziers fitting shopfronts, builders framing new openings, and architects specifying curtain walls all rely on these profiles daily. The reason is straightforward: aluminium delivers corrosion resistance, a high strength-to-weight ratio, full recyclability, and thermal stability that other materials struggle to match in exterior window applications.
What Exactly Is an Aluminium Window Channel
Strip away the jargon and an aluminium channel has three core parts. The web is the flat base that sits against the frame or reveal. The two legs (also called flanges) rise from either side of the web, creating the open trough that receives the glass edge. The gap between those legs is the channel opening — its width determines which glass thickness the profile can accommodate, with room left for glazing tape, rubber gaskets, or sealant.
When glass slides into the channel, the legs support it laterally while the web anchors the assembly to the aluminium window frame. Gaskets or setting blocks inside the channel prevent glass-to-metal contact, absorb thermal movement, and block water ingress. It is a deceptively simple arrangement that keeps panes secure for decades.
Why Aluminium Outperforms Other Channel Materials
Steel channels rust. Even galvanised steel eventually loses its protective coating in coastal or high-moisture environments, leading to staining and structural weakening. Aluminium, by contrast, forms a self-healing oxide layer that resists corrosion without additional treatment — a property documented by the Aluminium Federation (ALFED) as giving the metal one of the highest corrosion resistances of common engineering materials.
Plastic window trim and vinyl trim options — often made from uPVC — handle moisture well enough, but they degrade under prolonged UV exposure. Over time, vinyl window trim becomes brittle, discolours, and loses dimensional stability, particularly in Australia’s high-UV climate zones. Timber channels face a different problem entirely: moisture absorption leads to swelling, rot, and insect attack, demanding ongoing maintenance that aluminium window trim simply does not require.
Aluminium also weighs roughly one-third as much as steel while maintaining comparable engineering strength through correct profile design. That combination of light weight, durability, and minimal upkeep is why aluminium channels remain the default choice for window glazing across residential and commercial projects alike.
The real question is not whether aluminium is the right material — it is which profile shape, size, and finish suits your specific window configuration.
Types of Aluminium Channel Profiles Used in Windows
Profile shape dictates function. A channel that works perfectly for a fixed shopfront panel will fail in a sliding window track, and one designed for edge trimming has no business bearing structural load. Picking the right aluminium channel starts with understanding what each shape actually does when paired with glass.
U-Channel and C-Channel for Glass Retention
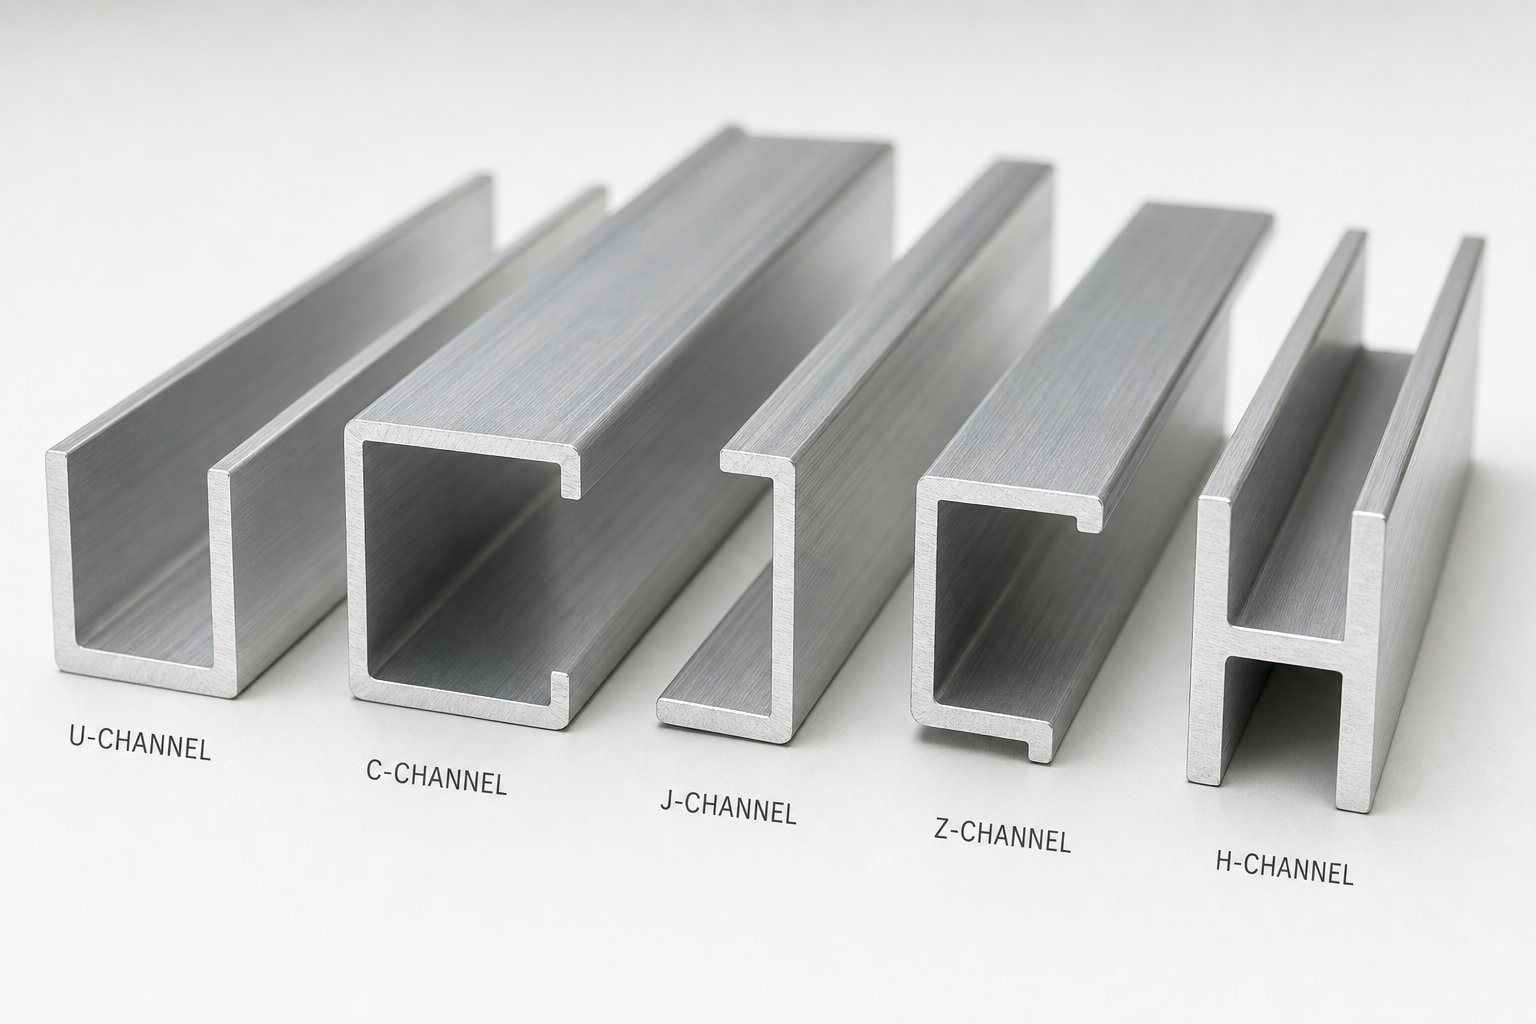
The aluminium u channel is the workhorse of window glazing. Its symmetrical open trough — two equal legs rising from a flat web — grips glass on both sides simultaneously. Slide a pane into the channel, pack the clearance space with glazing tape or a rubber gasket, and the glass is held firmly without any mechanical fasteners touching its surface. This makes the u-channel ideal for fixed glazing, shopfront displays, and glass balustrade panels where the pane does not need to move.
A u shaped aluminum channel typically ranges from 10 mm to 25 mm in internal width for residential window glass, though commercial applications can go wider. The key is matching the channel opening to the glass thickness plus gasket allowance — a relationship covered in detail in the sizing section below.
The aluminum c channel differs in one critical way: it has a lip or return on one leg, creating an asymmetrical profile. That lip allows snap-fit installation, where the glass or panel clicks into place behind the return rather than sliding in from the end. C channel aluminum profiles suit applications where end-loading is impractical — think retrofit situations or panels that need to be removable for cleaning. The trade-off is single-sided retention, so c-channel installations often rely on a secondary bead or clip on the open side for full security.
J-Channel, Z-Channel, and H-Channel for Trim and Transitions
Not every channel in a window system touches glass directly. Some manage the junctions between materials, and that is where J, Z, and H profiles earn their place.
A J-channel has one short leg and one tall leg connected by a web, forming a hook-like cross-section. In window applications, it finishes raw edges around the perimeter — concealing the gap between the aluminium frame and the surrounding wall cladding or render. It is also commonly used as a receiver for siding panels that terminate at a window opening.
Z channel aluminum profiles handle transitions between materials sitting at different planes. Picture a window frame that sits slightly proud of the external cladding: a z-channel bridges that step, acting as flashing to shed water while providing a clean shadow line. In Australian coastal builds, this water-management role is especially important for preventing moisture ingress behind cladding systems.
H-channels join two glass panels edge to edge. The profile is essentially two back-to-back u-channels sharing a common web. Each pane slots into its own channel, and the central web provides a narrow mullion between them. This is common in multi-panel fixed windows and internal glass partitions where a minimal frame appearance is desired.
| Profile Shape | Window Application | Glass Grip Style | Typical Use Case |
|---|---|---|---|
| U-Channel | Fixed glazing, shopfronts | Both sides (symmetrical) | Glass retention in non-operable windows |
| C-Channel | Retrofit panels, removable glazing | Single side with lip return | Snap-fit glass or panel installation |
| J-Channel | Perimeter edge finishing | Does not grip glass directly | Concealing frame-to-wall junctions |
| Z-Channel | Flashing and material transitions | Does not grip glass directly | Bridging plane changes, water shedding |
| H-Channel | Multi-panel glazing | Both sides on two adjacent panes | Joining glass panels with minimal mullion |
Choosing Between Structural and Decorative Channels
Every channel in a window system falls into one of two camps: structural or decorative. Structural channels form part of the load path — they physically hold the glass in place, resist wind pressure, and transfer dead loads into the frame or substrate. These profiles tend to have thicker walls (often 2 mm or more), deeper legs for greater glass bite, and are fixed with mechanical fasteners or welded into the frame assembly.
Decorative channels, by contrast, cover joints, conceal raw edges, or provide a visual accent without carrying meaningful load. They are thinner-walled, lighter, and often clip or adhesive-bond into position. A typical example is a snap-on aluminum u-channel cover strip that hides the screw line on a window sub-frame — it looks clean but contributes nothing to glass retention.
Confusing the two categories leads to problems. Specifying a decorative trim channel where a structural one is needed risks glass displacement under wind load. Conversely, using a heavy structural profile for a purely cosmetic role adds unnecessary cost and complicates installation. The distinction matters most in high-wind regions and upper-storey windows where pressure loads are significant — situations governed by AS 2047 in Australia.
With profile shape and structural role clarified, the next consideration is dimensional: how wide, how deep, and how thick does the channel need to be for your specific glass and frame combination?
Aluminium Channel Sizes and How to Measure for Windows
Ordering the wrong size channel is one of the most common — and most avoidable — mistakes in window glazing. A profile that is too narrow will not accept the glass; one that is too wide leaves the pane rattling inside. The difference between a perfect fit and a costly re-order often comes down to a few millimetres of clearance that were never accounted for.
How to Match Channel Size to Glass Thickness
The relationship between channel opening and glass thickness is not one-to-one. You always need clearance — space on each side of the glass for glazing tape, rubber gaskets, or silicone sealant. Without that gap, the glass sits metal-to-metal, which creates stress points and eliminates any capacity for thermal expansion.
A practical rule: the channel’s internal width should be approximately 1.5 mm to 3 mm wider than the nominal glass thickness. This clearance accommodates setting blocks, gasket compression, and minor glass thickness variations from the manufacturer.
Here is how that plays out for common residential and commercial glass:
- 4 mm glass (single-pane residential) — internal channel width of approximately 6 to 7 mm
- 6 mm glass (standard single glazing) — internal channel width of approximately 8 to 9 mm
- 10 mm glass (toughened panels, balustrades) — internal channel width of approximately 12 to 13 mm
- 12 mm glass (heavy commercial glazing) — internal channel width of approximately 14 to 15 mm
- Double-glazed units (20-24 mm) — internal channel width of approximately 25 to 27 mm
The critical calculation is straightforward: Internal Width = Overall Width minus (2 x Wall Thickness). Always run this formula before purchasing, because suppliers typically list the overall external width — not the internal opening your glass actually fits into.
Standard Aluminium Channel Dimensions Explained
Aluminium channel dimensions vary across aluminum channel profiles, but a core set of stock sizes covers the majority of window glazing scenarios in Australia. The table below maps common aluminum u channel sizes to their typical window applications.
| Overall Width (mm) | Leg Height (mm) | Wall Thickness (mm) | Internal Width (mm) | Typical Window Application |
|---|---|---|---|---|
| 12 | 12 | 2 | 8 | 4 mm single-pane louvres |
| 20 | 15 | 2 | 16 | 6-10 mm fixed residential glazing |
| 25 | 15 | 3 | 19 | 10-12 mm toughened panels |
| 30 | 15 | 3 | 24 | Double-glazed IGUs (20 mm units) |
| 40 | 20 | 3 | 34 | Heavy commercial double glazing |
| 50 | 25 | 3 | 44 | Thick laminated or triple-glazed units |
| 50 | 50 | 5 | 40 | Structural shopfront glazing (deep bite) |
A 2 inch aluminum u channel (approximately 50 mm overall width) is the largest stock profile most suppliers carry. Anything beyond that typically requires a custom extrusion run — worth considering for large-scale commercial projects but uneconomical for a single residential window.
Before purchasing, verify these key measurement points:
- Internal width — the actual space available for glass and gaskets
- External (overall) width — determines how the channel fits into the frame rebate or reveal
- Leg depth (flange height) — controls how much glass edge is captured, often called “bite”
- Wall gauge (thickness) — affects rigidity and load capacity; thicker walls suit structural roles
Reading Supplier Specifications Without Confusion
Specification sheets for aluminum channels sizes can be confusing because different suppliers label the same dimension differently. One might call the external measurement “width” while another uses “width” to mean the internal opening. The safest approach is to look for three explicit numbers: overall width, wall thickness, and flange height. From those three, you can derive everything else.
The dimension that matters most for glass fit is always the internal width. If a spec sheet only lists overall width and wall thickness, apply the formula (Overall Width minus twice the Wall Thickness) to confirm the opening suits your glass plus gasket assembly.
Leg depth is the second priority. For structural glazing, Australian Standard AS 1288 recommends a minimum glass edge cover (bite) relative to the pane size and wind load. Deeper legs provide more bite, which translates to greater resistance against suction forces — particularly relevant for upper-storey windows and exposed coastal sites.
Wall thickness, meanwhile, has some flexibility. A thicker wall adds rigidity but also reduces internal clearance for the same overall width. If you are using compressible EPDM gaskets rather than rigid setting blocks, a slightly tighter internal width can work because the gasket deforms to accommodate the glass. Conversely, if you plan to wet-glaze with silicone sealant, you want a wider gap — around 3 mm per side — to ensure the sealant achieves adequate depth for a proper bond.
Understanding these aluminum channel specifications removes the guesswork from ordering. But dimensions alone do not determine how a channel performs over time — that depends heavily on the surface finish applied to the aluminium before it reaches your window frame.
Aluminium Channel Finishes and Their Impact on Window Performance
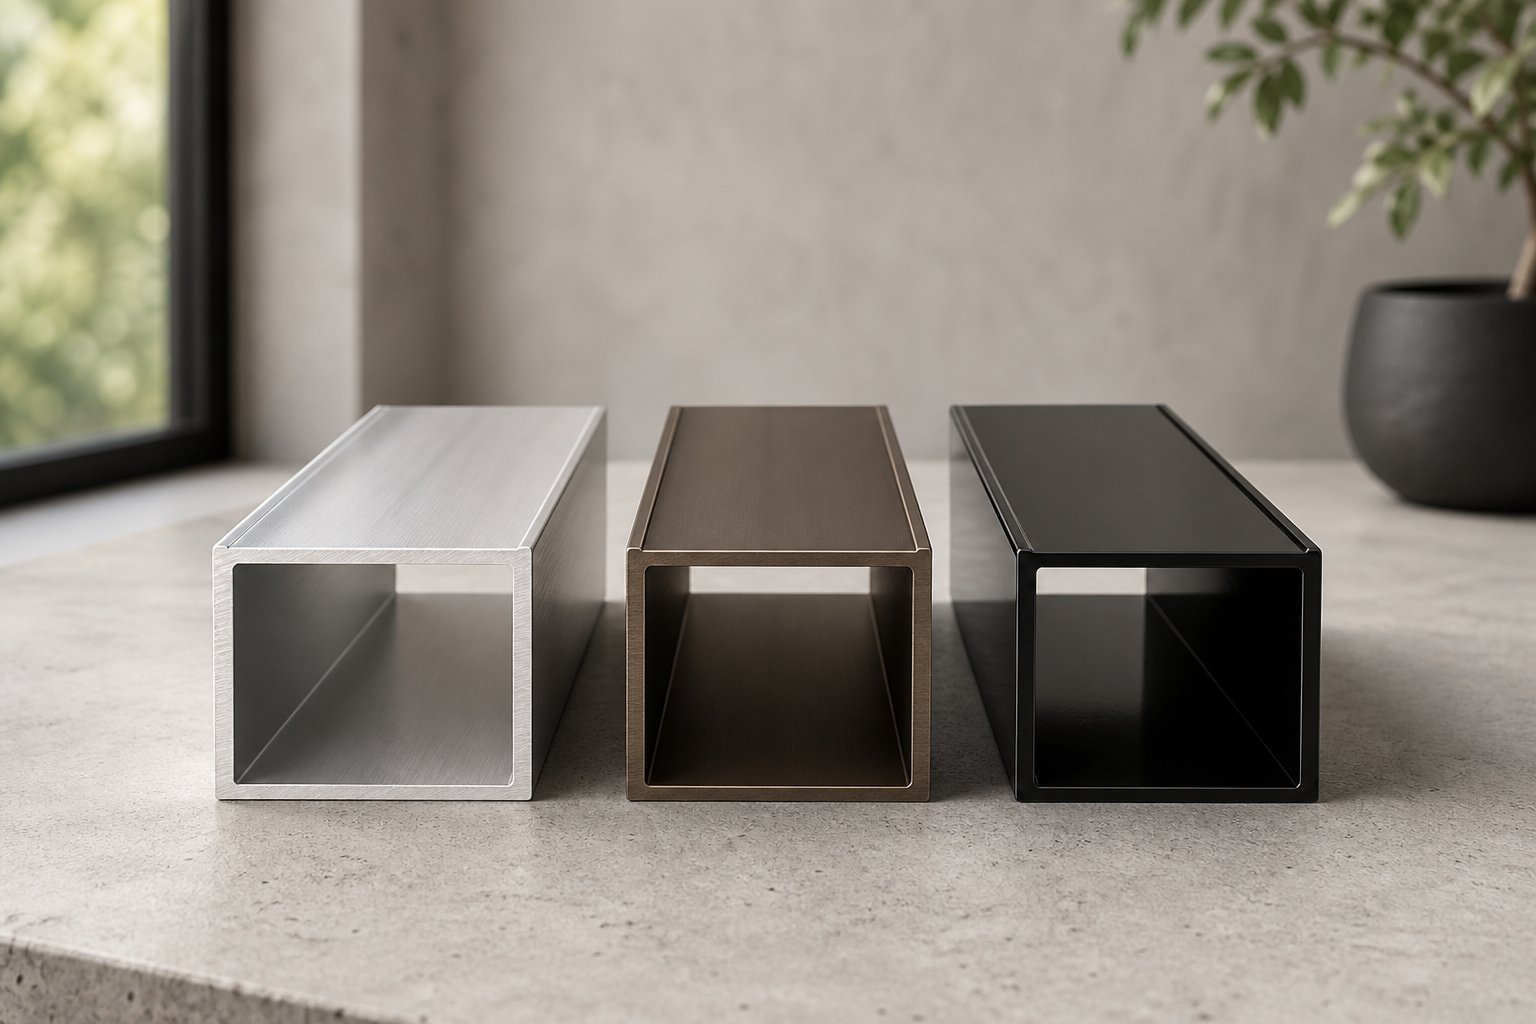
A channel with perfect dimensions can still fail prematurely if its surface finish is wrong for the environment. Finish is not just cosmetic — it is the first line of defence against UV degradation, salt spray, pollution, and moisture. Choosing between mill finish, anodised, and powder-coated aluminium metal trim determines how long your channels look good and function properly in real-world conditions.
Anodized, Powder-Coated, and Mill Finish Compared
Mill finish is raw aluminium straight from the extrusion press. It has a dull, slightly silvery appearance and relies solely on aluminium’s natural oxide layer for protection. Mill finish is the most economical option, but that thin natural oxide offers limited resistance to atmospheric attack — particularly in coastal or industrial areas. It suits concealed channels hidden within frame rebates where appearance and weather exposure are not concerns.
An anodized aluminum channel undergoes an electrochemical process that thickens the natural oxide layer to between 15 and 25 microns for architectural applications. This creates a hard, translucent coating that resists abrasion and corrosion while retaining a metallic aesthetic. Anodised finishes achieve a surface hardness of 300 to 400 Vickers — harder than most steels — making them exceptionally scratch-resistant. The trade-off is a limited colour palette, mostly confined to natural silver, bronze, and dark grey tones.
Powder coating applies a dry polymer powder electrostatically, then cures it at high temperature to form a thick film (typically 60 to 80 microns). This finish delivers the widest colour range — hundreds of RAL shades including black aluminum trim, white, and custom matches — along with strong UV and weather resistance. For alu trim exposed to the elements, powder coating provides the most versatile combination of protection and design flexibility.
| Finish Type | Durability | UV Resistance | Colour Options | Cost Level | Best Window Application |
|---|---|---|---|---|---|
| Mill Finish | Low — relies on natural oxide only | Poor — oxidises and dulls over time | None (raw silver) | Lowest | Concealed channels, interior use |
| Anodised | High — 15-25 micron oxide layer | Good — resists fading in moderate exposure | Limited (silver, bronze, charcoal) | Medium-High | Protected exterior, interior aluminum moulding trim |
| Powder Coated | Very High — 60-80 micron polymer film | Excellent — minimal chalking or fade | Extensive (200+ RAL colours) | Medium-High | Fully exposed exterior channels |
How Finish Choice Affects Longevity in Exterior Applications
Environment dictates finish. A black aluminium u channel on a beachfront home in Queensland faces a completely different challenge than the same profile on a sheltered Melbourne townhouse. Coastal salt spray, high-UV exposure in northern Australia, and industrial pollutants near refineries or ports each accelerate different failure modes.
In coastal zones, chloride-laden air attacks unprotected aluminium aggressively. Research on coastal aluminium performance confirms that salt concentration, duration of surface wetness, and temperature cycles are the primary corrosion drivers near the ocean. Powder-coated channels with proper chrome phosphate pretreatment offer the longest service life in these conditions — high-performance coatings are tested to withstand over 4,000 hours of salt spray exposure.
In high-UV regions (most of Australia, frankly), powder coating again outperforms because its thick polymer layer resists chalking and colour fade far longer than a thin anodised film. Anodising remains a solid choice for alum trim in partially sheltered locations — under eaves, on south-facing elevations, or in interior applications where UV exposure is indirect.
Industrial environments introduce acidic or alkaline pollutants that can attack both finishes. Here, the pretreatment beneath the topcoat matters as much as the finish itself. Proper surface preparation — degreasing, etching, and conversion coating — ensures the finish bonds at a molecular level and resists delamination under chemical attack.
Colour Matching Channels to Window Frames
A mismatched channel finish stands out immediately, especially on aluminum trim molding visible from the exterior. The goal is seamless integration with the overall window system.
Three colour families dominate Australian window projects:
- Black — the most popular contemporary choice. Black aluminum trim creates bold contrast against light-coloured renders and pairs naturally with dark window frames. Specify the same RAL or powder coat code used on the window frame to avoid subtle shade differences between channel and frame.
- White — common in traditional and coastal homes. White powder-coated channels blend with white window frames and lighter cladding systems.
- Natural aluminium (silver/charcoal) — anodised finishes in natural or dark grey tones suit industrial-style builds and complement raw concrete or timber cladding.
When ordering, request a colour sample chip from the same powder coat batch your window frames will use. Slight batch-to-batch variation is normal in powder coating, so matching from the same production run eliminates visible discrepancies once the channels and frames sit side by side on the finished building.
Finish protects the channel. But protection only matters if the channel is correctly applied to the right window type — and different window styles demand very different channel configurations.
Aluminium Channel Applications Across Window Styles
A channel that performs flawlessly in a fixed shopfront can be entirely wrong for a sliding window, and what works on a single residential casement may fall short in a multi-storey curtain wall. Window style determines how the glass moves (or does not move), how loads transfer through the frame, and how much tolerance the channel system needs to accommodate. Getting this match right is the difference between a window that seals quietly for decades and one that rattles, leaks, or binds within a year.
Fixed-Pane and Shopfront Glazing Channels
Fixed windows are the simplest channel application because the glass never moves. A U-channel receives the pane, gaskets fill the clearance space, and the assembly stays put permanently. This makes fixed glazing the most forgiving configuration for channel selection — tolerances can be tighter, and there is no wear from repeated operation.
In commercial shopfronts, the channel depth becomes a structural decision rather than a purely dimensional one. Larger glass panels generate higher wind loads, and the channel legs must provide enough “bite” — the amount of glass edge captured within the profile — to resist suction forces pulling the pane outward. For structural glazing in shopfront applications, leg depths of 20 mm or more are common, ensuring the glass remains retained even under significant negative pressure during storm events.
Decorative framing channels, by contrast, sit in front of the glass rather than gripping its edge. These shallower profiles — often used as aluminum window cladding over timber or steel sub-frames — provide a clean finished appearance without contributing to glass retention. The structural work happens behind them, in the primary frame system. Think of aluminum window wrap as a protective and aesthetic layer: it shields the underlying frame material from weather while presenting a uniform aluminium face to the street.
Aluminum capping for windows follows a similar logic on residential projects. Older timber-framed windows can be wrapped with aluminium capping profiles that protect exposed wood from moisture and UV damage without requiring full frame replacement. The capping channel slides over or clips onto the existing timber, and the result is a low-maintenance exterior that looks like a modern aluminium window from the outside. This approach — sometimes called aluminum window capping or capping windows with aluminum — extends the life of sound timber frames by decades while eliminating the painting cycle.
Sliding and Casement Window Channel Requirements
Operable windows introduce movement, and movement demands different channel thinking.
Sliding windows rely on an aluminium track channel at the sill — a specialised profile with a flat running surface and low-profile guide rails that keep the sliding sash aligned as it travels horizontally. The track must be smooth, dimensionally consistent along its full length, and designed with drainage slots to evacuate water that inevitably enters the track cavity during rain. Any irregularity in the track profile causes the sash to bind or jump, so manufacturing tolerances for sliding track channels are tighter than for fixed glazing profiles.
The glass within a sliding sash still sits in a perimeter channel, but here the channel is part of the moving panel rather than the fixed frame. Weight matters — heavier channel profiles add mass to the sash, increasing roller load and reducing ease of operation. Builders typically specify thinner-walled channels for sliding sash perimeters compared to fixed-frame equivalents, relying on the sash’s overall rigidity rather than the channel alone for structural performance.
Casement windows swing open on hinges, and their channels serve a dual purpose: glass retention and weathersealing. The perimeter channel around a casement sash must accommodate compression seals that press against the fixed frame when the window closes. This means the channel legs often incorporate grooves or rebates for EPDM gaskets — a detail absent from simple fixed-glazing channels. Because casement sashes experience repeated opening and closing cycles, the channel-to-gasket interface must tolerate compression set over thousands of operations without losing seal integrity.
Tolerance requirements differ markedly between these two window types. A fixed window can work with channel clearances as tight as 1.5 mm per side. Sliding windows need slightly more room to account for roller wear and track deflection. Casement windows need the tightest gasket compression but also enough clearance for the sash to close without excessive force — a balance that demands precise coordination between channel dimensions, gasket durometer, and hinge geometry.
Specialty Applications and Project-Scale Considerations
Beyond standard residential windows, aluminium channels play a system-level role in larger architectural assemblies where individual component selection cannot happen in isolation.
Curtain wall systems — the non-load-bearing glass facades common on commercial and multi-storey buildings — use aluminium framing members that function as deep structural channels spanning floor to floor. These are not off-the-shelf profiles. Curtain wall mullions typically range from 114 mm to 254 mm in system depth, with face widths of 50 to 76 mm, engineered to carry wind loads, dead loads, and thermal movement simultaneously. The glazing channel within these mullions must accommodate insulated glass units while maintaining air infiltration rates below 0.3 L/s per square metre — a performance threshold that demands factory-controlled gasket installation and precise dimensional tolerances.
Highlight windows, clerestory strips, and multi-panel configurations add another layer of complexity. When several windows sit adjacent in a continuous band, the channels between panels must align perfectly to maintain consistent sightlines. H-channels joining panels need to match the visual weight of the surrounding frame, and any aluminum wrap trim at the perimeter must transition cleanly between the window system and the wall cladding without creating water traps.
At project scale — a multi-unit residential development, a commercial fitout with dozens of openings, or a mixed-use building combining shopfronts with upper-level windows — channel selection becomes a coordination exercise. The engineering team determines load requirements, the fabricator confirms which profiles can be extruded and finished to specification, and the installation crew needs channels that arrive cut to length with hardware pre-fitted. Any disconnect between these teams creates site delays and costly rework.
This is where working with a full-service aluminium window supplier simplifies the process considerably. A partner like MEICHEN — who handles system recommendation, engineering coordination, material calculation, manufacturing, quality control, and logistics under one roof — removes the back-and-forth between separate profile suppliers, fabricators, and engineering consultants. For builders and architects managing multi-window projects, that integrated workflow means channel specifications are confirmed against the actual window system rather than guessed from generic catalogue data.
Whether the project involves a single residential renovation or a full building envelope, the channel must suit the window style it serves. But even a perfectly matched profile will underperform if it is cut poorly, fitted loosely, or sealed incorrectly — which brings the conversation to installation technique.
How to Install Aluminium Channels on Window Frames
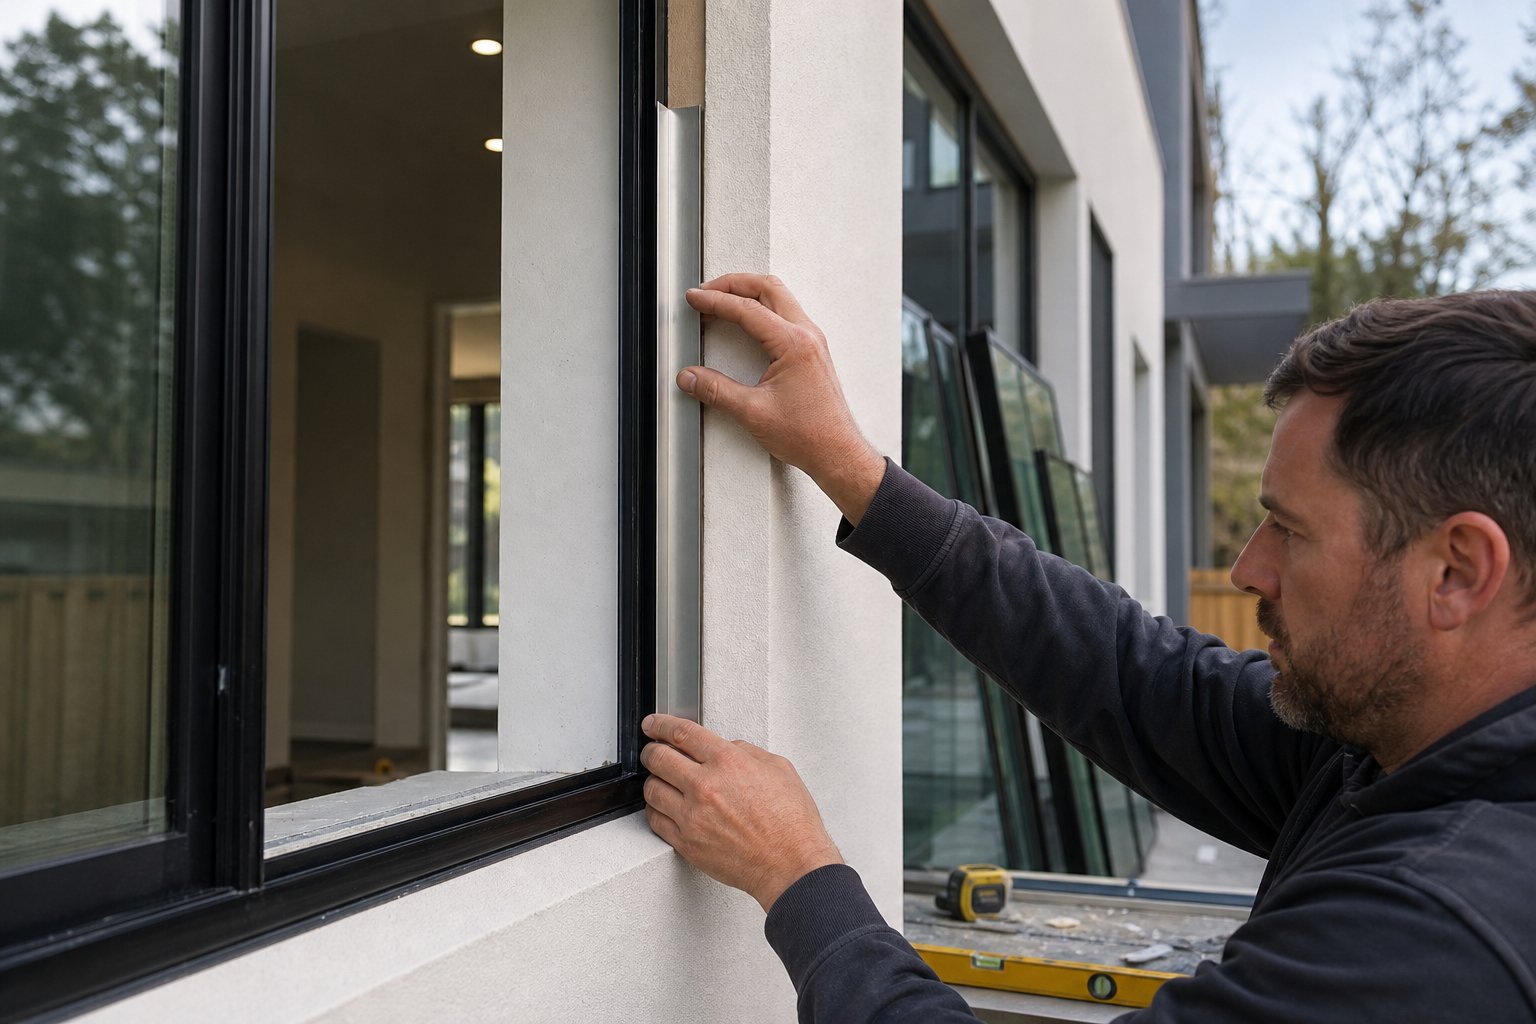
A channel that is perfectly sized and beautifully finished still depends entirely on how it is fitted. Poor installation introduces rattling, water ingress, and premature seal failure — problems that get blamed on the product when the real culprit is technique. Whether you are a glazier fitting metal exterior window trim on a new build or a homeowner replacing a deteriorated aluminum window casing on an older home, the process follows the same logical sequence: prepare, cut, fit, glaze.
Preparing the Window Opening for Channel Installation
Start with the reveal — the internal faces of the window opening where the channel will sit. Any irregularity here transfers directly into the finished installation. Dust, loose render, paint nibs, and mortar splatter all prevent the channel from seating flat against the substrate.
Clean the reveal surfaces thoroughly, then check for plumb and level using a spirit level on both vertical jambs and the head. Measure the diagonals of the opening: if they differ by more than 2 mm, the opening is out of square. Out-of-square reveals require either shimming behind the channel to bring it true, or custom-cutting the channel ends at a slight angle rather than a standard 90-degree mitre. Skipping this check is one of the most common causes of uneven gaps and visible misalignment in finished window aluminum trim.
Verify your channel dimensions against the actual opening one final time. Measure at three points — top, middle, and bottom for width; left, centre, and right for height. Openings in older Australian brick veneer and weatherboard homes are rarely perfectly consistent, so take the smallest measurement as your working dimension and allow for packing where the opening is wider.
Cutting, Fitting, and Securing Aluminium Channels
Aluminium cuts cleanly with the right blade. A compound mitre saw fitted with a non-ferrous cutting disc (carbide-tipped, high tooth count) delivers the most precise results for aluminum window trim exterior applications. For smaller jobs or site work without power, a hacksaw with a fine-tooth blade (24 or 32 teeth per inch) works well — just clamp the channel securely and cut with steady, even strokes to avoid distorting the profile walls.
After every cut, deburr the edges. A small file or fine-grit sandpaper removes the sharp lip left by the blade, preventing it from interfering with gasket seating or scratching the glass edge during installation. This step takes seconds but prevents problems that persist for the life of the window.
Follow this sequential checklist for a clean installation:
- Measure — confirm the channel length against the prepared opening at the exact position it will sit.
- Mark — scribe the cut line using a fine marker or scoring tool, accounting for any mitre angle at corners.
- Cut — use a mitre saw or hacksaw with a non-ferrous blade; keep the channel clamped firmly to prevent vibration.
- Deburr — file or sand all cut edges smooth, inside and out.
- Dry-fit — place the channel into position without sealant to verify length, alignment, and corner joints before committing.
- Seal — apply a bead of neutral-cure silicone to the back of the channel web where it contacts the reveal or frame.
- Fasten — secure with countersunk stainless steel screws at 300 mm centres, or use structural adhesive tape for lighter decorative glass trim molding applications where screw holes are undesirable.
Fastening method depends on the channel’s role. Structural channels that retain glass under wind load need mechanical fixings — screws into the frame or reveal. Decorative channels functioning purely as glass trim or edge covers can often rely on adhesive bonding or compression fit alone, provided the substrate is clean and stable.
Glazing the Glass into the Channel
With channels fixed in place, the glass goes in. This is where setting blocks, edge clearances, and sealant choice determine whether the window performs quietly for decades or develops problems within months.
Setting blocks — small pads of silicone rubber or neoprene — sit at the bottom of the channel to support the glass weight and prevent edge-to-metal contact. Industry glazing guidelines specify that setting blocks should be centred at quarter points along the bottom channel, with a durometer hardness of approximately 85 Shore A. Their length should be proportional to the glass area — never less than 100 mm for standard residential panes.
Edge clearance — the gap between the glass edge and the channel web — must be maintained on all four sides. This gap allows for thermal expansion of both the glass and the aluminium frame without creating stress concentrations. A minimum of 3 mm edge clearance is standard practice for most residential glazing, increasing for larger commercial panels where thermal movement is greater.
Once the glass is positioned on its setting blocks with correct clearances confirmed, seal the assembly. Two approaches dominate:
- Dry glazing — pre-formed EPDM gaskets compress between the glass face and channel legs, providing a resilient weatherseal that accommodates movement. Preferred for operable windows and situations where future glass replacement may be needed.
- Wet glazing — neutral-cure silicone sealant fills the gap between glass and channel. Provides a permanent bond with excellent water resistance. Common in fixed glazing and shopfronts, particularly when wrapping windows in aluminum capping systems where a seamless exterior appearance is the priority.
Common mistakes at this stage include insufficient edge clearance (leading to thermal stress cracks in the glass), omitting setting blocks (causing the glass to bear directly on the channel base and chip at the edge), and forgetting drainage provisions. Every bottom channel needs weep slots or drainage paths so that any moisture entering the glazing rebate can escape rather than pooling against the glass edge — a detail that prevents long-term seal degradation and staining, especially in exposed coastal locations.
A well-installed channel is invisible in the best sense: it holds the glass securely, sheds water reliably, and never draws attention to itself. But even the best installation requires occasional attention — and knowing when a channel needs maintenance versus replacement saves both money and frustration over the window’s lifespan.
Maintaining and Troubleshooting Aluminium Window Channels
Aluminium channels are low-maintenance — not no-maintenance. That distinction matters. Left entirely alone, even a well-finished profile will accumulate grime, trap moisture, and eventually show signs of degradation that compromise both appearance and function. A simple routine keeps metal window trim performing quietly for decades, while knowing what to look for prevents small issues from escalating into full channel replacement.
Routine Cleaning and Corrosion Prevention
The cleaning process is straightforward. Mix a mild pH-neutral detergent — standard dish soap works — with warm water, and wipe down the channel surfaces with a soft cloth or sponge. Rinse thoroughly with clean water and dry with a soft towel to prevent water spots. That is genuinely all it takes for routine upkeep.
What you avoid matters as much as what you use. Abrasive cleaners, steel wool, scouring pads, and solvent-based products damage anodised and powder-coated surfaces irreversibly. Oknalux’s maintenance guidelines emphasise that harsh chemicals strip protective coatings and accelerate the very corrosion they are meant to prevent. Stick to soft materials and neutral pH solutions — nothing stronger is needed for aluminium.
Frequency depends on environment. For most Australian homes, cleaning every three to four months maintains the finish and prevents buildup. Properties in coastal areas or near industrial zones need monthly attention. Salt spray, airborne pollutants, and fine particulate matter settle into channel crevices and — when combined with moisture — create localised corrosion cells that pit the surface over time. Industry maintenance data confirms that salt air is the most aggressive accelerant of aluminium degradation, particularly for hardware and trim channel components at the window bottom trim where water naturally collects.
Preventive steps beyond cleaning include:
- Clearing drainage slots and weep holes quarterly — blocked drainage causes standing water inside the channel cavity, which accelerates oxidation at the base
- Checking that sprinkler systems do not direct water onto aluminium channels — repeated wetting and drying cycles concentrate mineral deposits on the surface
- Applying a silicone-based protective treatment annually to exposed channels in harsh environments, particularly after professional cleaning
- Lubricating any moving components (track channels, sliding hardware) with silicone dry spray twice yearly — in spring and autumn — to prevent grit buildup from becoming abrasive
Signs Your Aluminium Window Channel Needs Replacement
Aluminium channels do not fail suddenly. They degrade gradually, and the early warning signs are easy to spot if you know where to look. Replace the channel — rather than attempting repair — when you observe any of the following:
- Visible pitting or white oxidation powder — a chalky white residue on the surface indicates the protective finish has broken down and active corrosion is underway beneath. Surface oxidation can sometimes be restored, but deep pitting that you can feel with a fingernail means the profile has lost structural integrity at those points.
- Rattling glass panels — glass that moves or vibrates within the channel indicates the legs have deformed, the gaskets have compressed beyond recovery, or the channel itself has widened from fatigue. A pane that once sat snugly should not develop play over time without cause.
- Water ingress around the channel perimeter — moisture appearing inside the glazing rebate or running down the interior wall below the window suggests the channel-to-frame seal has failed. Check drainage first, but persistent leaks after clearing weep holes point to channel or sealant failure.
- Cracked or deformed channel legs — aluminium does not flex back once it yields. A leg that has been bent outward by impact, thermal stress, or improper glass installation will not return to its original position and cannot grip the glass correctly.
- Failed gaskets or sealant pulling away from the channel — while gaskets themselves are replaceable, sealant that has lost adhesion to the channel surface often indicates the underlying finish has degraded. If new sealant will not bond reliably to the channel, replacement is more cost-effective than repeated resealing.
Well-maintained aluminium channels in moderate environments can last 40 years or more. In aggressive coastal or industrial conditions without regular cleaning, that lifespan can halve. The economics are clear: a few hours of annual maintenance costs far less than premature aluminum molding trim replacement across an entire window system.
Troubleshooting Common Channel Problems
Not every issue demands full replacement. Many common problems have targeted solutions that restore performance without the cost and disruption of pulling channels out entirely.
Rattling glass: The most frequent complaint. If the glass moves within the channel, the gasket or glazing tape has lost compression. Remove the glazing bead (if accessible), clean the channel interior, and install fresh EPDM gaskets or self-adhesive glazing tape to take up the slack. For molding aluminum profiles with wet-glazed silicone, adding a bead of neutral-cure silicone along the glass-to-channel junction restores the seal without removing the pane.
Water leaks: Start at the bottom. Check that weep holes and drainage slots are clear — a blocked weep hole is the single most common cause of water appearing inside a window frame. Use a fine probe or compressed air to clear debris. If drainage is functioning but water still enters, inspect the perimeter sealant between the channel and the frame or reveal. Cracked or separated sealant needs cutting out and replacing with fresh neutral-cure silicone. Pay particular attention to the window bottom trim area where water pressure is highest.
Thermal bridging and condensation: Standard aluminium channels conduct heat readily, and in cold weather this can cause condensation to form on the interior channel surface. If condensation is persistent and causing mould or paint damage, consider replacing the channel with a thermally broken alternative — a profile incorporating a polyamide strip that interrupts the thermal path through the aluminium. This is a more involved upgrade, but it addresses the root cause rather than masking the symptom.
Surface degradation and chalking: Early-stage oxidation — a dull, whitish film — can often be restored without replacement. Clean the affected area thoroughly, then apply a proprietary aluminium restoration compound designed for architectural finishes. Follow with a silicone protective coating to slow recurrence. If the degradation has progressed to deep pitting or the powder coat is flaking in sheets, refinishing is impractical and the trim channel should be replaced.
The pattern across all these issues is the same: catch problems early, address the root cause rather than the symptom, and maintain a regular inspection habit that prevents small defects from compounding into system failures. A channel that receives even modest attention repays that effort many times over in continued performance — which brings the final question into focus: how do you pull together everything covered so far into a confident purchasing decision?

How to Select the Right Aluminium Channel for Your Window Project
Seven variables. That is all that separates a confident channel specification from an expensive guess. Every decision covered in the preceding sections — profile shape, dimensions, finish, window style, installation method, and maintenance expectations — distils into a short list of selection criteria you can run through before placing an order for aluminum channels.
Key Selection Criteria at a Glance
Before committing to any aluminum extrusion channel, confirm these factors against your project requirements:
- Window type — fixed, sliding, casement, or curtain wall? Each demands a different profile geometry and tolerance range.
- Glass thickness — measure the actual pane (including any IGU spacer) and add gasket clearance to determine internal channel width.
- Exposure conditions — coastal salt spray, high UV, industrial pollutants, or sheltered interior? This drives finish selection.
- Finish requirements — mill finish for concealed channels, anodised for protected exterior or interior use, powder-coated for full weather exposure.
- Structural vs decorative role — load-bearing channels need thicker walls and deeper legs; cosmetic trim can be lighter and clip-fixed.
- Project scale — single residential opening or multi-unit development? Scale affects whether stock profiles suffice or custom aluminum channel extrusions are warranted.
- Budget — balance upfront cost against lifespan; a powder-coated extruded aluminum u channel costs more initially but eliminates refinishing for decades.
The table below maps common window scenarios directly to recommended channel configurations — use it as a quick-reference decision matrix when specifying aluminium channels for a project.
| Window Scenario | Recommended Profile | Size Range (Internal Width) | Recommended Finish |
|---|---|---|---|
| Single-pane fixed residential | U-Channel | 8–13 mm | Powder coat or anodised |
| Double-glazed fixed window | U-Channel (deep leg) | 25–27 mm | Powder coat |
| Sliding window track | Track channel with guide rails | Per system specification | Anodised (low friction) |
| Casement perimeter | U-Channel with gasket groove | Per sash system | Powder coat (colour matched) |
| Shopfront structural glazing | U-Channel (heavy wall, deep bite) | 34–44 mm | Powder coat |
| Multi-panel H-join | H-Channel | Matched to glass thickness | Powder coat or anodised |
| Edge trim and cladding junction | J-Channel or Z-Channel | N/A (non-glazing) | Powder coat (colour matched) |
| Timber frame capping (retrofit) | Capping channel (clip-on) | Matched to existing frame | Powder coat |
Working with a Specialist Supplier for Project Success
Generic metal stockists sell alu channel by the metre. They can tell you the dimensions and alloy grade. What they cannot do is confirm whether that u channel aluminum extrusion actually integrates with your window system — whether the gasket groove aligns with the hardware, whether the finish matches the frame, or whether the leg depth satisfies AS 2047 requirements for your specific wind region.
That gap between raw material supply and system-level confidence is where specialist aluminium window suppliers earn their value. A dedicated partner understands how each aluminum extruded channel interacts with glazing hardware, weatherseals, and structural engineering requirements. They coordinate across disciplines rather than leaving builders to reconcile conflicting specifications from separate profile, hardware, and glass suppliers.
For builders, developers, and architects managing complex projects — multi-unit developments, commercial fitouts, or mixed-use buildings with dozens of openings — partnering with a supplier who calculates materials, coordinates engineering, and delivers project-based supply eliminates the guesswork entirely. MEICHEN operates exactly this model: system recommendation, engineering coordination, material calculation, manufacturing, quality control, and logistics handled under one workflow from drawings to delivery. That integrated approach means alum channel specifications are validated against the actual window system before fabrication begins — not discovered to be wrong on site.
Whether your project is a single bathroom highlight window or a full building envelope with hundreds of openings, the selection logic remains the same. Match the profile to the window style, size it to the glass, finish it for the environment, and source it from someone who understands how all those pieces fit together. Get those fundamentals right, and the channel does what it should — holds your glass securely, invisibly, for the life of the building.
Frequently Asked Questions About Aluminium Channels for Windows
1. What is the difference between a U-channel and a C-channel for windows?
A U-channel has two symmetrical legs that grip glass on both sides, making it ideal for fixed glazing and shopfronts where the pane slides in from one end. A C-channel has an asymmetrical profile with a lip or return on one leg, allowing snap-fit installation where the glass clicks into place from the front. C-channels suit retrofit situations or removable panels but typically require a secondary bead on the open side for full glass security. U-channels provide stronger two-sided retention and are the standard choice for permanent window glazing in both residential and commercial applications across Australia.
2. How do I choose the correct aluminium channel size for my window glass?
Measure your glass thickness first, then add 1.5 mm to 3 mm of clearance on each side for gaskets or glazing tape. The channel’s internal width — not its external dimension — must accommodate the glass plus this clearance. For example, 6 mm glass needs an internal channel width of approximately 8 to 9 mm. Use the formula: Internal Width equals Overall Width minus twice the Wall Thickness. Always verify internal width, external width, leg depth (which determines how much glass edge is captured), and wall gauge before ordering. For complex projects, a specialist aluminium window supplier like MEICHEN can calculate the correct specifications based on your window system and engineering requirements.
3. Which finish is best for exterior aluminium window channels in Australia?
Powder coating offers the best all-round protection for exterior-exposed aluminium channels in Australian conditions. Its thick polymer film (60 to 80 microns) resists UV degradation, salt spray, and colour fading far longer than mill finish or standard anodising. For coastal properties in Queensland, NSW, or Western Australia, powder-coated channels with chrome phosphate pretreatment provide the longest service life. Anodised finishes work well in sheltered or interior applications where UV exposure is indirect. Mill finish should only be used for concealed channels hidden within frame rebates where weather exposure is minimal.
4. How often should aluminium window channels be cleaned and maintained?
In most Australian environments, clean aluminium channels every three to four months using mild pH-neutral detergent, warm water, and a soft cloth. Coastal and industrial-zone properties need monthly cleaning due to accelerated salt and pollutant buildup. Avoid abrasive cleaners, steel wool, or solvent-based products as these damage protective coatings. Additionally, clear drainage slots and weep holes quarterly, lubricate sliding track channels with silicone spray twice yearly, and inspect gaskets annually for compression loss. Well-maintained channels in moderate environments can last 40 years or more, while neglected channels in aggressive coastal conditions may need replacement in half that time.
5. Can aluminium channels be used to cap existing timber window frames?
Yes, aluminium capping channels are specifically designed to slide over or clip onto existing timber window frames, protecting exposed wood from moisture and UV damage without requiring full frame replacement. The capping profile covers the exterior timber surfaces, presenting a modern aluminium appearance from the outside while the sound timber structure remains intact underneath. This approach eliminates the ongoing painting cycle and extends the life of timber frames by decades. Powder-coated capping channels are recommended for colour matching with surrounding aluminium windows and ensuring long-term weather resistance in Australian conditions.
More Window & Door Guides