What Is the Sill of a Window and Why Does It Matter
You walk past your windows every day, maybe set a plant on the ledge or wipe away condensation. But if someone asked you to point to the sill, would you get it right? Most people wouldn’t, and that’s completely fair. The terminology around window parts is surprisingly muddled.
A window sill is the horizontal structural component at the bottom of a window frame. It supports the window unit, directs water away from the wall, and provides a finished edge on both the interior and exterior of the home.
That’s the short version. The longer story is that this single piece of your window does a lot of heavy lifting. On the outside, the sill slopes slightly downward to shed rain and prevent moisture from pooling against the wall. On the inside, the flat ledge you probably think of as the “sill” is technically called a window stool, though almost nobody uses that term in everyday conversation. Both surfaces work together to keep your window stable, weather-tight, and visually finished.
The Simple Definition Every Homeowner Should Know
Think of window sills as the foundation of your window opening. They bear the weight of the window unit, keep the frame aligned, and act as the first line of defense against water intrusion. Without a properly functioning sill, even a high-quality window will eventually develop drafts, leaks, or structural issues. Window sill height also plays a role here, affecting everything from natural light to safety compliance on upper floors.
Why Spelling and Terminology Cause So Much Confusion
Search for this topic online and you’ll find people typing “window seal,” “window cill,” and even “window sil.” A window seal is actually a completely different component, a flexible gasket that blocks air and moisture between panes or around the frame. “Cill” is an older British English spelling that still appears in some trade contexts, but “sill” is the standard. Whether you write it as a windowsill or window sill, both forms are accepted, though the two-word version is more common in construction and building documentation.
Getting the name right matters more than you’d think. Telling a contractor you have a “broken seal” when you actually have a cracked sill can lead to the wrong diagnosis, wasted time, and unnecessary cost. The terminology confusion only grows when you start looking at the individual parts that surround the sill itself.
Window Sill Anatomy and the Parts Most People Confuse
The bottom of a window opening is actually made up of several distinct parts, each with its own name and job. Most homeowners lump them all together under “sill,” and even some contractors use the terms loosely. That casual shorthand works fine in everyday conversation, but it falls apart the moment you need to order a replacement part, describe damage to a professional, or follow a repair guide. Understanding the full windowsill meaning requires looking at each component individually.
Sill vs Stool vs Apron Explained
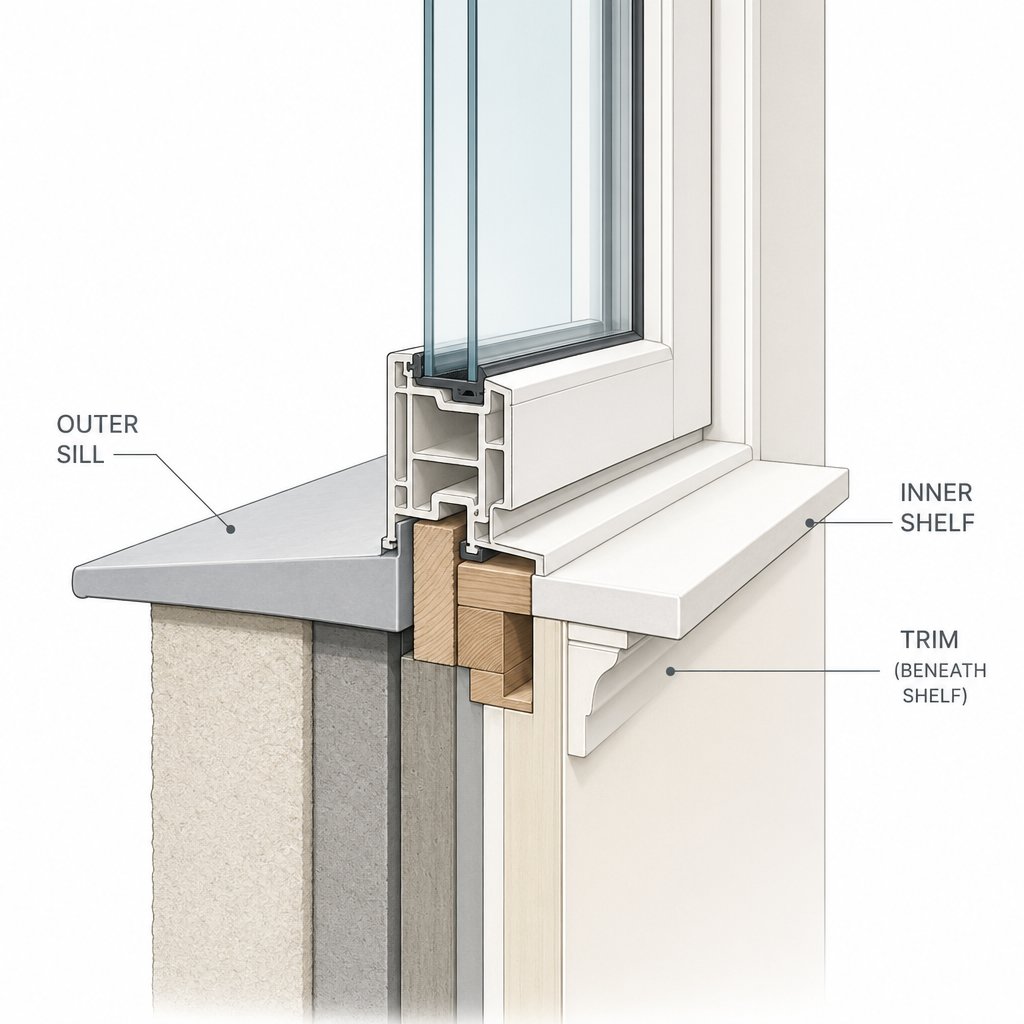
Here’s where the real confusion lives. When you lean on that flat ledge inside your home to water a plant or rest a coffee mug, you’re touching the stool, not the sill. The actual sill sits on the exterior side of the window, angled slightly downward so water runs away from the wall instead of pooling against it. These two parts sit at roughly the same level but serve very different purposes.
And just below that interior stool? There’s a trim piece called the apron that most people never think about, even though it’s right there in plain sight. Together, these three components form the complete bottom assembly of a window opening.
Here’s a breakdown of each part and what it actually does:
- Sill (exterior) — The outward-sloping structural piece at the very bottom of the window frame. Its primary job is shedding water away from the wall. On an outside window sill, you’ll notice a slight pitch, typically around 15 degrees, that prevents rain from sitting against the building envelope. The sill also supports the full weight of the window unit above it.
- Stool (interior) — The flat, horizontal shelf on the inside of the window that extends into the room. This is the part nearly everyone calls the “sill” in casual conversation. It provides a finished surface, covers the gap between the window frame and the interior wall, and yes, it’s where your plants end up. The stool typically overhangs the wall slightly on each side, creating small “horns” that align with the surrounding trim.
- Apron — The decorative trim board installed directly beneath the stool. It hides the gap between the stool’s underside and the wall surface, giving the window a polished, finished appearance. The apron usually matches the casing trim on the sides of the window for a cohesive look.
- Sill nose — The front edge of the sill or stool that faces outward. On exterior sills, the nose often features a drip groove, a small channel cut into the underside that forces water to drip straight down rather than running back along the wall. On interior stools, the nose may have a rounded or beveled profile for a cleaner finish.
A window sill pan, though not always visible, is another component worth knowing about. It’s a waterproof tray installed beneath the sill during construction to catch any moisture that gets past the sill itself. Think of it as a safety net, especially important in areas prone to wind-driven rain. If you’ve ever wondered about the difference between a window sill or seal, the pan is actually closer to the “seal” side of things, providing a hidden moisture barrier rather than a structural surface.
Other Window Parts You Should Recognise
The sill area doesn’t exist in isolation. Several surrounding components connect to it and influence how the whole assembly performs. Knowing these parts helps you see the bigger picture when evaluating your windows:
- Jambs — The vertical sides of the window frame that run from the head (top) down to the sill. The jambs hold the sash in place and, in operable windows, provide the track or channel the sash slides along. Side jambs connect directly to the sill at the bottom, so any sill damage can eventually affect jamb alignment too.
- Head — The top horizontal piece of the window frame, essentially the sill’s counterpart at the top of the opening.
- Casing — The trim that frames the window on the interior wall, running along both sides and across the top. The casing meets the stool at the bottom, which is why stool width and casing width need to coordinate for a clean joint.
So what is the sill of a window in the context of this full anatomy? It’s specifically the exterior, load-bearing, water-shedding bottom piece of the frame. Everything else, the stool, the apron, the sill nose, plays a supporting role around it. Getting these distinctions straight makes a real difference when you’re comparing interior and exterior sill requirements, which involve different materials, different slopes, and very different exposure to the elements.
Interior vs Exterior Window Sills and How They Differ
Knowing the names is one thing. Understanding how differently these two surfaces perform day to day is where it really starts to matter. An exterior sill and an interior window sill may sit at the same height in the wall, but they live in completely different worlds. One battles the weather. The other frames your living space. And the material for window sills you choose on each side needs to reflect that reality.
| Factor | Exterior Sill | Interior Sill (Stool) |
|---|---|---|
| Primary purpose | Shed water away from the wall and support the window unit | Provide a finished edge, shelf space, and a transition between frame and wall |
| Slope | Pitched outward (typically 5-15 degrees) to drain rainwater | Flat or nearly flat for usability |
| Material priorities | Moisture resistance, UV stability, freeze-thaw durability | Aesthetics, scratch resistance, design compatibility |
| Exposure level | Direct sun, rain, wind, temperature extremes | Controlled indoor climate with occasional condensation |
| Maintenance frequency | Inspect and treat every 1-2 years (more for timber) | Occasional cleaning; repaint or reseal every few years depending on material |
How Exterior Sills Protect Your Home From Water Damage
The exterior sill’s pitch is its most important feature. Even a slight outward slope prevents rainwater from pooling against the window frame and migrating into the wall cavity. That projection of at least 20 millimeters, ideally 30 to 50 millimeters, forces water droplets to break free and fall away before they can travel along the underside of the ledge and into the structure. Without that overhang, brickwork can spall, timber framing can rot, and moisture finds its way indoors.
Imagine a victorian style window sill outside a heritage home. Those deep stone or rendered sills weren’t just decorative. They were engineered to throw water well clear of the wall below. Modern exterior sills follow the same principle with updated materials, but the physics haven’t changed. UV exposure, driving rain, and seasonal temperature swings all demand a surface that won’t crack, warp, or absorb moisture over time.
Interior Sills and the Role They Play Indoors
Step inside and the priorities shift entirely. Interior sills, the stools, don’t need to shed rain. Instead, they serve as the visual anchor of the window opening, tying together the window sill and trim into a cohesive frame. They also provide that handy shelf for plants, photos, or a morning coffee.
Because indoor window ledges face a controlled environment, material choices lean toward appearance and feel rather than raw weather resistance. Wood, marble, and quartz are popular here precisely because they look and feel premium. The main threat indoors is condensation, especially in bathrooms and kitchens, so moisture tolerance still matters, just not to the same extreme as outside.
Where things get interesting is in the overlap. A poorly maintained exterior sill eventually causes interior problems: water stains on the stool, mould along the trim, even structural damage behind the wall. The two sides are connected through the same frame, which means neglecting one always catches up with the other. That connection also means the material you pick for each side needs to work as a system, not just look good in isolation.
Window Sill Materials Compared for Every Project Type
Picking a material that “looks nice” is easy. Picking one that still looks nice and performs well ten years from now, in your specific climate, on the correct side of the wall? That takes a bit more thought. The right material for an inside window sill in a dry, temperate bedroom is a terrible choice for an exterior ledge facing coastal salt spray. And yet, most guides treat material selection as a simple preference question rather than an engineering one.
Here’s a practical comparison of the most common sill materials, what they handle well, where they fall short, and which climates they’re best suited for.
| Material | Durability | Moisture Resistance | Maintenance Level | Best Climate Fit | Ideal Use Case |
|---|---|---|---|---|---|
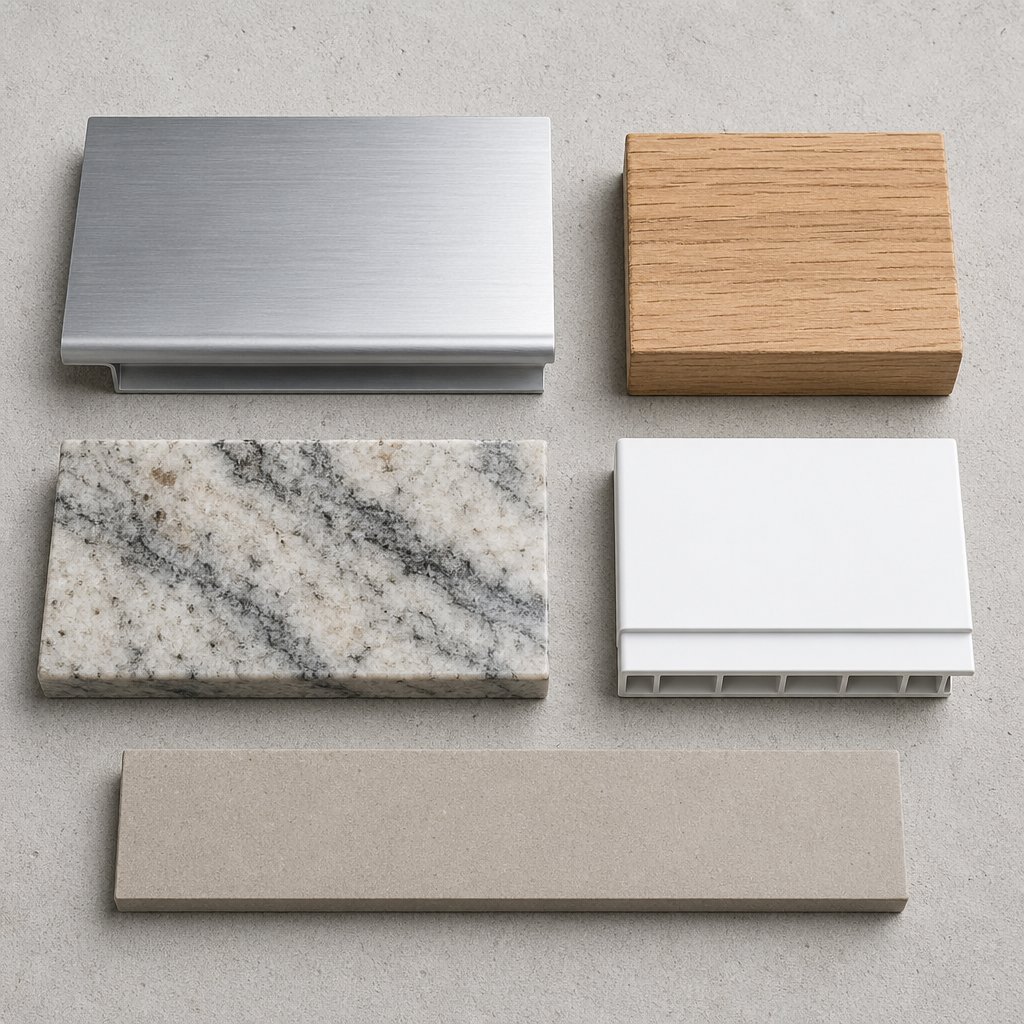
| Aluminium | Very high | Excellent — won’t rot, warp, or absorb water | Low — occasional wipe-down | Coastal, humid, and mixed climates | Exterior sills, integrated window systems, new builds and renovations |
| Wood (timber) | Moderate to high (species-dependent) | Low to moderate — vulnerable without sealing | High — regular sealing, painting, inspection | Mild, dry climates | Interior stools, heritage restorations, traditional aesthetics |
| Natural stone | Very high | High — naturally weather-resistant | Low | All climates, especially cold and wet | Exterior sills on brick or sandstone homes, premium interiors |
| Marble | High (but can stain) | Moderate — porous if unsealed | Moderate — needs periodic sealing | Dry to temperate climates | Interior stools in bathrooms, kitchens, luxury finishes |
| Tile | High | High (with proper grouting) | Moderate — grout lines need attention | Humid and wet climates | Interior sills in wet areas, budget-friendly renovations |
| PVC / uPVC | High | Excellent — completely non-absorbent | Very low | Humid, coastal, and cold climates | Exterior and interior sills, rental properties, low-budget projects |
| Composite | High | Very good | Low | Mixed and variable climates | Exterior sills, modern builds seeking wood-look without wood maintenance |
| Vinyl | Moderate | Good | Very low | Mild to moderate climates | Interior sills, replacement windows, cost-sensitive projects |
Wood, Stone, PVC, Aluminium and Other Common Materials
Timber remains one of the most popular choices for interior stools because of its warmth and natural grain. It suits heritage homes and traditional designs beautifully. The trade-off? Wood demands regular maintenance. Without consistent sealing and repainting, moisture creeps in, and rot follows. In humid or coastal areas, timber sills can deteriorate within just a few years if neglected. Advances in coating technology have improved timber’s durability, but it still requires more hands-on care than most alternatives.
Stone sills, including granite and bluestone, are the workhorses of exterior applications. They’re extremely durable, weather-resistant, and require almost no upkeep. You’ll often see them on older brick and sandstone homes where they’ve lasted decades with minimal attention. The downside is weight and cost. Stone is heavy, harder to cut and fit, and typically more expensive upfront.
Marble offers a premium look for interior applications, especially in bathrooms and kitchens. It’s visually striking but porous when unsealed, meaning it can stain or etch if exposed to acidic liquids. For a window ledge that doubles as display space in a living room, marble works well. For an exterior sill exposed to rain? Not ideal.
PVC and uPVC sills have gained ground for good reason. They’re completely non-absorbent, affordable, and can be manufactured to mimic the look of wood or stone. They won’t rot, warp, or need painting. The aesthetic is more utilitarian than natural materials, but for rental properties, wet areas, or budget-conscious renovations, PVC is hard to beat.
Aluminium stands out as a strong all-round performer, particularly for exterior sills. It’s lightweight, corrosion-resistant, and essentially maintenance-free beyond an occasional clean. As part of integrated aluminium window systems like those from MEICHEN, aluminium sills are engineered directly into the frame, which eliminates the gaps and joints where water typically finds its way in. That integrated design makes aluminium especially well-suited for Australian coastal and humid climates, where salt air and driving rain test every material’s limits. The one consideration is thermal conductivity. Aluminium transfers heat more readily than wood or PVC, though modern thermally broken frames address this effectively.
Composite materials blend wood fibres with polymers to deliver the appearance of timber without the moisture vulnerability. They resist rot, insects, and warping, making them a practical middle ground for homeowners who want a natural look on exterior sills without the maintenance commitment. Vinyl, while similar in low-maintenance appeal, is generally thinner and less rigid, better suited to interior applications or as part of a vinyl replacement window system.
Which Material Suits Your Climate Best
Climate is the factor most people overlook, and it’s arguably the most important one. A material that performs flawlessly in a dry inland town can fail dramatically on a humid coastline.
- Humid coastal areas — Salt air accelerates corrosion in untreated metals and breaks down timber finishes faster than you’d expect. Aluminium, PVC, and stone handle these conditions best. Timber needs aggressive maintenance schedules to survive, and even then, it’s fighting an uphill battle.
- Cold climates with freeze-thaw cycles — Water seeps into tiny cracks, freezes, expands, and splits the material from the inside out. Stone and PVC resist this well. Marble and tile can crack if water penetrates unsealed grout or surface pores. Composite holds up reasonably well, though prolonged ice exposure can test adhesion over time.
- Hot, dry climates — UV degradation is the primary threat here. Vinyl can become brittle and discolour after years of direct sun. PVC holds up better but still fades. Stone, aluminium, and composite materials tolerate sustained heat and UV exposure without significant deterioration. Timber dries out and can split if not regularly oiled or sealed.
- Mixed or variable climates — If your region swings between wet winters and hot summers, you need a material that handles both extremes. Aluminium and composite are the safest bets. PVC works well too, though it may show cosmetic wear faster than metal or engineered options.
Whether you’re searching for window seals or sills, the terminology can blur, but the material decision shouldn’t. A window seal or sill failure both lead to the same outcome: moisture where it doesn’t belong. Choosing the right material for your climate and application is the single most effective way to prevent that.
Material choice sets the foundation, but it doesn’t exist in a vacuum. The size and proportions of your sill, how high it sits from the floor, how deep it extends from the wall, are just as critical to getting the installation right.
Window Sill Dimensions and Standard Height Guidelines
You’ve picked the right material. It suits your climate, matches your style, and fits your budget. But how big should the sill actually be? Dimensions are the detail most homeowners skip over entirely, and they’re the detail that determines whether a window feels right in a room or slightly off.
Standard Sill Heights and What Building Codes Require
Sill height is the distance from the finished floor to the bottom of the window opening. In most residential construction, that measurement falls between 24 and 36 inches, roughly 600 to 900 millimeters. But that range isn’t arbitrary. It shifts depending on what the room is used for.
Living rooms and bedrooms typically sit at the lower end, around 24 to 36 inches, to maximise natural light and views. Kitchens push higher, 36 to 42 inches, so the sill clears the countertop. Bathrooms go higher still, often 48 to 60 inches from the floor, because privacy matters more than a view when you’re standing at the vanity.
Building codes add another layer. For upper-storey windows, most codes require a minimum sill height to prevent falls, particularly in homes with children. Egress windows in bedrooms and basements flip that logic: the sill can’t be higher than 44 inches from the floor, ensuring occupants can climb out during an emergency. These aren’t suggestions. Inspectors check them, and non-compliant windows can stall a home sale.
How Sill Depth Relates to Wall Thickness
Sill depth, the distance from the window frame to the front edge of the stool or exterior sill, is driven almost entirely by wall thickness. Average depths range from 2 to 8 inches depending on the construction type. A standard timber-framed wall with plasterboard might only need a 3- to 4-inch deep stool. A double-brick cavity wall could require 6 inches or more. What is a window stool without the right depth? A piece of trim that either falls short of the wall surface or overhangs awkwardly.
The exterior window sill depth matters just as much. It needs enough projection, typically 20 to 50 millimeters beyond the wall face, to throw water clear of the cladding below. Too shallow, and rain tracks back along the underside and into the brickwork.
Before you order materials or brief a builder, here are the key dimensional considerations to verify:
- Measure sill height from the finished floor, not the subfloor. New carpet or tiles can add 10 to 25 millimeters.
- Check your local building code for minimum sill heights on upper storeys and maximum sill heights for egress windows.
- Measure wall thickness at the window opening to determine the correct stool and sill depth. Round up to the nearest full inch.
- Confirm the window exterior sill projects far enough past the wall face to shed water effectively.
- Account for sill length: the sill should extend 1.5 to 3 inches beyond the jambs on each side for a proper seat and finished appearance.
- Verify measurements at multiple points across the opening. Older homes settle unevenly, and a sill cut to one measurement may not sit level across the full width.
Getting these numbers right isn’t glamorous work, but it’s the difference between a window that performs quietly for decades and one that starts showing problems within a few years. And those problems? They have a way of announcing themselves in very specific, very predictable patterns.
Signs Your Window Sill Needs Attention
Correct dimensions keep a sill performing well on day one. But what about year five, or year fifteen? Every sill material degrades eventually, and the difference between a minor touch-up and a major repair often comes down to catching problems early. The tricky part is that most damage starts quietly, in places you don’t normally look.
Early Warning Signs You Should Not Ignore
You don’t need specialised tools to inspect your windowsills. A flathead screwdriver, a flashlight, and ten minutes per window will tell you most of what you need to know. Restoration professionals recommend pressing gently into timber sills with a screwdriver to check for soft spots, and examining the frame for gaps, separation, or insect damage. The same principles apply to any sill material.
Here are the most common damage signs, ranked from earliest warnings to issues that demand immediate action:
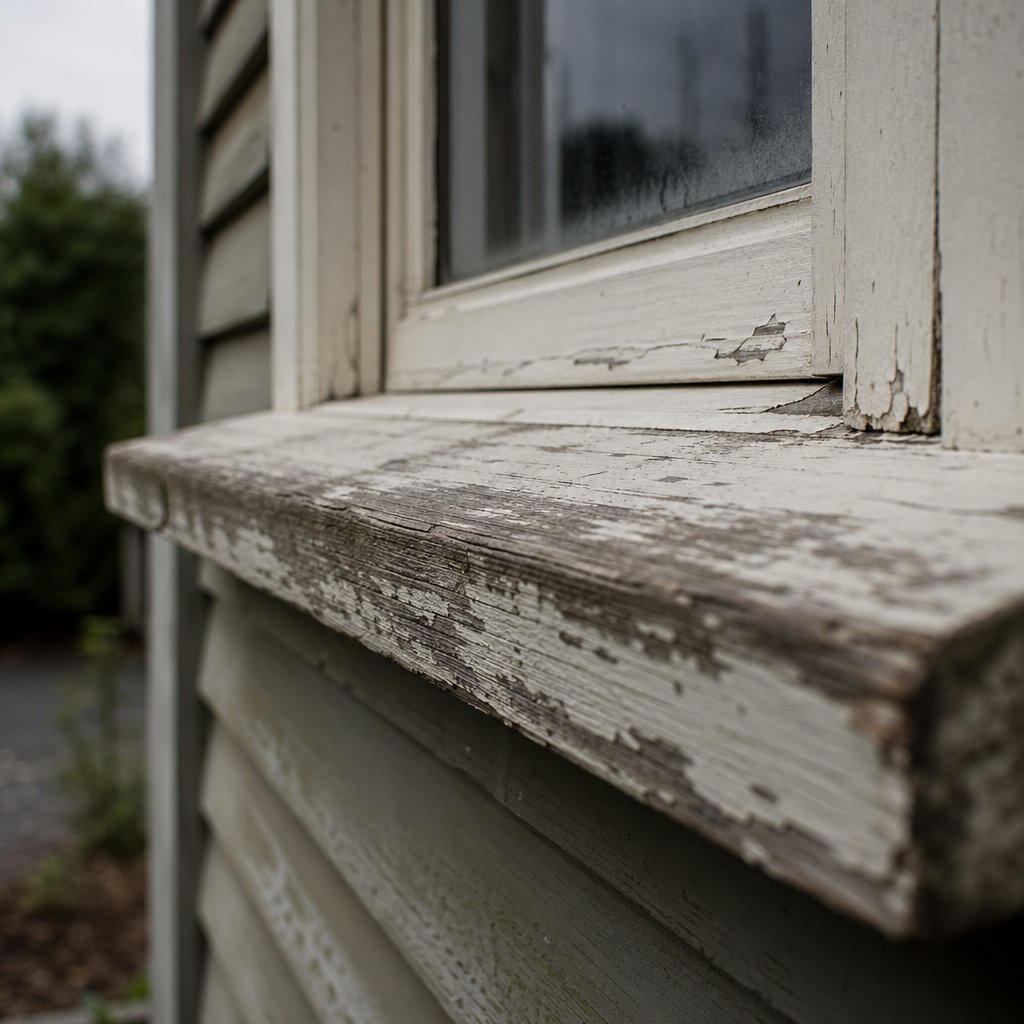
- Peeling or bubbling paint — This is usually the first visible clue. Paint lifts when moisture gets beneath the surface, so even a small patch of peeling on a window stool or exterior sill signals that water is finding a way in. Easy to fix now, expensive to ignore.
- Hairline cracks or surface discolouration — Fine cracks in stone, concrete, or rendered sills allow water to penetrate deeper with every rain cycle. Discolouration on interior stools, especially yellowish or brownish staining, often points to condensation damage or a slow leak from outside.
- Mould or mildew growth — Dark spots along the stool window area or where the sill meets the frame mean persistent moisture. Kitchens and bathrooms are common culprits, but mould on a living room sill suggests water is migrating from the exterior. Don’t just clean it. Find the source.
- Soft spots or spongy timber — Press your screwdriver into the wood. If it sinks in easily, crumbles, or flakes, rot has already taken hold beneath the surface. This is especially common on window sills exterior faces where paint has failed and moisture has been sitting unnoticed.
- Warping, bowing, or separation from the frame — When a sill pulls away from the jambs or the wall, the structural connection is compromised. You might notice gaps where the stool meets the casing, or the exterior sill may visibly bow. Understanding the window stool vs sill distinction matters here, because damage on one side often signals hidden problems on the other.
- Noticeable drafts or rattling — If you feel cold air near the bottom of a closed window, the sill area has likely lost its seal. This could mean failed caulking, a cracked sill, or frame separation that’s opened a direct path for outside air. At this stage, the sill meaning goes beyond aesthetics. It’s a structural and performance failure that needs professional assessment.
- Crumbling, spalling, or deep structural rot — Concrete or stone that’s flaking apart, timber that breaks off in chunks, or visible daylight through gaps around the sill. These are urgent. Water is entering the wall cavity, and the longer it continues, the more damage spreads to framing, insulation, and interior finishes.
How a Damaged Sill Affects Energy Efficiency and Comfort
A deteriorating sill doesn’t just look bad. It creates a thermal bridge, a weak point in your building envelope where heat transfers freely between inside and outside. In winter, warm air escapes through cracks and gaps around the sill. In summer, hot air infiltrates the same way. Your heating and cooling system works harder, your energy bills climb, and the room near that window never quite feels comfortable.
Air infiltration through a failed sill also carries moisture. That moisture condenses inside wall cavities, promoting mould growth you can’t see and degrading insulation performance over time. A single compromised sill won’t collapse your energy rating, but multiply it across several windows in an older home and the cumulative effect is significant.
The real cost of sill damage isn’t the sill itself. It’s everything the sill was supposed to protect. Catching these signs early keeps a small problem from becoming a renovation-scale headache, but knowing what you’re looking at is only half the decision. The other half is figuring out whether to repair what’s there or replace it entirely.
Repair or Replace Your Window Sill
Not every damaged sill needs to come out. Some problems are skin-deep, fixable in an afternoon with a putty knife and a can of paint. Others run much deeper, and patching over them only delays a bigger, more expensive failure. The challenge is telling the two apart before you commit time and money to the wrong approach.
| Repair Indicators | Replace Indicators |
|---|---|
| Surface paint peeling or bubbling with solid wood underneath | Soft, spongy, or crumbling material when probed with a screwdriver |
| Shallow scratches, chips, or pet damage on the stool | Deep rot extending more than a few millimeters into the timber |
| Hairline cracks in stone or rendered sills | Wide cracks, spalling, or pieces breaking away |
| Minor discolouration or staining | Persistent mould that returns after cleaning, indicating moisture behind the sill |
| Small gaps in caulking between sill and frame | Visible separation between the sill and the jambs or wall |
| Cosmetic wear that doesn’t affect the sill’s slope or drainage | Warping or bowing that changes the sill’s pitch and allows water to pool |
When a Simple Repair Will Do the Job
If the damage is cosmetic, a DIY fix is well within reach. The process is straightforward: clean the surface, scrape away any loose material, apply a quality wood filler or marine-grade epoxy, sand it smooth once dry, then prime and repaint. Wood filler repairs are beginner-friendly and can be completed in a few hours with no power tools. A tube of filler, a sanding block, and matching paint will run you under $50 in most cases.
For stone or concrete sills with minor surface cracks, a colour-matched exterior filler or patching compound does the same job. The key question is always whether the underlying structure is still sound. Push a screwdriver into the material. If it resists, you’re dealing with a surface issue. Fill it, seal it, and move on.
Whether you spell it window sill or window sill, the repair logic is the same: if the core material is intact and the sill still drains properly, a cosmetic fix will buy you years of additional life.
When Full Replacement Is the Smarter Investment
Deep rot, structural warping, and persistent moisture ingress all point toward replacement. Patching a sill that’s rotted through is like painting over rust. It looks better for a month, then the problem resurfaces worse than before.
Here’s where the cost calculation gets interesting. What is a window sill replacement actually going to cost? Professional sill replacement typically runs $250 to $800 per window depending on material and size, while a cosmetic repair averages $150 to $350. That gap seems manageable until you factor in modern window construction. In many integrated window systems, the sill isn’t a separate piece you can swap out independently. It’s engineered as part of the frame, which means replacing the sill may require replacing the entire window unit. That pushes costs to $450 to $1,500 or more per window.
This doesn’t mean replacement is always the wrong call. A severely damaged window windowsill that’s allowing water into the wall cavity is actively degrading your framing, insulation, and interior finishes. The longer you wait, the more the surrounding damage compounds. In those cases, replacing the full unit is genuinely the cheaper option over time.
A good rule of thumb: if the damage is limited to the surface and the sill still does its job structurally, repair it. If the sill has lost its shape, its seal, or its structural integrity, replace it, and factor in whether your window system allows sill-only replacement or requires the full unit. That decision shapes not just the repair bill, but how you maintain the result going forward.
How to Maintain Your Window Sills and Make Them Last
Repairing or replacing a sill is reactive. Maintenance is the proactive side of the equation, and it’s far cheaper. A few minutes of seasonal attention can add years to a sill’s lifespan regardless of material, yet most homeowners never think about their sills until something visibly fails.
Seasonal Maintenance Checklist by Material
How much work your sills demand depends almost entirely on what they’re made of. Timber needs the most hands-on care, while aluminium and PVC are close to set-and-forget. Here’s a practical breakdown organised by frequency:
- Every few months — Wipe down interior stools and any window ledge shelf areas with a damp cloth to remove dust and moisture. For vinyl window sills and PVC, a mild soap-and-water solution is all you need. Clean window tracks at the same time, since debris there can block drainage and push water back toward the sill.
- Twice a year (spring and autumn) — Inspect caulking and weatherstripping around every sill for cracks or gaps. Weatherstripping should be checked every 6 to 12 months and replaced if you notice drafts or visible wear. In spring, look for condensation staining on interior stools, a sign that winter moisture has been sitting too long. In autumn, clear leaves and debris from exterior sills before wet weather arrives, since trapped organic matter holds moisture against the surface and accelerates decay.
- Annually — Clean weep holes on exterior sills using a pipe cleaner or small brush. These tiny drainage slots can clog with dirt and paint, trapping water inside the frame where it damages framing, insulation, and sheathing. Pour a small amount of water into the window track to confirm it drains freely. If it doesn’t, clear the blockage before it causes hidden damage. For timber sills, this is also the time to apply a fresh coat of sealant or wood hardener. Wood windows need repainting or restaining every 3 to 5 years to maintain their moisture barrier.
- Every few years — Aluminium sills in coastal areas should be checked for early signs of pitting or surface corrosion, though a simple wipe with mild detergent usually keeps them in good shape. Stone and marble sills benefit from resealing every 1 to 2 years to maintain stain resistance. If you’ve ever wondered what are the things on the side of windows called, those are the jambs, and their junction with the sill is a prime spot for caulk failure, so inspect those joints during this cycle too.
Simple Habits That Prevent Expensive Repairs
Most sill failures trace back to moisture sitting where it shouldn’t for too long. Keeping exterior surfaces clear of debris, maintaining caulk seals, and ensuring weep holes drain freely eliminates the three most common causes of premature sill deterioration. Whether you call it a window cill or a sill, the maintenance logic is identical: keep water moving away from the frame, and the frame stays sound.
Proper sill upkeep also supports overall window performance. A well-sealed sill reduces air infiltration, which means your heating and cooling systems work less and your energy bills stay lower. It’s a small investment of time that protects a much larger investment in your windows and your home’s envelope. And when the time comes for a new build, renovation, or full window replacement, that maintenance history shapes the choices you’ll make about materials, systems, and long-term value.

Choosing the Right Window Sill for Your Next Project
Every project has its own set of constraints, and the sill approach that works for a ground-up new build rarely makes sense for a heritage renovation or a single-window replacement. The material guides and maintenance checklists covered earlier all feed into one practical question: what’s the smartest sill decision for your situation right now?
Matching Your Sill Choice to Your Project
For new builds, you have the luxury of choosing materials, dimensions, and window sill detail from scratch. This is the time to match sill material to your climate zone, lock in correct depths for your wall type, and coordinate the window stool and apron with your interior trim scheme before anything is installed. Getting it right at this stage costs almost nothing extra. Fixing it later costs a lot.
Renovations are trickier. You’re working within existing wall thicknesses, opening sizes, and sometimes heritage constraints. If the current windows sills are structurally sound, a material-matched repair or refinish may be all you need. If they’re failing, replacement opens the door to upgrading both the sill and the window unit together, which often delivers better long-term value than swapping the sill alone.
For straightforward replacements, whether you call it a window cill or sill, the key question is whether your current system allows sill-only swaps or requires a full unit change. That answer determines your budget, your timeline, and your material options.
Why Integrated Window Systems Solve Common Sill Problems
Many of the issues covered in this article, water ingress at sill joints, thermal bridging through gaps, ongoing maintenance at connection points, stem from the same root cause: the sill and frame are separate components joined on site. Every joint is a potential failure point.
Integrated window systems eliminate that weakness by engineering the sill as part of the frame itself. There are no seams for water to exploit, no mismatched materials expanding at different rates, and far less ongoing maintenance. For homeowners, renovators, and builders exploring aluminium options, MEICHEN’s aluminium windows range offers energy-efficient, Australian-standard-compliant frames where the sill design is built in from the factory, not assembled piecemeal on site.
Choose your sill material based on climate and exposure, match dimensions to your wall thickness and building code, and wherever possible, opt for an integrated window system that removes the joints where most sill problems begin.
The sill is a small part of your home that quietly influences comfort, energy performance, and long-term maintenance costs. Give it the same attention you’d give any other structural decision, and it will return the favour for decades.
Frequently Asked Questions About Window Sills
1. What is the difference between a window sill and a window stool?
The window sill is the exterior, outward-sloping structural piece at the bottom of the window frame designed to shed water away from the wall. The window stool is the flat, horizontal interior ledge that extends into the room, the surface most people mistakenly call the sill. While both sit at roughly the same level within the wall, the sill handles weather protection and structural support, whereas the stool provides a finished interior edge, covers the gap between the frame and the wall, and serves as usable shelf space. Understanding this distinction helps you communicate accurately with contractors and order the correct replacement parts when needed.
2. What materials are best for window sills in humid or coastal climates?
Aluminium, PVC, and natural stone perform best in humid and coastal environments. Aluminium is corrosion-resistant, lightweight, and virtually maintenance-free, making it an ideal choice for integrated window systems in salt-air conditions. PVC is completely non-absorbent and affordable, while natural stone like granite or bluestone offers exceptional weather resistance with minimal upkeep. Timber sills struggle in these climates because salt air breaks down finishes quickly and promotes rot, even with aggressive maintenance schedules. Brands like MEICHEN offer aluminium window systems specifically engineered for Australian coastal conditions, with the sill built directly into the frame to eliminate vulnerable joints.
3. How do I know if my window sill needs to be repaired or replaced?
The deciding factor is whether the damage is cosmetic or structural. Surface-level issues like peeling paint, shallow scratches, hairline cracks, or minor staining can typically be repaired with wood filler, patching compound, sanding, and repainting. Structural problems such as deep rot, spongy or crumbling material, significant warping, visible separation from the frame, or persistent mould that keeps returning after cleaning all point toward replacement. A simple test is pressing a flathead screwdriver into the sill material. If it resists, a repair will likely hold. If it sinks in or the material crumbles, the sill has lost its integrity and needs to come out.
4. What is the standard height for a window sill from the floor?
Standard residential window sill heights typically range from 600 to 900 millimeters (24 to 36 inches) from the finished floor, though this varies by room function and building code. Living rooms and bedrooms usually sit at the lower end to maximise light and views, kitchens push to 36 to 42 inches to clear countertops, and bathrooms often go as high as 48 to 60 inches for privacy. Building codes also set minimum sill heights on upper storeys to prevent falls, and maximum sill heights for egress windows in bedrooms and basements to allow emergency escape. Always measure from the finished floor surface and check local code requirements before finalising your window placement.
5. How often should I maintain my window sills?
Maintenance frequency depends on the sill material. Timber sills need the most attention, requiring sealant or paint refresh every 3 to 5 years and biannual inspections for moisture damage. Aluminium and PVC sills are nearly maintenance-free, needing only occasional cleaning with mild soap and water. Regardless of material, you should inspect caulking and weatherstripping around all sills twice a year, clean weep holes on exterior sills annually to prevent drainage blockages, and clear debris from exterior ledges before wet seasons. These small seasonal habits prevent the moisture buildup that causes most premature sill failures and help maintain your home’s energy efficiency.
More Window & Door Guides