Step 1. Confirm Your Sliding Door Rollers Are the Problem
You brace both hands on the frame, lean your weight into it, and the door barely budges. Or maybe it moves, but with a grinding screech that makes the dog leave the room. That heavy, uneven slide is your aluminium door telling you something is wrong underneath.
Worn or broken sliding door rollers cause the majority of these symptoms. But they are not the only possibility. Spending money on new sliding glass door roller wheels before confirming the diagnosis can leave you with the same stuck door and a receipt you regret. A few minutes of inspection now saves real frustration later.
Signs Your Sliding Door Rollers Have Failed
Failing sliding glass door rollers announce themselves through feel and sound well before you can see the damage. Look for these indicators:
- The door drags, jumps, or feels significantly heavier than it used to
- Grinding, squealing, or a repeating click-thump sound while sliding
- An uneven gap at the top of the door — wider on one side than the other
- Lifting the handle makes the door easier to move (the rollers are no longer carrying the weight properly)
- Visible cracks, flat spots, or seized wheels when you tilt the door and inspect the bottom edge
If you notice two or more of these, the wheels on your sliding glass door are the likely culprit. A single symptom, though, warrants a closer look at other causes before you commit to a roller swap.
Ruling Out Track Damage and Frame Misalignment
Not every sticking door needs new rollers. These conditions mimic roller failure but require different fixes:
- Debris in the track — sand, leaves, pet hair, and small stones accumulate in the bottom channel and physically block movement
- Bent or dented track — a visible dip or raised section where the door catches at the same spot every time
- Frame misalignment — diagonal cracks in nearby walls, multiple doors or windows sticking simultaneously, or a recently settled building
- Oxidation buildup — a chalky white residue on the aluminium track surface, common in coastal areas of Australia where salt air accelerates corrosion
If the frame itself has shifted — particularly in newer homes still settling or older weatherboard and brick veneer properties with foundation movement — replacing rollers alone will not fix sliding door rollers permanently. The underlying structural issue needs addressing first.
The Quick Clean-and-Test Method
Before ordering parts, try this simple diagnostic. Vacuum the entire bottom track using a crevice attachment. Scrub out any caked-on grime with a stiff brush and wipe the channel dry. Apply a light coat of silicone-based lubricant — never WD-40, which attracts dust and evaporates quickly — then slide the door back and forth several times.
If the door glides noticeably better, debris was your main issue. If it still drags, grinds, or sits unevenly despite a clean track, the rollers themselves have failed and replacement is the correct next step. Knowing how to fix sliding door rollers starts with being certain they actually need fixing — and this test gives you that certainty in under ten minutes.
Step 2. Identify Your Roller Type and Source the Right Part
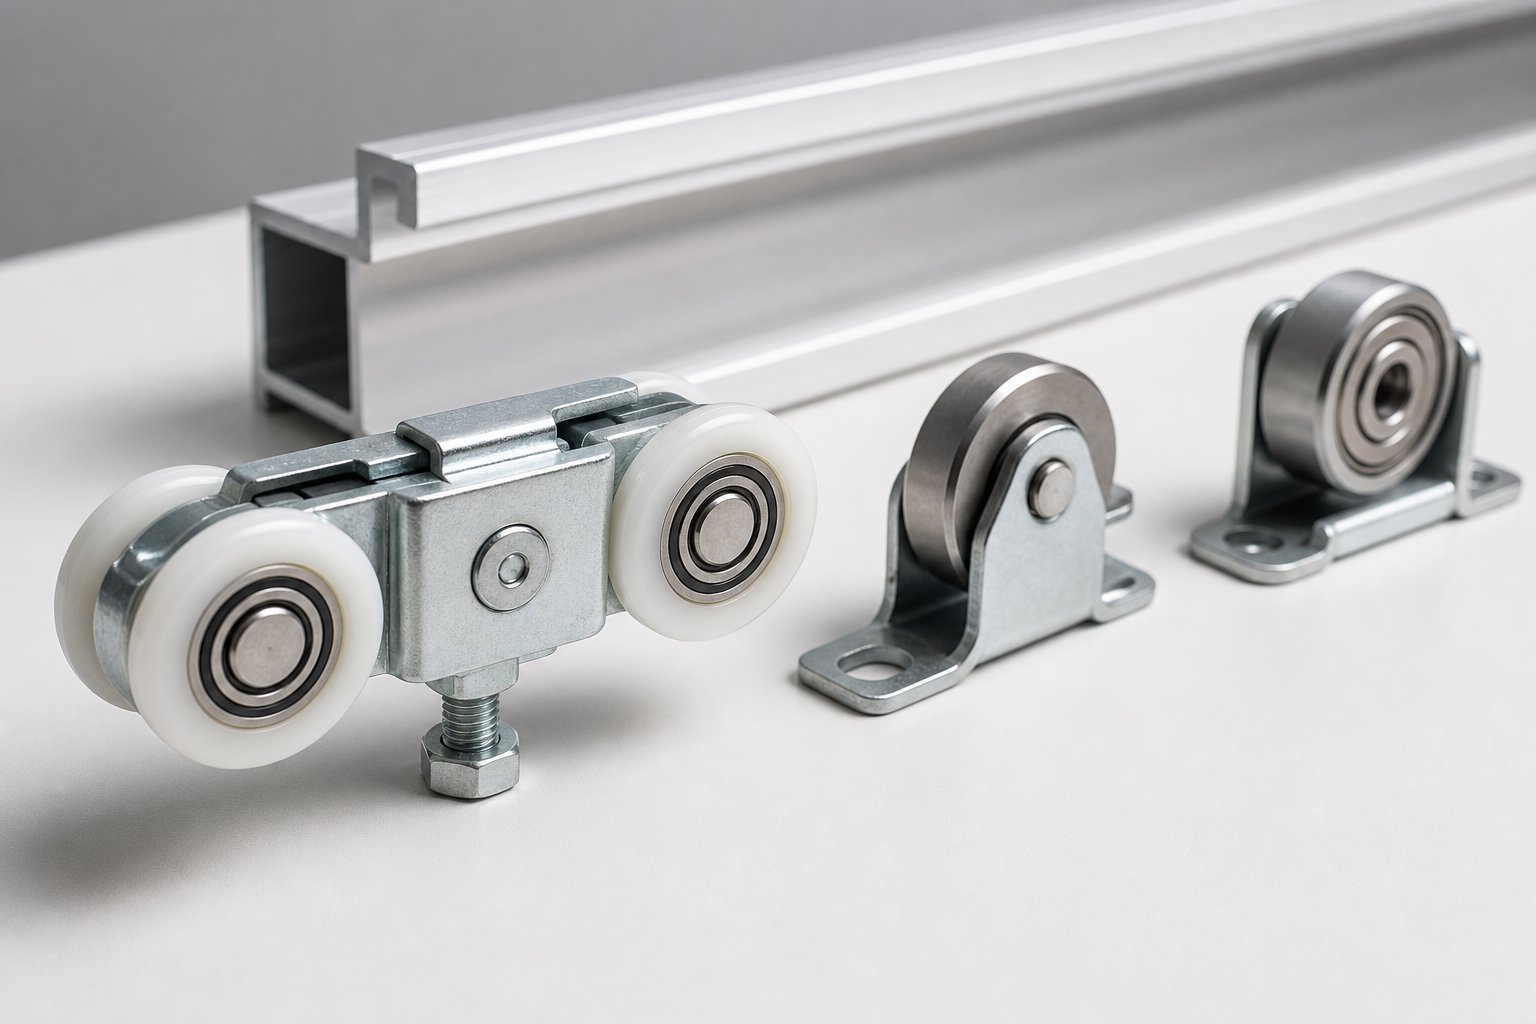
Buying the wrong roller is the single most common reason DIY sliding door repairs fail. Aluminium sliding doors use a surprising variety of roller designs, and grabbing a generic sliding glass door roller from the hardware store shelf rarely ends well. The correct part depends on four things: your door’s manufacturer, its model, the panel weight, and the shape of your track profile.
Common Roller Types for Aluminium Sliding Doors
Sliding glass patio door rollers fall into several distinct categories, each engineered for different weight loads and track configurations. Understanding the differences helps you avoid a second trip to the store — or worse, damaging your track with an incompatible wheel.
| Roller Type | Best Use Case | Weight Capacity | Durability | Noise Level |
|---|---|---|---|---|
| Nylon/Polymer | Standard residential doors, coastal areas | Up to 80 kg per roller | High — resists corrosion and salt air | Very quiet |
| Steel | Heavy-duty doors, high-traffic openings | Up to 120 kg per roller | High load strength but prone to rust | Moderate to loud over time |
| Ball-Bearing (sealed) | Premium doors requiring smooth, low-friction operation | Up to 100 kg per roller | Excellent — sealed bearings resist grit | Very quiet |
| Tandem (dual wheel) | Heavy aluminium panels with large glass areas | Up to 220 kg per door (pair) | Excellent — distributes weight evenly | Quiet |
| Single Wheel | Lightweight or older-style doors | Up to 40 kg per roller | Moderate — limited load distribution | Varies |
Most modern aluminium sliding patio door rollers use a tandem configuration — two wheels mounted on a single housing — because these doors are substantially heavier than vinyl equivalents. A standard aluminium panel with double glazing can weigh anywhere from 40 to 80 kg, so roller load ratings are not something to overlook. Choosing a single-wheel roller rated for a lightweight door when your panel weighs 60 kg will result in premature failure within months.
For homes in coastal regions of Australia — think anywhere from the Gold Coast to the Mornington Peninsula — polymer or nylon wheels outperform steel. Salt air corrodes steel rollers and can eventually damage the track itself, creating a more expensive repair down the line.
How to Find Your Door Model Number
Sourcing the correct sliding glass door roller assembly starts with identifying who made your door. The manufacturer name and model number are typically hidden in one of these locations:
- Frame edge — look along the top or side rail for a stamped or etched code
- Glass spacer bar — the metallic strip between double-glazed panes sometimes carries manufacturer details
- Roller cavity — remove the door (covered in Step 4) and check for a sticker or stamp inside the bottom channel where the rollers sit
- Original paperwork — building plans, invoices, or warranty documents from your home’s construction or renovation
If none of these reveal the manufacturer, take the old roller to a specialist door hardware supplier. Many Australian suppliers maintain databases of roller profiles matched to common door brands like Stegbar, Bradnam’s, AWS, and Capral. A physical sample is often enough for them to cross-reference the correct replacement rollers for sliding glass doors.
OEM (original equipment manufacturer) rollers guarantee a precise fit but can be harder to source for older doors. Compatible aftermarket options are widely available and often match or exceed original quality — just confirm the housing dimensions, wheel diameter, wheel width, and mounting style before purchasing. Measure the old roller carefully: wheel diameter, wheel edge profile, carriage width, carriage height, and the distance between mounting screw holes.
Matching Roller Profile to Track Shape
Here is where many people get caught out. The shape of your aluminum door wheel must match the profile of your bottom track, or the door will ride poorly regardless of how new the rollers are.
- Concave (grooved) wheels — designed for tracks with a raised rail or ridge running along the centre. The wheel wraps around the rail, keeping the door centred.
- Convex (rounded) wheels — suit tracks with a recessed channel or V-shaped groove. The rounded edge sits down into the channel.
- Flat wheels — used on flat-bottomed tracks where the door rides on a smooth, level surface.
Fitting a flat wheel onto a raised-rail track, for example, means the door balances on a narrow contact point instead of wrapping securely around the rail. The result is a patio sliding door roller that wobbles, wears unevenly, and fails far sooner than it should.
Take a close look at your track cross-section before ordering. If the profile is not obvious, run your finger along the track surface — a raised ridge in the centre indicates you need concave wheels, while a groove or valley calls for convex. Getting this match right is the difference between a door that glides with one finger and one that fights you all over again within a year.
Step 3. Gather Tools and Prepare Your Workspace Safely
With the correct replacement sliding door rollers in hand, resist the urge to dive straight in. Knowing how to replace sliding door wheels properly means having every tool staged and your workspace prepped before you touch the door. A missing screwdriver halfway through the job leaves you holding 50 kg of glass and aluminium with nowhere safe to set it down.
Essential Tools for Roller Replacement
Most of what you need is already in the garage. A few items, though, are specific to working with aluminium frames and heavy glazed panels.
- Hand tools — Phillips and flathead screwdrivers, cordless drill with Phillips bits, pry bar or putty knife, needle-nose pliers, and painter’s tape to mark screw positions before removal
- Cleaning supplies — vacuum cleaner with crevice attachment, stiff nylon brush, clean rags, and silicone-based track lubricant (avoid WD-40 — it attracts dust and dries out quickly)
- Workspace protection — drop cloths or flattened cardboard to protect flooring and tiles, plus a padded surface such as old blankets or foam sheets draped over sawhorses for laying the door flat
- Replacement parts — your new rollers, plus penetrating oil (for seized adjustment screws) and a screw extractor set in case fasteners are stripped
If you are learning how to change sliding door rollers for the first time, lay everything out in order of use. It keeps the process flowing and prevents scrambling mid-task.
Safety Gear and Lifting Precautions for Heavy Aluminium Doors
This is not a lightweight flyscreen. Aluminium sliding doors with double glazing weigh anywhere from 30 to 80 kg depending on panel size and glass thickness. A helper is not optional — it is essential.
- Protective gloves — aluminium frame edges can be surprisingly sharp, especially around cut ends and screw holes
- Safety glasses — debris falls from the head channel when you lift the door free
- Closed-toe shoes — a dropped panel can cause serious foot injuries
When it comes time to lift, both people should grip the door at the sides — never from the top rail alone. Bend at the knees, keep your back straight, and lift vertically rather than tilting. Wide doors (over 1.5 m) can flex at the centre if lifted unevenly, stressing the glass seal. For these panels, position your hands at the quarter points of the frame width to distribute the load.
Protect the glass edges with painter’s tape or foam strips before setting the door down. One careless bump against a sawhorse leg can chip the glass edge, compromising the sealed unit over time. Understanding how to replace sliding door rollers safely is as much about protecting yourself and the door as it is about the mechanical steps — and those steps start with getting the panel out of the frame cleanly.
Step 4. Remove the Aluminium Sliding Door From Its Track
Everything is staged, your helper is ready, and the replacement rollers are waiting on the bench. Getting the door out of the frame is the most physically demanding part of replacing rollers on a sliding glass door — but it is straightforward if you follow the correct sequence. Rush this step and you risk bending the aluminium frame, cracking the glass seal, or injuring yourself.
Retract the Rollers to Create Clearance
Slide the door open to roughly its midpoint. Along the bottom edge — or sometimes on the face of the frame near each corner — you will find adjustment screws. These are typically Phillips-head, recessed behind small plastic caps or visible through access holes in the aluminium extrusion. Each screw controls the height of one roller assembly.
Turn both adjustment screws clockwise. This retracts the rollers upward into the frame, lowering the door slightly and creating a gap between the bottom of the panel and the track rail. You need roughly 5 to 10 mm of clearance to lift the door free. Give each screw several full turns until you feel the door drop and sit loosely on the track.
A common snag here: oxidation around the screw holes. Aluminium frames exposed to moisture — particularly in coastal suburbs from Sydney’s Northern Beaches to Perth’s Fremantle strip — develop a white powdery corrosion that seizes fasteners in place. If the screws resist turning, spray penetrating oil directly into the hole and wait a full 10 minutes. Trying to force a seized adjustment screw with a worn screwdriver tip will strip the head, creating a much bigger problem. Patience at this stage pays off.
Also check the top of the frame for a head stop or anti-lift block. This is a small metal or plastic bracket screwed into the upper track that prevents the door from being lifted out during normal use. If present, remove the one or two screws holding it in place and set the bracket aside. Without removing this piece, the door physically cannot clear the frame.
Lift and Angle the Door Out of the Frame
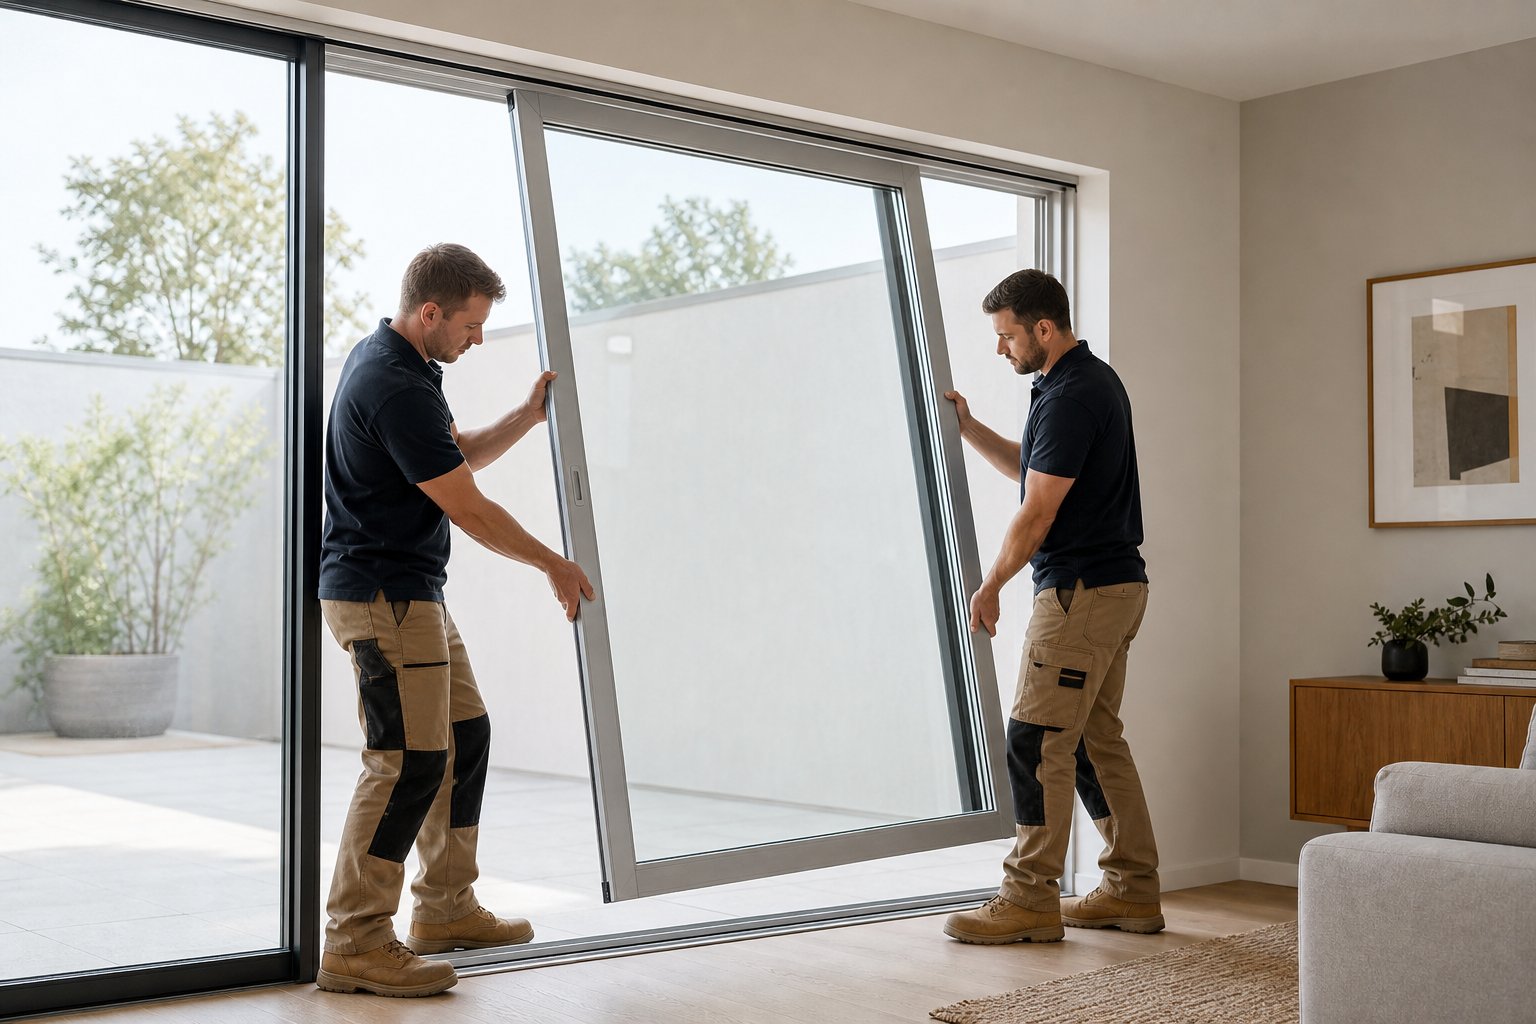
With rollers retracted and the head stop removed, the door is ready to come out. Here is the step-by-step sequence for how to remove a sliding glass door to replace rollers safely:
- Position yourself and your helper on either side of the door panel, gripping the frame at the vertical stiles (side edges) — not the top rail.
- Lift the door straight up into the head channel. The top of the frame slots into a deep upper track, and lifting vertically pushes the panel up into that space, clearing the bottom rail.
- Once the bottom edge clears the track, angle the base of the door toward you (into the room). Keep the top engaged in the head channel as a pivot point while you swing the bottom out.
- When the bottom is clear of the frame, lower the top edge out of the head channel by tilting the entire panel slightly and stepping back.
- With both people supporting the weight, carry the door to your prepared work surface — sawhorses draped with blankets or thick cardboard — and lay it flat with the bottom edge accessible.
The key motion is up, then out. Trying to pull the door toward you before lifting it high enough is how tracks get bent and rollers get jammed. If the panel feels stuck partway through the lift, lower it back down and confirm the rollers are fully retracted. A single extra turn on the adjustment screws can make the difference.
Handling Aluminium Frame Flex on Wide Doors
Doors wider than about 1.5 metres present a specific challenge when replacing the wheels on a sliding glass door. The aluminium frame, while strong in compression, can flex along its length if the load is not evenly distributed during lifting. This flex stresses the corner joints and can break the seal on double-glazed units.
For wide panels, position your hands at the quarter points of the frame width rather than at the very edges. If the door is exceptionally wide (over 2 metres), a third person supporting the centre from below is worth the effort. Lift in unison — a simple count of three keeps everyone synchronised.
Watch the aluminium edges as you manoeuvre the panel. Cut ends and screw-hole burrs on older frames are sharp enough to slice through work gloves. Grip firmly but keep your fingers away from the bottom channel where the roller housing sits — pinch points are common there.
Once the door is resting flat on your padded surface, take a moment to inspect the bottom edge. You will see the roller housings recessed into each end of the frame, held in place by one or two screws. This is exactly where the next phase of the job — removing the old rollers and inspecting the track — picks up. Replacing the wheels on a sliding glass door is largely about controlled, methodical steps, and the hardest physical work is behind you.
Before walking away from the frame opening, run your hand along the bottom track and check for obvious damage — dents, bends, or debris that may have been hidden beneath the door. Knowing the track condition now saves you from reinstalling the door only to discover it still drags. Understanding how to replace rollers on a sliding glass door means treating the track as part of the same system, not just the wheels themselves.
Step 5. Remove the Old Rollers and Clean the Track
Your door is resting flat on padded sawhorses with the bottom edge facing you. The roller housings are visible — recessed into each end of the aluminium frame, usually secured by one or two Phillips-head screws. This is where the actual sliding door roller replacement begins, and it is also where many DIY repairs hit their first real snag: fasteners that refuse to cooperate.
Removing Stuck or Stripped Roller Screws
Aluminium doors that have been in service for a decade or more often have screws corroded into place. Moisture wicks into the screw holes, reacts with the dissimilar metals, and effectively welds the fastener to the frame. Forcing a screwdriver into a seized screw just strips the head — turning a two-minute task into a twenty-minute problem.
Start with penetrating oil. Spray it directly into the screw head and around the base where it meets the aluminium housing. Wait a full 10 minutes. The oil needs time to creep into the threads and break the corrosion bond. After soaking, press the screwdriver firmly into the head and turn slowly. If it moves, even slightly, work it back and forth a quarter turn at a time until it loosens fully.
If the screw head is already stripped, try these methods in order:
- Rubber band trick — place a wide rubber band flat over the stripped head, then press your screwdriver through the rubber into the screw. The rubber fills the damaged slots and adds enough traction to grip and turn.
- Switch screwdriver type — a flat-head driver in a damaged Phillips slot, or a slightly larger bit, can catch on remaining material. Do not force it if it slips immediately — further stripping makes every subsequent method harder.
- Screw extractor bit — drill a small pilot hole into the centre of the screw head using a metal-rated bit at low speed. Insert the extractor bit, set your drill to reverse, and back the screw out. This works reliably on the hardened steel screws common in roller assemblies.
- Locking pliers — if the screw head sits proud of the surface, grip it with vise-grip pliers and twist counter-clockwise. This brute-force approach works when nothing else will.
Once the screws are out, slide the old roller assembly from its channel. Some housings pull straight down; others slide out from the end of the frame. Note the orientation before removing — a quick photo on your phone saves guesswork during reinstallation.
Inspecting the Roller Housing for Corrosion
With the old rollers removed, shine a torch into the cavity. You are looking for three things: corrosion, debris, and physical damage to the housing channel itself.
White powdery residue inside the cavity is aluminium oxide — common in Australian coastal and humid climates. A light coating is cosmetic and harmless. Heavy buildup that narrows the channel or creates rough ridges will prevent the new roller housing from seating flush. Scrub it out with a stiff nylon brush (never steel wool, which embeds particles that accelerate future corrosion) and wipe clean with a dry rag.
Check for:
- Cracks or splits in the aluminium around the screw holes — these indicate the frame has been over-stressed
- Enlarged or wallowed-out screw holes where the threads no longer grip
- Debris packed into the channel — grit, old lubricant residue, or fragments of the failed roller
- Burrs or rough edges that could prevent the new housing from sitting flat
Minor corrosion and debris are normal and easily addressed. Cracked aluminium around the mounting points, however, is a sign that sliding door roller repair may not be a lasting fix — the frame itself is compromised, and new rollers will loosen over time as the damaged metal cannot hold the screws securely.
Cleaning and Straightening the Bottom Track
While the door is off, the bottom track is fully exposed and accessible for the first time in years. Do not skip this step. Installing new sliding door replacement rollers onto a damaged or filthy track guarantees premature failure — you will be back doing this job again within months.
Start by vacuuming the entire length of the track with a crevice attachment. Years of accumulated sand, pet hair, leaf fragments, and general grime pack into the channel and create resistance that no roller can overcome cleanly. Follow up with a stiff brush to dislodge anything caked on, then wipe the track surface with a damp cloth.
With the track clean, inspect it carefully against this checklist:
- Dents or flat spots — caused by heavy objects dropped on the track or the door dragging without functional rollers
- Bends or bowing — the track lifts away from the sill or curves to one side, often from foundation settling
- Wear grooves — shiny, polished channels worn into the track surface by metal rollers grinding over years
- Corrosion pitting — rough, cratered areas where salt air or moisture has eaten into the aluminium
- Loose mounting — the track shifts or rattles when pressed, indicating failed fixings to the sill beneath
Minor dents and slight bends can be straightened at home. Place a block of hardwood (a short offcut of 90 x 45 mm framing timber works well) over the damaged section and tap it firmly with a hammer. The wood distributes the force evenly and prevents the hammer from creating new dents. Work gradually — multiple light taps are far better than one heavy blow that overshoots the correction.
For patio door roller replacement to deliver lasting results, the track needs to be straight within a millimetre or two across its full length. Lay a straight edge (a spirit level works) along the rail and look for gaps underneath. Any deviation greater than about 2 mm will cause the door to catch or ride unevenly on its new rollers.
Know when to stop. If the track is severely bent, worn through to bare metal with deep grooves, or corroded to the point where the rail profile has lost its shape, no amount of straightening will restore proper function. At that point, the track itself needs professional replacement — or the entire door system does. Attempting a glass door rollers replacement on a track that cannot support the wheels properly is false economy. You will get a few weeks of improved operation before the symptoms return.
A clean, straight track paired with fresh rollers is what transforms a stubborn door into one that glides with minimal effort. With both the housing cavities and the track now inspected and prepared, the door is ready to accept its new hardware — and the installation process requires its own set of careful steps to avoid the most common mistake people make: stripping the soft aluminium screw holes by over-tightening.
Step 6. Install the New Replacement Rollers
With clean cavities and a straight track ready to go, the sliding glass door roller replacement itself is surprisingly quick — provided you handle the aluminium frame gently. Soft metal and impatient hands are a bad combination.
Positioning and Securing the New Rollers
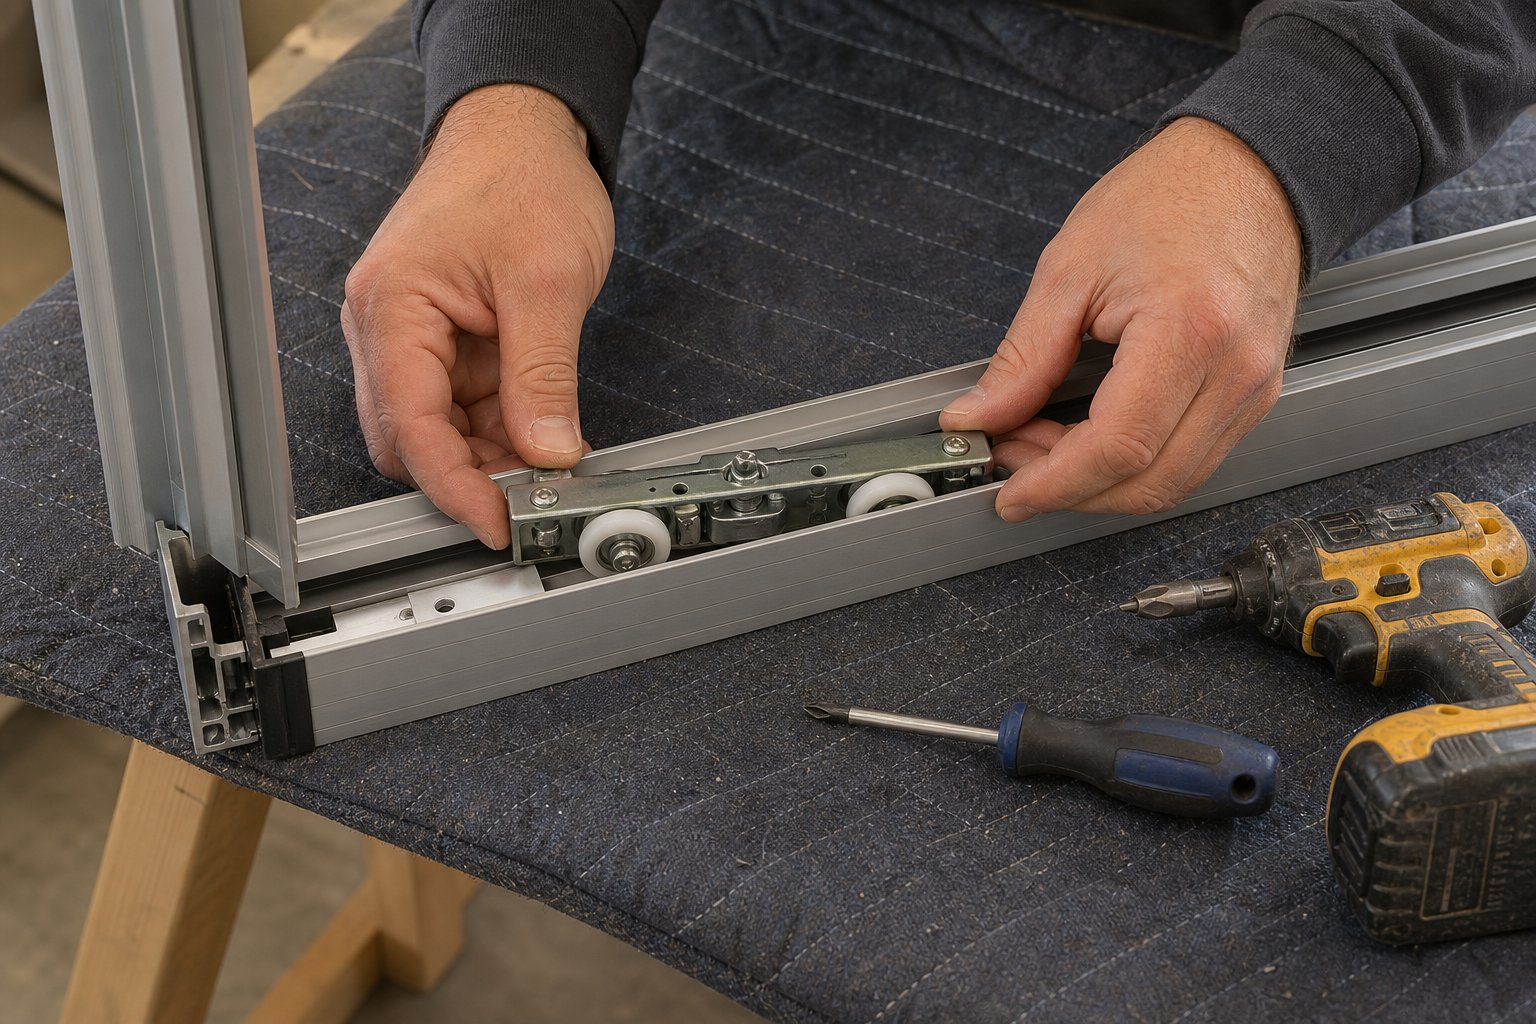
Orientation matters. Every sliding door wheel has a correct direction: the wheel faces down, and the flat face of the housing sits flush against the bottom of the door frame. Reference the photo you took of the old rollers during removal — it confirms which way the assembly slides into the channel.
Follow this sequence for each roller:
- Slide the new roller housing into the cavity at the bottom edge of the door, aligning the screw holes with the existing holes in the frame.
- If the housing does not seat fully flush — common with aftermarket sliding glass door replacement wheels that differ slightly from the originals — identify where it catches. Use a flat metal file to carefully remove material from the cavity walls, testing the fit after every few strokes.
- Once the housing sits flat with no rocking or gaps, insert the mounting screws by hand first. Thread them in finger-tight before reaching for the screwdriver.
- Tighten each screw firmly but stop the moment you feel resistance increase. A quarter turn past snug is enough.
Avoiding Stripped Screw Holes in Aluminium Frames
Aluminium is softer than steel. Over-tightening a screw — even slightly — cuts through the existing threads and leaves the fastener spinning freely in an enlarged hole. Once stripped, the roller housing cannot be secured properly and will shift under load.
If the original screw holes are already wallowed out or damaged from the old installation, you have two reliable options for a lasting sliding door wheel replacement:
- Pre-drill and upsize — drill out the damaged hole with a bit one size larger, then use a slightly thicker screw that cuts fresh threads into undamaged material.
- Thread-locking compound — apply a small drop of medium-strength threadlocker to the screw before driving it home. This fills micro-gaps in worn threads and prevents the screw from backing out under vibration.
Never use wall plugs or timber screws as a workaround. They do not grip aluminium extrusions correctly and will fail under the repeated lateral forces a sliding glass door wheel endures during daily use.
Verifying Free Rotation Before Reinstalling
Before lifting the door back into the frame, spin each wheel by hand. It should rotate freely with no catching, grinding, or stiff spots. A roller that does not spin smoothly on the bench will not glide in the track.
Also confirm both roller assemblies sit at equal height relative to the door bottom. Lay a straight edge across the two wheels — any difference means one housing is not fully seated or one adjustment screw is set differently. Correct it now, because uneven sliding glass door replacement rollers create the same lopsided gap and dragging you started with.
With both rollers spinning freely and sitting level, the door is mechanically ready to go back into the frame. The reinstallation and fine-tuning process — getting the panel seated, the height dialled in, and the track lubricated — determines whether your repair feels professional or just passable.
Step 7. Reinstall the Door and Adjust for Smooth Operation
The rollers are in, spinning freely, and sitting level. Getting the door back into the frame is essentially the removal process in reverse — but the adjustment that follows is where the real payoff happens. A properly dialled-in door glides with one finger and latches without force. A poorly adjusted one drags, bounces, or leaves gaps that let in drafts and dust.
Seating the Door Back Into the Track
Grab your helper and carry the panel back to the frame opening. The reinstallation sequence mirrors removal but in reverse order — bottom goes in first this time:
- Tilt the top of the door toward you slightly so the bottom edge angles toward the track opening.
- Lift the panel and guide the top edge up into the head channel (the deep upper track). Push it high enough that the bottom clears the lower track rail completely.
- With the top engaged in the head channel, swing the bottom of the door inward over the track.
- Lower the panel gently until the retracted rollers rest on the bottom rail. The door should sit loosely in the frame with visible clearance beneath.
- Slide the door back and forth a few centimetres to confirm it moves freely and the rollers are sitting on the track — not beside it or caught on a lip.
If the door will not seat properly, the most likely cause is that the rollers are not fully retracted. Turn the adjustment screws another full turn clockwise to pull the wheels higher into the frame, then try again. Forcing the panel down onto the track with partially extended rollers risks damaging both the new wheels and the rail surface.
Fine-Tuning Roller Height for a Level Fit
This is the step that separates a professional result from a mediocre one. Knowing how to adjust sliding glass door rollers correctly means understanding one simple principle: turning the adjustment screws counter-clockwise lowers the rollers, which raises the door panel upward in the frame.
Follow this sequence to dial in the perfect height:
- Start with the screw on the side closest to the latch. Turn it counter-clockwise one quarter turn.
- Slide the door to the closed position and check the gap between the top of the panel and the head frame. It should be even — the same width on both sides.
- If the gap is wider on one side, that side needs its roller lowered further (more counter-clockwise turns) to raise the door on that end.
- Make quarter-turn adjustments only. Test the slide after each change. Over-adjusting creates a see-saw effect where you chase the level back and forth.
- Continue until the top gap is uniform across the full width and the door slides smoothly without dragging at either end.
- Close the door fully and test the latch. It should engage without lifting or pushing the handle — if it does not, the door needs to come up slightly more on the latch side.
A level door also compresses the weatherseal evenly along its full height. Check this by closing the door and looking for daylight gaps around the edges. Uneven compression means one corner is sitting too low, letting air and water past the seal. How to replace sliding glass door rollers successfully comes down to this final calibration — the mechanical swap is only half the job.
Lubricating the Track for Long-Term Performance
With the door level and gliding smoothly, apply a silicone-based lubricant along the full length of the bottom track. Spray a light, even coat directly onto the rail surface, then slide the door back and forth several times to distribute it evenly under the wheels.
Never use petroleum-based products like WD-40 or general-purpose grease. These attract dust and grit, which bonds to the sticky residue and creates an abrasive paste that accelerates wear on your new rollers. Silicone-based lubricants stay clean, repel moisture, and do not break down under UV exposure — important for tracks exposed to direct Australian sunlight through glass panels.
Finish by replacing the head stop or anti-lift block you removed earlier. Screw it back into its original position in the upper track. This small bracket prevents the door from being lifted out of the frame during normal use — a security feature as much as a functional one.
Run through a final checklist before calling the job done:
- Door slides freely in both directions with minimal effort
- Latch engages and disengages cleanly without forcing
- Top gap is even across the full width of the panel
- Weatherseal compresses uniformly with no visible daylight gaps
- Head stop is reinstalled and secure
- No grinding, clicking, or squeaking sounds during operation
If you have followed each step carefully, you have just completed the full process of how to replace wheels on sliding glass door panels — from diagnosis through to a smooth, quiet result. For anyone wondering how to replace glass door rollers without calling a tradesperson, this is genuinely achievable in a couple of hours with basic tools and a willing helper.
That said, not every reinstallation goes perfectly on the first attempt. Adjustment screws that will not turn, doors that still drag despite new rollers, or panels that rock and bounce — these mid-repair problems are common enough to deserve their own troubleshooting guide, and knowing how to replace rollers in a sliding glass door also means knowing what to do when something does not go to plan.
Step 8. Troubleshoot Common Problems During Replacement
Even when you follow every step correctly, mid-repair surprises happen. A screw that will not budge, a door that still drags on fresh rollers, or a mysterious squeak that was not there before — these are not signs you have failed. They are normal complications that most guides skip over entirely. Knowing how to fix sliding glass door rollers means knowing what to do when the straightforward path hits a wall.
The table below covers the most common issues at a glance, followed by detailed solutions for the trickier ones.
| Problem | Likely Cause | Solution |
|---|---|---|
| Adjustment screws will not turn | Corrosion bonding the screw to the aluminium frame | Apply penetrating oil, wait 10 minutes, then try again. If still seized, apply gentle heat with a heat gun (not a flame) to expand the surrounding metal. Last resort: drill out the screw head and extract the shaft with locking pliers. |
| Roller housing will not seat flush | Burrs in the cavity, corrosion buildup, or slightly oversized aftermarket housing | Inspect the cavity with a torch. File down burrs or corrosion ridges with a flat metal file. Test-fit after every few strokes until the housing sits flat with no rocking. |
| Door still drags after new rollers | Damaged track, frame racking, or incorrect roller height adjustment | Check track for dents or bends (straight edge test). Verify both rollers are adjusted to equal height. If the frame is out of square, rollers alone cannot fix the problem. |
| Door rocks or bounces while sliding | One roller sitting higher than the other, or single rollers on a door that needs tandem assemblies | Re-adjust both sides to equal height. For heavy panels (over 60 kg), upgrade to tandem rollers that distribute weight across four wheels instead of two. |
| New rollers squeak or chirp | Dry bearings, break-in period, or track residue from old lubricant | Apply silicone lubricant to the track and wheel surfaces. Slide the door back and forth 20-30 times. Most squeaking resolves within the first week of use. |
| Door slides smoothly but will not latch | Panel height slightly off — latch misses the strike plate | Adjust the roller on the latch side one quarter turn counter-clockwise to raise that edge. Test latch engagement after each adjustment. |
Stuck Adjustment Screws and Rusted Hardware
This is the single most frustrating obstacle in sliding patio door roller repair. Aluminium and steel screws create a galvanic reaction in the presence of moisture, effectively fusing together over years. Coastal properties from Wollongong to the Sunshine Coast are particularly prone to this.
Your escalation path should follow this order:
- Penetrating oil and patience — spray generously, wait 10 minutes, and try again. Repeat up to three times before moving on.
- Controlled heat — a heat gun set to low (around 150°C) directed at the surrounding aluminium for 30 seconds expands the metal slightly, breaking the corrosion bond. Keep heat away from glass and weatherseals.
- Impact driver — a manual impact driver (the kind you strike with a hammer) delivers a sharp rotational force that breaks seized threads without stripping the head. These cost around $25 from any hardware store and are worth owning.
- Drill out — if the head is completely destroyed, drill through the screw head with a metal-rated bit slightly larger than the screw shaft. The head pops off, the housing comes free, and you extract the remaining shaft with locking pliers once the assembly is removed.
Replacing the extracted screw with a stainless steel fastener prevents the same galvanic corrosion from recurring. Stainless and aluminium are far more compatible than carbon steel and aluminium in wet environments.
Door Still Drags After Roller Replacement
You have installed new rollers, adjusted the height, lubricated the track — and the door still feels heavy. This is more common than you might expect, and it points to a problem beyond the rollers themselves. Anthony Innovations identifies several causes that explain why new rollers alone do not always restore smooth operation.
Work through these possibilities:
- Track damage you missed — lay a straight edge along the full length of the rail. Even a 2 mm dip or rise creates a catch point that makes the door feel heavy at that spot. Straighten minor bends with a hardwood block and hammer.
- Wrong roller load rating — if your replacement rollers are rated below the actual panel weight, they compress under load and create friction rather than rolling freely. Double-glazed aluminium panels are heavier than they look. Weigh the door if possible, or check the manufacturer’s specifications.
- Frame racking — close the door and measure the diagonal distances corner to corner. If they differ by more than 3 mm, the frame is out of square. Rollers cannot compensate for a racked frame because the door is being forced through a parallelogram-shaped opening. This is a structural issue.
- Incorrect wheel profile — a flat wheel on a raised-rail track, or a concave wheel in a flat channel, creates drag regardless of how new the roller is. Revisit the track profile matching covered in Step 2.
If you have eliminated all of these and the door still resists, the problem may be the header sagging under load — particularly in older homes where the lintel above the door opening has deflected over decades. This compresses the top of the door against the head track, creating friction that no amount of roller adjustment can overcome. At that point, you need a builder rather than new hardware.
When to Call a Professional Instead
Knowing how to repair sliding glass door rollers is valuable, but recognising when to stop is equally important. Some conditions are beyond a DIY fix, and persisting will cost more in time and materials than a single professional visit.
Call a qualified tradesperson if:
- The frame is visibly racked — diagonal measurements differ by more than 5 mm, or you can see the frame leaning when you stand back and look at it
- The track is severely bent, worn through, or corroded to the point where the rail profile has lost its shape
- The header or lintel above the door is sagging — visible as a bow in the top frame member or cracking in the wall above
- The aluminium frame has cracked at the corner joints — this indicates structural fatigue that cannot be repaired with new rollers
- You have replaced rollers and the door fails again within a few months — repeated failure signals a systemic problem, not a component one
A professional sliding glass door roller repair typically costs between $200 and $450 in Australia, including parts and labour. That figure is worth comparing against the hours spent on repeated DIY attempts that do not hold. Sometimes the most cost-effective way to fix sliding door rollers is to let someone with diagnostic experience identify the real cause on the first visit.
For doors where the frame, track, and hardware are all degraded together, even a professional roller swap becomes a temporary patch. When multiple components have reached end of life simultaneously, the conversation shifts from how to fix sliding door wheels to whether the entire door system warrants replacement — a decision that depends on the age, condition, and performance of the unit as a whole.

When Roller Replacement Isn’t Enough and You Need a New Door
Repeated roller failures within a year or two tell a story that new sliding door wheels alone cannot rewrite. At some point, replacing patio door rollers becomes a maintenance treadmill — you swap the hardware, enjoy a few months of smooth operation, and then the same symptoms creep back. That cycle signals the door system itself has degraded beyond what any single component can fix.
Signs Your Door System Has Reached End of Life
A roller swap is a targeted repair. It works brilliantly when the frame, track, and glazing are still sound. But when multiple elements fail together, fresh sliding glass door wheels are just a temporary patch on a systemic problem. Consider full replacement if you recognise several of these indicators:
- Recurring roller failure — new rollers wear out or seize within 12 to 18 months, despite correct installation and a clean track
- Track beyond repair — the rail is worn through, deeply grooved, or bent in multiple places that cannot be straightened with a block and hammer
- Frame corrosion — pitting or cracking in the aluminium extrusion, particularly around corner joints and screw holes, that compromises structural integrity
- Failed weatherseals — rubber gaskets have hardened, split, or compressed permanently, and replacement seals for your model are no longer available
- Poor thermal performance — single-glazed or non-thermally-broken frames that allow excessive heat transfer, condensation, or drafts
- Acoustic issues — road noise, aircraft noise, or neighbourhood sound passes through the door with little resistance
- Visible daylight gaps — even with rollers adjusted correctly, gaps remain around the panel edges that let in water, dust, and insects
If three or more of these apply, patio door rollers replacement is no longer a cost-effective strategy. You are spending money to maintain a system that cannot deliver acceptable performance regardless of how new the individual parts are. It is the equivalent of fitting fresh tyres to a car with a bent axle — the underlying geometry defeats the new components every time.
What to Look for in a Modern Aluminium Sliding Door System
Modern aluminium sliding doors are engineered as integrated units. The track profile, roller type, glazing weight, frame tolerances, and sealing systems are all designed together so each component supports the others. This is a fundamental shift from older doors where generic sliding door replacement wheels were expected to fit a range of loosely matched frames and tracks.
When evaluating a replacement system, prioritise these features:
- Track design with roller access — look for systems where rollers can be adjusted or replaced without removing the entire door from the frame. This dramatically reduces future maintenance effort.
- Roller assemblies rated for the actual door weight — premium systems use sealed ball-bearing tandem rollers matched to the specific panel mass, not generic hardware bolted in as an afterthought.
- Water-tightness and air-tightness ratings — tested and certified to Australian Standards (AS 2047), not just claimed. These ratings confirm the door performs as a sealed unit under wind and rain pressure.
- Thermally broken frames — polyamide thermal breaks between inner and outer aluminium profiles reduce heat transfer, prevent condensation, and improve energy efficiency in line with NCC requirements.
- Project-specific sizing — custom dimensions that fit your opening precisely, rather than forcing a standard size into a non-standard space with packing and shimming.
Systems like the MEICHEN MA100 Sliding Door illustrate this integrated approach — the track configuration, roller system, locking hardware, and glazing are purpose-built as a cohesive unit rather than assembled from mix-and-match components. That engineering coherence is what eliminates the recurring maintenance cycle that drives most people to search for sliding glass door replace solutions in the first place.
Planning Your Replacement Around Track and Hardware Quality
The decision to replace rather than repair is ultimately a cost-per-year calculation. A patio sliding door rollers replacement every 18 months at $200 to $400 per visit adds up quickly — and each cycle carries the risk of further track or frame damage that compounds the next repair bill.
A new door system, by contrast, resets the clock entirely. Purpose-built roller assemblies running on a matched track profile, sealed within a thermally broken frame, will deliver years of smooth operation before any maintenance is needed. The upfront cost is higher, but the total cost of ownership over a decade is often lower than repeated patchwork repairs on a worn-out system.
Before committing, get a professional assessment of your frame opening. Confirm whether the existing structural lintel, sill, and reveals can accept a new door without major building work. In many Australian homes — particularly brick veneer and rendered construction — a sliding door replacement fits within the existing opening with minimal modification, making the transition straightforward for a qualified installer.
Replacing sliding door wheels is a practical, satisfying DIY repair when the rest of the system is healthy. But when the frame, track, and seals have all reached their limit, investing in a modern integrated door system is the repair that actually lasts.
Frequently Asked Questions About Replacing Aluminium Sliding Door Wheels
1. How do I know if my sliding door rollers need replacing or if the track is the problem?
Clean the bottom track thoroughly with a vacuum and stiff brush, apply silicone lubricant, then test the door. If it still drags, grinds, or sits unevenly in the frame, the rollers have failed. Track issues typically cause the door to catch at the same spot every time, while roller failure produces consistent resistance across the full travel. Check for an uneven gap at the top of the panel — wider on one side indicates a collapsed roller on that end.
2. What type of replacement roller do I need for my aluminium sliding door?
The correct roller depends on your door’s manufacturer, panel weight, and track profile shape. Most modern aluminium doors use tandem (dual-wheel) rollers rated for 40 to 80 kg panels. The wheel shape must match your track — concave wheels for raised-rail tracks, convex for grooved channels, and flat for smooth surfaces. Find your door’s model number stamped on the frame edge or glass spacer bar, then take the old roller to a specialist supplier for cross-referencing if needed.
3. Can I replace sliding door rollers myself or do I need a professional?
Most homeowners can complete this repair in two to three hours with basic hand tools and a helper for lifting. The job requires a Phillips screwdriver, drill, pry bar, vacuum, silicone lubricant, and the correct replacement rollers. You should call a professional if the frame is visibly racked, the track is severely bent or worn through, the header is sagging, or if new rollers fail again within a few months — these indicate structural issues beyond a roller swap.
4. How much does it cost to replace sliding door rollers in Australia?
DIY roller replacement costs between $30 and $80 for parts depending on roller type and quality. Professional sliding door roller repair in Australia typically runs $200 to $450 including parts and labour. Tandem ball-bearing rollers for heavy aluminium panels sit at the higher end of the parts range. Factor in penetrating oil, silicone lubricant, and potentially a screw extractor set if your fasteners are corroded — common in coastal areas.
5. How often should sliding door rollers be replaced?
Quality rollers on a well-maintained track typically last 8 to 15 years in Australian conditions. Coastal properties with salt-air exposure may see shorter lifespans, particularly with steel rollers that corrode faster. Regular maintenance extends roller life significantly — vacuum the track monthly, apply silicone lubricant every six months, and keep the channel free of sand and debris. If you find yourself replacing rollers every 12 to 18 months, the track or frame has likely reached end of life and the entire door system may need replacement.
More Window & Door Guides