How Double Hung Aluminium Windows Actually Work
Search for double hung window repair near me and you will find dozens of guides written almost entirely for timber sash windows. The problem? Aluminium double hung windows operate on a fundamentally different mechanical system. Applying wood-window logic to an aluminium frame can waste your time, damage components, or turn a simple fix into an expensive replacement.
A double hung window has two sashes — upper and lower — that slide vertically within a frame. Both sashes move independently, allowing ventilation from the top, bottom, or both simultaneously. In older timber windows, heavy cast-iron counterweights connected by braided sash cords balance the weight of each sash. Aluminium systems take a completely different approach. They rely on spiral balance mechanisms — spring-loaded rods housed inside the jamb liner channels — to counterbalance sash weight without the bulk of a weight pocket. These spiral balances are rated to specific sash weights, and when they lose tension or snap, the sash slams shut or refuses to stay open.
Aluminium double hung windows use entirely different balance systems, sash removal methods, and hardware than their wood or vinyl counterparts. Repair techniques that work on one material can actively damage another.
How Aluminium Double Hung Windows Differ From Wood and Vinyl
Most aluminium double hung sashes tilt inward for cleaning and maintenance — a feature built into the pivot bar and tilt latch system integrated with the jamb liner. This is not the same tilt mechanism found in vinyl windows, and the parts are not interchangeable. The meeting rails on aluminium frames use interlocking aluminium extrusions rather than the simple cam locks common on timber windows, creating a tighter seal against air infiltration. Weatherstripping sits within precision-milled channels in the frame rather than being surface-mounted, making replacement a different process entirely.
Why Generic Window Repair Advice Falls Short for Aluminium
Three common mistakes come from following generic guides when you repair house windows made from aluminium. First, petroleum-based lubricants like WD-40 attract grit into tracks and degrade the rubber seals that keep water out. Second, using standard steel screws or brass hardware against aluminium creates galvanic corrosion — a chemical reaction between dissimilar metals that eats into the frame. Third, techniques like sanding or planing that fix a sticky timber sash will destroy an anodised or powder-coated aluminium finish permanently.
This guide covers home windows repair near me searches with something most resources lack: aluminium-specific diagnosis, tools, and step-by-step procedures. Every recommendation ahead applies directly to aluminium frames and the hardware systems built for them — starting with knowing exactly what each part is called and what it does.
Identifying Every Part of Your Aluminium Double Hung Window
Ordering the wrong part or describing a problem inaccurately to a window repair technician costs time and money. Aluminium double hung windows share some terminology with timber and vinyl systems, but many components are unique to extruded aluminium construction. Knowing the correct name for each piece makes sourcing replacements straightforward and keeps conversations with local window maintenance services productive rather than confusing.
Frame and Track Components
The frame is the structural skeleton anchored into your wall opening. Unlike timber frames built from separate pieces of dressed lumber, aluminium frames are extruded as continuous profiles with integrated channels, drainage slots, and weatherstrip grooves already formed into the metal.
- Head jamb — the horizontal top member of the frame that supports the upper sash track and houses the top seal.
- Side jambs — vertical members running from head to sill. These contain the jamb liner channels where spiral balances and sash guides sit.
- Sill — the bottom horizontal member, sloped slightly outward for water drainage. Aluminium sills include integrated weep holes and drainage channels moulded directly into the extrusion.
- Parting bead — in aluminium systems, this is an extruded aluminium or rigid vinyl strip (not the timber bead found in older windows) that separates the upper and lower sash tracks.
- Jamb liners — snap-in or screw-fixed tracks that guide sash movement and house the balance mechanisms. Modern thermally broken aluminium frames incorporate a polyamide strip within the jamb liner to reduce heat transfer.
Sash and Balance System Parts
Each sash is a self-contained unit holding the glass within an aluminium frame. The upper and lower sashes operate independently, counterbalanced by their own dedicated hardware.
- Upper and lower sash assemblies — rectangular aluminium frames holding glazed panels, each fitted with its own balance connection points.
- Spiral balance rods — spring-loaded steel rods inside a tube, mounted within the jamb liner channel. These replace the sash cord and weight system found in older timber windows. Constant-force balance springs are an alternative in heavier sash configurations.
- Pivot bars — small metal or nylon pins on the bottom corners of each sash that engage with the balance shoe, allowing the sash to tilt inward.
- Tilt latches — spring-loaded tabs at the top of the lower sash (and sometimes the bottom of the upper sash) that release the sash from the jamb liner for tilt-in access.
- Sash lock — the cam-action or lever lock mounted on the meeting rail where upper and lower sashes overlap when closed.
- Meeting rail interlocks — interlocking aluminium extrusions on the upper rail of the lower sash and the lower rail of the upper sash, creating a wind-resistant seal when locked together.
Weatherstripping and Sealing Elements
Sealing components do the invisible work of keeping air and water outside. They wear gradually, so understanding what sits where helps you spot degradation early — before drafts or leaks develop into bigger problems.
- Pile weatherstripping — fine, brush-like fibres pressed into channels along the jamb liners and parting bead. These create a low-friction seal against the sash edges as they slide.
- Compression bulb seals — flexible rubber or EPDM strips along the head jamb and sill that compress when the sash closes, blocking air movement at the top and bottom of the window.
- Glazing gaskets — rubber or silicone profiles that hold the glass within the sash frame, providing both structural support and a watertight seal around the perimeter of each pane.
Each of these sealing elements contributes to the window’s overall air and water tightness. When professional window maintenance services assess a draughty or leaking aluminium window, they typically inspect these three seal types in sequence — pile first, then compression seals, then glazing gaskets — because failure at any single point can mimic symptoms of a much larger problem.
With every component identified and named, the next logical step is matching what you are experiencing — a sash that slams, a draught you can feel, white powder forming on the frame — to the specific part that has failed.
Diagnosing Common Aluminium Double Hung Window Problems
A sash that refuses to budge and a sash that slams shut are two completely different failures — yet both get lumped under “broken window” in most repair guides. Jumping straight to a fix without identifying the actual cause leads to wasted parts, wasted weekends, and sometimes a worse problem than you started with. The smarter approach is diagnosis first, repair second.
The table below organises the most common symptoms by what you actually experience, then maps each one to its likely cause, how urgent it is, and whether you can handle it yourself. Use it to triage your situation before pulling anything apart.
| Symptom | Likely Cause | Severity Level | DIY Feasibility |
|---|---|---|---|
| Sash slams shut when released | Broken or detensioned spiral balance | Moderate — safety risk | High — replacement is straightforward |
| Sash sticks or binds halfway | Dirty tracks, oxidation buildup, or thermal expansion | Low to moderate | High — cleaning and lubrication usually resolves it |
| Sash will not tilt inward | Broken tilt latch or misaligned pivot bar | Low — functional inconvenience | High — parts are inexpensive and accessible |
| Sash rattles or feels loose when closed | Worn pile weatherstripping or failed meeting rail interlock | Moderate — air leakage and security concern | Moderate — weatherstrip replacement is easy; interlock repair needs precision |
| Draught felt around window edges | Degraded compression seals or weatherstripping | Moderate — energy loss | High — seal replacement is a common DIY task |
| Water leaking at sill or corners | Blocked weep holes, failed glazing gaskets, or cracked sealant | High — potential structural damage | Moderate — depends on leak source |
| White powdery residue on frame | Aluminium oxidation or galvanic corrosion | Low (surface) to high (pitting) | Moderate — surface treatment is DIY; pitting needs professional assessment |
| Sash binds in summer, gaps in winter | Thermal expansion of aluminium frame | Low to moderate | Moderate — may require track adjustment |
| Cracking at frame corners | Stress cracking from thermal cycling | High — structural integrity compromised | Low — professional repair or replacement needed |
Sash Movement Problems and Their Root Causes
A sash that slams shut the moment you let go is the single most common complaint with ageing aluminium double hung windows. The culprit is almost always the spiral balance — either the spring has lost tension over years of use, or the rod has snapped entirely. You can confirm this by tilting the sash inward and checking whether the spiral rod still turns freely inside its tube. If it spins without resistance, the spring is gone and the balance needs replacing, not adjusting.
Sticking or binding tells a different story. When a sash moves unevenly or jams partway through its travel, the issue usually sits in the track rather than the balance system. Aluminium oxide buildup — a fine grey or white residue — accumulates in jamb liner channels over time, creating friction that silicone lubricant alone cannot always overcome. In coastal areas, salt deposits compound the problem. If the binding only appears during hot weather, thermal expansion is the more likely cause. Aluminium expands roughly twice as much as steel for a given temperature change, and on a 40-degree day, that expansion can close the clearance between sash and track enough to make movement difficult or impossible.
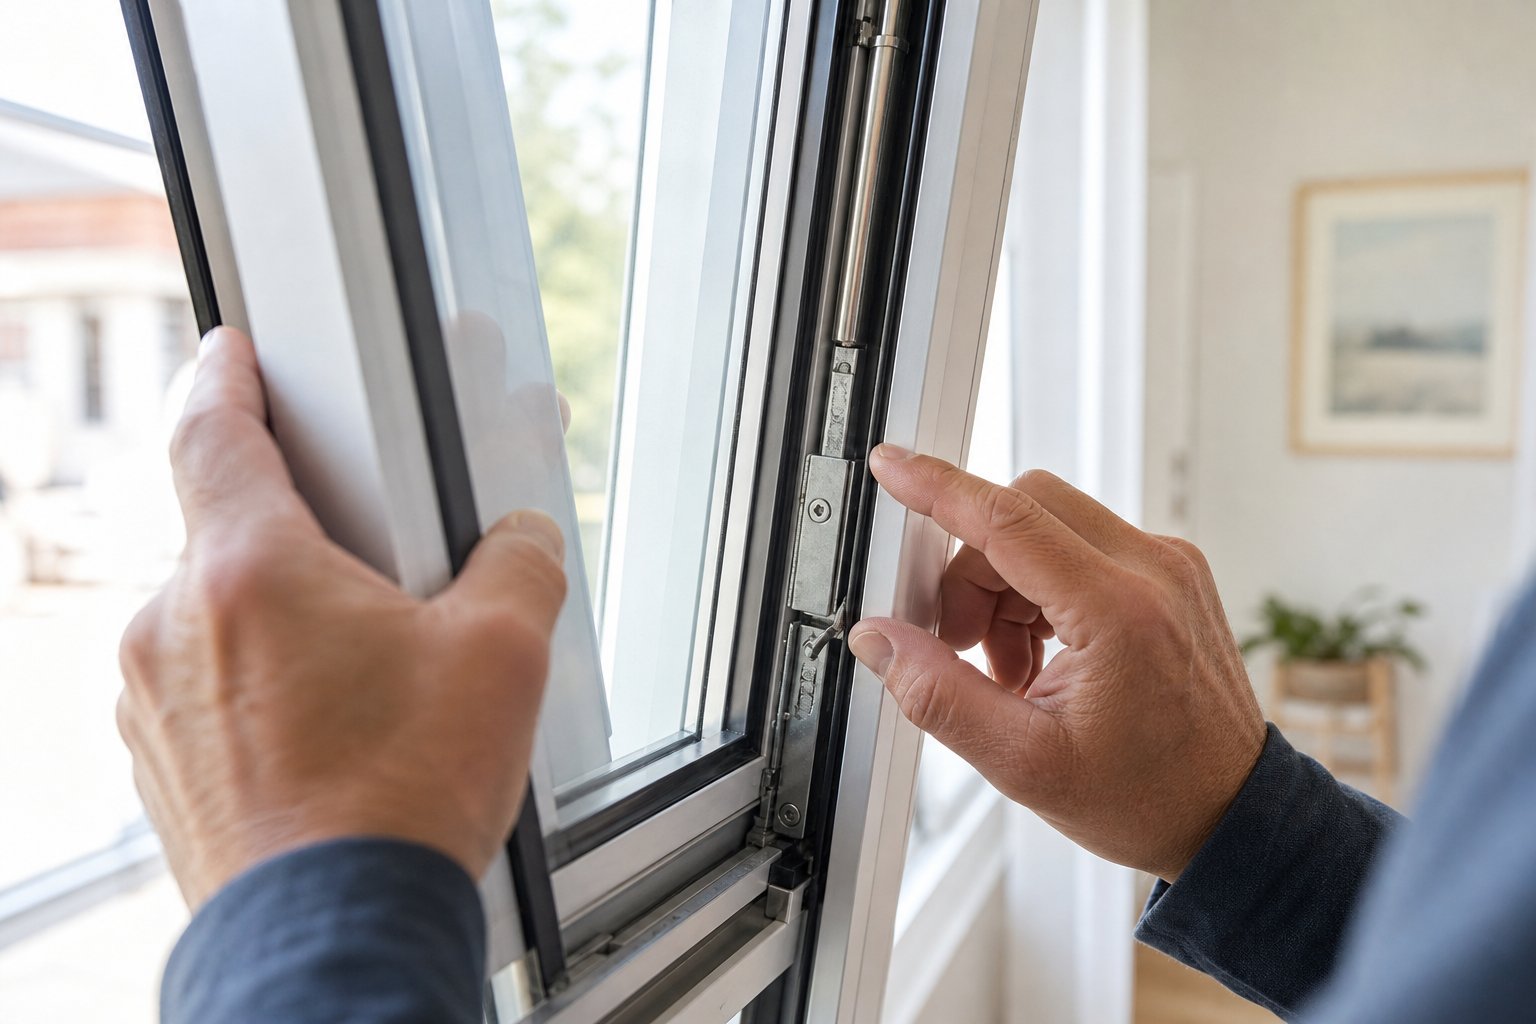
A sash that will not tilt inward for cleaning points to a mechanical failure in the tilt latch or pivot bar system. The tilt latches are spring-loaded plastic or nylon tabs — they fatigue and snap after years of repeated use. Pivot bars can also wear down or slip out of the balance shoe. Both are inexpensive parts, but you need to identify which one has actually failed before ordering replacements. Push both tilt latches inward simultaneously and gently pull the top of the sash toward you. If one side releases but the other does not, the non-releasing latch is your problem. If both release but the sash still will not tilt, a pivot bar is likely jammed or broken.
Air and Water Infiltration Diagnosis
Draughts and water ingress share some symptoms but stem from different failures. Distinguishing between them saves you from replacing weatherstripping when the real problem is a cracked glazing gasket — or vice versa.
For air leaks, the incense stick test remains one of the most reliable household diagnostic methods. Close the window fully, lock the meeting rail, and slowly pass a lit incense stick along the perimeter of the sash. Wherever the smoke stream deflects sharply or gets sucked toward the frame, air is moving through a gap. Common failure points include the compression bulb seals at the head and sill, worn pile weatherstripping along the jamb liners, and the meeting rail interlock where upper and lower sashes overlap. A building pressurisation test — running exhaust fans to depressurise the house — makes smaller leaks more obvious by increasing the pressure differential across the window.
Water infiltration requires a different test. On a dry day, have someone direct a garden hose at the window from outside while you watch from inside. Start at the sill and work upward methodically — this isolates the entry point rather than flooding the entire window and guessing where water first appeared. Common water entry points on aluminium frames include blocked weep holes in the sill (easily cleared with a thin wire), deteriorated glazing gaskets that have hardened and pulled away from the glass, and failed sealant at corner joints where the frame was originally assembled.
If water appears at the meeting rail only during wind-driven rain, the interlock seal between upper and lower sashes has likely compressed beyond its effective range. This is a different repair than a sill leak and requires either interlock adjustment or seal replacement at the meeting rail specifically.
Aluminium-Specific Failure Points
Several failure modes are unique to aluminium and will not appear in any guide written for timber or vinyl windows. Missing these during diagnosis means missing the actual problem.
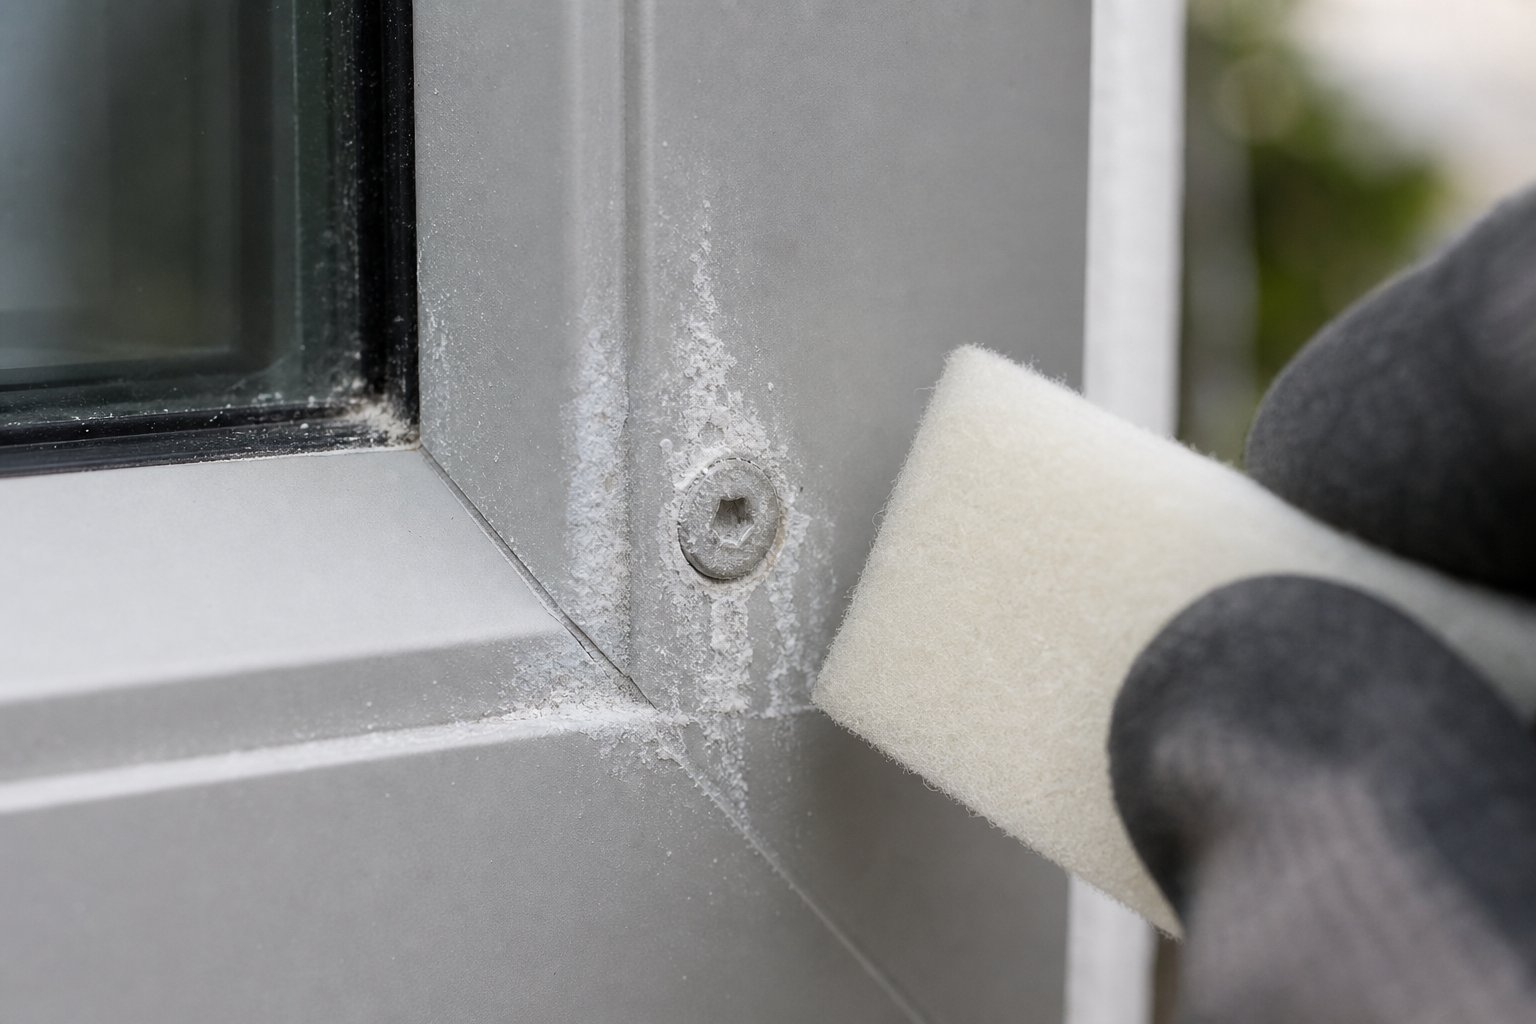
Surface oxidation shows up as a dull, chalky white or grey film on the frame surface. This is aluminium oxide — a natural protective layer that forms when aluminium is exposed to air. In mild form, it is purely cosmetic and actually protects the metal beneath. But in aggressive environments (coastal salt air, industrial pollution, or prolonged moisture contact), the oxide layer can thicken, become powdery, and eventually progress to pitting corrosion that eats into the structural profile. If you can wipe the residue off with a damp cloth and the metal beneath looks smooth, you are dealing with surface oxidation. If the surface feels rough or pockmarked after cleaning, pitting has begun and professional assessment is warranted.
Galvanic corrosion appears as white, crusty deposits concentrated around screws, hinges, or any point where a different metal contacts the aluminium frame. It occurs when dissimilar metals — typically steel screws or brass fittings — sit against aluminium in the presence of moisture. The electrochemical reaction corrodes the aluminium preferentially, weakening the frame at fastener points. This is especially prevalent in humid or coastal climates and is one of the most common causes of premature hardware failure on aluminium windows. If you notice white buildup specifically around screw heads or hinge plates, galvanic corrosion is almost certainly the cause.
Thermal expansion binding is seasonal and predictable. If your window operates perfectly in winter but sticks or jams during summer, the aluminium frame is expanding into its available clearance. This is not a defect — it is physics. Aluminium has a thermal expansion coefficient of approximately 23 x 10-6 per degree Celsius, meaning a 1-metre frame section grows roughly 0.5 mm over a 20-degree temperature swing. On a full-width window, that cumulative expansion can eliminate the running clearance between sash and track.
Stress cracking at corner joints represents the most serious aluminium-specific failure. Repeated thermal cycling — expanding in summer, contracting in winter, year after year — fatigues the corner welds or mechanical joints where horizontal and vertical frame members meet. Hairline cracks at these junctions compromise both structural integrity and weather sealing. Unlike the other issues above, stress cracking is rarely a DIY repair. If you spot cracks at any corner joint, the frame section typically needs professional welding or, in severe cases, full replacement.
Matching your symptom to the correct root cause is the critical first step. The repair itself — whether that means a new spiral balance, fresh weatherstripping, or corrosion treatment — requires the right tools and materials selected specifically for aluminium surfaces.
Essential Tools and Materials for Aluminium Window Repairs
Grabbing whatever is handy from the shed is a reliable way to scratch an anodised finish, strip a screw hole, or introduce corrosion that shows up six months later. Aluminium is softer than steel yet harder than timber — it demands a specific toolkit and a short list of products that work with the metal rather than against it. Getting this right upfront means the repair itself goes faster and lasts longer.
Non-Marring Tools for Aluminium Surfaces
Standard steel pry bars and flat-blade screwdrivers gouge powder-coated and anodised surfaces on contact. Once that protective layer is breached, moisture reaches bare aluminium and corrosion begins. The goal is to work the window apart without leaving a mark.
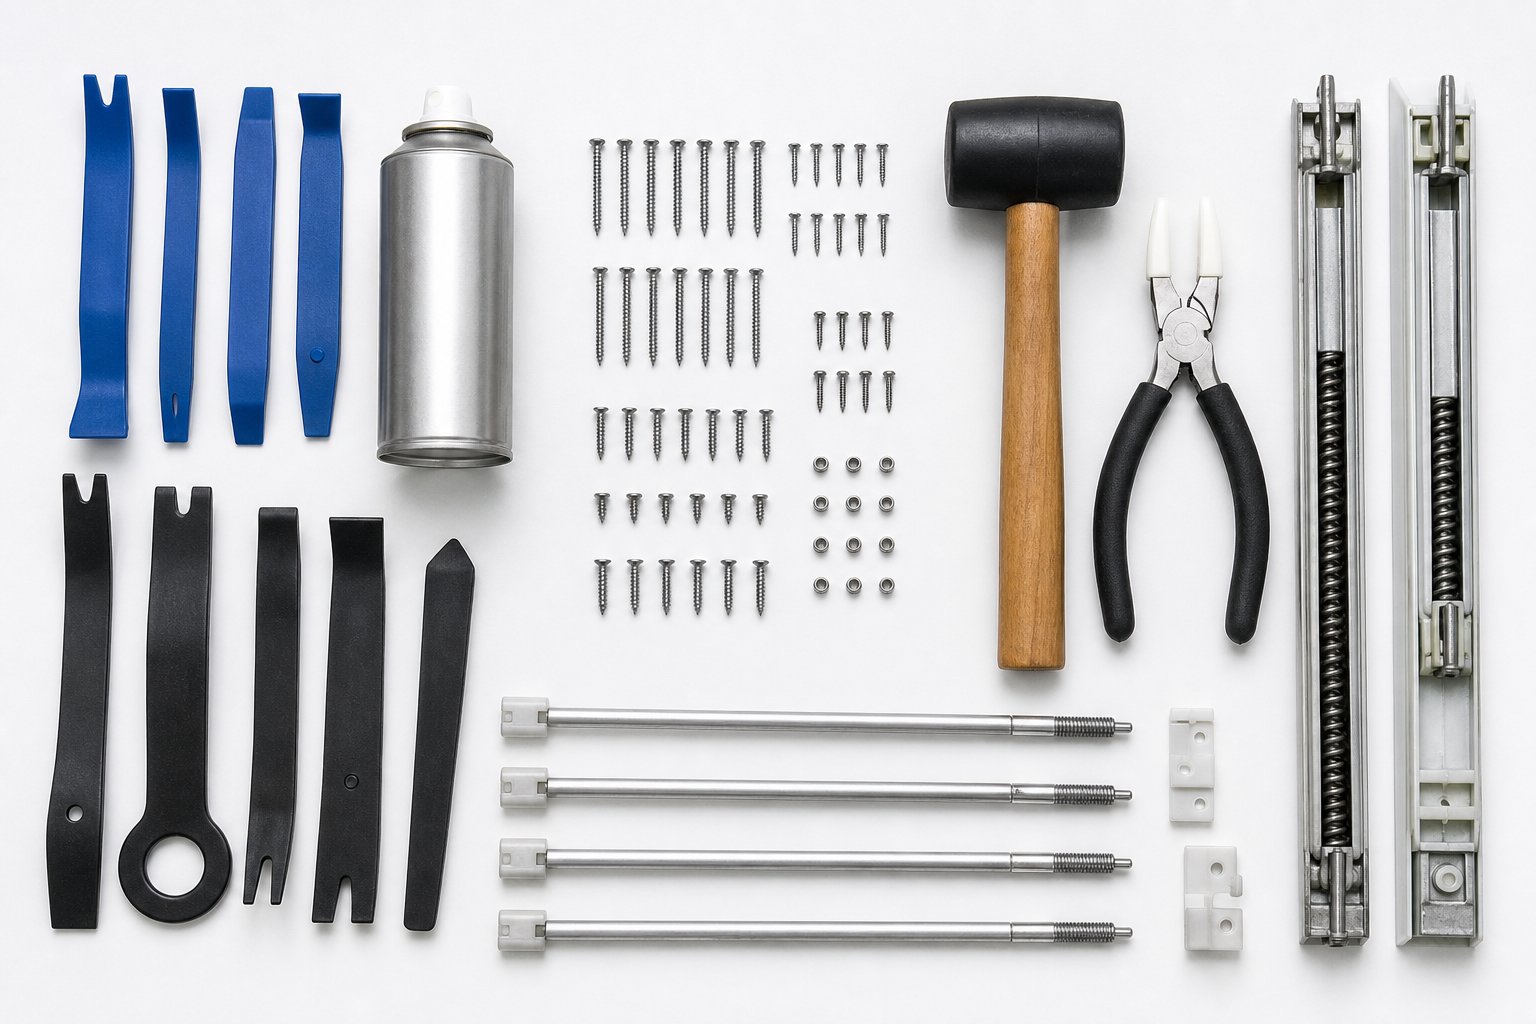
- Plastic trim removal tools — rigid nylon pry bars designed for automotive and joinery work. They flex enough to avoid denting aluminium extrusions while still providing adequate leverage to pop jamb liners and sash clips free.
- Nylon-tipped pliers — for gripping pivot bars, balance rods, and small hardware without scoring the surface.
- Rubber mallet — useful for reseating sashes and tapping jamb liners back into position without denting the frame.
- Painter’s tape or protective film — applied to working surfaces before using any metal tool nearby. A strip of tape along a track edge prevents accidental scratches during sash removal.
- Stainless steel fasteners — when replacing screws, always use stainless steel (preferably 316 grade in coastal areas) rather than plain steel or zinc-plated alternatives. Steel against aluminium creates galvanic corrosion; stainless steel sits much closer to aluminium on the galvanic series and resists this reaction.
- Cobalt or titanium drill bits — standard high-speed steel bits work but dull quickly on aluminium. Cobalt bits stay sharper and produce cleaner holes without grabbing.
Aluminium-Safe Lubricants and Cleaners
Lubricant choice matters more than most homeowners realise. Petroleum-based sprays like WD-40 provide a temporary fix but leave a sticky residue that attracts dirt and dust into tracks, compounding the original problem within weeks. They also degrade rubber and EPDM seals over time, turning a sticking sash into a leaking one.
- Silicone-based spray lubricant — the correct choice for aluminium tracks and balance mechanisms. Silicone dries to a non-sticky film, repels moisture, and will not damage rubber weatherstripping or plastic components. Apply sparingly to jamb liner channels after cleaning.
- Mild detergent solution — warm water with a few drops of dishwashing liquid cleans oxidation residue and grime from tracks without attacking the aluminium oxide layer. Avoid abrasive cream cleaners, steel wool, and anything acidic (vinegar, citrus-based cleaners) — these strip the protective oxide coating that keeps the metal stable.
- Non-abrasive nylon scouring pads — for stubborn buildup in track channels. White or blue Scotch-Brite pads work well; never use the green heavy-duty version on aluminium.
Replacement parts — spiral balances, tilt latches, pivot bars, and pile weatherstripping — are stocked at Bunnings and available through specialty window hardware suppliers online. If you cannot find the exact part locally, a handyman window repair near me search often turns up mobile technicians who carry common aluminium window spares on their van.
Sealants and Adhesives Compatible With Aluminium
Sealant selection is where many DIY repairs quietly fail. The two main types of silicone sealant — acetoxy-cure and neutral-cure — behave very differently on aluminium surfaces.
- Neutral-cure silicone sealant — releases alcohol during curing and is completely safe for aluminium, steel, and other metals. This is the only type you should use on aluminium window frames. It bonds well, remains flexible for decades, and will not cause discolouration or corrosion.
- Acetoxy-cure silicone (the type with a strong vinegar smell) — releases acetic acid during curing, which corrodes aluminium, copper, and zinc. Even brief contact during the cure period can initiate corrosion that spreads beneath the sealant bead, invisible until the joint fails. Avoid it entirely on any metal substrate.
For bonding aluminium components where structural strength is needed — reattaching a corner key or securing a loose glazing bead — a two-part epoxy rated for metals provides a stronger joint than silicone alone. Ensure the surfaces are clean, dry, and lightly abraded with a fine Scotch-Brite pad before applying.
With the right tools staged and the correct products on hand, you can move into the actual repair procedures with confidence that nothing you use will create a new problem while solving the old one.
Step-by-Step Repair Procedures That Actually Work
Vague advice like “replace the balance” or “clean the tracks” only helps if you already know how. The three procedures below walk through the most common double hung aluminium window repairs in exact sequence — what to remove first, what to watch for, and how to confirm the fix actually holds before you button everything back up.
Replacing a Worn Spiral Balance
A broken or detensioned spiral balance is the number one reason an aluminium double hung sash will not stay open. Spiral balances are rated by sash weight and tube length, so fitting the wrong size means the sash either slams shut again within days or becomes impossibly stiff to move. Measure before you buy.
- Tilt the sash inward. Slide both tilt latches inward simultaneously, then pull the top of the sash toward you until it sits at roughly 90 degrees. Lift one side to disengage the pivot bar from the balance shoe, then free the other side. Rest the sash on a padded surface — a folded towel on the floor works fine.
- Disconnect the pivot bar from the balance shoe. With the sash removed, locate the balance shoe sitting in the jamb liner channel. Use a flathead screwdriver to slide the shoe to the access cutout (usually at mid-height on the jamb liner) and rotate the cam to release it.
- Remove the old spiral balance. Unscrew the single retaining screw at the top of the jamb liner channel. Be prepared — the balance is under spring tension and the rod will spin when released. Grip the tube firmly, remove the screw, and let the tension unwind in a controlled manner. Pull the balance straight out of the channel.
- Measure for the correct replacement. Record the tube length (not the spiral rod length) in millimetres, the tube diameter, and the sash weight. Weigh the sash with a luggage scale if the original balance has no visible rating stamp. Spiral balance tip colours typically indicate weight ranges — red for lighter sashes, blue or green for heavier ones — though exact ratings vary between manufacturers.
- Install the new balance. Slide the new spiral balance tube into the jamb liner channel, bracket end down, and secure the top with the retaining screw. Insert the balance shoe through the access cutout and seat it in the track near the sill.
- Tension the balance. Set the sash back into its track and raise it to the fully open position. Grasp the bracket at the bottom of the spiral rod and rotate it clockwise. With each revolution, the rod shortens as it coils tighter inside the tube. Pull the bracket down about 150–200 mm and continue turning until it draws back up to the tube. This should provide enough tension for a standard sash.
- Attach the bracket and test. Without releasing tension, hook the bracket into the pivot shoe or tap its nub into the mortise on the sash bottom, then secure with a stainless steel screw. Lower the sash slowly, release it at several points along the track, and confirm it holds position. If it drifts down, add another quarter-turn of tension. If it is too stiff to lower smoothly, back off a quarter-turn.
Always replace both balances — left and right — even if only one has failed. Mismatched tension causes the sash to tilt, bind on one side, and wear the new balance unevenly.
Fixing a Sash That Will Not Stay Open
A sash that drops the moment you release it points to three possible failures, each requiring a different fix. Running through a quick diagnostic sequence before ordering parts saves a wasted trip to Bunnings.
- Check the spiral balance tension. Tilt the sash inward and locate the spiral rod on each side. Twist the tip gently with a flathead screwdriver. If it spins freely with no resistance, the internal spring has failed and the entire balance needs replacing — follow the procedure above.
- Inspect the pivot bar connection. If the balance still has tension but the sash drops anyway, the pivot bar may have disconnected from the balance shoe. Look at the bottom corners of the sash — you should see a small metal or nylon pin (the pivot bar) that slots into the shoe in the track. If the pin is cracked, worn flat, or missing entirely, replace it. Pivot bars press-fit or screw into a recess on the sash corner, and replacements are widely available through specialist window hardware suppliers.
- Examine the balance shoe cam. The shoe has a small cam mechanism that locks against the jamb liner to hold the sash in position. If the cam is cracked or the spring inside the shoe has broken, the shoe cannot grip. Slide the shoe to the access cutout, remove it, and compare it against a replacement to confirm the match before fitting the new one.
Outside window repair — particularly on upper-storey sashes — is far easier with tilt-in functionality. If the tilt mechanism works, all three of these checks and fixes can be completed from inside the room without a ladder.
Restoring Smooth Sash Operation in Sticky Tracks
A sash that drags, judders, or jams partway through its travel is rarely a balance problem. The friction sits in the tracks themselves, and the fix is methodical cleaning followed by proper lubrication — not brute force.
- Remove both sashes. Start with the lower sash (tilt and lift out), then the upper. Removing both gives full access to the jamb liner channels and prevents one sash from blocking your work area.
- Clean the jamb liner tracks. Use a stiff nylon brush to dislodge loose debris and dried oxidation residue from the channels. Follow up with a soft cloth dampened with mild detergent solution. For stubborn aluminium oxide buildup, a white Scotch-Brite pad works effectively without scratching the surface. Avoid steel wool or abrasive powders — these damage the anodised or powder-coated finish and accelerate future corrosion.
- Clear the weep holes and drainage channels. While the sashes are out, check the sill drainage slots. Blocked weep holes cause water to pool in the track, accelerating oxidation and promoting mould growth in pile weatherstripping. A thin wire or compressed air clears these quickly.
- Inspect the pile weatherstripping. Run your finger along the pile strips in the jamb liners and parting bead. Healthy pile stands upright and springs back when pressed. Matted, crushed, or missing sections create both friction irregularities and air gaps. Replacement pile weatherstripping presses into the existing channel — pull the old strip out, measure the channel width and pile height, and press the new length in with a flat tool or your thumb.
- Apply silicone lubricant. Spray a light coat of silicone-based lubricant along both jamb liner channels. Wipe excess with a clean cloth so the surface is slick but not wet — over-application collects dust and defeats the purpose.
- Reinstall the sashes and test. Replace the upper sash first, then the lower. Slide each one through its full range of travel several times. Movement should feel smooth and consistent from top to bottom with no catching or dead spots.
If binding persists after thorough cleaning and lubrication, check that the frame itself is still square. Hold a spirit level against each side jamb and measure the diagonals of the frame opening. A frame that has racked — often due to building settlement — pinches the sash at specific points in its travel. Minor racking can sometimes be corrected by adjusting the mounting screws that anchor the frame to the rough opening, but significant distortion may require a professional assessment.
These three procedures cover the vast majority of mechanical failures in aluminium double hung windows. Some problems, however, go beyond mechanics. Corrosion — the quiet, persistent enemy of any aluminium frame — demands its own set of treatment and prevention strategies.
Treating Oxidation and Corrosion on Aluminium Frames
Mechanical parts wear out and get replaced — that is straightforward. Corrosion is different. It works silently, often hidden behind hardware or inside track channels, weakening the frame itself rather than a single replaceable component. For aluminium double hung windows, oxidation and galvanic corrosion are the two primary degradation modes, and neither one appears in standard window repair guides written for timber or vinyl. Left untreated, surface oxidation progresses to structural pitting, and galvanic corrosion can loosen fasteners to the point where sash hardware pulls free from the frame entirely.
Understanding Aluminium Oxidation and How to Treat It
Aluminium does not rust — it lacks iron content entirely. What it does is oxidise. When bare aluminium contacts oxygen and moisture, a thin layer of aluminium oxide forms almost immediately on the surface. Under normal conditions, this oxide layer is actually beneficial: it bonds tightly to the metal, creating a hard, self-healing barrier that prevents further corrosion from reaching the aluminium beneath. This is why aluminium frames can last decades in mild climates with minimal maintenance.
Problems begin when environmental conditions overwhelm that natural protection. In coastal areas with salt-laden air, industrial zones with airborne pollutants, or anywhere moisture sits against the frame for extended periods, the oxide layer thickens beyond its useful range. Instead of a thin, invisible shield, it becomes a chalky white or grey powder that flakes and stains surrounding surfaces. The protective layer that normally preserves aluminium’s integrity can itself become a cosmetic problem — and a warning sign of worse to come.
Treating surface oxidation is well within DIY capability:
- Clean the affected area with a mild detergent solution and a white non-abrasive nylon pad. Work in one direction rather than circular motions to avoid creating visible swirl marks on anodised or powder-coated finishes.
- Apply an aluminium-specific cleaner for heavier oxidation. Products formulated for aluminium (available at Bunnings or marine supply stores) dissolve oxide buildup without attacking the base metal. Avoid acidic household cleaners — vinegar, citrus solutions, and bathroom tile cleaners all strip the protective oxide layer faster than it can reform.
- Protect the cleaned surface with a quality car wax, marine-grade aluminium polish, or a purpose-made conversion coating. These create a sacrificial barrier between the metal and the environment, slowing future oxide formation. Reapply every six to twelve months depending on exposure.
- Consider professional refinishing when oxidation has progressed beyond surface treatment — particularly if the original powder coating or anodising has failed across large areas. A professional applicator can strip, treat, and re-coat the frame in situ or remove sashes for workshop refinishing.
The critical distinction is between surface oxidation and pitting corrosion. Surface oxidation is cosmetic — the frame beneath remains structurally sound. Pitting corrosion, however, creates small but deep cavities in the aluminium profile itself. If you clean away the white residue and find the metal surface rough, pockmarked, or visibly eaten away, the damage has moved beyond cosmetic territory. Pitting compromises the structural cross-section of the extrusion, and once it reaches a certain depth, no surface treatment can restore the lost material. At that stage, professional assessment determines whether the affected section can be stabilised or needs replacement.
Preventing and Addressing Galvanic Corrosion
Galvanic corrosion is a different beast entirely. Where oxidation is aluminium reacting with its environment alone, galvanic corrosion is an electrochemical attack triggered by contact between dissimilar metals in the presence of moisture. It requires three ingredients simultaneously: two metals with different electrode potentials, direct electrical contact between them, and an electrolyte — typically rainwater, condensation, or salt spray bridging the joint.
In aluminium window frames, the most common culprits are steel screws, brass hinges, and copper flashing in contact with the aluminium extrusion. Aluminium sits toward the anodic (active) end of the galvanic series, while steel, brass, and copper are more noble (cathodic). When moisture bridges the connection, the aluminium becomes the sacrificial anode — it corrodes preferentially while the more noble metal remains largely unaffected. The result is white, crusty deposits concentrated specifically around fastener heads, hinge plates, or anywhere a dissimilar metal touches the frame.
Galvanic corrosion is the most common cause of premature aluminium window failure in coastal and humid environments. A single steel screw in an aluminium frame can initiate corrosion that spreads outward from the fastener point, weakening the surrounding metal over just a few seasons of exposure.
Identifying galvanic corrosion is straightforward once you know what to look for. Check around every screw, hinge pin, and bracket on the frame. White or grey crusty buildup localised around a fastener — rather than spread evenly across the frame surface — is the telltale signature. The corrosion products often lift paint or powder coating away from the metal in a ring pattern around the offending hardware.
Addressing existing galvanic corrosion involves four steps:
- Remove the offending hardware. Back out steel screws, remove brass fittings, and extract any dissimilar metal in direct contact with the aluminium. If screws have corroded into the frame, apply a penetrating lubricant (silicone-based, not petroleum) and allow it to work for several hours before attempting removal. Forcing a seized screw risks stripping the aluminium thread entirely.
- Clean the corrosion deposits. Use a nylon brush and mild detergent to remove the white buildup. For stubborn deposits in screw holes, a small nylon bottle brush or a wooden toothpick clears residue without enlarging the hole.
- Treat the aluminium surface. Once clean, apply a thin coat of neutral-cure silicone or a protective wax to the exposed area. For screw holes, a dab of marine-grade lanolin or dielectric grease inside the hole prevents future electrolyte contact.
- Replace with compatible fasteners. Fit stainless steel screws (316 grade for coastal properties) with nylon isolation washers between the screw head and the aluminium surface. The nylon washer breaks the electrical path between the two metals, eliminating the galvanic cell even if moisture is present. Alternatively, use aluminium fasteners where structural loads permit — aluminium against aluminium carries negligible galvanic risk.
Prevention is far simpler than treatment. Homeowners in coastal regions — including those searching for local window replacement Johns Island SC or window replacement Johns Island South Carolina — deal with salt air that dramatically accelerates galvanic reactions. For these environments, every fastener on an aluminium window should be audited. Replace any plain steel or zinc-plated screws with stainless steel equivalents before corrosion begins. Apply dielectric grease to threads during installation, and inspect hardware annually for the first signs of white deposit formation.
The area ratio between the two metals also matters. A small aluminium rivet holding a large steel bracket creates intense localised corrosion at the rivet because the anodic current concentrates on a tiny surface area. Conversely, a small stainless screw in a large aluminium frame spreads the galvanic effect across a much larger anode, slowing the corrosion rate considerably. This is why stainless fasteners in aluminium frames are generally acceptable with proper isolation — the geometry works in your favour.
Corrosion treatment restores what has already been damaged, but the rate at which oxidation and galvanic attack progress depends heavily on where you live and what your windows face every day. Climate — coastal salt, extreme heat, winter condensation — dictates how aggressively you need to maintain your aluminium frames and how often preventive measures need refreshing.
Climate and Coastal Environment Repair Priorities
Where your home sits on the map shapes how quickly aluminium degrades and which failures hit first. A beachside property in coastal Queensland faces a completely different threat profile than a home in alpine Victoria or western Sydney’s summer heat. Yet most window repair summerville sc guides and general maintenance resources treat every climate the same — clean occasionally, lubricate once a year, and hope for the best. That approach leaves coastal homeowners replacing hardware every few years and inland homeowners puzzling over condensation damage they never saw coming.
Tailoring your maintenance schedule and repair priorities to your specific environment extends the working life of aluminium double hung windows by years — sometimes decades. The guidance below breaks down by climate type so you can focus effort where it actually matters for your property.
Coastal and High-Humidity Environment Considerations
Salt air is relentless. Sodium chloride particles carried on coastal breezes settle on aluminium frames, dissolve in morning dew or humidity, and begin attacking the protective oxide layer within hours. Properties within 500 metres of the shoreline face the most aggressive exposure, but salt-driven corrosion can affect homes up to five kilometres inland depending on prevailing winds and local topography. In tropical coastal regions — think Far North Queensland, the Northern Territory coastline, or exposed stretches of the NSW South Coast — high humidity compounds the problem by keeping surfaces wet longer, giving salt deposits more time to react with the metal.
Joints and fastener points corrode first because moisture pools in crevices and salt concentrates where two surfaces meet. The meeting rail interlock, corner joints, and screw holes are the earliest casualties. Salt deposits also infiltrate jamb liner tracks, grinding against pile weatherstripping every time the sash moves. Over a single wet season, salt-contaminated tracks can shred weatherstrip fibres that would otherwise last five to ten years in a sheltered inland location.
A preventive maintenance schedule calibrated for coastal exposure looks like this:
- Quarterly: Rinse all window frames with fresh water — a garden hose at moderate pressure is sufficient. Focus on tracks, drainage channels, and the underside of sills where salt accumulates out of sight. This single habit removes chloride deposits before they breach coatings.
- Biannually: Inspect every piece of hardware for early galvanic corrosion. Check screw heads, hinge plates, tilt latches, and balance mounting brackets for white crusty deposits. Replace any compromised fasteners with 316-grade stainless steel immediately — do not wait for the next scheduled maintenance.
- Annually: Reapply a marine-grade protective wax or conversion coating to all exposed aluminium surfaces. Pay particular attention to areas where the powder coating shows chips, scratches, or wear from sash movement. Any breach in the coating is an entry point for salt attack.
- Immediately: Address any visible damage to powder coating or anodising the moment you notice it. A touch-up pen matched to your frame colour, sealed with neutral-cure silicone at the edges, buys time until a full professional recoat can be scheduled.
Balance mechanisms suffer in coastal environments too. Salt crystals work their way into spiral balance tubes, increasing internal friction and accelerating spring fatigue. If you notice a sash becoming progressively harder to raise over a single season — rather than the gradual decline over years that indicates normal spring wear — salt contamination inside the balance tube is the likely cause. Flushing the tube with silicone spray during your quarterly rinse can slow this process, but heavily contaminated balances typically need full replacement rather than rehabilitation.
Extreme Heat and Thermal Expansion Issues
Aluminium expands at roughly 23 x 10-6 per degree Celsius — about twice the rate of steel and significantly more than timber or vinyl. On a 42-degree summer day in western Sydney, Adelaide, or inland Queensland, a 1.2-metre aluminium frame member can grow by more than 0.7 mm compared to its length on a mild 15-degree morning. Across the full width of a double hung window, that cumulative expansion closes the running clearance between sash and jamb liner, producing the seasonal binding that many homeowners mistake for a mechanical fault.
The reverse happens in winter. As temperatures drop, the frame contracts and gaps open between the sash edges and weatherstripping. Draughts that appear only during cold snaps — then vanish when the weather warms — are thermal contraction at work, not failed seals. Replacing weatherstripping to fix a winter draught often creates a sash that binds in summer because the new, thicker seal cannot accommodate the expansion.
Managing thermal movement requires a different mindset than fixing a broken part:
- Check frame clearances during installation or after any adjustment. A properly installed aluminium double hung window includes built-in clearance — typically 1.5 to 2 mm per side — specifically to accommodate thermal growth. If a previous repair involved shimming or tightening the frame, that clearance may have been inadvertently reduced.
- Select weatherstripping that accommodates movement. Pile weatherstripping handles thermal cycling better than rigid compression seals because the flexible fibres compress and recover without creating excessive friction. When replacing seals on windows in high-heat zones, choose a pile height that seals adequately at the contracted (winter) dimension without binding at the expanded (summer) dimension.
- Inspect corner joints for stress cracking. Repeated expansion and contraction cycles fatigue the corner welds or mechanical crimps where horizontal and vertical frame members meet. Thermal stress over years of cycling can lead to frame distortion or cracking at these junctions. Hairline cracks at corners are not cosmetic — they compromise both structural integrity and weather sealing. Catching them early allows for professional welding repair before the joint fails completely.
- Avoid dark-coloured frames on sun-exposed elevations if thermal binding is already a problem. Dark powder coat finishes absorb significantly more solar radiation than lighter colours, pushing surface temperatures well above ambient air temperature. A black frame facing west in summer can reach 70 degrees Celsius or higher — amplifying expansion far beyond what the clearance was designed to handle.
For homeowners in regions like Summerville or other areas with hot summers and mild winters, window installation summerville sc professionals often encounter thermal binding as the primary service call during January and February. The fix is rarely a new part — it is understanding that the window is responding to physics, and adjusting clearances or weatherstrip profiles to work with that movement rather than against it.
Cold Climate Condensation and Thermal Bridge Problems
Aluminium conducts heat approximately 1,000 times more efficiently than timber and around 4,000 times more than PVC. That thermal conductivity is an asset in some contexts — it dissipates heat quickly and resists warping — but in cold climates, it creates a direct thermal bridge between warm interior air and cold exterior surfaces. The result is condensation forming on the inside face of the aluminium frame whenever indoor humidity meets the cold metal surface.
Condensation itself is not the problem — it is what happens next. Water runs down the frame, pools on the sill, and saturates the timber reveals, plasterboard, or paint surrounding the window. Over a single winter, repeated condensation cycles can rot timber sills, blister paint, promote mould growth behind architraves, and corrode the aluminium sill track from the inside out. Homes in alpine Victoria, the Canberra region, Tasmania, and elevated areas of the NSW Southern Tablelands deal with this every cold season.
Modern aluminium windows address this through thermally broken profiles — a polyamide (PA66 GF25) strip inserted between the interior and exterior aluminium sections during manufacturing. This insulating barrier reduces frame U-values by 30 to 60 percent and keeps the interior aluminium surface warm enough to stay above the dew point under normal indoor humidity levels. If your windows were manufactured with thermal breaks, condensation on the frame itself should be minimal unless indoor humidity is exceptionally high (above 60 percent relative humidity).
Older aluminium double hung windows — particularly those installed before the mid-2000s — typically lack thermal breaks entirely. The frame is a single continuous aluminium extrusion from inside to outside, conducting cold directly to the interior surface. For these windows, replacement windows summerville sc searches and similar queries reflect a common dilemma: repair or upgrade?
Repair options for non-thermally-broken frames focus on managing the condensation rather than eliminating the thermal bridge:
- Improve ventilation to reduce indoor humidity. Exhaust fans in kitchens and bathrooms, trickle vents in bedrooms, and avoiding drying laundry indoors all lower the moisture load that drives condensation.
- Apply a condensation channel or drip tray at the sill to catch and redirect water before it reaches surrounding materials. Purpose-made aluminium condensation gutters sit inside the reveal and drain to the exterior through a small weep tube.
- Install secondary glazing or interior storm panels to create an insulating air gap between the cold aluminium frame and the room. This does not fix the thermal bridge in the frame itself, but it reduces the temperature differential at the glass surface and slows airflow across the cold metal.
- Seal the interior frame-to-wall junction with a flexible, paintable sealant to prevent warm, humid air from reaching the coldest part of the frame where it meets the wall cavity. Air leakage at this junction often causes localised condensation that looks like a frame problem but is actually an installation gap.
When condensation damage has already affected the sill area — rotted timber reveals, bubbling paint, or visible mould — address the water damage first before tackling the thermal bridge. Replacing a sill liner or repainting over active moisture simply traps the problem behind fresh materials. Dry the area completely, treat any mould with an appropriate biocide, and repair or replace damaged substrates before implementing the condensation management strategies above.
If the window is otherwise mechanically sound but condensation is severe and persistent, upgrading to a thermally broken aluminium double hung unit delivers the most complete solution. Modern thermally broken frames paired with double-glazed insulated glass units virtually eliminate frame condensation while also improving acoustic performance and energy efficiency — a worthwhile investment for cold-climate properties where the existing windows are approaching end of life regardless.
Climate dictates the pace and type of degradation, but it does not change the fundamental truth that aluminium double hung windows are repairable systems. What it does change is the safety margin. Working on windows exposed to salt, extreme heat, or persistent moisture introduces hazards that mild-climate repairs do not — sharp corroded edges, thermally stressed glass, and the ever-present risk of working at height on upper-storey sashes.
Safety Precautions for DIY Aluminium Window Repairs
Aluminium is forgiving in many ways — it resists rot, holds its shape, and tolerates decades of weather exposure. What it is not forgiving about is careless handling. Cut aluminium edges slice skin as cleanly as a blade, metal shavings from drilling find eyes with unerring accuracy, and upper-storey sashes put you at height whether you planned for it or not. A few minutes of preparation prevents injuries that no amount of repair skill can undo.
Sharp Edge and Cut Hazard Prevention
Factory-extruded aluminium profiles look smooth, but the edges where sections were cut during manufacturing or where corrosion has roughened the surface can lacerate bare skin with minimal pressure. Broken glazing gaskets expose glass edges that compound the risk. Treat every aluminium edge as potentially sharp until you have confirmed otherwise.
- Heavy-duty work gloves — leather or cut-resistant synthetic (minimum ANSI/EN cut level C). Thin latex or nitrile gloves offer zero protection against aluminium edges and create a false sense of security.
- Long sleeves — a close-fitting long-sleeve shirt prevents forearm lacerations when reaching into frame cavities or lifting sashes past your body.
- Safety glasses or goggles — essential when drilling, filing, or cutting aluminium. Metal shavings are fine, sharp, and light enough to become airborne. Wrap-around styles prevent particles entering from the sides.
- Protective tape on working edges — before handling a removed sash, run a strip of painter’s tape along any exposed cut edges. This takes seconds and prevents the most common injury: a hand sliding along a frame edge during repositioning.
When removing sashes, grip the frame at the stiles (vertical sides) rather than the top or bottom rails where cut edges are more likely to be exposed. Set removed sashes on a padded surface — never lean them against a wall where they can slide and shatter the glass or fall onto feet.
Working at Height Safely
Upper sashes on double-storey homes sit well above safe reach from ground level. The good news: most aluminium double hung windows with tilt-in functionality allow you to perform upper sash repairs entirely from inside the room. Tilt the sash inward, disconnect it from the balance system, and work on it at floor level. This eliminates ladder work for the majority of repairs.
When exterior access is genuinely required — replacing external glazing gaskets, treating corrosion on the outer frame face, or addressing blocked weep holes on upper levels — ladder safety becomes non-negotiable.
- Ladder angle — position the base one unit out for every four units of height (a 75-degree angle). On soft ground, use a stabiliser or foot pad to prevent sinking or slipping.
- Three-point contact — maintain two hands and one foot, or two feet and one hand, on the ladder at all times. This means carrying tools in a belt or bucket rather than in your hands during ascent and descent.
- Ladder height — the top of the ladder should extend at least one metre above the working height so you have something to hold while stepping off or reaching sideways.
- Harness use — for any work above 2 metres where both hands must leave the ladder (removing a sash from outside, for instance), a fall-arrest harness anchored to a secure roof point or rated anchor is the appropriate precaution. A fall from even a single storey onto concrete or paving causes life-changing injuries.
- Weather conditions — never work at height in wind, rain, or on wet surfaces. Aluminium ladder rungs become slippery when wet, and wind gusts can destabilise both you and any sash you are holding.
If the repair requires sustained exterior work at height — multiple sashes, frame corrosion treatment across an entire elevation — scaffolding provides a far safer and more stable platform than a ladder. Scaffold hire for a weekend is inexpensive relative to the risk of a fall.
Lead Paint and Older Window Considerations
Aluminium windows became widespread in Australian homes from the 1960s onward. While the aluminium frame itself was never painted with lead-based products, the timber reveals, architraves, and window sills surrounding those frames very often were. Homes built before 1970 almost certainly contain lead paint on interior timber joinery. Properties built between 1970 and 1997 — when Australia restricted lead content in decorative paint to 0.1 percent — may also have lead-painted surfaces, particularly if original finishes were never stripped.
Disturbing lead paint during window repairs creates hazardous dust and chips. Sanding a timber sill to reseat a frame, prying off an architrave to access mounting screws, or even the vibration from hammering near a painted surface can release lead particles into the air you breathe.
- Test before disturbing — inexpensive lead test kits (available at Bunnings) give a result in seconds. Swab any painted timber surface you plan to sand, scrape, cut, or disturb during the repair. If the test reads positive, stop and reassess your approach.
- Contain the work area — if lead paint is present but you are not directly disturbing it (for example, removing a sash without touching the surrounding timber), lay plastic sheeting below the window to catch any incidental chips or dust. Seal the sheeting and dispose of it in general waste — do not vacuum lead dust with a standard household vacuum.
- Wet methods reduce dust — if minor disturbance is unavoidable, mist painted surfaces with water before and during work. Wet paint generates far less airborne dust than dry paint.
- Know when to call a professional — any work that involves sanding, scraping, or heat-stripping lead-painted surfaces over an area larger than a square metre should be performed by a licensed professional following safe work practices under Australian Standard AS 4361.2. This is not overcaution — lead exposure is cumulative and irreversible.
Children and pregnant women should not be present during any work that may disturb lead paint, regardless of how minor the disturbance seems. Wash hands and arms thoroughly after handling any components removed from near lead-painted surfaces, and launder work clothes separately.
Safety handled, the final question most homeowners face is not how to repair, but whether to repair. Some failures — particularly advanced corrosion, frame distortion, or obsolete hardware — reach a point where continued repair costs more than a quality replacement delivers in return.

When Replacement Makes More Sense Than Repair
Every repair has a breakeven point — a threshold where the cost of fixing what you have exceeds the value you get back in remaining service life. For aluminium double hung windows, that threshold depends on the type of failure, how far it has progressed, and whether replacement parts still exist for your specific system. The table below maps common repair scenarios against realistic costs and outcomes so you can make that call with numbers rather than guesswork.
| Issue Type | Typical Repair Cost Range (AUD) | Expected Lifespan After Repair | Replacement Recommendation |
|---|---|---|---|
| Spiral balance replacement (both sides) | $60–$150 (DIY) / $180–$350 (professional) | 10–15 years | Repair — cost-effective with long remaining life |
| Full weatherstripping replacement | $40–$100 (DIY) / $150–$280 (professional) | 5–10 years depending on climate | Repair — routine maintenance item |
| Tilt latch and pivot bar replacement | $30–$80 (DIY) | 10+ years | Repair — inexpensive and straightforward |
| Surface oxidation treatment and recoating | $100–$300 per window (professional) | 5–8 years before retreatment needed | Repair if frame is structurally sound |
| Insulated glass unit (IGU) replacement — seal failure | $250–$600 per sash | 15–20 years for new IGU | Repair if frame and hardware are in good condition |
| Frame pitting corrosion — moderate to severe | $400–$800+ (professional treatment) | 3–5 years before recurrence | Replace — diminishing returns on repeated treatment |
| Frame distortion or bowing | Often unrepairable | N/A | Replace — structural integrity compromised |
| Stress cracking at corner joints | $300–$600 (professional welding) | Variable — depends on thermal cycling severity | Replace if multiple corners affected |
| Obsolete hardware — no replacements available | Custom fabrication: $200–$500+ per piece | Uncertain | Replace — custom parts rarely match original performance |
The general principle is clear: if a single repair costs more than 40 to 50 percent of a quality replacement window, and the repaired component is likely to fail again within a few years, replacement delivers better long-term value. Multiple simultaneous failures — say, pitting corrosion plus failed balances plus blown IGUs — push that equation even further toward replacement.
Signs Your Window Is Beyond Economical Repair
Some failures signal that the window has reached end of life regardless of what individual parts cost. These are the conditions where continued repair becomes a holding pattern rather than a genuine fix.
Frame distortion or bowing means the aluminium extrusion has permanently deformed — usually from building settlement, impact damage, or severe thermal stress over decades. A bowed frame cannot hold a sash square, which means binding, air gaps, and failed locks no matter how many individual components you replace. There is no practical way to straighten an extruded aluminium frame once it has bowed beyond a few millimetres.
Extensive pitting corrosion compromises the structural cross-section of the extrusion itself. Surface oxidation is treatable. Pitting that has eaten visibly into the profile — particularly at the sill, corner joints, or balance mounting points — weakens the frame to the point where it cannot reliably hold sash weight or resist wind loads. Once corrosion sets in deeply, it compromises frame strength and leads to long-term failure that surface treatments cannot reverse.
Failed thermal breaks in double-glazed units present a subtler problem. If the polyamide thermal break within the frame has degraded or cracked — allowing direct metal-to-metal thermal bridging — the window loses much of its insulating value. This is not a field-repairable component. The thermal break is integral to the extrusion and cannot be replaced without replacing the frame.
Obsolete hardware with no available replacements traps homeowners in a cycle of improvisation. Aluminium window systems from the 1970s and 1980s used proprietary balance mechanisms, tilt hardware, and locking systems that manufacturers discontinued decades ago. When the last spare breaks and no aftermarket equivalent exists, the window becomes functionally unrepairable even if the frame itself remains sound. Custom fabrication is possible but rarely cost-effective — and the result seldom matches original performance.
Homeowners searching for home window replacement charleston sc or window replacement charleston south carolina often arrive at this decision after multiple repair attempts on ageing systems. The pattern is recognisable: fix the balance, then the weatherstripping fails, then corrosion appears at the fastener points, then the IGU fogs. Each repair is individually justified, but the cumulative spend approaches or exceeds replacement cost without delivering the performance, efficiency, or warranty that a new window provides.
Choosing a Quality Replacement Aluminium Double Hung Window
When repair no longer makes sense, the replacement you choose determines whether you are buying another 30 years of reliable service or repeating the cycle with a lesser product. Not all aluminium double hung windows are built to the same standard, and the features that matter most are precisely the ones that prevent the failures covered throughout this guide.
Here is what to prioritise:
- Thermally broken aluminium frames — a polyamide (PA66 GF25) strip between interior and exterior aluminium sections eliminates the thermal bridge that causes condensation, energy loss, and accelerated sill deterioration. Any modern replacement should include this as standard, not as an upgrade.
- Spiral balance systems rated to sash weight — quality replacements use precision-rated spiral balances (or constant-force balance springs for heavier sashes) that deliver smooth, consistent operation for a decade or more. Avoid systems using block-and-tackle balances repurposed from vinyl window designs — they wear faster in aluminium tracks.
- Double-glazed insulated glass units (IGUs) — argon-filled cavities between Low-E coated panes dramatically reduce heat transfer through the glass. For Australian conditions, look for a SHGC (Solar Heat Gain Coefficient) appropriate to your climate zone and a whole-window U-value that meets or exceeds NCC Section J requirements.
- Quality powder coating for corrosion resistance — a minimum 60-micron polyester powder coat provides the barrier between aluminium and environment. For coastal properties, marine-grade coatings or additional clear-coat protection extend service life significantly. Check that the coating meets AS 3715 for durability.
- Tilt-in sash design for maintenance access — after spending this entire guide learning how to maintain aluminium double hung windows, you want a replacement that makes future maintenance as simple as possible. Tilt-in functionality lets you clean glass, inspect balances, and replace weatherstripping from inside the room without ladders or exterior access.
- WERS certification — the Window Energy Rating Scheme provides independently verified performance data so you can compare products on equal terms rather than relying on marketing claims alone.
A purpose-built system like MEICHEN’s MA150 Double Hung Window illustrates what a modern aluminium double hung replacement looks like when these features come together in a single package — thermally broken profiles, spiral balance operation, double-glazed IGUs, and tilt-in sashes designed specifically for the aluminium platform rather than adapted from another material. It is worth investigating alongside other options as you compare what is available for your specific project requirements.
When evaluating charleston county sc window replacement companies or any window installation charleston provider, ask specifically about frame U-values (not just glass U-values), powder coat thickness and warranty, balance system type and weight rating, and whether the thermal break is continuous or segmented. These details separate a 30-year window from a 10-year window — and they are the same details that determine whether your next set of double hung aluminium windows will need the repairs this guide covers, or simply outlast them.
Replacement windows charleston sc searches return dozens of options at every price point. The cheapest quote is rarely the best value. A well-specified aluminium double hung window — properly manufactured, correctly installed, and maintained with the climate-appropriate schedule outlined earlier in this guide — delivers decades of smooth, efficient, trouble-free operation. That is the return on investment worth calculating: not just the upfront cost, but the total cost of ownership over the life of the window.
Frequently Asked Questions About Double Hung Aluminium Window Repairs
1. How do I fix a double hung aluminium window that won’t stay open?
A sash that drops when released typically has a failed spiral balance, a disconnected pivot bar, or a broken balance shoe cam. Start by tilting the sash inward and checking whether the spiral rod still offers resistance when turned. If it spins freely, the internal spring has failed and the entire spiral balance needs replacing — these are rated by sash weight, so weigh your sash before ordering. If the balance has tension but the sash still drops, inspect the pivot bars at the bottom corners of the sash for cracks or wear. Both are inexpensive parts available from specialist window hardware suppliers.
2. What lubricant should I use on aluminium window tracks?
Always use a silicone-based spray lubricant on aluminium window tracks. Silicone dries to a non-sticky film that repels moisture and won’t damage rubber weatherstripping or plastic components. Avoid petroleum-based products like WD-40 — they leave a residue that attracts dirt and grit into the tracks within weeks, compounding the original sticking problem. Petroleum lubricants also degrade EPDM and rubber seals over time, potentially turning a sticking sash into a leaking one. Apply silicone sparingly after cleaning tracks with mild detergent and a non-abrasive nylon pad.
3. How do I stop white powdery corrosion on my aluminium window frames?
White powdery residue on aluminium frames is aluminium oxide — a natural protective layer that becomes thick and unsightly in harsh environments like coastal salt air or high humidity. Treat it by cleaning with a non-abrasive nylon pad and aluminium-specific cleaner, then protect the surface with marine-grade wax or a conversion coating. Reapply every 6 to 12 months depending on exposure. If the metal beneath feels rough or pockmarked after cleaning, pitting corrosion has begun and professional assessment is needed. Prevent recurrence by rinsing frames quarterly with fresh water and replacing any steel screws with stainless steel to eliminate galvanic corrosion.
4. When should I replace my aluminium double hung windows instead of repairing them?
Replacement makes more sense when repair costs exceed 40 to 50 percent of a quality replacement window’s price, or when the frame itself is compromised. Key signs include visible frame distortion or bowing, extensive pitting corrosion that has eaten into the structural profile, stress cracking at multiple corner joints, and obsolete hardware with no available replacements. Modern thermally broken aluminium double hung systems like the MEICHEN MA150 offer spiral balances, double-glazed IGUs, and tilt-in sashes that address the common failure points found in older units — delivering decades of reliable service with minimal maintenance.
5. Can I replace spiral balances on aluminium double hung windows myself?
Yes, spiral balance replacement is one of the most common and achievable DIY repairs for aluminium double hung windows. The process involves tilting the sash inward, disconnecting the pivot bar from the balance shoe, removing the old balance from the jamb liner channel, and installing a correctly sized replacement. The critical step is matching the new balance to your sash weight — use a luggage scale to weigh the sash if the original balance has no visible rating stamp. Always replace both left and right balances simultaneously, even if only one has failed, to prevent uneven tension that causes binding and premature wear.
More Window & Door Guides