What Is a Bow Window and How Does It Work
Imagine standing in your living room and instead of looking through one flat pane of glass, you’re surrounded by a gentle sweep of windows curving outward like the hull of a ship. That’s the experience a bow window creates. It’s not a single unit or a basic double-hung — it’s a multi-panel system designed to wrap your view in a smooth, continuous arc.
Defining the Bow Window
A bow window is a curved window assembly made up of four, five, or six equally sized panels — called lites — joined together at gentle angles to form a graceful arc that projects outward from your home’s exterior wall. Each panel sits at a slight angle to its neighbor rather than meeting at sharp corners, and vertical mullions connect them along the curve. A curved head board spans the top of the assembly, while a matching seat board runs along the bottom, giving the interior ledge its finished shape. Together, these components create a rounded projection that adds both architectural depth outside and usable shelf or seating space inside.
A bow window is a set of four or more equally sized window panels arranged at gentle, equal angles to form a smooth outward curve, creating panoramic views, increased natural light, and additional interior space.
How Bow Windows Differ From Standard Windows
A standard flat window — whether it’s a single picture pane or a double-hung — sits flush with the wall. You get one viewing angle and one plane of light entry. A bow window changes that equation entirely. Because each panel faces a slightly different direction, the curved projection captures sunlight from a wider range of angles throughout the day. The result is a room that feels noticeably brighter without any additional square footage on your floor plan.
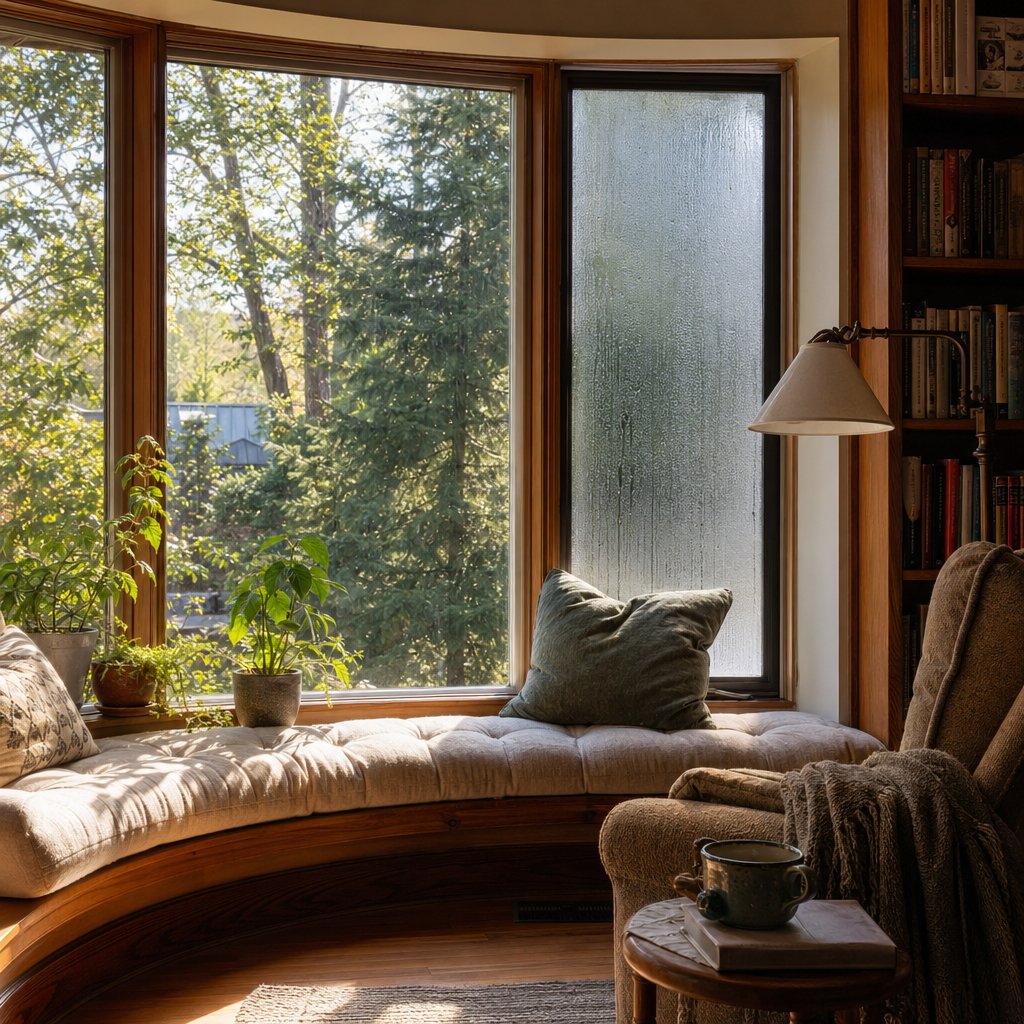
That outward projection also creates real, functional space on the interior side. Many homeowners use the deep sill area as a window seat, a display ledge for plants, or simply a cozy reading nook. The wider viewing angle means you’ll notice more of your yard, street, or landscape from a single spot in the room — a panoramic effect that flat windows simply can’t match.
Whether you’re exploring a bow window for a new build or considering bow window installation as a replacement upgrade, understanding this basic anatomy is the starting point. The real decisions — and the real trade-offs — come down to how many panels you choose, what style fits your home, and how much you’re prepared to invest.
Bow Window vs Bay Window and Why It Matters
The curved arc of a bow window gets confused with its angular cousin — the bay window — more than any other window style. The terms even get swapped interchangeably in casual conversation. But when you’re spending thousands of dollars on a window project, the difference between bay and bow window designs isn’t just academic. It affects your budget, your wall requirements, and the entire look of your home.
Panel Count and Shape Differences
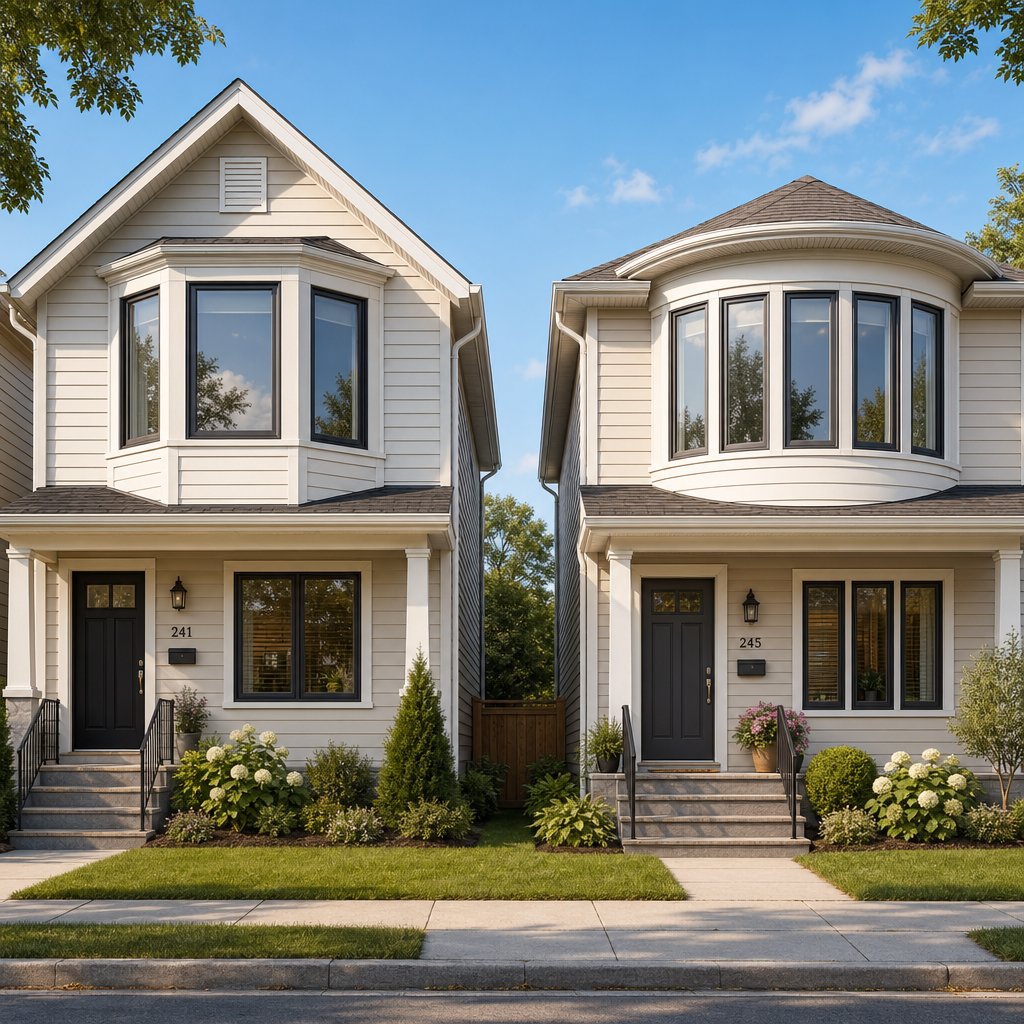
Here’s the simplest way to tell them apart. A bay window uses three panels: a large fixed center pane flanked by two smaller operable windows angled outward at roughly 25 to 45 degrees. Those sharp angles create a distinct, geometric projection — almost like a box pushing out from the wall.
A bow window, on the other hand, uses four to six equally sized panels set at much gentler, uniform angles. Instead of sharp corners, you get a smooth, continuous curve. Think of it as the difference between a triangle and an arc. This structural distinction is what drives every other difference between the two — from how much space they create inside to how much they cost to install.
Because bay windows rely on just three panels, they need a minimum of about 40 inches of wall space. Bow windows, with their wider sweep of four or more lites, typically require at least 80 inches. That’s a significant planning consideration if you’re working with a smaller exterior wall.
Cost, Space, and Aesthetic Impact
More panels mean more glass, more framing, and more complex engineering. That’s why the bay vs bow window cost gap can be substantial. Bay windows generally range from $900 to $7,100 installed, while bow windows typically start around $1,500 and can reach $15,000 or more for custom configurations. In fact, bow windows can run up to 2.5 times the cost of a comparable bay unit, largely because of the additional panels and the curved framing required.
On the space side, the wider curve of a bow window projects further from the exterior wall, creating a more generous interior area — ideal for a window seat, a plant display, or even a small breakfast nook. Bay windows produce a tighter, more angular alcove that works well in compact rooms like kitchens or dining areas where you want architectural interest without consuming too much floor space.
Aesthetically, the difference between bay and bow window styles is easy to spot from the curb. Bays deliver clean, angular lines that complement traditional, transitional, and contemporary facades. Bows bring a softer, rounded elegance often associated with Victorian and period architecture. Neither is inherently better — it depends on the look you’re after and the proportions of your home.
| Feature | Bay Window | Bow Window |
|---|---|---|
| Panel Count | 3 panels | 4 to 6 panels |
| Projection Shape | Angular (25-45 degree angles) | Smooth, continuous curve |
| Typical Cost Range | $900 – $7,100 | $1,500 – $15,000 |
| Minimum Wall Width | ~40 inches | ~80 inches |
| Interior Space Gained | Compact angular alcove | Wider curved area with more usable depth |
| Best Room Applications | Kitchens, dining nooks, smaller rooms | Living rooms, master bedrooms, larger spaces |
| Architectural Style Fit | Traditional, transitional, contemporary | Victorian, classical, elegant period homes |
| Natural Light | Good — three-angle light entry | Excellent — wider curve captures light from more directions |
If you’re weighing a bay window vs bow window for your next project, let the table above guide your initial thinking. But raw specs only tell part of the story. The style of the panels you choose — fixed, casement, double-hung — and the room where you plan to install them will shape the final result just as much as the window type itself.
Popular Bow Window Styles and Ideas for Every Room
Panel type and room placement do more than fine-tune the look of a bow window — they define how the space actually functions day to day. A five-lite unit with all fixed glass delivers a completely different experience than a four-panel configuration with operable casements on each end. Choosing the right combination starts with understanding what’s available and where each setup works best.
Classic and Modern Bow Window Designs
Traditional bow windows lean into detail. Think colonial grille patterns dividing each lite into smaller rectangular panes, warm wood interiors stained to match surrounding trim, and wide mullion profiles that give the window a handcrafted, period-appropriate feel. These configurations pair naturally with Cape Cod, Victorian, and Georgian-style homes where architectural ornamentation is part of the character.
Modern bow window ideas take the opposite approach. Slim aluminium or fiberglass frames minimize the visual barrier between you and the outdoors. Mullion profiles shrink to near-invisible lines, and some designs push glass from near floor level to just below the ceiling for a dramatic wall-of-light effect. If your home leans contemporary or mid-century, these cleaner configurations keep the curve without the fuss.
Where things get practical is panel operability. Not every lite in a bow window needs to open — and in many cases, it shouldn’t. Here are the most common configuration types:
- All-fixed — every panel is stationary, maximizing unobstructed views and reducing cost, but offering zero ventilation
- Alternating casement — fixed center panels flanked by casement windows that crank outward for airflow
- Alternating double-hung — fixed lites paired with double-hung panels that slide vertically, a popular choice for bow window replacement in older homes
- Full-casement — every panel operates independently, providing maximum ventilation but at a higher price point
The configuration you pick also affects your future options for bow window coverings. All-fixed panels are the simplest to dress since nothing moves, while operable panels need window coverings for bow windows that won’t interfere with opening and closing hardware — something worth thinking about before you commit.
Room-by-Room Bow Window Applications
Where you place a bow window matters just as much as how you configure it. Each room brings different priorities.
In living rooms, a five- or six-panel bow becomes the natural focal point. The wide panoramic curve draws the eye and floods the space with light from multiple angles. Furniture placement works best when seating faces toward or wraps around the projection rather than blocking it — a common mistake in rooms where the sofa ends up pushed against the curved sill.
Master bedrooms benefit from a four-panel bow with a built-in window seat. The curved alcove creates a reading nook that feels separate from the sleeping area without requiring extra square footage. Alternating casement panels keep fresh air flowing on mild nights.
Kitchens are an underrated spot for a bow window. The deep sill becomes instant herb garden shelf space, and the multi-angle light makes prep areas feel open and bright. Dining areas gain a similar advantage — natural light from several directions reduces the need for overhead fixtures during daytime meals.
Before you fall in love with a particular room placement, check these practical suitability factors:
- Minimum wall width — a four-panel bow typically needs eight to ten feet of uninterrupted exterior wall
- Ceiling height — rooms with standard eight-foot ceilings can feel top-heavy with an oversized bow; nine- or ten-foot ceilings give the curve room to breathe visually
- Furniture clearance — the interior projection extends roughly 12 to 24 inches into the room, so plan walkways and seating accordingly
- Exterior obstructions — porches, walkways, or property setback lines may limit how far the unit can project outward
- Structural wall type — load-bearing walls require header reinforcement, which adds cost and complexity to the project
Getting these details right upfront saves you from expensive surprises mid-project. And speaking of expenses, the style, configuration, and room you choose all feed directly into the final price tag — a topic that deserves its own honest breakdown.
Honest Pros and Cons of Bow Windows
Most of what you’ll find online about bow windows reads like a sales brochure — all upside, no caveats. That’s because the majority of those pages are written by manufacturers or installers who have a financial stake in your purchase. Here, the goal is different. You deserve the full picture so you can decide whether this investment actually makes sense for your home, your budget, and your lifestyle.
Why Homeowners Choose Bow Windows
There are real, tangible reasons these curved units remain one of the most sought-after window upgrades. When a bow window is well-matched to the right room and properly installed, the benefits are hard to replicate with any other window style.
- Dramatically increased natural light — multiple panels facing different directions capture sunlight from a wider arc throughout the day, reducing your reliance on artificial lighting
- Expanded usable interior space — the curved projection creates a deep sill area perfect for a window seat, display shelf, or small reading nook without adding square footage to your floor plan
- Enhanced curb appeal — few exterior features make as strong a visual statement, and that architectural interest can translate into a measurable boost in property value
- Superior panoramic views — where a flat window gives you one sightline, the gentle curve delivers a near-180-degree sweep of your surroundings
- Improved ventilation options — configurations with operable casement or double-hung panels let you control airflow from multiple angles simultaneously
For homeowners comparing a bow window vs bay window, the wider curve and additional panels give bows a clear edge in light capture and viewing angle. That advantage is especially noticeable in living rooms and master bedrooms where the window serves as the room’s focal point.
Challenges and Limitations to Consider
Here’s where honesty matters most. Every one of those benefits comes with a corresponding trade-off, and ignoring them leads to buyer’s remorse.
- Higher upfront cost — expect to pay significantly more than you would for a standard window or even a bay unit, with installed prices commonly ranging from $3,000 to $10,000 depending on size and materials
- Complex installation requiring structural reinforcement — the weight of four to six panels plus framing demands a reinforced header, and in many cases, cable or bracket support systems
- Water infiltration risk at panel joints — more panels mean more seams, and every seam is a potential entry point for moisture if flashing and sealant aren’t executed precisely
- Difficulty sourcing replacement parts for older units — if you own a bow window from a manufacturer that has changed product lines or gone out of business, finding matching panels or hardware can be a frustrating hunt
- Limited operability in some configurations — all-fixed designs sacrifice ventilation entirely, and even alternating setups leave half the panels sealed shut
- Significant wall space requirements — you’ll need a minimum of eight feet of uninterrupted exterior wall for a four-panel unit, which rules out many rooms in smaller homes
- Window treatment complexity — standard curtain rods and blinds won’t fit the curve, so you’ll need specialized solutions for window treatments for bow windows, adding to the overall project cost
One limitation that rarely gets discussed is thermal performance. Each panel joint is a potential air infiltration point, and the more lites you add, the more opportunities exist for drafts. The overall U-factor of a bow window depends heavily on glass quality, frame material, and how well the unit is sealed during installation. A poorly installed five-panel bow with budget glazing can underperform a well-installed double-pane flat window in both heating and cooling seasons. Modern Low-E coatings, argon gas fills, and thermally broken frames help close that gap — but they also push the price higher.
None of this means bow windows are a bad investment. It means they’re a specific investment that rewards careful planning and punishes shortcuts. The homeowners who end up happiest are the ones who walked in with realistic expectations about cost, installation complexity, and ongoing maintenance — not the ones who were sold a dream without the fine print.
So what does that cost picture actually look like when you break it down by material, glass type, and configuration? That’s where the numbers get interesting.
Bow Window Cost and What Affects Pricing
The honest pros-and-cons picture only gets you halfway to a decision. The other half is money — specifically, understanding why two seemingly similar bow windows can carry price tags that are thousands of dollars apart. The total installed cost for a bow window typically falls between $1,500 and $15,000, with the national average sitting around $3,900. That’s a wide range, and every dollar of difference traces back to a handful of specific variables.
What Drives Bow Window Pricing
Panel count is the most obvious cost lever. A four-lite unit uses less glass, less framing, and less labor than a six-lite configuration. Each additional panel adds material cost and increases the complexity of bow windows installation, so choosing four panels over six can save a meaningful amount without sacrificing the curved effect.
Frame material is the next major factor. Vinyl sits at the most accessible price point — roughly $950 to $2,100 for the frame alone — because it’s efficient to manufacture and requires minimal finishing. Wood frames range from $1,200 to over $6,000 per window, reflecting both the raw material cost and the craftsmanship involved. Fiberglass lands in the $1,400 to $3,800 range, offering strong durability at a premium. Aluminium frames run approximately $2,400 to $5,300, though their lightweight nature can offset some installation labor costs.
Glass type adds another layer. Double-pane glass is standard, but upgrading to triple-pane adds roughly 15% to the glass cost in exchange for better insulation and sound reduction. Low-E coatings and argon gas fills — features that block UV rays and reduce heat transfer — can add $300 to $1,000 to the total. Operability matters too: fixed panels cost less to manufacture than casement or double-hung panels that require hardware and moving parts. And if your project calls for custom sizing rather than standard dimensions, expect the price to climb toward the $10,000 to $15,000 range.
Replacement and Long-Term Value
If you’re shopping for replacement bow windows rather than a brand-new installation, the cost equation shifts. Replacing an existing unit typically runs $2,000 to $4,500, covering removal of the old window, potential structural modifications to the rough opening, new flashing and waterproofing, and interior trim finishing. When the replacement changes the opening size — say, upgrading from a four-panel to a five-panel unit — structural work and permitting fees push the budget higher. Building permits alone average about $50 per window.
The long-term value story is more encouraging. Modern glazing with Low-E coatings and gas fills can noticeably reduce heating and cooling costs compared to older single-pane or early double-pane units. Frame materials like fiberglass and aluminium demand far less maintenance over their lifespan than wood, which needs refinishing every few years to stay protected against moisture. And from a resale perspective, a well-chosen bow window adds genuine curb appeal — the kind of architectural detail that catches a buyer’s eye before they even walk through the front door. Some homeowners find that exploring bow window decorating ideas early in the planning process helps them visualize the full impact, from a styled window seat to a curated display shelf, which can further justify the investment.
Even practical add-ons factor into the total ownership cost. A custom bow window curtain rod or per-panel cellular shades aren’t free, and budgeting for window treatments upfront prevents sticker shock after the unit is already installed.
| Frame Material | Upfront Cost | Maintenance Cost | Expected Lifespan | Energy Performance |
|---|---|---|---|---|
| Vinyl | Low | Low | 20 – 30 years | Moderate |
| Wood | Medium – High | High | 30 – 50+ years (with maintenance) | Good |
| Aluminium | Medium – High | Low | 30 – 45 years | Moderate (improved with thermal breaks) |
| Fiberglass | High | Low | 30 – 40 years | High |
The table above gives you a quick way to weigh trade-offs across materials without getting lost in brand-specific pricing. Vinyl wins on affordability, fiberglass leads on energy performance, aluminium keeps maintenance minimal, and wood delivers unmatched aesthetics — at the cost of ongoing upkeep.
What the table can’t capture is how much of your final bill depends on the quality of the installation itself. A perfectly specced bow window installed poorly will leak, draft, and underperform every metric in that chart. That’s why the structural and installation side of the equation deserves just as much attention as the price tag.
Bow Window Installation and What It Takes Structurally
A perfectly specced unit sitting in a poorly prepared wall opening is a recipe for leaks, drafts, and structural headaches. Yet most bow window guides skip the installation details entirely — or bury them behind a “call us for a quote” button. Here’s what actually happens behind the drywall and beneath the siding when a bow window goes in, and why the structural side of this project is non-negotiable.
Structural Requirements Before Installation
Bow windows are significantly heavier and wider than standard window units. A five-panel configuration with wood or aluminium framing can easily weigh several hundred pounds before you factor in the glass. That weight, combined with the outward projection, creates forces that a typical wall opening simply isn’t designed to handle on its own.
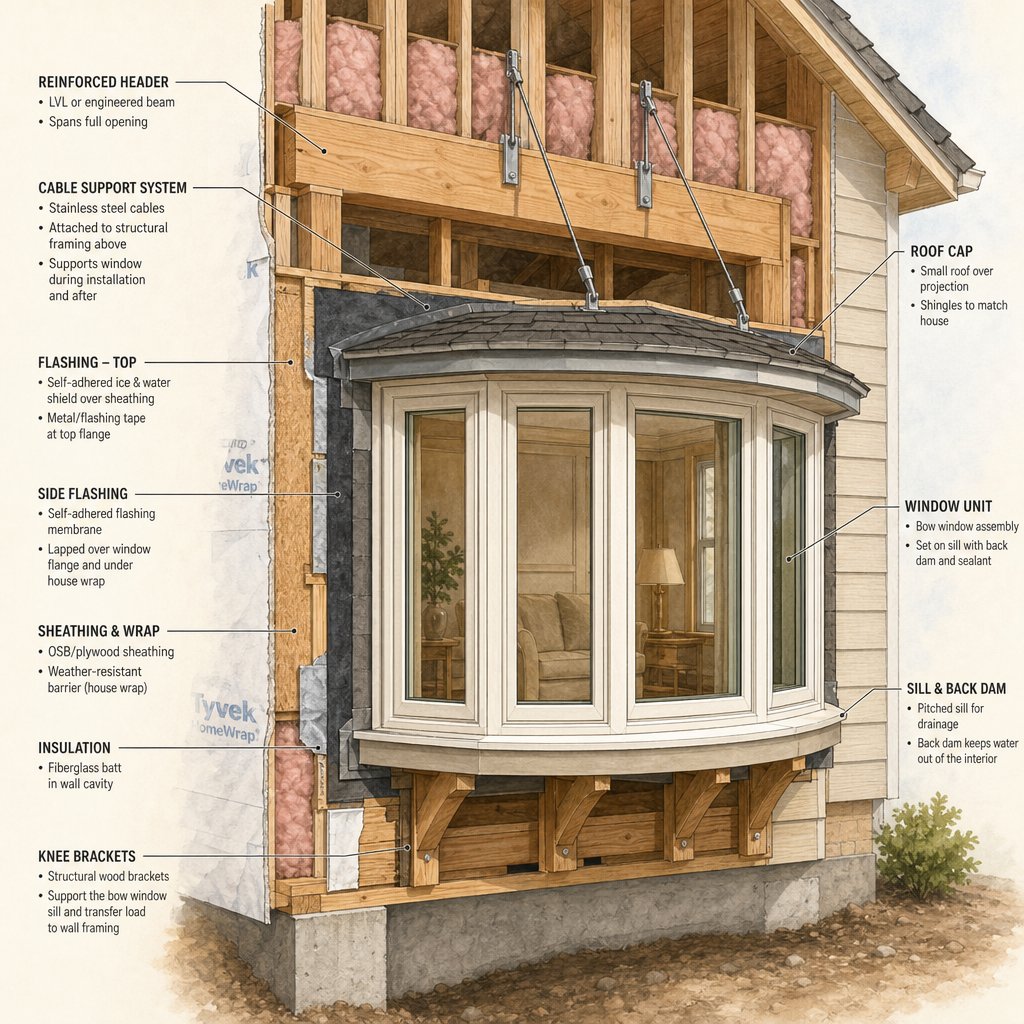
The first structural concern is the header — the horizontal beam that spans the top of the opening and transfers the load above the window down to the surrounding framing. For a standard double-hung, a basic two-by-six header might suffice. For a bow window spanning eight to ten feet of wall, you’ll typically need a laminated veneer lumber (LVL) beam or a steel lintel capable of carrying the combined weight of the window, the wall structure above it, and any roof load that bears down on that section. King studs and jack studs on either side of the opening support this header, and every measurement needs to be precise — off by even a fraction of an inch, and the window won’t sit level.
Below the window, the extended sill needs its own support system. Because the unit projects outward past the exterior wall plane, the bottom of the assembly is essentially cantilevered into open air. Depending on the size and weight, installers use one or more of these approaches:
- Cable support from above — steel cables run from the window frame up through eye hooks anchored into the header or roof structure, carrying the weight from the top down
- Knee brackets underneath — angled brackets mounted to the exterior wall below the projection, transferring the load back into the framing
- A combination of both — common on larger five- and six-panel units where neither method alone provides enough support
Then there’s the roof cap. The top of the projection needs a mini-roof or soffit enclosure to shed water away from the window and the exterior wall. Proper flashing at every junction — where the roof cap meets the siding, where the window frame meets the rough opening, and at each panel joint — is critical. As industry professionals have noted, failure to properly install flashing can lead to air infiltration, water damage, and compromised energy efficiency. With a bow window, you’re dealing with more joints and more angles than a flat window, so the margin for error shrinks considerably.
Professional Installation vs DIY
Let’s be direct: bow window installation is not a realistic DIY project for most homeowners. Even if you’ve successfully swapped out a single-hung or a sliding window before, the jump to a multi-panel curved unit is enormous. The weight alone requires multiple people to lift and position safely. The structural reinforcement — header construction, cable tensioning, bracket mounting — demands carpentry experience and a solid understanding of load paths. And the waterproofing complexity at multiple panel joints means one missed flashing detail can cause problems that don’t show up for months, by which point the damage is already done.
Professional labor for bow window installation typically costs $300 to $1,900 per window, separate from the cost of the unit itself. That fee covers not just the physical installation but also the structural assessment, permitting, and the precision work that keeps the curved alignment true. For a straightforward replacement where the new unit matches the existing opening, expect the on-site work to take one to two days. If the opening needs to be enlarged, the header rebuilt, or electrical wiring rerouted, the timeline stretches to three days or more.
Here’s the typical sequence a qualified installer follows:
- Structural assessment of the existing wall, header, and framing condition
- Header reinforcement or construction using LVL beams or steel lintels sized to the span
- Old window removal, carefully preserving surrounding siding and interior finishes where possible
- Rough opening preparation — ensuring the opening is perfectly square, level, and sized to the new unit within 1/8-inch tolerance
- Unit placement and leveling, using shims to achieve precise alignment on all four sides
- Shimming and fastening the window flanges to the framing, working slowly to avoid shifting shims
- Insulation and flashing — sealing every gap around the frame, applying flashing tape in the correct sequence (tape to substrate first, then window, then outer tape layer), and adding spray foam insulation on the interior side
- Interior and exterior trim finishing, including soffit enclosure, siding repair, drywall patching, and molding installation
Improper installation is the leading cause of leaks and drafts in bow windows — not defective glass, not cheap frames, but mistakes made during the steps above. Skipping the support wall during header work, nailing flanges before the unit is perfectly level, or applying flashing tape over house wrap instead of directly to the substrate are all errors that compromise the entire assembly. When you’re evaluating bow window prices, remember that the installation quality is where the real value lives. A bargain unit installed by an experienced contractor will outperform a premium window installed by someone learning on the job.
The structural demands and installation precision also explain why bay versus bow window projects differ so much in labor cost. A three-panel bay is lighter, narrower, and simpler to frame. A four- to six-panel bow requires more of everything — more header strength, more support hardware, more flashing, and more time to get the curved alignment right.
With the unit secured and sealed, the next challenge is one most homeowners don’t think about until the installers leave: how do you dress a curved window that no standard curtain rod or blind will fit?
Window Treatments and Coverings for Bow Windows
You’ve invested in a beautiful curved window — and then you realize that the straight curtain rod sitting in your garage is completely useless. That’s the reality every bow window owner faces. The gentle arc that makes these windows so striking is the same thing that makes standard off-the-shelf treatments a poor fit. Covering a bow window takes a bit more thought, but the right approach gives you privacy and light control without sacrificing the panoramic effect you paid for.
Curtains, Drapes, and Rods for Bow Windows
The core problem is geometry. A standard curtain rod is a straight bar, and a bow window is a curve. Forcing one onto the other leaves gaps, bunched fabric, and a look that fights the architecture instead of complementing it. Three practical solutions exist, each with its own trade-offs.
Flexible or bendable curtain rods are purpose-built for this situation. They’re made from a malleable metal core that you shape by hand to match the arc of your window. Once mounted, they allow curtain panels to glide along the full curve in a single sweep. The result is a unified, flowing look — especially effective in living rooms where the bow window serves as the room’s focal point. The downside? Mounting brackets can interrupt the glide path, preventing curtains from pulling fully to one side.
Per-panel rods take the opposite approach. You install a short, straight rod above each individual lite, hanging a separate curtain panel on each one. This method is simpler to set up and lets you open or close each section independently. The visual trade-off is segmentation — you’ll see distinct breaks between panels rather than one continuous drape.
Ceiling-mounted track systems offer the cleanest solution for bow window treatments. A curved track is custom-bent to match your window’s arc and mounted directly to the ceiling or the head board above the glass. Curtains hang from gliders that move freely along the entire track with no bracket interruptions. It’s the most seamless option, but also the most expensive and the hardest to install yourself.
Fabric choice matters just as much as the hardware. Lighter sheers preserve the light-flooding benefit that drew you to a bow window in the first place — they soften glare without blocking the view. Heavier drapes in lined fabrics provide better privacy and insulation, which is worth considering if the window faces a street or gets direct afternoon sun. Some homeowners layer both: sheers on an inner track for daytime diffusion and blackout drapes on an outer track for nighttime privacy.
Blinds and Shades That Fit the Curve
If curtains aren’t your style, hard treatments — blinds and shades — work well on bow windows as long as you approach them panel by panel. Most bow windows are separated by mullions or trim pieces between each lite, and that separation is actually an advantage here. It gives you a natural mounting point for individual treatments inside each frame opening.
Cellular shades are the most popular choice for a reason. Their honeycomb structure adds a layer of insulation at every panel — a real benefit given that multi-panel windows have more potential air infiltration points. They mount cleanly inside each frame, sit flush when raised, and come in light-filtering or blackout options. For a bow vs bay window comparison, cellular shades work equally well on both because they treat each section as an independent unit.
Roller shades offer a more minimalist look. Each panel gets its own shade that rolls up into a slim cassette at the top, virtually disappearing when you want an unobstructed view. They’re a strong fit for modern or contemporary interiors where clean lines matter. The limitation is that roller shades provide less insulation than cellular options and can look visually busy when you have five or six panels with slightly different shade positions.
Custom curved blinds do exist, but they’re a niche product — expensive to fabricate and limited in availability. For most homeowners, the per-panel approach with standard-sized treatments is more practical and far more budget-friendly.
The real decision comes down to whether you prioritize a unified, flowing appearance or easy per-panel functionality. Here’s a quick comparison of your main options:
- Flexible curtain rod — creates a single sweeping drape across the full curve; best for living rooms and formal spaces; brackets can block full curtain travel
- Per-panel rods — simple installation with independent control per lite; visually segmented; works in any room
- Ceiling-mounted track — smoothest glide and cleanest look; highest cost and most complex to install; ideal for large bow windows in Chicago-style bungalows and other period homes
- Cellular shades — excellent insulation and privacy; mount inside each frame; the most common practical solution for bow windows
- Roller shades — minimal profile and modern aesthetic; less insulation; can look busy across many panels
- Custom curved blinds — unified look across the full arc; expensive and hard to source; limited style options
For living rooms specifically, where the bow window is often the architectural centerpiece, a ceiling track with layered sheers tends to deliver the most polished result. Bedrooms benefit from cellular shades in a blackout fabric for sleep quality. Kitchens and dining areas — where moisture and cooking residue are factors — do well with roller shades that wipe clean easily.
Whichever treatment you choose, measure each panel individually. Even in a well-built bow window, lite widths can vary by a fraction of an inch from one section to the next, and that small difference matters when you’re ordering custom-fit shades or blinds. Getting the covering right is the finishing touch — but the material your window frame is made from determines how the entire unit performs for years to come.
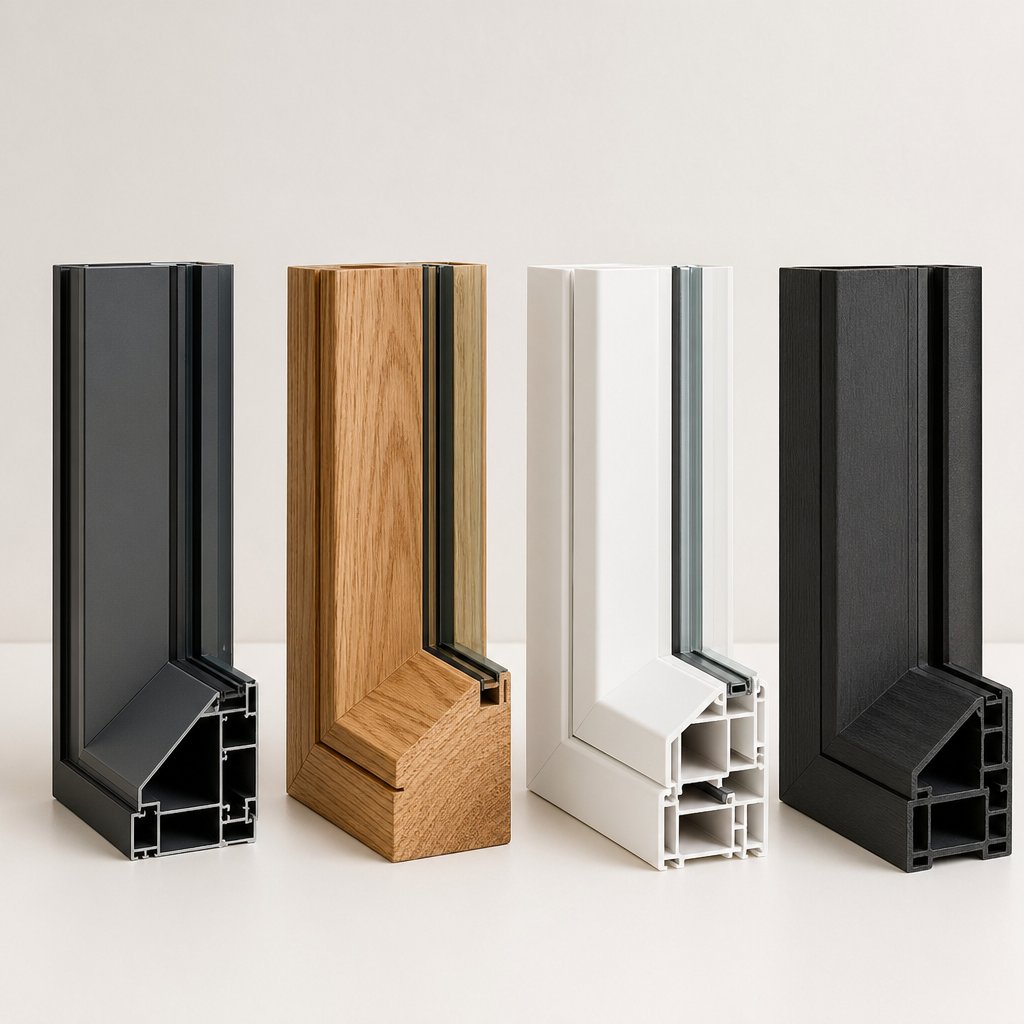
Choosing the Right Frame Material for Your Bow Windows
Frame material shapes everything about how a bow window performs, ages, and looks over its lifetime — yet most material comparisons you’ll find online are written by manufacturers who only sell one option. That makes it hard to get a straight answer. Here’s a side-by-side breakdown of all four major frame materials, evaluated on the same criteria, so you can match the right one to your climate, your budget, and your project.
Aluminium, Vinyl, Wood, and Fiberglass Compared
Each material brings a distinct set of strengths and compromises. The table below lays them out across the factors that matter most when you’re choosing frames for a bay or bow window project.
| Criteria | Aluminium | Vinyl | Wood | Fiberglass |
|---|---|---|---|---|
| Durability | High — resists corrosion, won’t warp or rot | Moderate — can warp under extreme heat | High if maintained — vulnerable to rot and insects without upkeep | Very high — resists warping, swelling, and rotting |
| Maintenance | Low — occasional cleaning; powder-coated finishes resist fading | Low — soap and water; no painting or staining | High — requires regular painting, staining, or sealing | Low — similar to vinyl; paintable without compromising durability |
| Energy Efficiency | Moderate to good with thermal breaks; standard aluminium conducts heat | Good — naturally insulating material | Good — natural insulator when properly sealed | Excellent — superior insulating properties |
| Aesthetic Options | Slim sightlines; wide color range via powder coating; modern look | Broad color and woodgrain options; less customizable for intricate shapes | Classic, natural beauty; fully customizable with stain or paint | Clean lines; paintable; mimics wood appearance |
| Weight | Lightweight — ideal for large multi-panel spans | Moderate | Heavy — adds to structural support requirements | Moderate — lighter than wood, heavier than aluminium |
| Cost Tier | Medium-High | Low | Medium-High | High |
| Expected Lifespan | 30 – 45 years | 20 – 30 years | 30 – 50+ years (with consistent maintenance) | 30 – 40+ years |
A few things jump out from that comparison. Aluminium and fiberglass both deliver long lifespans with minimal upkeep, but they sit at different price points and serve different aesthetic goals. Vinyl wins on affordability and ease of ownership. Wood remains unmatched for traditional beauty — but it demands the most from you in return.
Let’s dig into the nuances that the table can’t fully capture.
Aluminium frames have evolved dramatically from the drafty, condensation-prone profiles of decades past. The game-changer is thermal break technology — a reinforced polyamide bar inserted between the interior and exterior aluminium profiles, creating an insulated barrier within the frame itself. This barrier conducts heat and cold up to a thousand times slower than standard aluminium, which effectively neutralizes the material’s biggest historical weakness. Modern thermally broken aluminium offers slim sightlines that maximize glass area, high structural strength for spanning large multi-panel bow window openings, excellent corrosion resistance, and thermal performance that meets current energy standards. The frames can be powder-coated or anodized in hundreds of color combinations, and those finishes hold up against UV damage and salt exposure without peeling or fading. For homeowners and builders exploring aluminium bow window frames, MEICHEN’s aluminium windows collection is a practical starting point — their energy-efficient, Australian-standard-compliant systems illustrate how far thermally broken aluminium has come as a viable option for both residential and commercial projects.
Vinyl remains the go-to for budget-conscious projects. It’s an excellent insulator, never needs painting, and resists moisture without any special treatment. The catch? Lower-end vinyl can fade over time without UV protection, and in regions where summer temperatures regularly exceed 100 degrees Fahrenheit, vinyl frames can soften or warp. For a four- or five-panel bow window where each frame section is relatively narrow, warping in even one panel throws off the entire curved alignment — a problem that’s far more visible and harder to fix than it would be on a single flat window.
Wood delivers a warmth and richness that no synthetic material has fully replicated. It’s naturally energy efficient, easy to shape into custom profiles, and can be stained or painted to match any interior design scheme. The trade-off is maintenance. Wood frames need regular sealing or refinishing to prevent rot, swelling, and insect damage — and on a bow window with four to six panels, that’s a lot of surface area to keep up with. In humid or rainy climates, the maintenance cycle shortens, and the risk of moisture damage at panel joints increases. Homeowners who love the look of wood but want less upkeep often opt for wood-clad frames, which pair a wood interior with an aluminium or vinyl exterior shell.
Fiberglass is the premium pick. It’s stronger than vinyl, resistant to warping and rotting, and offers excellent insulating properties that rival or exceed wood. It can last 30 years or more with minimal upkeep, and it’s paintable if you want to change colors down the road. The downside is straightforward: fiberglass carries the highest upfront cost of the four materials. For homeowners who plan to stay in their home long-term and want set-it-and-forget-it performance, that premium often pays for itself. For those on a tighter timeline or budget, it can be harder to justify.
Matching Materials to Climate and Project Type
The “best” frame material doesn’t exist in a vacuum — it depends on where you live and what your project demands. Climate is the single biggest variable that separates a smart material choice from a regrettable one.
Aluminium excels in coastal and humid environments. Salt air corrodes wood and can degrade lower-quality vinyl over time, but aluminium — especially with anodized or powder-coated finishes — shrugs it off. Its lightweight profile also makes it a strong candidate for large bow window spans where structural load is a concern. If you’re building or renovating near the coast, aluminium with thermal breaks gives you durability, corrosion resistance, and modern energy performance in one package.
Vinyl works well in moderate climates where temperatures don’t regularly hit extremes in either direction. It handles temperature swings better than fiberglass in terms of expansion and contraction, making it a practical choice for regions like the mid-Atlantic or Pacific Northwest. Its low cost also makes it appealing for multi-window projects where the budget needs to stretch across several openings.
Wood suits temperate, drier climates where moisture exposure is manageable and the homeowner is committed to a regular maintenance schedule. Think inland areas with mild humidity — places where the natural beauty of wood can shine without constant battle against the elements. In wetter regions, wood-clad options with an aluminium exterior offer a workable compromise.
Fiberglass handles temperature extremes well and provides top-tier insulation, making it a strong fit for cold northern climates or desert regions with dramatic day-to-night temperature shifts. Its dimensional stability means it won’t expand or contract as aggressively as vinyl in those conditions, keeping seals tight and panel alignment true over the long haul.
For anyone weighing what is a bow window investment really worth, the frame material is where long-term value either compounds or erodes. A cheap frame that degrades in your climate will cost more in repairs and replacements over 20 years than a pricier frame that’s matched correctly from the start. Whether you’re choosing materials for a bay or bow window, the smartest approach is to start with your local weather patterns and work backward to the material that handles them best — then layer in your aesthetic preferences and budget from there.
With the right frame material locked in, the final question is whether a bow window actually makes sense for your specific home, your wall structure, and your long-term plans. That’s a decision worth walking through step by step.
Is a Bow Window the Right Choice for Your Home
Knowing which frame material suits your climate is one piece of the puzzle. The bigger question is whether a bow window belongs in your home at all. This isn’t a decision you want to make based on a showroom visit or a Pinterest board. It’s a structural, financial, and lifestyle commitment — and the best way to approach it is with a clear-eyed self-assessment before you start browsing bow windows for sale.
Wall Space, Budget, and Structural Readiness
Start with the physical realities of your home. A bow window needs room — both on the exterior wall and in your project budget. If any of the criteria below raise a red flag, it doesn’t necessarily mean you can’t proceed, but it does mean you’ll need professional guidance to work around the limitation.
- Available exterior wall width — a four-panel bow typically requires a minimum of eight feet of uninterrupted wall space; five- and six-panel units need even more
- Load-bearing wall status — if the target wall carries roof or upper-floor loads, you’ll need an engineered header (LVL beam or steel lintel) sized to the full span of the opening
- Foundation and support capacity — the outward projection requires cable support, knee brackets, or cantilevered framing beneath the sill
- Realistic budget range — expect to spend two to three times what a standard flat window replacement would cost, including structural work, flashing, trim, and window treatments
- Local building codes — many municipalities regulate how far an exterior projection can extend beyond the building envelope, and some require permits for any structural modification to a load-bearing wall
- HOA or historic district restrictions — exterior changes to the facade may need architectural review approval, especially in neighborhoods with design guidelines governing architectural projections like bay windows and similar structures
- Roof cap and drainage planning — the top of the projection needs a mini-roof or soffit with proper flashing to prevent water intrusion
If you check most of those boxes comfortably, you’re in a strong position. If several feel uncertain, a structural assessment from a qualified contractor will clarify what’s feasible before you commit any money.
Lifestyle and Long-Term Ownership Expectations
Different homeowners come to the bay window vs bow decision from very different starting points, and the right answer depends on what you’re trying to accomplish.
Renovators chasing a dramatic visual upgrade get the most immediate payoff. A bow window transforms a flat, forgettable wall into the room’s centerpiece — and the curved interior ledge opens up decorating possibilities that flat windows can’t offer, from a cushioned reading nook to a curated display shelf. If you’re weighing bow vs bay windows for a renovation, the bow delivers a bigger visual impact but demands more wall space and a larger budget.
Builders designing feature walls in new construction have the advantage of planning structural support from the ground up. There’s no retrofit, no header replacement, and no surprises behind the drywall. That makes new builds the most cost-effective scenario for a multi-panel bow because the framing, support, and flashing are integrated into the original plans rather than added after the fact.
Developers adding perceived value to multi-unit projects should weigh the curb appeal boost against the per-unit cost increase. A well-placed bow window on a front-facing living room can differentiate a property in a competitive market — but the return depends on the price point of the development and the expectations of the target buyer.
Regardless of your profile, think about the full ownership lifecycle before signing off. Vinyl frames may last 20 to 25 years, wood can push past 30 with diligent maintenance, fiberglass holds strong for 30 to 40 years, and aluminium typically delivers 20 to 30 years of reliable performance. Seals and weatherstripping won’t last as long as the frames — plan on inspecting them every few years and replacing them as needed to maintain thermal performance. When repair costs start approaching 50% of replacement cost, or when multiple panels show seal failure simultaneously, full replacement usually makes more financial sense than piecemeal fixes.
Don’t forget the finishing details that affect daily livability. Blinds for bow windows require per-panel solutions or custom curved tracks, and those costs add up across four to six lites. The same goes for cleaning — more panels mean more glass surfaces to maintain, inside and out. These aren’t dealbreakers, but they’re part of the honest ownership picture that too many guides leave out.
For homeowners, renovators, builders, and developers exploring energy-efficient aluminium options, MEICHEN’s aluminium windows collection offers a practical starting point for comparing Australian-standard-compliant systems across different project types and budgets.
A bow window is the right investment when your wall can support it, your budget accounts for the full project — not just the unit — and your long-term plans justify the premium over simpler alternatives. Match the frame material to your climate, plan for realistic maintenance, and treat installation quality as non-negotiable.
The homeowners who end up loving their bow windows are the ones who walked into the project with open eyes — aware of the costs, the structural demands, and the ongoing upkeep. The ones who regret it are usually the ones who skipped the homework. You’ve done yours.
Frequently Asked Questions About Bow Windows
1. What is the difference between a bay window and a bow window?
A bay window uses three panels joined at sharp angles to create a geometric, box-like projection from the wall. A bow window uses four to six equally sized panels set at gentler, uniform angles to form a smooth, continuous curve. This structural difference affects everything from the amount of interior space created to the overall cost. Bay windows suit smaller walls and tighter budgets, while bow windows require wider wall openings and deliver a more dramatic panoramic effect with greater natural light coverage.
2. How much does a bow window cost to install?
The total installed cost for a bow window generally falls between $1,500 and $15,000, with the national average near $3,900. Key pricing factors include the number of panels, frame material, glass type, and whether the project is a new installation or a replacement. Vinyl frames sit at the most affordable end, while fiberglass and aluminium options carry a higher upfront price but offer longer lifespans and lower maintenance. Professional installation labor adds $300 to $1,900 per window on top of the unit cost.
3. Can I install a bow window myself as a DIY project?
Bow window installation is not a realistic DIY project for most homeowners. The multi-panel unit can weigh several hundred pounds and requires precise structural reinforcement, including an engineered header, cable or bracket support systems, and meticulous waterproofing at every panel joint. Improper installation is the leading cause of leaks and drafts in bow windows. A qualified contractor ensures the curved alignment stays true, the flashing sequence is correct, and the load path is properly supported — all critical steps that demand professional experience.
4. What are the best window treatments for bow windows?
The most practical options include flexible curtain rods that bend to match the window’s arc, per-panel rods with individual curtain sections, and ceiling-mounted curved track systems for a seamless look. For blinds and shades, cellular shades mounted inside each panel frame are the most popular choice because they add insulation and fit cleanly. Roller shades work well in modern interiors, while custom curved blinds offer a unified appearance at a premium price. Choosing between curtains and shades depends on whether you prioritize a flowing, unified drape or easy per-panel control.
5. Which frame material is best for bow windows?
The best frame material depends on your climate, budget, and maintenance tolerance. Vinyl is the most affordable and low-maintenance but can warp in extreme heat. Wood offers classic beauty but demands regular refinishing. Fiberglass provides top-tier insulation and durability at the highest price point. Aluminium with thermal breaks delivers slim sightlines, excellent corrosion resistance, and strong structural support for large spans — making it ideal for coastal or humid environments. For energy-efficient aluminium options that meet Australian standards, MEICHEN’s aluminium windows collection at meichenwindows.com.au is a practical resource for comparing systems across different project needs.
More Window & Door Guides