What Aluminium Window Restoration Actually Involves
Faded, chalky, or pitted aluminium frames do not always need ripping out. In many cases, they can be brought back to a condition that looks and performs like the day they were installed. That process, aluminium window restoration, is broader than most homeowners realise, and it is frequently confused with two related but narrower terms.
Restoration vs Repair vs Refinishing
The three terms overlap, yet they describe different scopes of work. Aluminium window repair targets specific mechanical or structural defects, such as a broken latch, a bent track, or a failed seal. Refinishing deals only with the surface coating, applying a fresh layer of paint or powder coat over the existing frame. Restoration sits above both. It is the complete process of returning degraded frames to their original appearance and performance, combining cleaning, surface preparation, coating renewal, hardware servicing, and seal replacement as needed.
Restoration = full return to original condition. Repair = fixing specific defects. Refinishing = new surface coating only.
This article covers all three layers as part of the broader restoration process, presenting methods and considerations without favouring a single product or approach.
Why Aluminium Windows Are Worth Restoring
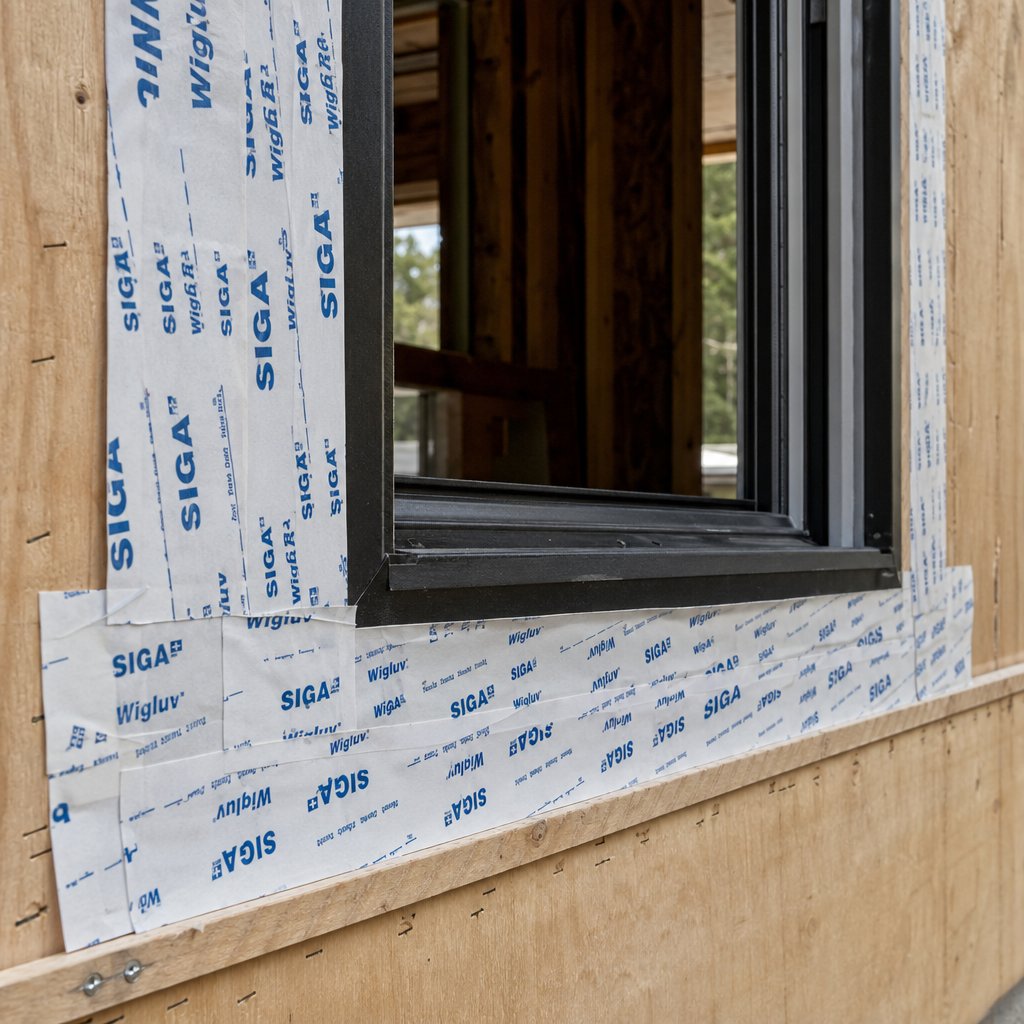
Aluminium is remarkably long-lived as a frame material. Installed in Australian homes and commercial buildings from the 1960s onward, old aluminium windows routinely remain structurally sound after 30 to 40 years of service. Ecovue notes that aluminium frames typically last 25 to 40 years, and many exceed that range with basic care. The metal resists rot, warping, and insect damage, meaning the underlying frame often outlasts its surface finish by decades.
For residential renovators tackling a weathered 1970s brick veneer, or commercial property managers maintaining a multi-storey office facade, the economics are straightforward. If the frame structure is intact, restoration delivers a like-new result at a fraction of replacement cost. The frame itself is rarely the problem. Oxidation, coating failure, and worn hardware are surface-level issues, and each one has a proven fix.
Understanding exactly how those surface-level problems develop, and why different finishes break down through entirely different mechanisms, is the foundation for choosing the right restoration method.
How Aluminium Frames Oxidize and Break Down Over Time
Every aluminium window frame degrades eventually, but the way it breaks down depends almost entirely on the finish applied at the factory. A mill-finish frame, an anodized frame, and a powder-coated frame each fail through a distinct chemical pathway. Treating them the same way during restoration is one of the fastest routes to wasted time and irreversible damage.
How Mill Finish Aluminium Oxidizes
Mill-finish aluminium is the raw material with no additional protective treatment beyond the metal’s own natural defence. When exposed to air, aluminium instantly forms a thin oxide layer (Al₂O₃) that bonds to the surface and acts as a passive shield. Under mild conditions, this layer is self-healing. A scratch re-oxidizes within seconds.
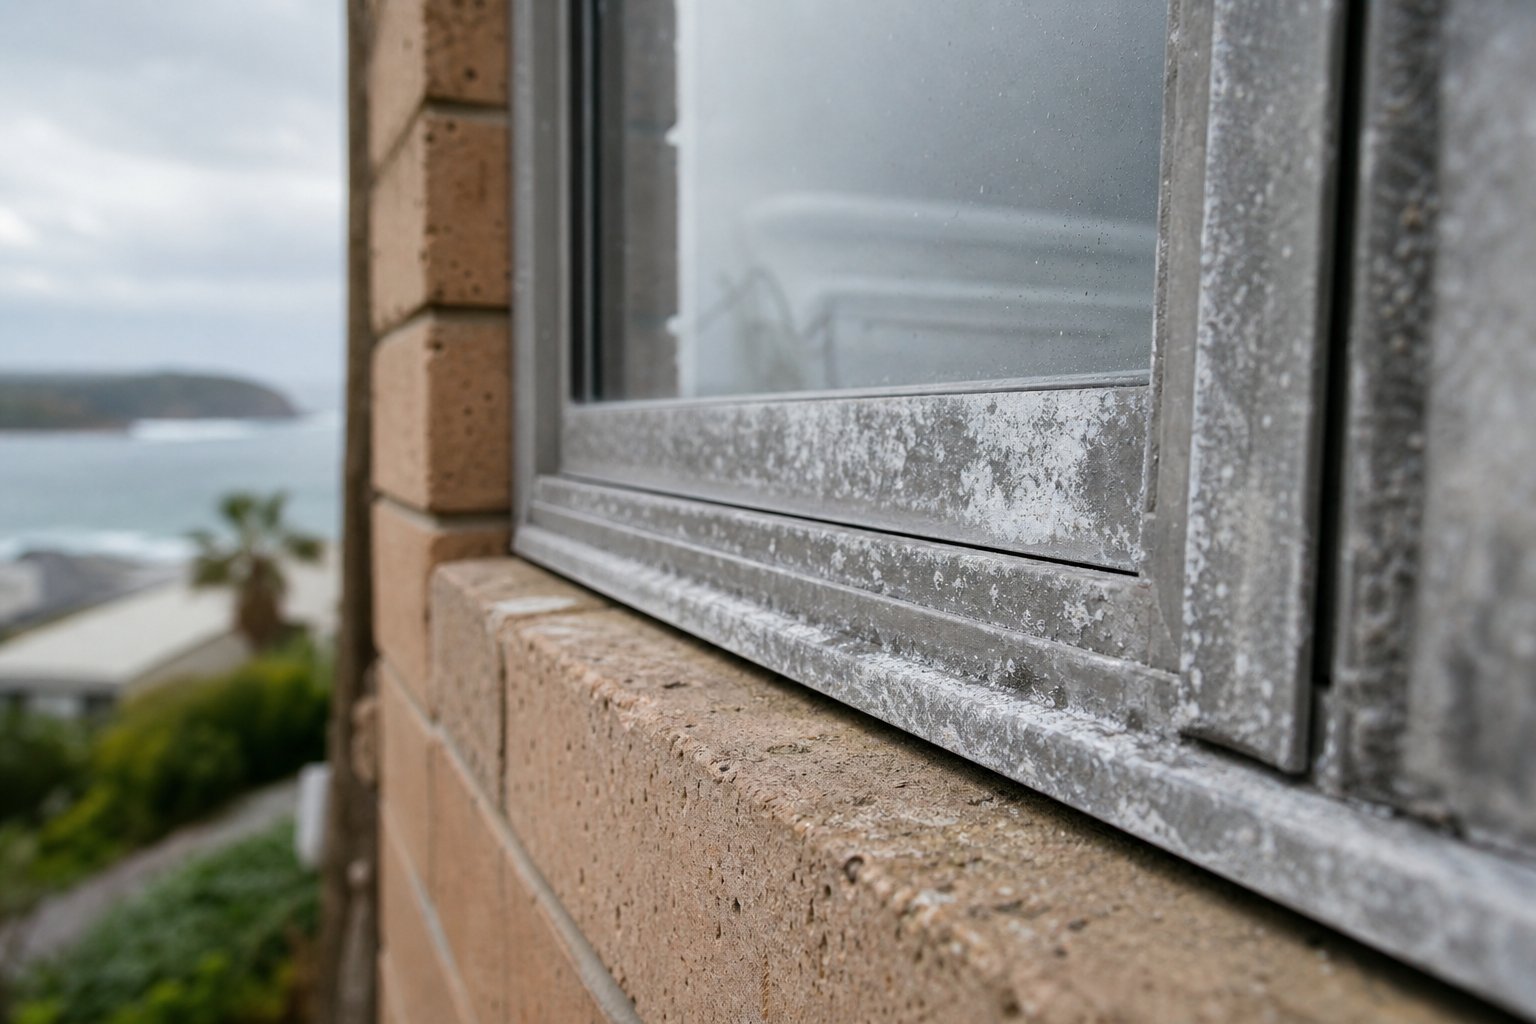
The problem is that this natural oxide is only 2 to 5 nanometres thick. Over years of exposure, the layer thickens unevenly, producing that familiar white, powdery residue homeowners often notice on oxidized aluminum window frames. The surface becomes dull and chalky to the touch. In aggressive environments, chloride ions penetrate the oxide barrier and trigger localised pitting, creating tiny craters that hold moisture and accelerate further aluminium window corrosion.
Mill-finish frames installed in the 1960s and 1970s across Australian suburbs are particularly susceptible. Without any factory-applied coating to supplement that thin natural oxide, decades of UV, rain, and airborne salts produce a surface that looks grey-white and feels rough or gritty underhand.
Anodized and Powder-Coated Frame Degradation
Anodized aluminium takes a fundamentally different approach to protection. The anodizing process converts the outer surface of the metal into a much thicker oxide layer, typically 10 to 25 micrometres for decorative finishes. This integral layer is hard, scratch-resistant, and part of the metal itself rather than a separate coating sitting on top. It does not peel or chip in the way paint does.
Over time, however, the sealed pores of the anodic layer begin to open. UV radiation and moisture work their way in, and the protective barrier thins. Once compromised, pitting corrosion sets in beneath the surface. Oxidized windows with anodized frames often show a blotchy, uneven discolouration before visible pits appear. The metallic sheen fades to a flat, lifeless tone, signalling that the anodic layer is losing integrity.
Powder-coated frames fail differently again. The 60 to 120 micrometre organic film applied at the factory acts as a physical barrier between the aluminium and the environment. It does not become part of the metal. When UV breaks down the resin binders, the surface chalks, fading in colour and leaving a powdery residue on your hand when touched. Adhesion weakens over time, and once the coating cracks or lifts, moisture reaches bare aluminium beneath, sparking window corrosion that spreads quickly under the remaining film.
Environmental Accelerators of Frame Damage
Geography determines how fast each finish type deteriorates. Not every Australian home faces the same conditions, and the dominant environmental stressor shapes which degradation mechanism takes hold first.
| Finish Type | Degradation Signs | Typical Timeline | Severity Indicators |
|---|---|---|---|
| Mill Finish | White powdery residue, surface dulling, localised pitting | 5–15 years depending on exposure | Powder rubs off on contact; pits visible without magnification |
| Anodized | Blotchy discolouration, loss of metallic sheen, subsurface pitting | 15–25 years in moderate climates; 8–15 years coastal | Uneven colour patches; rough spots where pores have opened |
| Powder Coated | Chalking, colour fade, cracking, adhesion loss, under-film corrosion | 10–20 years in temperate zones; 5–10 years in high UV or coastal | Chalk transfers to hand; flaking or bubbling at edges |
Salt air is the most aggressive accelerator for all three finishes. Coastal homes from Sydney’s Northern Beaches to Perth’s western suburbs face chloride deposition that attacks and degrades building materials steadily over time. Intense UV radiation, common across most of Australia, primarily drives chalking and colour fade on powder-coated frames while slowly degrading anodized seals. Urban industrial pollutants, particularly acidic compounds with a pH below 4.5, strip oxide layers from mill-finish aluminium at an accelerated rate. Persistent moisture and high humidity above 80 per cent compound every other factor, keeping surfaces wet long enough for electrochemical reactions to progress.
Each degradation pathway demands its own treatment approach. Knowing whether you are dealing with a failed anodic layer, a chalked powder coat, or raw oxidation on bare aluminium is the starting point for choosing the right restoration method, and misidentifying your finish type can mean applying a process that makes the damage worse rather than better.
Identifying Your Frame Finish and Assessing Damage
Misidentifying what is actually on your frames can lead you straight into the wrong restoration method, and some mistakes are not reversible. Stripping an anodized surface with an abrasive pad, for example, destroys the integrated oxide layer permanently. A few minutes of careful observation saves hours of rework and potential frame damage.
How to Identify Your Aluminium Frame Finish
Most old metal window frames in Australian homes fall into one of four categories. Each has distinct visual and tactile characteristics you can check without any specialist equipment.
- Look at the surface colour and sheen. Mill-finish aluminium appears dull silver or grey with no colour pigment. Anodised aluminium window frames retain a subtle metallic sheen, often in bronze, champagne, or natural silver tones, because the colour sits within the oxide layer rather than on top. Powder coated aluminium windows display a solid, opaque colour with no visible metal grain beneath. Painted frames may show similar opacity but often reveal brush marks, roller texture, or slight unevenness on close inspection.
- Run your fingertip across the surface. Anodised finishes feel glassy-smooth and cool. Powder-coated surfaces have a very slight orange-peel texture, almost imperceptible on quality work but detectable by touch. Mill-finish frames feel mildly gritty once oxidation has begun. Painted surfaces may feel either smooth or textured depending on application quality.
- Check how the coating interacts with the metal. Try pressing a fingernail into an inconspicuous corner. Powder coat and paint can be chipped away from the substrate because they sit on top of the aluminium. An anodised layer cannot be chipped off. It is part of the metal itself. If nothing chips and the surface feels integral, you are likely dealing with anodised aluminium frame windows or bare mill finish.
- Examine any damage areas. Where coating has failed, look at what is underneath. Powder coat and paint reveal bare silver aluminium beneath chips. Anodised frames show a lighter or darker patch where the anodic layer has thinned, but no distinct edge between coating and metal. Old metal window frames with layered paint may show multiple colours at a chip edge, indicating previous repaints over the original finish.
Rating Damage Severity From Surface to Structural
Identifying the finish is half the equation. The other half is gauging how far the degradation has progressed. A frame with light surface chalking needs a completely different intervention than one with deep pitting that compromises structural integrity. The following scale helps you match damage to the appropriate response.
| Level | Visual Signs | Touch Test | Recommended Action |
|---|---|---|---|
| 1 – Surface discolouration | Mild colour fade or dullness; no visible pits or cracks | Smooth or slightly chalky; no roughness | Chemical cleaning and protective sealant |
| 2 – Moderate coating failure | Noticeable chalking, localised flaking, or patchy colour loss | Powdery residue transfers to hand; isolated rough spots | Cleaning, light abrasion, and re-coating |
| 3 – Active corrosion | Visible white oxidation buildup, widespread flaking, or early pitting | Gritty texture; shallow pits felt under fingernail | Full surface preparation with chemical or mechanical treatment, then professional-grade re-coating |
| 4 – Structural compromise | Deep pitting, frame distortion, or metal thinning visible at edges | Deep craters catchable by fingernail; frame flexes under hand pressure | Professional assessment; likely replacement rather than restoration |
Most residential frames fall between Level 1 and Level 3. Level 4 damage is relatively rare in aluminium because the metal’s innate corrosion resistance prevents full structural failure in all but the most neglected coastal installations. Frames sitting at Level 1 or 2 are strong candidates for DIY methods, while Level 3 typically benefits from professional involvement or at least professional-grade materials and careful technique.
Getting both the finish type and the damage level right narrows your options to the methods that will actually work, which is exactly what the next step covers: comparing those methods head to head.
Restoration Methods Compared Side by Side
Four distinct approaches cover the full spectrum of aluminium frame restoration, from a light weekend clean to a factory-level professional refinish. Each suits a different combination of frame condition, finish type, and budget. Choosing the right one, or the right sequence of two or three together, depends on the diagnosis you completed in the previous step.
Chemical Cleaning and Oxidation Removal
Chemical cleaning is the least invasive option and the logical starting point for any frame showing Level 1 or mild Level 2 damage. It involves applying a specialised aluminium cleaner or mild acid solution, typically containing oxalic or phosphoric acid, to dissolve surface oxidation without physically disturbing the metal beneath. The process works across all finish types: mill finish, anodised, and powder coated.
For lightly oxidised frames, a non-abrasive chemical wash followed by thorough rinsing and a protective sealant can restore appearance in a single afternoon. Oxalic acid cleaners are particularly effective at lifting white chalking from anodised surfaces without destroying the remaining anodic layer. Results typically last three to five years before reapplication is needed, longer in sheltered positions and shorter in coastal or high-UV locations.
Skill requirement is low. The critical points are choosing a pH-appropriate product for your finish type, avoiding prolonged contact that can etch the metal, and neutralising the surface completely before applying any sealant.
Mechanical Polishing for Surface Restoration
When chemical cleaning alone cannot shift heavy oxidation or shallow pitting, mechanical polishing steps in. This method uses progressively finer abrasives, starting around 400 to 600 grit and finishing at 800 to 1000 grit, to physically remove the damaged surface layer and expose fresh aluminium beneath.
Polishing suits mill-finish frames best. Because these frames have no factory coating to preserve, removing a thin layer of oxidised metal is a straightforward path to a clean, even surface ready for sealing or coating. On anodised frames, mechanical polishing is a last resort. Once you sand through the anodic layer, it is gone permanently and the frame must be treated as bare aluminium from that point forward.
Time investment is moderate to high depending on frame count and pitting depth. A single standard window might take one to two hours of careful hand sanding. The grit progression matters: jumping too quickly to a fine grit leaves deep scratches unresolved, while lingering too long on coarse abrasives removes more metal than necessary. Results last indefinitely when followed by a quality protective coating, since the polishing itself simply prepares a clean substrate.
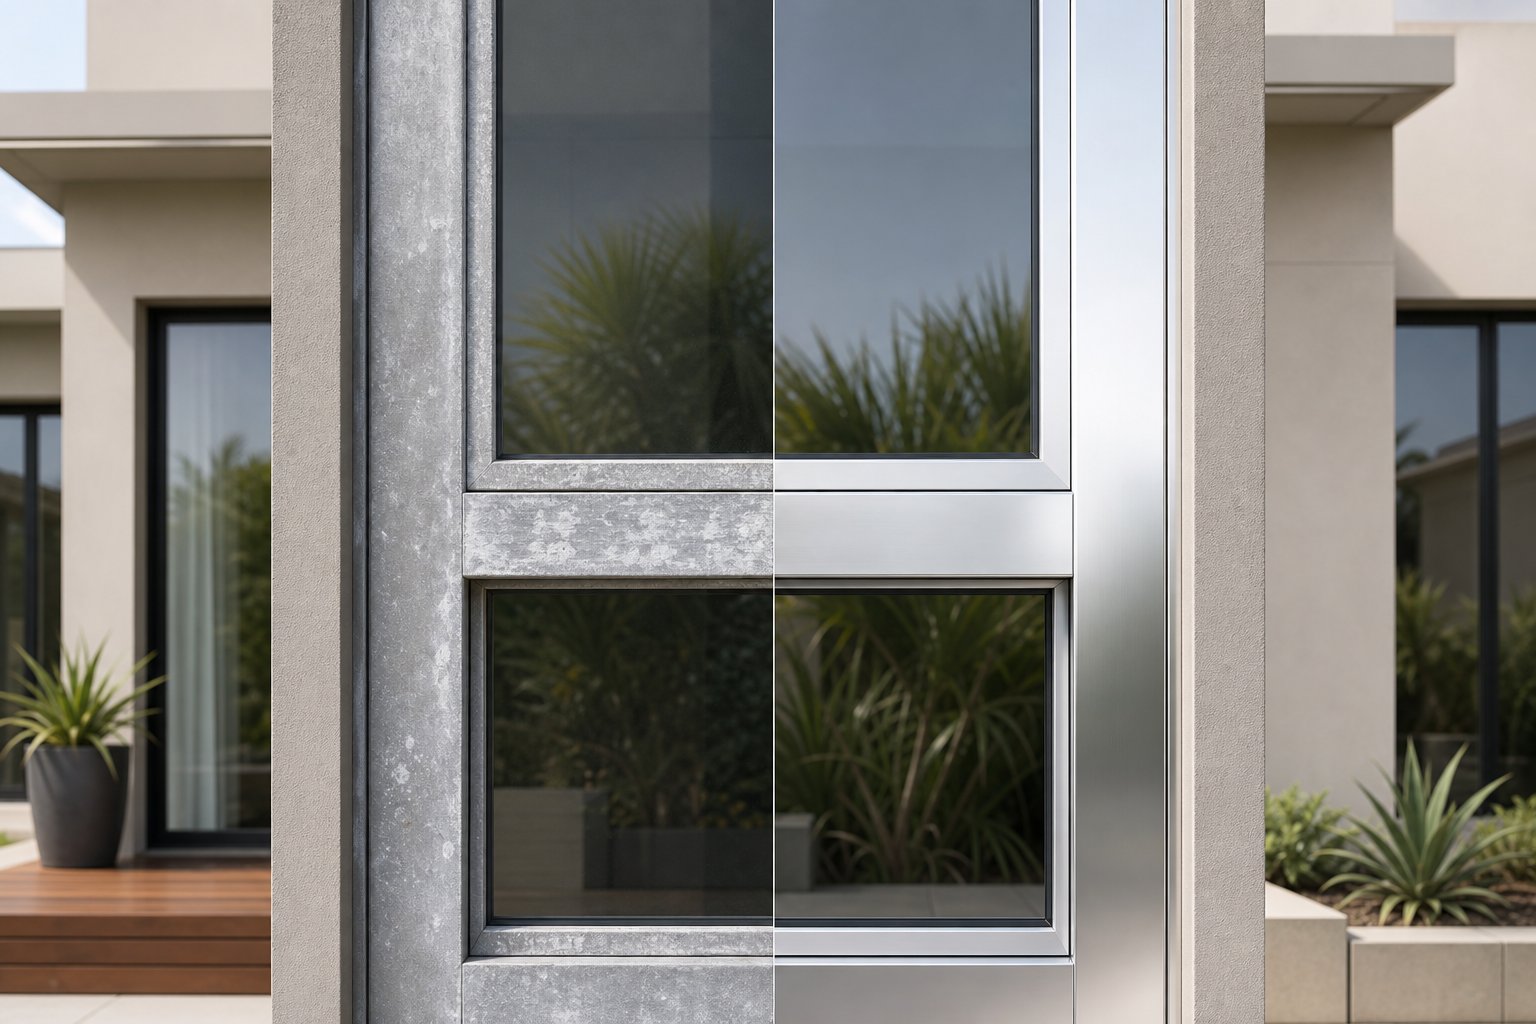
Re-Coating Options From Paint to Powder Coat
Re-coating is the go-to solution for frames with intact structure but visibly failed surface protection, the Level 2 and Level 3 cases where the aluminium underneath remains sound. Two main paths exist here: painting (brush, roller, or spray application) and powder coating aluminum windows in a factory setting.
Painting is accessible for DIY work. With proper surface preparation, an etching primer, and a quality two-part polyurethane or acrylic topcoat, a painted finish can deliver seven to ten years of protection. Repainting aluminium windows that were previously coated requires thorough sanding or chemical stripping of the old finish first, as fresh paint will not bond reliably over a chalked or flaking surface.
Powder coating windows, by contrast, is a professional process. Frames are removed, stripped to bare metal via sandblasting or chemical bath, then electrostatically coated with dry powder and baked in an industrial oven at around 200°C. The result is an exceptionally uniform, durable finish rated to 15 to 20 years in typical Australian conditions. The trade-off is cost and logistics: frames must be physically removed and transported to a facility, making this option impractical for some installations.
Professional Refinishing Services
For severe cases, large-scale projects, or homeowners who want factory-quality results without the DIY learning curve, professional refinishing services bridge the gap. These range from on-site electrostatic spray painting, where charged paint particles wrap evenly around the frame without removal, to full off-site re-anodising for architecturally significant aluminium.
On-site electrostatic painting is particularly popular for aluminum window frame repair in multi-storey buildings or heritage homes where removing frames risks damaging surrounding brickwork or rendering. Skilled operators achieve a finish close to powder-coat quality with turnaround times of just a few days. Off-site re-anodising, while delivering the most authentic restoration for repairing aluminium window frames with original anodised finishes, requires complete disassembly and access to specialised chemical baths, placing it firmly in the premium tier.
Professional services suit Level 3 damage, large window counts, or situations where the stakes of a DIY mistake are too high, such as street-facing facades or strata-managed buildings.
Method Comparison at a Glance
| Method | Best For | Skill Level | Durability | Limitations |
|---|---|---|---|---|
| Chemical Cleaning | Light oxidation on any finish (Level 1–2) | Low | 3–5 years before reapplication | Cannot resolve pitting or heavy corrosion; surface-level only |
| Mechanical Polishing | Mill-finish frames with moderate oxidation or shallow pitting | Moderate | Permanent prep (depends on subsequent coating) | Destroys anodised finishes; labour-intensive on large areas |
| Re-Coating (Paint) | Structurally sound frames with failed coatings (Level 2–3) | Moderate | 7–10 years with quality products | Requires meticulous surface prep; touch-ups may be visible |
| Re-Coating (Powder Coat) | Frames needing factory-grade durability (Level 2–3) | Professional only | 15–20 years | Frames must be removed; higher cost; longer turnaround |
| Professional Refinishing (On-site Spray) | Multi-storey, heritage, or large-scale projects (Level 2–3) | Professional only | 10+ years | Weather-dependent application; requires trained operator |
These methods are not mutually exclusive. A comprehensive restoration often combines two or more in sequence: chemical cleaning to strip surface contamination, mechanical preparation to level pitted areas, and then a durable re-coat to seal everything up. The combination you choose flows directly from your finish type, damage level, and whether you are tackling the work yourself or bringing in a specialist.
Whichever path you take, the quality of the outcome hinges on one thing above all else: having the right tools and materials on hand before you start. Improvising mid-project with the wrong abrasive or an incompatible primer is where most DIY restorations go sideways.
Tools and Materials for DIY Aluminium Restoration
A restoration that stalls halfway through because you grabbed the wrong cleaner or ran out of masking tape mid-coat is frustrating at best and damaging at worst. Gathering the correct supplies before you touch the frames prevents improvisation, and improvisation is where most DIY coating failures begin. Here is what you need, organised by the stage of work.
Cleaning and Preparation Supplies
Surface preparation accounts for roughly 80 per cent of the final result quality. Skimp here and no topcoat will save the job.
- Non-acidic aluminium window frame cleaner — A pH-neutral or mildly alkaline formula (pH 7 to 9) dissolves surface grime and light oxidation without etching the metal. Avoid anything containing bleach, hydrochloric acid, or ammonia, as these attack aluminium aggressively. Neutral aqueous cleaners balance effective soil removal with material compatibility, making them safe across mill-finish, anodised, and powder-coated surfaces.
- Degreaser — A solvent-based or citrus degreaser strips oils, fingerprints, and silicone residues that block primer adhesion. Apply after the initial wash and before any abrasion step.
- Soft-bristle brushes and microfibre cloths — Nylon or natural-fibre brushes dislodge debris from corners and gasket channels without scratching. Microfibre cloths lift residue without leaving lint behind.
- Fine abrasive pads (scotch-brite style, ultra-fine grade) — These scuff the surface to create a mechanical key for primer. Use maroon (very fine) or grey (ultra fine) grades. Steel wool is not suitable; it embeds iron particles that cause staining and galvanic corrosion on aluminium.
- Masking tape and painter’s plastic — Quality automotive-grade tape resists bleed-through and removes cleanly. Use plastic sheeting to protect glass panes, walls, and sills from overspray or drips.
Incompatibility warning: Acidic cleaners (pH below 5) must never be used on anodised frames. They dissolve the anodic layer, causing irreversible damage that no amount of re-coating can fix. Similarly, alkaline products above pH 10 without silicate inhibitors will etch bare aluminium, leaving a grey smut that requires additional cleaning steps to remove.
Coating and Finishing Materials
Choosing the right paint for aluminum window frames means matching your primer and topcoat to the substrate and to each other. Mixed systems from different manufacturers or incompatible chemistries are a common cause of peeling within the first year.
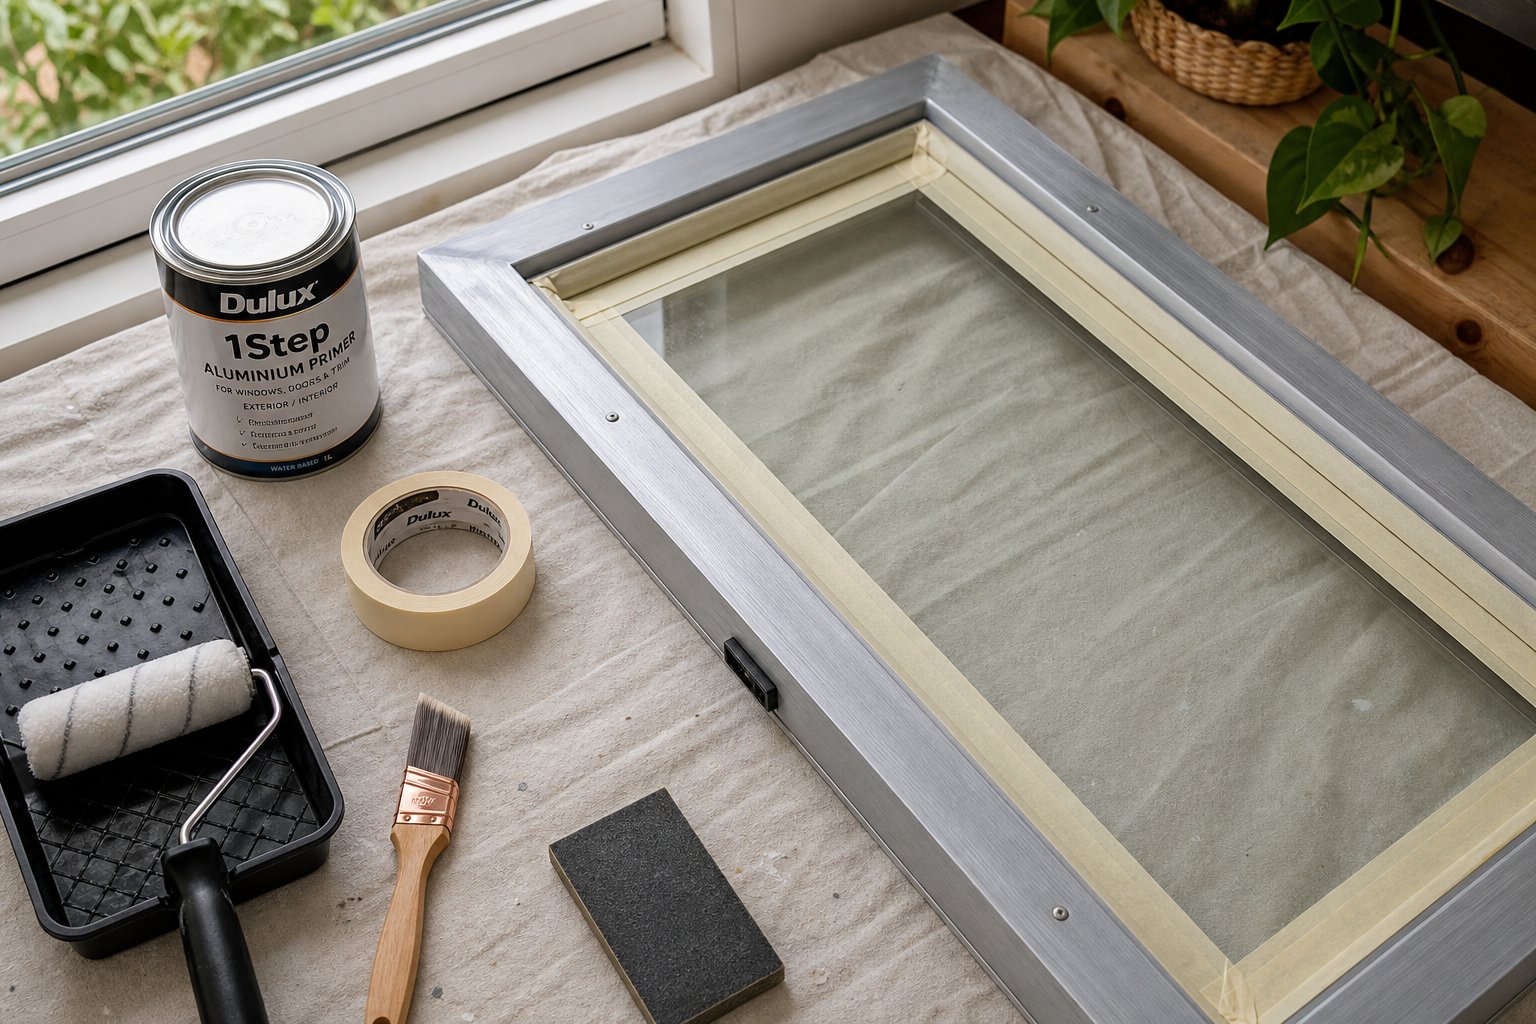
- Etching primer — This is non-negotiable on bare or freshly sanded aluminium. Etching primer contains phosphoric acid that microscopically bites into the metal surface, creating a chemical bond rather than relying on mechanical grip alone. Without it, topcoats peel within months.
- Aluminium-compatible topcoat — Acrylic latex, two-part polyurethane, or DTM (direct-to-metal) enamel all work as paint for aluminum windows, provided they are applied over the correct primer. Two-part polyurethanes deliver the hardest, most UV-resistant finish but require precise mixing ratios. Acrylic latex is more forgiving for beginners.
- Clear protective sealant — For frames that need protection but not a colour change, a clear acrylic or polyurethane sealant shields against UV and moisture without altering appearance. This suits polished mill-finish frames or anodised surfaces where you want to preserve the original look.
- Fine-nap mini rollers and angled sash brushes — Foam rollers leave a smooth, stipple-free finish on flat frame sections. Angled brushes reach into rebates and glazing channels. Spray equipment produces the best results but demands more masking and overspray management.
Safety Equipment You Should Not Skip
Aluminium dust and chemical fumes are easy to underestimate because the work feels low-key compared to heavier trades. The risks are real regardless.
- Chemical-resistant nitrile gloves — Protect hands from degreasers, etching primers, and cleaning chemicals. Standard latex gloves degrade quickly on contact with solvents.
- Safety glasses or goggles — Chemical splashes during cleaning and fine particles during sanding both pose eye injury risk. Wrap-around styles prevent lateral exposure.
- P2 respirator mask — Essential during sanding and spray application. Fine aluminium dust irritates airways, and solvent-based primer fumes require at minimum a P2-rated particulate filter. If using two-part polyurethane in a confined space, step up to an A1P2 combination filter rated for organic vapours.
- Drop sheets and ventilation — Work outdoors or in a well-ventilated garage whenever possible. If frames cannot be removed and work must happen indoors, set up cross-ventilation with fans directing fumes away from your breathing zone.
One more consideration often overlooked: working at height. Upper-storey windows frequently require ladder or scaffold access. A stable platform rated for your weight plus equipment, and ideally a second person spotting below, is essential. No coating job is worth a fall from a first-floor sill.
With the right supplies staged and safety gear fitted, the actual coating process becomes far more straightforward. The next critical variable is technique, specifically how you prepare and apply coatings in the correct sequence to make paint genuinely stick to aluminium rather than flake off within a season.
How to Paint and Recoat Aluminium Window Frames
Can you paint aluminium window frames that have lost their original finish? Absolutely. But here is the catch that trips up most DIYers: aluminium is non-porous. Paint does not soak into it the way it penetrates timber. Every millimetre of adhesion comes from the preparation work beneath the topcoat, not from the paint itself. Skip or rush that prep, and peeling begins within months.
Knowing how to paint aluminium window frames properly means treating the process as a system. Each step builds on the one before it, and cutting corners at any stage undermines everything that follows.
Surface Preparation That Makes Paint Stick
Preparation accounts for around 80 per cent of your ultimate success. The aluminium surface must be clean, degreased, and mechanically profiled before any primer touches it.
- Clean thoroughly. Wash frames with warm soapy water and a soft-bristle brush to remove dirt, cobwebs, and loose debris. Rinse completely and allow to dry.
- Degrease the surface. Apply a solvent-based degreaser or tri-sodium phosphate solution to strip invisible oils, silicone traces, and finger grease. These contaminants are adhesion killers that soap alone will not remove.
- Scuff-sand or chemically etch. Using 180 to 220-grit sandpaper or a fine scotch-brite pad, lightly abrade the entire frame to create microscopic scratches that give primer something to grip. On bare aluminium, an etching solution containing phosphoric acid achieves the same goal chemically, dissolving the oxide layer and roughening the surface simultaneously.
- Remove all dust. Wipe the sanded surface with a tack cloth or a rag dampened with isopropyl alcohol. Any remaining dust particles become trapped under the primer, creating bumps and weak spots.
- Mask adjacent surfaces. Apply quality painter’s tape tight against the glass edge, then cover panes with paper or plastic sheeting. Mask wall edges and sills as well, pressing tape firmly to prevent bleed-through.
The approach differs depending on your existing finish. Painting anodised frames requires aggressive scuffing with 180-grit to break through the hard anodic layer, because standard chemical etching often cannot penetrate it. Powder-coated frames in good condition are simpler: a thorough clean and scuff with 220-grit paper provides enough key for a bonding primer, without needing to strip the existing coating entirely. If the powder coat is flaking or bubbling, however, all loose material must come off first.
Choosing the Right Primer and Topcoat System
Primer selection is where the project succeeds or fails. Standard household primers designed for timber or plasterboard have near-zero adhesion to aluminium. You need a product specifically formulated for non-ferrous metal.
Self-etching primer is the most accessible option for DIY work. It contains mild phosphoric acid that chemically bonds to the aluminium surface while depositing a protective base coat. One even pass typically provides adequate coverage, and drying time runs 30 to 60 minutes in moderate conditions. For homeowners learning how to repaint aluminum window frames for the first time, self-etching aerosol primers simplify application significantly.
Two-part epoxy primer delivers the highest adhesion and corrosion resistance. It requires precise mixing of resin and hardener, has a limited working life once blended (usually two to four hours), and costs more. It is the better choice for coastal properties or frames with prior adhesion failures, where maximum durability justifies the extra effort.
For topcoats, choose a 100 per cent exterior-grade acrylic or urethane-modified enamel. These chemistries flex with the aluminium as it expands and contracts through temperature cycles, rather than cracking the way rigid oil-based paints do. Two coats minimum, applied in thin, even layers, deliver proper colour depth and UV protection.
Application Techniques for a Professional Finish
If you are wondering how to paint an aluminum window frame without it looking obviously hand-done, the answer comes down to thin coats and patience between them.
Apply primer starting at the top of the frame, working across and then down. Use consistent up-and-down strokes whether brushing or spraying. Keep the coat light. Thick primer runs, sags, and traps solvents that prevent proper curing. Once dry, knock back any nibs or rough spots with 320-grit sandpaper, wipe clean, then apply your first topcoat using the same methodical pattern.
Allow the manufacturer’s recommended drying time between coats. For most exterior acrylics, this is four to six hours in ideal conditions. Apply the second topcoat only once the first feels completely dry to the touch and does not indent under gentle fingernail pressure. Full cure takes seven to fourteen days, during which time you should avoid cleaning or stressing the freshly coated surface.
Ideal conditions for application: ambient temperature between 15°C and 30°C, relative humidity below 85 per cent, and no rain forecast for at least 24 hours. Painting in direct midday sun heats the aluminium and causes flash-drying, which traps solvents and weakens the film. Early morning or late afternoon on a mild, dry day gives the best results.
For frames that cannot be removed from the wall, which is the majority of residential situations, work in place. Thorough masking compensates for the lack of all-around access. Paint the top rail first, then the sides, then the bottom rail, and finally any glazing beads. This sequence prevents drips from landing on freshly coated sections below.
Even with flawless technique, the wrong conditions or a single preparation shortcut can undo hours of careful work. The most damaging of those shortcuts, and the mistakes that actively make frames worse, deserve their own attention.
Common Mistakes That Make Aluminium Damage Worse
A weekend restoration project can go from promising to destructive in a single misstep. The frustrating reality is that many common DIY errors do not simply fail to fix the problem; they actively worsen it. A frame that was a straightforward candidate for cleaning and recoating can end up needing full replacement because the wrong product or technique introduced damage that was not there before.
Knowing what not to do matters just as much as knowing the correct process, especially when working with a material as chemically reactive as aluminium.
Abrasive and Chemical Mistakes That Accelerate Damage
The first instinct when faced with a chalky, oxidised frame is often to scrub harder or reach for a stronger cleaner. Both impulses can backfire badly.
- Using steel wool or coarse abrasive pads — Steel wool scores the aluminium surface, creating deep scratches that act as entry points for moisture and oxygen. Worse, embedded iron particles from the wool trigger galvanic corrosion in the presence of water, producing rust-coloured staining and accelerating pitting in the surrounding aluminium. Use only ultra-fine scotch-brite pads (grey or maroon grade) or fine sandpaper in the 220 to 400 grit range.
- Applying bleach-based or acidic household cleaners — Chlorine bleach causes permanent pitting on aluminium. Acidic products such as bathroom tile cleaners or rust removers strip the natural oxide layer far too aggressively, leaving raw metal exposed to rapid re-oxidation. So how do you clean aluminium window frames safely? Stick to pH-neutral cleaners formulated for aluminium, or a simple solution of warm water and mild dish soap for routine grime.
- Over-sanding anodised frames — Anodised aluminium has a hard, integrated oxide layer that cannot be replaced once removed. Aggressive sanding with coarse grit destroys this protective barrier entirely, converting what was a cosmetically faded but structurally protected surface into bare metal vulnerable to corrosion from every direction. If your frames are anodised, sand only enough to key the surface for primer, never enough to cut through to raw aluminium beneath.
Coating Failures From Poor Preparation
Even homeowners who get the cleaning right can still end up with peeling paint within months. The culprit is almost always a skipped or substituted step in the coating system.
- Skipping the etching primer — Can you paint aluminium windows with standard primer and expect it to hold? No. Ordinary primers designed for timber or plaster have virtually no adhesion to non-porous aluminium. Without a self-etching or metal-specific primer creating a chemical bond to the substrate, topcoats begin lifting and flaking as soon as they face UV and thermal cycling. Paintistry notes that this single omission is one of the most common reasons DIY paint jobs fail on aluminium frames.
- Painting over existing corrosion or flaking — Fresh paint cannot seal in active corrosion. Moisture trapped beneath the new coating continues reacting with the aluminium, producing bubbling and rapid adhesion loss. Anyone looking to how to repaint aluminium windows properly must address every flake, pit, and chalky patch before primer goes on.
- Applying coatings in unsuitable weather — Painting below 10°C slows chemical curing and weakens the film. Painting in direct summer sun above 35°C causes flash-drying, trapping solvents and creating a brittle coat that cracks within weeks. High humidity above 85 per cent introduces moisture into the film as it cures, leading to clouding and poor adhesion. Aim for mild, dry conditions between 15°C and 30°C with low humidity and no rain forecast for 24 hours.
If your restoration attempt has already produced visible peeling, bubbling, or new pitting that was not there when you started, pause the project. Continuing with the same approach compounds the damage. At this point, stripping back to bare aluminium and starting fresh, or calling in a professional, is almost always cheaper than layering more product over a failed job. Can you paint aluminum window frames that have been compromised by a botched first attempt? Yes, but only after every trace of the failed coating is removed and the substrate is correctly reprimed from scratch.
These mistakes rarely happen in isolation. They compound, and they are heavily influenced by the environment your frames sit in. A technique that barely works in a sheltered inland suburb fails spectacularly on a salt-blasted coastal facade, which is why tailoring your approach to your specific climate conditions matters more than most guides acknowledge.
How Climate and Location Shape Your Restoration Plan
The same restoration method applied to identical frames can last twelve years in a sheltered Melbourne suburb and barely three on the Sunshine Coast. Geography is not a minor variable in aluminium window restoration. It is the single biggest factor determining how long your work holds up, what products you should use, and how often maintenance needs revisiting.
Australia’s climate zones throw nearly every environmental stressor at building exteriors, often in combination. A frame in Bondi faces salt spray and intense UV simultaneously. A frame in industrial Kwinana deals with airborne sulphur compounds on top of coastal chlorides. Tailoring your approach to these conditions is the difference between a restoration that lasts a decade and one that fades within a couple of years.
Coastal and Salt Air Restoration Challenges
Chloride ions are aluminium’s most aggressive enemy. In coastal zones, typically within five kilometres of the shoreline, salt corrosion poses a severe challenge to aluminium door and window systems. Airborne salt deposits on frame surfaces, dissolves in dew or rain, and creates a chloride-rich electrolyte that penetrates oxide layers and accelerates pitting.
For restoration in these environments, standard cleaning products are not enough. Frames require more frequent and more thorough washing to remove chloride deposits before they cause damage between maintenance cycles. Marine-grade sealants and topcoats formulated with corrosion-inhibiting pigments replace the general-purpose products that work fine further inland. When painting anodized aluminum window frames in coastal locations, the primer system must include a chromate-free corrosion inhibitor, and topcoats should carry explicit marine or severe-environment ratings rather than a generic exterior classification.
Maintenance intervals tighten considerably. What might be a biannual wash-down in temperate Canberra becomes a quarterly task for homes sitting on the Illawarra escarpment or along Perth’s western coastline.
High UV and Urban Pollution Considerations
Most of mainland Australia receives UV levels that rank among the highest globally. This radiation breaks down the polymer chains in paint and powder coat finishes, causing chalking, colour fade, and eventual adhesion loss. Intense sun exposure and temperature variation place ongoing stress on coated aluminium surfaces, with coating performance largely determining UV stability and long-term appearance.
In high-UV zones, which covers most of Queensland, Western Australia, and inland NSW, a standard acrylic topcoat may chalk visibly within five years. Upgrading to a UV-stabilised polyurethane or fluoropolymer-modified topcoat extends that timeline significantly. Three-coat systems incorporating a clear protective topcoat over the colour coat offer the best gloss retention and colour stability under harsh Australian sun.
Urban industrial environments introduce a different concern. Airborne pollutants, acidic particulates from traffic and manufacturing, and construction dust deposit a corrosive film on frames that standard rain does not wash away. These contaminants lower surface pH locally, eating through protective coatings faster than UV alone. Anodized aluminum windows in industrial areas often show patchy discolouration from acid deposits well before the anodic layer would normally thin from UV alone. Regular cleaning with a pH-neutral aluminium cleaner prevents pollutant buildup from gaining a foothold.
| Environment Type | Recommended Restoration Approach | Protective Coating | Maintenance Interval |
|---|---|---|---|
| Coastal (within 5 km of shore) | Aggressive chloride removal; marine-grade primer system; corrosion-inhibiting sealant | Two-part marine polyurethane or fluoropolymer topcoat with salt-resistance rating | Every 3–4 months (wash); re-coat every 5–7 years |
| High UV (inland QLD, WA, NSW) | Standard cleaning; UV-stabilised coating system; clear topcoat layer | UV-resistant polyurethane or three-coat fluoropolymer system with clear protective layer | Every 6 months (wash); re-coat every 7–10 years |
| Urban Industrial | Frequent pollutant removal; acid-neutralising wash; barrier topcoat | Chemical-resistant acrylic or polyurethane with high gloss retention | Every 3–4 months (wash); re-coat every 8–10 years |
| Temperate Inland | Standard preparation and coating; routine maintenance | Quality exterior acrylic or single-pack polyurethane | Every 6–12 months (wash); re-coat every 10–12 years |
Many Australian properties do not fall neatly into just one category. A home in Cronulla faces both intense UV and direct salt exposure. A unit in Newcastle’s industrial port precinct deals with all three stressors simultaneously. Where conditions overlap, default to the most demanding protocol. Using a marine-grade, UV-stabilised system in a combined coastal and high-UV zone costs marginally more upfront but avoids premature re-coating that doubles your long-term expense.
Your environment also determines whether restoration remains the right call at all. Frames that have already endured decades of multi-stressor exposure may sit closer to the threshold where the cost and frequency of maintenance tips the balance toward replacement, a decision that involves weighing far more than just surface condition.
When to Restore and When to Replace Aluminium Windows
Not every old aluminium window deserves a restoration. Some do, and the economics are overwhelmingly in favour of bringing them back. Others have crossed a threshold where no amount of cleaning, priming, and recoating will deliver a result that justifies the investment. The challenge is knowing which side of that line your frames sit on.
The question is not simply whether you can repaint aluminium window frames or polish out the oxidation. It is whether the frame behind that surface damage still has enough structural integrity, seal performance, and thermal relevance to warrant the effort. Here is how to tell the difference.
Signs Your Windows Can Be Successfully Restored
Aluminium window repairs make strong financial sense when the underlying frame remains sound and the problems are cosmetic or mechanical rather than structural. If your frames pass the following checks, restoration is almost certainly the better path:
- Surface oxidation without deep pitting — Chalky residue, colour fade, or light corrosion that has not eaten into the metal beyond surface level. A fingernail dragged across the frame catches no craters deeper than a scratch.
- Coating failure with intact substrate — Powder coat is chalking or paint is peeling, but the aluminium underneath appears clean and unblemished once loose material is removed.
- Hardware that operates or can be replaced — Handles, locks, and hinges still function or have compatible replacement parts available. Most standard Australian aluminium window hardware from the 1980s onward remains sourced through specialist suppliers.
- Seals showing wear but not structural failure — Rubber gaskets and weatherstripping have gone hard or compressed but the frame channels themselves are not distorted. Fresh seals can be pressed into original grooves.
- Frame sits square and true — No visible warping, bowing, or racking when viewed from the side. Sashes still close into the frame without binding or leaving daylight gaps at corners.
Old aluminium window frames meeting these criteria typically restore beautifully. A 1980s sliding window with faded anodising but zero pitting, for instance, needs only chemical cleaning and a protective sealant to look presentable for another decade. Learning how to repaint aluminium window frames that are structurally sound gives homeowners a cost-effective path that extends service life by ten years or more at a fraction of replacement pricing.
When Replacement Makes More Sense Than Restoration
Certain conditions signal that restoration will be a short-lived fix at best, or physically impossible at worst. If multiple items on the following list apply, replacement delivers better long-term value:
- Deep structural pitting — Pits you can catch with a fingernail, particularly along bottom rails where moisture pools. Once aluminium thins past a critical point, the frame loses load-bearing capacity and cannot safely hold glazing under wind load.
- Seal failure causing water infiltration — Water entering the wall cavity around the frame indicates that the frame-to-structure junction has failed. This is not a seal you can simply replace; it often means the frame has moved or corroded at its fixing points. Reynaers notes that condensation between panes, visible frame damage, and operational lag are all strong indicators that renovation is overdue.
- Hardware systems no longer available — Proprietary locking mechanisms from discontinued ranges leave frames permanently compromised on security if parts cannot be sourced.
- Single glazing in climate-controlled spaces — Old aluminium window frames with single-pane glass offer minimal insulation. Retrofitting double glazing into frames not designed for the weight and thickness rarely succeeds without compromising the seal or the sash operation.
- Restoration cost exceeding 60 to 70 per cent of replacement cost — When you factor in stripping, re-coating, new hardware, new seals, and potentially reglazing, the total can approach the price of a new window that arrives with a 10-year factory warranty and modern thermal performance built in.
Where replacement is the clear winner, modern aluminium window systems offer advantages that old frames simply cannot match regardless of how well they are restored. Thermally broken profiles dramatically reduce heat transfer compared to the solid aluminium extrusions used in older installations. Factory-applied powder coat finishes carry warranties of 15 to 20 years. Custom sizing eliminates the compromise of adapting weathered openings to off-the-shelf units. Manufacturers like MEICHEN produce aluminium window systems with these features specifically engineered for Australian conditions, giving homeowners, builders, and architects a direct path from identifying the need for replacement to specifying a solution purpose-built for the climate challenges covered earlier in this guide.
The durability that made your original aluminium frames worth considering restoration in the first place carries forward into quality replacements. The difference is that new systems arrive with the thermal breaks, hardware engineering, and finish technology that decades-old frames were never designed to include. For frames sitting firmly on the restore side of the ledger, the methods and materials outlined throughout this article will deliver years of renewed performance. For those that have crossed the line, investing in a properly specified replacement avoids the cycle of diminishing returns that comes from restoring a frame past its practical service life.
Aluminium Window Restoration FAQs
1. Can you paint aluminium window frames yourself?
Yes, you can paint aluminium window frames as a DIY project, but success depends entirely on surface preparation. Aluminium is non-porous, so paint cannot soak in the way it does with timber. You must clean the frames thoroughly, degrease the surface, scuff-sand with 180 to 220-grit paper to create a mechanical key, and apply a self-etching primer specifically formulated for non-ferrous metal. Without etching primer, topcoats will peel within months regardless of paint quality. Use an exterior-grade acrylic or urethane-modified enamel topcoat applied in two thin coats, allowing full drying time between each. Ideal conditions are 15 to 30 degrees Celsius with low humidity and no rain forecast for 24 hours.
2. How do you remove oxidation from aluminium window frames?
Removing oxidation from aluminium window frames depends on the severity. For light surface chalking (Level 1 damage), a pH-neutral aluminium cleaner or a mild oxalic acid solution dissolves the white powdery residue without damaging the metal beneath. Apply the cleaner, allow it to work for a few minutes, then scrub gently with a soft-bristle brush and rinse thoroughly. For heavier oxidation with shallow pitting, mechanical polishing with fine abrasive pads (400 to 600 grit progressing to 800 to 1000 grit) removes the damaged layer to expose fresh aluminium. Avoid steel wool, as embedded iron particles cause galvanic corrosion. Always follow oxidation removal with a protective sealant or primer and topcoat system to prevent rapid re-oxidation.
3. How long do restored aluminium windows last before needing retreatment?
Longevity varies significantly based on your restoration method and local environment. Chemical cleaning with a protective sealant lasts approximately 3 to 5 years before reapplication is needed. A properly applied paint system with etching primer and quality acrylic topcoat provides 7 to 10 years of protection. Professional powder coating delivers the longest lifespan at 15 to 20 years under typical Australian conditions. These timelines shorten considerably in aggressive environments. Coastal properties within 5 kilometres of the shoreline may see paint systems degrade in 5 to 7 years, while sheltered inland locations often exceed the upper estimates. Regular maintenance washing every 3 to 6 months extends any coating’s service life.
4. What is the difference between anodised and powder-coated aluminium window frames?
Anodised aluminium has its outer surface electrochemically converted into a thick, hard oxide layer (10 to 25 micrometres) that becomes an integral part of the metal itself. It cannot be chipped off, feels glassy-smooth, and retains a subtle metallic sheen in colours like bronze or champagne. Powder-coated aluminium has a separate organic film (60 to 120 micrometres) applied on top of the metal, baked in an oven at around 200 degrees Celsius. It shows a solid opaque colour with slight orange-peel texture and can be chipped away from the substrate. They degrade differently too: anodised finishes develop blotchy discolouration as sealed pores open, while powder coat chalks and flakes as UV breaks down the resin binders. Each requires a distinct restoration approach.
5. When should you replace aluminium windows instead of restoring them?
Replacement makes better financial sense when frames show deep structural pitting that catches a fingernail, warping or bowing visible from the side, water infiltration around the frame-to-wall junction, or when hardware from discontinued ranges cannot be sourced. Single-glazed aluminium frames in climate-controlled spaces are also strong replacement candidates, as retrofitting double glazing into frames not designed for the weight rarely succeeds. A useful cost threshold: if total restoration costs (stripping, re-coating, new seals, new hardware, and potential reglazing) exceed 60 to 70 per cent of replacement cost, a new thermally broken aluminium window system delivers better long-term value with factory warranties of 15 to 20 years and modern thermal performance that old frames cannot match.
More Window & Door Guides