What Aluminium Window Installation Actually Involves
A window can tick every box on paper — thermally broken profiles, high-performance glass, top-shelf hardware — and still leak, rattle, or jam within months. The difference almost always comes down to how it was put in. Aluminium window installation is not a single task. It is a sequence of interdependent stages, each one setting the conditions for the next. Skip or rush any stage and the performance you paid for never materialises.
The approach changes depending on your wall construction (brick veneer, timber frame, steel stud, concrete block), the window style (sliding, awning, casement, fixed), and whether you are working on a new build or an aluminium window replacement into an existing opening. A method that works perfectly in a timber-framed wall can fail in double brick if the fixings, flashing, and sealing details are not adapted accordingly.
Why Proper Installation Matters More Than the Window Itself
Industry testing consistently reveals that the majority of window failures — water ingress, air leakage, operational problems — trace back to installation deficiencies rather than product defects. ASTM E1105 water penetration testing routinely identifies improper flashing, incomplete sealant lines, blocked drainage paths, and over-tightened fixings as the root causes of failure. The window itself is rarely the weak link.
Most window failures found during field testing are installation errors — not product defects. A correctly installed mid-range window will outperform a premium window with poor fitment every time.
In Australia, aluminium window installation must comply with AS 2047 (windows and external glazed doors) and the National Construction Code. Internationally, standards such as AAMA 2400 address specific installation methods for flanged windows in framed construction. These documents exist because correct installation directly determines air tightness, water resistance, and long-term structural integrity.
New Construction vs Replacement Scenarios at a Glance
A new-construction install means working with a raw rough opening — integrating flashing with the building wrap, anchoring into exposed framing, and building the weather barrier from scratch. A replacement scenario involves removing an existing unit first, then deciding between a retrofit insert (new window into the old frame) or a full-frame replacement back to the rough opening. Each path carries different time, cost, and complexity implications.
This guide covers the full lifecycle in one place. Here is what each stage addresses:
- Measuring and sizing the opening accurately before ordering
- Gathering the correct tools and materials for your wall type
- Removing old windows safely (replacement projects)
- Installing the new frame — shimming, levelling, and fixing
- Weatherproofing with flashing, sealant, and building wrap integration
- Post-installation verification and ongoing maintenance
Every stage matters, but none more so than the first one most people get wrong: measuring the opening before a single dollar is spent on product.
How to Measure Window Openings Before You Order
Ordering a window before measuring the opening properly is like pouring a slab without checking levels — expensive to fix after the fact. Whether you are fitting aluminium windows into a new build or sizing a replacement aluminum window for an existing opening, accurate measurements prevent costly re-orders, awkward gaps, and frames that simply will not fit.
The technique differs depending on your scenario. In new construction, you are measuring a rough opening framed by studs, header, and sill plate. In a replacement, you are working within the constraints of an existing frame or reveal. Both demand precision, but each has its own reference points and tolerances.
Measuring for New Construction Rough Openings
A rough opening is the framed cavity in the wall — stud to stud horizontally, header to sill plate vertically. Most aluminium window manufacturers will deduct a set clearance (typically 10 mm on each side) from the rough opening dimension to determine the actual window size. Your job is to provide the rough opening measurement accurately so the supplier can apply their standard deductions for shimming and levelling.
Measure the width from trimmer stud to trimmer stud, and the height from the header’s bottom edge down to the sill plate. Take each measurement at three points because timber framing is rarely perfectly straight.
Measuring Existing Openings for Replacement Windows
Replacement projects add a layer of complexity. You need to determine whether you are measuring the structural opening (back to the rough framing) or the reveal — the finished surface visible from inside. If you are doing a full-frame replacement, measure the structural opening once the old frame is removed. For a retrofit insert, measure inside the existing frame from jamb to jamb and head to sill, because the new unit must fit aluminium windows within that space.
Older Australian homes — particularly weatherboard, fibro, and early brick veneer — often have openings that have shifted over decades. Walls settle, timber shrinks, and reveals can be out of square by 5 mm or more. A diagonal check catches this before your new window arrives.
Accounting for Shimming Clearance and Tolerances
Every opening needs clearance between the window frame and the surrounding structure to allow for shimming, insulation, and minor adjustment. A typical clearance is 5 to 10 mm per side for aluminium frames. Too little clearance makes it impossible to plumb and level the frame. Too much creates excessive reliance on sealant and reduces structural fixing integrity.
Reveal depth also matters. If the reveal is too shallow for the chosen profile, the window may project past the wall face or leave no room for internal trims. Measure the depth from the outer wall face to the inner lining to confirm it accommodates your window system.
Follow this sequence every time you measure an opening:
- Measure width at three points — top, middle, and bottom. Record the smallest figure.
- Measure height at three points — left, centre, and right. Record the smallest figure.
- Check diagonals corner to corner. If the difference exceeds 3 mm, the opening is out of square and may need correction before aluminum windows replacement can proceed.
- Measure reveal depth from the outer face of the wall to the inside lining.
Common mistakes that lead to re-orders include measuring old frames instead of the actual opening, taking a single width reading and assuming the opening is consistent, forgetting to account for render or cladding yet to be applied in new builds, and mixing up width and height on the order form. Each of these errors sounds minor in isolation, but any one of them can result in a window that arrives too large to fit or too small to seal properly.
Getting measurements right is a fifteen-minute task that protects weeks of project timeline. It also determines exactly which tools and materials you will need — a topic worth covering in detail before any physical work begins.
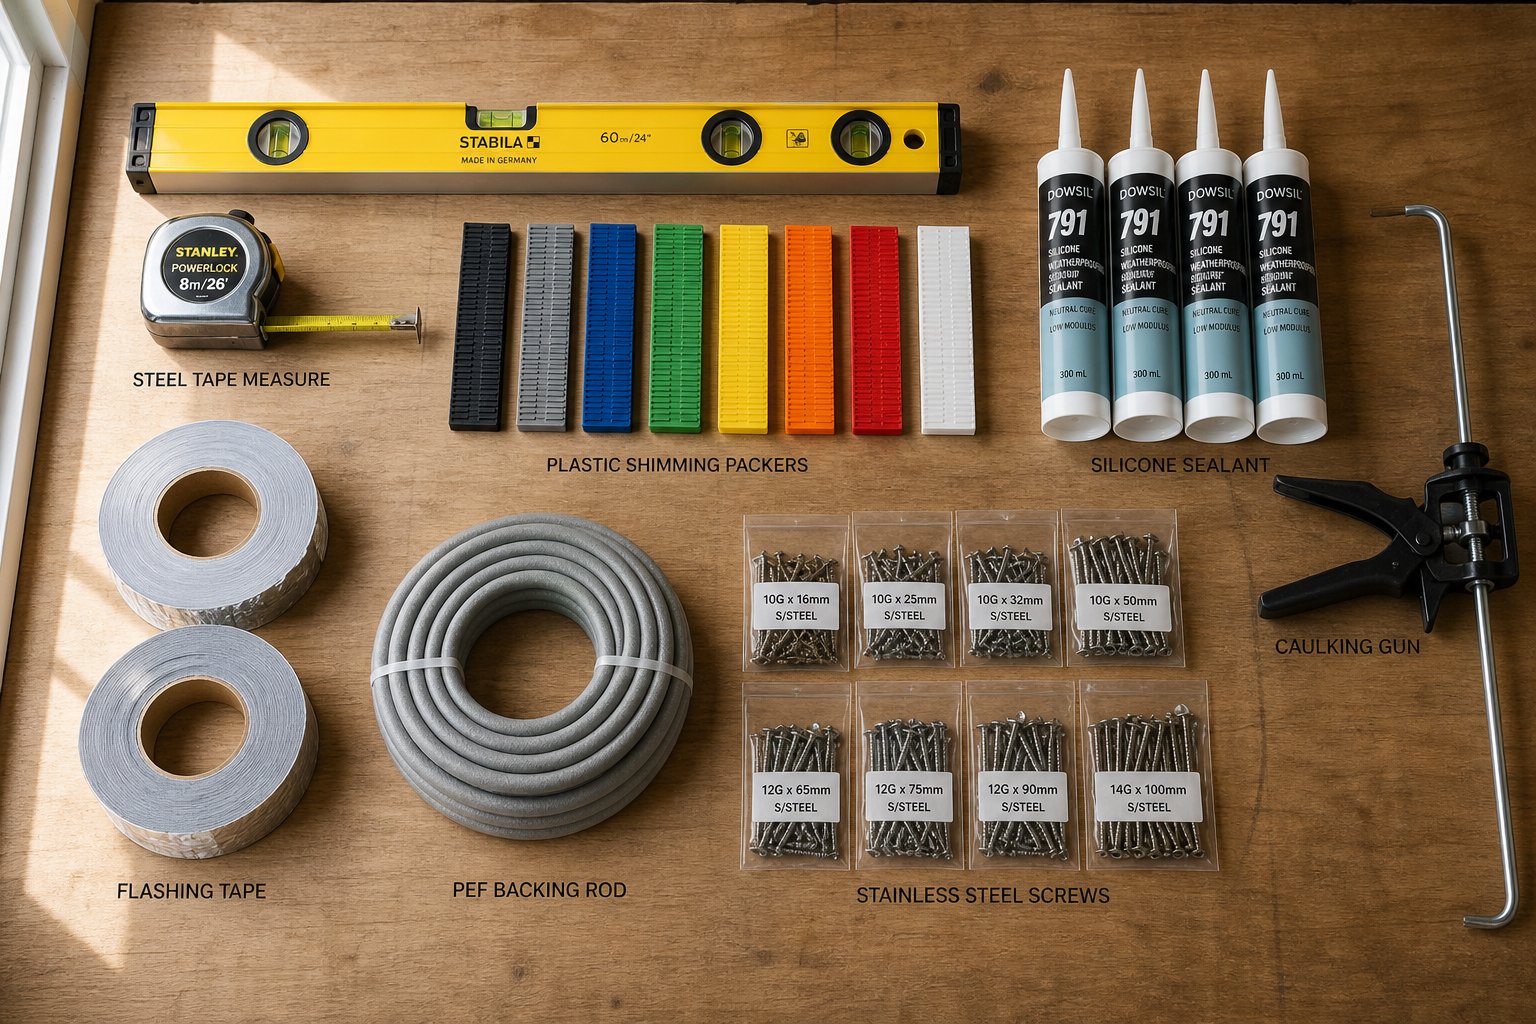
Tools and Materials Organised by Installation Stage
A trip back to the hardware store mid-install is not just annoying — it breaks momentum and invites shortcuts. The difference between correct window installation and a patchy job often comes down to having the right item within arm’s reach at the right moment. Most online guides hand you a generic checklist. What follows is a stage-by-stage breakdown, with every tool and material tied to its specific purpose so you understand why it is in the kit.
Tools for Removal and Preparation
If you are replacing an existing window, the removal stage demands its own set of tools before any new work begins. A reciprocating saw with a bi-metal blade is essential for shearing through old nail fins and embedded fixings without tearing into the surrounding frame. A flat pry bar (preferably 300 mm or longer) lets you lever old frames out without gouging plaster or brickwork. A cold chisel handles mortar around aluminium frames set into masonry reveals, and a good quality shop vacuum clears debris from the opening so you can inspect the substrate cleanly.
For measuring and marking — which continues throughout installation, not just at the start — keep a steel tape measure (minimum 5 m), a combination square, and a pencil or marking knife at hand. A laser level speeds up plumb and level checks across multiple openings, though a high-quality spirit level of at least 1200 mm remains the most reliable single tool for installing aluminium windows on site.
Fixing, Shimming, and Levelling Equipment
Structural fixing varies by wall type. Timber frames take 10-gauge countersunk screws (75 mm minimum) driven into studs. Brick or concrete needs sleeve anchors or Dynabolts with an appropriate masonry bit. Steel stud construction calls for self-drilling TEK screws rated for the gauge of the stud.
Shimming is where many installers cut corners. Plastic packers in assorted thicknesses (2 mm, 3 mm, 5 mm, and 10 mm) allow you to build up precise increments rather than forcing a single thick shim that can compress under load. Combined with your 1200 mm spirit level and a diagonal check from corner to corner, these packers let you dial the frame to plumb, level, and square before committing a single fixing.
Weatherproofing and Finishing Materials
This is the category most generic lists underserve. A correct aluminium windows installation relies heavily on materials that sit behind the visible frame — items that prevent water and air from breaching the wall assembly.
- Self-adhesive flashing tape (minimum 150 mm wide) — applied to the sill and jambs before the window goes in, directing any moisture that penetrates the outer seal back to the exterior.
- PEF (polyethylene foam) backing rod — inserted into the gap between frame and reveal to control sealant depth and create the correct depth-to-width ratio for long-term flexibility.
- Neutral cure silicone sealant — the only appropriate sealant for direct contact with aluminium. Acidic cure silicones release acetic acid during curing, which corrodes aluminium over time. Neutral cure avoids this reaction entirely.
- Polyurethane sealant — used where paintability is required or where the joint is between dissimilar materials (e.g., frame to rendered wall). Offers strong adhesion and flexibility but is not UV-stable when left exposed.
- Butyl tape — a compression seal used behind nail fins in new construction to create a primary weather barrier at the flange-to-substrate interface.
The table below consolidates the full list into a scannable reference you can screenshot or print before your next project.
| Tool / Material | Purpose | Installation Stage |
|---|---|---|
| Steel tape measure (5 m+) | Accurate opening and frame measurements | Measuring & marking |
| Spirit level (1200 mm min.) | Confirms plumb, level, and consistent reveals | Measuring / shimming |
| Laser level | Fast reference lines across multiple openings | Measuring & marking |
| Combination square | Checks 90-degree corners and reveal depth | Measuring & marking |
| Reciprocating saw (bi-metal blade) | Cuts through old nail fins, screws, and frame sections | Removal |
| Flat pry bar (300 mm+) | Levers old frames free without wall damage | Removal |
| Cold chisel & hammer | Breaks mortar around masonry-set frames | Removal |
| Shop vacuum | Clears debris for clean substrate inspection | Preparation |
| Plastic packers (2, 3, 5, 10 mm) | Builds precise shim stacks for plumb and level | Shimming & levelling |
| 10-gauge countersunk screws (75 mm) | Fixes frame to timber studs | Structural fixing |
| Sleeve anchors / Dynabolts | Fixes frame to brick or concrete reveals | Structural fixing |
| Self-drilling TEK screws | Fixes frame to steel studs | Structural fixing |
| Impact driver / drill | Drives fixings efficiently and controls torque | Structural fixing |
| Self-adhesive flashing tape (150 mm) | Directs moisture away from sill and jambs | Weatherproofing |
| PEF backing rod (various diameters) | Controls sealant depth-to-width ratio | Weatherproofing |
| Neutral cure silicone sealant | Non-corrosive perimeter seal on aluminium frames | Weatherproofing |
| Polyurethane sealant | Paintable seal for frame-to-wall junctions | Weatherproofing |
| Butyl tape | Primary weather seal behind nail fins | Weatherproofing |
| Caulking gun (heavy-duty) | Applies sealant with consistent pressure | Weatherproofing |
| Internal and external trims / architraves | Covers frame-to-wall junction for finished appearance | Finishing |
| Touch-up paint / colour-matched sealant | Conceals fixings and provides a clean visual line | Finishing |
Having every item staged and ready means each phase flows into the next without dead time. And the phase that demands the most preparation — safely extracting an old window without damaging the surrounding structure — is where things get physical.
Safely Removing Old Aluminium Windows
Pulling out an old window is not just demolition — it is controlled deconstruction. Every cut, pry, and pull either preserves the opening for a clean new install or creates problems that cost hours to fix. If you are replacing aluminium windows in a renovation or upgrade, this stage sets the quality ceiling for everything that follows.
Preparing the Area and Removing Window Sashes
Start inside the room, not at the window. Lay drop sheets over flooring within two metres of the opening. Move or cover furniture — cutting aluminium throws fine metal shavings and dust further than most people expect. Tape plastic sheeting over doorways if the room opens to carpeted areas or living spaces to contain airborne particles.
With the interior protected, remove window furnishings: locks, handles, restrictors, and any stay arms. On sliding windows, lift out the operable sashes first. Most aluminium sliders release by lifting the sash to compress the top weatherpile, then swinging the bottom edge inward. Awning and casement sashes typically detach once you disconnect the friction stays or remove hinge pins. Taking sashes out before touching the frame dramatically reduces the weight you are fighting and eliminates the risk of glass breaking during frame extraction.
For anyone researching how to replace sliding windows specifically, this sash-first approach is critical. Sliding panels are heavy and awkward. Removing them individually turns a two-person wrestling match into a controlled, methodical process.
Cutting Fixings and Releasing the Old Frame
How the frame is attached depends on the original construction method and your wall type. Nail-fin frames in timber-framed walls are secured through a perimeter flange buried behind the external cladding. Frames fixed directly into brick or concrete reveals use masonry anchors or screws driven through the jamb, head, and sill sections.
For nail-fin installations, use a reciprocating saw with a bi-metal blade to cut through the fins flush with the framing. Work from inside the opening so the blade does not damage the building wrap or cladding face. Once the fins are severed, the frame should release with moderate prying from a flat bar.
For direct-fixed frames in masonry, cut the fixings rather than trying to unscrew corroded anchors. A metal cutting disc on an angle grinder or an oscillating multi-tool slices through screws sitting in concrete without cracking the surrounding reveal. Pry gently and evenly — applying force at one point bows the aluminium and can chip render or crack brickwork. Work progressively around the perimeter, loosening each side before attempting full removal.
Understanding how to replace a sliding window in a brick veneer wall versus a timber-framed wall matters here. Brick veneer reveals are rigid and unforgiving, so aggressive prying risks spalling the brickwork. Timber frames offer slight flex, but hidden moisture damage can mean screws pull through rotted studs without warning.
Inspecting the Opening After Removal
With the old frame out, you get your first honest look at the substrate. This is where replacing aluminum frame windows often reveals surprises that were invisible from the outside — and you need to deal with them before the new unit goes in.
Run through this safety and condition checklist before proceeding:
- PPE check: Safety glasses, cut-resistant gloves, P2 dust mask (minimum), and steel-cap boots. If cutting or grinding, add hearing protection.
- Asbestos awareness: Homes built before the mid-1980s in Australia may have asbestos-containing materials in window surrounds, particularly fibro sheeting, old glazing putty, or cementitious flashings. If you find suspect material that is fibrous, chalky, or cement-like, stop work immediately. Do not sand, scrape, or disturb it. Engage a licensed asbestos assessor — this is a legal requirement under state workplace health and safety regulations.
- Structural inspection: Check timber framing for moisture damage, rot, or termite activity. Press a flathead screwdriver into studs, sill plates, and headers. Soft timber means structural repair before the new window can be fixed securely.
- Corrosion check: Steel lintels in brick veneer walls can rust and expand, cracking the masonry above the opening. Surface rust is manageable with a wire brush and rust converter. Heavy section loss needs a builder’s assessment.
- Square and plumb verification: Re-measure the opening diagonals. Old frames sometimes held a racked opening in shape through sheer friction. Once removed, the opening may shift slightly. Record any deviation — this informs your shimming strategy for the new frame.
- Debris removal: Vacuum all dust, old sealant residue, mortar fragments, and loose material from the sill and reveals. A clean substrate is essential for flashing tape adhesion and sealant bond.
Discovering rot or corrosion at this stage is not unusual in older Australian homes, particularly in coastal areas where salt air accelerates metal deterioration or in regions with high rainfall where moisture has been wicking behind frames for years. Address these issues fully before moving forward. A new aluminium window fixed into compromised framing will develop operational issues and leaks within a few seasons — no amount of sealant compensates for structural deficiency.
Non-square openings are equally common. If diagonals differ by more than 3 mm, you have two options: correct the framing (ideal) or accept the deviation and compensate through shimming during installation. The second path works for minor discrepancies but has limits — heavily racked openings need framing adjustment to avoid binding sashes and uneven weatherseal compression.
With the opening cleaned, inspected, and any remedial work completed, the substrate is ready to receive a new frame. The next decision — whether to go with a nail-fin installation for new construction or a retrofit method for existing openings — depends entirely on what the revealed wall structure tells you.
New Construction vs Retrofit Installation Methods
The condition of your opening dictates which installation method applies. A raw rough opening in a new build calls for a fundamentally different approach than sliding a replacement frame into an existing cavity. Choose the wrong method and you either compromise the weather barrier you have spent thousands building, or you create a window that relies on sealant alone to keep water out. Neither outcome is acceptable.
Two primary methods cover the vast majority of residential aluminium window installation in Australia: nail-fin (flange-based) for new construction, and retrofit (direct-fix or insert) for replacement scenarios. Each has distinct fixing mechanics, weatherproofing strategies, and limitations tied to wall construction.
Nail-Fin Installation for New Construction
A nail-fin window has a perimeter flange — a flat aluminium lip that extends outward from the frame on all four sides. This flange sits flush against the wall sheathing or framing face, gets fastened through pre-punched holes, and becomes an integral part of the building’s weather-resistant barrier. It is the standard method in timber-framed and steel-stud new builds across Australia.
The technique centres on three things: flange positioning, fastener spacing, and integration with your building wrap.
Flange positioning: The window sits from the exterior, pushed into the rough opening until the flange bears flat against the wall substrate. The frame projects inward, leaving the flange exposed on the outside face for taping and flashing. Getting this seating consistent and tight is critical — any gap between the flange and the substrate creates a channel for wind-driven rain.
Fastener spacing: Pre-punched holes in the flange typically sit at 150 mm from each corner and then every 300 mm to 450 mm along the perimeter, depending on the window size and wind load requirements under the National Construction Code. Use corrosion-resistant fixings — hot-dipped galvanised or stainless steel nails or screws — and drive them flush with the flange without over-setting. Sinking the fastener head below the flange surface tears the metal and breaks the seal plane.
Building wrap integration: This is where nail-fin installations succeed or fail. The window flange must integrate with the wall’s weather-resistant barrier in the correct shingling sequence. Sill flashing goes in before the window. Jamb flashing tapes over the side flanges after the window is fastened. Head flashing overlaps the top of the jamb tape and tucks under the building wrap above. Everything above laps over everything below, directing water out at every junction. A bead of silicone or butyl tape behind the top and side flanges provides a backup seal, but the sill is left unsealed to allow drainage — any moisture that breaches the outer plane needs an exit path.
This sequencing mirrors what professional installers use for flange window installations over house wrap — the principle applies universally regardless of the window brand or wrap system. Get the lapping order wrong, and water channels behind the flashing rather than shedding over it.
Retrofit Installation Into Existing Openings
When you replace aluminium windows in an existing home, stripping back to the raw rough opening is not always practical or cost-effective. Removing external cladding, disturbing render, or tearing out brickwork to access the original framing adds significant time and expense. Aluminum retrofit windows solve this by fitting a new frame inside the existing opening — either within the old frame (insert method) or directly into the structural reveal after the old frame is removed.
The retrofit approach works well when the existing structure is sound and the opening is reasonably square. Instead of a perimeter flange, the frame is fixed through its jamb, head, and sill sections directly into the surrounding wall using screws or anchors appropriate to the substrate. Shimming brings the frame to plumb and level before fixings are tightened.
Key differences from nail-fin installation:
- No external flange — the frame is the weather line, so perimeter sealant and correct backing rod placement become the primary moisture barrier.
- Fixing penetrates through the frame — pilot holes must be drilled cleanly to avoid distorting the aluminium profile, and screw placement must not interfere with sash tracks or hardware recesses.
- Glass area may reduce slightly compared to a full-frame new-construction install, because the retrofit frame sits within the opening rather than behind it.
- The existing wall finish remains largely intact, making it the less disruptive option for occupied homes and heritage facades.
Replacement aluminum windows using the retrofit method rely heavily on correct shimming. Packers sit at every fixing point and at the midspan of longer frame members. The frame must resist racking under wind load without relying on the shims alone — fixings transfer load into the structure while shims maintain position. Under-shimming leads to frame flex; over-shimming without adequate fixings lets the frame shift over time.
A block-frame (or box-frame) profile is the most common retrofit configuration in masonry construction. It presents a flat face to the reveal, anchors through the side members into brick or concrete, and the perimeter joint is sealed with neutral cure silicone over a PEF backing rod. This is the standard approach for aluminum frame window replacement in brick veneer homes throughout suburban Australia.
Adapting Your Approach to Different Wall Types
Your wall construction changes nearly every detail — fixing type, shim material, flashing method, and how the window interfaces with the weather barrier. A single-method approach does not work across all Australian residential construction.
Timber frame (new build): Nail-fin is the default. The flange fastens directly to the stud face through the wall sheathing. Fixing is straightforward — screws or nails bite into solid timber. Building wrap integration follows the lap sequence described above. This is the simplest scenario for aluminium window installation.
Brick veneer (replacement): The most common scenario for replace aluminium windows in existing Australian homes. The window fixes into the brick or rendered reveal using masonry anchors. Shimming must account for irregularities in the brickwork, and sealant adhesion to masonry surfaces can be inconsistent without proper priming. Flashing is more limited because the external cladding is not removable — correct sealant detailing and weep paths are your primary defence.
Steel stud (new build and commercial): Nail-fin or direct-fix methods apply, depending on the framing gauge. Light-gauge steel requires self-drilling TEK screws rated for the stud thickness. Heavy-gauge commercial framing may need pre-drilled holes and machine screws. Thermal bridging at the fixing points is a consideration — steel conducts heat far more readily than timber, so thermally broken profiles and isolation washers may be required to meet NCC energy provisions.
Concrete block (commercial and multi-residential): Typically a direct-fix or retrofit scenario. Sleeve anchors or chemical anchors secure the frame into the block. Opening tolerances in blockwork can vary significantly, so generous shimming clearance and careful plumb checks are essential. Some profiles in this application use a sub-frame — an aluminium or steel angle fixed to the concrete that the window then clips or screws into, providing fine adjustment independent of the masonry accuracy.
Selecting the correct method and profile system for your specific wall construction is not always obvious from a catalogue. Working with a manufacturer that provides system recommendation and engineering coordination — like MEICHEN’s end-to-end project support, which covers everything from drawings to delivery — helps builders match the right profile, flashing detail, and installation method to the actual wall assembly rather than discovering incompatibilities on site.
| Criteria | Nail-Fin (New Construction) | Retrofit (Replacement) |
|---|---|---|
| Wall type suitability | Timber frame, steel stud (new builds) | Brick veneer, concrete, timber frame, steel stud (existing buildings) |
| Difficulty level | Moderate — sequencing with building wrap is critical | Moderate to high — precision shimming and fixing through frame |
| Tools required | Nail gun or screw gun, flashing tape, silicone, spirit level | Drill, masonry bits, anchors, packers, backing rod, sealant |
| Weatherproofing approach | Flange integration with building wrap; lapped flashing tape | Perimeter sealant over backing rod; reliance on correct joint design |
| Typical applications | New homes, major renovations with cladding removed, extensions | Window upgrades in occupied homes, heritage facades, unit renovations |
| Impact on glass area | Maximum glazing — frame sits behind wall face | Slightly reduced — frame sits within existing reveal |
| Exterior disruption | Minimal (wrap installed during construction phase) | Minimal to none — existing cladding stays intact |
Choosing to replace aluminum windows using the wrong method for your wall type does not just make the job harder — it compromises the long-term seal. A nail-fin forced into a masonry reveal has nowhere to anchor its flange. A block-frame retrofitted into exposed timber framing without building wrap integration leaves the weather barrier incomplete. Match method to structure, and the window performs as designed for decades.
With the installation method locked in, the next challenge is executing the physical install itself — dry fitting, shimming, fixing, and confirming that sashes operate smoothly before you commit every fastener to its final position.
Step-by-Step Installation for Sliding and Awning Windows
Method selection gets you to the starting line. Execution gets you across it. Whether you are working on a slider window installation in a timber-framed wall or fitting an awning unit into a brick veneer reveal, the physical sequence is largely the same — and the margin for error is smaller than most people expect. A frame distorted by even 2 mm binds sashes, disrupts drainage channels, and compromises weather seals in ways that only show up months later during a heavy storm.
The following sequence applies to how to install a sliding window or awning window in a standard residential opening. Adapt fixing types and spacing to your wall construction as covered in the previous section, but the order of operations remains consistent.
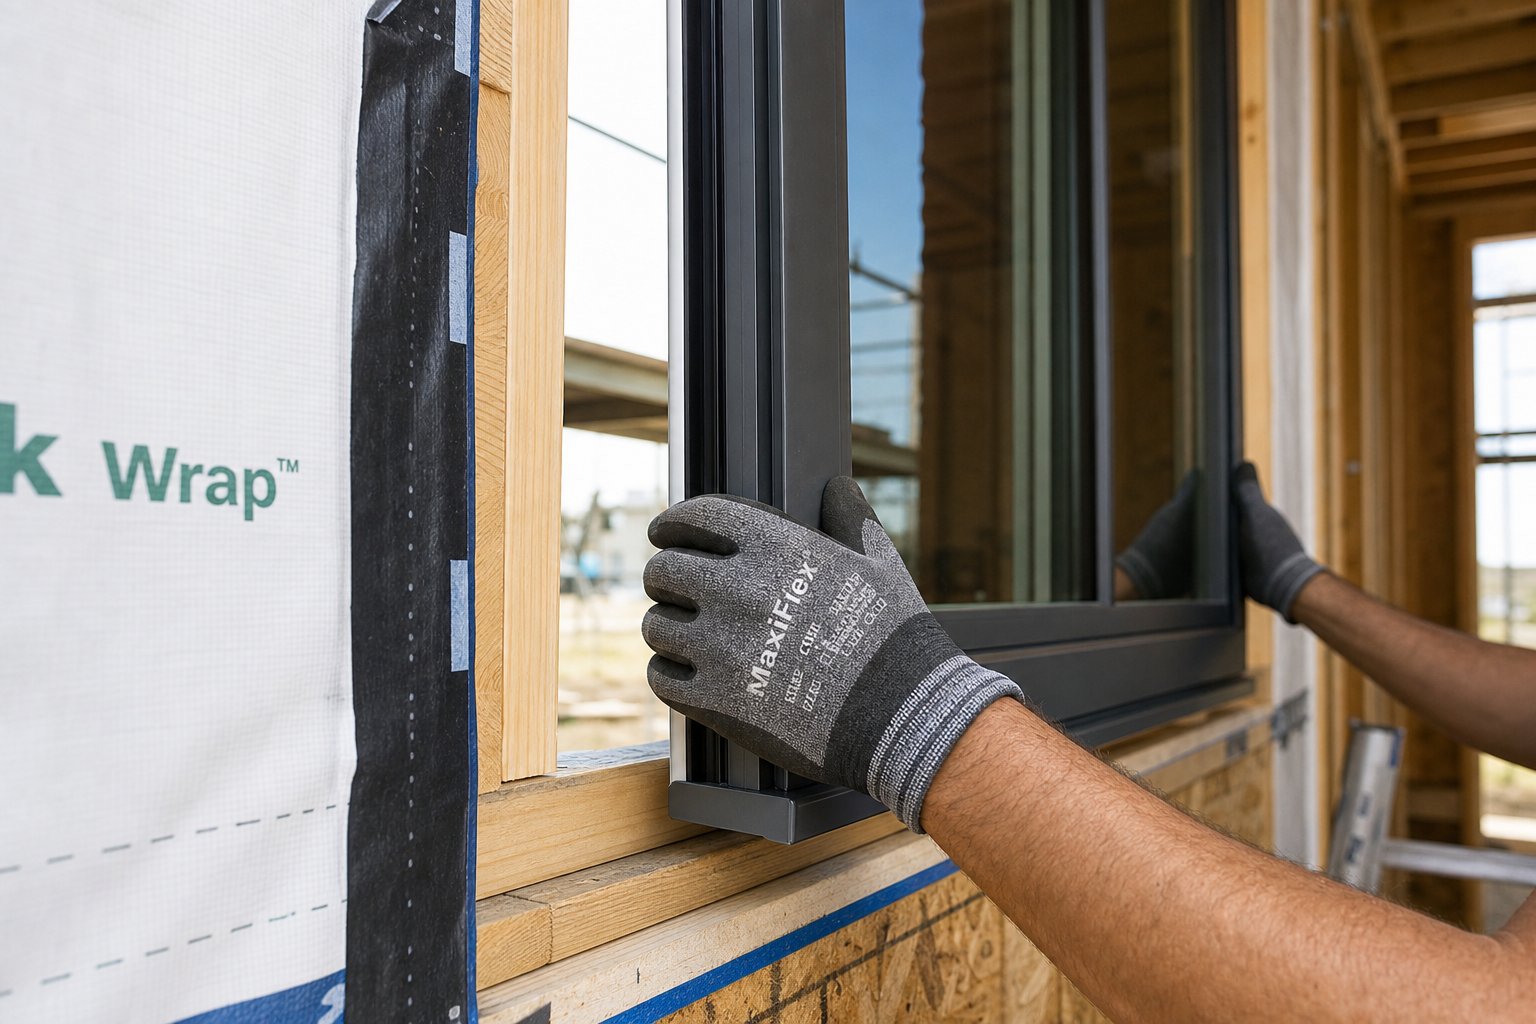
Dry Fitting and Positioning the Window
Before any fastener goes in, place the window into the opening without fixing it. This dry fit confirms three things: the unit physically fits with clearance on all sides for shimming, the frame depth matches the wall thickness and cladding type, and any special installation requirements — coupling brackets, specific head heights, or finishing details — can be addressed before you commit.
During the dry fit, check that the gap between the frame and the reveal is roughly even all around. A&L’s installation guidance recommends an opening 20 mm wider and 30 mm higher than the product to allow a square and plumb installation. If the gap is significantly uneven, the opening likely needs correction — either packing out the sill plate or trimming a proud stud — before proceeding.
For sliding windows installation, also confirm that the sill track sits level before any weight bears on it. A sloped sill means the rollers fight gravity every time someone opens the window, wearing hardware prematurely and creating uneven weatherpile compression.
Once you are satisfied with fit, remove the window and apply sill flashing tape to the bottom of the opening. The flashing should extend up each jamb by at least 100 mm, with the horizontal section lapping over the outer edge to direct any moisture back outside. This step happens before the window goes back in — flashing under the frame is impossible to retrofit correctly.
Shimming to Plumb, Level, and Square
Set the window back into the opening from the exterior. For those learning how to install sliding window units, position the frame so it overhangs the interior reveal by the plaster thickness — typically 10 mm in standard plasterboard construction. This ensures the internal lining finishes flush with the frame edge once the room is lined.
Follow this sequence to bring the frame into perfect alignment:
- Pack the sill level first. Place plastic packers under the frame at each fixing point location, checking with a spirit level across the full width. Fix packers in position with brad nails so they cannot shift when the frame bears down on them.
- Drive a temporary fixing — nail or screw, not fully tightened — through the pre-drilled hole nearest the sill on each jamb, 100 mm from the bottom corners.
- Place a temporary fixing through the top of each jamb, 100 mm from the top corners. Leave fixings proud — do not drive them home yet.
- Hold the spirit level against one jamb and confirm plumb. Shim between the frame and the stud or reveal to adjust. Repeat on the opposite jamb.
- Measure diagonals from corner to corner in both directions. Both measurements should match within 2 mm. If they differ, gently nudge the frame using a pinch bar at the corner that reads short, shimming to hold the corrected position.
- Pack between the reveal and frame above every fixing point. Packers must sit directly adjacent to fixings — a screw driven into an unsupported span of aluminium pulls the profile inward, bowing the frame and creating a pinch point.
This shimming discipline is what separates a professional sliding window installation from one that causes problems within the first year. Shims placed only at the sill and nowhere else leave the jambs free to flex under wind pressure, distorting the weatherpile contact and allowing air infiltration.
Securing the Frame and Verifying Operation
Here is where most DIY installers and even some tradespeople make a critical error. They square the frame, drive every fixing home tight, and only then try to operate the sash. By that point, if a single over-torqued screw has pulled the track out of true, the sash binds — and backing out fixings to re-shim is far harder than getting it right the first time.
Always check sash operation before fully tightening all fixings. Slide every panel, crank every awning open and closed. If anything drags, binds, or fails to latch, the frame is distorted. Once you drive fixings home into a twisted frame, sashes bind permanently and sill drainage fails because water cannot follow a warped track to the weep slots.
With sashes operating smoothly and the frame confirmed plumb, level, and square, drive all fixings to their final position. For timber framing, countersunk screws (10-gauge, 75 mm minimum) at 100 mm from each corner and a maximum of 450 mm centres along the jambs provide adequate hold. For masonry reveals, use sleeve anchors at the same spacing — pre-drill through the frame and into the substrate in a single operation to keep hole alignment clean.
Taller products — anything above 1500 mm — typically need additional mid-height fixings on each jamb. The same rule applies: pre-drill, pack, fix, and re-check plumb after each additional fastener. Every screw is an opportunity to distort the frame if it is driven without a packer directly behind it.
Common mistakes that lead to callbacks and warranty disputes:
- Over-tightening fasteners: Aluminium profiles are strong in compression but deform easily under localised point loads. An impact driver on full torque can dimple or bow a jamb section in a fraction of a second. Use a drill with adjustable clutch settings or switch to a hand driver for final tightening.
- Inadequate shim placement: Fixings without adjacent packers create inward deflection. Every fixing point must have a packer directly behind or beside it.
- Insufficient fixing points: Relying on only two screws per jamb on a tall window leaves the mid-section free to flex under wind load. Follow manufacturer spacing — typically 150 mm maximum from corners and 450 mm centres between.
- Ignoring manufacturer torque specifications: Some aluminium window systems specify maximum torque values for their fixing points. Exceeding these values voids the warranty and introduces frame distortion invisible to the eye but measurable in sash operation.
For anyone sourcing aluminium sliding windows Sydney suppliers will often provide installation sheets specific to their profile system — follow them. Generic advice gets you close, but the specific screw spacing, shim locations, and clearances for a given profile are engineered as a system. Deviating from them trades short-term convenience for long-term performance issues.
Once every fixing is set, sashes glide freely, and locks engage without force, the frame is mechanically complete. But a window that operates perfectly on install day can still fail catastrophically in driving rain if the weatherproofing layer — flashing, sealant, and drainage integration — is not detailed correctly around it.
Weatherproofing, Flashing, and Sealant Techniques
A frame that is plumb, level, and square is only half the job. Water does not care how well your screws are spaced — it cares about gaps, laps, and gravity. The weatherproofing layer around an aluminium window is what actually keeps the interior dry during a nor’easter or a week of coastal drizzle. Get the flashing sequence wrong or pick the wrong sealant, and moisture finds its way behind the cladding where it rots framing, corrodes lintels, and breeds mould invisibly for years.
This stage is where most installation guides fall short. They mention “seal around the frame” as though it is a single bead of silicone and move on. In reality, weatherproofing involves layered flashing membranes, carefully selected sealants, correct joint geometry, and deliberate drainage paths that work together as a system. Understanding how to wrap a window in aluminium flashing tape — and in what order — is what separates a watertight installation from one that fails at the first serious storm.
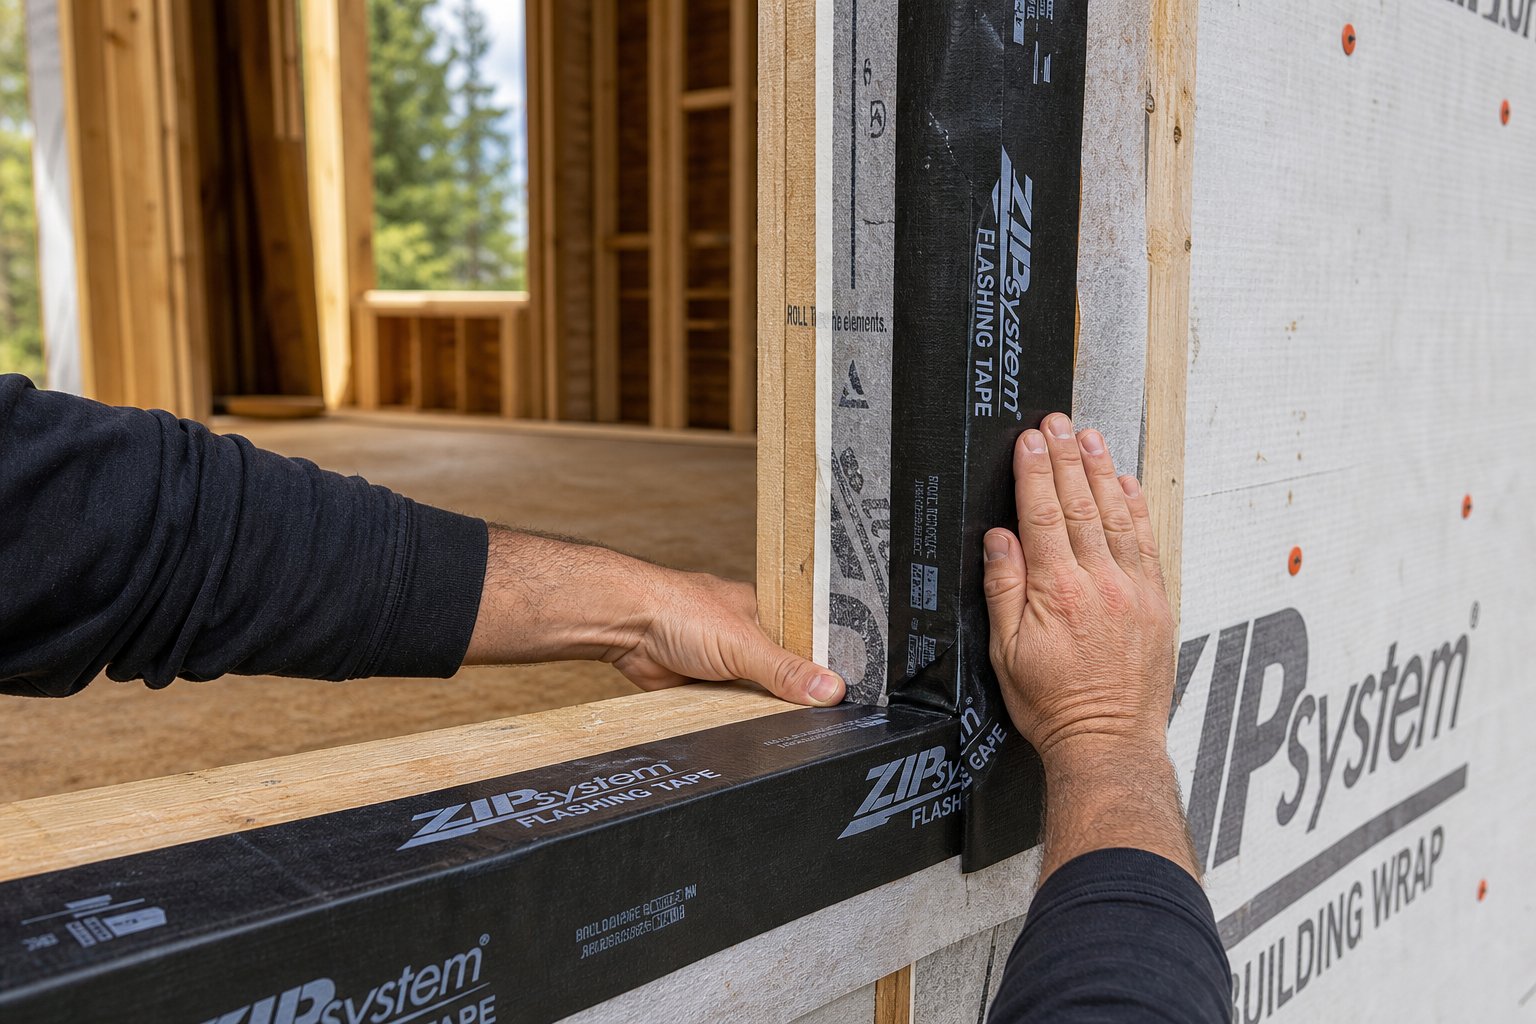
Flashing Sequence for Head, Jamb, and Sill
Flashing works on one simple principle: every upper layer overlaps the layer below it, so water always sheds outward and downward. Reverse the sequence anywhere and you create a pocket that traps moisture behind the membrane. The correct order, as Polyguard’s technical guidance confirms, starts at the bottom and works up:
- Sill flashing first. Apply self-adhesive flashing tape across the sill of the rough opening before the window is set. The tape must slope slightly toward the exterior — even 5 degrees is enough — so any water that reaches the sill drains outward rather than pooling. Extend the tape up each side of the opening by at least 100 mm to form upturned “dam” edges. Do not seal the outer edge of the sill — this is your primary weep path.
- Jamb flashing second. After the window is fixed in place, apply flashing tape vertically along each jamb, overlapping the turned-up edges of the sill flashing at the bottom. This ensures water travelling down the jambs drops onto the sill pan rather than running behind it.
- Head flashing last. The top piece laps over both jamb tapes and tucks under the building wrap above the window. This final overlap means water running down the wall face flows over the head tape, never behind it.
Incorrect layering — tucking jamb tape under the sill pan, or cutting head flashing too short to overlap the jambs — traps moisture at exactly the junctions where it does the most damage. Even well-applied sealant cannot compensate for reversed laps, because sealant degrades over time while correct shingling relies on gravity indefinitely.
Sealant Selection and Correct Application Technique
Sealant closes the visible perimeter joint between the aluminium frame and the wall — but it is a secondary barrier, not the primary one. Flashing handles bulk water. Sealant handles air infiltration and wind-driven rain that reaches the frame-to-reveal junction.
The critical requirement for any sealant in direct contact with aluminium is neutral cure chemistry. Professional sealant guides consistently warn against acetoxy-cure silicone (identifiable by its strong vinegar smell during curing), which releases acetic acid as it sets. That acid corrodes anodised and powder-coated aluminium finishes over time, creating staining and eventually undermining the seal bond. Neutral cure silicone cures without releasing corrosive by-products, making it the industry standard for aluminium frame replacement windows and new installations alike.
Correct application depends on joint geometry as much as product choice. For joints wider than 10 mm, maintain a 2:1 width-to-depth ratio — a 12 mm wide gap gets sealed to a depth of 6 mm. This ratio allows the sealant to flex under thermal movement without tearing. To control depth, insert a closed-cell polyethylene foam backing rod (PEF rod) into the joint before applying sealant. The rod prevents three-sided adhesion — where sealant bonds to the frame, the reveal, and the back of the cavity simultaneously. Three-sided adhesion locks the sealant rigid, and the first thermal cycle tears it apart from the inside out.
One area that must remain unsealed: the sill drainage slots. Aluminium window sills have weep holes or slots that allow condensation and wind-driven rain to drain out of the track. Sealing over these creates standing water inside the frame — a guaranteed path to internal leakage and hardware corrosion. When applying your perimeter bead, stop short of weep openings and leave drainage paths completely clear.
Integrating With Building Wrap and Drainage Paths
The window does not exist in isolation — it sits within the wall’s weather-resistant barrier. In timber-framed new builds, that barrier is the building wrap (sarking). How to wrap a window with aluminium flashing and integrate it into the sarking layer follows the same shingling logic as the flashing itself: lower layers go in first, upper layers overlap them.
In practice, this means the building wrap is cut and folded into the opening before the sill flashing is applied. The wrap tucks over the sill substrate, forming a continuous moisture plane from the wall face into the opening. After the window and flashing are installed, the wrap above the head is lapped over the head flashing tape — never tucked behind it. This creates a continuous drainage plane from roof to foundation, with the window integrated seamlessly rather than punching a hole through the moisture barrier.
For brick veneer replacement scenarios — where no building wrap is accessible — the sealant joint becomes the primary external weather line. This makes backing rod placement, sealant selection, and correct joint geometry even more critical. There is no hidden membrane to catch failures.
Before moving on to any finishing work, run through this weatherproofing verification checklist:
- Sill flashing slopes toward the exterior with no low points that could pool water
- Jamb flashing overlaps sill flashing at both bottom corners — no exposed edges
- Head flashing overlaps both jamb tapes and tucks under building wrap above
- Neutral cure silicone used for all frame-to-reveal perimeter joints — no acetoxy products
- Backing rod installed in all joints wider than 10 mm, maintaining 2:1 width-to-depth ratio
- Sill weep holes and drainage slots remain completely unsealed and unobstructed
- Building wrap laps correctly over head flashing — upper layers always over lower layers
- No sealant bridging between the outer frame face and the cladding where a drainage gap is required
- All flashing tape adhesion surfaces were clean and dry at the time of application
| Sealant Type | Best Application Area | Adhesion to Aluminium | Paintable | Typical Lifespan |
|---|---|---|---|---|
| Neutral cure silicone | Exterior perimeter joints, frame-to-masonry, frame-to-render | Excellent — no primer needed on clean aluminium | No | 20–25 years |
| Polyurethane sealant | Frame-to-wall junctions requiring paint coverage, sub-sill areas | Good — primer may be needed on bare aluminium | Yes | 15–20 years |
| Butyl tape (compression seal) | Behind nail fins, between flange and substrate, pre-compression joints | Good — mechanical compression bond | N/A (concealed) | 25+ years when compressed correctly |
Each sealant type has a specific role. Neutral cure silicone handles the external weather seal on exposed aluminium. Polyurethane fills the gap where internal trims meet the frame and paint coverage is needed. Butyl tape provides the hidden backup seal behind flanges in new construction. Using the wrong type in the wrong location — or worse, using acetoxy silicone anywhere on aluminium — creates a failure point with a predictable expiry date.
With flashing lapped correctly, sealant applied over properly sized backing rod, and drainage paths confirmed clear, the window assembly is now weathertight. The final stage — verifying performance under simulated conditions and setting up hardware for long-term operation — confirms that everything holds together when real weather arrives.
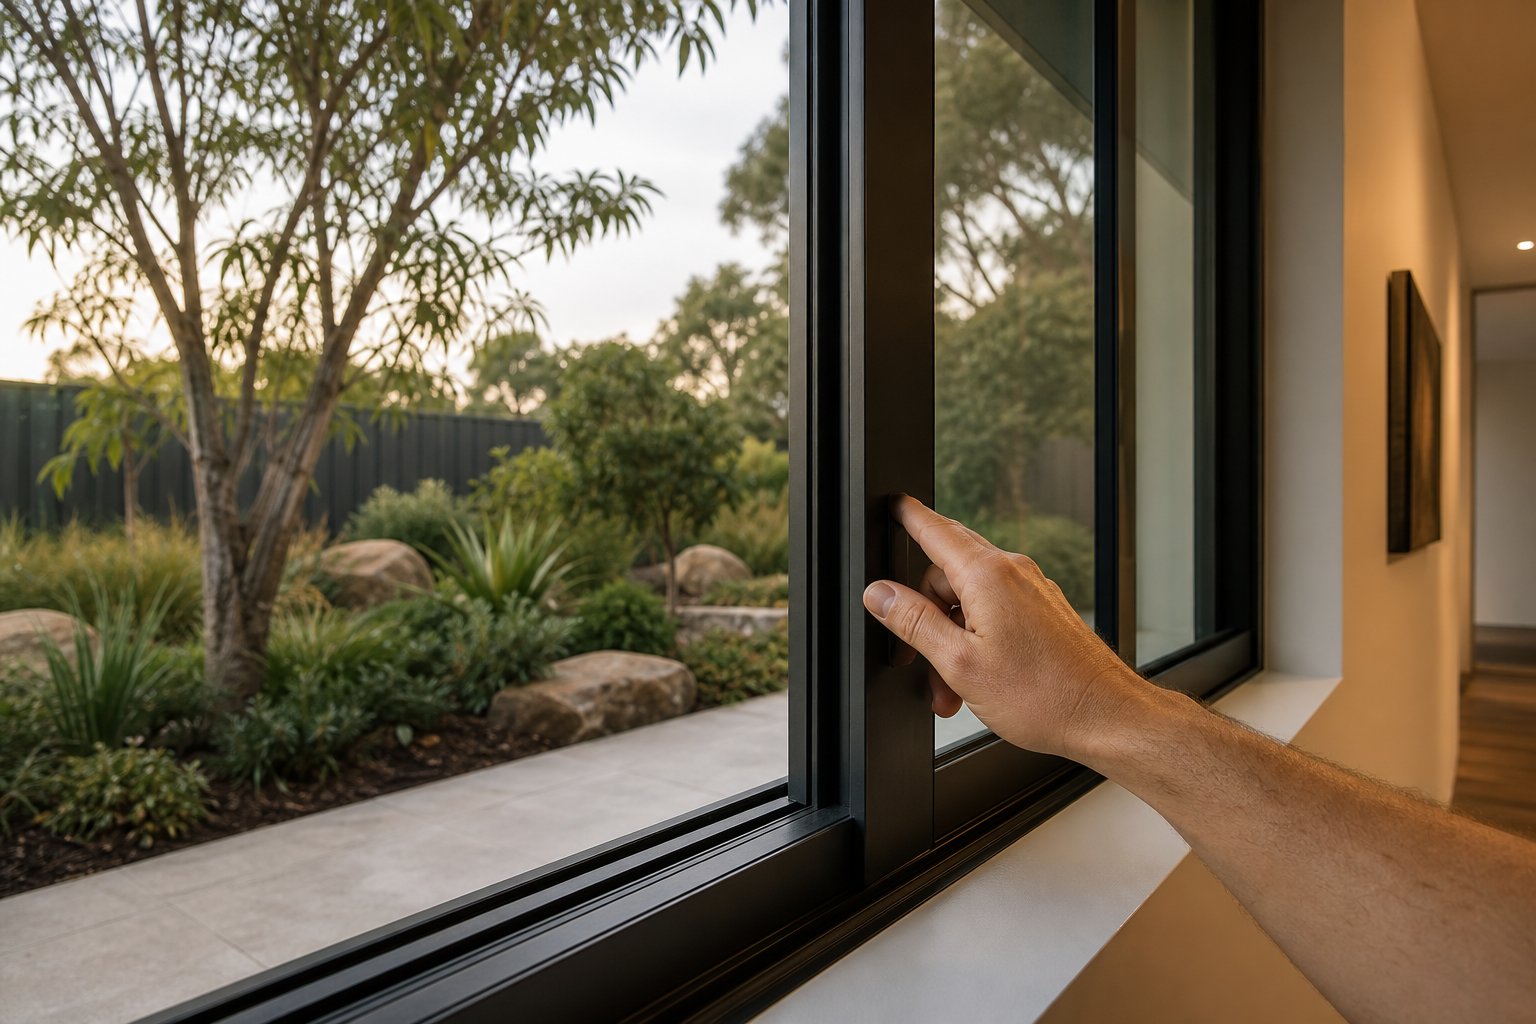
Post-Installation Checks and Ongoing Maintenance
A window that looks good on install day proves nothing. Performance only shows itself under load — wind pressure, driving rain, temperature swings across seasons. The difference between a lasting installation and one that generates callbacks within a year often comes down to what happens in the hour after the last screw goes in. Verification catches problems while they are still cheap to fix. Skip it, and you are betting your interior lining and wall framing on hope rather than evidence.
Essential Post-Installation Verification Checks
Professional installers do not sign off a job until they have actively tested the window’s performance under simulated conditions. A visual inspection tells you the sealant looks tidy. A functional test tells you the system actually works. Run through this sequence on every opening before calling the job complete:
- Sash operation test: Open and close every operable panel at least five times. Sliding sashes should glide without resistance or lateral wobble. Awning sashes should crank open evenly and hold position at any angle without drifting shut. If anything drags, sticks, or rattles, the frame is likely distorted at a fixing point — address it now.
- Lock engagement check: Engage all locks and latches. The striker should align with the keeper without forcing the handle. Misalignment here means the sash is not sitting parallel to the frame, which also means the weatherpile is not compressing evenly.
- Drainage function test: Pour approximately 200 ml of water directly into the sill track at the centre point. Watch it flow toward the weep slots and exit the frame to the exterior within seconds. If water pools, the sill is not level or a weep slot is blocked by sealant or debris. Clear the obstruction before proceeding.
- Sealant continuity inspection: Run a finger along every perimeter sealant bead. Feel for voids, thin spots, or areas where the sealant has not bridged between frame and reveal. Check that no sealant has inadvertently covered weep holes or drainage paths. Facility maintenance research consistently identifies gaps in perimeter sealant — particularly at corners and sill junctions — as the leading cause of long-term water intrusion through fenestrations.
- Water spray test: Using a standard garden hose with an adjustable nozzle, spray the exterior of the installed window from a distance of approximately 300 mm. Work systematically from the sill upward — bottom corners first, then jambs, then the head. Hold at each location for at least 30 seconds. Have someone inside checking for any moisture appearing at the frame perimeter, sill, or internal reveal. While this is not a substitute for formal pressure testing under AAMA 502 or ASTM E1105 methods (which use sealed chambers to simulate wind-driven rain at calibrated pressures), a hose test at standard mains pressure catches the obvious failures — unsealed corners, blocked weeps, and sealant voids — that account for the majority of residential leaks.
- Air infiltration check: On a windy day, hold your hand around the frame perimeter from inside. Any detectable draught indicates a gap in the seal line. For more precision, pass a lit incense stick slowly around the frame edges and watch for smoke deflection. This simple diagnostic mirrors the intent of ASTM E783 air leakage testing without requiring specialist equipment.
If the water test or air check reveals a failure, do not simply add more sealant over the top. Identify the root cause — a flashing overlap error, a displaced backing rod, or a distorted frame section — and correct it properly. Layering sealant over a failed joint delays the leak rather than fixing it.
Adjusting Hardware for Smooth Operation
Even a perfectly square frame sometimes needs hardware fine-tuning after installation. Sash weight, seal compression, and minor frame settling over the first few weeks can change how panels operate. Three adjustments cover the majority of post-install tweaks:
Roller height on sliding windows: Most aluminium sliding sashes ride on adjustable rollers housed in the bottom rail. A Phillips-head or hex screw at each end of the bottom rail raises or lowers the roller carriage. If a sliding panel drags along the sill track, raise the rollers a quarter-turn at a time until the sash clears the track while still engaging the head guide. If you ever need to know how to put sliding window back in frame after removal for cleaning or glass replacement, reverse the process — compress the top weatherpile, angle the bottom rail inward, and lower the panel onto the sill track before adjusting roller height for smooth travel.
Friction stays on awning windows: These hinged arms control how easily the sash opens and whether it holds position without drifting. Friction stay adjustment involves a small tension screw on the stay arm — clockwise to increase resistance (sash drifts closed), counterclockwise to reduce it (sash is too stiff to open comfortably). Adjust both stays equally to maintain balanced operation. Make incremental changes and test after each adjustment rather than cranking several turns at once.
Lock striker plate alignment: If the lock handle requires excessive force or fails to latch cleanly, the striker plate on the frame is misaligned with the lock tongue on the sash. Most strikers mount with two screws and have a small amount of lateral adjustment — loosen, reposition, and re-tighten. On multi-point locking systems, start with the primary lock point and work outward to secondary latches.
These adjustments are also relevant when you need to understand how to replace window glass in an aluminum frame down the track. Removing and re-glazing a sash means the panel comes out and goes back in — and each time, roller height and friction stay tension may need recalibration to account for the slightly different weight of new glass (particularly if upgrading from single to double glazing). Knowing how to replace window glass aluminum frame procedures without disturbing the frame’s alignment keeps the overall installation intact.
Long-Term Maintenance to Protect Your Investment
Aluminium does not rot, warp, or attract termites — but that durability leads many homeowners to assume zero maintenance is required. In reality, hardware wears, seals degrade, and drainage paths block over time. A modest annual routine keeps everything performing as intended:
- Clean tracks quarterly: Vacuum sill tracks and head channels to remove dust, leaf litter, and insect debris. Blocked tracks prevent drainage and cause water to back up into the interior. In coastal areas, salt residue accelerates hardware corrosion if left to accumulate.
- Lubricate hardware annually: Apply a light spray of silicone-based lubricant (not petroleum-based) to rollers, hinges, friction stays, and lock mechanisms. This reduces wear and keeps operation smooth. Petroleum-based products attract dust and gum up over time.
- Inspect seals and weatherpile: Check the perimeter sealant bead for cracking, loss of adhesion, or shrinkage — particularly at corners and sill junctions. Examine weatherpile strips on sliding sashes for compression set or fraying. Degraded weatherpile lets air and water bypass the sash regardless of how well the frame was installed.
- Re-seal on schedule: Quality neutral cure silicone lasts 20 to 25 years in sheltered conditions but can degrade faster on sun-exposed western elevations or in harsh coastal environments. Budget for sealant replacement at the 15- to 20-year mark as preventative maintenance rather than waiting for leaks to develop.
- Check gaskets and glazing seals: If you notice fogging between panes of double-glazed units, the insulated glass unit (IGU) seal has failed. This requires replacing the glass panel — not something sealant can fix. For single-glazed older windows, dried or cracked glazing putty should be removed and replaced to prevent water tracking between the glass and frame.
- Monitor for streaking or staining: Dark streaks below the frame on external walls can indicate sealant incompatibility or gasket oil leaching. Investigate the cause rather than just cleaning the stain — it is often an early warning of seal deterioration.
Successful aluminium window installation is not a single event — it is a chain that starts at the factory and extends through decades of service life. Every link matters: accurate profiles, correct hardware specification, precise manufacturing tolerances, and proper quality control before the product ever reaches site. Windows that arrive out of square, with poorly fitted gaskets, or with hardware that does not match the specified system create installation headaches that no amount of shimming or sealant can fully resolve.
This is why partnering with a supplier that integrates quality control and project-based supply into their workflow — as MEICHEN does from drawings through to delivery — reduces both installation issues on site and long-term maintenance burden. When the product arrives manufactured to the correct tolerances, with hardware pre-fitted and profiles true, the installer can focus on execution rather than compensating for factory defects. That upstream quality is what makes downstream performance possible.
Frequently Asked Questions About Aluminium Window Installation
1. What is the difference between nail-fin and retrofit aluminium window installation?
Nail-fin installation uses a perimeter flange that fastens to wall sheathing and integrates with building wrap, making it the standard for new timber-framed or steel-stud builds. Retrofit installation fixes the new frame directly into an existing opening using screws or masonry anchors, relying on perimeter sealant over backing rod as the primary weather barrier. The choice depends on whether you are working with a raw rough opening or replacing a window in an existing wall where disturbing the external cladding is impractical.
2. Why do most aluminium window failures trace back to installation rather than product defects?
Field testing under standards like ASTM E1105 consistently shows that water ingress, air leakage, and operational problems result from improper flashing sequences, incomplete sealant lines, blocked drainage paths, and over-tightened fixings. The window profile and glass unit are engineered to perform, but their performance depends entirely on correct shimming, appropriate fixing spacing, proper weatherproofing layering, and clear weep paths. A mid-range window installed correctly will outperform a premium product with poor fitment.
3. What sealant should I use on aluminium window frames?
Always use neutral cure silicone for any sealant in direct contact with aluminium. Acetoxy-cure silicone (identifiable by its vinegar smell) releases acetic acid during curing, which corrodes anodised and powder-coated aluminium finishes over time. Neutral cure silicone bonds well to clean aluminium without primer, lasts 20 to 25 years, and cures without corrosive by-products. For joints requiring paint coverage, polyurethane sealant is appropriate but may need a primer on bare aluminium surfaces.
4. How much clearance should I leave between the aluminium window frame and the opening?
A typical clearance of 5 to 10 mm per side is recommended for aluminium frames. This space allows for shimming the frame to plumb and level, accommodating minor structural irregularities, and inserting backing rod for correct sealant geometry. Too little clearance makes adjustment impossible, while too much creates over-reliance on sealant and weakens fixing integrity. Always measure width and height at three points and use the smallest figure to confirm adequate clearance exists.
5. How do I test my aluminium window installation for leaks after fitting?
Use a garden hose with an adjustable nozzle sprayed from approximately 300 mm distance. Work from the sill upward — bottom corners first, then jambs, then the head — holding at each position for at least 30 seconds while someone checks inside for moisture. Also test drainage by pouring 200 ml of water into the sill track and confirming it exits through weep slots within seconds. For air leakage, run your hand around the interior frame perimeter on a windy day or use an incense stick to detect drafts. If leaks appear, identify the root cause rather than layering more sealant over the failure point.
More Window & Door Guides