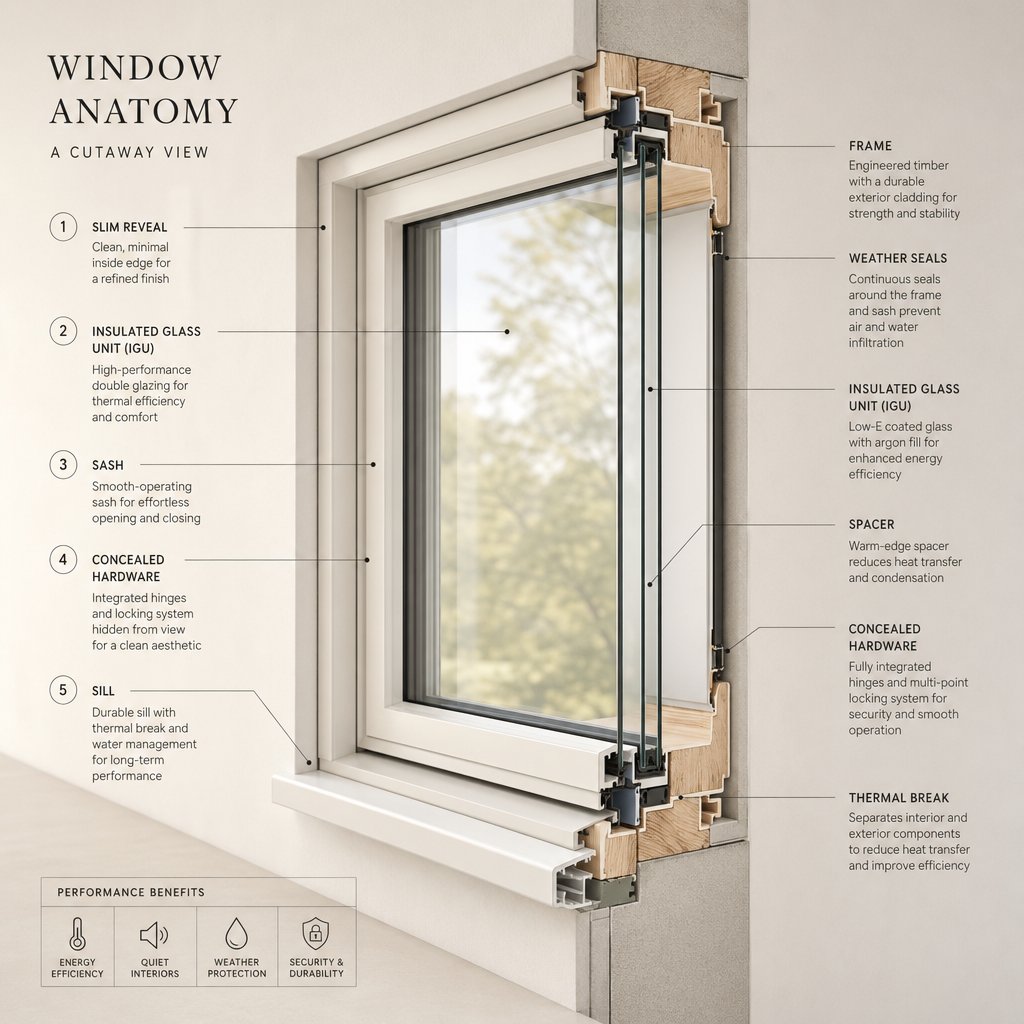
What Every Aluminium Window Part Does and Where to Find It
You are standing in front of an aluminium window. Something needs replacing, adjusting, or explaining to a tradesperson, but you cannot name the part you are looking at. That is exactly the problem this guide solves.
The anatomy of a window frame is surprisingly complex. A typical aluminium window contains upwards of 20 to 30 distinct named components, each shaped for a specific job. Extruded aluminium profiles, rubber gaskets, drainage slots, snap-fit beads, polyamide thermal breaks, and various hardware mounting channels all sit within what looks like a simple rectangle of metal and glass. Understanding the anatomy of windows at this level of detail is not about becoming an engineer. It is about putting the right name to the right part so you can order it, describe it, or understand what a quote is actually charging you for.
This article is structured as a practical identification resource. Rather than listing aluminium window frame parts in catalogue order, every component is grouped by the role it plays in the window system.
Why Knowing Your Window Parts Matters
Correct part names unlock three things. First, you can order exact replacements without guesswork or wasted returns. Second, you can communicate clearly with glaziers, builders, and suppliers, saving time on both sides of the conversation. Third, you can read a quote and know precisely what each line item refers to, whether it is a gasket, a glazing bead, or a friction stay.
How This Guide Is Organised
Each section below covers one functional category. Jump straight to the group that matches what you are trying to identify:
- Structural frame members — the head, sill, jambs, mullions, and transoms that form the rigid outer skeleton.
- Sash components — rails, stiles, and meeting rails that make up the moveable (or fixed) inner frame holding the glass.
- Glazing system parts — beads, gaskets, setting blocks, and spacers that lock glass securely in place.
- Drainage and ventilation elements — weep holes, pressure equalization chambers, and condensation channels that manage moisture.
- Thermal break technology — polyamide strips and composite profile assemblies unique to aluminium systems.
- Hardware integration points — euro grooves, screw ports, and hinge channels that accept locks, stays, and handles.
With that framework in mind, the logical starting point is the largest and most visible set of components: the structural members that hold the entire assembly together.
Structural Frame Members That Hold Everything Together
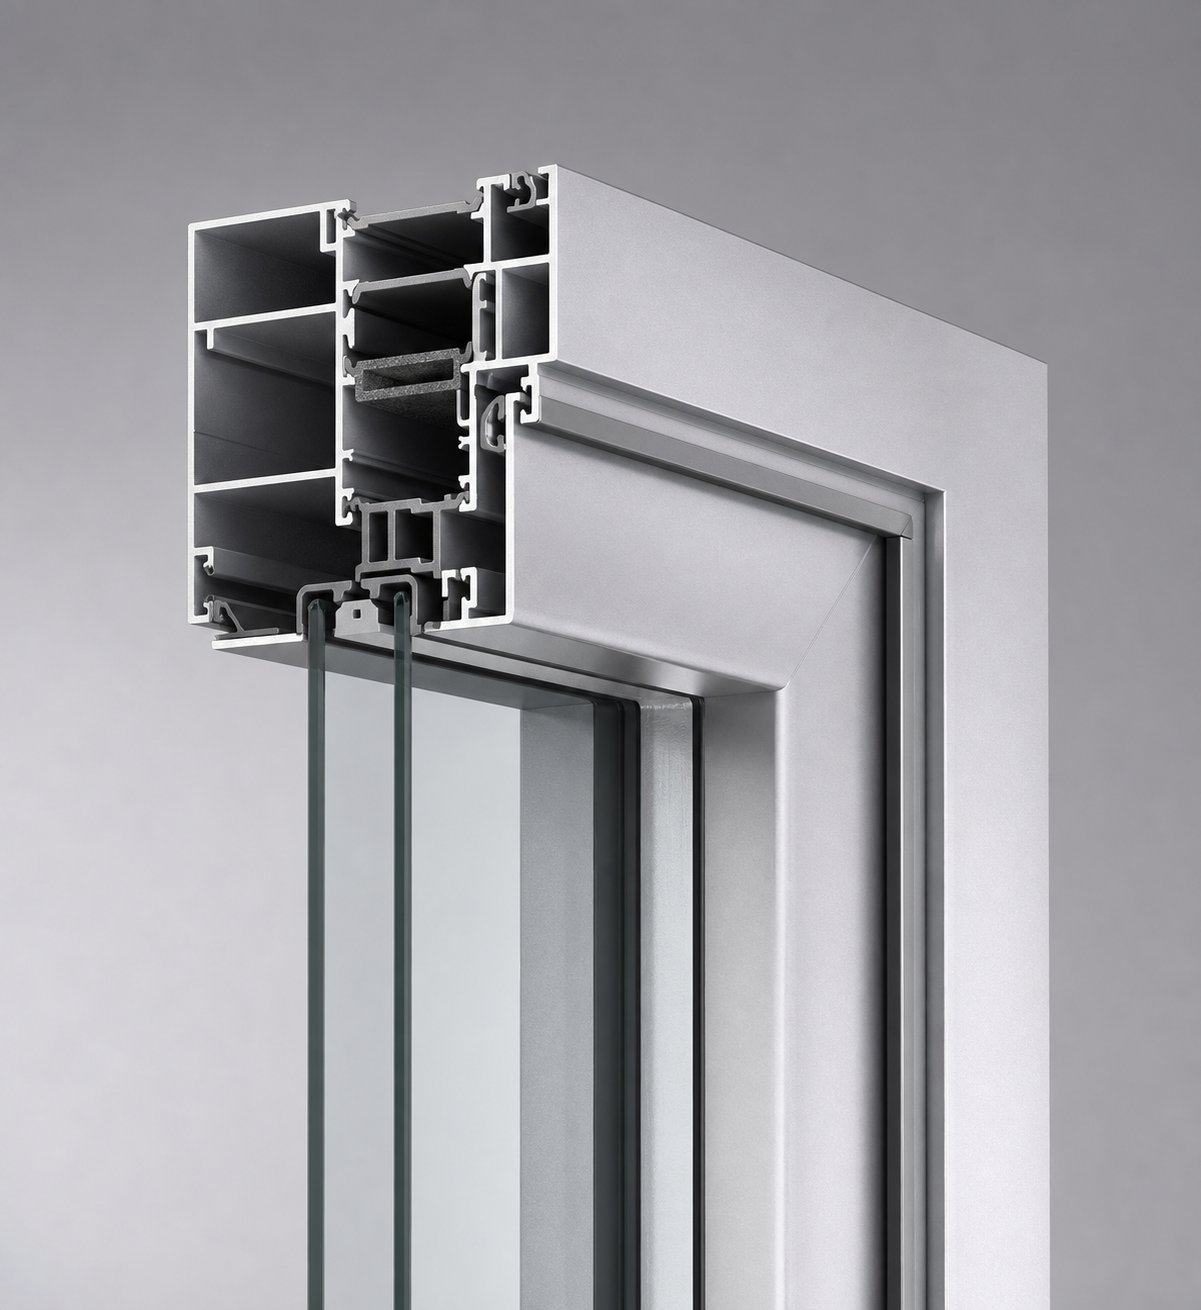
Every aluminium window begins with a rigid outer skeleton. This is the frame — the fixed perimeter anchored directly into the building structure. It never moves, never opens, and carries the full weight of the glazing and sash assembly while transferring wind loads into the surrounding wall. The frame consists of four primary members, each an extruded aluminium profile with a cross-section engineered for its specific position and structural duty.
Outer Frame Members and Their Functions
Stand in front of any aluminium window and you are looking at four distinct aluminium window profiles forming a rectangle. Each has a name tied to its position:
Head. The top horizontal member. It spans the full width of the opening and works with the building’s lintel to manage downward loads from the structure above. The head profile typically features a flat or slightly recessed exterior face and internal channels for weatherstrip retention. Its job is straightforward: keep the top of the window rigid and provide a sealing surface for the sash or fixed glazing above.
Sill. The bottom horizontal member. Unlike the head, the sill carries a dual responsibility. It supports the weight of the sash and glass resting on it, and it manages water. Sill profiles are shaped with a slight outward slope on their exterior face to shed rain away from the building. Internal drainage chambers and weep slots are machined or formed into the sill extrusion during manufacturing. In Australian conditions — where driving rain and coastal moisture are common — the sill’s drainage geometry is critical to long-term performance.
Jambs. The two vertical side members. Jambs provide lateral rigidity, preventing the frame from racking under wind pressure. They also serve as the primary anchor points for hardware: hinges on casement windows, tracks on sliders, and lock keeps on most operable types. When a builder fixes an aluminium window into a brick veneer or timber-framed wall, it is the jambs (along with the head and sill) that receive the fixing screws or brackets tying the window to the structure.
Together, the window frame head sill jamb assembly forms a closed rectangle that must remain square and planar over decades of thermal cycling. Each member is an extruded profile — meaning its cross-section is pushed through a die during manufacturing — and that cross-section includes built-in channels for gaskets, drainage, thermal breaks, and hardware mounting. You will not find two identical profiles used in different positions because the engineering demands at the top, bottom, and sides of a window are fundamentally different.
Mullions and Transoms Explained
Larger window assemblies rarely consist of a single frame opening. When you see a wide bank of windows or a combination of fixed and operable panels side by side, internal dividers split the assembly into zones. These dividers are structural members in their own right, and they go by two names depending on orientation.
Mullions are vertical dividers. A mullion sits between two adjacent window panels — say, a fixed pane beside a casement sash — and carries load in both directions. It transfers wind pressure from the glass panels into the head and sill while also supporting the weight of glazing on either side. Mullion and transom window parts are often the heaviest profiles in an assembly because they must handle loads from two separate units simultaneously.
Transoms are horizontal dividers. A transom splits a tall window into upper and lower zones, creating separate sashes or separating an openable section from a fixed panel. A common Australian residential example: a top-hung awning sash above a fixed lower panel, divided by a transom. The transom carries the weight of the upper sash and glass, much like a miniature sill within the frame.
One point of confusion worth clearing up. Glazing bars look similar to mullions and transoms from a distance, but they are not structural. Glazing bars are slim decorative strips applied to the glass surface (or sandwiched between panes in a double-glazed unit) to create the appearance of divided panes without actually splitting the glass. They are thinner, lighter, and carry no load. If you can push on the divider and it flexes or feels hollow, it is likely a glazing bar. If it is solid, chunky, and clearly part of the frame assembly, it is a mullion or transom.
Alloy Grades Used in Structural Components
Not all aluminium is the same. The alloy grade determines how strong, how workable, and how well-suited a profile is for its structural role. Two grades dominate aluminum window framing:
6061 aluminium is the stronger of the pair. With a yield strength of approximately 276 MPa in T6 temper, it handles higher mechanical loads without deformation. You will find 6061 in mullions, transoms, and heavy-duty sill profiles where wind load resistance and spanning capacity matter most. It is also common in commercial curtain wall systems where structural demands exceed those of residential windows.
6063 aluminium is the workhorse of architectural extrusion. Its yield strength is lower (around 214 MPa in T6 temper), but it flows through extrusion dies far more easily, producing complex cross-sections with thin walls, tight radii, and fine detail. Most head, sill, and jamb profiles in residential aluminium windows are 6063 because their shapes — with snap-fit bead channels, gasket grooves, and thermal break slots — demand superior extrudability. It also anodises more uniformly, giving a cleaner finished appearance.
In practice, many Australian aluminium window systems use 6063-T6 throughout for residential applications and reserve 6061-T6 for larger commercial spans or high wind-load zones such as cyclone-rated installations in northern Queensland or exposed coastal sites.
| Structural Part | Position | Primary Function | Typical Alloy Grade |
|---|---|---|---|
| Head | Top horizontal | Lintel load transfer, upper seal surface | 6063-T6 |
| Sill | Bottom horizontal | Water shedding, drainage, weight support | 6063-T6 |
| Jambs | Vertical sides | Lateral rigidity, hardware anchor points | 6063-T6 |
| Mullion | Vertical internal divider | Separates adjacent panels, carries wind load from both sides | 6061-T6 or 6063-T6 |
| Transom | Horizontal internal divider | Creates separate openable zones, supports upper sash weight | 6061-T6 or 6063-T6 |
These five structural members — head, sill, jambs, mullions, and transoms — define the rigid skeleton of any aluminium window. They dictate the overall dimensions, the number of openable panels, and the load paths through the assembly. But a skeleton without moving parts is just a fixed frame. The components that sit inside this structure, enabling the window to open, close, and seal, belong to a different family entirely: the sash.
Sash Components and Moving Parts Identified
The outer frame is fixed. It never moves. The sash is the part that does. Think of the sash as a smaller, self-contained frame that holds the glass panel and operates within the outer skeleton — sliding, swinging, tilting, or pivoting depending on the window type. In a fixed window, the sash still exists as a separate element, but it is permanently secured rather than hinged or tracked. Every aluminium sash window consists of these two distinct layers: the building-anchored outer frame and the operable (or fixed) inner sash that carries the glazing.
This distinction matters when ordering parts. A window sash rail and stile are not the same profiles as the head, sill, and jambs of the outer frame, even though they look similar at a glance. Sash extrusions are lighter, narrower, and shaped specifically for their role — accepting glazing beads on their inner faces and interfacing with hardware and seals on their outer edges.
Sash Rails, Stiles, and Meeting Rails
The sash is a rectangle, so it has four members. The horizontal ones are rails and the vertical ones are stiles — the same naming logic used in door construction.
Top rail. The upper horizontal member of the sash. On a casement window, this is where friction stays typically attach. On a sliding window, the top rail rides within a channel in the head of the outer frame. Its profile usually includes a gasket groove on the outer face for weather sealing against the frame head.
Bottom rail. The lower horizontal member. In a casement sash, the bottom rail carries most of the glass weight directly down into the sill via setting blocks. On a sliding window, it houses the rollers that allow the sash to glide along the track. The bottom rail profile is often slightly deeper than the top to accommodate drainage slots or roller housings.
Stiles. The two vertical side members of the sash. Stiles connect the top and bottom rails, forming the complete rectangle. On casement windows, one stile carries the hinge fixings (the hinge stile) while the opposite stile carries the locking mechanism (the lock stile). On sliding windows, stiles feature interlocking profiles or brush seals that press against the jambs to limit air infiltration.
Meeting rail. This is a specialised component found only where two sashes overlap. On a sliding window with two panels, the meeting rail is the vertical stile where the inner and outer sashes come together when closed. On a double-hung window (less common in Australia but found in heritage renovations), the meeting rail is horizontal — it is where the bottom rail of the upper sash meets the top rail of the lower sash. Meeting rails on sliding windows feature interlocking aluminium profiles designed to mesh together, creating a labyrinth path that blocks wind-driven rain. A brush seal or pile weatherstrip typically sits within a channel on one meeting rail, pressing against the face of the opposing rail to complete the seal.
Components That Enable Sash Movement
A sash needs mechanical parts to move. The type of movement dictates the hardware, and the hardware dictates the geometry of the window aluminum profile it mounts to. Each operating style requires purpose-shaped extrusion features built directly into the sash and frame.
Sliding sashes rely on rollers and track channels. Small tandem or single wheel rollers — usually nylon or stainless steel — are housed in the bottom rail of each sash. These wheels run along a raised aluminium track extruded into the sill profile. The track must be perfectly straight and level for smooth operation. Anti-lift blocks, mounted in the head track, prevent the sash from being pushed upwards and removed from the outside — an important security detail. Pile weatherstrip (also called woolpile) lines the track channels to reduce rattle and seal against dust and air infiltration.
Casement and awning sashes depend on friction stays — specialised hinges that hold the sash open at any angle through controlled resistance. A friction stay is a stainless steel arm with internal friction pads that generate torque between moving plates. Two or more stays are screwed into channels on the sash and the outer frame, allowing the window to swing outward (or inward) and stay put without slamming in the breeze. Top-hung awning windows use friction stays mounted on the sash stiles, while side-hung casements have them on the top and bottom rails. Selecting the correct friction stay requires matching the rated sash weight and dimensions to the hinge capacity — heavier sashes need heavy-duty variants or additional stays to prevent sagging over time.
Pivot windows use pivot pins set into the sash rails or stiles at a point that allows the entire sash to rotate around a central or offset axis. The pivot hardware mounts into reinforced sections of the extrusion, since the sash weight hangs from a single axis rather than being distributed across a track or multiple hinge points. Pivot windows are less common in residential builds but appear in commercial applications and high-rise apartments where cleaning access is a priority.
Sight Lines and Profile Dimensions
When architects and specifiers talk about aluminium sash window parts, one term comes up repeatedly: sight lines. The sight line is the visible width of the sash profile when the window is viewed face-on. A narrower sight line means less metal visible and more glass area — a desirable outcome for maximising natural light and views in contemporary Australian home design. Premium aluminium systems achieve sight lines as narrow as 30 mm to 45 mm per sash member, while standard residential profiles typically sit around 50 mm to 65 mm.
Profile dimensions also dictate how much space is available inside the extrusion for thermal breaks, gasket grooves, and hardware channels. A slimmer profile looks better but leaves less room for performance features. This trade-off is why different profile series exist within a single manufacturer’s range — giving specifiers options to balance aesthetics against thermal, acoustic, and structural performance.
For quick reference when identifying aluminium sash window parts on an installed window, here is a summary of each component and where to find it:
- Top rail — horizontal member at the very top of the glass panel; look for friction stay fixings or track engagement.
- Bottom rail — horizontal member at the bottom of the glass panel; check for roller housings (sliders) or drainage slots (casements).
- Stiles — vertical members on each side of the glass; one side holds hinges or brush seals, the other holds locks or interlocking profiles.
- Meeting rail — where two sash panels meet when closed; look for interlocking aluminium shapes and brush pile weatherstrip in the joint.
- Friction stays — stainless steel scissor arms connecting the sash to the outer frame, visible when the window is open.
- Rollers — concealed inside the bottom rail of sliding sashes; visible only from beneath if you lift the sash slightly.
- Anti-lift blocks — small plastic or metal pieces in the head track preventing sash removal; often visible as a small tab above the sash.
- Pivot pins — cylindrical fixings at the rotation point of pivot windows; visible at the mid-height of the sash stiles or offset towards the top.
The sash holds the glass, but it does not grip the glass directly. Between the aluminium extrusion and the glass pane sits an entire system of retention strips, rubber seals, and positioning blocks — the glazing components that lock everything securely in place while still allowing for thermal expansion and movement.
Glazing System Parts From Beads to Gaskets
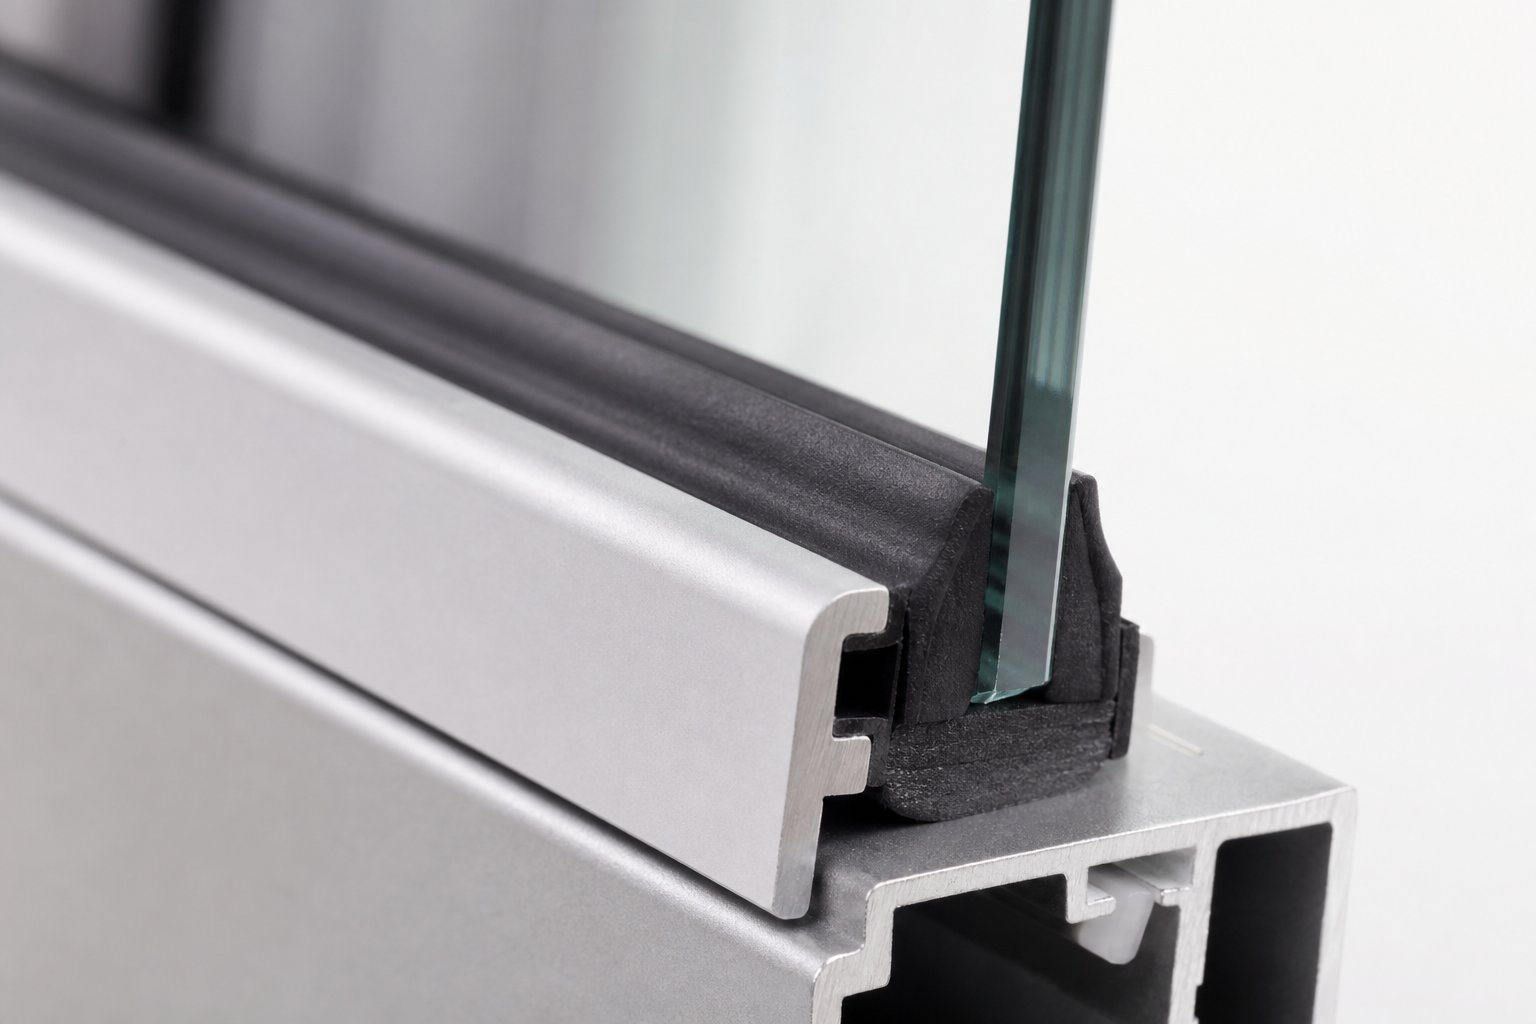
Glass does not simply rest inside an aluminium sash. Between the pane and the metal sits a carefully layered system of retention strips, rubber seals, and positioning blocks — each part engineered to hold the glass firmly, absorb movement, shed water, and prevent the one thing that will crack a pane faster than anything else: direct contact between glass and aluminium. These are the parts for aluminum profile systems that most homeowners never notice until something fails — a draught appears, a rattle develops, or condensation pools inside the frame.
The glazing system breaks down into three functional groups: beads that lock the glass in, gaskets that seal the gaps, and blocks that position and support the pane within the opening.
Glazing Beads and How They Lock Glass in Place
A glazing bead is a slim aluminium strip that clips or screws into the sash profile to hold the glass pane securely against its seals. Without beads, nothing retains the glass in the frame — they are the final mechanical lock between the pane and the window structure. Every glazing bead aluminium window system uses one of two fixing methods.
Snap-fit beads press into a specially shaped channel extruded into the sash profile. The bead’s cross-section includes a hook or barb that clicks into a corresponding groove, holding it in place through mechanical interlock. Removal requires a stiff putty knife or dedicated bead removal tool inserted at a corner to lever the strip free. Snap-fit beads are faster to install and produce a cleaner face without visible fixings.
Screw-fixed beads are secured with small screws at intervals along their length. They are less common in residential aluminium windows but appear in commercial or high-security applications where additional tamper resistance is specified, or where extremely heavy glass units demand more positive retention.
Both types come in profile shapes that match the aesthetic intent of the window system — ovolo (rounded), chamfered (angled), or square-edged. Because these cross-sections involve thin walls and precise snap-fit geometry, glazing beads are typically extruded from 6063 alloy for its superior formability and smooth surface finish after anodising or powder coating.
One critical design choice determines where beads sit relative to the building:
- Internal beading — beads are fitted from the inside of the building. This is the standard approach for ground-floor and accessible windows because an intruder cannot remove the bead from the exterior to extract the glass. Australian Standards reference internal beading as best practice for security performance under AS 2047.
- External beading — beads are fitted from the outside. This method is used in upper-storey commercial installations or curtain wall systems where access is controlled and internal removal is impractical. It simplifies reglazing from scaffolding or access platforms but sacrifices tamper resistance at ground level.
Gaskets, Seals, and Their Specific Positions
Gaskets fill every gap between the glazing bead, the glass pane, and the sash profile. They create airtight and watertight barriers, cushion the glass against vibration, and accommodate thermal expansion as aluminium and glass expand at different rates throughout the day. Understanding window gasket seal types starts with knowing where each one sits in the assembly.
Wedge gaskets push into the channel between the glazing bead and the glass face. They have a tapered cross-section — wider at the base and narrower at the tip — allowing them to compress into the space as the bead clicks home. The wedge shape generates consistent pressure against the glass surface, forming the primary weather seal on the beaded side of the pane.
Flipper seals (sometimes called wiper seals or finger gaskets) sit on sash edges where the sash meets the outer frame. Their cross-section features a thin, flexible fin that deflects against the opposing surface, acting as a first-line barrier to wind-driven rain. Industry guidance notes that these pull-in engaged gaskets function as an initial watershed or moisture barrier within the frame system.
Bubble gaskets (also called bulb seals) have a hollow tubular cross-section that compresses when the sash closes against the frame. The air trapped inside the hollow section provides a spring-like resistance, maintaining sealing pressure even as profiles expand or contract with temperature changes. They are common on casement and awning windows where the sash presses into the outer frame upon closing.
Brush seals (pile weatherstrip) consist of fine synthetic bristles set into a carrier strip that slides into a channel on the sash or frame. They are the standard seal type on sliding window tracks, sitting between the sash stiles and the frame jambs. Brush seals allow smooth lateral movement while still blocking dust, insects, and air infiltration. They wear over time and are one of the most commonly replaced parts on ageing sliding windows.
The material used for most of these gaskets is EPDM rubber (ethylene propylene diene monomer). EPDM is a synthetic elastomer chosen for fenestration because it resists UV degradation, ozone exposure, and temperature extremes — all critical in Australia’s harsh climate where intense sun and coastal conditions can destroy lesser materials within a few years. EPDM gaskets are always black (a limitation of the compound), with a typical hardness of 60 to 70 Shore A, providing enough firmness to maintain compression without being so rigid that they fail to fill irregular gaps.
Setting Blocks, Location Blocks, and Distance Pieces
Glass is heavy. A standard 1200 mm x 600 mm double-glazed unit weighs roughly 30 kg. That weight cannot rest directly on the aluminium sill profile of the sash — doing so would concentrate stress at a single point, risk cracking the glass edge, and create a direct thermal bridge between the pane and the frame. Three types of small, often overlooked components solve this problem.
Setting blocks are the load-bearers. These small rectangular pads — typically neoprene, EPDM, or silicone — sit at the base of the glass opening, usually positioned at the quarter points of the bottom rail. They carry the full dead weight of the glass unit, distributing it evenly into the sash profile below. Setting blocks for glazing must be wide enough to support the full depth of the glass edge and tall enough to maintain minimum edge clearance above the drainage zone in the sash rebate. GANA standards specify a minimum block length of 100 mm (approximately 4 inches), with placement no closer than the eighth points of the glass base — though quarter-point placement is preferred for optimal load distribution.
Location blocks (also called side blocks or anti-walk blocks) sit at the sides of the glass pane. Their job is lateral positioning — they keep the glass centred within the sash opening so it does not drift sideways during thermal cycling or building movement. On casement windows, location blocks are placed at the top and bottom corners on alternate sides to create a diagonal bracing effect. On fixed panels in non-structural silicone systems, anti-walk blocks prevent the glass from creeping sideways due to thermal expansion or seismic racking.
Distance pieces (also called edge packers) maintain a consistent gap between the glass edge and the aluminium rebate all the way around the opening. They prevent glass-to-metal contact during handling, installation, and in-service movement. Distance pieces are thinner than setting blocks and are placed around the perimeter rather than only at the base. They ensure the gaskets compress evenly and allow space for sealant or drainage behind the glass.
All three block types serve a shared engineering purpose: they isolate the glass from the frame while maintaining precise positioning. Without them, the glass would sit unevenly, gaskets would compress at different rates, and the risk of edge cracking from point-loads or thermal shock would increase dramatically.
| Gasket / Seal Type | Profile Shape | Location in Assembly | Primary Function |
|---|---|---|---|
| Wedge gasket | Tapered triangle | Between glazing bead and glass face | Compression seal against glass; watertight and airtight barrier on beaded side |
| Flipper seal (wiper) | Flat base with thin flexible fin | Sash edge where sash meets outer frame | First-line rain deflection and moisture barrier |
| Bubble gasket (bulb seal) | Hollow tubular bulb on flat carrier | Frame rebate face; compresses when sash closes | Compression sealing with spring-back recovery across temperature range |
| Brush seal (pile weatherstrip) | Synthetic bristles in carrier strip | Sliding track channels between sash and frame | Dust, air, and insect barrier while permitting lateral sash movement |
| Setting block | Solid rectangular pad | Base of glass opening at quarter points | Supports full glass weight; prevents glass-to-metal contact at base |
| Location block | Solid rectangular pad (thinner) | Sides of glass at opposing corners | Lateral centering; prevents glass drift from thermal or structural movement |
| Distance piece | Thin flat spacer | Around full perimeter of glass edge | Maintains even edge clearance; ensures uniform gasket compression |
These glazing components work as a system. The setting blocks carry the load. The location blocks and distance pieces hold position. The gaskets and beads seal the assembly against weather. Remove or misplace any one of them and performance degrades — draughts appear, water finds its way in, or glass edges crack under uneven stress. Yet even with perfect glazing, water still enters the frame cavity. Rain hits the seals, condensation forms on cold surfaces, and pressure differentials push moisture inward. Managing that moisture is the job of a separate set of parts buried deep within the aluminium profiles — the drainage and ventilation system.
Drainage and Ventilation Parts You Should Not Overlook
Water will always reach your window frame. No matter how well the gaskets and seals perform, rain penetrates the outer weather barrier during heavy storms, and condensation forms on cold aluminium surfaces when indoor humidity is high. The system is designed for this. What separates a window that lasts decades from one that rots out the surrounding wall in a few years is how effectively it moves that moisture back outside. This is where the window drainage system parts come in — a set of small, often invisible components buried within the profile cross-section that most people never think about until something goes wrong.
Weep Holes and Drainage Slots Explained
Weep holes are small rectangular or oval slots machined into the aluminium profile at its lowest points. Their job is simple: let trapped water escape from inside the frame cavity to the exterior by gravity. Every aluminium window has them, and understanding weep holes in an aluminium window frame is essential for ongoing maintenance.
On a standard casement or awning window, weep holes sit along the bottom face of the outer frame sill. Look at the external face of the sill — you will typically see two or three narrow slots, each around 5 mm to 10 mm wide, spaced evenly along the length. These connect the internal drainage chamber of the profile to the outside air, allowing any water that has entered through the gaskets to drain outward rather than pooling inside.
Sliding windows have an additional set of drainage points along the meeting rail and the bottom track. Because the track channel collects rain runoff and condensation from the sash rollers, drainage slots are machined at intervals along the track to prevent ponding. Standing water in a track corrodes rollers, attracts debris, and eventually overflows into the building interior.
The method of drainage depends on the building construction. Face-drained windows release water through visible slots on the front face of the frame — common where the window sits on a stone or tiled sill or features a stub cill. Secret-drained (concealed drainage) windows route water downward through the base of the outer frame into a sub-cill below, hiding the drainage exits from view. This approach suits deeper walls of brick and block construction where a sub-cill projects outward to carry water clear of the wall face.
Most weep holes are fitted with small covers — either a spring-loaded flap or a slotted plastic cap. These covers serve a dual purpose. They prevent wind-driven rain from being forced back into the cavity through the drainage slot, and they block insects from nesting inside the hollow profile chambers. The covers are press-fit into the weep slot and can be removed for cleaning or replacement.
Pressure Equalization and Condensation Management
A weep hole alone is not a drainage system. This is a point the engineering literature makes emphatically: without pressure equalization, wind can hold water inside the frame cavity or actively push it inward through micro-gaps. Pressure equalization window design solves this by turning physics against itself.
Here is the principle in plain terms. When wind hits a building face, air pressure builds on the exterior. If the cavity inside the frame profile is sealed, exterior pressure exceeds interior cavity pressure, creating a differential that drives water inward through any tiny path it can find. A pressure-equalized system prevents this by connecting the drainage cavity to the exterior through small vents — not just drainage slots, but dedicated openings that allow air pressure (not bulk water) to communicate between outside and inside the chamber. When pressure inside the cavity equals pressure outside, the driving force disappears. Water simply sits in the cavity until gravity draws it down and out through the weep holes below.
Multi-chambered aluminium profiles are engineered around this logic. A typical thermally broken sill profile contains three or more distinct chambers in cross-section:
- An outer rain-screen chamber that deflects bulk water and reduces kinetic energy.
- A pressure-equalization drainage chamber — the critical middle zone where captured water is held safely until it drains by gravity.
- An inner air-seal chamber housing the final EPDM gasket that keeps the conditioned interior dry.
This staged approach means the window manages water progressively rather than relying on a single seal to keep everything out — a strategy that fails under sustained wind-driven rain, especially in exposed Australian coastal and cyclone-prone regions.
Condensation channels address a different moisture source. Aluminium conducts heat roughly 1,000 times more effectively than timber. Even with a thermal break installed, the interior face of the profile can cool below the dew point during cold mornings, causing moisture from indoor air to condense on the metal surface. Condensation channels are shallow grooves formed into the interior-facing section of the profile that collect this moisture and direct it via a gentle slope toward the nearest weep point. Without these channels, condensation would drip onto the sill, stain paint, and promote mould growth on surrounding timber reveals or plasterboard. Thermal break profiles reduce the severity of condensation by limiting heat flow through the frame, but they do not eliminate it entirely in colder climates like Melbourne, Canberra, or Hobart during winter.
Identifying Drainage Parts on Your Window
Finding these components on an installed window is straightforward once you know where to look. Start from the outside. Crouch down and look at the bottom external face of the window frame sill. The weep slots appear as small rectangular openings, usually with a plastic cover or cap sitting flush with the profile surface. If your window sits on a sub-cill (a separate aluminium tray projecting from the wall below the frame), the weep exits may be concealed underneath the outer frame — look at the top face of the sub-cill for drainage slots instead.
On sliding windows, run your finger along the external track channel at the base. You should feel drainage slots at regular intervals — typically every 300 mm to 500 mm. If you cannot feel them, debris may already be blocking them.
Pressure equalization vents are harder to spot because they are small and positioned to be inconspicuous. Look for tiny slotted openings on the vertical face of the sill profile, separate from the larger weep slots. They may appear as a row of narrow slits or circular holes, often located slightly higher than the weep holes themselves.
Condensation channels are only visible from inside the building. Remove the internal glazing bead on the sill (if your system allows non-destructive removal) and look at the flat internal face of the sill profile. A shallow groove running the length of the profile, angled slightly toward one end, is the condensation channel.
Blocked drainage is one of the most common causes of water damage around aluminium windows. These are the warning signs that something in the drainage system is obstructed:
- Water pooling on the internal sill or spilling over the frame edge onto the wall below.
- Visible standing water inside the track channel of a sliding window that does not drain after rain stops.
- Damp patches, bubbling paint, or mould growth on the wall directly beneath the window frame.
- A musty smell near the window, especially in cooler months, indicating trapped moisture in the frame cavity.
- Weep hole covers that appear swollen, discoloured, or pushed outward by internal water pressure.
- Staining or mineral deposits (white calcium marks) on the exterior face below the weep slots, suggesting water has been overflowing rather than draining normally.
If any of these symptoms appear, the first step is clearing the weep holes. A thin piece of wire, a pipe cleaner, or compressed air can dislodge debris. For track drainage slots on sliding windows, a vacuum cleaner nozzle run along the channel often pulls out the accumulated dust and grit that blocks flow. Regular maintenance — clearing weep slots and tracks once or twice a year — prevents most drainage failures before they cause structural damage.
Drainage keeps water out. But there is another challenge unique to aluminium that neither timber nor uPVC windows face: the metal itself conducts heat so efficiently that it creates energy loss and condensation risk across the entire frame profile. Solving that problem requires a set of specialised parts found only in aluminium systems — the thermal break assembly.
Thermal Break Technology and Aluminium-Only Parts
Aluminium is roughly 1,000 times more thermally conductive than timber and around 3,500 times more conductive than uPVC. Left uninterrupted, a solid aluminium profile acts like a highway for heat — pulling warmth out of your home in winter and channelling solar heat inward during summer. The interior face of the frame chills rapidly on cold mornings, dropping below the dew point and triggering condensation that drips onto sills and feeds mould. This is the fundamental engineering problem that a thermal break aluminium window profile solves, and it requires a set of parts that simply do not exist in any other framing material.
Polyamide Strips and Why Aluminium Windows Need Them
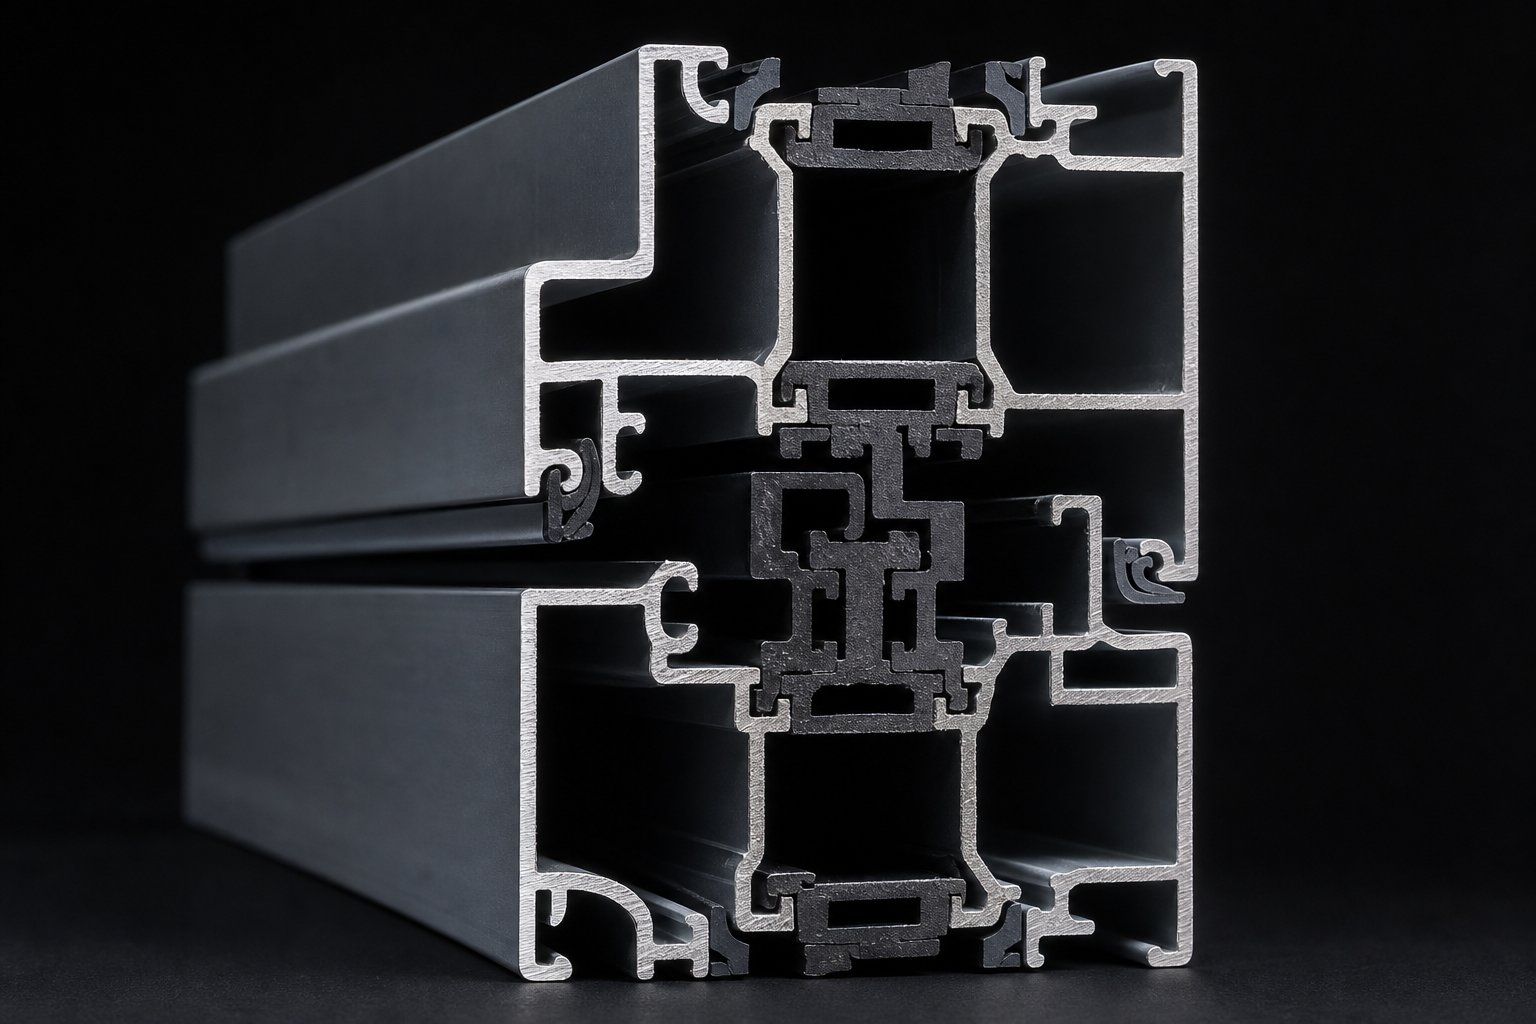
A thermal break works by physically splitting the aluminium profile into two separate pieces — an interior section and an exterior section — and bridging the gap with a material that conducts almost no heat. That bridging material is a polyamide strip, specifically PA66 reinforced with 25% glass fibre. The glass fibre adds structural rigidity so the strip can carry shear loads between the two aluminium halves without flexing or creeping over decades of thermal cycling.
In cross-section, the polyamide strip window frame assembly looks like this: an outer aluminium extrusion faces the weather, an inner aluminium extrusion faces the room, and two parallel polyamide strips connect them along their length like rungs on a ladder. The strips slot into precisely machined channels — called thermal barrier channels — that are knurled or serrated on their internal walls to grip the polyamide mechanically after insertion. During manufacturing, the strips are rolled into these channels and then the aluminium is crimped inward to lock everything permanently in place. The result is a composite profile: a single structural member made from three distinct materials working together.
The thermal barrier channels themselves are formed during the initial aluminium extrusion process. Their dimensions, wall thickness, and internal knurling pattern must be exact — too tight and the polyamide strip cannot insert; too loose and the mechanical bond fails under load. This is why thermal break profiles cost more than standard non-broken extrusions. The die is more complex, tolerances are tighter, and the crimping step adds a secondary manufacturing process.
What does this achieve in practice? A thermally broken frame reduces heat transfer through the profile by 50% to 65% compared to a non-broken aluminium section. For Australian compliance under the National Construction Code (NCC) and NatHERS energy ratings, thermally broken frames are now standard in climate zones where heating loads are significant — Melbourne, Canberra, Hobart, and the elevated regions of NSW and Queensland. Even in warmer climates, the reduced solar heat gain through the frame contributes to lower cooling loads and improved WERS (Window Energy Rating Scheme) star ratings.
From an identification standpoint, you can spot a thermal break on an installed window by looking at the frame edge-on — through the gap between the sash and outer frame, or at a cut end if the frame is exposed. The thin dark strip (usually black or dark grey) visible between two aluminium sections is the polyamide. If the profile appears as one continuous piece of metal from inside to outside with no interruption, it is a non-thermally-broken frame.
Parts Unique to Aluminium That Other Frame Materials Lack
Thermal breaks are the most significant aluminium-only feature, but they are not the only one. The extrusion process that creates aluminium window profiles allows engineers to incorporate a range of precision features directly into the cross-section during manufacturing — features that timber and uPVC systems achieve through entirely different (and often less elegant) methods.
Euro groove channels. These are standardised T-shaped slots extruded into the inner face of the sash profile. Hardware manufacturers across the industry design their espagnolette locks, shootbolt mechanisms, tilt-and-turn gearboxes, and multi-point locking systems to slide into this universal channel. The euro groove eliminates the need to drill individual fixing holes for each hardware component — the hardware simply drops into the groove and is secured with set screws at the correct position. It is a standardised interface between frame and hardware that makes assembly faster and component replacement simpler. Timber windows achieve the same function by routing a mortise or drilling screw holes; uPVC windows use steel reinforcement chambers with screw fixings through the plastic shell.
Screw ports and screw slots. These are pre-formed cylindrical bosses or elongated channels within the aluminium extrusion that accept self-tapping screws for attaching accessories, keeps, strike plates, and ancillary hardware. Unlike drilling into timber (which works but degrades over time as screw holes enlarge) or screwing through thin uPVC walls into steel reinforcement (which adds manufacturing steps), aluminium screw ports provide a consistent, repeatable fixing point formed in a single extrusion pass. Screw slots — elongated versions of screw ports — allow adjustment along the profile length before final tightening, useful for aligning keeps with lock points during installation.
Snap-fit bead channels. Covered earlier in the glazing section, these deserve mention here as aluminium window extrusion parts that have no direct equivalent in timber or uPVC. The channel’s cross-section is an undercut slot — wider at the base than the opening — into which the glazing bead’s barbed foot clips mechanically. The precision of the extrusion process allows tolerances tight enough that the bead holds securely without fasteners, yet releases cleanly with a prying tool for reglazing. Timber windows use pinned or screwed timber beads. uPVC windows use welded-in gasket legs or co-extruded flexible lips that grip the glass. Neither achieves the same tool-free snap-fit retention that aluminium extrusions offer.
All of these features share a common origin: they are formed during the extrusion process in one pass through the die. No secondary machining, no drilling, no routing. The die creates the complete cross-section — thermal barrier channels, euro grooves, screw ports, bead channels, gasket slots, drainage chambers — all in a single operation. This is the core advantage of aluminium as a framing material and the reason its profiles look so different in cross-section from anything made of timber or plastic.
| Feature / Part | Aluminium System | Timber Equivalent | uPVC Equivalent |
|---|---|---|---|
| Thermal break | Polyamide PA66 strips crimped between inner and outer extrusions | Not required — timber is a natural insulator | Not required — uPVC is a natural insulator |
| Hardware attachment | Euro groove channel (standardised T-slot extruded into profile) | Routed mortise or drilled screw holes into solid timber | Screws through plastic shell into internal steel reinforcement |
| Screw fixing points | Pre-formed screw ports and screw slots in extrusion walls | Direct screw into timber grain (pilot holes recommended) | Screw into steel reinforcement sleeve within hollow chamber |
| Glazing bead retention | Snap-fit undercut channel — bead clips in without fasteners | Timber bead pinned or screwed into rebate | Co-extruded flexible lip or welded gasket leg |
| Gasket grooves | Precision-extruded channels sized for specific gasket cross-sections | Routed groove or applied with adhesive | Co-extruded with the profile or press-fit into routed slot |
| Drainage chambers | Multi-chamber profile with integrated pressure equalization cavities | Drainage groove routed into sill; drip grooves cut into underside | Hollow multi-chamber profile with drilled weep holes |
The names of aluminium window parts covered in this section — polyamide strips, thermal barrier channels, composite profiles, euro grooves, screw ports, and snap-fit bead channels — represent what makes aluminium systems fundamentally different from other framing materials. They exist because the extrusion process allows complexity that timber and plastic cannot replicate in a single manufacturing step. Recognising these features on a cross-section drawing or a cut profile sample helps you confirm what system you are dealing with and what replacement parts it requires.
These aluminium-specific components define the profile itself. But different window types — sliding, casement, awning, tilt-and-turn — each demand their own additional parts shaped for a particular mode of operation. The same thermal break profile that works in a fixed panel will not accommodate the track system of a slider or the multi-point locking gear of a tilt-and-turn sash.
Parts That Differ By Window Type
A profile system designed for a sliding window cannot simply be repurposed for a casement or tilt-and-turn unit. Each operating style introduces components that only exist within that system — parts shaped around a specific motion, a particular locking method, or a unique sealing challenge. If you are trying to identify or order replacement parts, knowing your window type narrows the field immediately. A roller assembly only belongs to a slider. A friction stay only belongs to a hinged sash. A multi-point gearbox only belongs to a tilt-and-turn. Here is how the aluminium sliding windows material and hardware set differs from casement, awning, fixed, and tilt-and-turn configurations.
Sliding Window Parts and Track Systems
Sliding windows move horizontally along a track rather than swinging outward on hinges. This lateral motion demands a unique set of components built into and around the sash and frame profiles.
Meeting rails with interlocking profiles. Where two sliding sashes overlap at the centre, the meeting rails feature a male-and-female interlocking cross-section. One rail has a protruding fin; the other has a recessed channel. When the sashes close, these shapes mesh together to form a labyrinth path that wind-driven rain cannot easily penetrate. The interlock geometry is specific to each profile series — parts from one manufacturer’s sliding system will not mate with another’s.
Top and bottom tracks. The sill profile incorporates raised aluminium rails (the bottom track) on which the sash rollers travel. The head profile features a corresponding channel (the top track) that captures the top of the sash and prevents it from swinging inward or outward. Track geometry varies between two-track systems (two sliding panels) and three-track systems (three panels or a sliding-plus-fixed configuration). The sliding material used for track surfaces is typically hard-anodised aluminium or the bare extruded 6063 alloy, chosen for wear resistance and low friction against nylon roller wheels.
Sash rollers. Concealed within the bottom rail of each sliding sash, rollers are small wheel assemblies — usually tandem nylon or stainless steel wheels on a spring-loaded carriage. They bear the full sash weight and allow smooth lateral travel. Rollers are height-adjustable via a screw accessible from the sash face or edge, enabling the installer to level the sash within the track after installation. Worn rollers are the most common cause of a stiff or noisy sliding window.
Anti-lift blocks. These small plastic or aluminium pieces mount inside the head track directly above each sash. They close the gap between the top of the sash and the head channel, preventing the sash from being lifted off its bottom track from the outside. Without anti-lift blocks, a sliding window can be removed by simply pushing it upward and swinging the base inward — a well-known security vulnerability on older systems that lacked this part.
Pile weatherstrip. Fine synthetic bristles set into a polypropylene backing strip that presses into channels along the sash stiles, meeting rails, and track edges. Pile strip is the primary air and dust seal on sliding windows because it allows lateral movement without generating friction the way compression gaskets would. Over time, the bristles flatten and lose their sealing ability — replacement pile strip is one of the most frequently ordered aluminium window spares.
Casement and Awning Window Parts
Casement windows swing outward (or inward) on hinges mounted to one stile. Awning windows hinge at the top and push outward at the base. Both types share a family of parts that do not exist in sliding systems. If you are referencing a casement window parts diagram, these are the components you will find labelled:
Friction stay mounting slots. Rather than traditional butt hinges, aluminium casement and awning sashes use friction stays — stainless steel scissor arms that allow the sash to hold at any opening angle. The sash and frame profiles include pre-formed elongated slots or channels specifically shaped to accept the friction stay shoes. These mounting slots are part of the extrusion itself, meaning you cannot retrofit friction stays onto a profile that was not designed for them.
Espagnolette lock channels. An espagnolette lock is a single-handle mechanism that drives locking cams or mushroom pins simultaneously into multiple keeps around the frame. The handle and gearbox sit in the euro groove channel on the sash stile, while the keeps (strike plates) mount into corresponding slots on the frame jamb, head, and sill. This creates a multi-point engagement from a single lever action — pulling the sash evenly and firmly into its compression gaskets all the way around.
Hinge reinforcement plates. On larger or heavier casement sashes, the aluminium extrusion alone may not provide enough thread engagement for friction stay screws. Hinge reinforcement plates — steel or thicker aluminium plates — are inserted inside the hollow profile chamber behind the stay mounting point. They distribute the load from the stay fixings across a wider area, preventing the screw threads from pulling through the aluminium wall over years of repeated opening and closing.
Restrictor stay brackets. Building codes and safety standards require that certain windows — particularly those above ground floor level or in children’s bedrooms — cannot open beyond a specified width (typically 125 mm in Australia to comply with fall-prevention requirements). Restrictor stays are secondary arms or cable devices that limit opening angle. Their mounting brackets bolt into dedicated positions on the sash and frame, often using the same euro groove or screw port system that accommodates the primary hardware. Some restrictor stays include a keyed release allowing full opening for cleaning or emergency egress.
Fixed and Tilt-and-Turn Unique Components
Fixed windows are the simplest in terms of moving parts — they have none. But they introduce their own specialised profiles. Structural glazing profiles are used where the glass is bonded directly to the frame with structural silicone rather than retained by mechanical beads. The profile cross-section includes a flat bonding platform with no snap-fit channel — just a smooth aluminium surface prepared for adhesion. This approach eliminates visible beads from the exterior, creating a flush glass appearance common in modern architectural glazing where slim sight lines are the priority.
Tilt-and-turn windows sit at the opposite end of the complexity spectrum. They are the most mechanically demanding window type, opening inward on a side hinge (turn mode) or tilting inward from the top (tilt mode for ventilation) — all controlled by a single handle that activates different locking positions depending on its rotation angle.
The tilt and turn window components that make this dual operation possible include:
- Multi-point locking gearbox — the central mechanism behind the handle that translates handle rotation into lateral movement of connecting rods running around the sash perimeter.
- Corner drives — angled connectors at each corner of the sash that redirect the connecting rod’s motion from horizontal to vertical (or vice versa), enabling locking points on all four sides.
- Tilt-and-turn hinges — specialised hinges at the bottom of the sash that allow both pivoting (tilt) and swinging (turn) depending on which locking points are engaged.
- Scissor stay arm — a top-mounted arm that controls the tilt angle and transfers the sash weight back to the hinges during tilt mode, preventing the sash from falling inward.
- Mushroom cam locks — rotating cams on the sash that engage with frame-mounted keeps at multiple points, pulling the sash into compression seals. These differ from standard locking pins by their mushroom-shaped heads, which hook behind the keep and resist being forced open.
- Euro groove hardware track — the standardised channel running the full perimeter of the sash that houses the connecting rods, corner drives, and locking cams as a single integrated system.
The profile geometry for tilt-and-turn sashes must accommodate all of this hardware within its cross-section while maintaining structural integrity and thermal break continuity. This makes tilt-and-turn aluminium profiles among the deepest and most complex extrusions in any window system — typically 70 mm to 90 mm in frame depth compared to 45 mm to 55 mm for a basic sliding profile.
The table below maps which parts are unique to each window type and which are shared across systems:
| Component | Sliding | Casement | Awning | Tilt-and-Turn | Fixed |
|---|---|---|---|---|---|
| Sash rollers and track | Unique | — | — | — | — |
| Anti-lift blocks | Unique | — | — | — | — |
| Pile weatherstrip | Unique | — | — | — | — |
| Interlocking meeting rails | Unique | — | — | — | — |
| Friction stays | — | Unique | Unique | — | — |
| Espagnolette lock system | — | Unique | Unique | — | — |
| Restrictor stay brackets | — | Unique | Unique | — | — |
| Multi-point gearbox and corner drives | — | — | — | Unique | — |
| Tilt-and-turn hinges | — | — | — | Unique | — |
| Scissor stay arm (top) | — | — | — | Unique | — |
| Structural glazing profiles | — | — | — | — | Unique |
| Euro groove hardware channel | — | Shared | Shared | Shared | — |
| Compression gaskets (bubble/wedge) | — | Shared | Shared | Shared | Shared |
| Glazing beads | Shared | Shared | Shared | Shared | Shared |
| Setting blocks and packers | Shared | Shared | Shared | Shared | Shared |
| Thermal break polyamide strips | Shared | Shared | Shared | Shared | Shared |
| Weep holes and drainage slots | Shared | Shared | Shared | Shared | Shared |
What this table makes clear is that choosing a window type is not just an aesthetic or ventilation decision — it commits you to a specific set of profiles, hardware, and replacement parts for the life of that window. A sliding window and a tilt-and-turn window share almost nothing beyond their thermal break and glazing components. Their sash extrusions, hardware channels, and sealing systems are entirely different.
For builders, developers, and architects specifying across a multi-unit project, this complexity multiplies fast. A residential development with sliders in bedrooms, casements in bathrooms, and tilt-and-turn in living areas means three distinct profile systems, three hardware families, and three sets of gaskets and seals — all of which must be coordinated from a single supplier to ensure compatibility and consistent finish. Specialist aluminium window partners like MEICHEN support this process by helping project teams select the correct profile system and component set for each window type, from initial system recommendations through to material specification and delivery coordination.
Knowing which parts belong to which system is essential for ordering and replacement. But there is a more immediate challenge that faces anyone standing in front of an installed window: identifying what they are actually looking at, from both sides of the glass, without cutting anything open or pulling anything apart.
How to Visually Identify Parts on an Installed Window
You do not need to disassemble anything. You do not need manufacturer drawings or a window part names diagram pinned to the wall. With a methodical approach — working from the exterior face inward — you can identify and name every visible aluminum window frame part on a fully installed unit using nothing more than your eyes, your fingers, and the knowledge already covered in this guide.
Identifying Parts From the Exterior
Step outside and face the window. What you see first is the outer frame face — the flat or slightly profiled aluminium surface of the head, sill, and jambs that sits flush with (or slightly proud of) the surrounding wall cladding. Run your hand along the bottom. The sill nosing is the forward-projecting lip at the base of the sill profile that throws rainwater clear of the wall below. Beneath it or along its face, you will spot the weep hole covers — small plastic caps or spring flaps sitting in rectangular slots. These are your drainage exits.
Look at the edges of any operable sash where it meets the outer frame. The thin rubber lip visible along the sash perimeter is a flipper seal or weatherstrip — the first line of defence against wind-driven rain. If your window is externally beaded (common in upper-storey commercial installations), you will see a slim aluminium strip running along the glass edge on the outside face. This is the external glazing bead. On most Australian residential windows, however, beads are fitted internally — meaning the exterior glass edge shows only a flush gasket line rather than a removable strip.
On sliding windows, crouch down and examine the track at the base of the frame. The raised aluminium rail running horizontally is the bottom track. Look for small drainage slots machined into the track at regular intervals. Above the sash, inside the head channel, anti-lift blocks may be visible as small tabs closing the gap between the sash top and the frame head.
Identifying Parts From the Interior
Move inside and face the same window. The most prominent feature is the internal glazing bead — the aluminium strip running around the glass perimeter on the room side. This is the part you would lever out with a putty knife if reglazing were needed. Its profile shape (square, ovolo, or chamfered) is an aesthetic choice that varies by manufacturer and system series.
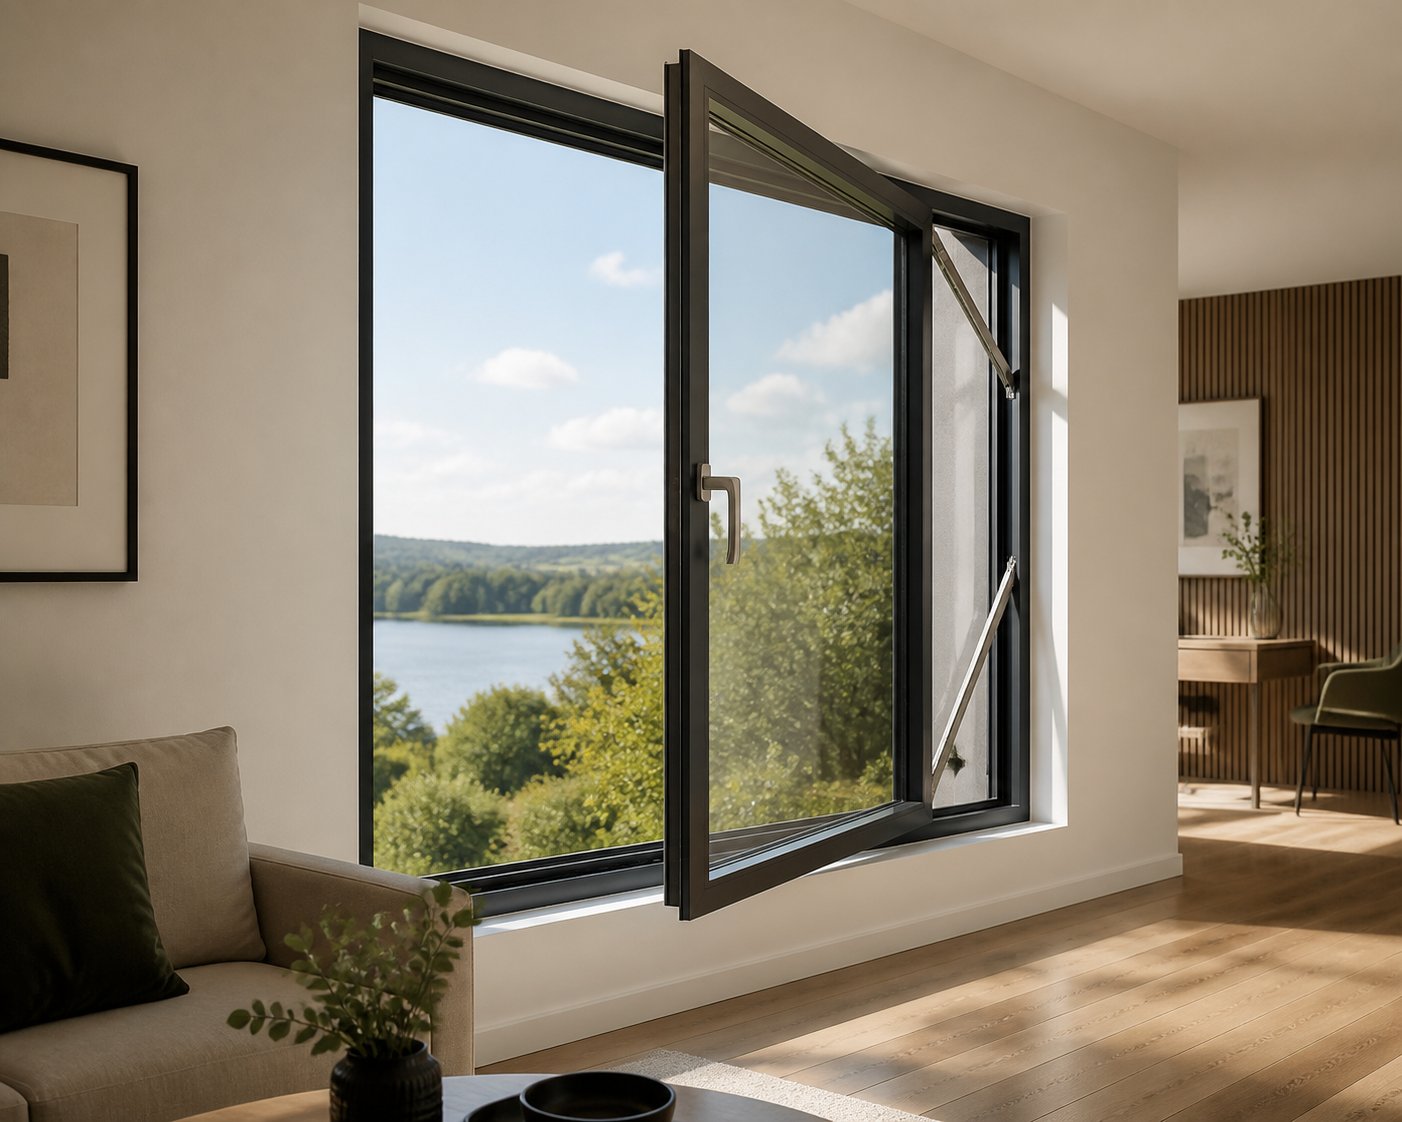
The handle mounted on the sash stile is your sash handle or window operator. On casement and awning windows, rotating this handle engages the espagnolette lock — look at the frame jamb, head, and sill for small metal plates with a slot or hook. These are the lock keeps (also called strike plates) that the locking cams engage with when the handle closes.
Where friction stays connect the sash to the frame, you may notice small plastic caps covering the stay mounting screws — these are hinge covers, purely cosmetic but useful for identifying hinge positions. On some windows, a slim rectangular vent sits along the head of the frame. This is a trickle ventilator — a background ventilation device that allows airflow without opening the window, common in buildings designed to meet NCC ventilation requirements.
Finally, look at the internal face of the sill profile where it meets the sash. If your window has a thermally broken frame, a shallow groove running along this surface is the condensation channel — the pathway that collects internal moisture and directs it toward the nearest weep point rather than letting it drip onto your sill or paintwork.
Regional Terminology Differences
Here is where things get confusing. Search for aluminium window parts online and you will encounter British, American, and Australian terms used interchangeably — often on the same supplier website. The same physical component can carry different names depending on which country’s literature you are reading. Australian specifications largely follow British terminology, as noted in the AGWA Window Terminology reference document compiled by the Australian Glass and Window Association. But American resources dominate online search results, so Australian readers frequently encounter unfamiliar terms.
The most common points of confusion:
- Sill vs cill — “cill” is an older British spelling still used in some UK fabricator catalogues. In Australia and modern British usage, “sill” is standard.
- Mullion vs muntin — in American English, “muntin” refers to the small bars dividing glass into panes (what Australians and Brits call glazing bars). An American “mullion” matches the Australian definition: a structural vertical divider between window units. Confusing the two can lead to ordering the wrong part entirely.
- Casement vs sash — in American terminology, “sash” sometimes refers specifically to a vertically sliding window (as in “sash window” meaning double-hung). In Australia and the UK, “sash” is a general term for the operable inner frame of any window type, while “casement” describes a side-hinged opening style.
- Meeting rail vs check rail — Australian and American sources typically use “meeting rail.” Some British documents use “check rail” for the same component.
This aluminium window terminology guide would not be complete without a cross-reference table. Use it to translate between sources when researching parts or communicating with international suppliers:
| Part Description | Australian Term | British Term | American Term |
|---|---|---|---|
| Bottom horizontal frame member | Sill | Sill (or cill in older documents) | Sill |
| Vertical structural divider between units | Mullion | Mullion | Mullion |
| Small bars dividing glass into panes | Glazing bars | Glazing bars (or astragals) | Muntins (or grilles) |
| Overlapping rail where two sashes meet | Meeting rail | Meeting rail (or check rail) | Meeting rail |
| Operable inner frame holding glass | Sash | Sash | Sash (but “sash window” implies double-hung) |
| Side-hinged opening window | Casement | Casement | Casement |
| Retention strip holding glass in frame | Glazing bead | Glazing bead | Glass stop (or glazing bead) |
| Handle mechanism with multi-point locking | Espagnolette lock | Espagnolette (or espag lock) | Multi-point lock |
| Sliding window seal bristles | Pile weatherstrip | Pile seal (or woolpile) | Weatherstripping (or fin seal) |
If you can describe where a part sits on the window and what it does — “the rubber seal on the edge of the sliding panel where it meets the other panel” — any competent supplier can identify the correct component regardless of which regional terminology you use. Position plus function will always get you to the right part.
The ability to identify parts of a window visually and name them correctly — or at least describe them precisely — is what turns a frustrating phone call with a supplier into a five-minute transaction. You know what each component looks like, where it sits, and what it does. The final step is knowing what information to provide when you actually place an order, and how to work with professionals who can source or manufacture the exact part your window system requires.
Sourcing the Right Parts With Confidence
Naming the part is only half the job. The other half is turning that identification into a successful order — whether you are replacing a single gasket on a bathroom window or specifying window profiles aluminium across a 40-unit development. Correct part identification gives you the language to communicate precisely with suppliers, fabricators, and installers. Vague descriptions lead to wrong shipments, wasted lead time, and costly returns. Precise descriptions — grounded in the terminology and component knowledge covered throughout this guide — get the right part delivered the first time.
What Information You Need When Ordering Parts
Suppliers and fabricators work from specifics, not generalities. When sourcing any aluminum window profile or accessory, gather these details before making contact:
- Profile system and series — the manufacturer’s system name or number (e.g., a specific commercial or residential series). This tells the supplier which family of extrusions and compatible hardware applies.
- Part code or cross-section reference — if visible on the profile, existing hardware, or original documentation. Even a partial code narrows the search dramatically.
- Section dimensions — overall depth, width, and wall thickness of the profile. For hardware, record hole spacing, backset, and overall length.
- Alloy grade and temper — typically 6063-T5 or 6063-T6 for architectural profiles. Structural mullions or high-load components may require 6061-T6.
- Surface finish — anodised (specify colour and micron thickness) or powder coated (specify RAL or custom colour code). Mismatched finishes are immediately visible on installed windows.
- Quantity and length — confirm whether you need cut-to-size pieces or stock lengths (usually 5 m to 6.5 m bars). Cut lengths reduce waste on site but may carry a processing surcharge.
OEM aluminium products and replacement parts almost always require matching to a specific profile system. A glazing bead from one series will not snap into the channel of another — even from the same manufacturer — because cross-section geometry differs between product lines. This is why photographs, measurements, and any legacy markings matter so much when sourcing replacements for existing installations.
Working With a Project-Capable Aluminium Window Partner
For individual homeowners replacing a seal or a set of rollers, a local hardware supplier or glazier can usually source what is needed from a part number and a photograph. Larger projects demand a different level of support.
Builders, developers, architects, and procurement teams working across multiple window types, floor plans, and delivery stages benefit from a partner who handles the full process — not just selling profiles off the shelf. That means support from initial drawings and window schedules through system recommendations, material calculation, manufacturing coordination, quality control, and logistics planning. A partner operating at this level eliminates the fragmentation that causes errors: one supplier for profiles, another for hardware, a third for gaskets, and nobody coordinating compatibility between them.
MEICHEN operates in exactly this space. Their services page outlines how they support Australian projects from specification through to delivery — covering drawings, system selection, material sourcing, fabrication coordination, and delivery planning as an integrated workflow. For readers who have worked through this guide and now need professional support identifying, specifying, or sourcing the parts their project requires, it is a practical next step worth exploring.
Whether you are fixing a single window or fitting out an entire building, the principle remains the same: name the part accurately, document its dimensions and context, and work with people who understand the system it belongs to. That combination turns a complex problem into a straightforward transaction.
Frequently Asked Questions About Aluminium Window Frame Parts
1. What are the main parts of an aluminium window frame?
An aluminium window frame consists of four primary structural members: the head (top horizontal), the sill (bottom horizontal), and two jambs (vertical sides). These form the fixed outer skeleton anchored to the building. Within this frame sits the sash — the operable inner frame holding the glass — made up of rails, stiles, and sometimes meeting rails. Additional components include glazing beads that retain the glass, EPDM rubber gaskets for weather sealing, setting blocks for weight distribution, polyamide thermal break strips for insulation, and drainage elements like weep holes. Larger assemblies also feature mullions (vertical dividers) and transoms (horizontal dividers) that separate the window into multiple panels.
2. What is the difference between a mullion and a transom on a window?
A mullion is a vertical structural divider that separates two adjacent window panels side by side, while a transom is a horizontal structural divider that splits a tall window into upper and lower zones. Both carry structural loads — mullions transfer wind pressure from glass panels into the head and sill, and transoms support the weight of upper sashes much like an internal sill. Neither should be confused with glazing bars, which are purely decorative strips that create the appearance of divided panes without actually separating the glass or carrying any load.
3. What is a thermal break in an aluminium window and why does it matter?
A thermal break is a polyamide strip (PA66 reinforced with 25% glass fibre) inserted between the inner and outer halves of an aluminium window profile to interrupt heat conduction. Without it, aluminium conducts heat roughly 1,000 times faster than timber, causing significant energy loss and condensation on interior frame surfaces during cold weather. Thermally broken frames reduce heat transfer by 50% to 65% compared to non-broken profiles. In Australia, they are now standard for compliance with the National Construction Code in cooler climate zones including Melbourne, Canberra, and Hobart, and they improve WERS star ratings even in warmer regions.
4. How do I find and maintain weep holes on my aluminium windows?
Weep holes are small rectangular slots located on the bottom exterior face of the window frame sill. Crouch down outside and look for two or three narrow openings (5 mm to 10 mm wide) spaced evenly along the sill, often fitted with small plastic caps or spring-loaded flaps. On sliding windows, additional drainage slots sit along the bottom track at roughly 300 mm to 500 mm intervals. To maintain them, clear debris using a thin wire, pipe cleaner, or compressed air once or twice a year. For sliding tracks, run a vacuum nozzle along the channel. Signs of blockage include water pooling on internal sills, damp patches below the window, mould growth, or white mineral staining on the exterior face beneath the slots.
5. Can I use parts from one aluminium window system in a different brand or series?
Generally, no. Aluminium window parts are engineered to precise cross-section geometries specific to each profile system and series. A glazing bead from one series will not snap into the channel of another — even from the same manufacturer — because the undercut slot dimensions differ between product lines. The same applies to gaskets, hardware, and thermal break strips. When ordering replacements, you need the profile system name, part code or cross-section reference, and section dimensions to ensure compatibility. For larger projects involving multiple window types, working with a specialist partner like MEICHEN ensures all profiles, hardware families, and seals are coordinated from a single source for guaranteed compatibility.
More Window & Door Guides