What Aluminium Casement Window Details Actually Show You
You’ve probably seen glossy brochures listing frame colours and glass options. That’s marketing. Aluminium casement window details are something else entirely — they’re the technical cross-section drawings and specifications that reveal how a window is actually constructed, sealed, and fixed into a wall opening. These documents are the blueprint-level truth behind every casement window on a project.
Defining Aluminium Casement Window Details
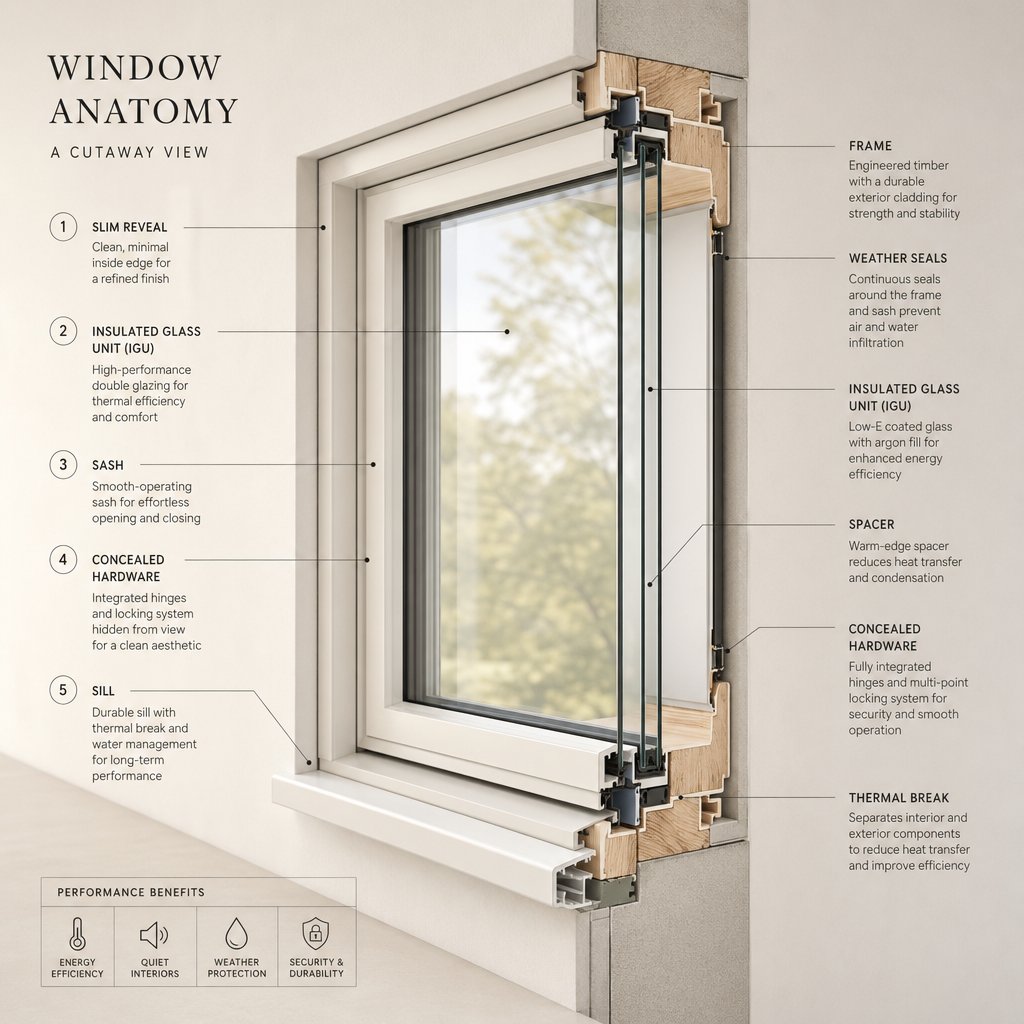
Aluminium casement window details are scaled cross-section drawings that show the precise geometry of frame profiles, sash components, glazing pockets, weather seals, thermal breaks, and installation interfaces — everything needed to understand how the window performs as a complete assembly within a wall system.
So what’s a casement window in the first place? It’s a window hinged on one side that swings outward (or inward) like a door, creating a full opening for ventilation. Aluminium casement windows pair that simple operating principle with lightweight, corrosion-resistant frames that suit Australian coastal and urban environments alike. The “details” part refers not to product features but to the technical documentation — head sections, sill sections, jamb sections — that architects and builders rely on during design and construction.
Why Technical Details Matter for Your Project
Marketing spec sheets tell you a window casement system is “thermally efficient” or “weather resistant.” The detail drawings show you why — the exact seal configuration, the thermal break width, the drainage path that prevents water ingress. Without reading these drawings, you’re trusting a claim rather than verifying a design. For anyone specifying aluminium casement windows on a residential build or commercial fitout, the difference between a generic brochure and a proper shop drawing or product data sheet can mean the difference between a window that performs for decades and one that leaks in its first winter.
Who Needs to Understand Window Details
Builders and architects use these drawings daily — checking dimensions against rough openings, confirming flashing interfaces, and verifying compliance with AS 2047. But homeowners benefit too. When you’re comparing quotes for casement windows, understanding the detail drawings lets you see whether a supplier is offering a 44mm frame or a 70mm frame, a single weather seal or a triple-seal system. That knowledge shifts the conversation from price alone to genuine value. This guide walks you through reading those documents step by step, so the next time a set of window details lands on your desk or inbox, you’ll know exactly what you’re looking at.
Anatomy of an Aluminium Casement Window
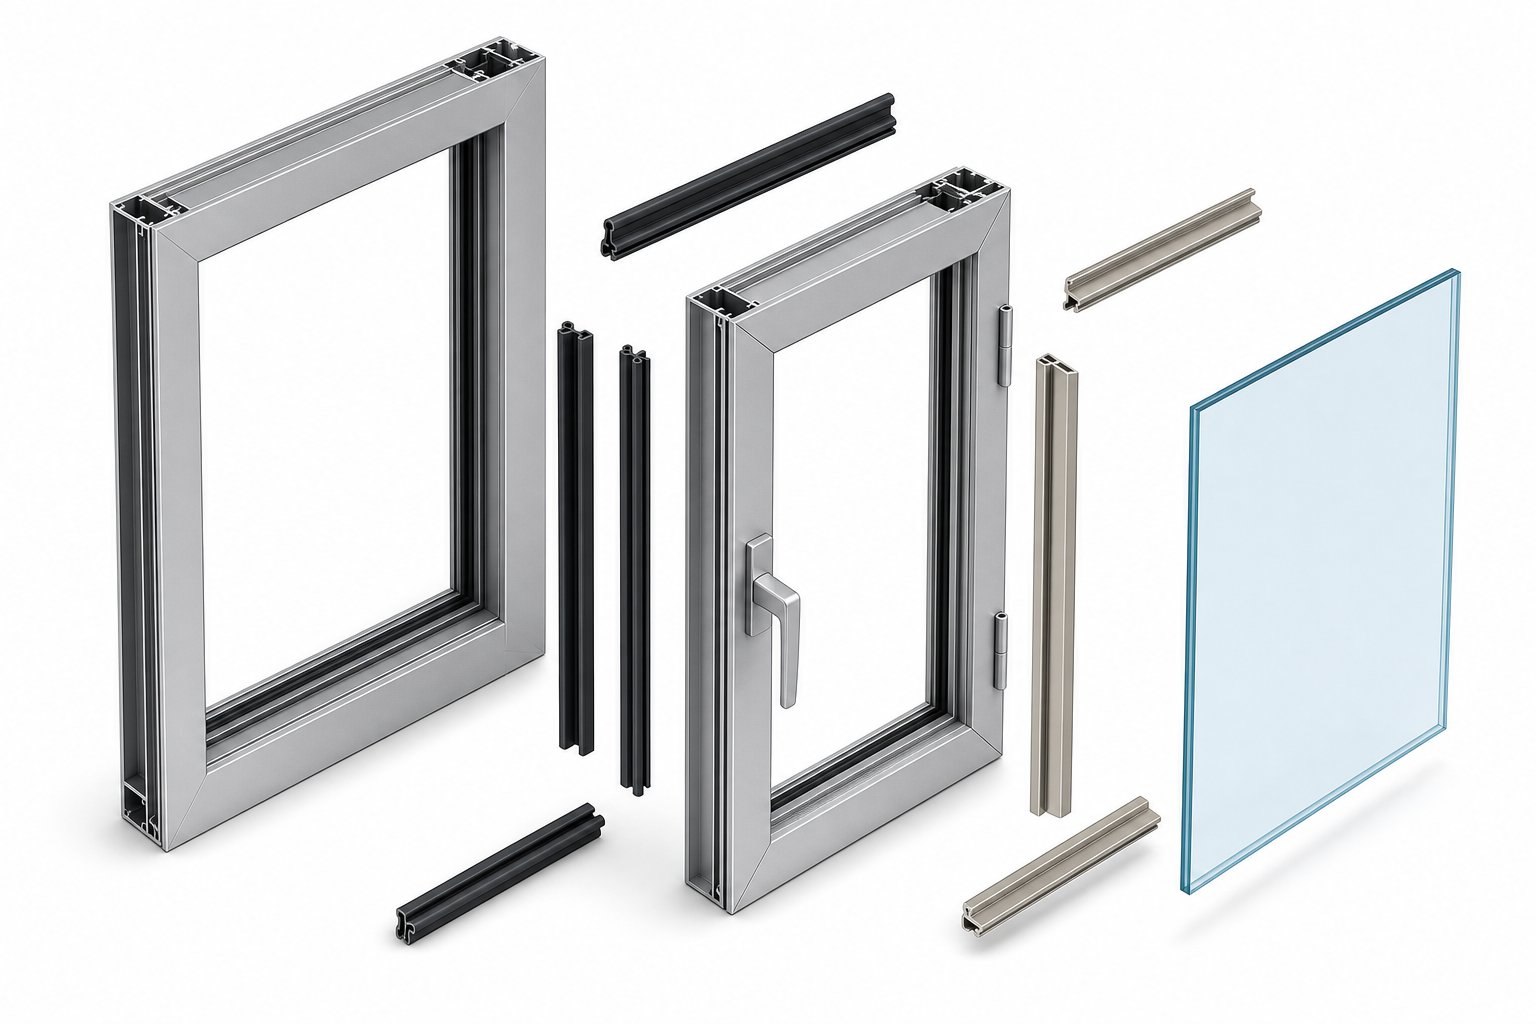
Every aluminium casement window detail drawing dissects the unit into distinct sections, each representing a critical junction between the window and the surrounding wall. Think of it like an exploded diagram of a machine — each part has a job, and the drawing shows you whether that job is being done well. Before you can judge performance on paper, you need to know what you’re looking at.
Here’s a breakdown of the primary components you’ll encounter in a typical detail set:
- Frame profile — the fixed aluminium perimeter anchored into the wall opening, forming the structural backbone of the entire unit.
- Sash profile — the operable (moving) section that holds the glazing and swings open on hinges.
- Glazing bead — the clip-in or screw-fixed strip that secures the glass unit within the sash or fixed frame.
- Weather seals — rubber or synthetic gaskets compressed between the sash and frame when closed, blocking air and water.
- Thermal break — an insulating barrier (usually polyamide) separating the interior and exterior aluminium faces to reduce heat transfer.
- Hardware pocket — recessed channels within the frame or sash that house hinges, locking points, and stays.
- Drainage slots (weep holes) — small openings that allow trapped moisture to escape to the exterior.
These elements appear across every section of the drawing — head, sill, jamb, mullion, and transom — but their geometry and configuration shift depending on their position in the window assembly.
Head Detail and Its Role in Weather Protection
The head detail sits at the top of the frame where the aluminium casement window meets the wall opening above. Its primary job is straightforward: keep water out. Rain running down the external wall face hits this junction first, so the head profile typically incorporates a drip edge or recessed channel that directs water away from the frame-to-wall interface.
In a quality specification, you’ll see the head detail showing a clear gap between the top of the frame and the lintel or header, filled with a compressible foam backing rod and sealed with a flexible sealant. This allows for minor structural movement without cracking the seal. The drawing should also show how external flashing (often a metal Z-flashing or self-adhesive membrane) laps over the head of the frame, creating a shingle effect that sheds water outward rather than letting it track behind the frame.
Look for the seal configuration at the head — a well-designed aluminum casement window will show at least two lines of weather defence here, preventing both direct water entry and wind-driven rain from reaching the interior.
Sill Detail and Drainage Design
The sill detail is arguably the most critical section in any window drawing. Gravity pulls water downward, and the sill is where it accumulates. A properly designed sill profile slopes outward (typically at a minimum 5-degree fall) so water drains away from the glass and frame rather than pooling against seals.
Weep holes or drainage slots appear in the sill section of the outer frame, allowing any moisture that breaches the primary weather seal to escape before it reaches the inner seal. This creates what’s known as a drained and ventilated cavity — a pressure-equalisation principle that’s fundamental to high-performance aluminum casement windows in exposed Australian conditions.
When reviewing a sill detail, check whether the drawing shows a sub-sill or sill support bar beneath the main frame. This component provides structural support, creates a secondary drainage plane, and simplifies installation by allowing the frame to sit level even on slightly uneven masonry. A single casement window in a standard residential opening might use a simple integrated sill, while larger or multi-panel configurations often require a dedicated sub-sill for adequate water management.
Jamb, Mullion, and Transom Explained
The jamb details represent the vertical sides of the frame — left and right — where the window meets the wall reveals. These sections show how the frame is fixed to the structure (typically with mechanical anchors or screw fixings through the frame into timber or masonry), how the gap between frame and wall is sealed, and where the hinge hardware sits on the opening side.
A mullion is the vertical divider used when multiple window panels sit side by side within a single frame. In a french casement window configuration, for example, two sashes meet at a central mullion (or in some designs, the sashes meet each other without a fixed mullion, using an astragal instead). The mullion detail shows how the profiles interlock, where seals compress, and how structural loads transfer between panels. French casement windows are popular for maximising the clear opening, and their detail drawings reveal whether the meeting stile design provides adequate weather resistance without a bulky central bar.
The transom is essentially a horizontal mullion — it divides upper and lower sections of a window assembly. You’ll see transoms in configurations where a fixed highlight panel sits above an operable casement sash, or where windows casement french style are paired with a top-hung awning above. The transom detail shows drainage paths (since water can collect on this horizontal surface), structural capacity for supporting glass above, and seal continuity between the operable and fixed sections.
For single frame casement windows — a single operable sash within one frame — the detail set is simpler: head, sill, and two jambs. But as soon as you combine multiple panels, fixed lights, or mixed opening types, mullion and transom details become essential reading. Understanding how these components interact tells you whether the system will perform as a unified assembly or whether weak points exist at the junctions between sections.
The relationship between all these parts — frame profile depth, sash overlap onto the frame, seal compression distance, and glazing bead retention — determines real-world performance. A drawing that shows generous sash-to-frame overlap (typically 8mm or more) with dual compression seals indicates a system designed for Australian wind and rain exposure. Minimal overlap with a single seal line suggests a lighter-duty product better suited to sheltered applications. These are the details that separate a window specification you can trust from one that looks good only on a brochure.
How to Read Cross-Section Detail Drawings
Knowing the parts is one thing. Reading the drawing that ties them all together is where most people get stuck. A cross-section detail slices through the window assembly at a specific point — head, sill, or jamb — and lays bare every layer from the exterior face of the wall to the interior lining. Each material gets its own graphic language, and once you crack that code, even complex casement window designs become surprisingly legible.
Understanding Cross-Section Conventions and Symbols
Technical drawings use hatching patterns to distinguish materials at a glance. Aluminium profiles are typically shown with a specific pattern of thin, closely spaced diagonal lines at 45 degrees — distinct from the broader, more widely spaced hatching used for steel. Rubber seals and gaskets appear as solid black fills or a stippled pattern representing rubber, plastic, and electrical insulation. Glass is either left blank (clear) or shown with a fine diagonal line along its edge to indicate the cut surface.
Thermal breaks — the polyamide or polyurethane strips that separate inner and outer aluminium faces — are often highlighted with a distinct hatch or a contrasting fill, making them easy to spot within the profile. Dimension lines with arrows and numerical values (in millimetres) indicate profile depths, seal gaps, and glazing rebate dimensions. If you see a dashed line within the frame profile, it usually represents a hidden feature behind the cutting plane, such as a screw channel or drainage path not visible in that particular slice.
Identifying Key Performance Features in a Drawing
Here’s a practical sequence for reading any aluminium casement window cross-section, working from the weather side inward:
- External face and drip features — identify the outermost aluminium surface, any projecting drip edges, and the external glazing line.
- Outer weather seal — locate the first compression gasket between the sash and frame. This is your primary rain defence.
- Drainage chamber — look for the cavity between outer and inner seals. This space should connect to weep slots at the sill, forming the pressure-equalised zone.
- Inner air seal — find the second (or third) gasket closer to the room side. This seal blocks air infiltration and contributes to acoustic performance.
- Thermal break zone — spot the insulating strip within the frame and sash profiles. Its width (typically 20mm to 34mm in thermally improved systems) directly affects U-value.
- Glazing pocket and bead — identify where the glass unit sits, how it’s retained, and the depth available for different glazing thicknesses.
- Internal face and hardware pocket — note the interior aluminium surface, any recessed channels for locking mechanisms, and the finished edge that faces the room.
This outside-to-inside reading method works for push out casement windows, inswing casement windows, and fixed panels alike. The difference between a push out window and an inswing casement window shows up in the hinge location and the direction the sash overlaps the frame — on outward-opening units, the sash sits on the exterior side of the frame seal line, while inswing designs reverse that relationship.
To determine opening direction from a drawing, look for the hinge pocket. It appears as a recessed notch or channel on one jamb detail, sized to accept the hinge leaf. The opposite jamb will show the locking hardware pocket instead. On plan-view drawings, a dashed arc indicates the swing path, confirming whether the casement window design is left-hung or right-hung.
Common Mistakes When Reading Window Details
The most frequent error is confusing the interior and exterior sides of the section. Many drawings label these with “EXT” and “INT” or use a ground line and wall hatching to orient you, but not all do. If you’re unsure, look for the drainage slope — it always falls toward the outside.
Another common trap: assuming all windows with frame profiles of the same depth perform identically. Two 52mm-deep frames can have vastly different thermal break widths, seal configurations, and glazing capacities. The detail drawing reveals these differences; the spec sheet often doesn’t. Similarly, people sometimes mistake a window block frame (a simple rectangular frame for new masonry openings) for a retrofit frame with built-in reveal covers. The section drawing clarifies which type you’re dealing with by showing the fixing method and perimeter interface.
Spend a few minutes orienting yourself before diving into dimensions. Confirm which section you’re viewing (head, sill, or jamb), identify the exterior face, and then work inward layer by layer. That disciplined approach turns a dense technical drawing into a readable story about how your window will actually perform once it’s built into the wall.
Frame Profiles, Alloys, and Wall Thickness
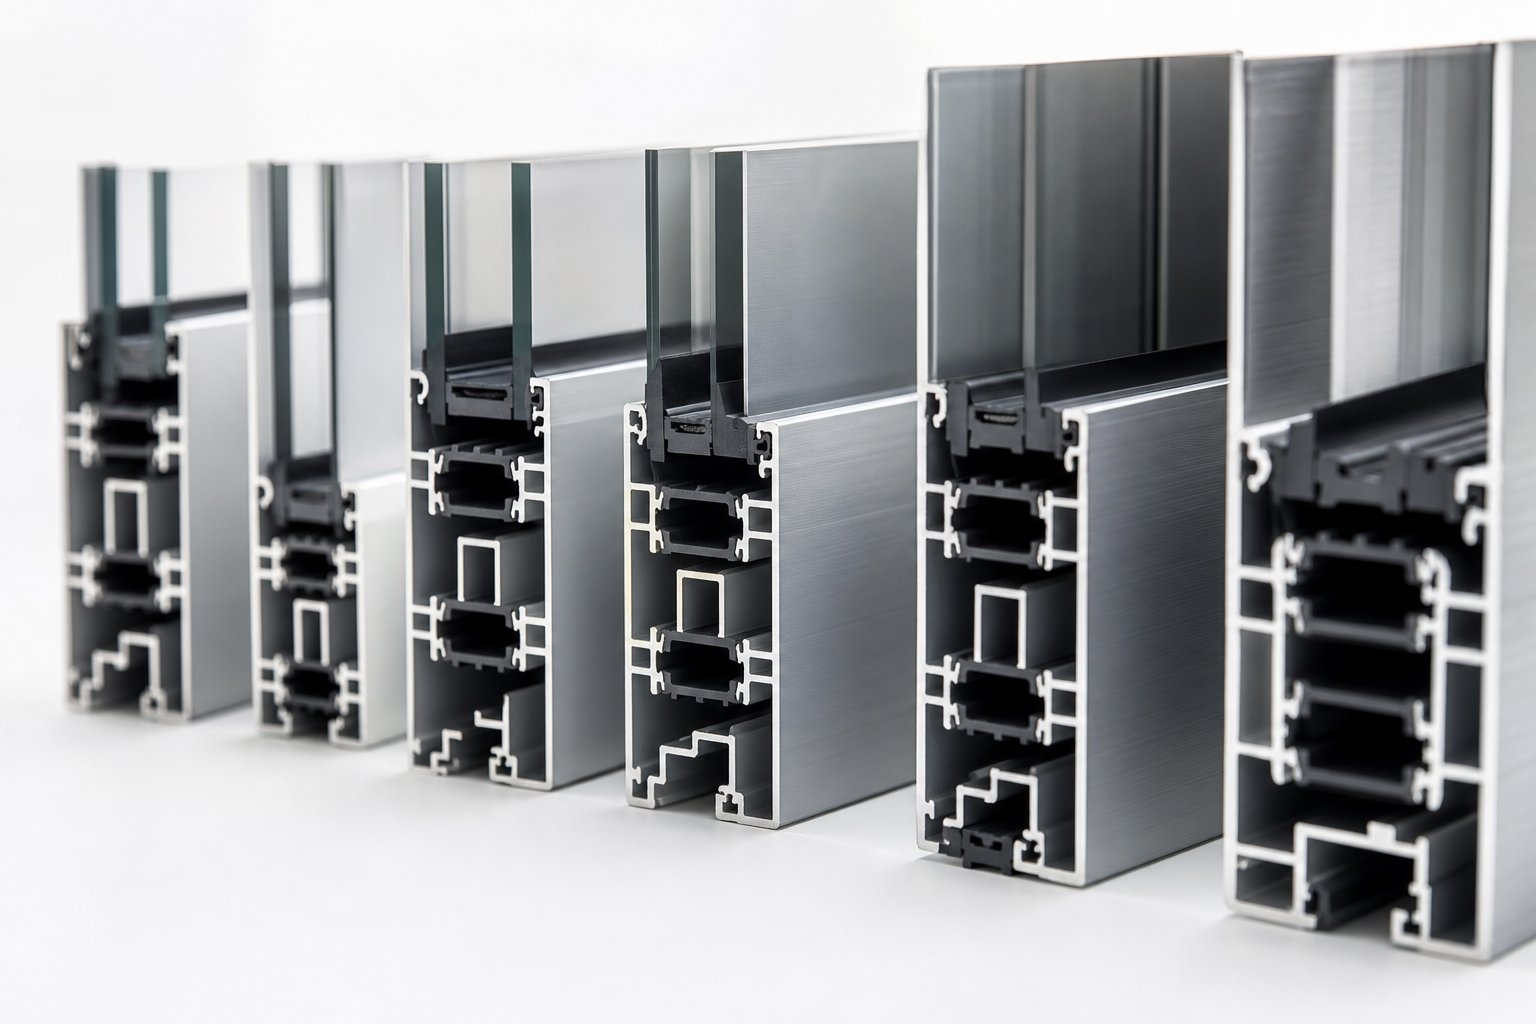
Those cross-section drawings you’ve learned to read are full of profile geometry — but the material behind that geometry matters just as much. Two frames can look identical on paper yet perform very differently depending on the aluminium alloy, wall thickness, and whether a thermal break is present. This is where specification reading shifts from shape recognition to material science.
Aluminium Alloy Types and What They Mean
Most aluminium casement windows sold in Australia use 6063-T5 alloy — and for good reason. The “6063” designates the alloy composition (aluminium with small additions of magnesium and silicon), while “T5” indicates the heat treatment temper applied after extrusion. In practical terms, this combination delivers three things that matter for window frames:
- Excellent extrudability — the alloy flows smoothly through complex dies, allowing manufacturers to produce intricate hollow profiles with tight tolerances, thin walls, and integrated channels for seals and hardware.
- Good corrosion resistance — 6063 forms a stable oxide layer that protects against atmospheric exposure, making it well suited to Australian coastal and urban environments.
- Adequate strength — with a tensile strength around 150 MPa in T5 temper (or approximately 190 MPa in T6), it handles residential and light commercial wind loads without requiring heavy sections.
You might occasionally see 6061-T6 specified for aluminum frame casement windows in high-load commercial applications. It’s roughly 50% stronger, but harder to extrude into complex shapes and more expensive. For the vast majority of residential casement window sizes encountered in Australian projects, 6063-T5 hits the right balance between performance, finish quality, and cost.
Wall Thickness and Structural Performance
Wall thickness refers to the thickness of the aluminium material forming the profile’s outer and inner faces — not the overall depth of the frame. It’s a critical number that directly affects how much load the frame can carry and how well it resists deflection under wind pressure.
Australian Standard AS 2047 and industry practice generally call for a minimum wall thickness of 1.4mm for structural members in window frames. Thinner profiles (1.2mm or below) might appear in budget products or thin frame windows marketed for their slim aesthetics, but they compromise structural rigidity. Under sustained wind loads — particularly in exposed or elevated positions — undersized wall thickness leads to frame deflection, seal disengagement, and ultimately water or air leakage.
For standard residential casement windows sizes, 1.4mm to 1.6mm wall thickness provides a solid margin. Larger sashes or commercial applications often step up to 1.8mm or 2.0mm to maintain deflection limits within acceptable tolerances. When reviewing a detail drawing, the wall thickness is usually noted as a dimension on the profile cross-section, or listed in the accompanying specification schedule.
Standard Sizes and Custom Profile Options
Frame profile depth — the measurement from the exterior face to the interior face of the frame — determines what the window can accommodate in terms of glazing thickness, thermal break width, and hardware integration. Deeper profiles handle more, but they also create wider sight lines. Here’s how common depths align with typical applications:
| Profile Depth | Typical Application | Glazing Capacity | Thermal Break |
|---|---|---|---|
| 44mm | Residential light-duty, sheltered locations | Single or narrow double glazing (up to 20mm units) | Standard or none |
| 52mm | Residential general-purpose | Double glazing (up to 24mm units) | Standard (20–24mm) |
| 60mm | Residential heavy-duty, exposed sites | Double or slim triple glazing (up to 30mm units) | Improved (24–30mm) |
| 70mm | Commercial, high-rise, cyclone-rated | Triple glazing or thick laminated units (up to 36mm+) | High-performance (30–39mm) |
Profile depth directly constrains maximum sash size. A shallow 44mm frame simply can’t house the hardware or provide the structural rigidity needed for a large sash — the moment of inertia is too low, and deflection under wind load exceeds acceptable limits. Deeper 60mm and 70mm profiles place more material further from the neutral axis, dramatically increasing stiffness and enabling custom casement windows with sash heights exceeding 1500mm or panel areas beyond 2.5 square metres.
For anyone chasing a clear frame window aesthetic with minimal visual bulk, the trade-off is real: slimmer profiles look elegant but limit panel size and thermal performance. The detail drawing tells you exactly where that trade-off sits for any given system.
Thermally improved profiles differ from standard ones by incorporating a polyamide or polyurethane strip that physically separates the interior and exterior aluminium sections. In a standard (non-thermally-broken) profile, the aluminium is continuous from outside to inside, conducting heat freely. A thermally broken profile is essentially two separate aluminium pieces bridged by an insulating barrier. The detail drawing makes this obvious — you’ll see the thermal break material (distinct hatching) interrupting the aluminium cross-section. Cased windows in older Australian homes often feature non-thermally-broken aluminium frames from the 1980s and 1990s; upgrading to a thermally improved profile is one of the most impactful changes when replacing a cased window in a renovation.
Nail-On Fin Frames Versus Retrofit Frames
The frame type you need depends entirely on whether you’re building new or replacing existing windows. Two main options dominate the Australian market:
Nail-on fin frames (also called flange frames) feature an integrated perimeter fin that fixes directly to the structural framing — timber studs or steel framing — before the external cladding is applied. The cladding then laps over the fin, creating a weathertight seal. This approach suits new construction and major renovations where the wall is open to the frame, because the fin becomes part of the building’s weather envelope. It provides a strong, well-sealed connection but requires access to the structural frame during installation.
Retrofit frames (sometimes called H-bar or block frames) are designed to fit within an existing opening without disturbing the surrounding wall finish. They’re fixed through the frame face directly into the masonry or timber reveal using mechanical anchors, and the perimeter gap is sealed with foam and sealant. This makes them far less invasive for replacement projects — no need to remove cladding, render, or internal linings.
The trade-off? Retrofit frames sacrifice a small amount of glass area because the frame must fit inside the existing opening rather than sitting behind the cladding. For straightforward window replacements where the existing structure is sound, retrofit frames save significant time and cost. For new builds or gut renovations where walls are stripped back, nail-on fin frames deliver a more integrated weather seal and maximise the glazed area within the rough opening.
Your detail drawings will clearly show which type is specified — the fin is unmistakable as a flat projection extending beyond the frame profile, while a retrofit frame shows a clean rectangular perimeter with face-fix anchor points. Knowing the difference ensures you’re comparing like with like when evaluating quotes and specifications for your project.
Thermal Breaks and Energy Performance Ratings
Choosing the right frame type and profile depth gets you the structural foundation. But structure alone doesn’t keep your home comfortable — thermal performance does. Aluminium conducts heat roughly 1,000 times faster than timber, which is precisely why raw aluminium frames earned a poor reputation for energy efficiency in decades past. Modern casement windows solve this problem with thermal break technology, and the detail drawings you’ve been learning to read will show you exactly how effective (or ineffective) a given system is.
Understanding U-Value, R-Value, and SHGC
Three metrics define how a window handles heat:
- U-value (thermal transmittance) — measures how quickly heat passes through the entire window system (frame + glass). Expressed in W/m²K, lower numbers mean better insulation. A casement window aluminium frame with no thermal break might sit around U6.7 for single glazing, while a thermally broken double-glazed unit can achieve U3.6 or better.
- R-value (thermal resistance) — the inverse of U-value. Higher is better. A single-glazed aluminium window rates around R0.15, whereas a thermally broken double-glazed system reaches approximately R0.28.
- SHGC (Solar Heat Gain Coefficient) — measures how much solar radiation passes through the window, expressed as a number between 0 and 1. In cooler Australian climates, a higher SHGC lets beneficial winter sun warm your interiors. In tropical regions, a lower SHGC reduces unwanted heat gain.
The critical point: these ratings apply to the whole window system, not just the glass. Frame material plays a substantial role, which is why an aluminium casement with identical glazing can perform very differently depending on whether it includes a thermal break.
How Thermal Breaks Transform Aluminium Performance
A thermal break physically separates the exterior and interior aluminium faces with an insulating material, interrupting the conductive heat path. Two technologies dominate the market:
- Polyamide strips (struts) — rigid pre-formed strips inserted and crimped into channels within the aluminium profile. Polyamide has a thermal conductivity of approximately 2.08, significantly lower than aluminium’s 160+ W/mK, though higher than polyurethane alternatives.
- Polyurethane pour-and-debridge — liquid polyurethane is poured into the aluminium cavity, solidifies in under three minutes, and then a strip of aluminium at the base is removed (debridged) to break the thermal path. Foamed polyurethane achieves a thermal conductivity around 0.21, making it roughly ten times more effective as an insulator than polyamide.
Why does thermal break width matter? A wider break places more insulating material between the hot and cold aluminium faces, reducing heat flow proportionally. A 20mm polyamide strip delivers a meaningful improvement over a non-broken frame, but stepping up to a 34mm high-performance break can push aluminium casement windows into territory that rivals wood casement windows and uPVC casement window systems for thermal resistance — without sacrificing aluminium’s strength, slim sight lines, or durability in harsh conditions.
This is why detail drawings specify break width rather than simply noting “thermally broken.” A 20mm break and a 34mm break are not interchangeable — they target different climate zones and performance requirements under the National Construction Code (NCC).
Performance Ranges With and Without Thermal Breaks
The following table illustrates how thermal break configuration affects whole-window performance for a typical double-glazed aluminium casement system:
| Configuration | Typical U-Value (W/m²K) | Approximate R-Value | Suitable Climate Application |
|---|---|---|---|
| No thermal break (double glazed) | 4.5–5.0 | R0.20–R0.22 | Mild coastal, NCC Zone 5–6 (sheltered) |
| Standard thermal break (20–24mm polyamide) | 3.2–3.8 | R0.26–R0.31 | Temperate zones, NCC Zone 4–6 |
| High-performance thermal break (30–39mm polyurethane) | 2.2–2.8 | R0.36–R0.45 | Cold climates, alpine, NCC Zone 7–8 |
For context, a typical brick veneer wall with R2 insulation batts achieves a U-value of 0.45 — meaning even a high-performance thermally broken window loses heat roughly five times faster than the surrounding wall. That’s the reality of any window, regardless of frame material. But the gap between a non-broken aluminium frame (U5.0) and a high-performance break (U2.4) is enormous in energy cost terms. One Australian case study found that choosing non-thermally-broken aluminium over thermally broken or uPVC alternatives increased projected heating and cooling costs by more than a third over 20 years.
Casement windows vinyl (PVC) and timber-framed systems naturally achieve lower U-values because their frame materials are inherently less conductive. But aluminium clad casement windows and fully aluminium thermally broken systems close that gap while offering superior structural performance, slimmer profiles, and far greater resistance to warping, rot, and termite damage — factors that matter enormously across Australian climate zones. The trade-off isn’t thermal performance versus durability anymore; with the right thermal break specification, modern aluminium casement windows deliver both.
Your climate zone determines the minimum performance your building code demands. In NCC Climate Zones 7 and 8 (think Canberra, Hobart, alpine regions), high-performance thermal breaks are essentially mandatory to meet NatHERS energy targets. In milder zones along the Queensland coast, a standard break — or in some sheltered applications, even a non-broken frame — may satisfy code minimums, though exceeding those minimums almost always pays for itself in reduced energy bills and improved comfort. The detail drawing tells you exactly which thermal break width is specified, letting you verify whether the proposed system matches your climate requirements before a single frame is ordered.
Glazing Options and Frame Profile Selection
Thermal break width determines how well the frame resists heat flow — but the glass itself accounts for roughly 80% of a window’s total thermal performance. That means your glazing choice and your frame profile depth are locked in a relationship: one dictates what the other can accommodate. Get this pairing wrong, and you’ll either end up with a frame too shallow to hold the glass you need, or you’ll over-specify the frame for glazing that doesn’t demand it.
Single, Double, and Triple Glazing Compatibility
Glass units vary dramatically in thickness depending on configuration. A single casement window with basic 4mm or 5mm monolithic glass needs minimal frame depth — even a slim 44mm profile handles it comfortably. Double-glazed insulating glass units (IGUs) typically range from 20mm to 28mm thick (two panes of glass plus an air or gas-filled spacer), requiring at least a 52mm frame to seat properly with adequate glazing bead engagement. Triple casement windows push that further — three panes with two spacer cavities create units 36mm thick or more, demanding 60mm to 70mm profile depths to maintain structural glazing retention and seal compression.
Here’s a practical breakdown of common glazing configurations and where they fit:
- Single glazing (4–6mm) — budget applications, internal partitions, or mild climates where NCC thermal requirements are minimal. Rarely specified in new residential builds.
- Double glazing with air fill (20–24mm unit) — the standard for most Australian residential projects. Provides meaningful thermal and acoustic improvement over single glazing at moderate cost.
- Double glazing with argon fill and Low-E coating (20–28mm unit) — the performance sweet spot for temperate and cool climates. Argon’s lower thermal conductivity reduces convective heat transfer within the cavity, while Low-E coatings reflect radiant heat back toward its source.
- Triple glazing with argon fill (36–44mm unit) — maximum thermal performance for alpine regions, passive house projects, or severe noise exposure. Heavier units require robust hardware and deeper frame profiles.
- Laminated glass (6.38mm–12.76mm per pane) — specified for safety compliance (AS 1288), bushfire zones (BAL ratings), acoustic control, or cyclone-rated applications. Adds weight and thickness that must be factored into frame selection.
How Glazing Thickness Affects Frame Selection
The glazing rebate — the pocket within the sash or fixed frame that receives the glass unit — must be deep enough to fully seat the IGU while leaving room for the glazing bead to clip or screw into place. A typical rebate provides 18mm to 22mm of engagement depth for standard double glazing. If you try to fit a 36mm triple-glazed unit into a rebate designed for 24mm double glazing, the bead won’t engage properly, compromising both weather sealing and structural retention under wind load.
This is why the detail drawing’s glazing pocket dimensions matter so much. They tell you the maximum glass unit thickness the system accepts — and by extension, the thermal and acoustic performance ceiling for that particular frame. For large casement windows with sash areas exceeding 2 square metres, the glazing weight also becomes a factor. A 28mm double-glazed unit weighs approximately 30 kg per square metre; a 44mm triple unit pushes past 45 kg/m². Hinges, stays, and locking hardware all need to be rated for that load, and the frame profile must resist the resulting deflection.
The largest casement window a system can support depends on this interplay between glazing weight, profile stiffness (moment of inertia), and hardware capacity. Manufacturers publish maximum sash size tables for each profile, and these figures assume a specific glazing thickness — swap in heavier glass and the maximum panel size shrinks accordingly.
Exploring Glazing Configurations for Your Climate
Pairing a fixed casement panel with an operable sash is one of the most effective strategies for maximising glass area without sacrificing ventilation. A fixed casement window doesn’t need hinges, stays, or locking hardware, so its frame and sash profiles can be slimmer — or the same profile can support a larger panel area because there’s no moving weight to manage. Flanking a central fixed panel with operable single casement windows on each side gives you an expansive view through the fixed light and cross-ventilation through the operable sashes.
This combination approach works particularly well for living areas facing a view, where you want the largest possible uninterrupted glass area. The detail drawings for these configurations show how the mullion between the fixed and operable sections handles the transition — different seal lines, different glazing bead details, but a unified external appearance.
For Australian homeowners, builders, and architects exploring these configurations, suppliers like MEICHEN offer aluminium casement systems with multiple glazing choices and custom sizing, allowing you to match frame depth and glass specification to your specific climate zone and design intent. Their project-based supply approach means you can configure fixed and operable panels within a single system rather than mixing incompatible product lines — a practical advantage when coordinating residential or commercial window schedules.
Glazing selection is never a standalone decision. It ripples through frame depth, hardware specification, structural calculations, and ultimately cost. The detail drawing captures all of these interdependencies in a single cross-section, which is exactly why reading it properly saves you from discovering incompatibilities on site rather than on paper.
Weatherstripping and Seal Configurations
Glazing and frame profiles handle the structural and thermal side of the equation. But none of that matters if air and water find a path between the sash and frame when the window is closed. The seal system is what turns a well-engineered aluminium casement into a genuinely weathertight assembly — and the detail drawing shows you exactly how many lines of defence sit between the outside weather and your interior space.
Compression Seals and How They Work
Casement windows have a natural advantage over sliding or hung window types when it comes to sealing. The closing action pulls the sash firmly against the frame, compressing the gaskets rather than simply sliding past them. This compression seal principle is what makes aluminium crank windows and vertical crank out windows consistently outperform sliders for air and water resistance — the seal gets tighter as the hardware draws the sash home.
In a typical detail drawing, you’ll see the compression seal as a solid black or stippled profile sitting in a channel on either the frame or sash face. When the window closes, the opposing surface presses into the gasket, deforming it to create continuous contact around the full perimeter. The amount of compression (usually 2–4mm of deformation) is critical — too little and the seal doesn’t engage fully; too much and the gasket fatigues prematurely.
Brush Seals and Bubble Gaskets
Not every seal position uses a compression gasket. Brush seals — fine synthetic filaments set into a carrier strip — appear primarily in sliding window systems, but you’ll sometimes find them in secondary positions on casement assemblies, particularly where a casement window with screen track interfaces with the frame. They’re effective at blocking dust and insects while allowing smooth movement, though they offer less resistance to air infiltration than compression alternatives.
Bubble gaskets (also called hollow bulb seals) are the workhorse of high-performance aluminium casement details. Made from EPDM rubber, these gaskets feature a hollow tubular cross-section that compresses evenly with minimal force, then recovers its shape when the window opens. The hollow profile means consistent compression across the full perimeter, even where slight frame deflection or manufacturing tolerances create minor gaps. You’ll spot them in detail drawings as a circular or oval profile sitting proud of the frame channel, ready to deform against the closing sash.
The seal materials themselves vary in durability and suitability:
- EPDM (Ethylene Propylene Diene Monomer) — the industry standard for window gaskets. Excellent UV resistance, maintains flexibility across a wide temperature range (-40°C to +120°C), and lasts 20+ years in Australian conditions without significant degradation.
- Silicone — superior temperature resistance and longevity, but more expensive. Often specified for extreme environments or where colour stability matters (silicone doesn’t yellow over time).
- TPE (Thermoplastic Elastomer) — co-extruded directly with the aluminium profile during manufacturing, creating a permanent bond. Lower cost than EPDM but can harden over time in high-UV environments, making it less ideal for exposed northern Australian applications.
Multi-Point Locking and Seal Performance
A seal is only as good as the force holding it in compression. This is where multi-point locking hardware becomes essential. Unlike a single central latch — which concentrates closing force at one point and allows the sash corners to pull away from the frame — a multi-point system engages three to five locking points simultaneously with a single handle turn. The result is distributed, uniform pressure around the entire sash perimeter, ensuring every millimetre of gasket achieves its designed compression.
For windows with cranks — the fold-down or roto-style operators common on roll out windows and outward-opening casements — the crank mechanism itself provides the final pull-in force that seats the sash against the seals. Combined with multi-point espagnolette locks, this creates consistent compression at the top, bottom, and both sides of the sash. Detail drawings show the lock points as small rectangles or notches at intervals along the frame, with corresponding keeper plates on the sash.
Quality aluminium casement details typically reveal a dual or triple weather seal configuration in cross-section. Working from outside to inside, the system follows a staged logic:
- Outer weather seal — the first compression gasket deflects the bulk of wind-driven rain and reduces water volume reaching inner layers.
- Drainage chamber — a cavity between outer and inner seals, connected to the exterior via pressure-equalisation vents. Any water that passes the outer seal enters this space, where equalised air pressure prevents it from being driven further inward, and gravity routes it out through weep slots at the sill.
- Inner air seal — the final gasket on the room side, responsible for airtightness and acoustic isolation. Under normal conditions, this seal should never contact water.
This pressure-equalised, drained system is what separates a high-performance aluminium casement from a budget product relying on a single seal line. When you see three distinct gasket profiles in a cross-section drawing — with a clear cavity between the outer and inner seals — you’re looking at a system engineered to handle Australian storm conditions without relying on any single component to be perfectly watertight. It’s redundancy by design, and it’s visible in the detail drawing if you know where to look.
Screens add another layer to consider. For crank windows with screens, the flyscreen typically mounts on the interior side (since the sash swings outward), sitting in its own channel within the frame profile. The screen track shouldn’t interfere with the primary seal lines, and well-designed systems show a dedicated screen pocket separated from the weather seal zone. Screens for crank out windows need to be removable or hinged to allow access for cleaning the exterior glass — another detail visible in the jamb cross-section if the system accounts for it.
Climate Zones and Building Code Requirements
Seal configurations, thermal breaks, and glazing choices all contribute to performance — but performance itself is defined by the building codes that govern your specific site. A triple-sealed, thermally broken casement aluminium window system that exceeds requirements in suburban Melbourne might still fall short for a cyclone-rated exterior casement window on the Townsville coastline. The detail drawing should specify exactly which ratings the window achieves, and those ratings only make sense when measured against what your location demands.
Performance Criteria by Climate Zone
Australian building codes don’t treat every site equally — and they shouldn’t. A sheltered single-storey home in Adelaide’s inner suburbs faces fundamentally different environmental loads than a beachfront property in Darwin or an alpine lodge near Thredbo. The Australian Standard AS 2047 establishes the performance framework that all windows must satisfy, covering four critical criteria:
- Structural performance (wind load) — the window must resist deflection and failure under the design wind pressures specific to its site, height, and shielding conditions.
- Water penetration resistance (WPR) — measured in Pascals, this rating confirms how much wind-driven rain pressure the window can withstand before water breaches the interior seal line.
- Air infiltration — sets maximum allowable air leakage through the closed window, directly affecting energy efficiency and occupant comfort.
- Operating force — ensures the window remains easy to open and close, particularly important for accessibility compliance.
Climate zone shapes which of these criteria dominates your specification. Coastal tropical regions prioritise water resistance and structural capacity against cyclonic winds. Cold-climate zones in southern Australia and alpine areas push thermal performance to the foreground. Temperate urban sites often find that a balanced mid-range specification covers all bases without over-engineering any single parameter.
Understanding Wind Load and Water Resistance Ratings
Wind load ratings are expressed as two values: Serviceability Limit State (SLS) and Ultimate Limit State (ULS). SLS represents the pressure at which the window deflects to its maximum allowable limit (typically span/250) without permanent damage — it’s about everyday performance. ULS is the pressure at which the window must not catastrophically fail — it’s about safety in extreme events.
For typical housing, these are expressed as N or C ratings derived from AS 4055 (Wind Loads for Housing). The N ratings (N1 through N6) apply to non-cyclonic regions, while C ratings (C1 through C4) cover cyclonic areas in northern Australia. Commercial and multi-storey residential buildings use specific SLS and ULS pressures calculated from AS/NZS 1170.2 rather than simplified letter ratings.
Water penetration resistance must equal or exceed 30% of the positive SLS wind load for the site. So if your site’s SLS rating is 1,500 Pa, the window needs a minimum WPR of 450 Pa. This relationship means that as wind exposure increases, water resistance requirements automatically scale upward — a logical link, since higher winds drive rain harder against the building envelope.
Unlike steel casement windows common in heritage buildings — where the metal casement window frame relies on putty and paint for weather protection — modern aluminium systems achieve these ratings through engineered seal compression and pressure-equalised drainage. The performance is tested, certified, and labelled rather than dependent on maintenance-intensive coatings.
Building Code Minimums and When to Exceed Them
The National Construction Code (NCC) references AS 2047 as the deemed-to-satisfy pathway for window compliance. Every compliant window carries a performance label showing its tested wind and water ratings. But code minimum is exactly that — the lowest acceptable standard. Exceeding it often makes practical sense, particularly in these scenarios:
| Exposure Level | Typical SLS Wind Load | Minimum WPR | Key Considerations |
|---|---|---|---|
| Low-rise sheltered (suburban, single-storey) | 600–1,000 Pa | 180–300 Pa | Standard specifications generally sufficient; focus on thermal and acoustic performance |
| Mid-rise urban (2–4 storeys, moderate exposure) | 1,000–2,000 Pa | 300–600 Pa | Higher wind loads at elevation; heavier-duty hardware and deeper profiles recommended |
| High-rise coastal (5+ storeys or direct ocean exposure) | 2,000–3,500 Pa | 600–1,050 Pa | Maximum structural ratings; enhanced corrosion protection; cyclone compliance in northern zones |
A decision-making framework helps match specifications to real conditions. Coastal properties — even single-storey ones — face salt-laden air that accelerates corrosion, so specifying marine-grade anodising or premium powder coating matters as much as the structural rating. Alpine regions demand high-performance thermal breaks and low U-values to meet NatHERS energy targets, even if wind loads are moderate. Tropical areas in Queensland and the Northern Territory need cyclone-rated C-class windows with laminated glazing and reinforced hardware, plus generous ventilation capacity for the months when air conditioning isn’t running.
The responsibility for nominating the correct wind rating sits with the purchaser — typically the builder, architect, or designer — who must provide this information in writing to the window supplier. Detail drawings should clearly note the design wind pressures or N/C rating the window is specified to meet, allowing the installer to verify on-site that the correct product has been delivered. If your detail drawings don’t include these ratings, ask for them. A specification without performance ratings is incomplete, regardless of how detailed the cross-sections appear.
Selecting the Right Aluminium Casement Specifications
Ratings, profiles, seals, thermal breaks — you now understand what each element does and how to spot it in a detail drawing. The remaining question is practical: which specifications actually matter for your project? Not every build needs a 70mm thermally broken frame with triple glazing, and not every budget allows for it. The trick is matching the right performance tier to your specific conditions without over-spending or under-specifying.
New Build Versus Retrofit Considerations
Your starting point — new construction or casement window replacement — determines the frame type before anything else. New builds give you access to nail-on fin frames that integrate directly with the wall’s weather barrier, maximising glass area and providing the tightest possible seal at the frame-to-structure junction. You’re working with a clean rough opening, so there’s no compromise on sizing or profile depth.
Replacement casement windows in existing homes typically require retrofit (block) frames that fit within the current opening without disturbing surrounding finishes. This approach is faster, less disruptive, and significantly cheaper — but it locks you into the existing opening dimensions and sacrifices a small amount of glazed area. If the existing frame is structurally sound, retrofit delivers excellent value. If it’s corroded, warped, or water-damaged, full-frame removal becomes necessary regardless of budget preference, pushing the project into new-construction territory even though the house isn’t new.
For major renovations where walls are already stripped back to framing, treat the window specification as a new build — you have full access to the structure, so there’s no reason to accept the limitations of a retrofit frame.
Matching Specifications to Your Application
Residential and commercial projects demand different performance tiers, and the best casement windows for a suburban home aren’t necessarily the top rated casement windows for a multi-storey office building. Here’s a structured approach to evaluating specifications against your requirements:
- Confirm your site’s wind region and terrain category — this gives you the minimum structural and water resistance ratings your windows must achieve under AS 2047.
- Identify your NCC climate zone — this determines the thermal performance floor (U-value) your glazing and frame combination must meet for NatHERS compliance.
- Assess exposure conditions — coastal salt spray, bushfire attack level (BAL), cyclone region, or high-UV exposure each add specific requirements beyond the baseline code.
- Define your glazing needs — acoustic control, solar heat gain management, safety compliance (AS 1288), or maximum thermal insulation. This dictates glass unit thickness, which in turn sets your minimum frame profile depth.
- Set your aesthetic priorities — contemporary casement windows with slim sight lines require careful profile selection; a modern casement window look typically favours 52mm or 60mm frames with square-edge detailing rather than bulky 70mm commercial sections.
- Compare whole-of-life cost, not just supply price — a cheaper aluminium casement frame with no thermal break might save money upfront but cost substantially more in heating and cooling over 15 to 20 years, particularly in NCC Zones 6 through 8.
Casement style windows suit most residential applications because their compression seal mechanism inherently outperforms sliding alternatives for air and water tightness. But within the casement category, the gap between a basic single-seal system and a premium triple-sealed, thermally broken unit is enormous. Your site conditions and comfort expectations should drive that choice — not marketing claims alone.
Working With Suppliers Who Understand Your Needs
Armed with the knowledge from this guide, you’re in a position to have a genuinely informed conversation with window suppliers rather than relying on whatever they recommend by default. Ask to see the detail drawings — head, sill, and jamb sections — for any system you’re considering. Verify the thermal break width, seal configuration, glazing capacity, and tested performance ratings against your project’s requirements.
For Australian homeowners, builders, and architects ready to move from understanding details to specifying windows, suppliers like MEICHEN offer aluminium casement systems with custom configuration options, multiple colour choices, and project-based supply for both residential and commercial applications. Their range allows you to apply the specification knowledge you’ve gained — selecting the right profile depth, glazing type, and performance tier for your climate zone and design intent — rather than settling for a one-size-fits-all product.
The goal isn’t finding the single “best” window in some abstract sense. It’s finding the right aluminium casement specification for your site, your budget, and your long-term expectations — then verifying that choice in the detail drawings before anything gets ordered or installed. That’s how you read drawings like a pro and build with confidence.
Frequently Asked Questions About Aluminium Casement Window Details
1. What are aluminium casement window details and why do I need them?
Aluminium casement window details are scaled technical cross-section drawings showing the precise geometry of frame profiles, sash components, glazing pockets, weather seals, thermal breaks, and installation interfaces. Unlike marketing brochures that list general features, these documents reveal exactly how a window is constructed and sealed into a wall opening. Homeowners need them to compare quotes meaningfully, while builders and architects use them to verify compliance with AS 2047, confirm flashing interfaces, and ensure correct installation. Reading these details lets you verify performance claims rather than simply trusting them.
2. How do thermal breaks improve aluminium casement window performance?
Thermal breaks are insulating strips — typically polyamide or polyurethane — that physically separate the interior and exterior aluminium faces within the frame profile. Since aluminium conducts heat roughly 1,000 times faster than timber, this separation is critical. A standard 20-24mm polyamide thermal break can reduce a double-glazed aluminium casement’s U-value from around 4.5-5.0 W/m²K down to 3.2-3.8 W/m²K. High-performance 30-39mm polyurethane breaks push performance further to 2.2-2.8 W/m²K, approaching levels comparable to timber and uPVC frames while retaining aluminium’s strength and slim sight lines.
3. What minimum wall thickness should aluminium casement window frames have?
Australian Standard AS 2047 and industry practice generally require a minimum wall thickness of 1.4mm for structural members in aluminium window frames. This thickness provides adequate resistance to deflection under wind pressure for standard residential casement windows. Larger sashes or commercial applications typically step up to 1.8mm or 2.0mm. Budget products with wall thickness below 1.4mm risk frame deflection under sustained wind loads, which can cause seal disengagement and lead to water or air leakage over time.
4. What is the difference between nail-on fin frames and retrofit frames for casement windows?
Nail-on fin frames feature an integrated perimeter flange that fixes directly to structural framing before external cladding is applied, making them ideal for new construction where walls are open. They maximise glass area and provide a tightly integrated weather seal. Retrofit (block) frames fit within existing openings without disturbing surrounding wall finishes, fixed through the frame face into masonry or timber reveals. They suit replacement projects where minimal disruption is preferred but sacrifice a small amount of glazed area. Your detail drawings will clearly show which type is specified — the fin appears as a flat projection beyond the frame profile, while retrofit frames show a clean rectangular perimeter with face-fix anchor points.
5. How do I determine the correct wind and water resistance rating for my aluminium casement windows?
Your site’s wind region, terrain category, building height, and shielding conditions determine the required ratings under AS 2047. Non-cyclonic regions use N ratings (N1 through N6), while cyclonic areas in northern Australia use C ratings (C1 through C4). Water penetration resistance must equal or exceed 30% of the positive Serviceability Limit State wind load for your site. For example, if your SLS rating is 1,500 Pa, windows need a minimum water penetration resistance of 450 Pa. The responsibility for nominating the correct rating sits with the builder, architect, or designer, who must provide this information to the window supplier in writing. Suppliers like MEICHEN can then configure aluminium casement systems to meet your specific site requirements.
More Window & Door Guides