What Is Window Framing and Why Does It Matter
Window framing is the structural skeleton built into a wall to create, support, and reinforce an opening for a window unit. Every time you cut studs out of a wall to make room for glass, you interrupt the load path that keeps the structure standing. The window frame you build around that opening is what restores structural continuity, channeling gravity loads and lateral forces safely down to the foundation.
Get it wrong, and you risk sagging headers, cracked drywall, windows that bind or leak, and in serious cases, compromised wall integrity. Get it right, and the opening performs as if those studs were never removed.
What Window Framing Actually Does
Think of a framed wall as a continuous chain of vertical members transferring weight from the roof down to the ground. When you remove links from that chain for a window, the framing around the opening has to pick up the slack. Headers span the gap at the top, jack studs carry the header load down each side, and king studs anchor everything back into the wall system. Below the window, a rough sill and cripple studs complete the opening and provide nailing surfaces for sheathing.
A properly framed window opening redirects gravity and lateral loads through headers, jack studs, and king studs so the opening does not compromise the wall.
This same load-transfer logic applies whether you are framing rough openings for doors or windows. The principles are identical; only the dimensions and sill details change.
Who This Guide Is For
This guide is written for new-build framers, renovation contractors cutting into existing walls, and DIY homeowners tackling their first window project. It covers the full picture: component terminology, load-bearing versus partition wall differences, how to read a window rough opening size chart, code-aligned header sizing, step-by-step window framing sequences, and advanced methods like OVE framing. You will also find a troubleshooting section for common mistakes.
Whether you are installing a large picture window that demands engineered headers or fitting smaller between stud windows that slot into standard 24-inch on-center bays, the goal is the same: a square, plumb, properly supported opening ready to receive the window unit. Understanding each component inside that opening is where it all starts.
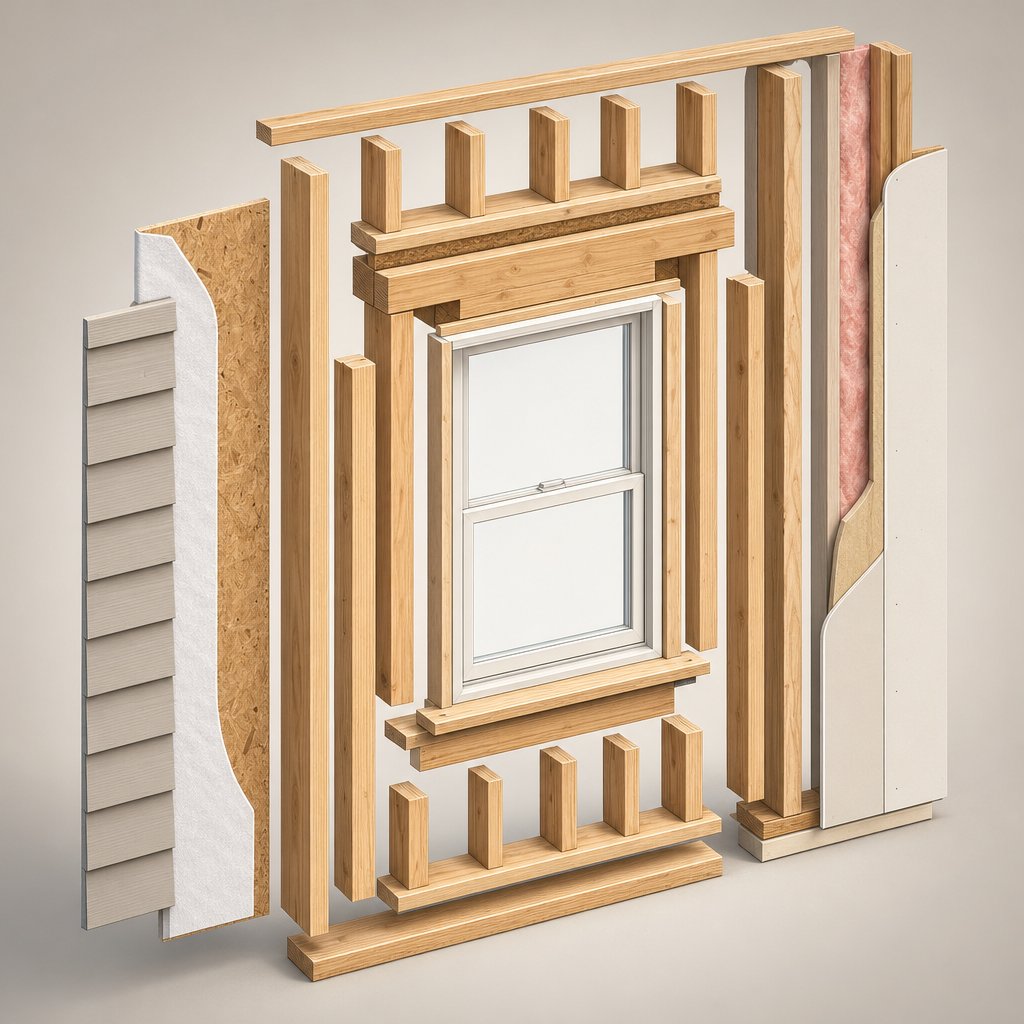
Anatomy of a Framed Window Opening
Every framed window opening is made up of the same core components, yet the terminology trips up even experienced builders. Names vary by region, and job-site shorthand does not always match what you will find in a codebook or manufacturer’s installation guide. This section breaks down each part in plain language so you have a single, bookmarkable reference for how to frame a window opening correctly.
King Studs, Jack Studs, and How They Work Together
Imagine stripping the drywall off a wall with a window in it. On each side of the opening, you will see two vertical members standing side by side. The outer one, running the full height from sole plate to top plate, is the king stud. The shorter one nailed directly to it, rising only to the underside of the header, is the jack stud (also called a trimmer stud). They look similar, but their jobs are distinct.
So what is a jack stud, exactly? It is the vertical member whose sole purpose is to carry the header. The header sits directly on top of the jack studs, and every pound of load that the header collects gets transferred straight down through the jacks to the sole plate and into the foundation. A well-supported header transfers its load to the jack stud and keeps the framework stable above the opening.
The king stud, by contrast, maintains the structural continuity of the wall itself. It ties the top plate to the sole plate just like any common stud would, but it also anchors the entire window assembly laterally. Without the king stud, the jack stud and header would have nothing solid to brace against.
The jack stud vs king stud relationship is easiest to remember this way: the king stud holds the wall together, and the jack stud holds the header up. They work as a pair, and framing a window without both is asking for trouble. Local building codes typically require two or more jack studs when an opening exceeds five feet in width, because wider headers carry more weight and need additional bearing points.
- King stud – Full-length stud from sole plate to top plate that anchors the sides of the opening and maintains wall continuity.
- Jack stud (trimmer) – Shorter stud nailed to the king stud that directly supports the header and transfers its load downward.
- Common stud – Standard wall stud spaced at 16 or 24 inches on center; not part of the window opening itself but defines the surrounding wall layout.
Headers, Rough Sills, and Cripple Studs Explained
The vertical members frame the sides of the opening. The horizontal members frame the top and bottom, and a set of short studs fills in the gaps above and below. Here is how each one works.
The header is the horizontal beam that spans the top of the window rough opening. It collects any load bearing down from above, whether that is roof weight, a second floor, or simply the top plate and sheathing, and redirects it sideways to the jack studs on each end. Headers are typically built from doubled dimensional lumber, engineered LVL beams, or built-up assemblies, depending on the span and load. Header sizing is covered in detail later in this guide.
At the bottom of the opening sits the rough sill (sometimes called the saddle). This horizontal member spans between the jack studs and defines the lower edge of the window rough opening. It does not carry the same structural load as the header, but it supports the weight of the window unit itself and provides a solid nailing surface for the window installation.
Then there are the cripple studs, the short vertical members that fill the spaces above the header and below the rough sill. Cripple studs above the header run from the top of the header up to the top plate. Cripple studs below the sill run from the bottom of the rough sill down to the sole plate. They maintain the standard stud spacing of the wall, which is critical for two reasons: they give sheathing and drywall a consistent nailing surface, and they help transfer lateral forces (like wind loads) through the wall plane. As the AK House Project notes, top cripples channel weight from the top plate to the header, while bottom cripples transfer weight from the sill down to the sole plate.
A common misconception is that cripple studs are optional because they are short. They are not. Skip them, and you lose sheathing attachment points, weaken the wall’s ability to resist racking, and create problems when it is time to hang drywall.
The table below maps each component to its location and function. If you have been searching for a rough opening for windows chart that explains the parts rather than just the dimensions, this is your quick-reference guide.
| Component | Location in Opening | Primary Function |
|---|---|---|
| King stud | Full-height, both sides | Anchors the opening to the wall; maintains top-plate-to-sole-plate continuity |
| Jack stud (trimmer) | Both sides, sole plate to header | Directly supports the header and transfers its load to the foundation |
| Header | Top of opening, spanning between jack studs | Carries loads from above and redirects them to the jack studs |
| Rough sill (saddle) | Bottom of opening, between jack studs | Defines the lower edge of the opening; supports the window unit |
| Cripple studs (top) | Above the header, up to the top plate | Maintain stud spacing for sheathing and drywall; transfer lateral loads |
| Cripple studs (bottom) | Below the rough sill, down to the sole plate | Maintain stud spacing; transfer loads from sill to sole plate |
| Top plate | Top of wall | Ties wall studs and king studs together; distributes loads from above |
| Sole plate (bottom plate) | Bottom of wall | Anchors the wall to the floor system; receives loads from all vertical members |
With every part of the opening identified, the next question becomes structural: does the wall you are cutting into carry load from above, or is it simply dividing interior space? That distinction changes the header requirements, the permit process, and the overall complexity of framing a window dramatically.
Load-Bearing Walls vs Partition Walls and What Changes
Not every wall in a house does the same job. Some carry the weight of the roof, upper floors, and everything in between down to the foundation. Others simply divide rooms. The type of wall you are cutting into determines how complex your window framing project will be, what size header you need (or whether you need one at all), and whether a building permit and inspection are required before you pick up a saw.
Misidentifying a load-bearing wall is one of the most consequential mistakes in residential construction. Remove studs from a bearing wall without proper temporary support, and you risk immediate structural failure, sagging floors, cracked finishes, and a repair bill that dwarfs the original project cost. A partition wall, on the other hand, can be modified with far less engineering and far fewer code hurdles.
How to Tell If Your Wall Is Load-Bearing
The most reliable way to identify a load-bearing wall is to review the original building blueprints or have a structural engineer inspect the framing. When those options are not available, several field checks can point you in the right direction.
- Joist direction – Walls that run perpendicular to the floor joists above are typically load-bearing. Walls running parallel to the joists rarely carry load, though exceptions exist when a wall sits directly beneath a single joist.
- Stacked support below – Check the basement or crawlspace. If another wall, beam, or column sits directly below the wall in question, following the same path, it is almost certainly bearing weight. As Home Depot’s identification guide notes, a wall with a beam, column, or another wall directly below it is a load-bearing wall.
- Exterior walls – Nearly all exterior walls are load-bearing. Any exterior wall standing on the foundation sill should be treated as structural.
- Central location – Walls near the center of the building often support the greatest share of roof and floor loads, especially in homes without open trusses.
- Wall thickness – Walls thicker than six inches are usually load-bearing, since the extra depth accommodates larger framing members or doubled plates.
- Roof and floor connections – If roof rafters, trusses, or floor joists land on or bear directly above the wall, it is carrying load.
When you are evaluating window studs framing in an existing structure, keep in mind that partial walls and interior walls with columns or posts at their ends are also common load-bearing configurations. Do not assume a wall is non-structural just because it does not span the full width of the house.
The bottom line: if there is any doubt, hire a structural engineer or building inspector to confirm before you cut. Cutting into a load-bearing wall without proper temporary support is one of the most dangerous framing mistakes a DIYer can make. This Old House reinforces this point, advising that a qualified contractor or engineer should always verify the wall type before modifications begin.
When Headers Are Structurally Required
Here is where the load-bearing versus partition distinction directly shapes your rough opening framing plan.
In a load-bearing wall, every window opening requires a properly sized header. The header spans the gap where studs were removed and transfers roof, floor, or upper-wall loads sideways to the jack studs, which carry those loads down to the sole plate and foundation. Without a header, or with an undersized one, the structure above the opening has no support path. The result can range from gradual sagging to sudden failure.
Header sizing in bearing walls depends on the width of the rough opening, the loads being carried, and the materials used. The IRC provides prescriptive tables for common residential scenarios, and the next section of this guide covers sizing in detail. For now, the key point is that a king stud and jack stud assembly on each side of the opening, combined with a correctly sized header, forms the structural backbone of every load-bearing window frame.
In a non-load-bearing (partition) wall, the rules relax considerably. The 2015 IRC states that load-bearing headers are not required in interior or exterior nonbearing walls, and a single flat 2×4 may be used for openings up to 8 feet in width. You do not even need structural jack studs in a partition wall, since there is no load for them to bear. Many builders still install a header and full cripple stud wall assembly in partition walls for consistency and to future-proof the framing in case the building’s use changes, but structurally it is not mandatory.
Permit requirements follow the same split. Modifying a load-bearing wall almost always requires a building permit and at least one framing inspection. Partition wall modifications may or may not need a permit depending on local jurisdiction, but the permitting threshold is significantly lower.
Always confirm the load path and permit requirements before cutting into any wall. Skipping this step risks structural damage, code violations, and failed inspections.
Understanding whether your wall carries load also affects how you plan the rest of the cripple stud wall layout, the temporary shoring you will need during construction, and the materials you will order. A partition wall project might take an afternoon with basic lumber. A bearing wall project could require engineered headers, temporary support walls, an engineer’s stamp, and a scheduled inspection.
With the structural role of the wall settled, the next piece of the puzzle is the opening itself: how wide, how tall, and how much shimming clearance to leave. Getting those measurements right is what separates a clean window installation from a frustrating one.
How to Measure and Size a Rough Opening
A perfectly framed wall means nothing if the opening is the wrong size. Too tight, and the window will not fit without trimming framing members. Too loose, and you are relying on excessive shimming that weakens the seal and complicates installation. The rough opening is where framing precision meets real-world window dimensions, and getting it right comes down to understanding a simple relationship: the framed hole must be slightly larger than the window unit going into it.
What a Rough Opening Is and How to Measure It
The rough opening is the framed hole in the wall where the window will sit. When you are framing a window opening, you are building this hole to exact specifications. Its width is measured between the inside faces of the jack studs on each side. Its height is measured from the top of the rough sill to the underside of the header. These two numbers, width and height, define the space your window unit needs to fit into.
Standard practice calls for the rough opening to be approximately 1/2 inch larger than the window unit in both width and height. That means about 1/4 inch of clearance on each side and 1/2 inch at the top. This gap gives you room to shim the window plumb and level, apply insulation around the frame, and seal the perimeter against air and moisture infiltration. As Thermal King Windows notes, industry standards typically recommend the rough opening be about 1/4 to 1/2 inch wider and taller than the window’s frame dimensions.
Here is the critical part most guides gloss over: you cannot take a single measurement and call it done. Walls shift, lumber warps, and framing is rarely perfectly uniform. Measure the width in three places: near the top of the opening, at the center, and near the bottom. Then measure the height in three places: left side, center, and right side. Use the smallest measurement in each direction when ordering your window. This approach, confirmed by Woodland Windows & Doors, ensures the unit will fit even if the opening is slightly out of square.
Beyond width and height, check the opening for square by measuring both diagonals corner to corner. If the two diagonal measurements match within 1/8 inch, the opening is square. If they do not, you will need to correct the framing before the window goes in. Also verify that the rough sill is level and the jack studs are plumb. A window shimmed into a racked opening will never perform the way it should.
One more dimension matters that many first-timers overlook: wall depth. Measure from the interior face of the framing to the exterior face. The window frame depth needs to work with your wall thickness so the unit sits flush or can be properly extended with jamb extensions. This is especially relevant in renovation projects where walls may be thicker than standard 2×4 or 2×6 construction due to added insulation or furring strips.
Rough Opening Size Charts and How to Read Them
Every window manufacturer publishes rough opening specifications for each model they sell. These specs are the authoritative source for sizing your opening, and they should always take priority over generic charts or rules of thumb. A window listed as 36 inches by 48 inches might require a rough opening of 36-1/2 by 48-1/2 inches from one manufacturer and slightly different dimensions from another. Even within the same brand, different window types (casement, double-hung, sliding) can have different clearance requirements.
That said, a general reference chart helps you plan framing windows before you have selected a specific product, or when you want to confirm that your opening falls within a standard range. The table below shows common nominal window sizes alongside their typical rough opening dimensions. Keep in mind that these are approximate values. Always verify against the product data sheet for the exact window you plan to install.
| Window Size Code | Nominal Window Size (W x H) | Typical Rough Opening (W x H) | Common Window Types |
|---|---|---|---|
| 2030 | 24″ x 36″ | 24-1/2″ x 36-1/2″ | Single-hung, double-hung, casement |
| 2040 | 24″ x 48″ | 24-1/2″ x 48-1/2″ | Single-hung, double-hung, casement |
| 3040 | 36″ x 48″ | 36-1/2″ x 48-1/2″ | Double-hung, picture, casement |
| 3050 | 36″ x 60″ | 36-1/2″ x 60-1/2″ | Double-hung, casement, sliding |
| 4050 | 48″ x 60″ | 48-1/2″ x 60-1/2″ | Double-hung, picture, sliding |
| 4060 | 48″ x 72″ | 48-1/2″ x 72-1/2″ | Double-hung, picture, sliding |
| 5050 | 60″ x 60″ | 60-1/2″ x 60-1/2″ | Picture, horizontal sliding |
| 6060 | 72″ x 72″ | 72-1/2″ x 72-1/2″ | Picture, horizontal sliding |
The four-digit size code is an industry shorthand worth understanding. As Lake Washington Windows explains, the first two digits represent the width in feet and inches, and the second two digits represent the height. A 3040 window, for example, indicates a rough opening approximately 3 feet 0 inches wide by 4 feet 0 inches tall (36″ x 48″). The manufactured window unit itself will be about 1/2 inch smaller in both directions to allow room for installation and insulation.
If you are building a window frame for a unit that fits between standard stud bays, such as a narrow casement slotted into a 24-inch on-center layout, the rough opening may be tight enough that even small measurement errors cause problems. Windows between studs in these configurations leave very little margin, so double-checking every dimension is especially important.
One practical tip that saves a lot of headaches: order your windows before you frame, or at the very least, confirm the manufacturer’s rough opening specs before you start cutting lumber. Building a window frame to a generic size and then discovering the actual product needs a different opening leads to costly rework. Manufacturer product pages typically list rough opening dimensions for each window model, making it straightforward to plan your framing around a specific unit.
Also keep in mind what are cripple studs doing in relation to your rough opening sizing. The cripple studs above the header and below the rough sill do not change the rough opening dimensions themselves, but they need to align with the wall’s stud layout. If your rough opening width does not land on a stud spacing increment, you will need to plan cripple stud placement carefully to maintain consistent nailing surfaces for sheathing and drywall.
With the opening measured and sized to match your window unit, the next question is what spans the top of that opening. Header sizing depends on how wide the rough opening is, what loads bear down from above, and what materials you use to build it. Getting the header wrong undermines everything the rest of the framing does right.
Header Sizing for Window Openings
The header is the single most critical structural member in any framed window opening. It carries every pound of load from above and delivers it to the jack and king studs on each side. Choose the right size, and the opening performs flawlessly for decades. Choose wrong, and you are looking at sagging framing, cracked finishes, failed inspections, or worse. So how do you frame in a window with the correct header? It starts with understanding the relationship between opening width and the beam that spans it.
How Header Size Relates to Opening Width
The principle is straightforward: the wider the rough opening, the larger the header needs to be. A header spanning a narrow 24-inch casement carries far less load than one stretching across a 72-inch picture window. As span increases, the header must resist greater bending forces, which means deeper lumber or stronger engineered material.
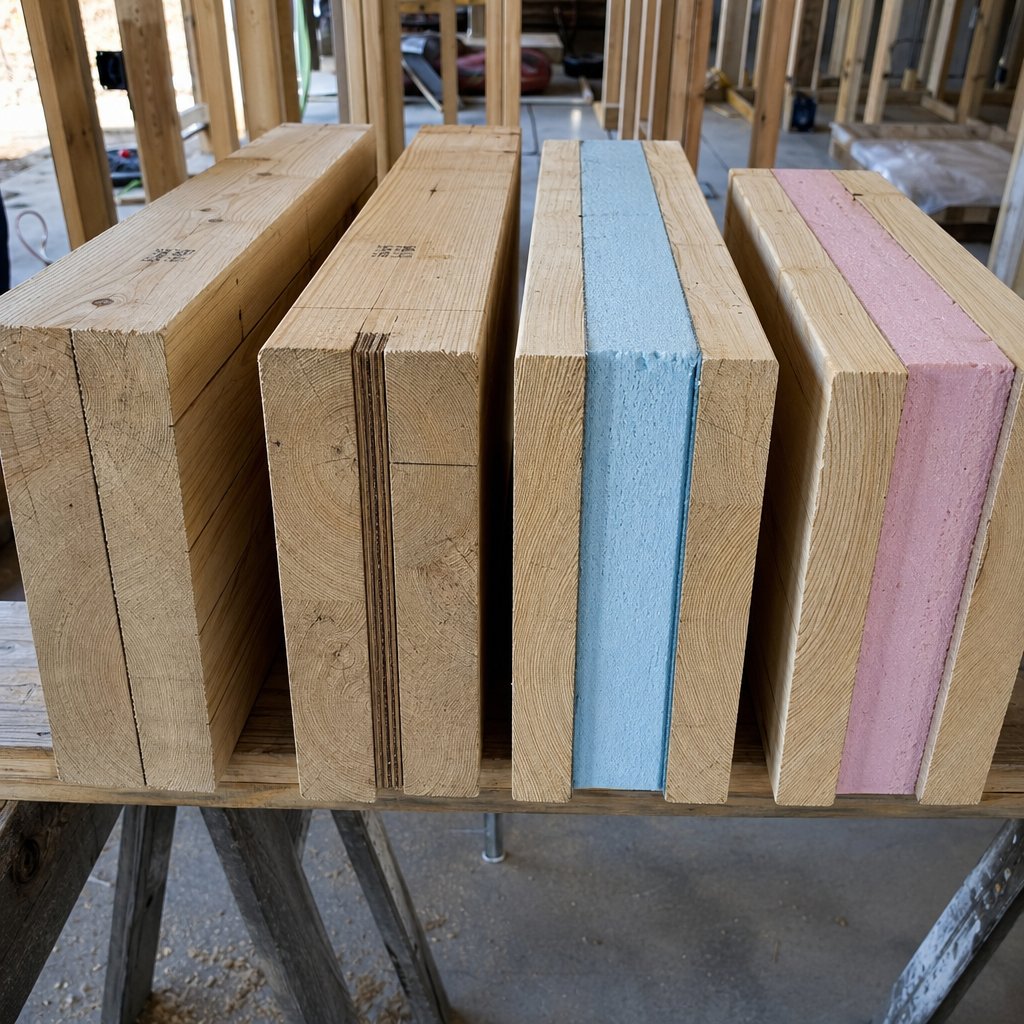
Most residential headers are built using one of three methods:
- Doubled dimensional lumber – Two pieces of sawn lumber (2×6, 2×8, 2×10, or 2×12) fastened together with a 1/2-inch plywood or OSB spacer to match the width of a 2×4 wall. This is the most common approach and the one most framers learn first.
- Engineered lumber (LVL, LSL) – Laminated veneer lumber and laminated strand lumber offer higher load-bearing capacity and greater consistency than sawn lumber. As RoMac Building Supply notes, LVLs allow for longer header spans compared to 2x12s, reducing the need for additional supports. They are also less prone to warping, twisting, and shrinkage.
- Built-up insulated headers – Two pieces of lumber or LVL with rigid foam insulation sandwiched between them instead of plywood. This method reduces thermal bridging through the header, a real benefit in energy-conscious builds. Fine Homebuilding recommends using 2-inch rigid foam between 1-3/4-inch LVL stock in 2×6 walls, fastened with structural screws long enough to penetrate both plies.
The table below provides general header sizing categories for single-story, load-bearing exterior walls using doubled sawn lumber. Think of it as a planning-level reference, not a substitute for the IRC prescriptive tables or an engineer’s calculation. Actual sizing depends on building width, snow load, number of stories supported, species and grade of lumber, and local code requirements.
| Rough Opening Width | Typical Doubled Header Size | Notes |
|---|---|---|
| Up to 3 ft. | 2×6 | Suitable for narrow casement or bathroom windows in most single-story applications |
| 3 ft. to 5 ft. | 2×8 | Covers most standard double-hung and mid-size window openings |
| 5 ft. to 7 ft. | 2×10 | Common for wider picture windows and sliding windows; verify with a window rough opening chart for your specific unit |
| 7 ft. to 8 ft. | 2×12 | Approaching the practical limit for sawn lumber; consider LVL for spans at the upper end |
| Over 8 ft. | Engineered beam (LVL/LSL) or steel | Requires engineering calculation; prescriptive IRC tables typically do not cover spans this wide |
A few things to keep in mind when reading this chart. First, these sizes assume a single-story load with moderate conditions. A two-story home with the same opening width will need a deeper or stronger header because the load from the second floor and roof stacks on top. Second, building width matters. The IRC header tables factor in the tributary load area, which increases with wider buildings. A framing window opening in a 36-foot-wide house demands more from the header than the same opening in a 20-foot-wide house. Third, lumber species and grade affect allowable spans. Douglas fir and southern yellow pine handle more load than spruce-pine-fir at the same dimensions.
In non-load-bearing walls, the sizing conversation is much simpler. The IRC permits a single flat 2×4 across openings up to 8 feet wide, since there is no structural load to carry. Many builders still install a header for visual consistency and to simplify framing for window installations, but it is not structurally required.
When to Consult an Engineer for Header Sizing
The IRC prescriptive header tables cover a wide range of common residential scenarios, and for straightforward projects they are all you need. You can look up your building width, opening span, and number of supported floors, then read the required header size directly from the table. Any framing window diagram that references IRC tables will follow this same logic.
But prescriptive tables have limits. You should involve a structural engineer when:
- The opening spans more than 8 feet
- The wall supports more than two floors plus a roof
- Concentrated loads (such as a beam or post from above) bear directly over the opening
- The project is in a high snow-load or high-wind zone that exceeds the table assumptions
- You are using non-standard materials or unconventional framing methods
- Local code requires an engineer’s stamp for the span in question
Over-sizing a header might seem like a safe bet, but it comes with real downsides. A doubled 2×12 where a 2×8 would suffice wastes lumber, adds unnecessary weight, and most importantly, displaces insulation space in the wall cavity. That thermal bridge above every window adds up across a whole house. As Fine Homebuilding points out, deeper sawn-lumber headers are also more likely to cause drywall cracks as green lumber dries or expands during seasonal humidity changes.
Under-sizing, of course, is far worse. An undersized header is both a structural hazard and a code violation that will fail inspection. There is no upside to guessing small on framing for window headers in a bearing wall.
When in doubt, size up or get an engineering calculation. Never guess on headers in load-bearing walls.
With the header sized and the rest of the opening components understood, the real hands-on work begins: assembling all of these pieces into a square, plumb, code-compliant rough opening, whether you are framing from scratch in new construction or cutting into an existing wall.

How to Frame a Window Step by Step
Terminology and sizing tables are useful, but at some point the tape measure goes back on your belt and the nail gun comes out. This section walks through the actual sequence of framing a window opening, first in new construction where you are building the wall from the ground up, and then in an existing wall where the stakes and the complexity are both higher.
Framing a Window Opening in New Construction
When you are learning how to frame for windows in a new wall, the process is methodical. Every component covered earlier in this guide gets installed in a specific order so that each piece supports the next. Follow this sequence and you will end up with a square, plumb, properly supported window opening ready for sheathing.
- Mark the layout on the plates. Using your plans and the manufacturer’s rough opening specs, mark the window opening location on both the sole plate and the top plate. Indicate the positions of the king studs, jack studs, and cripple studs. Accurate layout here prevents compounding errors down the line.
- Install the king studs. Cut two king studs to run full-length from the sole plate to the top plate, just like any common stud. Toenail or end-nail them to both plates. These anchor the entire opening assembly, so make sure they are plumb and properly fastened. The king stud jack stud relationship starts here: the king studs set the outer boundary of the opening and give the jack studs something solid to attach to.
- Cut and install the jack studs. Measure from the top of the sole plate to the underside of where the header will sit. Cut two jack studs to that length and nail each one to its corresponding king stud with 10d or 16d nails staggered every 12 to 16 inches, per code. These trimmer studs carry the header, so the connection to the king studs must be tight and continuous.
- Build and install the header. Assemble the header to the size determined by your span and load calculations. For a doubled lumber header, sandwich a 1/2-inch plywood or rigid foam spacer between the two pieces and fasten with 16d nails or structural screws. Lift the header into position on top of the jack studs and nail through the king studs into the header ends. Verify it is level before moving on.
- Install cripple studs above the header. Cut short studs to fill the gap between the top of the header and the underside of the top plate. Space them to match the wall’s stud layout, typically 16 or 24 inches on center. Toenail them to both the header and the top plate. These maintain sheathing nailing surfaces and transfer lateral loads through the wall plane.
- Install the rough sill. Measure the distance between the inside faces of the jack studs and cut the rough sill to fit. Position it at the correct height for your window unit and nail it to the jack studs. Double-check that it is level. The rough sill defines the bottom of the window opening, and any tilt here translates directly into installation headaches.
- Install cripple studs below the rough sill. Cut short studs to span from the underside of the rough sill down to the top of the sole plate. Again, maintain the wall’s stud spacing. Nail them to both the sill and the sole plate.
- Check for square, plumb, and level. Measure both diagonals of the completed opening. If they match within 1/8 inch, the opening is square. Confirm the jack studs are plumb and the header and sill are level. Correct any discrepancies before sheathing goes on, because fixing a racked opening after the wall is sheathed and stood up is far more difficult.
A note on fasteners: the IRC specifies minimum nailing schedules for each connection in the framed opening. For example, IRC Table R602.3(1) calls for specific nail sizes and quantities at header-to-king-stud, jack-stud-to-king-stud, and cripple-to-plate connections. Skipping nails or substituting smaller fasteners weakens the assembly even if every piece of lumber is the right size. If your local jurisdiction has adopted amendments to the IRC, check those as well.
Cutting a New Window Opening in an Existing Wall
Framing a window in a wall that is already standing introduces a layer of complexity that new construction does not have. You are not building a wall from scratch on the deck. You are surgically removing material from a structure that is actively carrying load, and every cut you make changes the load path until the new framing is in place.
The first step is always identification. Is the wall load-bearing or a partition? If you skipped the earlier section on that distinction, go back and read it. The answer dictates everything that follows. For a partition wall, you can often cut out the studs, frame the opening using the same component sequence above, and move on. For a load-bearing wall, you need temporary support before a single stud comes out.
Temporary support means building a shoring wall or positioning adjustable jack posts on both sides of the planned opening to carry the load while the permanent framing is open. As TonyView’s load-bearing wall guide emphasizes, this step is not optional: without temporary shoring, removing studs transfers unplanned stress directly to the ceiling and framing above, which can cause immediate cracking, rafter movement, or drywall damage. The shoring stays in place until the new header, jack studs, and king studs are fully installed and fastened.
With temporary support in place, the sequence looks like this:
- Remove interior and exterior finish materials (drywall, siding, sheathing) in the area of the new opening.
- Cut and remove the existing studs within the opening footprint. Save any wiring, plumbing, or HVAC runs for rerouting.
- Frame the new opening following the same eight-step sequence used in new construction: king studs, jack studs, header, upper cripples, rough sill, lower cripples, and a final square check.
- Have the framing inspected before closing up the wall. A building inspector will verify beam sizing, connection hardware, nail patterns, and compliance with the approved plans.
This work typically requires a building permit, and in most jurisdictions the framing must pass inspection before drywall, siding, or any finish material goes back on. Skipping the permit is not just a code violation. It creates a liability issue that can surface during a future sale or insurance claim.
One specialty scenario worth mentioning: egress windows in basements. Building codes require bedroom egress windows to meet minimum clear-opening dimensions, typically 5.7 square feet of opening area with a minimum width of 20 inches and a minimum height of 24 inches. These code-mandated minimums directly affect rough opening sizing, and in basement applications you may also be cutting through concrete or masonry foundation walls, which adds structural and waterproofing considerations well beyond standard wood-frame work. What is a rough opening in this context? It is still the framed hole measured between jack studs and from sill to header, but the dimensions are driven by life-safety egress requirements rather than just the window unit size.
Whether you are working in new construction or retrofitting an existing wall, the framing components and their relationships stay the same. The door framing materials and methods overlap significantly too. Headers, king studs, jack studs, and cripple studs all appear in door openings, with the main difference being the absence of a rough sill and lower cripples since doors extend to the floor. If you are framing both windows and doors on the same project, cutting all your king studs and jack studs in batches saves time and keeps dimensions consistent.
Getting the step-by-step execution right is half the battle. The other half is choosing which framing approach to use in the first place. Traditional framing and advanced framing (OVE) handle window openings differently, and the method you pick affects lumber use, thermal performance, and how your local inspector will evaluate the work.
Traditional Framing vs Advanced Framing at Window Openings
Two framers can rough frame a window opening to the exact same dimensions, use the same window sizes and rough openings, and still end up with very different walls. The difference is not in the opening itself but in how much lumber surrounds it. Traditional framing and advanced framing (also called Optimum Value Engineering, or OVE) represent two philosophies for how to frame a window, and the one you choose affects material cost, thermal performance, and how your inspector evaluates the finished work.
Traditional Window Framing Approach
The conventional method is what most framers learn first and what most crews default to on the job site. At each window opening, you will typically see doubled jack studs on each side, doubled or even tripled king studs, solid lumber headers in every wall regardless of whether it carries load, and full sets of framing cripple studs above the header and below the rough sill. The studs in the window frame are spaced at 16 inches on center, and corners use three-stud assemblies.
This approach has clear advantages. It is familiar to nearly every framing crew in the country, widely accepted by building inspectors without question, and straightforward to execute without detailed framing plans. You do not need to think hard about which members are structurally necessary and which are not. Everything gets doubled, every opening gets a full header, and the result is a robust assembly that nobody will challenge at inspection.
The downside? More lumber than the structure actually requires. Building Science Corporation estimates that standard stud construction uses 5 to 10 percent more board feet and up to 30 percent more individual pieces of lumber than necessary. Every extra stud is also a thermal bridge, a path where heat conducts straight through the wall and bypasses the insulation. In a house with a dozen or more windows, those extra studs around each opening add up to a measurable loss in energy performance.
Advanced Framing (OVE) at Window Openings
Advanced framing takes the opposite approach: use only the lumber the structure demands and leave everything else as cavity space for insulation. The concept originated from a HUD and NAHB Research Foundation collaboration in the 1970s called “Operation Breakthrough,” and it has been code-accepted in model building codes since the early 1980s.
At window openings, OVE framing looks noticeably different. You will see a single jack stud on each side where structural loads allow it, a single pair of king studs, and right-sized headers matched to the actual load rather than a one-size-fits-all doubled 2×12. In non-load-bearing walls, the header disappears entirely or gets replaced by a flat 2×4. What is a cripple stud’s role in this system? The same as in traditional framing — maintaining on-center spacing for sheathing and drywall — but OVE calls for installing them only where needed to hit that spacing, not as a blanket addition at every opening.
One of the most practical OVE strategies is aligning windows with the wall’s 24-inch on-center stud layout. When a window lands on the module grid, a common stud doubles as the king stud, eliminating an extra framing member entirely. Narrow windows that fit between standard 24-inch bays can use single-stud openings, further reducing lumber. The Building America Solution Center recommends limiting framing to a maximum of one pair of king studs and one pair of jack studs per window opening, with additional members installed only as needed for structural support.
Headers in OVE walls also get an energy upgrade. Instead of solid doubled lumber, builders use insulated headers — two structural members with rigid foam sandwiched between them — or hang headers from metal hangers to eliminate jack studs altogether. Both methods reduce thermal bridging at the top of the opening, which is one of the largest heat-loss zones in a traditionally framed wall.
The result, according to Joseph Lstiburek at Building Science Corporation, is a wall with a framing factor closer to 15 percent compared to 25 percent in standard construction. That 10-point reduction translates to roughly 75 percent more thermal resistance in the wall assembly when using fiberglass batt insulation. Research from the NAHB Research Foundation found savings of up to $1,000 per home in materials and labor for production builders who adopted a combination of advanced framing techniques.
Side-by-Side Comparison
The table below breaks down how the two methods differ across the factors that matter most when you are deciding how to frame a window opening.
| Factor | Traditional Framing | Advanced Framing (OVE) |
|---|---|---|
| Studs per opening | Doubled jack studs, doubled or tripled king studs | Single jack stud and single king stud pair where loads allow |
| Header treatment | Full solid lumber header in every wall, load-bearing or not | Right-sized or insulated header in bearing walls; flat 2×4 or no header in non-bearing walls |
| Cripple studs | Installed at every position above header and below sill | Installed only where needed to maintain on-center stud spacing |
| Framing factor (wood as % of wall area) | ~25% | ~15% |
| Thermal performance | Lower — more thermal bridges at each opening | Higher — fewer studs and insulated headers reduce heat transfer |
| Lumber cost | Higher — 5-10% more board feet, up to 30% more pieces | Lower — material placed only where structurally required |
| Ease of execution | High — familiar to most crews, minimal planning needed | Moderate — requires detailed framing plans and crew training |
| Code acceptance | Universally accepted | Recognized by the IRC and model codes, but some local inspectors may be unfamiliar |
A few practical notes before you commit to one method. Advanced framing is recognized by the IRC and backed by decades of building science research, but not every local jurisdiction or inspector is comfortable with it. If you plan to use OVE details, confirm acceptance with your building department before framing begins. Have your framing elevations drawn up in advance and be prepared to walk the inspector through the details. As the Building America Solution Center advises, advanced framing details should be specified in the construction plans and reviewed by the site supervisor and lead framer before work starts.
Also consider your crew. Traditional framing is forgiving of field improvisation. OVE is not. Every stud placement, header size, and cripple location needs to follow the plan. Builders who rely on crew habits rather than detailed layouts will struggle to execute advanced framing consistently. The upfront planning pays off in material savings and energy performance, but only if the execution matches the design.
Whichever method you choose, the studs in the window frame still need to be plumb, the header still needs to be level, and the rough opening still needs to be square. When any of those basics go wrong, the framing method does not matter nearly as much as the mistake itself. Diagnosing and correcting those errors before the window goes in is what separates a solid installation from a callback.
Common Window Framing Mistakes and How to Fix Them
Even experienced crews make framing errors. The difference between a pro and a beginner is not that the pro never makes mistakes — it is that the pro catches them before the drywall goes on. Whether you are troubleshooting framed windows on a job site or diagnosing a problem years after construction, most issues trace back to the same handful of root causes. Knowing how to spot them and what to do about each one can save you from costly rework, failed inspections, and windows that never quite seal or operate the way they should.
Out-of-Square Openings and How to Correct Them
A racked opening is one of the most common problems in window stud framing, and it is also one of the easiest to miss if you skip the diagonal check. Here is how to catch it: measure from the top-left corner of the rough opening to the bottom-right corner, then measure the opposite diagonal. If the two numbers do not match within 1/8 inch, the opening is out of square.
Why does it matter? Try installing a rectangular window into a parallelogram-shaped hole. The unit will bind on one corner, leave a gap at the opposite corner, and no amount of shimming will produce a proper seal. Air leaks, water intrusion, and operational problems follow. As Bay and Bent points out, thinking existing framing is square without actually checking is one of the most frequent installation mistakes, and it leads to windows that never seal properly.
The fix depends on when you catch it. If the wall is still open and unfastened at the top or bottom plate, loosen the nails at the racked corner, use a sledgehammer and a block to push the frame back into alignment, re-measure the diagonals, and re-fasten once they match. If the wall is already sheathed and stood up, you may need to cut the sheathing nails along one edge, rack the frame, and re-nail. Catching it early is always easier, which is why step eight in the framing sequence — checking for square before sheathing — is not optional.
Undersized Headers and Missing Jack Studs
An undersized header does not always announce itself immediately. The signs develop over time: a subtle bow above the window, hairline cracks radiating from the upper corners of the drywall, doors or windows nearby that start sticking, or a visible sag in the wall line when you sight down it from one end. In severe cases, the header deflects enough to transfer load unevenly, stressing the framing below and potentially compromising the wall’s structural integrity.
Correcting an undersized header in a load-bearing wall is not a patch job. You need to install temporary shoring on both sides of the opening to carry the load, remove the failed header, and install a correctly sized replacement that meets jack and king stud requirements for the span. This is the same temporary-support process described in the retrofit framing section, and it is just as critical here. Do not attempt to sister material onto an undersized header and call it fixed — the connection geometry rarely works, and no inspector will approve it.
Missing or poorly fastened jack studs are a related problem, and they are more common than you might expect. Skipping a jack stud is a tempting shortcut when lumber is short or the schedule is tight, but it removes the direct bearing point for the header. The header then relies on toenails or friction to stay in position, neither of which is a structural connection. The fix is straightforward: sister a new jack stud to the king stud with 10d or 16d nails staggered every 12 inches, making sure it bears tightly against the underside of the header and sits flush on the sole plate.
Here is a quick-reference list of the five most common framing errors, along with how to spot each one and what to do about it:
- Out-of-square opening — Diagonal measurements do not match. Loosen fasteners, rack the frame back into alignment, re-check, and re-fasten.
- Undersized header — Visible sag above the window or drywall cracking at upper corners. Shore the load, remove the header, and install a properly sized replacement.
- Missing jack stud — Header has no direct bearing point on one or both sides. Sister a new jack stud to the king stud with proper nailing so it supports the header from below.
- Rough opening too tight or too loose — Window will not fit, or excessive shimming is needed. See correction methods in the next section.
- Improper nailing patterns — Connections feel loose, or framing shifts under load. Add fasteners per the IRC nailing schedule, or pull and replace incorrectly driven nails. Pay particular attention to the jack-stud-to-king-stud connection and header end nailing.
Rough Openings That Are Too Tight or Too Loose
You have framed the opening, the window arrives on site, and it does not fit. If you have ever had to learn how to frame in a window the hard way, this scenario is probably the reason. A too-tight opening is the more immediately frustrating problem. The window physically will not slide into the hole without trimming a jack stud or sill, which means pulling nails, re-cutting lumber, and re-checking square — essentially reframing part of the opening. The root cause is almost always a measurement error or using generic dimensions instead of the manufacturer’s published rough opening specs.
A too-loose opening is less obvious but just as problematic. When the gap between the window frame and the rough opening exceeds about 3/4 inch on any side, you are relying on shims and sealant to bridge a space they were never designed to handle. Excessive shimming can bow the window frame, causing the sash to bind or the seal to fail. It also makes weathersealing unreliable — expanding foam and backer rod have limits, and a large gap invites air infiltration and moisture problems over time. Bay and Bent notes that wrong measurements leading to gaps or air leaks are the single biggest source of window framing callbacks.
The correction for a too-loose opening depends on how far off it is. If the gap is moderate (3/4 inch to 1 inch), you can fur out the jack studs or sill with strips of plywood or OSB to bring the opening back to the correct dimension, then re-check for plumb and level. If the opening is significantly oversized, the better fix is to remove the rough sill or jack studs and reframe to the correct dimensions. Yes, it takes more time. But a window shimmed into an oversized opening will underperform for the life of the building.
These same measurement principles apply when you frame an interior door rough opening — the clearance tolerances and consequences of getting them wrong are nearly identical. The difference is that a misframed door opening shows itself every time someone walks through it, while a misframed window opening hides behind trim until air leaks or water damage reveal the problem months or years later.
Catching and correcting these mistakes before the opening window goes in is always faster and cheaper than fixing them after installation. A five-minute diagonal check, a quick plumb reading on each jack stud, and a final measurement against the manufacturer’s spec sheet are the simplest quality-control steps in the entire framing process — and the ones most often skipped under schedule pressure. Build the habit, and callbacks drop.
Solid framing and a correctly sized opening set the stage, but the window unit itself has to match. Frame material, energy rating, and dimensional compatibility all factor into whether the finished installation performs the way the framing was designed to support.
Selecting the Right Window System for Your Framed Opening
A square, plumb rough opening is only half the job. The window unit you drop into that opening has to match its dimensions, suit the wall depth, and meet the energy and code requirements for your climate zone. Choose the wrong unit and even flawless framing cannot prevent air leaks, poor thermal performance, or an installation that fights you at every step. The framing supports the window; the window completes the wall system. Both halves need to work together.
Matching Window Type to Your Framing
Different window styles place different demands on the rough opening and the framing around it. A casement window, for example, swings outward on hinges and typically maxes out around 36 inches in width, which means a relatively compact header and standard king stud vs jack stud assembly. A double-hung window can span 40 inches or more, requiring a wider header and potentially doubled jack studs depending on the load. Sliding windows handle wide openings well and suit contemporary spaces, while awning windows work in tight spots like above kitchen sinks or as part of a larger window wall framing arrangement. Picture windows bring in maximum light but carry no ventilation, so they are often paired with operable units on either side.
Each of these types also has a slightly different rough opening tolerance. Casements tend to need tighter clearances because the crank mechanism is sensitive to frame distortion. Double-hungs are a bit more forgiving since the sashes slide vertically within the frame. Sliding windows need a level sill track to operate smoothly. When you frame a window opening, knowing which style is going in helps you prioritize where to focus your precision — level sill for sliders, plumb jacks for casements, consistent width for double-hungs.
Frame material matters just as much as style. Timber window frames expand and contract with moisture changes, so the shimming gap needs to accommodate seasonal movement. Vinyl frames have a higher coefficient of thermal expansion, meaning they grow and shrink with temperature swings — a consideration in climates with extreme heat or cold. Aluminium frames, by contrast, offer dimensional stability and slim sightlines that maximize glass area within the framed window opening. Because aluminium holds its shape so consistently, it pairs well with projects where precise, tight-tolerance rough openings have been framed. The rigidity of the material means less reliance on shimming to compensate for frame flex, and the narrow profiles let more light through without requiring a larger opening.
This dimensional stability is one reason aluminium window systems are popular in both new construction and renovation work. When your stud window framing is accurate and your rough opening is square, an aluminium unit drops in cleanly and stays put. There is less room for error, but also less need for correction.
Choosing Energy-Efficient Windows That Fit Your Frame
Energy performance is not just about the glass. The entire window assembly — frame, glazing, seals, and hardware — contributes to how much heat transfers through the opening you framed. The Federal Energy Management Program (FEMP) identifies two primary metrics for evaluating window efficiency: U-factor, which measures the rate of heat flow through the unit (lower is better), and solar heat gain coefficient (SHGC), which measures how much solar heat passes through the glass (lower values reduce cooling loads in warm climates, higher values capture free heat in cold climates).
The right balance of U-factor and SHGC depends on your climate zone. A framed window in a cold northern climate benefits from a low U-factor and a higher SHGC to retain indoor heat while capturing solar warmth. In a hot southern climate, you want both values low to keep heat out. ENERGY STAR publishes climate-zone-specific thresholds that make this selection straightforward — look up your zone, then filter products that meet or beat those numbers.
Beyond the ratings, practical compatibility with your framing matters. The window’s frame depth needs to work with your wall thickness. A unit designed for a 2×4 wall will not sit properly in a 2×6 wall without jamb extensions, and vice versa. The mounting flange or block frame configuration also affects how the window attaches to the rough opening and integrates with your weather-resistive barrier. These details are spelled out on the manufacturer’s product page alongside the rough opening dimensions you already used to size the framing.
For homeowners, renovators, builders, and developers looking for aluminium window systems that combine dimensional stability with verified energy performance, MEICHEN’s aluminium windows collection offers a range of Australian-standard-compliant options sized for common residential rough openings. The product hub covers multiple aluminium window types — casement, sliding, awning, and fixed — suited to different framing configurations and climate requirements. Once your rough opening is framed correctly, exploring a resource like this helps you match a specific unit to your opening dimensions and energy goals without guesswork.
When evaluating any window for a framed opening, run through these key factors:
- Aluminium frame durability and dimensional stability — Aluminium resists warping, rot, and thermal distortion, making it a strong match for tight-tolerance rough openings. Energy-efficient options with thermal breaks, like those in MEICHEN’s range, address aluminium’s natural conductivity while preserving its structural advantages.
- Rough opening compatibility — Confirm the manufacturer’s published rough opening specs match your framed dimensions. Even a 1/4-inch discrepancy can cause installation problems, as covered in the measurement section of this guide.
- Energy rating for your climate zone — Check U-factor and SHGC against ENERGY STAR thresholds for your region. FEMP data shows that ENERGY STAR-qualified windows can save roughly $2 per square foot over their lifetime compared to less efficient models.
- Compliance with local building standards — Verify that the window meets the codes enforced in your jurisdiction, whether that is the IRC in the United States or the relevant national construction code in your region. Non-compliant units will fail inspection regardless of how well the opening is framed.
- Warranty coverage — Look for warranties that cover the frame, glazing seal, and hardware separately. A strong warranty signals manufacturer confidence in the product’s longevity and gives you recourse if a component fails prematurely.
The window header framing, the jack studs, the square rough opening — all of that structural work exists to support the window unit you ultimately install. Choosing a unit that fits the opening precisely, performs in your climate, and meets code turns good framing into a finished wall system that holds up for decades. Take the time to match the window to the frame, and the frame will do exactly what it was built to do.
Frequently Asked Questions About Framing Windows
1. What size header do I need for a window opening?
Header size depends on the rough opening width and whether the wall is load-bearing. For single-story load-bearing walls using doubled sawn lumber, general guidelines suggest a doubled 2×6 for openings up to 3 feet, a doubled 2×8 for 3-to-5-foot spans, a doubled 2×10 for 5-to-7-foot spans, and a doubled 2×12 for 7-to-8-foot spans. Openings over 8 feet typically require engineered beams like LVL or steel. Non-load-bearing partition walls only need a flat 2×4 across the top regardless of width. Always verify against IRC prescriptive tables for your specific load conditions, building width, and snow load zone, and consult a structural engineer for spans beyond standard tables.
2. How much bigger should a rough opening be than the window?
Standard practice is to make the rough opening approximately 1/2 inch larger than the window unit in both width and height. This provides about 1/4 inch of clearance on each side and 1/2 inch at the top for shimming, insulation, and sealing. However, exact clearance requirements vary by manufacturer and window type, so always check the specific product’s published rough opening specifications before framing. Measure the opening at multiple points to confirm it is square, plumb, and level, using the smallest measurement in each direction when ordering your window.
3. What is the difference between a jack stud and a king stud?
A king stud runs the full height of the wall from sole plate to top plate, anchoring the window opening assembly and maintaining the structural continuity of the wall. A jack stud (also called a trimmer) is shorter, running from the sole plate up to the underside of the header only. Its sole purpose is to directly support the header and transfer its load downward to the foundation. The two work as a pair: the king stud holds the wall together and braces the assembly laterally, while the jack stud holds the header up. Both are required at each side of a window opening in load-bearing walls.
4. Do I need a permit to frame a new window opening in an existing wall?
In most jurisdictions, yes, especially if the wall is load-bearing. Modifying a load-bearing wall almost always requires a building permit and at least one framing inspection to verify header sizing, connection hardware, and nail patterns. Partition wall modifications may or may not require a permit depending on local rules, but the threshold is significantly lower. Beyond code compliance, permits protect you during future home sales and insurance claims. Skipping the permit creates liability issues that can surface years later, so always check with your local building department before cutting into any wall.
5. What is advanced framing (OVE) and should I use it for window openings?
Advanced framing, or Optimum Value Engineering (OVE), uses only the lumber structurally required at each opening rather than doubling everything by default. At windows, this means single jack studs where loads allow, right-sized or insulated headers, and cripple studs placed only where needed for sheathing attachment. OVE reduces lumber costs by up to 10 percent, cuts thermal bridging significantly, and is recognized by the IRC. However, it requires detailed framing plans, crew training, and confirmation from your local building department that inspectors will accept it. Traditional framing remains a solid choice for crews unfamiliar with OVE or in jurisdictions where inspectors prefer conventional methods.
More Window & Door Guides