

Step 1 - Assess the Paint Type and Frame Condition
Grab a tool too soon and you risk gouging a perfectly good frame or wasting hours on a method that won't budge the paint. Removing paint from aluminium window frames successfully comes down to three assessments you need to make before anything else: what kind of paint is on there, how it got there, and what's underneath it.
A full intentional coat of oil-based enamel calls for a completely different strategy than a few accidental splatters of water-based wall paint left over from a weekend refresh. And the frame's own finish — whether it's anodised, powder-coated, or bare aluminium — dictates which chemicals and abrasives are safe to use without causing permanent damage. Get these wrong, and you could strip a protective powder coat you meant to keep, or pit an anodised surface beyond repair.
Where things get particularly tricky is layered situations: removing one paint coat without damaging another beneath it. This is common on older frames that have been repainted multiple times. The top layer might be latex that peels easily, while the base coat is a tightly bonded enamel you want to preserve. Knowing what you're dealing with at each layer prevents you from going too aggressive too early.
How to Identify the Paint Type on Your Frame
A quick test tells you more than guessing ever will. Here's how to figure out what you're working with:
- Denatured alcohol wipe test — Dampen a white rag with denatured alcohol and rub firmly on the painted surface. If paint transfers onto the cloth, it's latex or water-based paint. A clean rag indicates oil-based paint, which bonds differently and requires stronger solvents.
- Scrape test for adhesion — Use a fingernail or plastic edge on an inconspicuous spot. Paint that flakes or lifts in sheets has poor adhesion and may respond well to mechanical removal alone. Paint that resists scraping is well-bonded and likely needs chemical softening first.
- Visual inspection for application method — Brush marks suggest hand-applied paint (usually latex or oil-based). A fine, even texture with slight orange peel points to spray paint. Overspray appears as a fine mist of tiny dots rather than a solid film.
Assessing Frame Condition Before You Start
The frame beneath the paint determines your boundaries. Anodised aluminium has a uniform metallic sheen with no brush marks — it's created through an electrochemical process that forms a protective oxide layer directly into the metal surface. This layer is only microns thick, which means aggressive chemicals or coarse abrasives can destroy it permanently. As noted by DuCo Group, anodised aluminium can't simply be recoated or touched up once damaged, making careful assessment essential before painting anodised aluminium window frames or stripping paint from them.
Powder-coated frames feel slightly textured and show a uniform colour with no metallic undertone. This finish is more forgiving — it can handle gentle chemical strippers — but harsh caustic products will still blister it. Bare aluminium looks dull grey with possible white oxidation spots and has no protective layer at all, so while it's the most tolerant of abrasion, it's also the most vulnerable to chemical pitting from the wrong stripper.
Identifying your specific combination of paint type and frame finish narrows your options to methods that actually work without collateral damage — which is exactly what the next step helps you decide.
Step 2 - Choose the Best Way to Remove Paint From Aluminum Frames
Your paint type and frame condition point you toward a method — but the right choice also depends on how much paint you're dealing with, how much time you have, and how comfortable you are with chemicals or power tools. Four core approaches exist for removing paint from aluminium frames, and each one suits a different real-world situation. Picking the wrong method doesn't just waste time. It can permanently scar the aluminium, crack sealed glass units, or dissolve rubber gaskets that cost more to replace than the paint job itself.
The comparison below lays out what each method does well, where it falls short, and how much risk your frame faces in the process.
Matching Your Situation to the Right Method
Every paint remover for window frames has trade-offs. Chemical strippers are gentle on the metal but slow and messy. Mechanical removal is fast for small spots but risky over large areas. Heat guns power through thick layers but introduce dangers unique to aluminium's thermal conductivity. A combination approach handles the toughest jobs but demands more skill and patience.
| Method | Best For | Time Required | Cost | Skill Level | Risk to Frame |
|---|---|---|---|---|---|
| Chemical stripping | Full paint coats, large areas, oil-based or enamel paints | 2-6 hours (multiple applications) | $30-$80 AUD in materials | Beginner to intermediate | Low — if product is aluminium-safe |
| Mechanical (sanding/scraping) | Small splatter, overspray, flaking paint, touch-up areas | 30 minutes to 2 hours | $10-$30 AUD | Beginner | Moderate — scratching risk on anodised finishes |
| Heat gun | Thick multi-layer paint, frames removed from openings | 1-3 hours | $50-$150 AUD (if purchasing gun) | Intermediate to advanced | High — heat travels through entire frame, risks cracking glass |
| Combination approach | Stubborn layered paint, partial removal jobs, mixed paint types | 3-8 hours | $50-$100 AUD | Intermediate | Low to moderate — depends on methods combined |
Chemical stripping stands out as the safest option for the aluminium itself. Industrial paint stripping research confirms that chemical methods dissolve coatings without abrasion or thermal stress, allowing the metal to retain its original properties. That principle scales down perfectly to residential window frames — the substrate stays intact while the paint lifts away.
Mechanical methods carry moderate risk because aluminium is a soft metal. Even fine sandpaper removes material, and on anodised frames where the protective layer measures only microns thick, there's very little margin for error. Still, for a handful of paint splatters after redecorating, pulling out chemicals feels like overkill when a plastic scraper and some isopropyl alcohol will handle it in minutes.
Heat guns sit at the high-risk end. They're fast and effective on thick, stubborn coatings, but aluminium conducts heat so efficiently that warming one section heats the entire frame almost instantly. Near double-glazed units, that thermal shock can crack sealed glass — a repair bill that dwarfs the cost of slower methods.
Scenario-Based Decision Guide
Rather than guessing, match your specific situation to the approach that professionals would use:
- Paint splatter from redecorating — A gentle solvent (isopropyl alcohol for latex, mineral spirits for oil-based) combined with a plastic scraper. This is the most common DIY scenario and rarely needs anything stronger.
- Old flaking or peeling paint — Scrape away all loose material first with a plastic blade, then apply a chemical stripper to the remaining well-bonded sections. Trying to sand off flaking paint just pushes debris into the frame's profile grooves.
- Stripping a full respray or factory coat — Gel-formula chemical stripper with multiple applications. Expect two to three rounds for oil-based or enamel paints. Patience here saves the frame from unnecessary abrasion.
- Removing graffiti or spray paint — A solvent-specific approach based on the spray paint type. Aerosol paints are typically lacquer-based and respond well to acetone or lacquer thinner applied with a cloth, working in small sections to avoid spreading the pigment.
- Multiple paint layers from decades of repainting — A combination approach works best. Use a heat gun (on removed frames only) or chemical stripper to soften the bulk, then finish with fine sanding to clean up residue and level the surface for recoating.
The question of can you paint metal window frames after stripping comes up constantly — and the answer depends entirely on how cleanly you remove the existing coat. A rushed job that leaves chemical residue or scratches across the surface means poor adhesion for any new finish. That's why spending an extra few minutes here, choosing the method that matches your situation rather than grabbing whatever's in the shed, pays off when it's time to apply fresh paint or protective coating.
With your method selected, the next priority is assembling the right tools and materials — because even the correct approach fails if you're using the wrong grit sandpaper, a metal scraper instead of plastic, or a chemical stripper that contains sodium hydroxide.
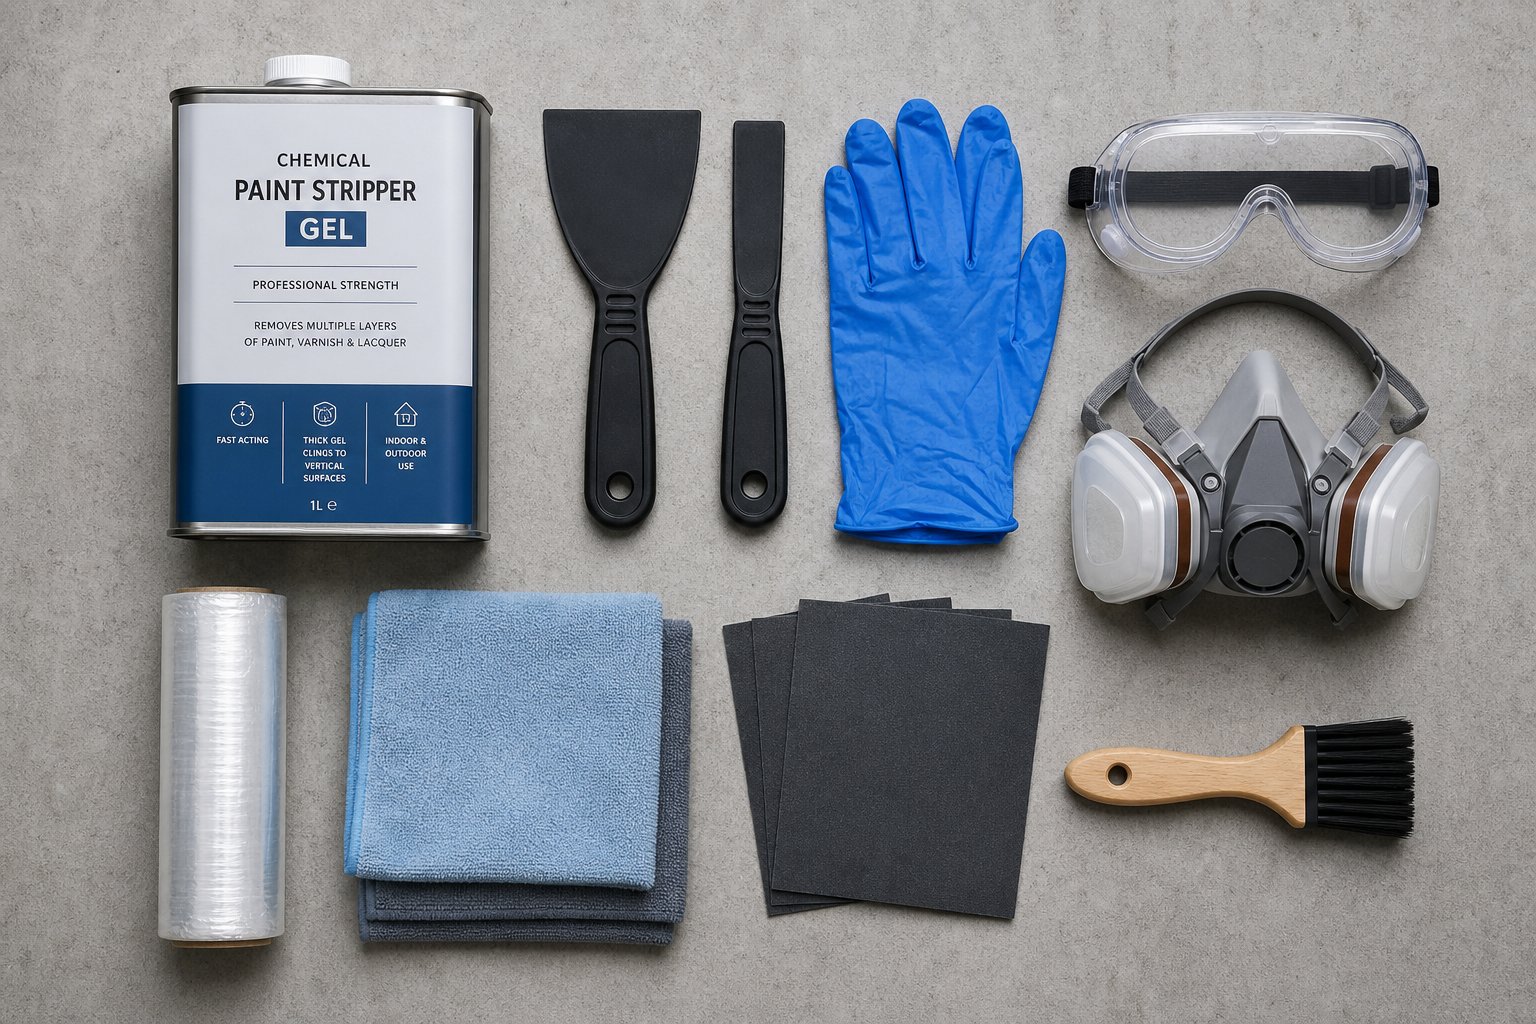
Step 3 - Gather Your Tools and Materials
Having the right supplies laid out before you start means you won't be halfway through stripping a frame, hands covered in chemical gel, realising you don't have a plastic scraper and reaching for a metal one instead. That single substitution can gouge soft aluminium permanently. Each removal method requires its own kit, and a few items are non-negotiable regardless of which approach you've chosen.
Gather everything based on your selected method below. If you're planning a combination approach, pull supplies from both relevant lists.
Chemical Stripping Supplies
Chemical stripping is the most common method for full paint coats, and choosing the best paint remover for aluminium starts with reading the label carefully. Here's what you need:
- Aluminium-safe chemical stripper — Gel formula is essential for vertical surfaces like window frames. It clings rather than running off. Verify the product is labelled safe for non-ferrous metals. Some strippers contain sodium hydroxide (caustic soda), which actively pits aluminium and causes permanent surface damage.
- Plastic scrapers — Never metal on aluminium. Rigid plastic or nylon blades remove softened paint without scoring the surface.
- Nylon brush — For working stripper into frame profiles, grooves, and corners where a flat scraper can't reach.
- Mineral spirits — For cleanup and neutralising residue after stripping.
- Plastic cling wrap — Covering applied stripper prevents it drying out on vertical surfaces, dramatically improving effectiveness.
- Chemical-resistant gloves — Nitrile, not latex. Chemical strippers cause burns on unprotected skin.
- Safety goggles — Splash-proof, not just dust glasses.
- Respirator mask — A P2-rated half-face respirator with organic vapour cartridges. Paper dust masks are insufficient for chemical fumes.
- Drop cloths — Plastic sheeting beneath the work area to catch drips and stripped paint residue.
A critical point on product selection: methylene-chloride-free gel formulas are now the standard for DIY use. They're slower-acting than older solvent-based strippers but far safer to handle and less likely to damage aluminium. Always test any stripper on a hidden section of the frame first — even products marketed as aluminium-safe can react unexpectedly with certain anodised or powder-coated finishes.
Mechanical and Heat Gun Supplies
If you're tackling paint splatter or overspray with mechanical methods, your kit stays simpler. For cleaning aluminium window frames of small paint spots, you need precision tools rather than heavy chemicals:
- 220-400 grit sandpaper — Silicon carbide paper is ideal for soft metals like aluminium. Never go coarser than 220 grit.
- Sanding sponges — These conform to profiled frame shapes, reaching into channels and rebates that flat sandpaper misses.
- Plastic razor blades — Disposable blades that strip paint from aluminum without scratching. Replace them as soon as they dull.
- Microfibre cloths — For wiping residue and applying solvents.
- Isopropyl alcohol — Softens latex paint for easier scraping and cleans the surface afterwards.
For heat gun work, the supply list reflects the higher risk involved:
- Variable-temperature heat gun — Adjustable settings are non-negotiable. Fixed-temperature guns run too hot for aluminium near glass.
- Infrared thermometer — Monitors actual surface temperature so you stay below the danger zone for sealed glass units.
- Heat-resistant gloves — Aluminium conducts heat rapidly; the frame will be hot well beyond where you're pointing the gun.
- Plastic scraper — For lifting softened paint immediately after heating.
- Fire extinguisher nearby — Old paint can ignite at high temperatures, and nearby timber or rubber seals are combustible.
One rule applies across every method: wire wool and metal scrapers should never touch aluminium frames. Wire wool — even fine grades — embeds microscopic steel particles into the soft aluminium surface. Those particles then rust, leaving permanent brown spots that no amount of polishing will remove. Metal scrapers gouge the surface outright. Stick to plastic, nylon, and non-woven abrasive pads exclusively.
With your supplies assembled and within arm's reach, the next phase is protecting everything around the frame that you don't want stripped, dissolved, or splattered — glass, rubber seals, hardware, and surrounding wall finishes all need shielding before any removal work begins.
Step 4 - Prepare Your Work Area and Protect Surfaces
Skipping preparation is how a straightforward paint removal job turns into a weekend of fixing collateral damage. Chemical strippers don't discriminate — they'll eat through rubber gaskets, blister surrounding wall paint, and fog glass if given the chance. Spending fifteen minutes masking and protecting now saves hours of repair work later, and it's the difference between getting paint off window frames cleanly and creating three new problems for every one you solve.
Masking and Protecting Glass and Seals
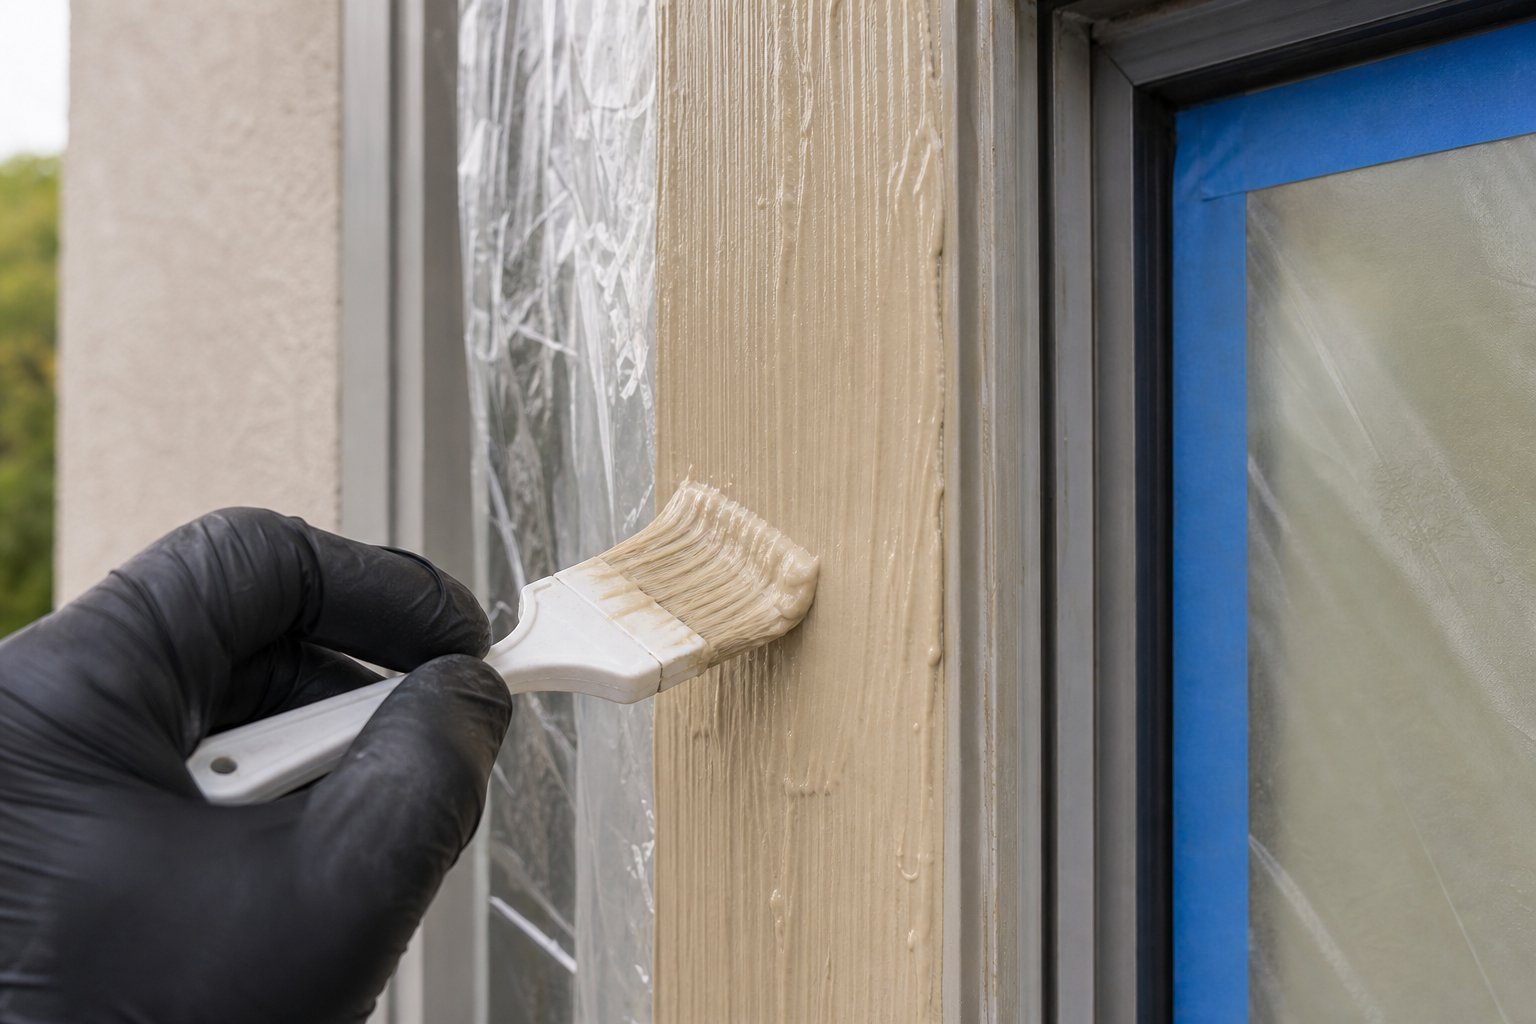
Glass panes need a barrier between them and whatever removal method you're using. Apply painter's tape directly along the edge where glass meets frame, pressing it firmly into the junction so no stripper can seep underneath. Then run plastic sheeting over the full pane, taping it to the outer edges of the masking tape. This double layer catches drips and prevents chemical splashes from etching or hazing the glass surface.
Rubber gaskets and weatherstripping deserve special attention. Chemical strippers destroy rubber on contact, turning flexible seals brittle and useless. Where possible, carefully peel gaskets away from the frame before starting — most modern aluminium window gaskets are designed to be removable for maintenance. If they can't be removed without damage, cover them completely with painter's tape, overlapping strips to ensure no exposed rubber remains. Press tape edges down firmly; even a small gap lets solvent wick underneath.
Remove all handles, locks, stays, and any other hardware attached to the frame. Beyond protecting them from chemicals and scratches, getting hardware out of the way gives you unobstructed access to the frame profiles where paint tends to build up in corners and recesses. Bag the hardware together with its screws so nothing goes missing.
Preparing the Frame Surface
A dirty frame undermines every removal method. Grime, cobwebs, and oxidation residue create a barrier between chemical strippers and the paint beneath, reducing effectiveness and wasting product. Even mechanical methods work poorly on grimy surfaces — you end up grinding dirt into the aluminium rather than lifting paint off it.
Follow this sequence to get your frame ready for how to get paint off a window frame without complications:
- Remove loose hardware — handles, locks, stays, and any decorative covers.
- Clean the frame thoroughly — warm soapy water and a soft cloth removes surface grime, oxidation, and any loose debris. Pay attention to corners and drainage slots.
- Let the frame dry completely — moisture trapped under chemical stripper dilutes it and reduces dwell time. Allow at least 30 minutes in warm weather, longer on cool or humid days.
- Mask glass and seals — tape and plastic sheeting as described above, ensuring full coverage with no gaps.
- Lay drop cloths below — plastic sheeting on the sill, floor, or ground catches stripped paint and chemical drips. Tape the sheeting to the wall below the frame so nothing runs down onto brickwork or render.
- Ensure ventilation if working indoors — open windows in the room, set up a fan directing fumes outward, and keep your respirator on throughout. Chemical fumes accumulate quickly in enclosed spaces.
For frames still installed in the wall — which is most residential situations — protecting the surrounding wall paint and sill matters just as much as protecting the glass. Use wide masking tape (50 mm minimum) along the wall edge where it meets the frame, then extend plastic sheeting outward to cover at least 300 mm of wall surface on all sides. Chemical stripper that drips onto painted render or timber sills will damage those finishes just as readily as it strips the frame.
Thorough preparation turns the actual paint removal into a controlled, contained process rather than a frantic race against drips and splashes. With glass shielded, seals protected, and the frame clean and dry, you're set to apply your chosen removal method with confidence that the only thing coming off is the paint you're targeting.
Step 5 - Strip Paint Using Chemical Removers
Chemical stripping is the go-to method for removing a full paint coat from aluminium frames, and for good reason — it dissolves the bond between paint and metal without physically abrading the surface. But technique matters enormously here. A thick, even application left undisturbed for the right amount of time lifts paint cleanly in sheets. A thin, rushed coat dries out in minutes and achieves nothing except wasted product and frustration. Here's how to remove paint from aluminium frames using chemical strippers the right way, section by section.
Applying Chemical Stripper to Aluminium Frames
Work methodically rather than coating the entire frame at once. Gel strippers begin losing effectiveness as soon as they start drying, so manageable sections keep you in control of timing.
- Apply gel stripper in a thick, even coat — Use a disposable brush and work in sections of about 30-50 cm at a time. The layer should be roughly 3 mm thick; too thin and it evaporates before penetrating the paint film. As Promain's paint stripper guide notes, a thick application is critical because newer formulations without methylene chloride need more dwell time to break down coatings effectively.
- Cover with plastic cling wrap immediately — Press cling wrap over the wet stripper, smoothing it against the surface. This single step dramatically improves results on vertical surfaces by preventing evaporation. The stripper stays active and wet against the paint for the full dwell period instead of crusting over within minutes.
- Wait the manufacturer's recommended time — Typically 15-45 minutes depending on the product and paint thickness. Resist the urge to check constantly. For thicker oil-based or enamel coats, longer is better — some modern gel strippers perform best when left to work for several hours rather than the minimum time listed on the tin.
- Test a small area first — Peel back the cling wrap at one corner and scrape gently with a plastic scraper. If the paint wrinkles and lifts away from the aluminium cleanly, it's ready. If it still feels firmly bonded, re-cover and wait longer.
- Scrape the entire section into a waste container — Once the test confirms the paint is lifting, remove the cling wrap and scrape softened paint off in long, steady strokes with your plastic scraper. Work from top to bottom so debris falls away from clean areas. Collect everything into a lined container for disposal.
- Reapply to stubborn areas rather than scraping harder — If patches of paint remain bonded after the first pass, apply a fresh coat of stripper to those spots specifically. Forcing a scraper against resistant paint is how you gouge aluminium. Patience and a second application always outperform brute force.
Expect most full paint coats to require two to three applications of stripper, particularly for oil-based or enamel paints that have cured hard over years of UV exposure. Each round removes another layer, and the process gets faster as less paint remains. Thick multi-coat situations — common on older frames that have been repainted several times — may need even more passes.
Cleanup and Neutralising the Surface
Stripping the paint is only half the job. Residual chemical left on the aluminium surface remains active and will interfere with anything applied afterwards — primer won't bond properly, new paint may blister or peel within months, and the surface can develop discolouration over time.
Neutralising paint stripper residue is one of the most frequently overlooked steps in any stripping project. For metal surfaces, the process is straightforward: wipe or rinse the frame thoroughly with the neutraliser specified by your stripper's manufacturer. Most solvent-based gel strippers call for mineral spirits; water-based or "green" formulas typically require a clean water rinse. Check the product label — using the wrong neutraliser can leave a film that's just as problematic as not neutralising at all.
How do you know the surface is properly neutralised? Run a clean white cloth across the stripped frame. If it comes away clean with no oily or tacky residue, and the aluminium doesn't feel slippery to the touch, you're clear. If any stickiness or chemical odour remains, wipe down again with fresh mineral spirits or water as appropriate, then allow the frame to dry completely.
For anyone planning on repainting aluminium window frames after stripping, this neutralising step is non-negotiable. Skipping it is the single most common reason new paint fails prematurely on chemically stripped surfaces — the residue prevents proper adhesion regardless of how good your primer and topcoat are.
A realistic difficulty assessment: chemical stripping is low-risk to the aluminium itself, making it the safest way to remove paint off aluminium without surface damage. However, it's high-risk to rubber seals and surrounding finishes if your masking isn't thorough, and high-risk to your skin and lungs without proper PPE. Keep your respirator on throughout, change gloves if they develop tears, and never let stripped residue sit on exposed skin.
Chemical methods handle full coats and well-bonded paint beautifully, but they're not always the most efficient choice for smaller jobs. Paint splatter, overspray, and localised flaking respond faster to mechanical techniques — scraping and sanding methods that target specific spots without the mess and wait times of chemical application.
Step 6 - How to Get Paint Off Aluminum Frames with Sanding and Scraping
For a few paint splatters left behind after redecorating — easily the most common scenario Australian homeowners face — mechanical removal is faster, cleaner, and far less involved than mixing up chemicals. You're targeting specific spots rather than treating an entire frame, so the job stays contained and manageable. The trade-off is precision: aluminium is a soft metal, and careless scraping or overly aggressive sanding will leave marks that are impossible to buff out, particularly on anodised finishes.
Scraping Technique for Paint Splatter and Overspray
Small drips, overspray dots, and the odd brush mark along a frame edge respond well to a simple scrape-and-wipe approach. The key is softening the paint first so it releases without you needing to dig into the aluminium beneath it.
- Soften the paint with isopropyl alcohol — Dampen a microfibre cloth with isopropyl alcohol and hold it against the paint spot for 30 seconds. This partially dissolves latex and water-based paints, loosening their grip on the frame surface. For oil-based splatters, mineral spirits works better as the softening agent.
- Scrape with a plastic razor blade at a shallow angle — Hold the blade at roughly 15-20 degrees to the frame surface. A steep angle concentrates force on a tiny point and gouges soft aluminium; a shallow angle spreads pressure across the blade's width and slides under the paint film instead of into the metal.
- Work in one direction only — Push the blade forward in a single direction rather than sawing back and forth. Repeated back-and-forth motion creates micro-scratches that catch light and become visible once the frame is clean. One-directional strokes keep the surface uniform.
- Wipe residue with an alcohol-dampened cloth — After lifting the paint, wipe the area immediately with a fresh cloth dampened in isopropyl alcohol. This removes any remaining paint film and lets you inspect the surface for damage or leftover spots that need another pass.
This technique handles most post-renovation splatter in minutes. If you find yourself scraping hard or the paint isn't budging, stop — that's a sign the paint is too well-bonded for mechanical removal alone, and you'll need to switch to a chemical approach for that spot rather than forcing it and scratching the frame.
Sanding for Larger Areas and Flaking Paint
Sanding suits a different scenario: removing flaking or poorly adhered paint across a broader section of frame, typically as preparation before repainting aluminium windows. Where scraping targets individual spots, sanding levels an entire surface — stripping away loose material and feathering the edges of remaining paint so a fresh coat goes on smoothly.
The grit you choose matters more than the effort you put in. Silicon carbide wet/dry sandpaper in the 320-400 grit range is ideal for aluminium window frames. It cuts cleanly through paint and oxidation without loading up the way standard aluminium oxide paper does. Never drop below 220 grit — coarser abrasives remove material too aggressively and leave deep scratches in the soft metal that show through any subsequent finish.
Sand in one direction along the length of the frame profile, using light, consistent pressure. Avoid circular motions, which create swirl marks visible in direct sunlight. Keep the surface lightly dampened with water to reduce friction, prevent the paper from clogging with aluminium dust, and minimise heat build-up that can smear paint residue into the grain.
For profiled frames with grooves, channels, and rebates — common on most Australian aluminium window systems — flat sandpaper simply can't reach into the recesses. Sanding sponges conform to these shapes, wrapping around curves and pressing into channels where paint accumulates. They're available in the same grit ranges and give you consistent contact across complex profiles without concentrating pressure on high points.
Risk Assessment for Mechanical Methods
Mechanical removal carries a moderate risk of surface damage, and that risk escalates sharply on anodised frames. The anodised layer is only microns thick — a few careless passes with sandpaper can cut straight through it, exposing bare aluminium that oxidises differently and creates a visible patch that can't be repaired without professional re-anodising.
The most critical rule: never use wire wool or steel brushes on aluminium frames. As corrosion specialists note, steel wool introduces iron particles into the aluminium surface, and those embedded particles cause galvanic corrosion — appearing as rust-coloured spots that bleed outward over time. This damage is permanent and irreversible. Stick exclusively to plastic blades, nylon pads, and silicon carbide sandpaper.
For anyone planning on how to remove paint from a window frame mechanically, the honest assessment is this: it's the right tool for small, targeted jobs and surface preparation before recoating. It's the wrong tool for stripping a full paint coat from an entire frame — that volume of sanding almost guarantees uneven results and surface damage. Full coats belong to chemical strippers; mechanical methods clean up what's left behind.
Heat offers a third path — one that powers through thick, multi-layered paint faster than either chemicals or sanding. But aluminium's extraordinary thermal conductivity introduces risks that don't exist on timber or steel frames, making technique and temperature control absolutely critical.
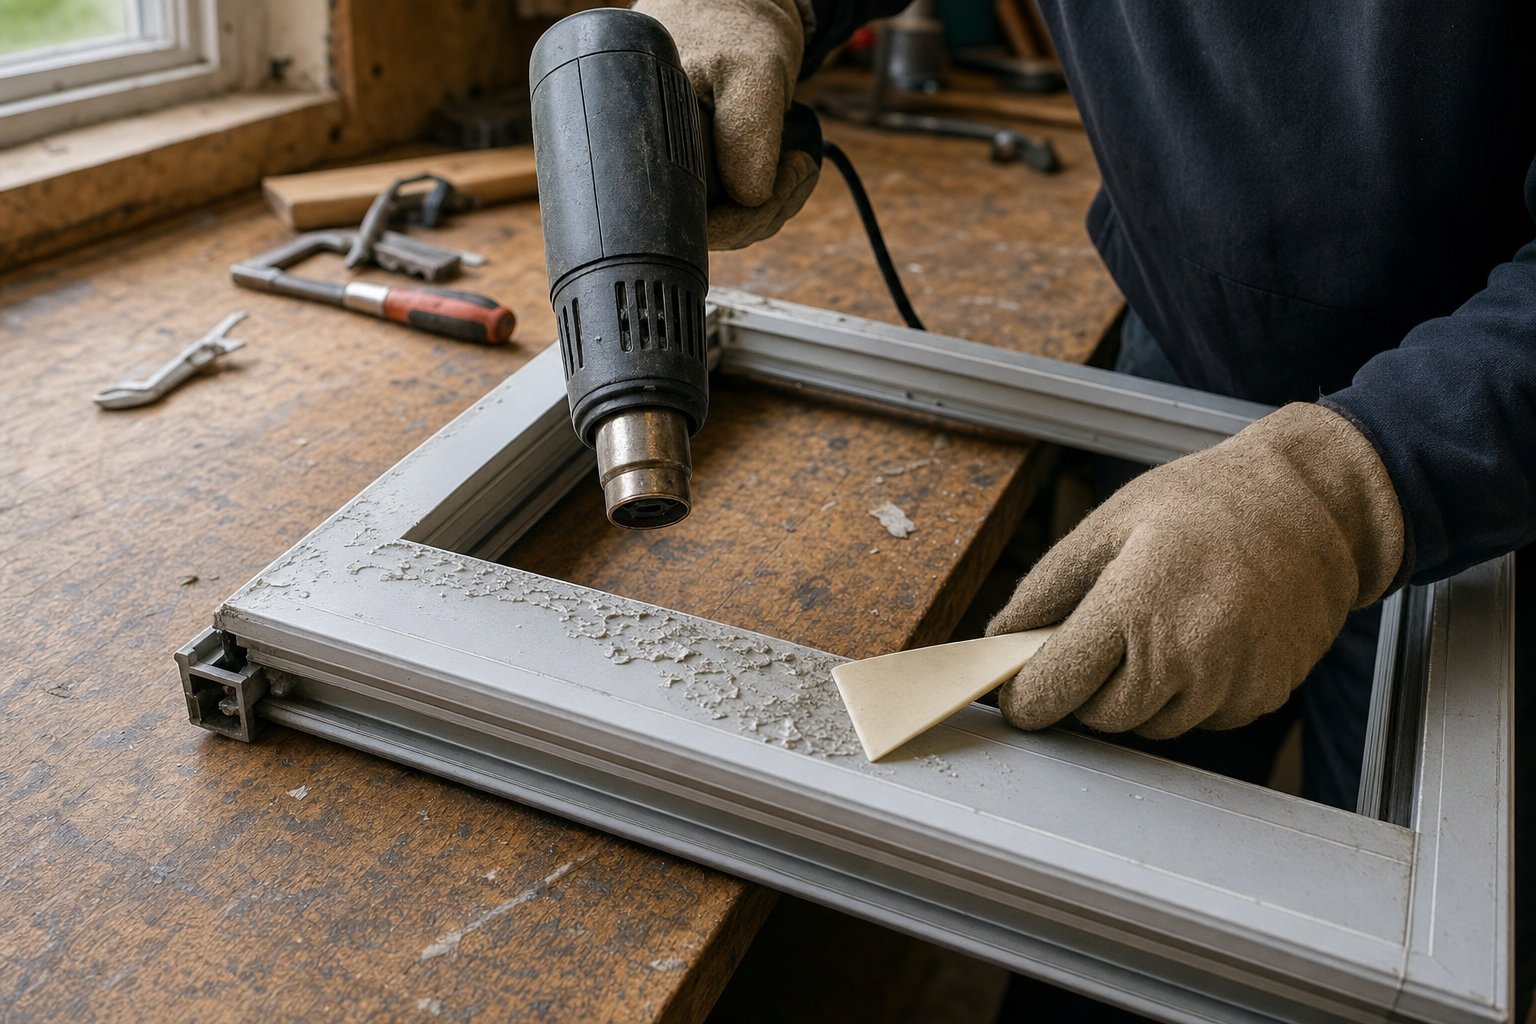
Step 7 - Use a Heat Gun Safely on Aluminium
A heat gun cuts through thick, multi-layered paint faster than any other method. The warmth softens the coating into a gooey consistency that lifts away in satisfying strips rather than stubborn flakes. On timber frames, it's straightforward. On aluminium, it's a different proposition entirely — and the reason comes down to physics rather than technique.
Aluminium conducts heat roughly 1,000 times more efficiently than wood. Point a heat gun at one corner of a timber frame and the heat stays localised. Do the same on aluminium and the entire frame becomes hot within seconds. That thermal conductivity is what makes this method high-risk on metal window frames, and it's why understanding the boundaries matters more here than with any other removal approach.
When a Heat Gun Works on Aluminium Frames
Heat guns earn their place when you're dealing with thick, multi-coat paint that has built up over years of repainting — the kind that resists chemical strippers even after multiple applications. The heat breaks down the paint's molecular bond with the surface, causing it to bubble and release. As Master Appliance's paint removal guide notes, this method works particularly well when removing multiple layers at once, since heat penetrates through all coats simultaneously rather than dissolving them one at a time.
However, the risks specific to aluminium are significant: the metal transfers heat instantly across the entire frame, potentially cracking sealed glass units through thermal stress, melting rubber gaskets, and warping thin frame sections that are only a few millimetres thick. Heating metal can also release fumes that are dangerous to breathe, making ventilation or a respirator essential.
If you're going to use this method, here's how do you remove paint from aluminum frames with heat without causing collateral damage:
- Set your heat gun to the lowest effective temperature — Start at 200°C and increase only if the paint isn't responding. A variable-temperature gun is non-negotiable for this job; fixed-output models run far too hot for aluminium near glass.
- Never exceed 300°C on aluminium near glazing — Beyond this threshold, the risk of thermal stress cracking in sealed glass units rises sharply. Use your infrared thermometer to monitor actual surface temperature rather than relying on the gun's dial setting alone.
- Keep the gun moving constantly in slow sweeps — Never hold it in one spot. Steady, even passes prevent localised overheating that warps thin aluminium sections. Hold the nozzle roughly 5-8 cm from the surface.
- Work in 10 cm sections — Heat a small area just until the paint bubbles or changes texture. The moment you see movement in the paint film, stop heating that section.
- Scrape immediately with a plastic scraper while paint is soft — Softened paint re-hardens quickly on aluminium because the metal dissipates heat fast. If you wait too long, you'll need to reheat. Work with the gun in one hand and scraper in the other if your coordination allows it.
Place a drop cloth beneath your work area before starting — once heated paint scrapings cool, they bond stubbornly to whatever surface they land on. Collect scrapings in a disposable container as you go.
Risk Assessment and When to Avoid Heat
Aluminium's thermal conductivity means heat travels far beyond where you point the gun. A frame heated at one corner will be hot along its entire length within seconds. This makes heat guns unsuitable for double-glazed units where thermal stress can crack sealed glass — a repair that typically costs several hundred dollars per unit.
That warning isn't theoretical. Research into thermal stress fractures confirms that sudden temperature changes cause uneven expansion in glass, with cracks typically initiating from the pane edges and expanding inward. The risk intensifies because aluminium frames transfer heat directly into the glass edge — the exact point where thermal fractures begin. Thicker glass and wire-reinforced glass are particularly vulnerable, while toughened glass offers more resilience.
Several factors compound the danger for removing paint from window frames with heat:
- Double-glazed sealed units — The trapped air or argon gas between panes heats unevenly, creating differential pressure that stresses seals and glass simultaneously. A cracked sealed unit means full replacement, not just a pane swap.
- Rubber gaskets and weatherstripping — These melt or deform at temperatures well below what's needed to soften paint. Even with masking, conducted heat through the aluminium reaches gaskets from behind.
- Thin frame sections — Budget aluminium frames from the 1980s and 1990s often have wall thicknesses under 2 mm. Concentrated heat can warp these permanently, misaligning the frame and compromising its seal.
- Lead-based paint on older frames — Paint applied before the 1980s may contain lead. Heating it releases toxic fumes that are extremely hazardous. If there's any chance the paint predates the mid-1980s, do not use a heat gun — have the paint tested first.
The honest recommendation: reserve heat guns for frames that have been physically removed from the window opening, where there's no glass at risk and you can work on a flat surface with full access. For single-glazed frames where glass replacement is an acceptable cost if cracking occurs, heat remains an option — but go in with eyes open about that possibility.
For frames still installed with double glazing intact, chemical stripping or mechanical methods are safer paths to remove paint from a window frame without gambling on an expensive glass replacement. The speed advantage of heat simply doesn't justify the potential cost when a sealed unit fails.
Rate this method honestly: high-risk, high-reward. It's the fastest approach for thick, stubborn, multi-layered paint — but it carries the highest likelihood of collateral damage among all removal methods. Patience with chemicals almost always produces a better outcome on installed aluminium frames than speed with heat.
Whichever method you've chosen — chemical, mechanical, or heat — certain mistakes crop up repeatedly that turn a manageable job into an expensive one. Knowing what not to do is just as valuable as knowing the correct technique.
Step 8 - Avoid These Costly Mistakes
Every method covered so far works — when executed correctly. The problem is that most frame damage doesn't come from choosing the wrong approach. It comes from shortcuts taken during the right one. A moment of impatience, a substituted tool, or a skipped step can leave you with permanent pitting, embedded rust spots, or a cracked sealed glass unit that costs far more to fix than the paint removal itself ever would have.
These mistakes show up constantly in forum threads and trade callbacks alike. They're predictable, preventable, and worth memorising before you pick up a scraper or open a tin of stripper.
Mistakes That Permanently Damage Your Frames
Some errors can't be undone. Once the aluminium surface is compromised, no amount of polishing or recoating will restore it to its original condition. The table below covers the most damaging mistakes people make — and crucially, why they seem like reasonable ideas at the time.
| Mistake | Why People Do It | Consequence |
|---|---|---|
| Using wire wool or steel wool | Feels gentle and controllable compared to sandpaper; readily available in most households | Embeds microscopic steel particles into the soft aluminium surface. These particles oxidise over weeks, leaving permanent rust-coloured spots that bleed outward and cannot be removed without re-finishing the entire frame |
| Using caustic soda or oven cleaner | Cheap, effective on paint, and often recommended in online "hacks" as a budget alternative to purpose-made strippers | Caustic soda (sodium hydroxide) has a pH of around 14, making it highly corrosive to non-ferrous metals. It pits and permanently discolours aluminium within minutes, creating a rough, frosted surface that no primer can properly bond to |
| Scraping with metal blades or putty knives | Faster and more rigid than plastic alternatives; metal blades hold their edge longer and feel more effective | Aluminium is softer than steel. Metal blades gouge visible channels into the frame surface, particularly on anodised finishes where the protective layer is only microns thick. These scratches catch dirt and moisture, accelerating localised corrosion |
| Overheating near sealed glass units | Impatience with slow chemical methods; the heat gun produces visible results quickly and feels productive | Aluminium conducts heat directly into the glass edge, causing thermal stress fractures. A cracked double-glazed sealed unit typically costs $250-$600 AUD to replace per pane — far exceeding the cost of chemical stripper and patience |
| Using coarse sandpaper (below 220 grit) | Removes paint faster; seems logical that rougher paper means quicker results | Cuts through the anodised layer or powder coating beneath the paint, exposing bare aluminium that oxidises differently and creates a visible, unrepairable patch. Research confirms that grit below 220 triples the risk of base metal damage on aluminium |
The common thread across all five: they feel like they're working in the moment. Wire wool seems to polish rather than scratch. Oven cleaner bubbles impressively against paint. A metal scraper peels off stubborn spots that plastic won't budge. The damage only becomes apparent hours or days later — once rust spots bloom, pitting dries white, or a hairline crack appears in the glass.
Process Mistakes That Waste Time and Money
These won't destroy your frame outright, but they'll cost you wasted product, repeated work, and results that fall apart once you try to repaint. If you're planning how to paint aluminum window frames after stripping, avoiding these errors is what separates a finish that lasts from one that peels within a season.
- Not testing stripper on a hidden area first — Even products labelled "aluminium-safe" can react unexpectedly with certain anodised or powder-coated finishes. A 5-minute test on the back of the frame or an inconspicuous corner reveals any discolouration or adverse reaction before you've coated the entire visible surface. Skipping this gamble is how people end up with blotchy, uneven frames they can't fix.
- Applying stripper too thin — A thin coat evaporates before it penetrates the paint film, especially on sun-exposed frames that retain warmth. You burn through product without results, then assume the stripper "doesn't work" and switch to something harsher. The fix is simple: apply a thick 3 mm layer and cover it with cling wrap to prevent drying.
- Not covering stripper with plastic wrap on vertical surfaces — Gel formulas cling better than liquid, but they still dry out within minutes on a warm aluminium frame in direct sun. Without a plastic wrap barrier, the active chemicals evaporate before breaking down the paint. This single step can double the effectiveness of any gel stripper.
- Rushing between applications — Scraping at paint that's only partially softened forces you to apply more pressure, which risks scratching the frame. It also leaves behind a patchy result — some areas stripped clean, others with bonded paint remnants that require starting the entire process over. Let each application work for its full recommended dwell time before testing.
- Not neutralising chemical residue — This is the mistake that doesn't reveal itself until weeks later. Active chemical residue left on the surface causes adhesion failure in any subsequent coating. Primer won't bond, paint peels in sheets, and the entire job needs redoing from scratch. A simple wipe-down with mineral spirits or water (depending on the product) takes two minutes and prevents months of frustration for anyone repainting aluminium window frames.
- Working in direct sunlight or on hot frames — Australian conditions make this particularly relevant. A dark-coloured aluminium frame in full sun can reach 60°C or higher, causing chemical strippers to flash off almost instantly. Work in the early morning, late afternoon, or on the shaded side of the house. If the frame is too hot to touch comfortably, it's too hot for effective chemical stripping.
Patience is genuinely the single most important factor across every removal method. Rushing chemical dwell times, forcing scrapers against resistant paint, cranking heat gun temperatures higher than necessary — every shortcut leads to either frame damage or incomplete results that demand rework. The job takes as long as it takes, and accepting that upfront produces better outcomes than any expensive tool or premium product.
Can you repaint aluminium window frames after making some of these mistakes? In many cases, yes — but only after additional corrective work. Pitted surfaces need filling and sanding. Scratched anodising needs priming with an etch primer to create a bondable surface. Embedded steel particles need treating with a rust converter before any coating goes over them. Each correction adds time and cost that proper technique would have avoided entirely.
With the paint removed and these pitfalls sidestepped, the bare frame needs attention before you decide what comes next — whether that's a fresh coat of paint, a protective clear finish, or an honest assessment of whether the frame's condition warrants a different path altogether.

Step 9 - Finish and Protect Your Stripped Frames
Bare aluminium exposed to air begins forming an oxide layer almost immediately. That natural oxidation isn't catastrophic — it's actually what gives aluminium its corrosion resistance — but it creates a dull, chalky appearance and interferes with paint adhesion if you leave it too long before applying a protective finish. The window between stripping and finishing is measured in hours, not days. What you do in that window determines whether your frames look sharp for years or deteriorate faster than they did under the old paint.
Inspect and Prepare the Bare Aluminium
With all paint removed, you're seeing the frame's true condition for the first time — possibly in decades. Run your fingers along the surface and look closely for damage that was hidden beneath the old coating:
- Scratches from removal — Light surface marks from scraping or sanding. These are cosmetic and will disappear under primer and paint, but deep gouges may need filling with an aluminium-compatible filler before recoating.
- Pitting from chemicals — Small craters in the surface caused by overly aggressive strippers or prolonged dwell times. Mild pitting is manageable with a good etch primer; severe pitting compromises the frame's structural integrity at thin sections.
- Corrosion hidden under paint — White powdery deposits or rough patches indicate oxidation that was trapped beneath the old coating. This is common on frames where moisture penetrated through cracked paint over years.
Clean the entire frame thoroughly with isopropyl alcohol to remove all chemical residue, dust, and oils from handling. This final wipe gives you a neutral surface ready for whatever finish comes next.
If the frame is anodised and the anodising remains intact — visible as a uniform, slightly metallic sheen with no bare patches — it may need no further treatment beyond cleaning. The anodised layer itself provides excellent long-term protection. However, if the anodising is scratched through or the frame is bare aluminium with no factory finish remaining, it needs a protective coating to prevent progressive oxidation and maintain its appearance.
How to Repaint Aluminium Window Frames for a Lasting Finish
Repainting is the most common next step, and the process demands the same attention to preparation that made your stripping job successful. Knowing how to paint aluminium windows properly means understanding that the primer does the heavy lifting — the topcoat is just colour and UV protection.
The three-phase painting system for aluminium follows a strict sequence: etch, prime, and topcoat. Skip any phase and the finish fails prematurely.
- Apply an etch primer — Self-etching primers contain mild acids that chemically bond to the aluminium surface while laying down a protective base coat. They're available in aerosol cans for small jobs or in tins for brush application on full frames. For coastal Australian locations with salt-air exposure, a two-part epoxy primer offers superior corrosion resistance and is worth the extra cost and mixing effort.
- Allow full cure time — Etch primers typically need 24 hours before topcoating. Rushing this step traps solvents beneath the topcoat, causing bubbling weeks later.
- Apply two coats of exterior-grade acrylic paint — Use 100% acrylic or urethane-modified enamel rated for exterior metal. These formulations flex with aluminium's thermal expansion rather than cracking. Apply thin, even coats and allow the manufacturer's recommended recoat window between them.
- Cure fully before use — Paint feels dry within hours but takes 7-14 days to reach full hardness. Avoid closing windows tightly or cleaning frames during this curing period.
For homeowners who prefer the natural aluminium look, a clear protective lacquer maintains the metallic appearance while shielding against oxidation and UV degradation. Marine-grade clear coats designed for aluminium boat fittings work well on window frames and typically last 3-5 years before needing reapplication.
When Replacement Makes More Sense Than Restoration
Sometimes stripping paint reveals a frame that's beyond economical repair. Significant pitting across structural sections, corrosion that has thinned the aluminium wall thickness, warping from previous heat damage, or frames that simply don't meet current thermal performance standards — these situations shift the cost-benefit calculation away from restoration.
Consider these factors honestly before investing in repainting:
- Frame age and condition — Frames over 30 years old with visible corrosion or worn hardware may have limited remaining service life regardless of cosmetic treatment.
- Extent of damage revealed after stripping — Widespread pitting or thinning means the frame's structural margins are reduced. Paint hides this; it doesn't fix it.
- Thermal performance — Older single-glazed aluminium frames without thermal breaks perform poorly against current NCC energy efficiency requirements. Repainting improves appearance but does nothing for insulation or condensation issues.
- Budget for ongoing maintenance vs one-time replacement — Site-applied paint on aluminium typically lasts 8-12 years in moderate Australian climates before needing attention again. In harsh coastal or high-UV environments, that drops to 5-7 years.
Homeowners evaluating frame condition after stripping often discover that modern aluminium window systems offer a fundamentally different maintenance proposition. Factory-applied powder coating — the finish used by manufacturers like MEICHEN — bonds at a molecular level during a high-temperature curing process that site-applied paint simply cannot replicate. These finishes resist chipping, fading, and peeling for decades rather than years, and come in extensive colour ranges that eliminate the cycle of stripping and repainting entirely. With custom configuration options, glazing choices suited to Australian climate zones, and thermally broken profiles that meet current energy standards, replacement becomes a practical long-term consideration for frames that have reached the end of their restorable life — not an extravagance, but a calculation that often works out cheaper than repeated maintenance over the next decade.
For frames in sound structural condition with only cosmetic issues, though, a proper repaint following the etch-prime-topcoat system delivers excellent results. The effort you've invested in careful paint removal pays its dividend here: a clean, undamaged aluminium surface accepts primer and paint beautifully, giving you a finish that genuinely lasts rather than peeling within a season. Whether you repaint, clear-coat, or replace, the stripped frame you're looking at represents the honest starting point for whichever path makes sense for your home and budget.
Frequently Asked Questions About Removing Paint From Aluminium Window Frames
1. What is the best paint remover for aluminium window frames?
A gel-formula chemical stripper labelled safe for non-ferrous metals is the best option for aluminium frames. Gel formulas cling to vertical surfaces and won't run off like liquid strippers. Avoid any product containing sodium hydroxide (caustic soda), as it pits and permanently discolours aluminium. Methylene-chloride-free gel strippers are the current standard for DIY use — they work more slowly but are safer to handle and gentler on the metal. Always test on a hidden area first, as even aluminium-safe products can react with certain anodised or powder-coated finishes.
2. Can I use a heat gun to remove paint from aluminium window frames?
You can, but it carries significant risks specific to aluminium. The metal conducts heat roughly 1,000 times more efficiently than wood, meaning heat applied at one point travels across the entire frame within seconds. This can crack double-glazed sealed units through thermal stress, melt rubber gaskets, and warp thin frame sections. Heat guns are best reserved for frames that have been physically removed from the window opening. If the frame is still installed with double glazing, chemical stripping is a safer choice that avoids the risk of an expensive glass replacement.
3. How do I remove paint splatter from aluminium frames after decorating?
For small paint splatters — the most common scenario after redecorating — a simple solvent-and-scrape method works quickly without chemicals or mess. Dampen a microfibre cloth with isopropyl alcohol (for latex paint) or mineral spirits (for oil-based paint) and hold it against the spot for 30 seconds to soften the paint. Then use a plastic razor blade held at a shallow 15-20 degree angle, working in one direction only. Wipe the area clean with an alcohol-dampened cloth afterwards. This handles most post-renovation splatter in minutes without risking damage to the frame surface.
4. Will wire wool or steel wool damage aluminium window frames?
Yes — wire wool and steel wool cause permanent, irreversible damage to aluminium frames. Even fine-grade steel wool embeds microscopic iron particles into the soft aluminium surface. These particles then oxidise over the following weeks, creating rust-coloured spots that bleed outward and cannot be removed without completely refinishing the frame. This galvanic corrosion is a chemical reaction between dissimilar metals and no amount of polishing will fix it. Use only plastic scrapers, nylon pads, and silicon carbide sandpaper (320-400 grit) on aluminium surfaces.
5. Do I need to repaint aluminium frames after stripping the old paint?
It depends on the frame's underlying finish. If the frame has intact anodising (visible as a uniform metallic sheen), it may need no further treatment beyond cleaning. Bare aluminium without a factory finish needs protection from progressive oxidation — either an etch primer followed by exterior-grade acrylic paint, or a clear protective lacquer to maintain the metallic look. For frames in poor structural condition after stripping, modern aluminium window systems with factory-applied powder coating from suppliers like MEICHEN offer finishes that last decades without maintenance, eliminating the strip-and-repaint cycle entirely.