

Assess Your Paint Type and Frame Condition First
A few stray flecks of overspray from a weekend painting job and a full frame caked in decades-old enamel are two very different problems. The tools, chemicals, and time each one demands barely overlap, so figuring out which scenario you are dealing with is the first real step toward a clean result.
Overspray Removal vs Full Paint Stripping
Scattered splatter from a roller or spray can usually responds to a simple solvent wipe and a plastic scraper. A complete old paint job — especially one with multiple layers — calls for chemical strippers, longer dwell times, and more patience. Choosing the wrong approach wastes hours and risks damaging the frame surface underneath.
Why Aluminium Frames Need Special Care
Aluminium is softer and more chemically reactive than steel, and it lacks the forgiving grain structure of timber. Strong caustic strippers containing sodium hydroxide will attack the metal itself, leaving pitting, darkening, or a frosted appearance that no amount of polishing can undo. Even metal scrapers and steel wool can embed particles that trigger galvanic corrosion. If you want to remove paint from aluminium window frames without creating a bigger problem, every product and tool needs to be aluminium-safe from the start.
Identifying Your Paint Type Before You Start
How do you remove paint from aluminum frames effectively? Match your method to the paint. Latex lifts easily with heat or a citrus-based stripper. Oil-based and enamel coatings typically need a dedicated chemical product. Spray paint overspray often dissolves with rubbing alcohol alone. Your frame finish matters just as much — anodized aluminium carries a hardened oxide layer that aggressive techniques can destroy, while mill-finish frames are more tolerant but still scratch easily.
Before you open a single container, identify these four factors:
- Paint type — latex, oil-based, enamel, or spray paint
- Frame finish — anodized (smooth, uniform colour) or mill-finish (raw, slightly textured silver)
- Area coverage — isolated spots versus entire frame surfaces
- Frame condition — any existing corrosion, pitting, or weathering that could worsen during removal
Getting these details sorted upfront shapes every decision that follows — from which stripper to buy, to whether a heat gun is safe to use, to how aggressively you can scrape.
Step 1 Gather Tools and Choose an Aluminium-Safe Stripper
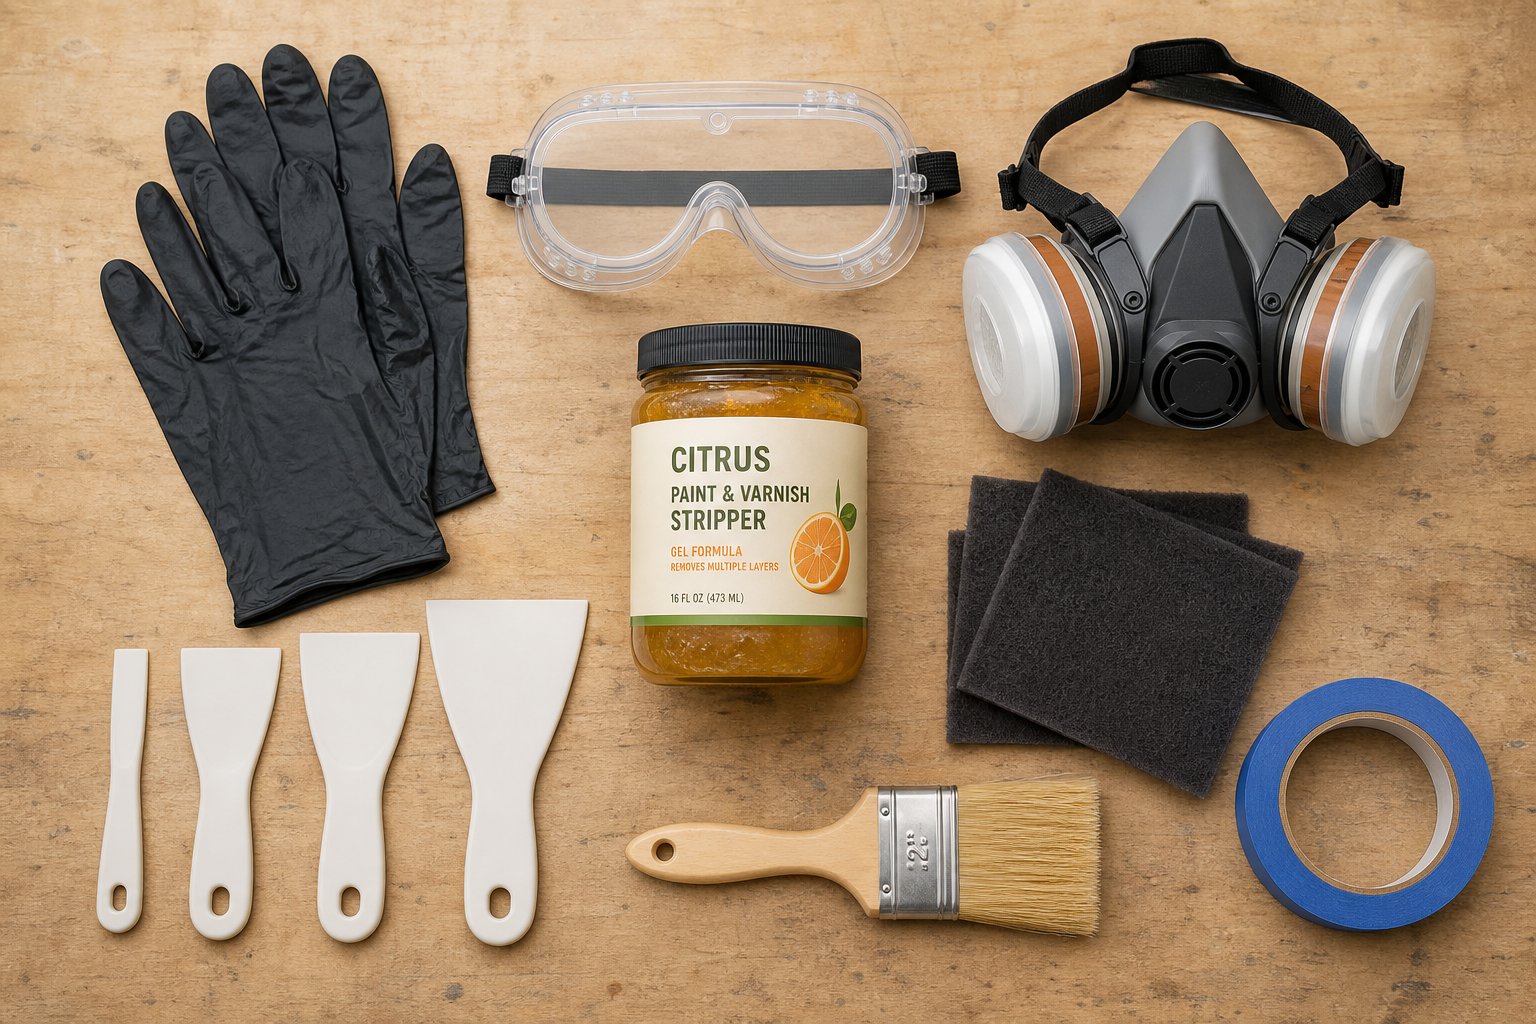
Picking up the wrong scraper or grabbing a heavy-duty stripper off the shelf without reading the label can leave you with gouged frames or discoloured metal. A few minutes spent assembling the right kit protects both the aluminium and your health throughout the project.
Safety Gear and Workspace Setup
Chemical strippers release fumes even in their milder formulations, and softened paint can contain lead or other hazardous pigments. Gear up before you crack a lid:
- Chemical-resistant gloves — nitrile or butyl rubber, not standard latex. Solvents like benzyl alcohol and dibasic esters permeate thin latex easily, so thicker chemical-rated gloves are essential.
- Safety goggles — sealed around the edges, not open-sided glasses. Splashes from gel strippers happen more often than you would expect on vertical window frames.
- Respirator mask — a half-face respirator with organic vapour cartridges for chemical methods, or at minimum a P2 particulate mask when sanding or scraping dried paint.
- Drop cloths — canvas or plastic sheeting beneath the window to catch drips and paint chips.
- Painter's tape and plastic wrap — mask off glass panes, rubber seals, and weatherstripping before applying any product.
Work outdoors or in a well-ventilated space whenever possible. Even lower-toxicity strippers benefit from airflow, and Australian summer heat accelerates solvent evaporation considerably.
Aluminium-Safe Chemical Strippers Explained
The best paint remover for aluminium is one that softens the coating without reacting with the metal underneath. Three categories fit that description: citrus-based, soy-based, and NMP-based formulations. Each uses a different active solvent to break down paint bonds, and each has trade-offs in speed, odour, and safety profile.
Citrus-based strippers rely on benzyl alcohol or d-limonene as the primary solvent, with a small percentage of citrus peel extract contributing to the formula. Products like Citri-Strip use benzyl alcohol at 30 to 60 percent concentration and work on both latex and oil-based paints. They are non-caustic, non-corrosive to aluminium, and most people find the citrus odour tolerable indoors.
Soy-based strippers use methyl soyate alongside a secondary solvent. The better formulations — such as those using Safenol (bis(2-methoxyethoxy)methane) instead of NMP — avoid reproductive toxicity concerns while still handling multiple paint layers effectively. They cling well to vertical surfaces, making them practical as a paint remover for window frames where dripping is a constant nuisance.
NMP-based (n-methyl-2-pyrrolidone) strippers are effective and relatively low in fumes, but NMP carries a California Prop 65 warning for reproductive harm. Several major retailers have voluntarily removed NMP products from shelves. If you choose this category, wear full protective gear and limit skin contact — NMP has a high dermal permeability rate.
For anyone looking to strip paint from aluminum frames without health trade-offs, citrus-based or NMP-free soy-based products offer the safest balance of performance and aluminium compatibility.
Chemicals That Damage Aluminium Surfaces
Two product categories should never touch your aluminium window frames:
Caustic (alkaline) strippers based on sodium hydroxide or potassium hydroxide dissolve aluminium's protective oxide layer and etch into the base metal. Research into aluminium surface finishing confirms that the metal's natural oxide film is only stable within a pH range of roughly 4.5 to 8.5. Caustic strippers push well above pH 12, causing irreversible darkening and pitting. Products like Peel Away 1 work brilliantly on brick and timber but will ruin aluminium.
Methylene chloride (dichloromethane) strippers are fast-acting but carry severe health risks. Methylene chloride is linked to central nervous system damage and is classified as a probable carcinogen, with 56 reported accidental exposure deaths since 1980. It is banned or heavily restricted in multiple countries. Beyond the health concerns, methylene chloride evaporates rapidly and can leave residues that promote oxidation on bare aluminium. Avoid it entirely.
| Stripper Category | Aluminium Safe? | Effectiveness | Typical Dwell Time | Key Concern |
|---|---|---|---|---|
| Citrus-based (benzyl alcohol) | Yes | Good for 1-2 layers of latex or oil-based paint | 30 minutes to 24 hours | May need multiple applications on thick coatings |
| Soy-based (NMP-free, e.g. Safenol) | Yes | Very good across multiple layers and coating types | 30 to 60 minutes per application | Slower than harsh solvents; patience required |
| NMP-based | Yes | Good to very good on most coatings | 2 to 8 hours | Reproductive toxicity (Prop 65); high skin absorption |
| Caustic / alkaline (sodium hydroxide) | No — causes pitting and darkening | Excellent on masonry and timber | 12 to 48 hours | Destroys aluminium oxide layer; irreversible damage |
Your scraping tools matter just as much as the chemical you choose. Stick to plastic scrapers, nylon-bristle brushes, and non-woven abrasive pads (Scotch-Brite or equivalent) rated for aluminium. Metal blades, wire brushes, and coarse steel wool embed ferrous particles into the softer aluminium surface, creating rust spots and galvanic corrosion over time. A plastic razor blade handles stubborn edges without leaving a mark.
With the right gear assembled and a stripper matched to your paint type, the actual application process becomes straightforward — and far less likely to end with a damaged frame.
Step 2 Select the Right Removal Method for Your Situation
Having the right stripper on hand is only half the equation. The best way to remove paint from aluminum frames depends on what kind of paint you are dealing with, how much of it there is, and whether your frames carry an anodized finish or a raw mill surface. Picking the wrong method wastes product, wastes time, and can leave marks that are harder to fix than the paint itself.
Matching Methods to Paint Types
Three primary approaches cover nearly every scenario you will encounter on aluminium window frames:
Chemical stripping is the go-to for full paint jobs and oil-based coatings. Oil-based and enamel paints form a hard, cross-linked film that heat alone struggles to soften evenly. A citrus-based or soy-based stripper breaks those bonds at the molecular level, letting you lift entire sheets of paint cleanly. This method also handles multiple layers well — critical on older homes where frames may carry three or four coats built up over decades.
Heat application works effectively on thick latex layers. A heat gun softens water-based acrylic paint quickly, making it pliable enough to peel away with a plastic scraper. The catch with aluminium is thermal conductivity — the metal disperses heat rapidly, so you need to work in small sections and keep the gun moving. Excessive heat in one spot risks warping thinner frame profiles or discolouring the surface.
Mechanical abrasion suits isolated overspray and small splatter spots. A fine Scotch-Brite pad dampened with rubbing alcohol handles most spray paint overspray without any chemical stripper at all. For slightly more stubborn spots, a plastic razor blade at a shallow angle lifts dried drips cleanly. This is the fastest approach when you are dealing with a handful of paint flecks rather than a full coating.
Latex paint responds well to both chemical and heat methods, giving you flexibility. Oil-based paint almost always requires a chemical stripper — heat alone tends to char it rather than soften it uniformly. Spray paint overspray is the simplest to tackle: rubbing alcohol or a citrus-based product dissolves most aerosol paints within minutes.
Anodized vs Mill-Finish Aluminium Considerations
Your frame's surface finish dictates how aggressive you can be. This distinction matters more than most guides acknowledge, especially if you are considering painting anodised aluminium window frames in the future and need the surface intact for primer adhesion.
Anodized frames have been electrochemically treated to build up a thick, hard oxide layer — typically 15 to 25 microns on architectural-grade aluminium. That layer provides corrosion resistance and colour stability, but it is brittle under chemical or mechanical attack. Caustic strippers destroy it outright, and even aggressive scrubbing with coarse abrasives can break through it in patches, leaving an uneven appearance. Stick to gentle chemical strippers (citrus or soy-based) and soft non-woven pads only. If you need to remove paint off aluminum frames with an anodized finish, patience and light pressure are non-negotiable.
Mill-finish frames have no protective treatment beyond aluminium's natural thin oxide film. They tolerate a wider range of methods — heat guns, slightly more aggressive pads, and longer chemical dwell times — without the same risk of visible damage. That said, they still scratch easily compared to steel, so metal scrapers remain off-limits.
Quick Method Selection Guide
Use this table to match your paint type and coverage to the right primary technique:
| Paint Type | Primary Method | Secondary Method | Difficulty Level |
|---|---|---|---|
| Latex (full coverage) | Heat gun + plastic scraper | Citrus-based chemical stripper | Moderate |
| Oil-based / enamel (full coverage) | Chemical stripper (citrus or soy-based) | Heat gun for stubborn patches | Moderate to high |
| Spray paint overspray (spots) | Rubbing alcohol + Scotch-Brite pad | Citrus-based stripper for heavier spots | Easy |
| Multiple layers (mixed types) | Chemical stripper with extended dwell | Heat gun between applications | High |
| Any paint on anodized frames | Gentle chemical stripper only | Soft non-woven pad with solvent | Moderate (requires care) |
If your situation falls into the "high difficulty" range — multiple layers on anodized frames, for instance — plan for repeated light applications rather than one aggressive pass. Aluminium rewards patience, and a methodical approach protects the surface you will eventually want to refinish or leave exposed.
With your method locked in, the next challenge is applying it correctly. Chemical strippers in particular demand specific techniques on vertical aluminium surfaces to penetrate evenly without dripping off or drying out prematurely.
Step 3 Apply Chemical Strippers Without Damaging the Frame
Vertical aluminium surfaces fight you at every stage — stripper wants to slide off, dwell times shorten as product dries, and uneven application leaves patchy results. A methodical approach solves all three problems and keeps the metal underneath untouched.
Applying Chemical Stripper Correctly
Before any product touches the frame, the surface needs to be clean. Dirt, cobwebs, and grime act as a barrier between the stripper and the paint film, reducing penetration and wasting dwell time. A quick wash with warm soapy water and a sponge removes that barrier. Rinse thoroughly and let the frame dry completely — residual moisture dilutes gel strippers and weakens their hold on vertical surfaces.
Always test in an inconspicuous spot first. Pick a section hidden behind a curtain or at the bottom corner of the frame, apply a small amount of stripper, and wait the full recommended time. This confirms the product won't discolour your specific frame finish and gives you a realistic preview of how the paint responds.
Ready to go? Follow these steps to remove paint from your window frame cleanly:
- Mask off glass panes, rubber seals, and any hardware with painter's tape and plastic sheeting.
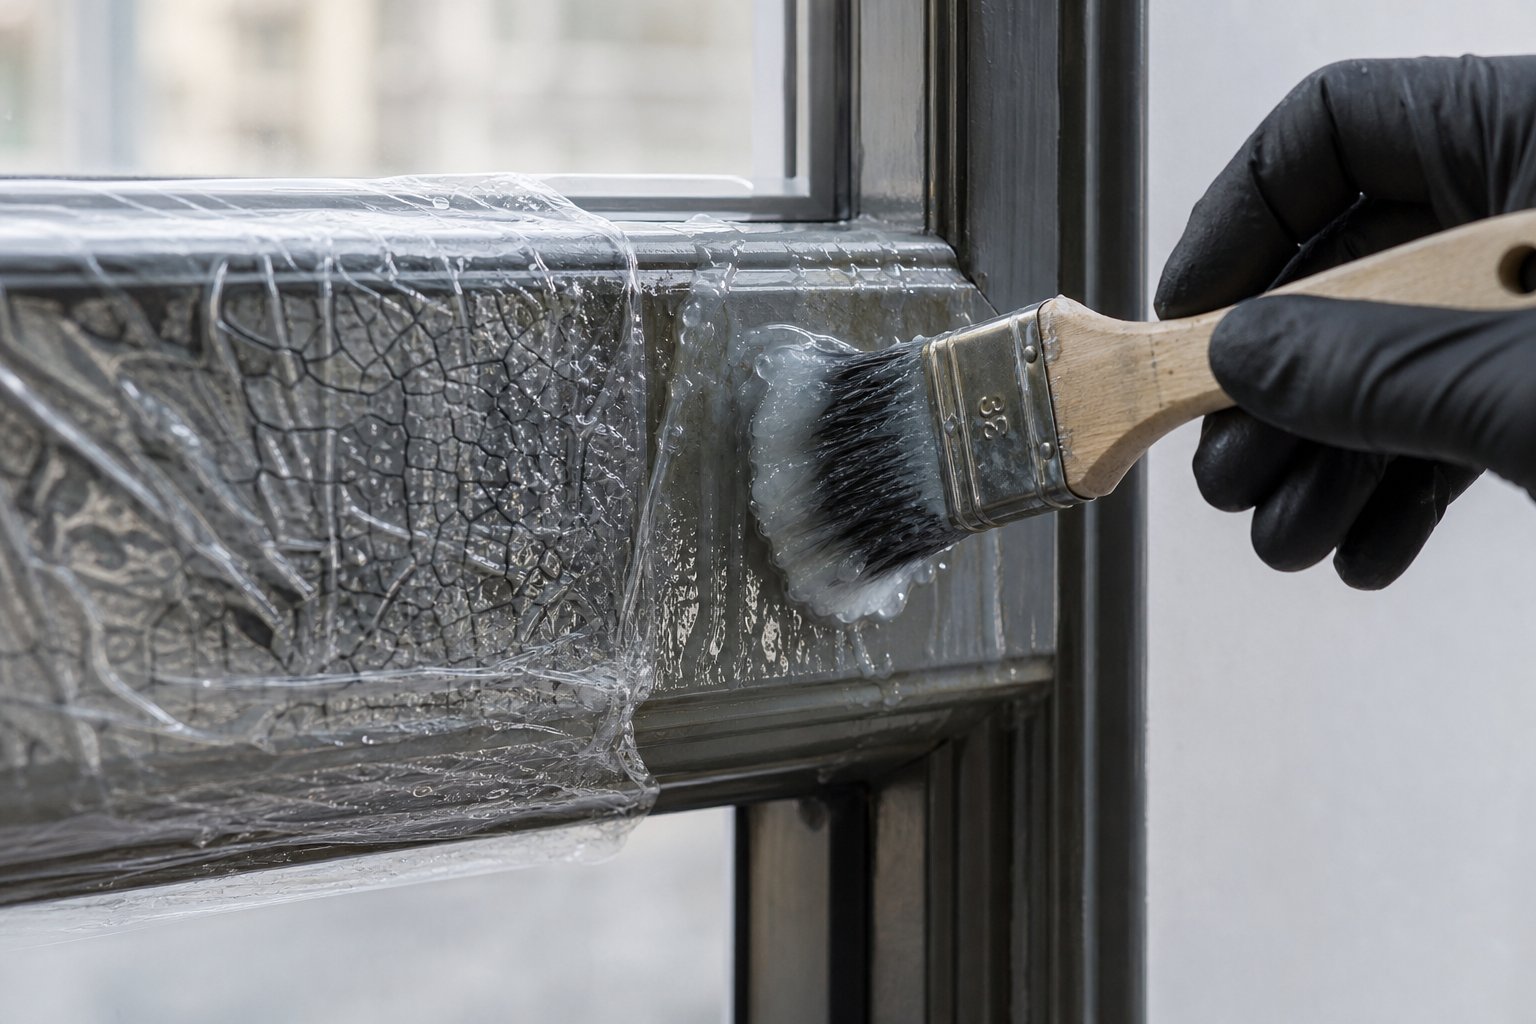
- Load a disposable chip brush with stripper and apply in thick, even coats — aim for roughly 3 to 5 mm thickness. Thin layers dry out before they can penetrate.
- Work in manageable sections of about 30 to 50 cm at a time rather than coating the entire frame at once.
- Immediately cover each coated section with cling film or plastic wrap, pressing it gently against the stripper. This keeps the product wet so it can keep working longer — even overnight if needed.
- Wait for the full dwell time: citrus-based strippers typically need 4 to 24 hours depending on paint thickness; NMP-based products work faster at 2 to 8 hours. Resist the urge to scrape early.
- Peel back the plastic wrap and check a small area. The paint should look wrinkled, bubbled, or soft enough to push with a fingernail.
Temperature affects performance significantly. In cooler months or shaded areas, dwell times stretch toward the longer end of the range. Australian summer heat can accelerate drying even under plastic wrap, so working in the early morning or late afternoon gives you more consistent results.
Scraping Technique for Aluminium Surfaces
This is where most DIYers damage their frames. The instinct is to dig in with the scraper edge, but aluminium is soft enough that even moderate downward pressure from a plastic blade can leave visible gouges.
Hold your plastic scraper at a low angle — roughly 20 to 30 degrees to the frame surface — and push forward rather than pressing down. The softened paint should lift away in ribbons or sheets with minimal force. If you find yourself applying real pressure, the stripper has not had enough time to work. Stop, reapply, cover again, and wait longer.
For flat frame sections, a wide plastic putty knife covers ground quickly. On narrower profiles and rebates, switch to a smaller plastic scraper or an old credit card trimmed to size. A Scotch-Brite pad dampened with water handles residual film that the scraper leaves behind, using light circular motions to avoid creating directional scratch patterns on the aluminium.
Handling Multiple Paint Layers
Older Australian homes — particularly those built in the 1970s and 1980s — often have aluminium frames carrying three, four, or even five coats of paint accumulated over decades. Removing paint from aluminum in this situation is rarely a single-pass job.
Each application of stripper typically penetrates one to two layers before losing effectiveness. The plastic wrap technique helps maximise penetration depth, but expecting one coat of product to dissolve everything down to bare metal sets you up for frustration. Plan for multiple cycles: strip, scrape, clean the residue, then reapply fresh stripper to the next layer down.
Between applications, wipe the frame with a damp cloth to remove loosened paint residue. This gives the next coat of stripper direct contact with the remaining paint rather than wasting its chemistry on debris already lifted from the surface. Skipping the hidden spot test between layers is also risky — deeper coats may be a different paint type (oil-based under latex is common) that responds differently to your chosen product.
Patience pays off here. Two or three careful applications with proper dwell times deliver a cleaner result than one aggressive pass with a harsher product. The aluminium underneath does not regenerate once damaged, so each cycle should feel controlled and unhurried.
Chemical stripping handles the bulk of the work on most frames, but certain areas resist it — thick drips, heavily built-up edges, and spots where the stripper simply cannot maintain contact long enough. Those stubborn patches often respond better to targeted heat or gentle mechanical methods applied with precision.
Step 4 Use Heat or Mechanical Methods for Stubborn Paint
Some paint simply refuses to budge under chemical strippers alone. Thick drips along the bottom rail, built-up edges where masking tape once sat, heavily layered corners — these spots often need a different kind of persuasion. A heat gun or targeted mechanical technique fills that gap, but aluminium's thermal conductivity and softness demand a more careful hand than you would use on timber or steel.
Heat Gun Technique for Thick Paint Layers
Heat works by softening paint to a pliable, almost rubbery state that peels away cleanly under a plastic scraper. On aluminium frames, the challenge is that the metal conducts heat rapidly across the entire profile, making it harder to concentrate warmth on one spot and easier to overheat thin sections without realising it.
Keep your heat gun set below 300°C. Above that threshold, thinner aluminium profiles risk warping or developing a permanent discolouration — a dull, greyish bloom that no amount of polishing removes. Most variable-temperature heat guns have a dial or digital readout; if yours only has "low" and "high" settings, stick to low and test on an inconspicuous section first.
The technique itself is straightforward:
- Hold the gun 5 to 8 cm from the paint surface, angled slightly so hot air does not blast directly onto glass panes or rubber seals nearby.
- Move the nozzle slowly across a section no larger than 10 to 15 cm at a time. You will see the paint begin to bubble or wrinkle within 20 to 40 seconds.
- The moment the surface changes texture, set the gun aside and scrape immediately with a plastic putty knife held at a low angle. Softened paint lifts in satisfying ribbons when you catch it at the right moment.
- Work methodically along the frame — heat one section while the previous section cools. Reheating the same spot repeatedly concentrates thermal stress and increases the risk of warping.
Timing is everything. Wait too long after heating and the paint re-hardens as aluminium sheds warmth quickly. Move too fast with the gun and you will not soften the coating enough to scrape cleanly. A rhythm develops after the first few passes — heat, scrape, shift, repeat.
For frames with multiple thick layers, combine heat with chemical stripping. Apply stripper first to break down the top coats, scrape those away, then use the heat gun on the stubborn base layer that bonded directly to the metal. This layered approach reduces the total heat exposure your frames endure.
Lead Paint Warning and Safety Precautions
Critical safety warning: If your home was built before the mid-1970s, assume that older paint layers on aluminium frames may contain lead. Heating lead-based paint releases toxic lead fumes at temperatures well below what a standard heat gun produces. The Minnesota Department of Health warns against using heat guns at temperatures above 370°C (700°F) on lead paint — but even lower settings can generate hazardous dust and vapour. In Australia, lead-based paint was common in residential use until the early 1970s. If there is any chance your frames carry original paint from that era, do not use heat methods. Chemical stripping with proper containment, or licensed professional removal, is the only safe path. Lead exposure causes permanent neurological damage in children and kidney, blood pressure, and fertility problems in adults.
Testing is simple and inexpensive. Lead test kits available from hardware stores give a result in minutes — a small investment that could prevent serious health consequences. If the test comes back positive, stop all DIY work and contact a licensed lead paint removal specialist in your state.
Mechanical Removal for Overspray and Splatter
Not every paint problem needs chemicals or heat. Scattered overspray from a nearby painting job, a few dried drips on the frame edge, or light splatter from a roller — these respond well to simple mechanical methods that take minutes rather than hours.
Here is how to get paint off window frames when you are dealing with isolated spots rather than full coverage:
Rubbing alcohol (isopropyl alcohol) dissolves most spray paint overspray on contact. Dampen a clean microfibre cloth or cotton pad with isopropyl alcohol and hold it against the paint spot for 30 to 60 seconds. The solvent softens the thin overspray film, and a gentle wipe lifts it away. For slightly more resistant spots, a fine-grade Scotch-Brite pad (grey or white — never green, which is too coarse for aluminium) dampened with alcohol provides just enough abrasion to break the paint free without marking the metal.
Plastic razor blades handle dried drips and thicker splatter. Hold the blade nearly flat against the frame — a 10 to 15 degree angle — and slide it under the edge of the paint spot. The goal is to shear the paint away from the aluminium surface rather than scraping downward into it. These blades flex slightly, which helps them follow the frame's contour without digging in.
The key to avoiding visible scratch patterns on aluminium is your motion. Work in small, random circular movements rather than long straight strokes in one direction. Straight-line abrasion creates parallel scratches that catch light and become obvious, especially on anodized finishes. Circular motion distributes any micro-abrasion evenly, leaving the surface looking uniform rather than scored.
For stubborn spots that resist alcohol, try a small dab of citrus-based stripper applied with a cotton bud directly onto the paint. Let it sit for 10 to 15 minutes, then wipe clean. This targeted approach avoids coating the entire frame in product when you only need to address a few problem areas.
Between heat, chemical, and mechanical techniques, most paint situations on aluminium frames have a clear solution. The real test comes in the areas where none of these methods can be applied in their standard form — the narrow channels, tight corners, and hardware recesses where paint hides and standard tools simply cannot reach.
Step 5 Tackle Corners, Channels, and Hard-to-Reach Areas
Flat frame surfaces are the easy part. The real frustration starts when you peer into the sliding track grooves, the tight corners where stiles meet rails, and the recesses behind handles and stays. Paint loves to pool in these spots — gravity pulls wet paint into channels during the original application, and overspray settles into every crevice. Standard scrapers and brushes are too wide to reach, and slathering chemical stripper into a narrow groove often just makes a mess without proper contact time.
Removing paint from window frame details requires a different toolkit and a more deliberate approach than broad surfaces. Here is what works in those awkward spaces.
Clearing Paint from Track Grooves and Channels
Sliding window tracks and drainage channels are typically 8 to 12 mm wide — too narrow for a standard putty knife and too deep for a flat pad to reach the bottom. Paint that has dried inside these grooves also tends to be thicker than on exposed surfaces, since liquid paint naturally flows downhill and collects there.
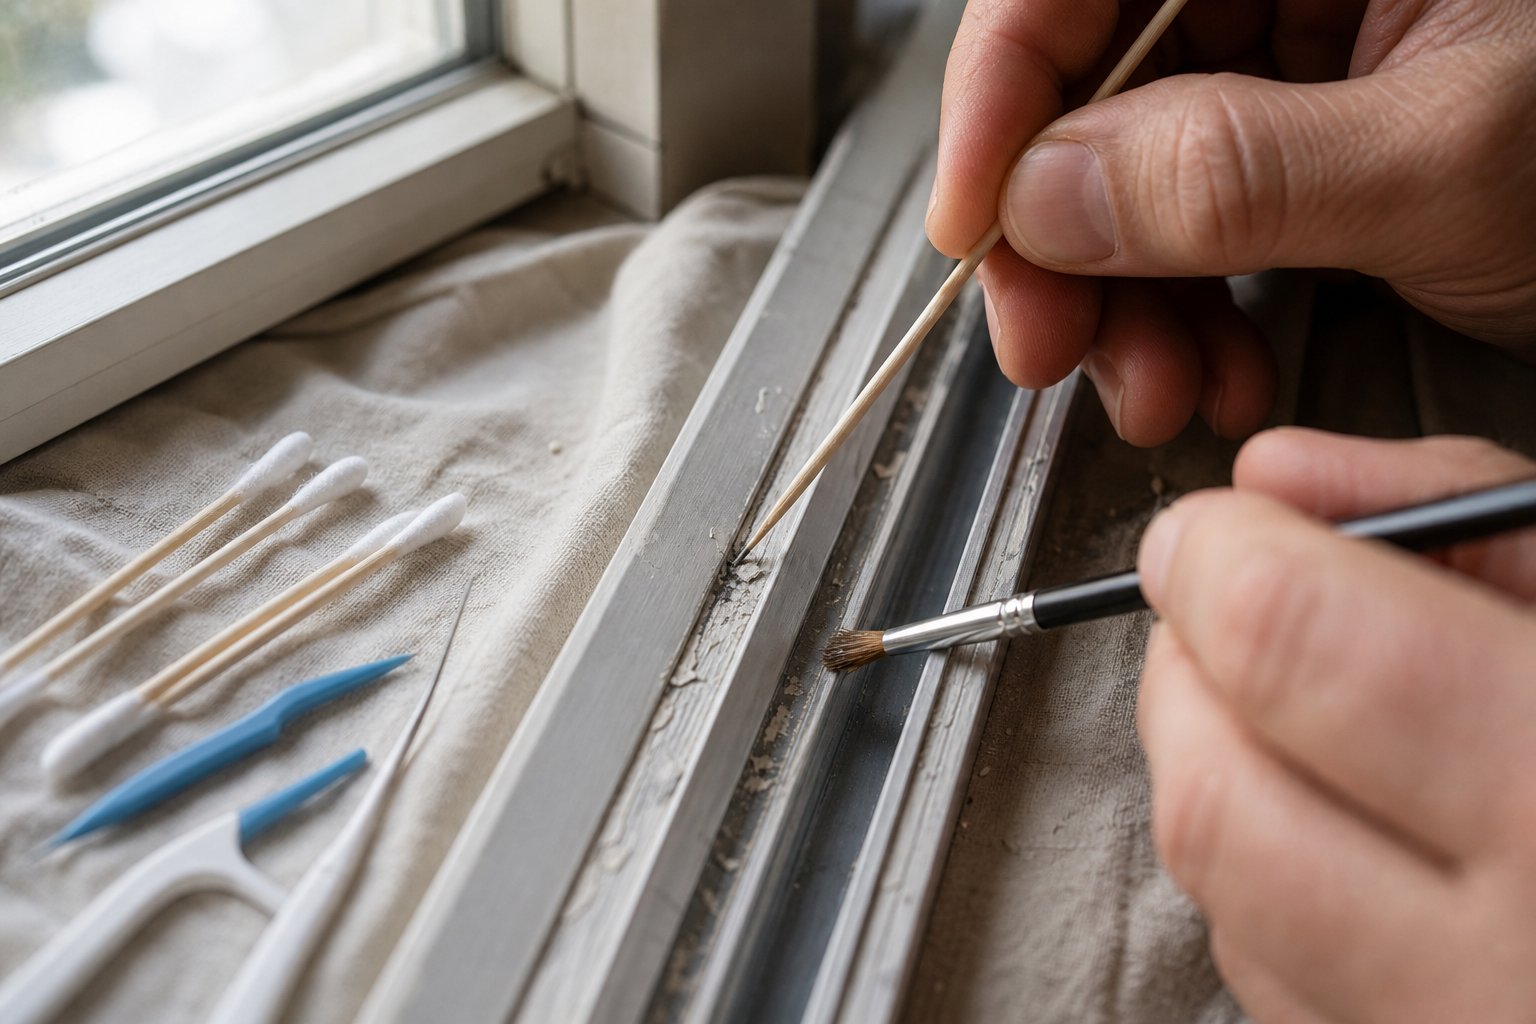
Start by applying your aluminium-safe stripper directly into the channel using a small artist's brush or a disposable acid brush (the kind with a tin handle and short bristles). Pack the stripper in generously — you want the groove filled rather than lightly coated. Cover the channel opening with a strip of cling film pressed down with painter's tape to hold moisture in and extend dwell time.
After the recommended wait, use these specialised tools to clear softened paint from tight spaces:
- Bamboo skewers or wooden toothpicks — firm enough to scrape softened paint from channel floors and corners, soft enough that they will not scratch aluminium. Sharpen the tip with a knife for precision, or flatten the end to create a miniature chisel shape.
- Plastic-tipped dental picks — the curved and angled tips reach into track grooves and around roller mechanisms where straight tools cannot access.
- Cotton swabs dipped in stripper — ideal for dissolving paint residue in tight internal corners after the bulk has been removed. Rotate the swab as you work to keep a fresh surface in contact with the paint.
- Detail brushes (stiff nylon, 5-10 mm wide) — scrub loosened paint out of channels after the initial scrape. An old toothbrush works in a pinch, though purpose-made detail brushes hold their shape better in tight spaces.
- Plastic syringe (without needle) — useful for flushing warm soapy water through narrow drainage slots to clear dissolved paint and stripper residue after scraping.
Work along the channel in short sections rather than trying to clear the entire length at once. Softened paint re-hardens as it cools and dries, so tackle 10 to 15 cm at a time, clean it out, then move on.
Working Around Hardware and Seals
Handles, window stays, locks, and friction hinges all create hidden edges where paint builds up underneath. Trying to strip paint around hardware in place is an exercise in frustration — you cannot get proper stripper contact, and scraping tools catch on screw heads and mounting plates.
The better approach is to remove hardware before stripping. Most aluminium window fittings attach with Phillips-head or hex screws that come out in seconds. Place all screws and small parts in a labelled zip-lock bag for each window so nothing goes missing. With the hardware off, you expose the full paint edge and can apply stripper evenly across the entire surface.
A few practical notes on hardware removal:
- Photograph each fitting's position before removal — some stays and restrictors have specific mounting orientations that are easy to forget during reassembly.
- If screws are painted over, score around the screw head with a sharp craft knife first to prevent the surrounding paint from chipping in a wide radius when you turn the screw.
- Friction stays on awning and casement windows often have riveted pins that cannot be removed without specialist tools. In that case, mask around the stay with painter's tape and work carefully with cotton swabs and a detail brush.
Protecting Weatherstripping and Glass Beads
Rubber seals and foam weatherstripping degrade quickly when exposed to chemical strippers. Solvents in citrus-based and soy-based products can swell, soften, or permanently deform EPDM and silicone seals — turning a paint removal job into a seal replacement job.
The simplest protection is a thin coat of petroleum jelly (Vaseline) applied to all rubber seals and weatherstripping before any stripper goes on the frame. The petroleum jelly creates an oily barrier that repels water-based and solvent-based strippers alike. Apply it with a cotton swab or your fingertip, covering the full exposed face of the seal. Once stripping is complete, wipe the petroleum jelly off with a dry cloth — it leaves no residue that affects seal performance.
Glass beads — the aluminium or plastic clips that hold glazing panels in place — present a trickier challenge. Paint often seeps into the hairline gap between the bead and the frame during the original paint job, effectively gluing the bead in place. If you need to access paint trapped behind the bead:
- Score along the bead edge with a sharp utility knife to break the paint film bridging the gap. Do not cut deep — you are only slicing through the paint skin, not prying yet.
- Insert a thin plastic putty knife or a purpose-made bead removal tool into the scored line at a corner of the frame. Aluminium beads clip in with a snap-fit, so gentle outward pressure at the midpoint usually releases them.
- Work slowly along the bead length, releasing it gradually rather than forcing one end. Sudden force cracks plastic beads and bends aluminium ones out of shape.
- Once removed, strip paint from both the bead and the frame channel behind it using your standard method. Clean both surfaces before refitting.
If the beads are old, brittle, or already cracked, source replacements from your window manufacturer or a glazing supplier before you start — attempting to refit a damaged bead risks the glass panel loosening over time.
Cleaning aluminum window frames in these detailed areas takes longer per square centimetre than broad surfaces, but skipping them leaves visible paint lines that undermine the entire project. Once every channel, corner, and recess is clear, the frame is ready for its final stage: neutralising chemical residue, assessing the bare metal condition, and deciding how to protect or refinish the surface going forward.
Step 6 Clean the Surface and Assess Frame Condition
Bare aluminium is now visible, but the job is far from finished. Active chemical residue left on the metal acts like a slow-burning fuse — it interferes with primer adhesion, causes blotchy discolouration, and can trigger peeling topcoats or sticky surfaces weeks after you think the project is done. This neutralisation and assessment phase separates a lasting result from one that fails within a season.
Neutralizing and Cleaning Stripper Residue
Different stripper types demand different neutralisers. Citrus-based and soy-based products are typically water-rinsable, while solvent-based formulations need a mineral spirits wipe before water touches the surface. Always check the product label first — the manufacturer knows what deactivates their specific chemistry.
Follow this sequence to bring the frame to a genuinely clean, residue-free state:
- Wipe the stripped frame with the appropriate neutraliser — mineral spirits for solvent-based strippers, or clean water for water-based and citrus-based products. Use a soft cloth or non-woven pad, working into every groove and corner.
- Continue wiping until the cloth comes away without any colour, stickiness, or oily sheen. If the cloth still picks up residue, repeat with a fresh one.
- Wash the entire frame with warm soapy water (a few drops of dishwashing liquid in a bucket works well) using a soft sponge. This removes any remaining chemical traces and loosened paint particles.
- Rinse thoroughly with clean water — a spray bottle or garden hose on a gentle setting prevents pooling in channels.
- Dry the frame completely using clean microfibre towels, then allow 12 to 24 hours of air drying before applying any coating. Aluminium does not rust like steel, but trapped moisture beneath a new finish causes adhesion failure and bubbling.
How do you know the surface is properly neutralised? Run a dry white cloth across the frame. It should come away clean with no discolouration, no slippery feel, and no chemical odour. If anything feels tacky or the cloth picks up colour, neutralise again. Skipping this step is the single most common reason DIY repainting aluminium window frames fails within the first year.
Assessing Frame Condition After Removal
With the frame stripped and clean, you finally see what you are actually working with. Take a close look under good natural light — early morning or overcast conditions reveal surface imperfections that direct sunlight washes out.
Look for these specific issues:
- Pitting — small craters or rough patches where corrosion or a caustic product has eaten into the metal. Light pitting can be polished out; deep pitting compromises the frame's appearance permanently.
- White chalky oxidation — a powdery residue indicating the protective oxide layer has degraded. Common on frames exposed to coastal salt air or prolonged UV without maintenance.
- Discolouration or dark patches — often caused by previous contact with alkaline cleaners or incompatible chemicals. These stains sit within the metal surface and rarely polish out completely.
- Anodized layer damage — if your frame was originally anodized, check for areas where the finish appears uneven, patchy, or worn through to raw aluminium. Once the anodized layer is breached, it cannot be restored without industrial re-anodizing, which requires removing the frame entirely.
Frames in good condition — smooth, uniform colour, no pitting — are ready for whatever finish you choose. Frames showing moderate oxidation or light surface damage can usually be restored with some additional preparation. Frames with deep pitting, structural corrosion, or widespread anodized layer failure present a harder question: can you repaint aluminium window frames in that condition and expect a decent result?
The honest answer is that paint hides cosmetic flaws but does not repair structural ones. If pitting is deep enough to feel with a fingernail, or if corrosion has thinned the metal noticeably, repainting is a short-term cosmetic fix rather than a long-term solution.
Surface Restoration and Protection Options
The condition assessment points you toward one of three paths forward:
Leave the aluminium exposed with a protective clear coat. Mill-finish frames that stripped cleanly can be polished with a dedicated aluminium polish to restore a soft metallic sheen. Follow with two to three light coats of a UV-resistant clear lacquer or automotive-grade clear coat to lock in the finish and prevent oxidation. This approach works well on frames in good condition where you want to preserve the natural aluminium look.
Prepare for repainting aluminium windows. If you plan to apply a new colour, surface preparation is everything. The frame needs a self-etching primer specifically formulated for aluminium — standard primers designed for steel or timber will not bond to the slick, non-porous aluminium surface and will peel within months. Self-etching primers contain mild acids (typically phosphoric) that create a microscopic chemical key as they cure, giving the topcoat something to grip. Apply one even coat, allow it to cure per the manufacturer's instructions, then follow with two coats of exterior-grade acrylic or urethane-modified paint rated for metal surfaces.
Accept that the frame condition makes refinishing impractical. Severe pitting, widespread corrosion, or structural thinning means any coating you apply is sitting on compromised metal. In these cases, the frame has reached the end of its serviceable life, and the investment in strippers, primers, and paint delivers diminishing returns. This is the point where replacement becomes the more practical conversation — one worth exploring based on your budget, the number of affected frames, and how the rest of the window (glass, seals, hardware) is holding up.
Whichever path you choose, the quality of your neutralisation and cleaning work directly determines how well the next layer — whether clear coat, primer, or nothing at all — performs over the coming years. Rushing this stage undermines every hour you spent stripping.

Step 7 Refinish Your Frames or Consider a Lasting Upgrade
Your frames are stripped, neutralised, and dry. The decision ahead shapes how long it will be before you are back here doing this again — or whether you ever need to repeat the process at all.
Repainting Aluminium Frames the Right Way
If you want to repaint aluminium window frames and have the result last more than a couple of seasons, preparation accounts for roughly 80 percent of your success. The bare metal needs three things in sequence: a thorough degrease, a compatible primer, and a topcoat built for thermal cycling.
Start by wiping the frame with a solvent-based degreaser or isopropyl alcohol to eliminate any oils left by your hands during stripping. Even fingerprints contain enough oil to compromise primer adhesion on aluminium's non-porous surface.
Next, apply a self-etching primer formulated for non-ferrous metals. These primers contain phosphoric acid that micro-etches the aluminium as it cures, creating a chemical bond rather than relying on surface texture alone. One even coat is sufficient for most self-etching aerosol products; two-part epoxy primers offer stronger adhesion in coastal or high-exposure environments but require precise mixing and a limited pot life.
For the topcoat, choose a 100 percent exterior acrylic or urethane-modified enamel rated for metal surfaces. Apply two thin coats rather than one thick one — thin layers cure more evenly and flex better as the aluminium expands and contracts through temperature swings. Allow the manufacturer's full recoat window between layers, and avoid painting in direct sun or when humidity exceeds 85 percent. Under ideal conditions, a well-executed DIY job on aluminium frames lasts roughly 8 to 12 years before chalking or peeling begins.
Knowing how to paint metal frame windows properly makes a genuine difference, but even the best brush-applied finish cannot match what comes out of a factory oven.
Powder Coating vs DIY Paint Durability
Factory powder coating is an entirely different process from wet painting. A dry powder — a blend of resin, curing agents, and pigment — is electrostatically charged and sprayed onto the aluminium, then baked at high temperature to fuse into a uniform, chemically bonded shell. The result is a finish that resists scratches, UV degradation, and corrosion at a level no brush or spray can replicate on site.
The numbers tell the story clearly:
| Factor | DIY Repaint (Brush/Spray) | Factory Powder-Coated Finish |
|---|---|---|
| Expected lifespan | 8 to 12 years in moderate climate | 20+ years with basic maintenance |
| Maintenance required | Touch-ups every 3-5 years; full repaint at end of life | Occasional wash with soapy water |
| Appearance consistency | Visible brush marks or orange peel; fades unevenly over time | Smooth, uniform finish; consistent colour retention |
| Scratch resistance | Moderate — chips from impact or abrasion | High — electrostatically bonded layer resists surface damage |
| UV resistance | Depends on topcoat quality; chalking common after 5-7 years | Engineered for prolonged UV exposure; meets AAMA 2604/2605 specs |
| Colour range | Limited by available retail paint colours | Extensive standard palette plus custom colour matching |
Coastal Australian homes face an even starker gap. Salt air accelerates paint breakdown significantly — a DIY finish in a beachside suburb may need attention within five to six years, while quality powder coating holds up for well over a decade in the same conditions.
When Factory-Finished Replacement Makes More Sense
Repainting is a sound choice when frames are structurally solid and you are dealing with one or two windows. But if you have just spent a weekend stripping multiple frames only to find pitting, oxidation damage, or worn seals underneath, the calculus shifts. Each repaint cycle adds cost and labour without addressing underlying deterioration — and the finish never quite matches what a factory environment produces.
For homeowners weighing long-term value, professionally specified aluminium windows with factory powder coating eliminate the strip-and-repaint cycle entirely. Standard colour ranges cover most architectural styles, custom powder coating matches any specific palette, and the finish arrives ready to install with no on-site painting required. Design-conscious renovators also gain access to project-based design support, glass choices, and opening configurations tailored to the home — benefits that no amount of careful repainting delivers.
The right path depends on your frame condition, your budget, and how many more times you are willing to repeat this process. For a single window with solid frames, repainting makes perfect sense. For a whole-home situation where frames are aging and finishes are failing across the board, factory-finished replacement is the option that pays back over decades rather than years.
Should You DIY or Call a Professional?
Stripping and refinishing one or two frames over a weekend is a satisfying project. Stripping twelve across an entire house while balancing work, family, and weather windows is a different proposition entirely. Knowing where the practical boundary sits between a worthwhile DIY effort and a false economy saves both money and frustration.
DIY Assessment Criteria and Time Investment
A single aluminium window frame with light overspray takes 30 to 60 minutes from start to finish using mechanical methods. A fully painted frame with multiple layers demands 4 to 8 hours of active work spread across two or more days — factoring in stripper dwell time, scraping, reapplication, neutralising, and drying. Multiply that across five, eight, or fifteen windows and the project stretches into weeks of evenings and weekends.
DIY paint removal makes solid sense when:
- You have fewer than five or six frames to address
- The paint is a single layer of latex or spray paint overspray
- Frames are in good structural condition with no visible corrosion
- You have confirmed no lead paint is present (homes built after the mid-1970s)
- You are comfortable working with chemical products and have adequate ventilation
Beyond five or six frames, the cumulative cost of strippers, plastic scrapers, protective gear, primers, and topcoats adds up quickly. Factor in your time at any reasonable hourly rate and the economics start to shift.
When Professional Removal Is Worth the Cost
Certain situations take the project out of DIY territory regardless of your skill level. Lead paint is the clearest example — in Australia, homes built before the early 1970s commonly used lead-based coatings, and disturbing them without proper containment creates a genuine health hazard. Licensed lead paint removalists carry the equipment, training, and waste disposal certifications that regulatory frameworks require for safe handling.
Professional help also makes sense when frames show extensive anodized layer damage, when you cannot identify the paint type with confidence, or when access is difficult — second-storey frames requiring scaffolding or ladder work add risk that outweighs any cost saving from doing it yourself. A professional spray painter working with a 2-pack system can also deliver a finish that lasts 10 to 15 years, far exceeding what most DIY brush applications achieve.
Evaluating Full Window Replacement as an Alternative
There is a tipping point where neither DIY stripping nor professional repainting represents the best use of your renovation budget. Can you paint metal window frames that are pitted, corroded, and carrying worn-out seals? Technically yes — but the result will never look right, and you will be back here within a few years doing it again.
Replacement outperforms repeated stripping and repainting in these specific scenarios:
- Frames show deep pitting or structural corrosion that paint cannot disguise
- Seals, hardware, and glazing are failing alongside the finish — indicating the window has reached end of life, not just end of paint life
- You are addressing six or more windows and the combined cost of professional stripping, priming, and repainting approaches $2,500 to $7,500 for the house
- Energy efficiency upgrades (double glazing, thermally broken frames) are part of your renovation goals
- You want a maintenance-free finish that lasts 20+ years without touch-ups or full restrip cycles
For whole-home situations, professionally specified aluminium windows with factory powder coating deliver a fundamentally different outcome. Standard colour ranges suit most architectural styles, custom powder coating matches any palette, and the finish arrives bonded at a molecular level — no on-site painting, no dwell times, no chemical fumes. Glass choices, opening configurations, and project-based design support mean the replacement addresses performance, aesthetics, and liveability in one step rather than treating each problem separately.
The honest framework is simple: if your frames are sound and the job is small, strip and repaint them yourself. If the frames are deteriorating and the scope is large, invest in a solution that eliminates the cycle rather than resetting it. Either way, you now have the knowledge to make that call with confidence rather than guesswork.
Frequently Asked Questions About Removing Paint from Aluminium Window Frames
1. What is the best paint remover for aluminium window frames?
Citrus-based strippers using benzyl alcohol or NMP-free soy-based products are the safest and most effective options for aluminium. They soften paint without reacting with the metal underneath. Avoid caustic strippers containing sodium hydroxide, as these dissolve aluminium's protective oxide layer and cause irreversible pitting and darkening. For light overspray, rubbing alcohol alone often does the job without any dedicated stripper.
2. Can you use a heat gun to remove paint from aluminium frames?
Yes, but with caution. Keep the temperature below 300 degrees Celsius to prevent warping or discolouration of the aluminium. Hold the gun 5 to 8 cm from the surface and work in small 10 to 15 cm sections, scraping with a plastic tool as soon as the paint bubbles. Never use heat on frames that may contain lead paint — homes built before the mid-1970s in Australia commonly used lead-based coatings, and heating them releases toxic fumes.
3. Will paint stripper damage anodized aluminium window frames?
Gentle citrus-based and soy-based strippers will not damage anodized finishes when used correctly. However, caustic alkaline strippers destroy the anodized layer permanently, and aggressive scrubbing with coarse abrasives can break through it in patches. For anodized frames, use only aluminium-safe chemical strippers with soft non-woven pads, and avoid metal scrapers entirely. Once the anodized layer is breached, it cannot be restored without industrial re-anodizing.
4. How do you remove paint from aluminium window tracks and grooves?
Apply stripper into the channel using a small artist's brush, filling the groove generously. Cover with cling film to extend dwell time. After waiting, use bamboo skewers or plastic-tipped dental picks to scrape softened paint from the channel floor. Cotton swabs dipped in stripper clean tight internal corners, and a stiff nylon detail brush scrubs loosened residue free. Work in short 10 to 15 cm sections to prevent the softened paint from re-hardening.
5. Is it better to strip and repaint aluminium frames or replace them?
For one or two frames in good structural condition, stripping and repainting is cost-effective and delivers 8 to 12 years of life. However, if frames show deep pitting, corrosion, or failing seals across multiple windows, replacement with factory powder-coated aluminium windows offers better long-term value. Powder-coated finishes last 20-plus years with minimal maintenance, compared to repeated strip-and-repaint cycles every decade. The tipping point typically comes when addressing six or more deteriorating frames.