

Why Aluminium Window Locks Fail Differently
Search for how to fix aluminium window lock problems and you'll find pages of generic advice written for uPVC or timber frames. The trouble is, applying those fixes to aluminium windows often accelerates the damage. Aluminium frames have thinner wall profiles, different internal cavities, and a unique vulnerability to galvanic corrosion when paired with incompatible fasteners. A repair approach that works perfectly on a chunky uPVC frame can strip threads, crack housings, or trigger rapid metal degradation on an aluminium one.
Why Aluminium Window Locks Need Specific Repair Guidance
The difference between aluminium vs uPVC window lock repair comes down to material behaviour. uPVC is a thick, forgiving plastic that accepts a wide range of screw sizes and tolerates over-tightening. Timber has natural grip and bulk. Aluminium, by contrast, uses thin-walled extruded profiles where screw length, thread type, and fastener material all matter critically. Use a plain carbon steel screw in an aluminium frame and galvanic corrosion can degrade that fastener within months, particularly in coastal environments. The lock hardware loosens, the frame suffers cosmetic pitting, and you're left with a bigger problem than the one you started with.
Most aluminium window lock failures fall into one of four categories: handle failure, gearbox wear, keep misalignment, or corrosion. Identifying which category your problem fits determines the correct fix and prevents wasted effort on the wrong repair.
What This Guide Covers
This aluminium window lock repair guide walks through a structured path: diagnosing exactly why aluminium window locks fail in your situation, understanding which lock type is fitted to your window, performing the right repair with appropriate materials, and recognising when replacement makes more sense than persisting with a fix. Each section addresses aluminium-specific considerations that generic resources skip entirely.
The starting point for any successful repair is accurate diagnosis, and that requires understanding how different failure modes present themselves on aluminium frames specifically.
Common Failure Modes in Aluminium Window Locks
Aluminium window locks don't fail randomly. Each breakdown follows a predictable pattern tied to the material properties of the frame, the environment the window lives in, and the quality of the original hardware installation. Matching your symptoms to the correct failure mode is the fastest way to avoid wasting money on the wrong repair.
Galvanic Corrosion and Metal Compatibility Issues
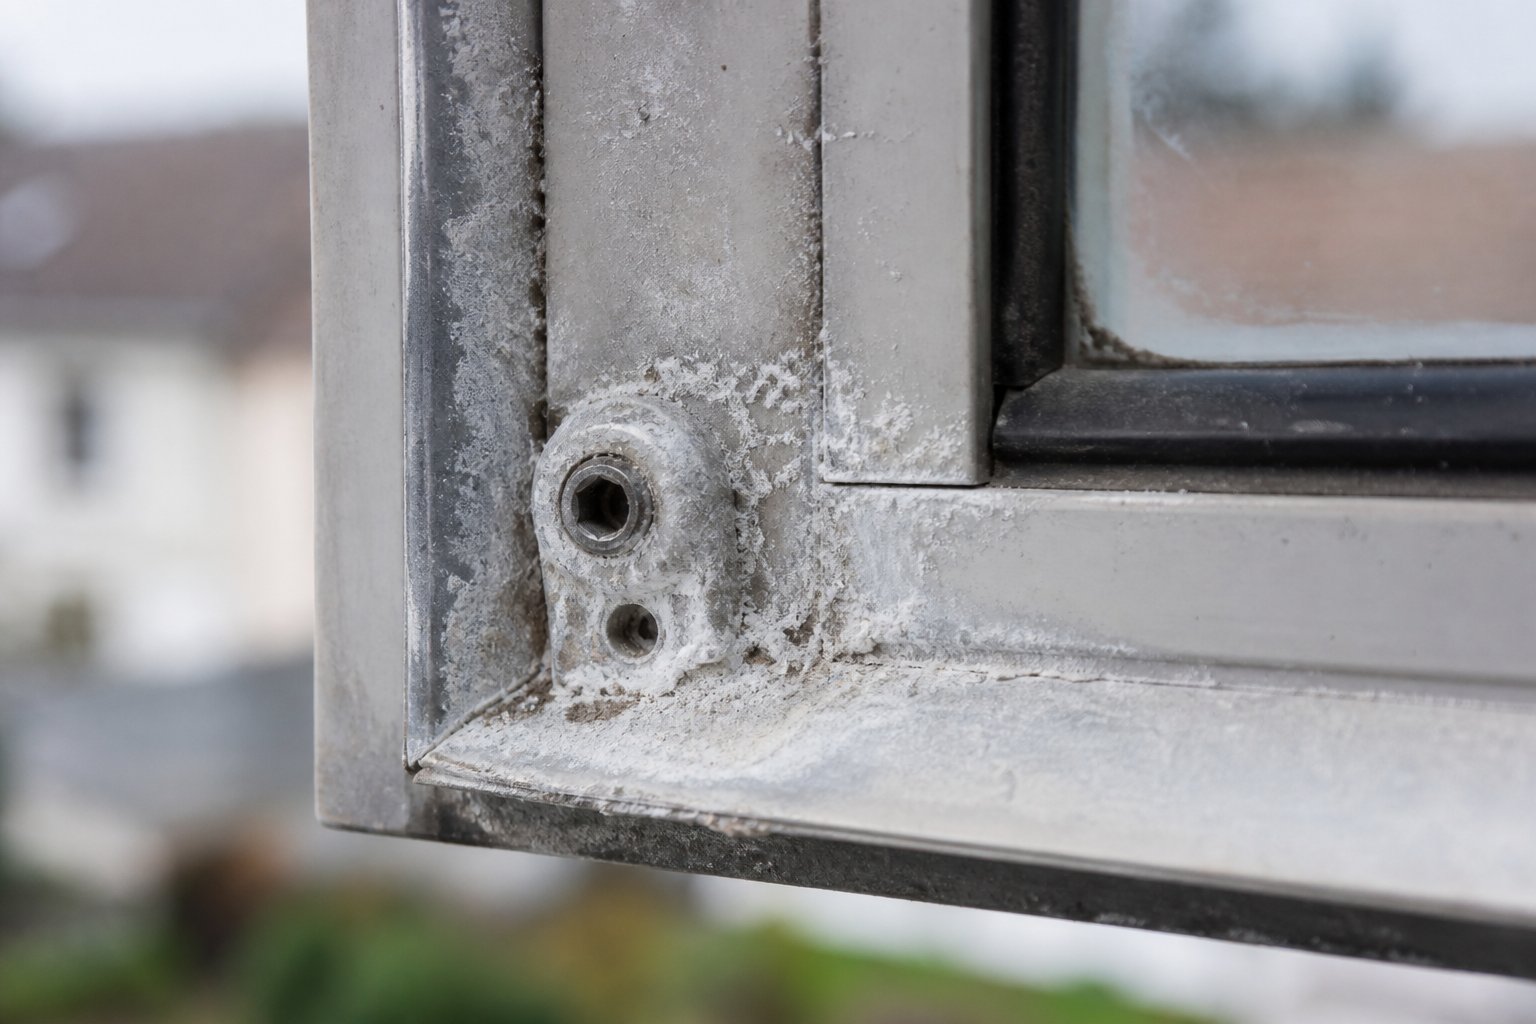
Galvanic corrosion on an aluminium window frame occurs when two dissimilar metals sit in direct contact and moisture completes the circuit. Plain steel screws in aluminium profiles are the most common culprit. Because aluminium is more anodic than steel, it corrodes preferentially at the contact point, producing white or grey powdery deposits and eventually pitting the frame material itself. Zinc-bodied lock components mounted directly against aluminium create the same reaction, just more slowly.
Coastal properties across Sydney's Northern Beaches, Perth's western suburbs, or anywhere within a few kilometres of salt water see this process accelerate dramatically. Salt spray acts as a highly efficient electrolyte, turning what might be a five-year degradation cycle inland into visible damage within twelve to eighteen months.
If you're dealing with aluminium window lock corrosion repair, look for these telltale signs:
- White, chalky powder around screw heads or where the lock body meets the frame
- Screws that feel loose but won't tighten — the surrounding aluminium has corroded away
- Pitting or rough texture on the frame surface beneath the lock hardware
- Lock body discolouration where zinc plating has broken down
- Difficulty turning the handle due to corrosion buildup inside the mechanism cavity
Gearbox Wear and Seized Mechanisms
If you're wondering why is my aluminium window lock stiff, the answer often lives inside the gearbox — the internal assembly that converts your handle's rotational movement into the linear motion of the lock tongue or bolt. Years of daily use gradually wear the internal cams and springs. Eventually, the mechanism binds partway through its travel or requires excessive force to operate.
A seized mechanism is the more extreme version. Lack of lubrication allows metal-on-metal contact points to gall, while salt air exposure creates oxidation within the housing that locks moving parts in place. An aluminium window lock seized mechanism typically presents with:
- Handle that moves partway then stops dead
- Grinding or crunching sensation when forcing the handle
- Lock tongue that extends but won't retract, or vice versa
- Handle that has become progressively stiffer over months before finally seizing completely
- Visible rust or oxidation on exposed metal edges of the lock faceplate
The progressive nature matters here. A lock that worked fine yesterday and jammed today is more likely a misalignment issue. One that's been getting gradually harder to operate points squarely at internal wear or corrosion buildup.
Frame Settlement and Lock Misalignment
Buildings move. Concrete slabs settle unevenly, timber subfloors shift seasonally, and aluminium frames themselves expand and contract with temperature changes. Research into thermal behaviour shows that at elevated temperatures, aluminium profiles expand both lengthwise and laterally, which can push locks out of alignment with their keeps. In Australian summers, dark-coloured aluminium frames on west-facing walls can reach surface temperatures well above 50°C, making this a real-world issue rather than an engineering footnote.
Misalignment symptoms differ from corrosion and wear because the handle itself typically operates smoothly — the problem only shows up when attempting to engage the lock:
- Lock tongue or bolt misses the keep opening, visibly striking above, below, or to one side
- Lock engages only with significant upward or downward pressure on the sash
- Window rattles when locked because the tongue barely catches the keep edge
- Problem worsens in summer and partially resolves in winter (thermal cycling)
- Visible gap between frame and sash that wasn't present when the window was new
Each of these three failure modes demands a different repair strategy. Treating corrosion as misalignment, or misalignment as gearbox failure, sends you down the wrong path entirely — which is precisely why a structured diagnostic process matters before touching a single screw.
Diagnosing Your Aluminium Window Lock Problem
Knowing the common failure modes is one thing. Pinpointing which one is actually affecting your window requires a hands-on process of elimination. The following diagnostic sequence takes you from the simplest check to the most involved, so you identify the faulty component without disassembling anything unnecessarily.
You'll need a Phillips-head screwdriver, a torch, and five minutes. Work through each step in order — the result of each test determines whether you need to continue or whether you've already found your answer.
Step One: Testing Handle Operation
Start with the handle itself. This is the fastest way to diagnose an aluminium window lock fault because the handle's behaviour tells you immediately whether the problem is at the input stage or further downstream.
- With the window open, turn the handle through its full range of motion — typically 90 or 180 degrees depending on the lock type.
- Note whether the handle moves freely, moves with resistance, or refuses to turn at all.
- Check for play or wobble at the handle base, which suggests a worn spindle or loose fixing screws.
What your results mean:
- Handle turns freely but feels hollow or disconnected — the spindle has likely sheared. The handle spins without engaging the internal mechanism, meaning you need a spindle or handle replacement.
- Aluminium window handle not turning properly, stiff or grinding — internal corrosion or gearbox wear is restricting movement. Continue to Step Three.
- Handle operates smoothly through full travel — the handle and spindle are fine. Your problem lies further along the mechanism. Move to Step Two.
Step Two: Inspecting the Lock Tongue and Keep
If the handle works correctly but your aluminium window lock is not engaging, the fault sits at the point where the lock bolt meets the frame. This is where misalignment and keep damage reveal themselves.
- Close the window and operate the handle while watching the lock tongue or bolt extend from the sash edge.
- Observe whether the tongue lines up with the keep opening on the frame — use your torch to check for a gap, offset, or obstruction.
- Look for paint buildup, debris, or corrosion deposits inside the keep slot that could be blocking entry.
- Apply gentle pressure to the sash — push it towards the frame — and try the lock again. If it engages with pressure but not without it, the sash has dropped or shifted.
What your results mean:
- Tongue aligns with the keep but won't enter — obstruction inside the keep. Clean it out and test again.
- Tongue misses the keep opening entirely — frame or sash movement has caused misalignment. The keep needs repositioning, which is covered in the repair section of this guide.
- Tongue enters the keep but the window still rattles or doesn't feel secure — the keep is worn or the tongue has insufficient throw. Component replacement is likely needed.
- Tongue doesn't extend at all despite the handle turning fully — the gearbox or internal linkage has failed. Proceed to Step Three.
Step Three: Checking Gearbox and Internal Mechanism
This final step addresses the most involved failure point. If troubleshooting aluminium window lock problems has brought you here, the issue is internal — either the gearbox has worn out, a cam has broken, or linkage rods have disconnected.
- Remove the handle by undoing the fixing screw (usually a single screw beneath a cap or on the handle face).
- Use a flat-blade screwdriver across the exposed spindle square to manually operate the gearbox. Apply steady, moderate force.
- Watch the lock faceplate for movement of the tongue, bolt, or mushroom cams. On multi-point systems, check whether all locking points move simultaneously.
- Listen for grinding, clicking, or no response at all as you turn the spindle.
What your results mean:
- Gearbox operates manually with the screwdriver but not with the handle — the spindle or handle connection is the problem, not the gearbox itself.
- Gearbox is completely seized and won't turn manually — internal corrosion has locked the mechanism. Replacement of the entire lockcase is usually the only fix.
- Gearbox turns but locking points don't respond — broken internal cams or disconnected linkage rods. On multi-point systems, this typically means the gearbox assembly needs replacing as a unit.
- Gearbox moves with a rough, gritty feel — early-stage corrosion or debris. A thorough clean and PTFE lubrication may restore function if caught early enough.
By this point, you know exactly which component is at fault — handle and spindle, keep and alignment, or gearbox and internal mechanism. That distinction matters because each lock type found on aluminium windows has different serviceable parts, different replacement availability, and different difficulty levels for a DIY repair.
Aluminium Window Lock Types and How They Work
Your diagnostic results only become actionable when matched to the specific lock mechanism fitted to your window. A worn gearbox on a multi-point system requires a completely different response than a worn gearbox on a sweep lock — largely because one has a gearbox and the other doesn't. Understanding the types of aluminium window locks and their mechanical principles saves you from ordering wrong parts or attempting repairs that don't apply to your hardware.
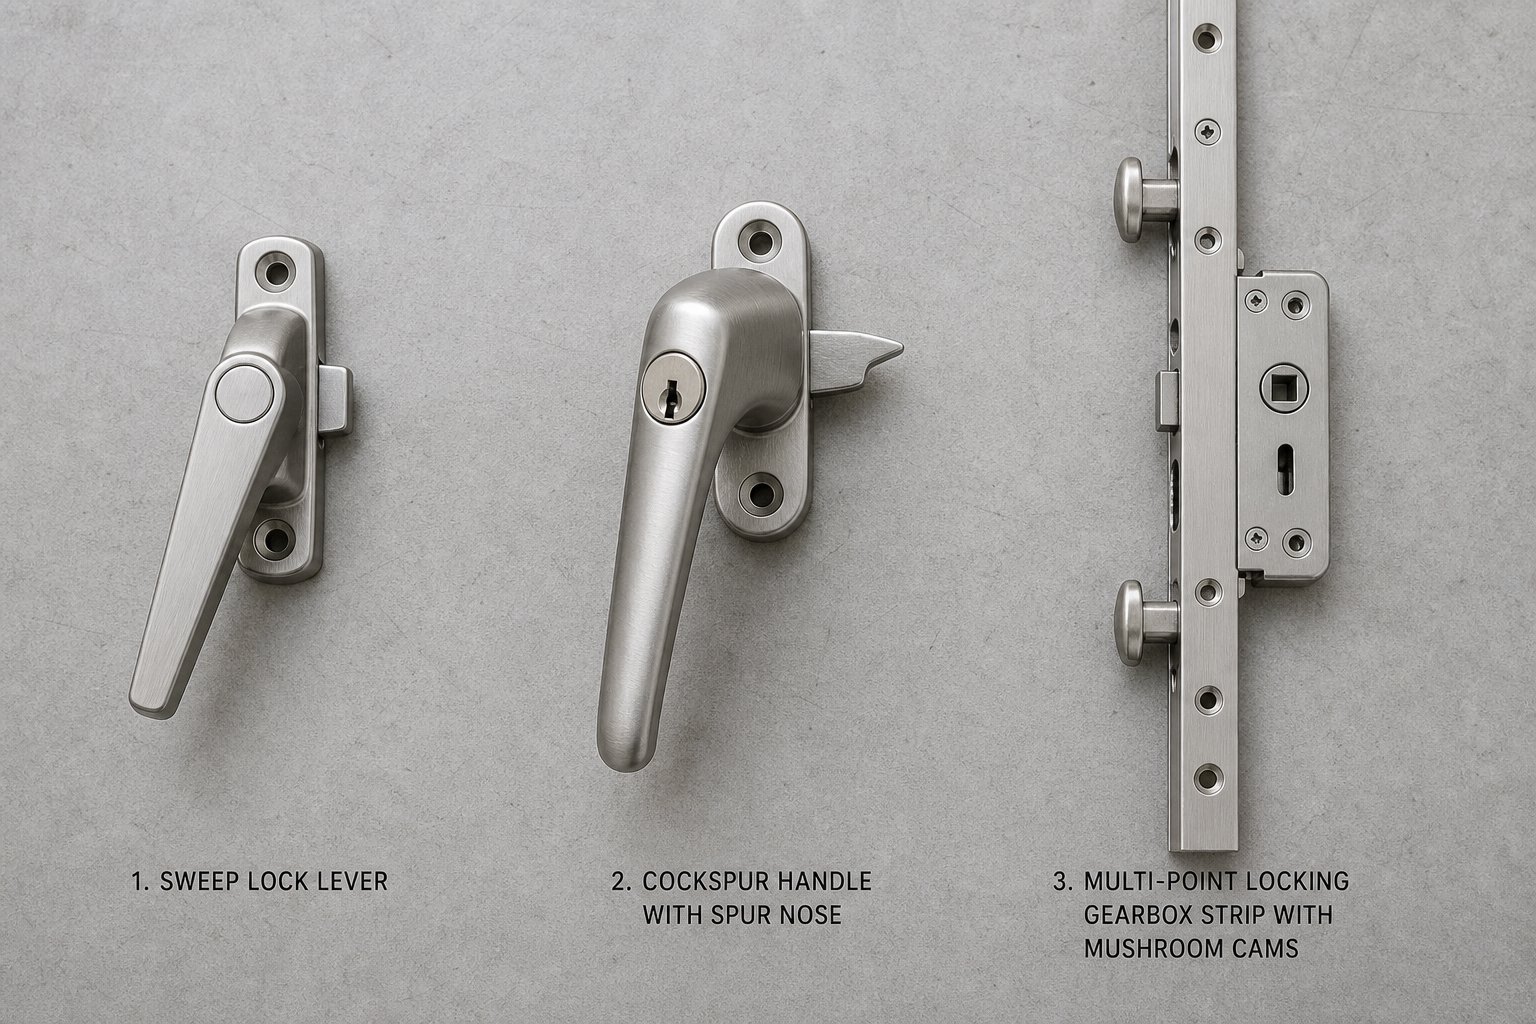
Three lock mechanisms dominate the aluminium window market in Australia. Each serves a different window style, operates on a distinct mechanical principle, and presents its own repair profile.
Sweep Locks on Sliding Aluminium Windows
Sweep locks are the simplest mechanism you'll encounter, and they're almost universal on sliding aluminium windows across Australian homes built from the 1970s onwards. The operating principle is straightforward: a pivoting arm (the sweep) rotates over a raised keeper on the adjacent sash or frame, pulling the window tight against the weatherseal as it clamps down.
How does an aluminium window lock work in this configuration? A single lever rotates around a central mounting screw. As the lever swings into the locked position, its curved underside contacts the keeper and applies compression force between the two sashes. There's no gearbox, no spindle, and no internal linkage — just a mechanical lever and a mating surface.
This simplicity makes aluminium sliding window sweep lock repair among the most accessible DIY jobs. The serviceable components are limited to:
- The sweep body itself (the rotating lever and its base plate)
- The keeper (the raised tab or hook the sweep latches over)
- The mounting screws (typically two for the sweep, one or two for the keeper)
Common failure points include worn or cracked sweep arms that no longer apply adequate clamping force, missing or damaged keepers, and loose mounting screws where the aluminium frame has lost thread grip. Because sweep locks are surface-mounted, replacement means removing two or three screws and fitting a new unit — no dismantling of the sash required.
The catch is sizing. Sweep locks aren't fully standardised across manufacturers. Height from the mounting surface to the hook varies, and the keeper needs to match. Fitting a sweep lock that's too tall or too short results in either incomplete engagement or excessive force that strains the sash.
Cockspur Handles on Older Casement Frames
If your aluminium casement windows were installed before the mid-1990s, there's a strong chance they use cockspur handles. These are identifiable by the pronounced spur — a protruding nose — that extends sideways from the handle body and hooks over a wedge or striker plate mounted on the frame.
Mechanically, a cockspur handle is a lever that rotates around a single fixing bolt. When you push the handle down, the spur swings over the frame-mounted wedge and draws the opening sash tightly against the seal. Like sweep locks, cockspurs have no internal locking mechanism in the traditional sense — the latch operates entirely externally. Many modern replacements add a key-lockable cylinder for improved security, but the underlying principle stays the same.
Cockspur handle aluminium window replacement involves a few critical measurements. The most important is the distance from the handle's fixing bolt to the nose tip (this determines whether the spur reaches the wedge). You also need to confirm the handle's hand — left-handed or right-handed — based on which side the window opens from. A right-handed cockspur won't function on a left-opening window because the spur swings the wrong way.
Serviceable components include:
- The handle body and spur
- The cockspur wedge (adjustable wedges can compensate for minor misalignment)
- The fixing screw and any secondary locating screws
Failures typically show up as a broken spur tip, a handle that no longer draws the window tight (worn wedge), or spindle bolt corrosion that prevents handle rotation. Because cockspurs mount externally with visible fixings, they're straightforward to replace — provided you can source the correct size and hand orientation.
Multi-Point Locking Systems on Modern Aluminium Windows
Modern casement and tilt-and-turn aluminium windows almost universally use multi-point locking systems. These are a fundamentally different category from sweep locks and cockspurs, both in complexity and security performance.
A multi point lock aluminium window uses a central gearbox connected to a handle via a spindle. When you rotate the handle, the gearbox converts that rotation into linear movement along metal strips (typically stainless steel or zinc-plated steel) that run inside the sash perimeter. These strips push mushroom cams or hook bolts outward at multiple points — usually two to five — simultaneously engaging with corresponding keeps on the frame.
The result is distributed locking force around the sash perimeter rather than a single contact point. This provides significantly better security and also helps compress the weatherseal evenly, improving both draught resistance and weather performance.
Serviceable components depend on how the system is configured:
- The handle and spindle (most commonly replaced, often resolves loose or wobbly handles)
- Individual keeps (can be repositioned to correct minor alignment drift)
- The gearbox assembly (replaceable as a unit on most modern systems)
- Extension pieces and corner drives (replaceable if damaged, though sourcing can be difficult on older or discontinued profiles)
What's generally not serviceable is the internal cam mechanism within the gearbox. When internal components shear or seize, the entire gearbox needs swapping. The linkage rods running through the sash are also typically replace-the-lot rather than repair-in-place items, since accessing them requires partial sash disassembly.
Multi-point systems offer the highest security rating but also the steepest DIY difficulty. Getting a gearbox replacement wrong — incorrect backset, wrong spindle height, incompatible cam positions — leaves you with a window that either won't lock at all or locks but won't open again.
| Dimension | Sweep Lock | Cockspur Handle | Multi-Point System |
|---|---|---|---|
| Typical window style | Sliding (horizontal and vertical) | Older side-hung casements | Modern casement, awning, tilt-and-turn |
| Serviceable components | Sweep body, keeper, mounting screws | Handle, wedge, fixing screw | Handle, spindle, gearbox, keeps, linkage rods |
| Common failure points | Cracked sweep arm, loose screws, worn keeper | Broken spur, corroded fixing bolt, worn wedge | Seized gearbox, broken cams, misaligned keeps |
| Average DIY difficulty | Low — surface-mounted, simple tools | Low to moderate — correct sizing critical | Moderate to high — internal components, precise measurements needed |
| Security level | Basic — single compression point | Basic to moderate (key-lockable upgrades available) | High — distributed locking, often insurance-compliant |
Knowing which system your window uses shapes everything that follows — from the tools and measurements you'll need, to the materials you should avoid, to whether a repair is worth attempting yourself or better left to a specialist glazier.
Aluminium-Specific Repair Considerations
The lock type tells you what to fix. The frame material tells you how to fix it — and more importantly, what not to use while doing so. Aluminium frames impose constraints that uPVC and timber simply don't. Get the fastener wrong, misjudge the wall thickness, or ignore the profile type, and your repair creates a new failure timeline measured in months rather than years.
Choosing the Right Screws and Fasteners for Aluminium
Aluminium window lock screw size matters more here than on any other frame material. A standard residential aluminium profile has a wall thickness between 1.2 mm and 1.6 mm — far thinner than the solid bulk of a uPVC sash or the dense grain of a hardwood frame. That means screws designed for those materials are often too long, too thick, or threaded in a way that strips the aluminium rather than gripping it.
For most lock hardware, you're working with screws in the #6 to #8 gauge range (roughly 3.5 mm to 4.2 mm shaft diameter), with lengths between 12 mm and 25 mm depending on the profile depth available. Self-tapping screws with a fine thread pitch bite into thin aluminium walls without requiring a pre-drilled hole to be oversized. Coarse-thread wood screws — the type that come bundled with many generic lock kits — will chew through a thin aluminium wall and offer almost no holding strength.
Material selection is equally critical. The best screws for aluminium window locks are austenitic stainless steel — specifically grades 304 or 316. This isn't a nice-to-have upgrade. It's the only reliable way to prevent galvanic corrosion between the fastener and the frame. Carbon steel screws, even zinc-plated ones, create a dissimilar-metal contact that degrades in the presence of moisture. The fastener corrodes, loosens, and eventually fails — taking a chunk of frame material with it.
- Use: Austenitic stainless steel (grade 304 for inland, grade 316 for coastal)
- Use: Self-tapping screws with fine thread pitch, sized to the profile wall thickness
- Use: Screws short enough to grip the wall without penetrating the opposite face or internal thermal break
- Avoid: Plain carbon steel — corrodes rapidly against aluminium
- Avoid: Zinc-plated steel — the plating breaks down and galvanic reaction follows
- Avoid: Brass fasteners in coastal areas — brass itself corrodes in salt air and can stain aluminium green
- Avoid: Coarse-thread wood screws — strip aluminium walls and provide poor pullout resistance
The cost difference between a stainless steel screw and a carbon steel one is negligible — a few cents per fastener. But using the wrong type means you'll be back doing the same repair within a year or two, likely with additional frame damage to contend with.
Single-Glazed vs Thermally-Broken Frame Differences
Not all aluminium profiles are built the same way, and thermally broken aluminium frame lock fitting requires awareness of what's happening inside the extrusion. Older single-glazed aluminium windows — the type installed in millions of Australian homes from the 1960s through the 1990s — use a simple, single-piece extruded profile. The internal cavities are relatively shallow, and the walls you're screwing into are one continuous piece of aluminium. What you see is essentially what you get.
Modern thermally-broken profiles are a different beast. These frames consist of two separate aluminium sections — an interior piece and an exterior piece — joined by a polyamide thermal barrier strip. That strip sits right where you might expect solid aluminium to be, and driving a screw through it compromises both the thermal performance and the structural connection between the two halves.
When fitting or replacing lock hardware on a thermally-broken frame, the screw must engage with the aluminium section only — not bridge across the thermal break. This often means using shorter screws than you'd expect for the visible frame depth, and positioning hardware where the manufacturer intended fixings to go (usually indicated by pre-punched pilot holes or reinforced internal chambers). If your replacement lock doesn't align with existing screw holes, consult the frame manufacturer's technical documentation before drilling new ones.
Environmental Factors That Affect Lock Longevity
Where your home sits geographically should influence every material choice you make during repair. Coastal aluminium window lock corrosion prevention starts at the fastener level but extends to the lock hardware itself.
Properties within five kilometres of the coast — anywhere from Queensland's Gold Coast to Sydney's eastern suburbs to Perth's beachside corridors — sit in what Australian Standards classify as a severe or very severe corrosion environment. Lock components rated for inland use deteriorate rapidly under salt-laden air exposure. Grade 316 stainless steel fasteners become essential rather than optional, and lock bodies should ideally be marine-grade stainless or high-quality anodised aluminium rather than standard zinc-alloy diecast.
Inland properties face a different primary concern: thermal cycling. Australian summers push dark-coloured aluminium frames to extreme surface temperatures, causing expansion that stresses lock fixings and shifts alignment over repeated seasonal cycles. Here, the priority is ensuring screws maintain grip despite thermal movement — which means avoiding overtightening (which can crack the frame around the screw hole) and checking lock alignment annually as part of routine window maintenance.
These material and environmental factors might seem like small details compared to the mechanical business of diagnosing faults and replacing parts. But getting them wrong is precisely why generic fixes make aluminium window locks worse — and why the actual hands-on repair steps need to account for them from the first screw you pick up.
Step-by-Step Aluminium Window Lock Repairs
With the right diagnosis in hand and appropriate materials selected, it's time to get practical. The three repairs below cover the most common DIY aluminium window lock repair scenarios Australian homeowners encounter: a failed sweep lock on a slider, a keep that's drifted out of alignment, and a cockspur handle that needs swapping. Each procedure assumes you're working with stainless steel fasteners and have identified your lock type from the earlier sections.
One principle applies across all three: measure before you order parts. Aluminium window lock replacement parts lack the universal sizing you'll find in the uPVC world. A sweep lock from one manufacturer won't necessarily fit the keeper from another, and a cockspur handle measured incorrectly will arrive and sit uselessly in a drawer. Take every measurement twice, photograph the existing hardware from multiple angles, and note any stamped part numbers on the old components.
Replacing a Sweep Lock on a Sliding Window
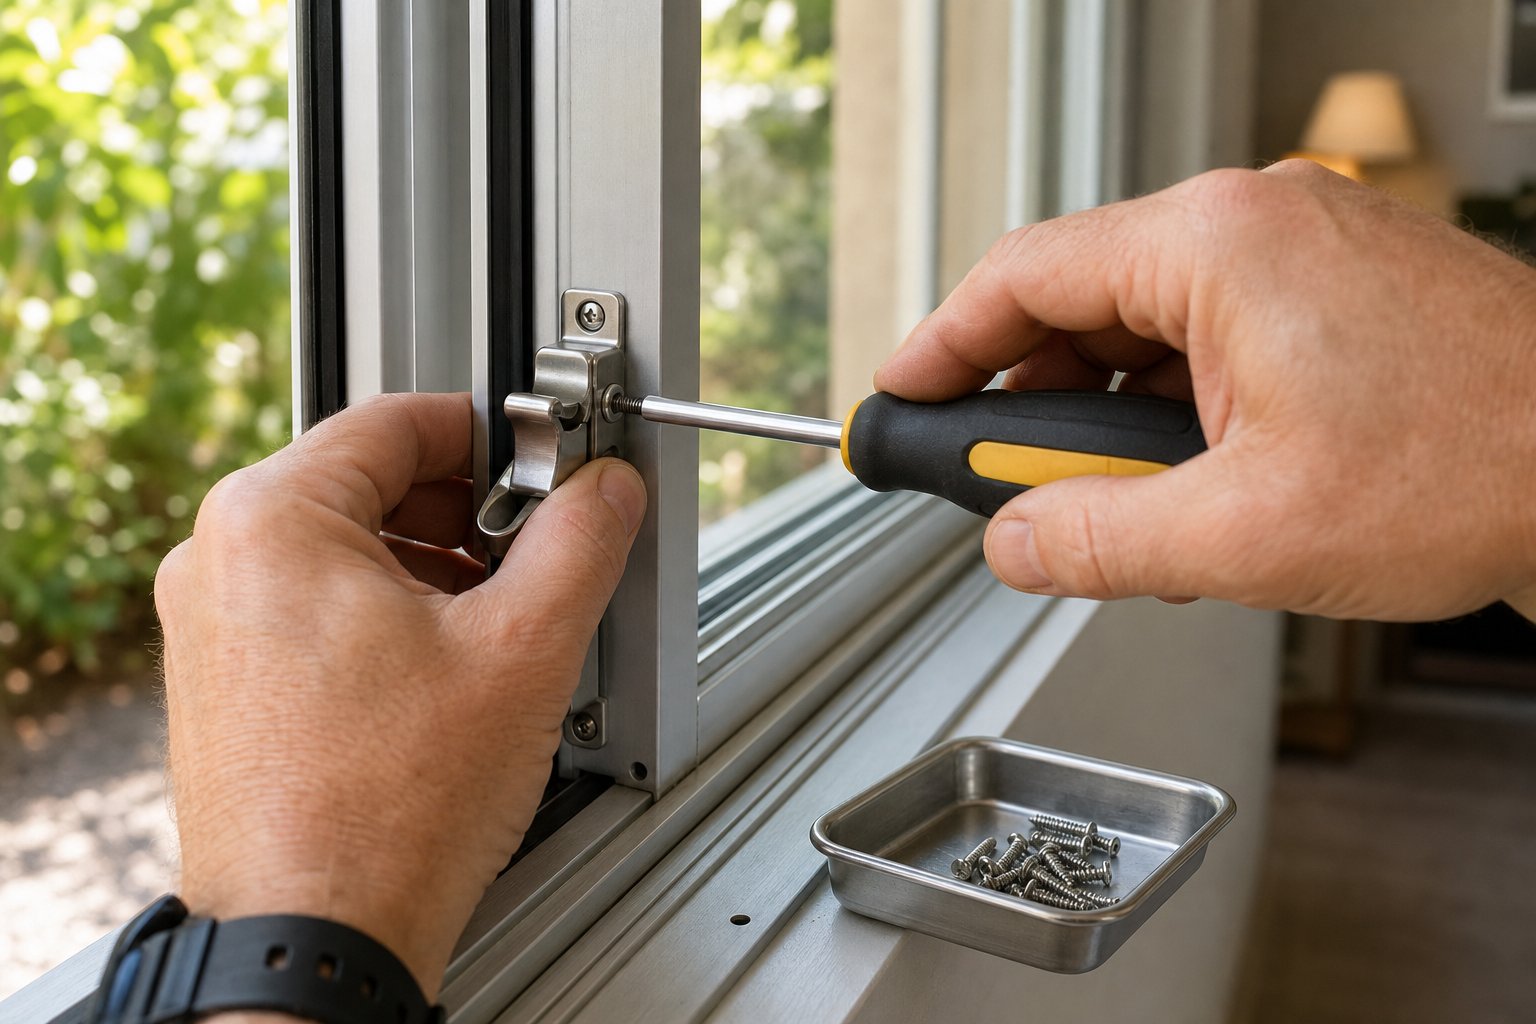
Sweep locks are the most straightforward to replace yourself — no internal mechanism, no spindle, just a surface-mounted lever and its mating keeper. Here's how to replace an aluminium window lock step by step on a sliding sash:
- Slide the window to the fully open position so you can access both the sweep body (mounted on the inner sash) and the keeper (mounted on the outer sash or frame).
- Remove the two screws securing the old sweep body. If they resist, apply a drop of penetrating oil and wait five minutes — forcing corroded screws in thin aluminium walls risks stripping the holes entirely.
- Lift the old sweep off and inspect the screw holes. If the aluminium around them looks sound, you can reuse the same positions. If the holes are wallowed out or corroded, you'll need to fill them with a two-part epoxy filler, let it cure, and re-drill pilot holes slightly offset from the originals.
- Hold the new sweep body in position and check that it aligns with the existing keeper when rotated to the locked position. The curved underside of the sweep arm should contact the keeper smoothly and pull the sash tight without excessive force.
- Mark the new screw positions with a pencil, drill pilot holes using a 2.5 mm bit (prevents the aluminium from splitting), and secure the sweep with stainless steel self-tapping screws. Tighten until firm — don't overtorque.
- Test the lock by sliding the window closed and operating the sweep through its full rotation. The sash should draw snugly against the weatherseal with no rattling.
If the keeper is also damaged or worn, replace it at the same time. Keepers are typically secured with a single screw and need to sit at the correct height for the sweep arm to latch over them securely.
Adjusting a Misaligned Keep or Striker Plate
Adjusting aluminium window lock keep alignment is often all that's needed when the handle operates smoothly but the lock tongue misses its target. This repair applies to both casement and sliding windows with bolt-style or tongue-style locks.
- Close the window and operate the handle to extend the lock tongue. Use a pencil or lipstick applied to the tongue tip to mark exactly where it contacts the frame — this shows you precisely how far the keep needs to move.
- Remove the screws holding the keep or striker plate in place. On aluminium frames, these are typically two countersunk screws.
- Reposition the keep so its slot aligns with the mark left by the tongue. For vertical drift (keep too high or too low), you may be able to use the existing screw holes by elongating them slightly with a round file. For lateral drift (keep too far in or out), new screw holes are usually necessary.
- Drill fresh pilot holes at 2.5 mm if repositioning, ensuring you're engaging solid aluminium wall rather than a hollow cavity or thermal break strip.
- Secure the keep loosely with one screw, then test engagement by operating the lock with the window closed. The tongue should slide into the keep slot with minimal resistance and hold the sash firmly.
- Once alignment is confirmed, tighten both screws fully and fill any abandoned screw holes with colour-matched exterior-grade filler to prevent moisture ingress.
If the misalignment exceeds 3-4 mm in any direction, repositioning the keep alone may not solve it. That level of drift often indicates frame distortion or sash drop that needs addressing at the hinge side before the lock will function reliably long-term.
How to Measure for Replacement Lock Parts
Ordering the wrong part is the single biggest time-waster in DIY aluminium window lock repair. uPVC hardware benefits from a handful of dominant manufacturers using standardised dimensions. Aluminium window hardware doesn't — profiles vary between brands, eras, and even product lines within the same manufacturer. Measuring accurately before ordering saves weeks of back-and-forth returns.
For espagnolette handles and multi-point systems, you need to know how to measure aluminium window lock spindle dimensions and gearbox parameters:
- Spindle length: Remove the handle and measure the metal square shaft from the face of the gearbox to its tip. Common lengths range from 15 mm to 40 mm. Too short and the handle won't engage the gearbox; too long and it prevents the handle sitting flush against the frame.
- Spindle thickness: Measure across the square — typically 7 mm or 8 mm on residential aluminium windows. A vernier calliper gives a precise reading here, since the difference between 7 mm and 8 mm determines whether the handle engages or wobbles uselessly.
- Screw centres: Measure centre-to-centre between the two handle fixing screws. Standard spacings include 38 mm and 43.5 mm, but non-standard measurements are common on older aluminium frames.
- Backset distance: Measure from the centre of the spindle hole to the nearest edge of the window profile or faceplate. This determines whether the handle sits correctly without fouling the frame edge.
- Faceplate dimensions: For gearbox replacements, measure the length, width, and corner radius of the existing faceplate. Also note the positions of any roller cams or locking points along its length.
For cockspur handles, the critical measurement is nose length — the distance from the fixing bolt centre to the tip of the spur. This determines whether the spur reaches and engages the wedge on the frame. Also confirm the hand orientation (left or right) by noting which direction the spur faces when the handle is in the locked-down position.
Photograph everything. Part numbers stamped on gearbox faceplates, old handles from the side and front, screw positions, and the profile shape itself. A hardware supplier who can see what you're working with will get you the right aluminium window lock replacement parts far more reliably than dimensions alone.
These repairs cover the most common scenarios, but not every situation resolves this cleanly. Sometimes a lock fails at the worst possible moment — late at night, mid-storm, or just before you leave for a week — and a proper repair simply isn't feasible until parts arrive or a professional can attend.
Emergency Fixes When Your Lock Fails Unexpectedly
A lock that gives out at 10pm on a Friday doesn't care that the hardware store opens Monday. Rain is forecast, you're leaving for the coast tomorrow morning, or the bedroom window facing the street simply can't stay unsecured overnight. In these moments, you need a temporary fix for a broken aluminium window lock that buys time without causing additional damage to the frame.
The goal here is security and weather resistance until a proper repair can happen. None of the solutions below are permanent. They're designed to get you through hours or days — not weeks or months.
Securing a Window Overnight When the Lock Fails
For casement and awning windows where the sash opens outward, your immediate options depend on what you have in the house right now. A surface-mounted auxiliary bolt — the type sold as a patio door security bolt — can be screwed directly to the aluminium frame and sash to hold the window shut. Two stainless steel screws into each piece give you a mechanical connection that resists being forced from outside. Position the bolt at mid-height on the sash for even pressure against the seal.
If you don't have a bolt on hand, a window restrictor cable (the kind used for child safety) can serve as an interim lock. Screw one end to the fixed frame and the other to the opening sash with the cable at its shortest setting. The window won't open more than a crack, and the cable resists enough lateral force to deter casual tampering. It won't stop a determined intruder, but it's substantially better than an unlocked window facing the street.
For windows that close flush but simply won't latch, a strong adhesive-backed hook-and-loop strip applied between sash and frame can hold the window against wind pressure overnight. This addresses weather sealing rather than security — useful when rain is the immediate concern and you're home to monitor things.
Temporary Fixes for Sliding Window Locks
When your aluminium sliding window won't lock shut, you have a mechanical advantage: the sash sits in a track. Anything that physically prevents it from sliding open is an effective interim solution.
The classic approach is a timber dowel or metal bar cut to fit precisely in the track between the sliding sash and the jamb. Lay it flat in the lower track with the window fully closed. The sash physically cannot slide open without first removing the bar from inside — which an intruder outside the glass cannot do. A broom handle cut to length works identically if you don't have a dowel handy.
For double-sliding windows where both sashes move, you need two bars — one in each track — or a single bar wedged between the two sashes in the overlap zone. A C-clamp or small G-clamp tightened onto the track rail just behind the closed sash achieves the same result with no cutting required. Position it low and out of external sight lines so it's not visible as an improvised solution.
Sheet-metal screws driven partway into the upper track also prevent sash movement. Adjust them so the window barely clears the screw heads when you need to slide it open again, but cannot be lifted up and over the lower track — a common forced-entry technique on older aluminium sliders.
Why Temporary Fixes Must Be Replaced
Every solution above has limitations that make it unsuitable as a long-term answer. Dowels and clamps provide no compression against the weatherseal, meaning air infiltration and water entry continue unchecked. Auxiliary bolts screwed into unplanned positions stress the frame at points not engineered for load. Restrictor cables offer minimal resistance to forceful attempts. And none of these solutions satisfy insurance requirements for window security — if a break-in occurs through a window secured only by a temporary measure, your claim may face scrutiny.
Treat these as what they are: a bridge measured in days, not a destination. Once parts arrive or a professional can attend, complete the permanent repair using the correct lock hardware and appropriate fasteners for your frame type.
- Timber dowel or metal bar — cut to track length, keeps in a toolbox or behind curtains for quick deployment
- Small G-clamp or C-clamp — fits most aluminium track profiles, no modification needed
- Surface-mounted bolt (patio door security bolt) — stainless steel preferred, requires a drill and two screws per side
- Window restrictor cable — child-safety type with shortest cable setting engaged
- Heavy-duty adhesive hook-and-loop strip — weather holding only, not a security measure
- Penetrating oil and a rag — for seized locks that might free up with lubrication and patience
Keeping a few of these items in your toolkit means a failed lock at midnight becomes a ten-minute inconvenience rather than a security crisis. But once the immediate pressure passes, the real question shifts from how to secure the window tonight to whether the existing lock is worth repairing at all — or whether the smarter long-term move is replacing the entire assembly.
Repair or Replace Your Aluminium Window Lock
That question — aluminium window lock repair or replace — rarely has a universal answer. It depends on what's actually failed, how old the hardware is, whether parts still exist for it, and what your insurer expects from the windows protecting your home. Getting this decision wrong in either direction costs you: repairing a lock that should be replaced means the same failure returns within months, while replacing hardware that only needed a $15 keep adjustment wastes hundreds of dollars unnecessarily.
When In-Situ Repair Makes Sense
A repair is the right call when the core mechanism still functions and the fault is isolated to a single, replaceable component. Situations where repair delivers good value include:
- Keep misalignment from thermal movement or minor settlement — repositioning the keep restores full function at minimal cost
- Worn handle or spindle where the gearbox still operates smoothly — a handle swap takes fifteen minutes
- Surface corrosion that hasn't penetrated the lock body or compromised the frame screw holes
- Cracked sweep lock arm where the mounting points and keeper remain intact
- Stiff mechanism that responds to cleaning and PTFE lubrication
In each scenario, the underlying lock assembly is sound. You're addressing a wear item or an adjustment, not a systemic failure. The cost to repair typically falls between $20 and $80 AUD in parts for a DIY job, or $100 to $200 AUD if you call a locksmith for the labour.
When Full Lock Assembly Replacement Is Necessary
Replacement becomes the practical choice when the failure is internal, structural, or unsupported by available parts. Knowing when to replace an aluminium window lock assembly saves you from throwing good money after bad:
- Seized gearbox with internal corrosion — no amount of lubrication restores sheared cams or corroded springs
- Extensive galvanic corrosion that has degraded both the lock body and the surrounding frame material, leaving no solid aluminium for new screws to grip
- Discontinued lock models where no compatible replacement gearbox, handle, or linkage exists — common on aluminium windows manufactured before 2000 by companies no longer trading
- Repeated failure after repair — if you've already adjusted the keep and replaced the handle and the problem persists, the frame itself may have distorted beyond what hardware adjustments can compensate
- Obsolete security performance — basic single-point locks that no longer meet current standards, even if mechanically functional
The cost to replace an aluminium window lock assembly ranges from $80 to $250 AUD for parts depending on whether you're fitting a simple sweep lock or a full multi-point gearbox system. Add $150 to $350 AUD for professional installation if the job involves a multi-point mechanism or frame modifications. Industry data indicates that when repair costs exceed 50% of full replacement cost, replacing delivers better long-term value.
Insurance and Security Rating Considerations
Here's where the decision extends beyond pure economics. Australian home insurers typically require that external windows and doors have functioning locks as a condition of theft coverage. Allianz notes that homeowners are responsible for taking reasonable steps to prevent theft — and functioning, adequate window locks are a baseline expectation across most policies.
The aluminium window lock insurance requirements that catch people out tend to involve adequacy rather than mere presence. A basic cockspur latch technically locks, but some insurers consider single-point locks on accessible ground-floor windows insufficient for policy compliance. If a break-in occurs and the insurer determines the lock was substandard or non-functional, the claim may be reduced or denied entirely.
This creates a practical dilemma. Repairing a 30-year-old cockspur handle to working condition might restore its mechanical function but doesn't upgrade its security rating. You've spent money returning to a standard your insurer may not accept. In many cases, upgrading to a keyed lock or multi-point system during the repair makes more sense than a like-for-like swap of outdated hardware — even if the old lock was technically fixable.
| Factor | Repair (In-Situ Fix) | Replace (New Lock Assembly) |
|---|---|---|
| Typical cost (AUD, DIY) | $20 – $80 | $80 – $250 |
| Typical cost (AUD, professional) | $100 – $200 | $230 – $600 |
| Time to complete | 15 – 45 minutes | 1 – 3 hours (including sourcing) |
| Security improvement | Restores original level only | Can upgrade to higher-rated hardware |
| Insurance compliance | Only if original lock met standards | Opportunity to meet current requirements |
| Longevity of fix | 2 – 5 years depending on cause | 10 – 20+ years with quality hardware |
| Best suited for | Minor misalignment, worn handles, surface issues | Internal failure, discontinued parts, security upgrades |
There's also a tipping point that sits beyond individual lock replacement. When an aluminium window has reached the stage where the lock is failing, the seals are degraded, the frame shows widespread corrosion, and replacement parts no longer exist, you're effectively maintaining a window past its useful life. At that point, the cost-effective path is often upgrading the entire window unit rather than continuing to patch individual components. Modern aluminium window systems from manufacturers like MEICHEN come with integrated, insurance-compliant multi-point locking hardware engineered as part of the window assembly — not bolted on as an aftermarket addition. The locks, seals, and frame work as a designed system from day one, which eliminates the compatibility headaches and fastener mismatches that plague repairs on ageing frames.
For most homeowners, the decision tree is straightforward: if the fault is isolated and parts are available, repair. If you're facing internal mechanism failure, discontinued hardware, or locks that don't meet current insurance expectations, replace the lock assembly. And if multiple components across the window are failing simultaneously, weigh the cumulative repair spend against what a complete modern window with purpose-built hardware would cost — because at some point, ongoing repairs become the more expensive option.

Professional Help and Preventing Future Lock Failures
Some repairs sit comfortably within DIY territory. Others don't — and recognising where that line falls saves you from damaged frames, voided warranties, and security gaps that persist because the underlying problem was never properly resolved. Equally important is what happens after a successful repair. The lock works today, but without a basic maintenance routine, you'll be back troubleshooting the same symptoms within a few years.
When to Call a Professional
A locksmith or specialist glazier becomes the right call when the job exceeds basic component swapping. Knowing when to call a locksmith for a window lock isn't about admitting defeat — it's about recognising situations where incorrect work creates bigger problems than the original fault.
Call a professional if:
- The gearbox on a multi-point system has seized and you cannot identify a compatible replacement part
- Frame distortion has shifted the sash beyond what keep adjustment can compensate — a glazier can assess whether the hinges, friction stays, or frame itself need realignment
- You need to drill new fixing points into a thermally-broken profile and aren't certain where the internal chambers sit
- The window is on an upper storey where safe external access isn't possible without scaffolding or ladders beyond your comfort level
- Your insurer requires a security-rated lock and you need confirmation that the installed hardware meets policy requirements
- Previous DIY attempts have stripped screw holes or cracked the frame — a professional can assess whether the frame is still salvageable
When choosing a locksmith, verify they have specific experience with aluminium window hardware rather than just door locks. A general locksmith comfortable with deadbolts and cylinder locks may lack familiarity with multi-point gearboxes, espagnolette mechanisms, or the material constraints aluminium frames impose. Ask whether they carry stainless steel fasteners as standard — if they're planning to use zinc-plated screws on your aluminium frame, that tells you something about their understanding of the job.
Expect a professional visit to cost between $120 and $350 AUD depending on complexity, travel, and whether parts need ordering. Multi-point gearbox replacements sit at the higher end because sourcing the correct unit often requires the technician to identify the system on-site first.
Maintenance Habits That Prevent Future Lock Failures
Preventing aluminium window lock failure is far cheaper than repairing one. Most lock failures that seem sudden actually develop over months or years of neglect — corrosion builds incrementally, lubrication dries out gradually, and alignment drifts millimetre by millimetre with each seasonal temperature swing. A simple quarterly routine catches these problems while they're still trivial to address.
How to lubricate aluminium window locks properly: use a silicone-based spray or dry PTFE lubricant on all moving contact points. Spray into the keyhole, along the lock tongue, and into the gearbox slot where the spindle enters. Operate the handle several times to work the lubricant through internal components. Avoid petroleum-based oils like WD-40 for long-term lubrication — they attract dust and gum up over time, making things worse. WD-40 is useful for freeing a seized mechanism in an emergency, but follow it with a proper silicone or PTFE product once movement is restored.
Follow this seasonal maintenance checklist to keep your locks operating reliably year-round:
- Every 3 months: Operate every window lock through its full range of motion — locks that sit unused for months are the ones that seize
- Every 3 months: Wipe lock bodies, keeps, and exposed metal components with a dry microfibre cloth to remove salt deposits, dust, and moisture
- Every 6 months: Apply silicone or PTFE lubricant to all moving lock components, hinges, and friction stays
- Every 6 months: Check all lock screws for tightness — thermal cycling loosens fasteners gradually over consecutive seasons
- Annually: Inspect keeps and striker plates for wear marks that indicate developing misalignment
- Annually: Test lock engagement under load — close and lock the window, then apply gentle inward pressure on the sash to confirm it holds firmly without rattling
- Annually (coastal properties): Inspect all fasteners for early corrosion signs and replace any showing discolouration or pitting before they degrade the frame
Properties in coastal areas or regions with high humidity — think anywhere from Cairns to the Illawarra, Perth's western strip, or Melbourne's bayside suburbs — benefit from moving to a bi-monthly lubrication schedule. Salt air accelerates oxidation of internal components faster than most homeowners realise, and the cost of a $12 can of silicone spray every couple of months is trivial compared to a $300 gearbox replacement.
Investing in Quality Hardware for Lasting Security
Aluminium window lock maintenance tips only go so far if the hardware itself was cheap to begin with. Budget lock components made from die-cast zinc alloy or low-grade plated steel have a shorter functional life regardless of how diligently you maintain them. Industry data suggests quality stainless steel hardware maintains reliable performance for 20 or more years under normal residential use, while entry-level zinc-based components may begin degrading within 8 to 12 years — sooner in aggressive coastal environments.
When replacing a failed lock, treat it as an opportunity to upgrade rather than simply restore. A multi-point locking system with stainless steel cams and corrosion-resistant keeps delivers better security, improved weatherseal compression, and longer service life than the basic single-point latch it might be replacing. The upfront cost difference between budget and quality hardware is typically $50 to $150 AUD — a fraction of what repeated future repairs would cost.
For homeowners whose repair journey has revealed systemic issues — multiple failing locks across the house, frames with widespread corrosion compromising screw retention, or hardware so outdated that no replacement parts exist — the conversation shifts from individual lock repair to rethinking the window system as a whole. Purpose-built aluminium window systems designed for Australian conditions integrate locks, handles, seals, and frames as an engineered unit from the factory. The locking hardware is matched to the profile dimensions, fastened into reinforced chambers designed for the purpose, and specified with corrosion resistance appropriate to the intended installation environment. That integrated approach eliminates the compatibility guesswork, the galvanic corrosion risks from mismatched metals, and the gradual decline that plagues aftermarket hardware bolted onto ageing frames.
Whether you've resolved your lock issue with a $20 keep adjustment or you're facing the reality that your 30-year-old aluminium windows need more than hardware patches, the underlying principle stays constant: aluminium window locks perform reliably when the right materials meet proper maintenance. Skip either one and you'll be reading this guide again sooner than you'd like.
Frequently Asked Questions About Aluminium Window Lock Repair
1. Why is my aluminium window lock so stiff to operate?
A stiff aluminium window lock typically indicates internal gearbox wear or corrosion buildup inside the mechanism. Salt air exposure and lack of lubrication allow metal-on-metal contact points to oxidise, gradually restricting movement until the lock seizes completely. If the stiffness has developed progressively over months, apply a silicone-based or dry PTFE lubricant into the gearbox slot and operate the handle repeatedly. Avoid petroleum-based products like WD-40 for long-term use as they attract dust. If lubrication doesn't restore smooth operation, the internal cams or springs may be worn beyond recovery, requiring gearbox replacement.
2. Can I use any screw to reattach my aluminium window lock?
No. Aluminium frames require specific fasteners to avoid accelerated corrosion and thread stripping. Use austenitic stainless steel screws — grade 304 for inland properties or grade 316 for coastal locations within five kilometres of salt water. Self-tapping screws with a fine thread pitch in #6 to #8 gauge (3.5 mm to 4.2 mm shaft diameter) provide the best grip in thin-walled aluminium profiles. Plain carbon steel and zinc-plated screws create galvanic corrosion when in contact with aluminium, degrading both the fastener and the surrounding frame material within months to a couple of years.
3. How much does it cost to repair or replace an aluminium window lock in Australia?
For a DIY repair involving keep adjustment or handle replacement, expect to spend between $20 and $80 AUD on parts. Professional locksmith visits for straightforward repairs typically cost $100 to $200 AUD. Full lock assembly replacement runs $80 to $250 AUD for parts alone, or $230 to $600 AUD with professional installation — particularly for multi-point gearbox systems that require precise measurement and sourcing. When cumulative repair costs approach 50% of full replacement value, or when parts for discontinued locks are unavailable, upgrading the entire lock assembly or window unit delivers better long-term value.
4. How do I temporarily secure an aluminium window when the lock breaks?
For sliding windows, cut a timber dowel or metal bar to fit snugly in the track between the closed sash and the jamb — this physically prevents the window from being forced open from outside. For casement windows, a surface-mounted patio door security bolt screwed into the frame and sash with stainless steel fasteners provides overnight security. A window restrictor cable set to its shortest length also works as an interim measure. These are short-term solutions only — they don't compress weatherseals, may not satisfy insurance requirements, and should be replaced with permanent hardware within days.
5. How often should I maintain my aluminium window locks to prevent failure?
Follow a quarterly routine for best results. Every three months, operate all window locks through their full range of motion and wipe lock bodies with a dry cloth to remove salt and dust. Every six months, apply silicone or PTFE lubricant to all moving components and check screws for tightness, as thermal cycling gradually loosens fasteners. Annually, inspect keeps for wear marks indicating alignment drift and test lock engagement under load. Coastal properties should move to bi-monthly lubrication. This routine catches developing issues while they cost cents to fix rather than hundreds of dollars.